SHE5AC2005 - Air Conditioning SHE - Free user manual and instructions
Find the device manual for free SHE5AC2005 SHE in PDF.


User questions about SHE5AC2005 SHE
0 question about this device. Answer the ones you know or ask your own.
Ask a new question about this device
Download the instructions for your Air Conditioning in PDF format for free! Find your manual SHE5AC2005 - SHE and take your electronic device back in hand. On this page are published all the documents necessary for the use of your device. SHE5AC2005 by SHE.
USER MANUAL SHE5AC2005 SHE
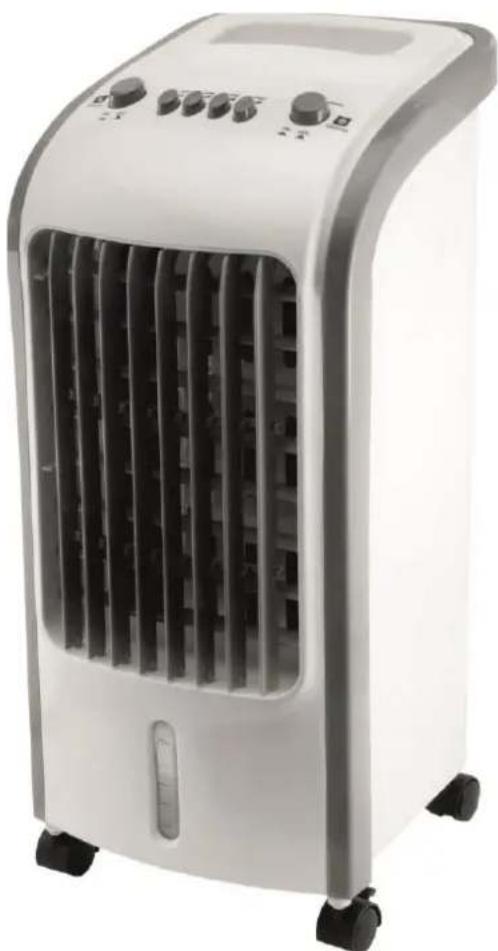
AIR COOLER SHE5AC2005
natural_image
White electric air conditioner unit with cooling fins and control knobs (no visible text or symbols)text_image
Diagram of a heat exchanger with numbered parts labeled for identification.RÜCKSEITE:
natural_image
Pure mechanical diagram showing a lever and two separate views of a pump or valve (no text or symbols)text_image
Diagram of a mechanical device with labeled parts, showing front and side views with numbered annotations.text_image
Technical diagram showing two views of a mechanical device with labeled components (① and ②)HINWEIS
| Important Information about Safety, Site Location and Electrical Connections 14-15 | |
| Recycling, Waste Management, Declaration of Conformity 15 | |
| Scope of Supply 16 | |
| Description of Appliance 16 | |
| Commissioning 17 | |
| Before using the appliance for the first time 17 | |
| Installation 17 | |
| Filling the water tank 18 | |
| Cool packs 18 | |
| Setting the functions 19 | |
| Switching on the appliance & setting the speed 19 | |
| Switching off the appliance 19 | |
| Swing 19 | |
| Cool 19 | |
| Tipps for correct application 20 | |
| Maintenance and cleaning 20 | |
| Cleaning dust filters 20 | |
| Cleaning the water tank 21 | |
| Cleaning the housing 21 | |
| Activities at the beginning/end of the season 21 | |
| Tracking and fixing problems 22 | |
| Technical informations 22 | |
| Warranty 23 | |
PLEASE READ THE OPERATING MANUAL CAREFULLY BEFORE BEGINNING INSTALLATION, MONITORING, OPERATING, OR MAINTENANCE. PROTECT YOURSELF AND OTHERS BY FOLLOWING THE SAFETY INSTRUCTIONS. FAILURE TO COMPLY WITH INSTRUCTIONS MAY RESULT IN PERSONAL INJURY AND/OR PROPERTY DAMAGE AND/OR LOSS OF GUARANTEE CLAIMS!
IMPORTANT INFORMATION ABOUT SAFETY, SITE LOCATION AND ELECTRICAL CONNECTIONS.


Use this appliance exclusively under the guidelines of this operating manual. Any other use not recommended by the manufacturer may cause fire, electrical shock, or personal injury.
- This appliance is intended exclusively for the cooling of living spaces in households and may not be used for any other purpose.
- The appliance is not suitable for continuous and precision operation and should not be used for cooling electrical systems (e.g. in server rooms).
- Remove the packing and make sure that the appliance is not damaged. In case of doubt, do not use the appliance, and contact the service centre or your dealer.
- If the appliance has a defect, switch it off and contact either your dealer or the customer hotline
- If the power supply cable is damaged, it must be replaced by the manufacturer or an authorised service centre to avoid all possible risks.
-
For any repairs, always contact the customer service offices authorised by the manufacturer. You can access the customer service centres online at www.she.at.
-
Before connecting it to the mains power supply, check that the mains voltage and the type of electrical current matches the information provided on the type plate on the appliance.
-
The electrical outlet that the appliance must be connected to, must not be defective or loose and must be suitable for the current load required, and, above all, must be reliably earthed. In case of doubt, have your electrical installation checked by a qualified electrician.
-
Avoid using an extension cable, because this could overheat and cause a fire.
-
It is forbidden to adapt or modify the characteristics of this appliance in any way. Use only replacement parts and accessories recommended by the manufacturer (failure to comply will result in the loss of the guarantee and warranty).
-
Children must not be allowed to play with the appliance.
-
Do not let small children play with the packaging – THERE IS A DANGER OF SUFFOCATION ON SMALL PARTS!
-
Children under 8 years of age and persons with limited physical, psychological, sensory or mental abilities, as well as a lack of experience and knowledge, may only use this appliance under appropriate supervision and if this appliance is used for detailed instructions on both using this appliance in a safe manner and describing any existing hazards.
-
Do not operate the appliance unattended. Whenever you leave the room, always switch off the appliance.
-
Do not twist, buckle or snap off the power supply cable.
-
Do not use the appliance with wet hands.
-
Do not use the appliance outdoors.
-
Never cover the appliance.
-
Do not operate the appliance in rooms where gas, oil or sulphur are present.
-
Do not use the appliance near water or high humidity, e.g. in damp cellars, or next to swimming pools, bathtubs or showers. Make sure that water does not get into the appliance.
-
Do not place the appliance near heat sources (e.g. next to heating systems) and avoid direct sunlight.
-
Keep a minimum distance of at least 50 cm from combustible substances (e.g. alcohol) or pressurised vessels (e.g. spray containers).
-
Do not place any heavy or hot objects on top of the appliance.
-
Place the appliance on a solid and even support surface.
-
Never insert fingers, pins or other objects into the appliance and make sure that the air entry and outlet are never blocked.
-
Change the water regularly.
-
Always fill the water tank above the minimum level, but never above the maximum level.
-
If you want to move the appliance, always make sure that the locking brakes are released.
-
If there is water in the water tank, do not move the appliance quickly to avoid any leakage(s) or splashing any water.
-
To avoid high humidity, do not use the appliance in "COOL" mode for long periods of time in a closed area without ventilation.
-
The cool packs are not a toy – keep children and animals away from them.
-
Never attempt to open the cool packs for any reason. The liquid contained in it can be harmful to health.
-
Remove the plug and empty the water tank, when the appliance is not in use.
-
Always switch the appliance off, before unplugging it.
-
Do not pull the mains cable to disconnect the appliance from the mains supply. Always pull the plug to pull out the mains cable.
-
To avoid electric shocks, do not handle the plug with wet or damp hands.
When not in use, keep the appliance vertical in a safe, dry place that is inaccessible for children, and do not cover the appliance with plastic packaging.
- Maintain the appliance in good condition by maintaining and cleaning it. If you have any questions about maintenance, contact the customer hotline/service centre authorised by the manufacturer.

RECYCLING
The packaging materials can be recycled. Therefore, it is recommended to dispose of them in sorted waste.
WASTE MANAGEMENT
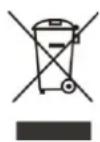
The pictogram with the crossed out dustbin points to the requirement for separate disposal of electrical and electronic appliances (WEEE). Electrical and electronic appliances can contain hazardous and environmentally hazardous materials. Therefore, do not dispose of these in the unsorted residual waste, but at a registered collection centre for waste electrical and electronic equipment. By doing so, you will help to conserve resources and protect the environment.
For further details, please consult your dealer or your local authorities.
DECLARATION OF CONFORMITY

We hereby confirm that this article complies with the essential requirements, regulations and guidelines of the EU.
The detailed declaration of conformity can be viewed at any time via following link: www.she.at/downloads/doc/she5ac2005.pdf
Specifications are subject to change without prior notice.
SCOPE OF DELIVERY
The SHE cooler comes with:
- 1x air cooler
- 4x transport wheels
- 2x cool packs
- 1x operating manual
DESCRIPTION OF THE APPLIANCE
Description of the individual components
FRONT SIDE:
- Handle
- Control buttons
- Air outlet grille
- Water level indicator
- Transport wheels
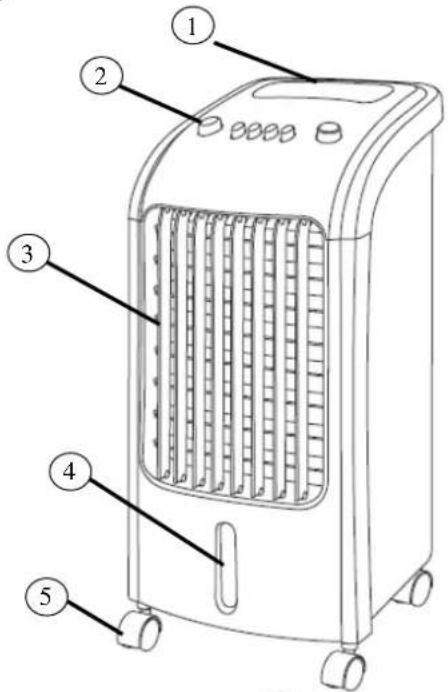
text_image
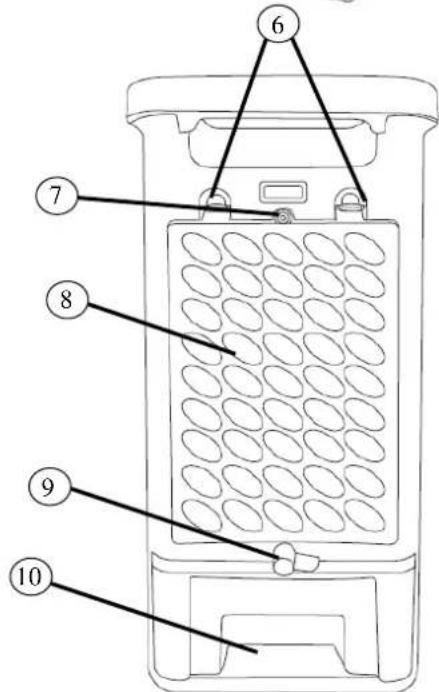
Diagram of a portable air heater with numbered parts labeled 1 to 5BACK:
- Cover plates of the radiator cover grid
- Safety screw
- Radiator cover grid + dust filter
- Blowout latch
- Water tank
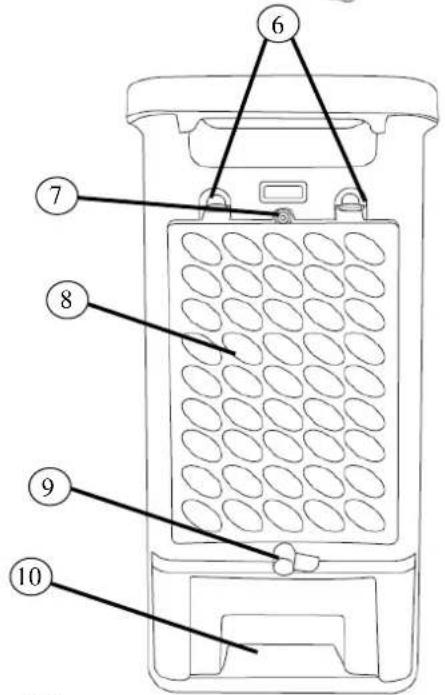
text_image
6 7 8 9 10Seite 17 von 123
COMMISSIONING
BEFORE USING THE APPLIANCE FOR THE FIRST TIME
Unpacking the Appliance
- Open the carton and take out the appliance.
- Remove all packaging from the appliance.
- Unwind the mains cable completely and make sure not to damage it.
Transport wheels
For easier transport, the appliance is equipped with transport wheels.
In addition, two rollers are equipped with a locking brake to guarantee that they remain firmly in position.
- After the appliance has been carefully unpacked, insert the transport rollers into the designated notches on the bottom of the appliance.
- To adjust the locking brakes, press the levers as follows: PRESS DOWNWARDS → to fix the brake PUSH UPWARDS → to release the brake
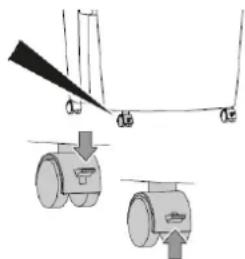
text_image
Technical diagram showing mechanical components with labeled parts and directional arrows indicating motion or forceRemoving transport protection in the water tank
The water pump is fixed to the bottom of the water tank in a safety holder that is also provided with a removable transport securing device.
- Push the blowout latch located above the water tank upwards, so that the water tank can be pulled out.
- Cut through the transport securing device located above the water pump, and remove it from the safety holder.
- Now you can release the pump from the holder if necessary to remove the water tank from the air cooler completely.
INSTALLATION
Please note the following points for installation.
- Place the appliance on a level and solid surface and adjust the locking brakes so that the appliance stands firmly in position.
- There must be at least a 50 cm gap to walls or other objects.
- Before using the appliance, make sure that both the air inlet and the air outlet are free of obstacles and are not blocked.
- Connect the appliance to an earthed outlet.
FILLING THE WATER TANK
Furthermore, please note the following:
-
Push the blowout latch ① located above the water tank upwards, so that the water tank can be pulled out.
-
Fill the water tank with clean water, paying attention to the fill level on the front of the water tank ②:
-
MIN mark → The water tank must be filled to above the MIN mark so that the pump can function properly
-
MAX mark → The water tank must not be filled over the MAX mark, otherwise water could enter the inside of the appliance and thus
-
Make sure the water tank is not damp or wet on the outside, and if so, wipe it dry.
-
Then carefully push the tank back into the air cooler and turn the safety latch back.
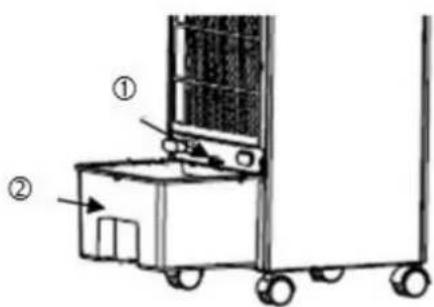
text_image
Diagram of a mechanical device with labeled parts, showing front and side views with numbered annotations.COOL PACKS
You will receive two cool packs that can be put into the water tank for a further cooling effect.
When using the cool packs, please note the following:
-
Before use, place the cool packs in a freezer for at least 3-4 hours.
-
When inserting the cool packs into the tank, make sure that the MAX mark is not exceeded.
NOTE
Ice cubes can also be filled into the water tank.
When doing so, please make sure that the MAX mark is not exceeded.

ATTENTION
Never attempt to open the cool packs for any reason. The liquid contained in it can be harmful to health.
SETTING THE FUNCTIONS
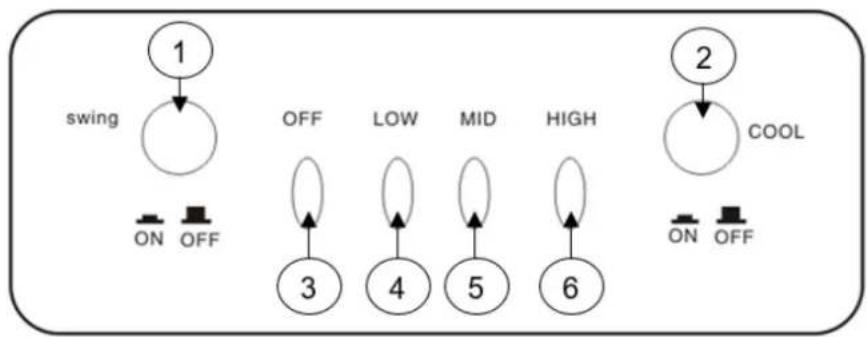
flowchart
graph TD
    A["swing"] --> B["1"]
    B --> C["OFF"]
    C --> D["3"]
    D --> E["LOW"]
    E --> F["4"]
    F --> G["MID"]
    G --> H["5"]
    H --> I["HIGH"]
    I --> J["6"]
    J --> K["2"]
    K --> L["COOL"]
    style A fill:#fff,stroke:#000
    style K fill:#fff,stroke:#000
    style L fill:#fff,stroke:#000
SWITCHING ON THE APPLIANCE & SETTING THE SPEED
- Please use the following buttons on the control panel to switch on the appliance, and at the same time, to adjust the speed of the blower:
- ④ LOW → Set to the lowest blower level
○ ⑤ MID → Set to the medium blower level - ⑥ HIGH → Set to the highest blower level
SWITCHING OFF THE APPLIANCE
• To switch off the appliance, please use the ③ OFF button.
SWING
• To set the SWING function, please use the ① SWING button.
• To deactivate the function, press the ① SWING - button again.
NOTE
This function allows the blown-out air to be distributed to the left and right. This enables horizontal air distribution in the room.
COOL
- As soon as the knob is pressed, the appliance starts pumping water to create cold and moist air, that is then blown out of the appliance.
- To set the SWING function, please press the ① COOL button.
• To deactivate the function, press the ② COOL - button again.
TIPS FOR CORRECT APPLICATION
Here are some tips to get the very best out of the air cooler:
| Protect the room from direct sunlight with curtains, blinds or shutters. This saves you energy. | 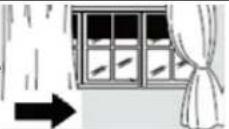 |
| Do not place any objects on to the appliance, and do not obscure the air outlet. | |
| Keep the grilles clear. | |
| Make sure that no heat sources are operating in the room. | |
| Never use the appliance in very humid rooms (e.g. laundry rooms). | |
| Do not use the appliance outdoors. | |
| Make sure that the appliance is on level flooring and that the locking brakes are applied. | |
MAINTENANCE AND CLEANING
CLEANING DUST FILTERS
To ensure that the air cooler operates efficiently, you should clean the dust filter after each week of operation.
-
Before cleaning the appliance, switch it off, then wait a few minutes, and then unplug it to disconnect the appliance from the mains power supply.
-
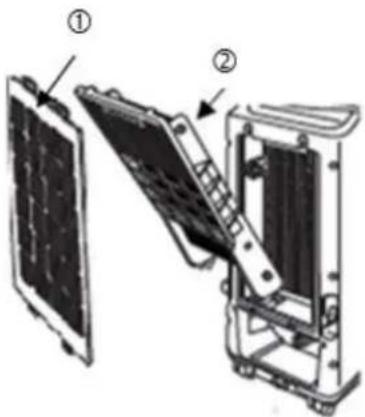
Unscrew the safety screw ① and press the tabs to remove the cover grille.
-
Then remove the underlying dust filter ② from the appliance.
-
Use a vacuum cleaner to remove the dust accumulated in the filter.
-
If the filter is very dirty, immerse it in warm water and rinse it several times – but the water temperature must not exceed 40 °C.
-
Before putting the dust filter back into the cover grille, allow it to dry out well after washing.
-
Reattach the cover grille and tighten the safety screw into the cover.
text_image
Technical diagram showing two views of a device with labeled components, including panel and frame assembly.NOTE
Never use the appliance without a filter.
CLEANING THE WATER TANK
It is recommended to clean the water tank every 2-3 weeks during use.
- Push the blowout latch located above the water tank upwards, so that the water tank can be pulled out.
- Then release the water pump from the safety holder and remove the water tank completely from the appliance.
- Clean the tank both inside and outside with a soft cloth that has been previously immersed in soapy water
- Then rinse the tank with warm and clean water.
- Allow the tank to dry completely and then put the water pump back into the safety holder before re-filling the water tank.
CLEANING THE HOUSING
Before cleaning the appliance, switch it off, then wait a few minutes, and then unplug it to disconnect the appliance from the mains power supply.
Clean the appliance with a moderately damp cloth, then wipe it with a dry cloth.
- Never use benzene, alcohol or solvents to clean the appliance – this could be dangerous.
- Do not spray insecticides or similar agents on to the air cooler.
ACTIVITIES AT THE BEGINNING/END OF THE SEASON
ACTIVITIES AT THE END OF THE SEASON
- Switch off the appliance and disconnect the mains plug.
- Carefully empty and clean the water tank.
- Clean the filter and reinsert it after drying (see section "Cleaning Dust Filters").
- Pack away the appliance and store it in a cool, dry place.
INSPECTIONS AT THE BEGINNING OF THE SEASON
- Verify that the power supply cable is in order and that the earthing is functioning.
- Follow the installation and safety instructions carefully.
TRACKING AND FIXING PROBLEMS
Before contacting our customer hotline/service centre, please check whether the error can be rectified using the instructions below.
| PROBLEM | POSSIBLE CAUSE | SOLUTION |
| The air cooler does not switch on. | You are using the wrong button. | Please bear in mind that the appliance can be switched on by using the speed buttons. |
| Power failure | Wait for the power supply to be restored. | |
| The appliance is not connected to the power supply. | Connect/plug the appliance to the power supply and wait for a minimum of 30 mins!! | |
| The air cooler works only for a short amount of time. | The water tank is empty. | Fill the water tank. |
| Something is blocking the air outlet. | Check and remove all obstacles that are blocking the air supply. | |
| During operation, an unpleasant odour is emerging from the room. | The air filter or water tank is dirty. | Clean the air filter(s) and/or water tank in accordance with the description. |
| The appliance is very loud. | The floor that the air cooler is located on is not level. | Place the air cooler in a different location. |
| Technical information | |||
| Nominal voltage | 220 V ~ 240 V | ||
| Frequency | 50 Hz | ||
| Rated power input | 80 W | ||
| Water tank capacity | 3 L | ||
| Description | Symbol | Value | Unit |
| Maximum air velocity | V | 8.5 | m/s |
| Fan power input | P | 80 | W |
| Air circulation | SV | 270 | (m3/h) W |
| Fan sound power level | LWA | 65 | dB(A) |
| Consumption in standby mode | PSB | 0 | W |
| Dimensions | |||
| Product dimensions: | 240 x 260 570 mm | ||
| Weight: | 4.4 kg | ||
| Contact addresses for more information and Serviceline: | Schuss Home Electronic GmbHScheringgasse 3, A-1140 Vienna, AustriaTel: +43 (1) 97 0 21 – 0Serviceline: +43 (1) 97 0 21 – 502www.she.atFB no.: 236974 t / FB court: Vienna | ||
WARRANTY
By purchasing this SHE quality product means that you have decided to place trust in durability, reliability and innovation.
For this SHE appliance, we grant a warranty period of 2 years from the date of purchase valid in Austria! If, contrary to expectations, service work on your appliance is still necessary during this period, we hereby guarantee either free repairs (spare parts and working time) or (at the discretion of Schuss) that we will replace the product. If it is not possible to either repair or exchange the product for economic reasons, we reserve the right to create a time value credit.
For air conditioners, please contact the customer hotline as a first step (see the labels on the appliance or title page of the operating manual), for fans, contact your specialist dealer or directly contact us. We would like to point out that repair work that has not been performed by the authorised contract workshop in Austria will immediately terminate the validity of this warranty.
This warranty does not cover:
• In case of improper use, we do not assume any consequential damage
• Repair or replacement of parts due to normal wear and tear
- Damage resulting from failure to follow the operating manual
- Appliances that are used commercially, even in part
- Appliances mechanically damaged due to external influence (any fall(s), impact(s), breakage(s), improper use, etc.) as well as signs of wear and tear of an aesthetic nature
- Appliances that have been improperly treated
- Appliances that have not been opened by our authorised service workshop
- Damage caused by improperly closed condensate drain valves of air conditioners or an incorrectly inserted water tank
• Unfulfilled consumer expectations
- Damage caused by force majeure, water, lightning and overvoltage
- Appliances that have had their type designation and/or serial number on the appliance changed, deleted, made illegible or removed.
- Services outside our contract workshops, the transport costs to either an authorised workshop or to us and back, and the associated risks
We would like to expressly point out that a fixed amount of € 60 (indexed basis CPI 2010, June 2015) will be charged within the warranty period in the event of operating errors or if no error has been detected.
The provision of a warranty service (repairs or replacement of the appliance) does not extend the absolute warranty period of 2 years from the date of purchase.
The 2-year warranty is only valid upon presentation of the proof of purchase (must include the name and address of the dealer as well as the complete appliance designation) and the corresponding warranty certificate, on which the appliance type and the serial number (on the box and on both the back and underside of the appliance) are to be noted! Without presenting the warranty certificate, only the legal warranty applies!
We would like to expressly point out that the statutory warranty rights are unaffected by this warranty and continue unabated.
A liability for damage on the part of Schuss Home Electronic GmbH and its vicarious agents only exists in the event of gross negligence or intent. In any event, liability for lost profits, expected but not occurred savings, consequential damage and damage arising from claims of third parties is excluded. Damage to or for recorded data are always excluded from the liability for damage.
Congratulations on making your choice. We wish you a lot of pleasure with the SHE appliance!
ADDRESS
SHE Vertrieb
Schuss Home Electronic GmbH
A-1140 Vienna (Austria),
Tel.: +43 (0)1/ 970 21
Type designation:
Serial number:
In the event of a warranty claim, this warranty certificate must be handed over with the appliance to the authorised service workshop or the dealer which you purchase.
SOMMAIRE

DÉCLARATION DE CONFORMITÉ

text_image
Diagram of a portable air heater with numbered parts labeled 1 to 5FACE ARRIÈRE :
text_image
Technical diagram showing mechanical components with labeled parts and directional arrows indicating motion or forcetext_image
Diagram of a mechanical device with labeled parts, showing front and side views with numbered annotations.text_image
Technical diagram showing two labeled components of a mechanical assembly, with numbered annotations pointing to different parts.AVIS
text_image
Diagram of a portable air heater with numbered parts labeled 1 to 5PARTE POSTERIOR:
text_image
Technical diagram showing mechanical components with labeled parts and directional arrowstext_image
Diagram of a cart with labeled parts, showing numbered annotations for componentstext_image
Technical diagram showing two labeled components of a device or panel assembly, with numbered annotations.NOTA
text_image
Diagram of a heat exchanger with numbered parts labeled 1 to 5RETRO:
text_image
Diagram showing mechanical components with labeled parts and directional arrows, likely illustrating a system or assembly process.text_image
Diagram of a mechanical device with labeled parts, showing front and side views with numbered annotations.BATTERIE RICARICABILI PER LA REFRIGERAZIONE
text_image
Technical diagram showing two labeled components of a mechanical assembly, with numbered annotations pointing to different parts.AVVISO
text_image
Diagram of a portable air heater with numbered parts labeled 1 to 5ZADNÍ STRANA:
natural_image
Simple line drawing of a mechanical component with no text or symbolstext_image
Diagram of a mechanical device with labeled parts, showing front and side views with numbered annotations.CHLADICÍ AKUMULÁTORY
text_image
Technical diagram showing two labeled components of a mechanical assembly, with numbered annotations pointing to different parts.UPOZORNĚNÍ
text_image
Diagram of a portable air heater with numbered parts labeled 1 to 5HÁTOLDAL:
text_image
Diagram showing mechanical components with labeled parts and directional arrows indicating motion or forcetext_image
Diagram of a wheeled cart with labeled parts, showing front and side views with arrows indicating movement or force.HÜTÖAKKUK
text_image
Technical diagram showing two labeled components of a mechanical assembly, with numbered annotations pointing to different parts.MEGJEGYZÉS
text_image
Diagram of a portable air heater with numbered parts labeled 1 to 5TYLNA STRONA:
natural_image
Simple line drawing of a mechanical component with no text or symbolstext_image
Technical diagram of a wheeled cart with labeled parts, showing front and side views with numbered annotations.AKUMULATORY DO CHŁODNICY
text_image
Technical diagram showing two labeled components of a mechanical device with internal structure and assembly detailsWSKAZÓWKA
text_image
Diagram of a portable air heater with numbered parts labeled 1 to 5POLEDINA:
natural_image
Pure technical diagram showing mechanical components without any text, numbers, or symbolsUklanjanje transportnog osigurača u spremniku za vodu
Pumpa za vodu fiksira se na dnu spremnika za vodu u sigurnosnom držaču koji je dodatno opremljen zaštitnim elementom za transport koji možete ukloniti.
text_image
Diagram of a cart with labeled parts, showing numbered components and directional arrowstext_image
Technical diagram showing two views of a mechanical device with labeled components (① and ②)NAPOMENA
text_image
Diagram of a portable air conditioner unit with numbered parts labeled 1 to 5ZADNJA STRANA:
- Jezičci zaštitne rešetke
- Sigurnosni zavrtanj
- Zaštitna rešetka + filter prašine
- Sigurnosna poluga
- Rezervoar za vodu
text_image
6 7 8 9 10Seite 105 von 123
PUŠTANJE U RAD
PRE PRVOG PUŠTANJA U RAD
Raspakujte uređaj
text_image
Technical diagram showing mechanical components with labeled parts and directional arrows indicating motion or forceIzvadite osigurače transporta iz rezervoara za vodu
text_image
Diagram of a mechanical device with labeled parts, showing front and side views with numbered annotations.RASHLADNI ULOŠCI
U okviru obima isporuke dobijate dva rashladna uloška, koje možete da stavite u rezervoar za vodu, kako biste postigli veći efekat hlađenja.
text_image
Technical diagram showing two labeled components of a mechanical assembly, with numbered annotations pointing to different parts.NAPOMENA
Ne koristite nikada uređaj bez filtera.