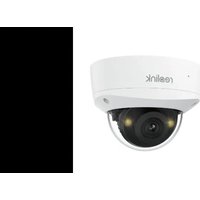
RLC-840A - Surveillance Camera REOLINK - Free user manual and instructions
Find the device manual for free RLC-840A REOLINK in PDF.


| Product type | IP PoE surveillance camera |
| Brand | Reolink |
| Model | RLC-840A |
| Power supply | PoE (IEEE 802.3af) or 12V DC power adapter |
| Dimensions | Φ117 x 86 mm |
| Weight | 570 g |
| Operating temperature | -10°C to +55°C |
| Night vision | Infrared LED and warm lights 3000K |
| Audio | Built-in microphone and speaker (two-way audio) |
| Storage | microSD card (internal slot) |
| Connection | Ethernet RJ45 (PoE) |
| Mounting | Ceiling or wall (template provided) |
| Box contents | Camera, waterproof cover, screw bag, 1m Ethernet cable, mounting template, reset pin, quick start guide, surveillance sticker |
| Software compatibility | Reolink App (smartphone) and Reolink Client (PC) |
| Reset | Reset button (hold 5 seconds) |
| Firmware update | Via the app or client |
| Warranty | 2 years (limited warranty) |
| Cleaning | Soft cloth for the dome |
| Certifications | FCC, ICES-003, CE |
| Repairability | Online technical support (support.reolink.com) |
Frequently Asked Questions - RLC-840A REOLINK
User questions about RLC-840A REOLINK
0 question about this device. Answer the ones you know or ask your own.
Ask a new question about this device
Download the instructions for your Surveillance Camera in PDF format for free! Find your manual RLC-840A - REOLINK and take your electronic device back in hand. On this page are published all the documents necessary for the use of your device. RLC-840A by REOLINK.
USER MANUAL RLC-840A REOLINK
If you need any technical help, please visit our official support site and contact our support team before returning the products, https://support.reolink.com.
CET PRODUCT SERVICE SP. Z O.O.
Ul. Dluga 33 102 Zgierz, Polen

CET PRODUCT SERVICE LTD.
Beacon House Stokenchurch Business Park, Ibstone Rd, Stokenchurch High Wycombe, HP14 3FE, United Kingdom
Nov 2023
QSG1_A
58.03.006.0074A

EN/DE/FR/IT/ES
Item No.: P327/P337/P347
Quick Start Guide
Apply to: RLC-540A/RLC-840A

@ReolinkTech https://reolink.com
EN
Contents
What's in the Box 2
Camera Introduction 3
Connection Diagram 5
Set up the Camera 6
Mount the Camera 7
Troubleshooting 10
Specification 11
Notification of Compliance 11
EnglishEnglish1 2
What's in the Box
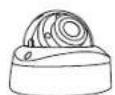


Camera Waterproof Lid Pack of Screws

1M
Ethernet Cable

Mounting Template

Reset Needle

Quick Start Guide
Surveillance
Sticker
NOTE:
* Quantity of accessories varies with the camera model you purchase.
Camera Introduction
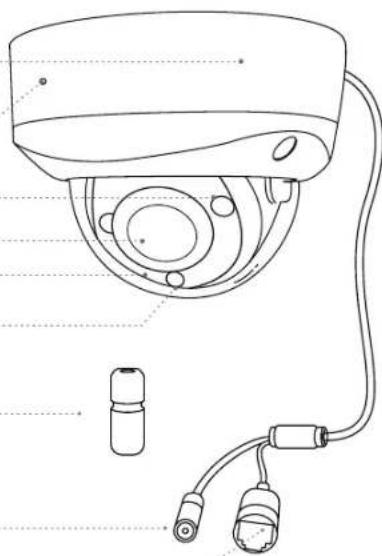
PoE Camera
Mount
Built-in Mic
3000K Warm Lights
Lens
IR LEDs
Daylight Sensor
Waterproof Lid
Power Port
Network Cable
EnglishEnglish3 4
natural_image
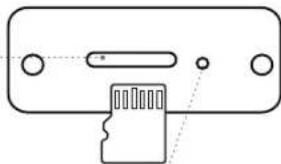
Line drawing of a security camera with attached cables and connector (no text or symbols)microSD Card Slot
*Loosen the screws with a screwdriver (not included) to access the microSD card slot
Insert the microSD card with its contact pins facing upward into the slot.
natural_image
Pure diagram of a device component with no text, numbers, or symbolsReset Button
* Press and hold the reset button for 5s with a pin to restore factory settings.
Speaker
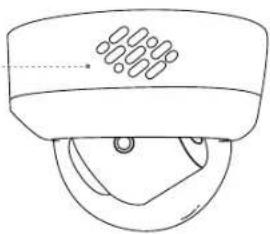
natural_image
Simple line drawing of a mechanical component with no text or symbolsConnection Diagram
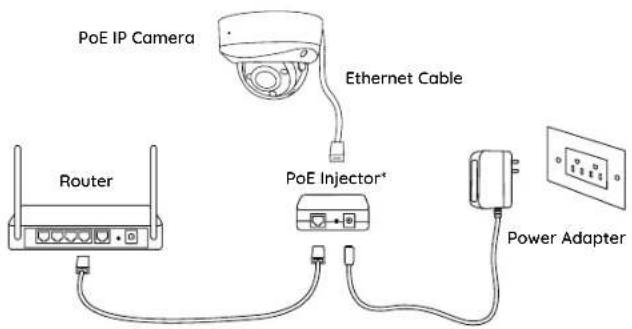
Before initial setup, follow the steps below to connect your camera.
-
Connect the camera to a PoE injector with an Ethernet cable.
-
Use the power adapter to power on the PoE injector and connect it to your router.
NOTE: You can power the camera with a PoE switch, PoE injector, Reolink PoE NVR or a DC 12V power adapter (not included in the package).
EnglishEnglish5 6
Set up the Camera
Download and launch the Reolink App or Client software, and follow the onscreen instructions to finish initial setup.
- On Smartphone
Scan to download the Reolink App.


- On PC
Download path of the Reolink Client: Go to https://reolink.com > Support > App & Client.
NOTE:
- If you are connecting the PoE camera to a Reolink PoE NVR, please set up the camera via the NVR interface.
Mount the Camera
Installation Tips
- Do not face the camera towards any light sources.
- Do not remove the protective film from the dome cover until the installation is complete.
- Do not point the camera towards a glass window. Or, it may result in poor image quality because of the window glare by infrared LEDs, ambient lights or status lights.
- Do not place the camera in a shaded area and point it towards a well-lit area. Or, it may result in poor image quality. To ensure the best image quality, the lighting condition for both the camera and the capture object shall be the same.
- To ensure better image quality, it's recommended to clean the dome cover with a soft cloth from time to time.
- Make sure the power ports are not directly exposed to water or moisture and not blocked by dirt or other elements.
- With IP waterproof ratings, the camera can work properly under condi-
tions like rain and snow. However, it doesn't mean the camera can work underwater. - Do not install the camera at places where rain and snow can hit the lens directly.
Install the Camera
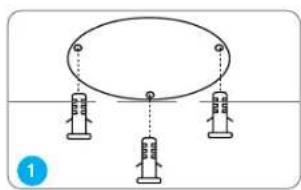
Put the mounting template on the ceiling and drill holes at the indicated locations, then insert the drywall anchors.
natural_image
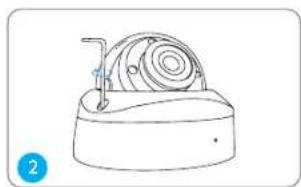
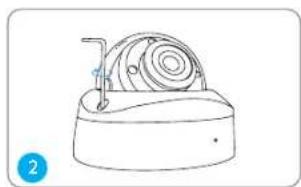
Line drawing of a mechanical device with a spiral housing and handle (no text or symbols)Screw the dome cover off the camera base with the hex key.
natural_image
Technical line drawing of a mechanical component with no visible text or symbolsNOTE: Keep the protective film on the dome cover until the installation is complete.
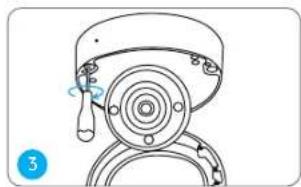
Screw the camera base to the ceiling.
Adjust the camera's viewing angle as needed.
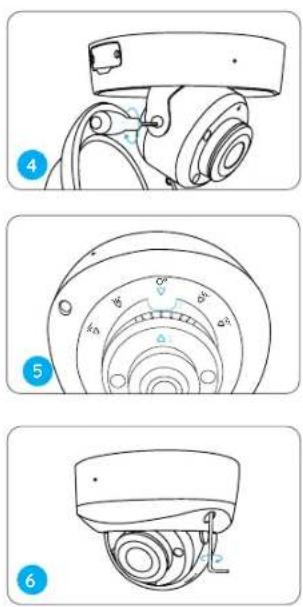
Align the arrows and the notch according to the diagram.
- Arrows on camera base
- Notch on camera module
- Arrow on camera top
Attach the dome cover to the camera base by tightening the screws.
NOTE: Remove the protective film from the dome cover after the installation.
EnglishEnglish9 10
Troubleshooting
Camera is not Powering on
If your camera is not powering on, please try the following solutions:
- Make sure your camera is powered on properly. The PoE camera should be powered by a PoE switch/injector, a Reolink NVR or a 12V power adapter.
- If the camera is connected to a PoE device as listed above, connect it to another PoE port and check again.
- Try again with another Ethernet cable.
Picture is not Clear
If the picture from the camera is not clear, please try the following solutions:
- Check the camera dome cover for dirt, dust or spiderwebs, and clean the dome cover with a soft, clean cloth. The dust-absorber included in the package is recommended.
- Point the camera to a well-lit area, the lighting condition will affect the picture quality a lot.
- Upgrade the firmware of your camera to the latest version.
- Restore the camera to factory settings and check out again.
Specification
Operating Temperature: -10°C\~+55°C (14°F\~131°F)
Size: Φ117x 86mm
Weight: 570g
For more Specifications, visit https://reolink.com/.
Notification of Compliance
FCC Compliance Statement
This device complies with Part 15 of the FCC Rules. Operation is subject to the following two conditions: (1) this device may not cause harmful interference, and (2) this device must accept any interference received, including interference that may cause undesired operation.
ISED Compliance Statements
This Class B digital apparatus complies with Canadian ICES-003.
Simplified EU Declaration of Conformity
EnglishEnglish11 12
Reolink declares that this device is in compliance with the essential requirements and other relevant provisions of EMC Directive 2014/30/EU and LVD 2014/35/EU.

Correct Disposal of This Product
This marking indicates that this product should not be disposed with other household wastes, throughout the EU. To prevent possible harm to the environment or human health from uncontrolled waste disposal, recycle it responsibly to promote the sustainable reuse of material resources. To return your used device, please use the return and collection systems or contact the retailer where the product was purchased. They can take this product for environmentally safe recycling.
Limited Warranty
This product comes with a 2-year limited warranty that is valid only if purchased from Reolink Official Store or a Reolink authorized reseller. Learn more:
https://reolink.com/warranty-and-return/.
Terms and Privacy
Use of the product is subject to your agreement to the Terms of Service and Privacy Policy at reolink.com. Keep out of reach of children.
DE
Inhaltsverzeichnis
Lieferumfang 14
Über die Kamera 15
natural_image
Technical line drawing of a security camera with attached cables and components (no text or symbols)microSD-Kartenslot
natural_image
Pure diagram of a device component with no text, numbers, or symbols
natural_image
Simple line drawing of a mechanical component with no text or symbolsVerbindungsdiagramm
natural_image
Line drawing of a mechanical device with a spiral component and handle (no text or symbols)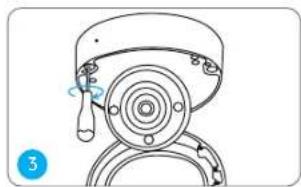
natural_image
Technical line drawing of a mechanical component with no visible text or symbolsBringen Sie die
natural_image
Technical line drawing of a mechanical assembly with no visible text or symbolsnatural_image
Line drawing of a surveillance camera with no text or symbolsnatural_image
Technical line drawing of a security camera with attached cables and components (no text or symbols)Fente Carte microSD
natural_image
Pure diagram of a device component with no text, numbers, or symbols
natural_image
Simple line drawing of a mechanical component with no text or symbolsnatural_image
Simple diagram showing three vertical structures with dotted lines and a central oval shape, no text or symbols present.natural_image
Line drawing of a vintage-style telephone receiver with a dial and antenna (no text or symbols)natural_image
Line drawing of a mechanical device with a circular component and attached parts (no text or symbols)natural_image
Technical line drawing of a mechanical assembly with no visible text or symbolsnatural_image
Line drawing of a surveillance camera with no text or symbols
Telecamera Coperchio

Impermeabile

Confezione

Ethernet 1m
natural_image
Technical line drawing of a security camera with attached cables and connector components (no text or labels)Italianoltaliano39 40
Slot Scheda MicroSD
natural_image
Pure diagram of a device component with no text, numbers, or symbolsPulsante di Reset
natural_image
Simple line drawing of a mechanical component with no text or symbols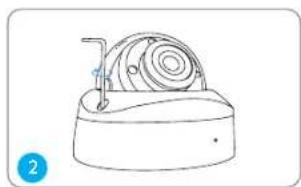
natural_image
Line drawing of a mechanical device with a spiral housing and handle (no text or symbols)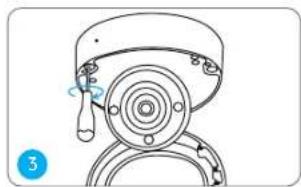
natural_image
Technical line drawing of a mechanical component with no visible text or symbolsnatural_image
Technical line drawing of a mechanical assembly with no visible text or symbolsnatural_image
Line drawing of a surveillance camera with no text or symbolsnatural_image
Line drawing of a security camera with attached cables and connector (no text or symbols)EspañolEspañol51 52
Ranura para tarjetas microSD
natural_image
Pure electrical circuit lines without any symbolsnatural_image
Simple line drawing of a mechanical component with no text or symbolsnatural_image
Line drawing of a mechanical device with a spiral housing and handle (no text or symbols)natural_image
Technical line drawing of a mechanical component with no visible text or symbolsnatural_image
Technical line drawing of a mechanical assembly with no visible text or symbolsnatural_image
Line drawing of a surveillance camera with no text or symbols- Quick Start Guide
- Contents
- What's in the Box
- NOTE:
- Camera Introduction
- PoE Camera
- Connection Diagram
- Set up the Camera
- - On Smartphone
- - On PC
- Mount the Camera
- Installation Tips
- Troubleshooting
- Camera is not Powering on
- Picture is not Clear
- Specification
- Notification of Compliance
- FCC Compliance Statement
- ISED Compliance Statements
- Correct Disposal of This Product
- Limited Warranty
- Terms and Privacy
- Inhaltsverzeichnis
- microSD-Kartenslot
- Verbindungsdiagramm
- Fente Carte microSD
- Slot Scheda MicroSD
- Pulsante di Reset
Brand : REOLINK
Model : RLC-840A
Category : Surveillance Camera