TS-1320S - Rice cooker Brentwood - Free user manual and instructions
Find the device manual for free TS-1320S Brentwood in PDF.

User questions about TS-1320S Brentwood
0 question about this device. Answer the ones you know or ask your own.
Ask a new question about this device
Download the instructions for your Rice cooker in PDF format for free! Find your manual TS-1320S - Brentwood and take your electronic device back in hand. On this page are published all the documents necessary for the use of your device. TS-1320S by Brentwood.
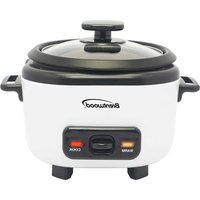
USER MANUAL TS-1320S Brentwood
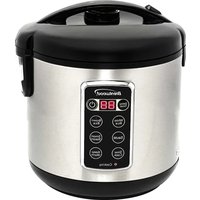
text_image
Brentwood® SELECT© 2021 Brentwood Appliances, Inc.
MULTI RICE COOKER ARROCERA ELÉCTRICA MULTIUSOS CUISEUR DE RIZ MULTIFONCTION
ITEM NO.: TS-1320S
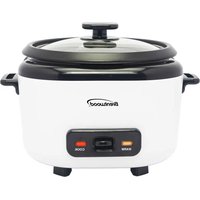
text_image
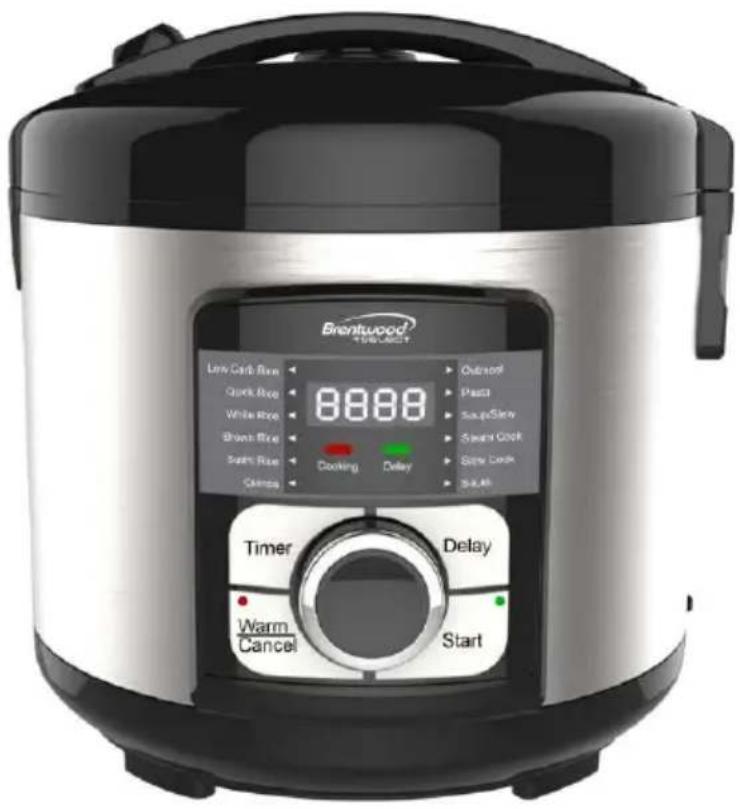
Brentwood TAWCAST Low Carb Rum Quick Rice White Rice Brunch Rice Soft Rice Cabbage 8.888 Cooking Delay Outsoll Paste Soup Slow Switch Cook Slope Lock Skill Timer Delay Warm Cancel StartOperating and Safety Instructions
FOR INDOOR HOUSEHOLD USE ONLY
When using this or any other electrical appliance, always follow these basic safety precautions, especially when children are present.
READ ALL INSTRUCTIONS BEFORE USE
WARNING-- To reduce the risk of fire, electric shock, serious personal injury and property damage please note the following:
- This product is not intended for use by children. Keep the product out of the reach of children and pets. Extra caution is necessary when using this appliance near children.
- Always ensure the product is unplugged from the electrical outlet and allowed to cool before assembling, disassembling, relocating, or cleaning it.
- Do not leave the product unattended while it is in use. Always unplug the product from the electrical outlet when not in use.
- Do not immerse the Base, Power Cord, or Plug of this product in or expose the Power Cord or Plug to water or other liquids.
- Do not touch hot surfaces. Use protective oven mitts or gloves to avoid burns or personal injury.
- Take proper precautions to prevent burns, fire, or personal or property damage as this appliance generates heat and steam during use.
- Do not use attachments not recommended nor sold by the product manufacturer.
- Do not place on or near a hot gas or electric burner, in a heated oven, or other heated surfaces.
- Do not operate the product empty. Use extreme caution when moving an appliance containing hot food, water, or other liquids.
- Use the product in a well-ventilated area. Keep at least 4-6 inches of space on all sides of the product to allow adequate air circulation.
- Use appliance on a table or flat surface. Keep the product away from curtains, wall coverings, clothing, dishtowels, or other flammable materials.
- Do not plug or unplug the product from the electrical outlet with a wet hand.
- This product is intended solely for non-commercial, non-industrial, household use in cooking of food for human consumption; do not use the product outdoors or for any other purpose.
- Do not let cord hang over edge of table or counter where it may be tripped over or pulled.
- Do not allow cord to touch hot surfaces.
- Do not operate the product if it has a damaged or cut Power Cord or plug, if wires are exposed, if it malfunctions, if it is dropped or damaged, or is exposed to water.
- This product has no user-serviceable parts. Do not attempt to examine or repair this product yourself. Please review warranty on Page 11.
- Do not put any stress on the power cord where it connects to the product, as the power cord could fray and break.
SPECIAL INSTRUCTIONS: A short power supply cord is provided to reduce the risk of becoming entangled in or tripping over a longer cord. An extension cord is not recommended for use with this product, but if one must be used:
- The marked electrical rating must be at least as great as that of the product.
- Arrange the extension cord so that it will not drape over the countertop or tabletop where it can be tripped over or pulled.

WARNING: This product is equipped with a polarized plug (one blade is wider than the other blade) to reduce the risk of electrical shock. This is a safety feature. The plug will fit in a polarized outlet only one way. If you are unable to insert the plug into the electrical outlet, try reversing the plug. If the plug still does not fit, contact a qualified electrician. Never use the plug with an extension cord unless you can fully insert the plug into the extension cord. Do not alter plug. Do not attempt to defeat the safety purpose of the polarized plug.
Parts:

Measuring Cup

natural_image
Simple line drawing of a laboratory flask (no text or symbols)Spatula

text_image
CUP 5-4 3-2Stainless Steel Low Carb Rice Steamer Basket

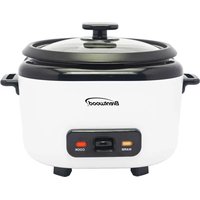
text_image
Brentwood + SWEELMINTY Line Carbice Quick Rice White Rice Brown Rice Sugar Rice Quinoa Camping Delay Communal Paste Soup/Show Steam Cook Slow Cook Semi Timer Warm Cancel Delay StartMulti Rice Cooker

text_image
CUP 10 1.8 8 1.4 6 1.0 4 0.5Non-Stick Inner Pot
SAVE THESE INSTRUCTIONS FOR FUTURE REFERENCE
PANEL FUNCTIONS:
Choice of the following Preset features: Low Carb Rice, Quick Rice, White Rice, Brown Rice, Sushi Rice, Quinoa, Oatmeal, Pasta, Soup/Stew, Steam Cook, Slow Cook, Sauté, Timer, Warm/Cancel, Delay and Start.
CONTROL KNOB FUNCTIONS:
Soft Button Choices:
Timer
Delay
Warm/Cancel
Start
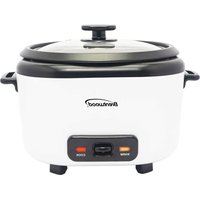
text_image
Brentwood +SELECT Low Carb Rice Quick Rice White Rice Brown Rice Sushi Rice Quinoa Cooking Delay Oatmeal Pasta Soup/Stew Steam Cook Slow Cook Sauté Timer Warm Cancel Delay StartBefore First Use
IMPORTANT: Please check all packaging material carefully for accessories before discarding.
NOTICE: Do not touch the ventilating hole as the steam is very hot and can scald.
Attention: First use may cause a slight odor or small smoking upon heating, it is normal. This is a result of the heating element chemical reaction. It quickly goes away.
- Rinse all accessories with warm tap water and a soft sponge.
- Place the Inner Pot into the Rice Cooker. Pour in 2 cups of water and secure with lid closed.
- Plug the product into an electrical outlet, and then steam for 2-3 minutes.
- Wait until machine beeps and turns off; unplug the product from the electrical outlet.
- Allow the product to cool before handling. Use cooking mittens to remove the inner pot; pour the water out, rinse and machine is ready to use or dry thoroughly and store away.
| Functions | Low Carb Rice | Quick Rice | White Rice | Brown Rice |
| Default Time | 00:30 Minutes | 00:35 Minutes | 00:45 Minutes | 01:00 Hour |
| Temperature | - | - | - | - |
| Time Range | 20-40 Minutes | - | - | - |
| Time Intervals (Min./Hrs.) | 5 Minutes | - | - | - |
| Has Delay Time | Yes | Yes | Yes | Yes |
| Functions | Sushi Rice | Quinoa | Oatmeal | Pasta |
| Default Time | 00:40 Minutes | 00:10 Minutes | 00:15 Minutes | 00:10 Minutes |
| Temperature | - | - | - | 212F° |
| Time Range | - | 5 Minutes – 3 Hours | 5 Minutes – 3 Hours | 1-60 Minutes |
| Time Intervals (Min./Hrs.) | - | 1 Minute 15 Minutes 30 Minutes | 1 Minute 15 Minutes 30 Minutes | 1 Minute |
| Has Delay Time | Yes | Yes | Yes | No |
| Functions | Soup/Stew | Steam Cook | Slow Cook | Sauté |
| Default Time | 00:45 Minutes | 00:05 Minutes | 04:00 Hours | 00:15 Minutes |
| Temperature | 212F° | 212F° | 208F° | 150-356F° |
| Time Range | 5 Minutes – 5 Hours | 1-60 Minutes | 1-14 Hours | 1-30 Minutes |
| Time Intervals (Min./Hrs.) | 1 Minute 15 Minutes 30 Minutes | 1 Minute | 30 Minutes 1 Hour | 1 Minute |
| Has Delay Time | Yes | No | Yes | No |
HOW TO USE:
NOTICE: Do not touch the ventilating hole as the steam is very hot and can scald.
Cooking Ordinary Rice:
- Use the provided measuring cup and add rice to the inner cooking pot.
- Rinse rice to remove excess starch and drain.
- Fill the inner cooking pot with water to the line which matches the number of cups of rice being cooked.
- Place the inner cooking pot into the rice cooker.
- Close the lid securely.
- Plug the cord into an available outlet.
- Switch the panel control knob to select 'White Rice' cooking function.
- After confirming the function, press 'Start' to cook.
Cooking Low Carb Rice:
- Add rice to the Stainless Steel (SS) Low Carb Rice Steamer Basket.
- Place the SS Basket into the inner cooking pot.
- Add water to the SS Basket with water to the line which matches the number of cups of rice being cooked. (Example: to cook 5 cups of low carb rice, fill the SS Basket up to the 5 Cup mark with water.) For ordinary rice capacity in comparison to Low Carb Rice, see 'Capacity Table' below.
| CAPACITY TABLE – LOW CARB RICE REFERENCE | |
| Traditional White Rice | Low Carb Rice |
| 5 Cup | 1.5 Cup |
| 7 Cup | 3 Cup |
| 8 Cup | 4 Cup |
| 10 Cup | 5 Cup |
How to Adjust Cooking Time
- You can manually adjust the preset time for the following Preset Dishes: Low Carb Rice, Quinoa, Hot Cereals (Oatmeal), Pasta, Sauté, Steam Cook, Time can be manually adjusted.
- Choose the Preset Dish you wish to make.
- Press 'Timer' and now turn the control knob clockwise or counterclockwise, to increase/decrease the cooking time.
How to Use 'Delay Function'
- The following dishes can use the 'Delay' feature:
| White Rice | Quick Rice | Brown Rice |
| Low Carb Rice | Sushi Rice | Hot Cereal |
| Quinoa | Soup Stew | Slow Cook |
- Once you have chosen the dish you are preparing, press the 'Delay' button, use the knob to select the delay time, LED display will flash <00:00>.
- Switch the control knob to adjust the time between 0 to 24 hours. Depending on the delay time you need. (Note: when the 'Delay' time is used for hours between 0 to 10, the LED time feature increases by 30 min. When choosing the 'Delay' time between 10 to 24 hours, the LED time feature increases by one hour each time.)
- Choose your delay time and press 'Start', the digital display will countdown from the time selected.
- Once the delayed time has been reached, it will beep once before it starts to cook.
How to Use 'Warm/Cancel'
- Press 'Warm' button, it runs into keep warm mode, digital display will show '00:00', it counts clockwise, the longest keep warm time is 12 hours.
- Press 'Cancel' button at any cooking mode, it beeps one time, and stops cooking, it shifts into active mode. Active mode is when the machine is ready for next command.
How to 'Steam'
The cooking time of vegetables is determined by the amount of water added, softness and size of vegetables.
FRESH vegetables should be washed before cooking. The chart will help guide time needed to cook vegetables and water to add.
- Place the water amount you desire in the inner pot.
- Close lid and Select Steam Cook and press start.
- Place food to steam on the Steamer Basket and set aside.
- Steam default is set for 1 min. but can be adjusted up to 1 hour max.
- Machine will beep when it has reached boiling. Then will begin the 1 min timer.
- Using caution from steam, to avoid escaping steam, open the lid.
- Place the Steam Basket of food on top of inner pot of hot boiling water.
- Close lid securely.
- Machine will beep and turn off when 1 min. has been reached.
- Using caution from steam, open the lid to check food periodically for doneness.
- If done, using caution from steam, use oven mitts remove Steam Basket from Inner Pot.
- Unplug the machine from the outlet when done.
| Vegetable | Water (Cups) | Cooking Minutes |
| Eggplant | 112 | 20 |
| Zucchini | 12 | 10 |
| Peas | 12 | 10 |
| Cauliflower | 1 | 15 |
| Green Beans | 1 | 15 |
| Corn | 1 | 15 |
| Asparagus | 12 | 10 |
| Spinach | 12 | 10 |
| Cabbage | 12 | 10 |
| Carrots | 1 | 15 |
Cleaning Your :
WARNING: Always unplug the product and allow it to cool before cleaning or storing.
NOTICE: To avoid damaging the product, do not pour cold water into the Non-Stick Inner Pot after use and do not use abrasive cleaners/pads to clean any part of the product.
- Remove the Inner Pot and Lid from the Cooker. Wash these in warm soapy water. Do not use a scouring pad as this may damage the Non-Stick of the Inner Pot.
- Clean the outside of the Cooker with a clean damp cloth. Do not submerge any part of the cooker in water.
- You can also wipe the heating plate on the inside of the cooker with a damp cloth making sure to dry completely before re-using.
- Dry all parts thoroughly before storing or using again.
Recipe Ideas:
Not all multi-rice cookers are the same, please experiment with the timing.
| Brown Rice PilafFunction: Brown Rice | |
| Ingredients1 Cup Brown Rice1 Yellow onion, diced2 1/4 cups water or stock1/4 cup sliced almonds,toastedChopped flat leaf parsley forgarnishKosher Salt and black pepperfor taste*Always unplug your MultiRice Cooker when not in use. | DirectionsIn the bowl of your rice cooker add the brown rice,diced onion, and water (or stock, if desired). Plugin your Multi Rice Cooker and turn knob to thedesired setting ‘Brown Rice’, default is <01:00>hour, and press ‘Start’.After 30-40 minutes check rice for doneness. Withcooking mitts and caution of steam, open lid andcheck rice. When rice has finished cooking to yourlikeness, fluff with a fork, season with salt andpepper and transfer to a serving bowl. Top withtoasted sliced almonds and parsley. |
| Mediterranean-Style Steamed Salmon with Lemon and Fresh HerbsFunction: Steam | |
| Serves: 4Ingredients1-Yellow onion, halved and sliced4-Green onions (spring onions), trimmed and sliced lengthwise, divided1-lb Skin-on salmon fillet (suggestion: wild Alaskan), cut into 4 portionsKosher salt1 Tsp ground Coriander1-Tsp ground Cumin1/2-Tsp Aleppo Pepper4/5-Garlic cloves, choppedExtra Virgin Olive OilFresh Parsley (approx. 28g)1-Lemon, thinly sliced1/2-Cup White Wine (or broth)*Always unplug your Multi Rice Cooker when not in use. | DirectionsPlace the sliced yellow onions and some of the green onions on the bottom of the Non-Stick Inner Pot. Arrange salmon, skin-side down, on top.Season with kosher salt and black pepper.In a small bowl, mix the coriander, cumin, and Aleppo pepper. Coat top of salmon with the spice mixture. Drizzle with a little bit of extra virgin olive oil.Add garlic, parsley, and the remaining green onions on top of the salmon (arrange so that everything is spread evenly over the salmon portions.) Arrange lemon slices on top.Add another drizzle of extra virgin olive oil, then pour the white wine (or broth).Plug in your Multi Rice Cooker and turn the knob to the desired setting, ‘Steam’ the default is <00:01> minute, to add time press ‘Time’ to adjust and turn knob clockwise to set for <00:10> minutes. Press ‘Start’ (DO NOT UNCOVER). Once the time is reached machine will beep and switch to active mode <--->. With Caution of steam, check for doneness. If more time is needed repeat and set timer for an additional 1-5 minutes, depending on your preference of doneness. When done, let sit with lid closed for 5 minutes undisturbed. Using cooking mitts, open lid and with a spatula, spoon out your fish with lemon and herbs and place on a plate and enjoy over rice!Always unplug your Multi Rice Cooker when not in use. |
| Balsamic Honey Glazed Chicken SautéFunction: Sauté | |
| Serves: 4Ingredients4-Fresh Boneless SkinlessChicken Breasts2-Tbsp Olive Oil1/4-Cup Balsamic Vinegar1-Tsp Garlic (minced)1/2-Tsp Salt1/4-Tsp Black Pepper1/2-Cup Chicken Stock2-Tbsp Honey*Always unplug your Multi Rice Cooker when not in use. | DirectionsSeason the chicken with salt and pepper.Plug in your Multi Rice Cooker place the ‘Non-Stick Inner Pot’ into your Multi Rice Cooker and turn the knob to the desired setting, ‘Sauté’, the default is <00:15>minutes. If you need more time, press ‘Timer’ and add more time by going clockwise, press ‘Start’ when ready.Using cooking mitts and caution of heat: In the non-stick Inner Pot, heat oil and sauté the chicken for 3-4 minutes on each side until lightly golden. Remove the chicken from the inner pot, place in a bowl and cover to keep warm.In a glass measuring cup or small bowl, combine the chicken stock, balsamic vinegar, and honey. Stir to dissolve the honey. Add the garlic to the inner pot and sauté for 30 seconds. Stir in the chicken stock mixture and bring to a boil. Add chicken back to the inner pot, cook for 3 to 5 minutes until the chicken is cooked through. The chicken is done when it feels firm to the touch and a meat thermometer inserted in the center reaches 170°F.Once the time is reached machine will beep and switch to active mode <--->. If more time is needed repeat and set timer for an additional 1-5 minutes, depending on your preference of doneness. When done, serve each piece of Balsamic Honey Glazed Chicken with a drizzle of glaze. Tip: Serve over rice or with sauteed vegetables. Enjoy! |
ONE YEAR LIMITED WARRANTY
Write down the following information about your appliance to better help you obtain assistance or service if you ever need it.
CUSTOMER RECORD
Date of Purchase ____ Store/Dealer ____
Model/Item No: ____
THIS WARRANTY APPLIES TO PRODUCTS PURCHASED AND USED IN THE CONTINENTAL U.S. AND CANADA ONLY. This is the only express warranty for this product and is in lieu of any other warranty or condition. This product is warranted to be free from defects in material and workmanship for a period of one (1) year from the date of original purchase. During this period, your exclusive remedy is repair or replacement of this product, at our option; however, you are responsible for all costs associated with returning the product to us and our returning a product or component under this warranty to you. If the product or component is no longer available, we will replace with a similar one of equal or greater value. This warranty does not cover glass, filters, wear from normal use, use not in conformity with the printed directions, or damage to the product resulting from accident, alteration, abuse, or misuse.
THIS WARRANTY EXTENDS ONLY TO THE ORIGINAL CONSUMER PURCHASER. KEEP THE ORIGINAL SALES RECEIPT, AS PROOF OF PURCHASE IS REQUIRED TO MAKE A WARRANTY CLAIM.
This warranty is void if the product is used for other than single-family household use or subjected to any voltage and waveform other than what is specified on the rating label (E.G., 120V\~60Hz). We exclude all claims for special, incidental, and consequential damages caused by breach of express or implied warranty. All liability is limited to the amount of the purchase price. Every implied warranty, including any statutory warranty or condition of merchantability or fitness for a particular purpose, is disclaimed except to the extent prohibited by law, in which case such warranty or condition is limited to the duration of this written warranty. This warranty gives you specific legal rights. You may have other legal rights that vary depending on where you live. Some states do not allow limitations on implied warranties or special, incidental, or consequential damages, so the foregoing limitations may not apply to you. To make a warranty claim do not return this appliance to the store.
TO OBTAIN WARRANTY SERVICE AND/OR TROUBLESHOOTING INFORMATION:
Call Customer Service at 1-888-903-0060 in the U.S.
Monday through Friday: 9:00 am – 5:00 pm PT
U.S. Customers Please Email: warranty@brentwoodus.com
Canadian Customers Please Email: Canada.warranty@brentwoodus.com
Go online at www.brentwoodus.com
PRECAUCIONES IMPORTANTES

text_image
Brentwood TIMELY.MOTTER Low-Catting Clearing White Size Balance Sheet SUST/ORDER Options Cooling Delay Dimmed Flame Smooth/Dimed Steam/Clock Slam Cover Sunt Timer Warm Cancel Delay StartOlla
Arrocera
Múltiple

natural_image
Line drawing of a bowl with a handle and measurement scale (no text or symbols)text_image
Brentwood +SELECT Low Carb Rice Quick Rice White Rice Brown Rice Sushi Rice Quinoa Cooking Delay Oatmeal Pasta Soup/Stew Steam Cook Slow Cook Sauté Timer Warm Cancel Delay Startnatural_image
Simple line drawing of a bulb-like shape with a circular top and stem (no text or symbols)Spatule

text_image
CUPtext_image
Brentuood T R S L E S T Low Carb Rice Quick Rice White Rice Brown Rice Sugar Rice Quinex Cooking Delay Quinexal Paste Soup/Menu Steam Cock Screw Cock Seed Timer Warm Cancel Delay Starttext_image
Brentwood +SELECT Low Carb Rice Quick Rice White Rice Brown Rice Sushi Rice Quinoa Cooking Delay Oatmeal Pasta Soup/Stew Steam Cook Slow Cook Sauté Timer Warm Cancel Delay Start© 2021 Brentwood Appliances, Inc.