GA-135BK - Coffee machine Brentwood - Free user manual and instructions
Find the device manual for free GA-135BK Brentwood in PDF.

User questions about GA-135BK Brentwood
0 question about this device. Answer the ones you know or ask your own.
Ask a new question about this device
Download the instructions for your Coffee machine in PDF format for free! Find your manual GA-135BK - Brentwood and take your electronic device back in hand. On this page are published all the documents necessary for the use of your device. GA-135BK by Brentwood.
USER MANUAL GA-135BK Brentwood
Brentwood® Appliances
© 2021 Brentwood Appliances, Inc.
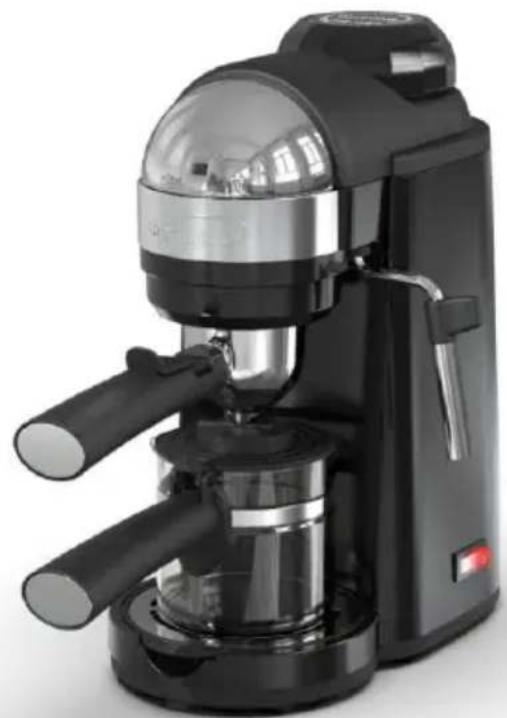
ESPRESSO & CAPPUCCINO MAKER
MAQUINA DE CAFÉ ESPRESSO Y CAPPUCCINO
CAFETIÈRE EXPRESSO ET CAPPUCCINO
ITEM NO.: GA-135BK
Operating and Safety Instructions
FOR INDOOR HOUSEHOLD USE ONLY
When using this or any other electrical appliance, always follow these basic safety precautions, especially when children are present.
READ ALL INSTRUCTIONS BEFORE USE
WARNING-To reduce the risk of fire, electric shock, serious personal injury and proper damage please note the following:
- This appliance is not intended for use by persons (including children) with reduced physical, sensory, or mental capabilities, or lack of experience and knowledge, unless they are closely supervised and instructed concerning use of the appliance by a person responsible for their safety. Close supervision is necessary when any appliance is used by or near children. Children should be supervised to ensure that they do not play with the appliance.
- Always ensure the product is unplugged from the electrical outlet and allowed to cool before assembling, disassembling, relocating, or cleaning it.
- Do not leave the product unattended while it is in use. Always unplug the product from the electrical outlet when not in use.
- Do not immerse the Base, Power Cord, or Plug of this product in or expose the Power Cord or Plug to water or other liquids.
- Do not touch hot surfaces. Use handles and protective oven mitts or gloves to avoid burns or personal injury.
- This appliance generates heat and steam during use. Please take the proper precautions to avoid burns, fire, and personal/ property damage.
- Only use attachments recommended, provided, or sold by the product manufacturer.
- Do not place on or near a hot gas or electric burner, in a heated oven, or other heated surfaces.
- Use extreme caution when moving an appliance containing hot food, water, or other liquids.
- Use the product in a well-ventilated area. Keep at least 4-6 inches of space on all sides of the product to allow adequate air circulation.
- Use appliance on a table or flat surface. Keep the product away from curtains, wall coverings, clothing, dishtowels, or other flammable materials.
- Do not plug or unplug the product from the electrical outlet with a wet hand.
- This product is intended solely for non-commercial, non-industrial, household use in cooking of food for human consumption; do not use the product outdoors or for any other purpose.
- Do not operate the product empty.
- Do not let cord hang over edge of table or counter where it may be tripped over or pulled.
Do not allow cord to touch hot surfaces. - Do not operate the product if it has a damaged or cut Power Cord or plug, if wires are exposed, if it malfunctions, if it is dropped or damaged, or if the Motor Housing is dropped in or exposed to water.
-
This product has no user-serviceable parts. Do not attempt to examine or repair this product yourself. Please review the Warranty Policy on Page 7.
-
Do not put any stress on the power cord where it connects to the product, as the power cord could fray and break.
SPECIAL INSTRUCTIONS: A short power supply cord is provided to reduce the risk of becoming entangled in or tripping over a longer cord. An extension cord is not recommended for
use with this product, but if one must be used:
- The marked electrical rating must be at least as great as that of the product.
- Arrange the extension cord so that it will not drape over the countertop or tabletop where it can be tripped over or pulled.
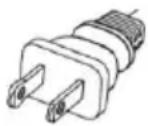
WARNING: This product is equipped with a polarized plug (one blade is wider than the other blade) to reduce the risk of electrical shock. This is a safety feature. The plug will fit into a polarized out only one way. If you are unable to insert the plug into the electrical outlet, try reversing the plug the plug still does not fit, contact a qualified electrician. Never use the plug with an extension coil unless you can fully insert the plug into the extension cord. Do not alter the plug. Do not attempt defeat the safety purpose of the polarized plug.
Before First Use
IMPORTANT: Please check all packaging material carefully before discarding as there may be accessory parts contained within the packaging material.
- Wash the Carafe, Porta Filter, and Filter Basket with warm soapy water. Rinse and dry thoroughly.
- Place parts together and run a brew cycle with water only. Do not add coffee. Repeat 2-3 times to remove any dust or debris from manufacturing.
Attention: First use may cause a slight odor or small smoking upon heating, it is normal. This is a result of the heating element chemical reaction. It quickly goes away.
- When the brewing cycle is complete, turn your espresso maker off. Empty the water from the carafe once it has cooled, rinse the carafe, carafe lid, and filter basket.
HOUSEHOLD USE ONLY SAVE THESE INSTRUCTIONS FOR FUTURE REFERENCE
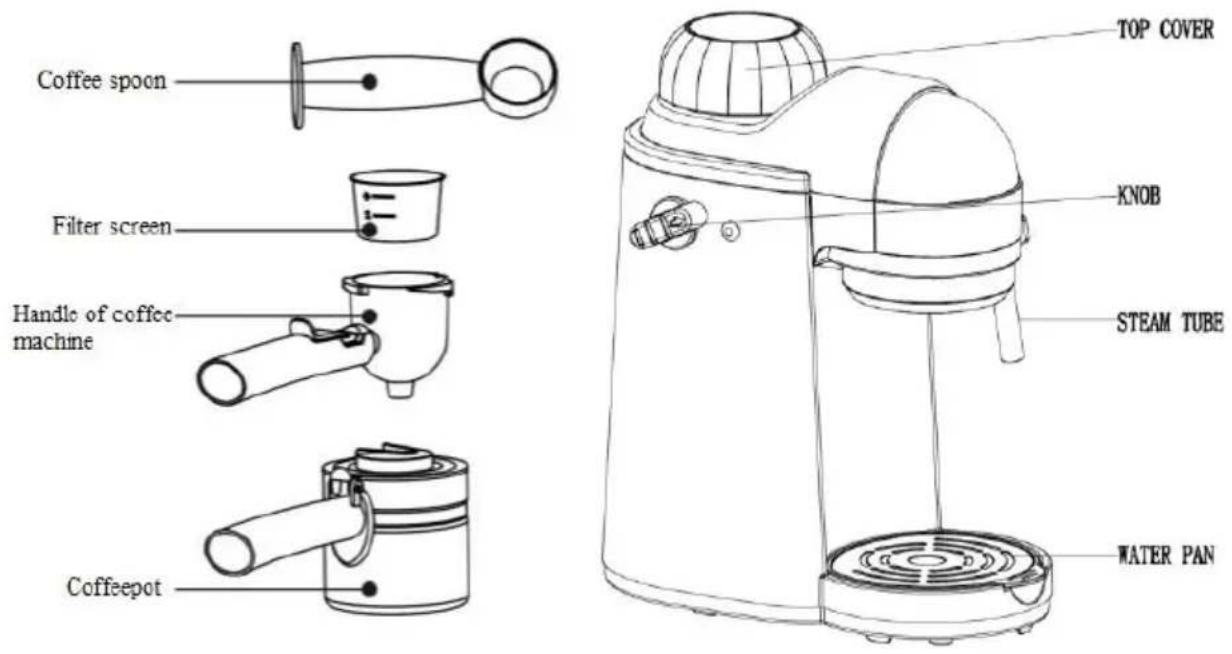
Parts:
WARNING: The coffee machine cannot be kept working continuously. If a second serving is needed, please wait for 3 minutes after releasing the steam.
WARNING: Machine and parts are HOT during and after use. Allow to cool before touching.
How to Brew Espresso
-
Always turn control dial to "RELEASE OFF" position and remove plug from wall outlet before filling water. Never overflow water tank or use more than the recommended amount of water.
-
Use scoop end of the Scoop & Tamp tool to scoop fresh, medium ground coffee into the Filter Basket. Fill to the '2' or '4' level markers inside the Filter Basket for '2' or '4' servings of espresso. Then use the tamp end of the Scoop & Tamp tool to gently level and tamp the coffee grounds in the Filter Basket.
-
Place the Filter Basket inside the Portafilter. Make sure the Filter Basket Lock is laying flush with the handle, then insert the Portafilter into the underside of the machine. Position the handle under the 'INSERT' text. Insert the Portafilter, then turn the handle left so it is now aligned under the "LOCK" text.
-
Fill the carafe with water to the '2' or '4' level markers, matching the amount of coffee grounds used in the Filter Basket. Remove cap from the top of the machine and pour water from the carafe into the water tank. Replace the cap and turn right until seal is tight.
-
Place the empty carafe on the drip tray, positioning the carafe's lid directly under the Portafilter's spout.
-
Turn the control dial from the 'RELEASE OFF' position to 'ESPRESSO CUP' icon and wait 3 minutes, the machine will heat, build pressure, and begin to brew espresso.
- Once espresso has reached the desired serving level slowly turn the control dial to the 'PAUSE' position and wait until the indicator light is off. The espresso is now ready.
- Move the control knob to the 'RELEASE OFF' position and release remaining pressure.
- Once done, shut down power with power switch.
CAUTION: machine, parts, and liquids are very hot during and after use. - To avoid spillage or injury, do not detach the portafilter while the machine is operating. Before removing the portafilter, release the pressure from the water tank by moving the control dial to the 'RELEASE OFF' position. Keeping hands and face away from the machine, allow steam to escape until there is none left.
- Once cooled, remove the Portafilter, flip the filter basket Lock up and hold in place using your thumb. Turn the Portafilter over to tap out grounds over a trash receptacle. Wash Portafilter and Filter Basket in warm soapy water, dry, and reassemble for storage.
- Always release pressure and allow unit to cool for at least 5 minutes before storing or starting next brew cycle. Machine and parts are very hot during and after use.
How to Steam Milk (Non-Fat or 2% Recommended)
- Fill the carafe with water to the 'STEAM' icon level marker and add water to the water tank.
- Follow the 'How to Brew Espresso' through step 7.
- Move the control dial from the 'ESPRESSO CUP' icon to the 'PAUSE' position. Remove the carafe from the drip tray, away from the machine.
- Ensure the plastic cover is installed on the steam wand. Place a damp towel over the steam wand and briefly purge by slowly moving the control dial from 'PAUSE' to the 'STEAM' icon, clearing any residue. Turn the dial back to 'PAUSE.'
Steam Milk - Creates Hot Milk for Lattes
- Fill up to 2/3 cold milk in a stainless-steel frothing pitcher or similarly sized cup.
- Position the frothing pitcher under the steam wand, submerging the tip deeper into the milk creating less bubbles.
- Slowly turn the dial towards the 'STEAM' position to start steaming. Continue to steam milk until pitcher is almost too hot to handle.
- Turn the dial to the off position before moving the wand outside of the milk.
Froth & Steam Milk - Creates Hot Milk with Foam for Cappuccino
- Fill frothing pitcher or similarly sized cup with 1/3 cold milk.
- Place the wand into the frothing pitcher, submerging it just below the milks surface. Slowly turn the dial towards the 'STEAM' position to start steaming.
- Keep the wand just below the surface of the milk to create microbubbles, the frothy foam used for cappuccinos. Continue to steam until volume doubles.
- Slowly lower the wand towards the bottom of the pitcher and keep until the froth and milk becomes silky smooth and the pitcher is almost too hot to handle. Turn the dial to the off position before moving the wand outside of the milk. Heavier steamed milk will settle at the bottom of the pitcher and will pour out before the froth. Left over froth is used as a top layer on drinks.
| Latte | Directions Follow the “Steam Milk” instructions. Prepare espresso. Pour espresso into an 8-10oz latte cup. Pour freshly steamed milk aiming at the center. Top with a thin layer of foam with the left-over froth. |
| Ingredients ·1 Part Espresso ·3 Parts Steamed Milk ·Thin Layer of Froth | |
| Cappuccino | Directions Follow the “Froth & Steam Milk” instructions. Prepare of espresso. Pour espresso into a 6-8oz cappuccino cup. Start to pour freshly frothed milk starting at the center of the cup and follow a circular pattern out to the rim of the cup. |
| Ingredients ·1 Part Espresso ·1 Part Steamed Milk ·1 Part Frothed Milk | |
| Latte Macchiato | Directions Follow the “Steam Milk” instructions. Prepare espresso. Pour freshly steamed milk into an 8-10oz latte cup. Pour freshly pulled espresso at the center. Top with layer of frothed milk. |
| Ingredients ·1 Part Steamed Milk ·1 Part Espresso ·1 Part Frothed Milk |
CARE AND CLEANING (DO NOT PLACE ANY PARTS IN DISHWASHER)
- Unplug machine from power outlet and allow to cool before cleaning.
- Clean the machine with a soft, damp cloth. Never submerge machine in water.
- Clean the portafilter, filter basket, carafe, and Scoop & Tamp in warm, soapy water.
- Place all clean parts together and run brew cycle with water only. Do not add coffee. Repeat a few times to remove any dust inside. This should be done on a monthly basis or more for places with extra hard water.
- Always clean and dry coffee maker completely before storing.
ONE YEAR LIMITED WARRANTY
Write down the following information about your appliance to better help you obtain assistance or service if you ever need it.
CUSTOMER RECORD
Date of Purchase _ Store/Dealer _
Model/Item No:
THIS WARRANTY APPLIES TO PRODUCTS PURCHASED AND USED IN THE CONTINENTAL U.S. AND CANADA ONLY. This is the only express warranty for this product and is in lieu of any other warranty or condition. This product is warranted to be free from defects in material and workmanship for a period of one (1) year from the date of original purchase. During this period, your exclusive remedy is repair or replacement of this product, at our option; however, you are responsible for all costs associated with returning the product to us and our returning a product or component under this warranty to you. If the product or component is no longer available, we will replace with a similar one of equal or greater value. This warranty does not cover glass, filters, wear from normal use, use not in conformity with the printed directions, or damage to the product resulting from accident, alteration, abuse, or misuse.
THIS WARRANTY EXTENDS ONLY TO THE ORIGINAL CONSUMER PURCHASER. KEEP THE ORIGINAL SALES RECEIPT, AS PROOF OF PURCHASE IS REQUIRED TO MAKE A WARRANTY CLAIM.
This warranty is void if the product is used for other than single-family household use or subjected to any voltage and waveform other than what is specified on the rating label (E.G., 120V~60Hz). We exclude all claims for special, incidental, and consequential damages caused by breach of express or implied warranty. All liability is limited to the amount of the purchase price. Every implied warranty, including any statutory warranty or condition of merchantability or fitness for a particular purpose, is disclaimed except to the extent prohibited by law, in which case such warranty or condition is limited to the duration of this written warranty. This warranty gives you specific legal rights. You may have other legal rights that vary depending on where you live. Some states do not allow limitations on implied warranties or special, incidental, or consequential damages, so the foregoing limitations may not apply to you. To make a warranty claim do not return this appliance to the store.
TO OBTAIN WARRANTY SERVICE AND/OR TROUBLESHOOTING INFORMATION:
Call Customer Service at 1-888-903-0060 in the U.S.
Monday through Friday: 9:00am - 5:00pm PST.
U.S. Customers Please Email: warranty@brentwoodus.com
Canadian Customers Please Email: canada.warranty@brentwoodus.com
Go online at www.brentwoodus.com
PRECAUCIONES IMPORTANTES