
330015 - Hand blender Max Pro - Free user manual and instructions
Find the device manual for free 330015 Max Pro in PDF.


User questions about 330015 Max Pro
0 question about this device. Answer the ones you know or ask your own.
Ask a new question about this device
Download the instructions for your Hand blender in PDF format for free! Find your manual 330015 - Max Pro and take your electronic device back in hand. On this page are published all the documents necessary for the use of your device. 330015 by Max Pro.
USER MANUAL 330015 Max Pro
Professional Hand Mixer

natural_image
Four black Max Pro spray machines with different designs and colors, displayed against a white background (no text or symbols on the devices themselves)Use and Maintenance Manual
CE
Max Pro

natural_image
Four Max Pro spray machines shown in different orientations (no text or symbols visible on the devices themselves)Use and Maintenance Manual
GB
Contents
1- GENERAL INFORMATION
• Purpose of the Manual 4
• Manufacturer and Machine Identification ..... 4
• Machine Descriptions .... 5
• Technical Specifications 6
• Overall Dimentions 7
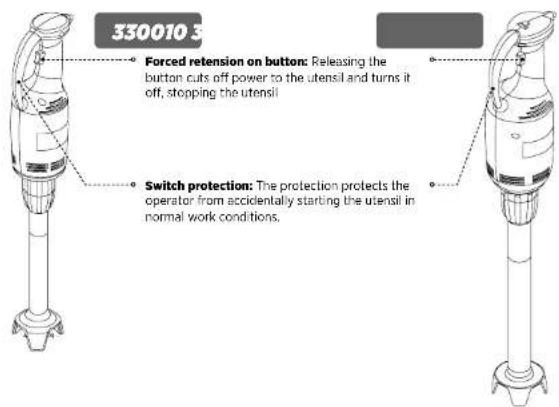
• Safety Devices 8
• Safety Information 8
• Residual Risks 9
2-INSTALLATION INFORMATION
• Packaging and Unpacking 10
• Installation Area 10
• Electrical Connections .... 10
3-USE and CLEANING INFORMATION
• Control Description .... 11
- Mixer Use .... 11
- Whip Use 12
- Recommendations for Use 12
• End of the Day Cleaning 13
• Extended Periods of Disuse 13
- Troubleshooting 13
4- ATTACHMENTS
- Spare Parts Catalogue .... 14
Max Pro
Purpose of the Manual
This manual was written by the Manufacturer and is an integral part of machine equipment. During design and construction the Manufacturer has carefully considered possible hazards and personal risks that may result from interaction with the machine. In addition to observing the specific laws in force, the manufacturer has adopted all "exemplary construction technique principles". The purpose of this information is to advise the users to adopt extreme caution to avoid risks. However, discretion is invaluable. Safety is also in the hands of all the operators who interact with the machine. Keep this manual in a suitable place, always within reach for consultation. The following symbols are included to better stress some passages:

INFORMATION: Indicates particularly important technical information.

DANGER - WARNING: Indicates hazards that may cause serious damages; attention is required
The following is enclosed with this manual:
- Warranty certificate describing the Manufacturer's warranty conditions.
- Documents that prove conformity with effective health and safety laws.
Contact the Authorised dealer for any service request, information or spare parts order.
Machine and Manufacturer Identification

text_image
Technical Specifications Model V Hz IN W IPX3 YEAR Conformity Markings Serial NumberMachine Model Year of ManufactureMax Pro
Machine Descriptions
The mixer range is made up of the following models:
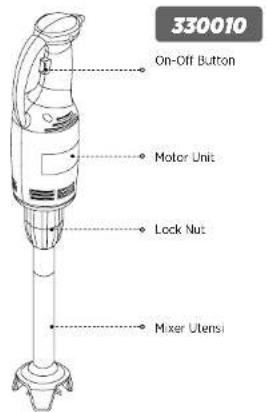
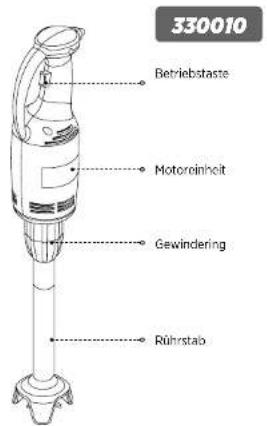
Model 330010 was designed for small processing needs. The utensil has a classic vertical hold shape. The motor unit is constructed with a plastic structure while the mixing utensil is made up of stainless steel, aluminium alloy and plastic elements. The machine has only one speed.

Model 330012/330015 was designed for small-medium work needs. The utensil has a classic vertical hold shape. The motor unit is constructed with a plastic structure while the mixing and whip utensils are made up of stainless steel, aluminium alloy and plastic elements. The machine has one mixer speed and adjustable whip speed.

natural_image
Product photo of a Max Pro spray gun, a vertical stand, and a whisk (no visible text or symbols)General Information
| Noise Level Less than 70 dB(A) | |
| Installation Hand-held utensil | |
| Protection Level IPX3 | |
| Electrical Shock Protection Class II | |
| Directive Compliance 93/68/EC - 98/37/EC - 2003/108/EC - 2002/72/EC - Regulation (EC) nr 1935/2004 - 2004/108/EC - 2006/95/EC | |
Max Pro
Technical Specifications
text_image
330010 On-Off Button Motor Unit Lock Nut Mixer Utensi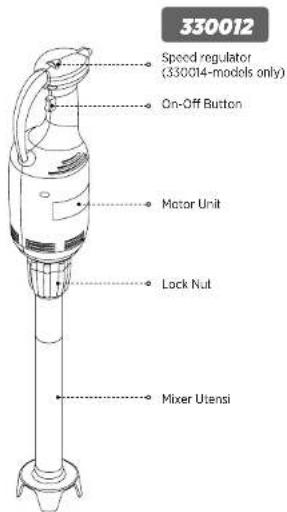
text_image
330012 Speed regulator (330014-models only) On-Off Button Motor Unit Lock Nut Mixer UtensiMax Pro
text_image
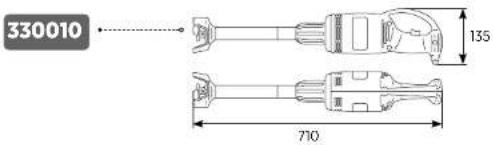
330010 135 710
text_image
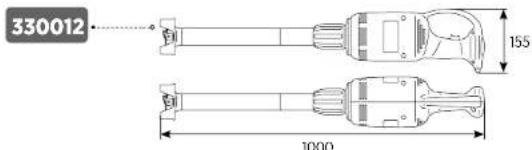
330012 155 1000
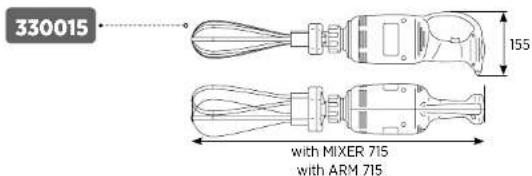
text_image
330015 155 with MIXER 715 with ARM 715
| Model Power Supply Power Revolution Net Weight Packaged Weight | |||||
| 330010 230V 50/60Hz | IPn 0,25 KW 13000 rpm 2,2 Kg 3,4 Kg | ||||
| 330015 | 230V 50/60Hz IPn | 0,4 KW | 1000 rpm | 4.5 Kg | 6 Kg |
| 330012 230V 50/60Hz | IPn 0,4 KW 11000 rpm ? | ? | |||
Overall Dimensions
Packaged Dimensions
| Model | A | B | C |
| 330010 | |||
| 330015 | |||
| 330012 |
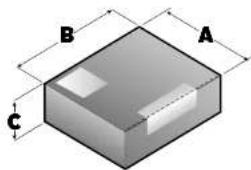
text_image
B A C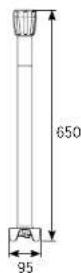
330012 ARM
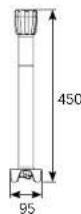
330015 ARM
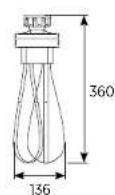
MIXER
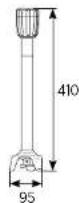
330010 ARM
Max Pro
Safety Devices
text_image
330010 3 Forced retention on button: Releasing the button cuts off power to the utensil and turns it off, stopping the utensil Switch protection: The protection protects the operator from accidentally starting the utensil in normal work conditions.Safety information
- Careful consultation of this manual before installation and use is essential. Continual observance of the indications found in the manual guarantee personal and machine safety.
- Never tamper with safety devices for any reason.
- Strict observance of the work safety regulations issued by the responsible organisations in each country is strongly recommended.
- The manufacturer is not liable for damages to persons or things due to the neglect of safety regulations.
- Correct machine placement, illumination and cleanliness are important conditions for personal safety.
- Do not expose the machine to the elements.
• Machine connections and start-up must only be performed by specialised technicians. - Make sure that the system specifications of the room where the machine is installed correspond to the information printed on the plate.
- Make sure the machine is connected to a grounding system.
• The work area around the machine must always be kept clean and dry. - Use the garments foreseen by work safety regulations.
- This utensil must only be used for its specific purpose; any other use is considered improper and therefore hazardous.
-
Check the suitability and weight of products to be processed; do not overload the machine.
-
Introducing objects, tools, hands or other things within hazardous parts is forbidden.
- Keep the machine away from children.
- Disconnect the power cord from the electrical socket when the machine is not in use.
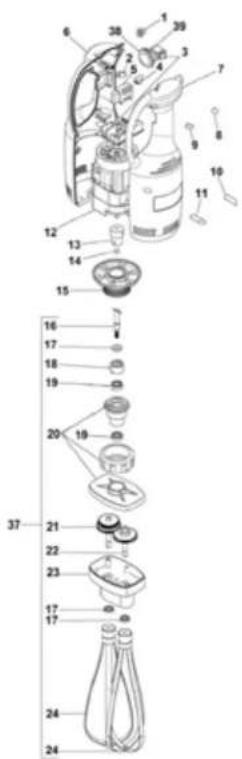
• In the event of malfunctions and/or problems, do not attempt to repair the machine. Contact the authorised dealer. - Use original spare parts.
- Before cleaning the machine, disconnect the power supply by unplugging the machine.
- Do not clean with high-pressure jets of water.
Residual risks
In accordance with point 1.7.2 "Residual risk warnings" in Machine Directive 98/37/EC and further amendments, please note that the safety guards, constructed in accordance with said Directive, do not completely eliminate cutting and trapping risk to upper limbs.
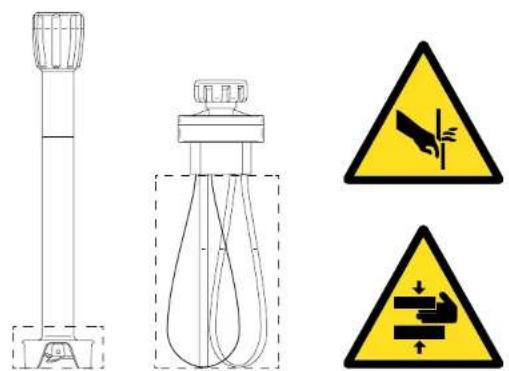

DANGER-WARNINGS: Never near upper limbs or other body parts to the indicated utensil area when inserted in the motor unit. Only clean utensils removed from the motor unit.
Max Pro
Installation Information
Packing and Unpacking
The machine is packaged in cardboard with polyester foam inserts to guarantee full integrity during transport.
- Handle the packaging according to the instructions.
- Open the packaging and check the integrity of all components. Keep packaging for future moves.
- Lift the machine as indicated and place it in the installation area.
Installation Area
The arranged area must be suitably illuminated and an electrical socket must be available. The resting surface must be sufficiently ample, even and dry. The fry top must be installed in rooms with non-explosive environments. In any case, installation must also be performed in consideration of the work safety laws in force.
Room Conditions Table
| Descriptions Values | |
| Working temperature 0-35 | °C (32-95 °F) |
| Storage temperature -15 / +65 | °C (-6.8 / +149 °F) |
| Relative humidity Maximum 80% with 20 °C room temperatureMaximum 50% with room temperature between 20+60 °C | |
| Dustiness Less than 0.03 g/m2 | |
Electrical Connections
Verify the efficiency of the grounding system in the building. Make sure that line voltage (V) and frequency (Hz) correspond to those of the machine (See the identification plate and wiring diagram). The machine is equipped with an electrical cord that connects to a multipolar plug. The plug is to be connected to a wall switch equipped with a circuit breaker.
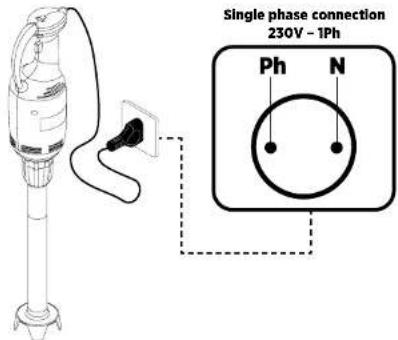
text_image
Single phase connection 230V - 1Ph Ph N
DANGER-WARNING:
Electrical connections to the supply mains must be performed by specialised personnel.
Use and Cleaning Information
Control Descriptions
1) On-Off Button: Press the button to start the machine. Release to stop the machine.
2) Speed adjustment knob (330015 model only): The speed adjustment knob both adjusts utensil speed and directly by-passes to maximum machine speed. To switch from one condition to another, rotate the knob one notch.
a) Adjustable speed (only use with the whip utensil): - 330015, it is marked:


b) Maximum speed (only use with the mixer utensil): - on both 330012 models, it is marked:


Mixer Use
- Insert the mixer utensil in the motor unit and tighten the utensil lock nut.
- Connect the motor unit to the power plug.
- For 330012 models, turn the speed adjustment knob.
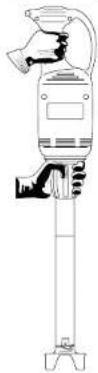
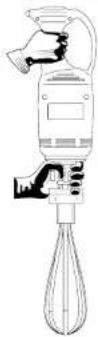
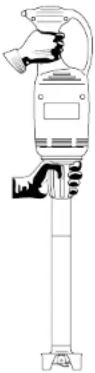
- Firmly hold the mixer lock nut with one hand and the motor unit handle with the other.
- Insert the mixer in the container with the product to be processed.
- Press the on button being careful not to near hands or any other part of the body to the area where the mixer blades are located.
- When finished, release the on button to stop the utensil and remove the utensil from the container.

DANGER-WARNING: Never near upper limbs or other parts of the body to the area where the mixer utensil blade is located when inserted in the motor unit. Only clean utensils removed from the motor unit.
Max Pro
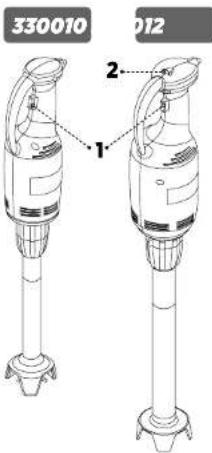
text_image
330010 012 1 2330012
Max Pro
Whip Use
- Insert the whip utensil in the motor unit and tighten the utensil lock nut.
- Connect the motor unit to the power plug.
- For mod. 330015, turn the speed adjustment knob to a number between 1 and 10.
- For model 330015, turn the speed adjustment knob.
- Firmly hold the mixer lock nut with one hand and the motor unit handle with the other.
- Insert the whip in the container with the product to be processed.
- Press the on button being careful not to near hands or any other part of the body to the area where the whips are located.
- Rotate the speed adjustment knob to select the best rotation speed for the process.
- When finished, release the on button to stop the utensil and remove the whip utensil from the container.
Recommendations for Use
- Use the mixer utensil in containers, making sure to rest the protective blade hood on the bottom so that processing product never exceeds the maximum level notch on the utensil (2/3 of the accessory).
- Use the whip tool in containers, making sure never to rest the two whips on the bottom and so that the gear box is always out of the processing product.
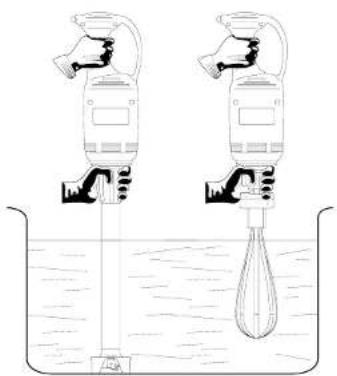
natural_image
Diagram of two identical mechanical devices in a container with liquid, no text or symbols present
INFORMATION: Be very careful never to submerge the whip utensil gear box in processing product to avoid damaging the gear unit inside.
330015
End of the Day Cleaning
- Unplug the motor unit from the power socket.
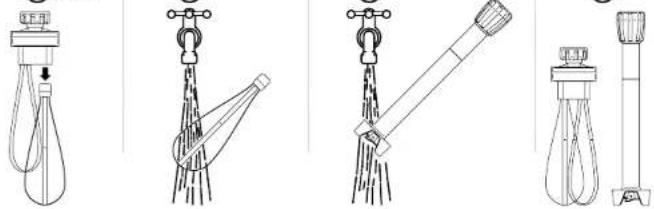
- Remove utensils from the motor unit!
- Remove the whips from the whip utensil and wash them under running water (only when the utensil is removed from the motor unit): ^2
- Wash the mixer utensil under running water (only when the utensil is removed from the motor unit).
- Hang the utensils with the mixer ends (mixer blade or whips) facing down. ^4
- Clean external motor unit parts with a damp sponge and dry (only perform this operation when unplugged from the power socket).
- Do not use metallic pads and abrasive detergents.
- Accurately clean using neutral products.
①234
natural_image
Five line drawings of different types of spray sprinklers or levers, shown from different angles (no text or labels present)Extended Periods of Disuse
- For extended periods of disuse, unplug the utensil from the power socket, clean the utensil and cover it with a cloth to protect if from dust.
Problems, Causes, Solutions
• In the event of breakdown or malfunctioning, turn off the wall fuse and contact your Dealer's service centre.
- Avoid dismantling internal machine parts.
| Problem Cause Solution | ||
| The machine does not start | Main switch off Trun on main switch to "I" | |
| No power reaches the motor unit Contact your dealer's service centre | ||
Max Pro
Max Pro
Max Pro®
330012 330015
text_image
Exploded view diagram of a spray bottle with numbered parts for identification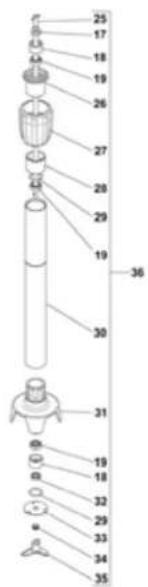
text_image
Labeled diagram of a laboratory apparatus with numbered parts, likely for scientific or technical reference.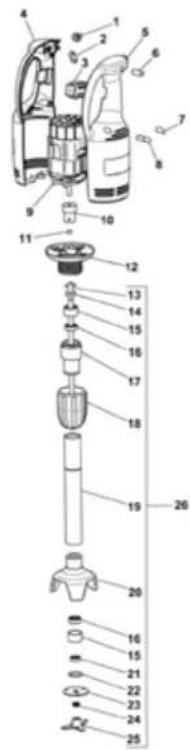
text_image
Exploded view diagram of a mechanical device with numbered parts for identification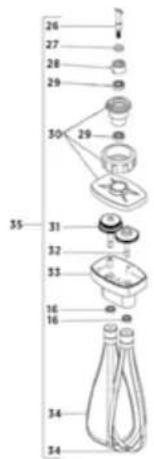
text_image
Labeled diagram of a food item with numbered parts, likely for a recipe or cooking step.330010
Max Pro

natural_image
Four Max Pro spray machines shown from different angles, no visible text or labels on the devices themselves.Emploi et Entretien
FR
Contents
1- INFORMATIONS GENERALES
The mixer range is made up of the following models:
natural_image
Product photo of a Max Pro spray gun, a micrometer, and a whisk (no visible text or symbols)Informations Generales
| Noise Level < 70 dB(A) | |
| Installation Appareil à utilisation manuelle | |
| Protection Level IPX3 | |
| Electrical Shock Protection Classe II | |
| Conformité aux Directives 93/68/EC - 98/37/EC - 2003/108/EC - 2002/72/EC - Regulation (EC) nr 1935/2004 - 2004/108/EC - 2006/95/EC | |
Max Pro
natural_image
Line drawing of a handheld electric drill bit connected to a power outlet (no text or symbols)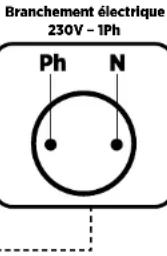
DANGER - ATTENTION: Never near upper limbs or other parts of the body to the area where the mixer utensil blade is located when inserted in the motor unit. Only clean utensils removed from the motor unit.

text_image
330010 012 1 2330012
Max Pro
natural_image
Two identical mechanical devices with handles and a central vertical post, submerged in liquid (no text or symbols visible)
natural_image
Line drawings of five different types of spray sprinklers or pumps, shown from different angles (no text or labels present)Inconvénients, Causes, Remèdes
text_image
Labeled diagram of a bottle disposal or cleaning device with numbered parts for identification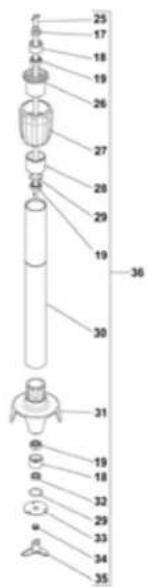
text_image
Labeled diagram of a mechanical device with numbered parts, likely a valve or pump assembly.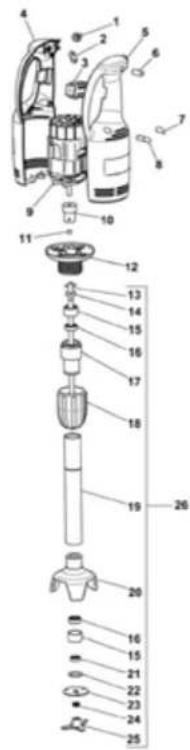
text_image
Exploded view diagram of a mechanical device with numbered parts for identification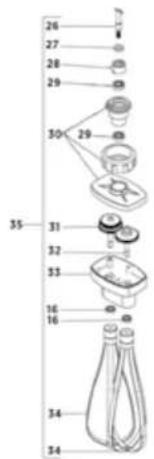
text_image
Labeled diagram of a food item with numbered parts, likely for a recipe or cooking step.330010
Max Pro

natural_image
Four Max Pro spray machines shown from different angles, no visible text or labels on the devices themselves.natural_image
Product photo of a Max Pro spray gun, a vertical stirrer, and a whisk (no visible text or symbols)Technical Specifications
natural_image
Two identical mechanical devices in a beaker with liquid, one holding a droplet (no text or symbols visible)
natural_image
Simple line drawing of a faucet with a handle and lever, no text or symbols present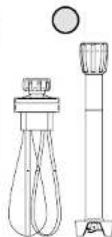
text_image
Exploded view diagram of a spray bottle with numbered parts and exploded view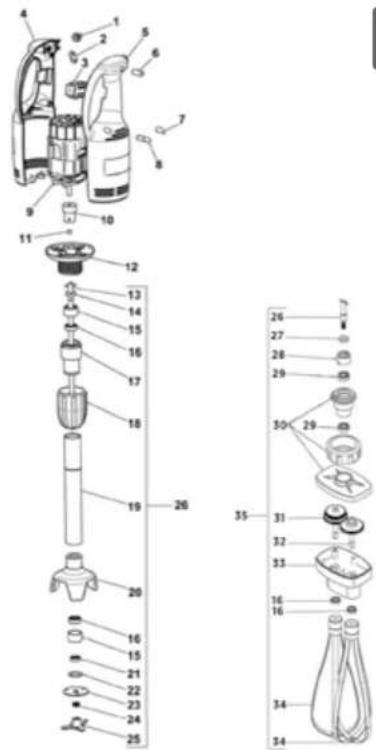
text_image
Exploded view diagram of a spray gun with numbered parts for identification330010

text_image
Max Pro®Professional Hand Blender
www.emga.com
After Sales Support and Service Center
EMGA International B.V.