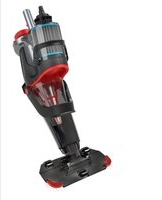
EV60 - Vacuum Cleaner KOKIDO - Free user manual and instructions
Find the device manual for free EV60 KOKIDO in PDF.


| Product Type | Cordless Electric Pool Vacuum |
| Brand | KOKIDO |
| Model | EV60 |
| Power Supply | Built-in Rechargeable Li-ion Battery |
| Power Adapter | External, detachable (charging plug included) |
| Charging Time | 5 to 6 hours (first full charge recommended) |
| Runtime | Up to 75 minutes in normal use |
| Maximum Operating Depth | 3 meters |
| Water Temperature | 5°C to 42°C |
| Filtration | Main filter cone + Cartridge filter for fine debris |
| Special Functions | Leaf-Out™, Sand-Out™, Floc-Out™ (for flocculant and silt) |
| Included Accessories | Charging plug, external adapter, filter cone, cartridge filter, garden hose adapter, instruction manual |
| Main Material | Durable plastic with waterproof seals |
| Safety | Use with residual current device (GFCI/RCD) recommended; shuts off in case of overheating or malfunction |
| Routine Maintenance | Regular filter cleaning, rinse with fresh water after each use |
| Storage | In a dry, ventilated place, away from sunlight and heat sources; charge to 30-50% before storage |
| Warranty | Limited warranty (see manual); does not cover normal wear, accidental damage, or misuse |
Frequently Asked Questions - EV60 KOKIDO
User questions about EV60 KOKIDO
0 question about this device. Answer the ones you know or ask your own.
Ask a new question about this device
Download the instructions for your Vacuum Cleaner in PDF format for free! Find your manual EV60 - KOKIDO and take your electronic device back in hand. On this page are published all the documents necessary for the use of your device. EV60 by KOKIDO.
USER MANUAL EV60 KOKIDO
natural_image
3D rendering of a vacuum cleaner assembly (no visible text or symbols)Remark: Depending on the model you own, accessories/ parts shown in this manual are not necessarily included in every model.
Product/parts in photos/drawings may vary with the model purchased. Check the spare parts drawing to understand the parts included in your model purchased.
SAFETY WARNINGS & INSTRUCTIONS
Information contained in this Instruction Manual will help you operate the item safely, protect yourself and others from hazards, and prevent damage to the device and other property.
SAVE THESE INSTRUCTIONS
WARNING!
- This is not a TOY. Children should be kept out of reach from this pool vacuum and its accessories.
- Never allow children to operate this pool vacuum.
- This appliance is not intended for use by persons with reduced physical, sensory, mental capabilities, or a lack of experience and knowledge, unless they are given supervision or instructions concerning the safe use of the appliance and understand the hazards involved by a person responsible for their safety.
- Children must not play with this product.
- Cleaning and maintenance of the pool vacuum must not be carried out by children.
- Make sure the pool vacuum is fully immersed in the pool before initiating operation. The minimum water level required to operate the pool vacuum must cover the entire pool vacuum. Operating the pool vacuum when it is not immersed correctly could damage the unit and void the warranty.
- Maximum operating depth in water is 3 meters (9.8ft).
- Maximum water temperature: 5^ C ( 41^ F) – 42^ C ( 107.6^ F).
- ▶□Detachable supply unit (external adaptor).
- The pool vacuum should only be recharged with the external adaptor and charging plug delivered with this product.
- For the purposes of recharging the battery, only use the detachable supply unit that provided with this pool vacuum to charge the battery.
- Connect the external adaptor to a power source through a residential current device (RCD) / a ground fault circuit interrupter (GFCI). If in doubt, consult a qualified electrician.
- Do not use this pool vacuum if any damage is detected.
- Replace damaged parts with ones that are certified by the distributor or manufacturer.
- Turn off the power, disconnect the external adaptor from the power source, and unplug the external adaptor from the charging plug before detaching the pool vacuum from the charging plug.
- Disconnect the pool vacuum from the supply mains and make sure the pool vacuum is OFF prior to carrying out regular maintenance – such as cleaning the filter and the charging pins.
- Do not attempt to replace the installed rechargeable Li-ion battery pack.
- DO NOT handle the pool vacuum, external adaptor, and charging plug while it is charging with wet limbs and without shoes.
- Ensure that children do not attempt to access the pool vacuum while it is operating.
- DO NOT use this pool vacuum without an intact filter cone in place, as your warranty will be voided as a result.
- Suction entrapment hazard: This pool vacuum generates suction. Do not allow hair, body, or any loose parts of your clothing to make contact with the suction hole of the pool vacuum during its operation.
- Never insert body parts, clothing or other objects into the openings and moving parts of the pool vacuum.
- DO NOT use this pool vacuum to pick up any toxic substance, flammable, and combustible liquids (i.e. gasoline) in the presence of explosive or flammable fumes.
- Under no circumstances should you attempt to disassemble the pool vacuum and replace the impeller, motor, and battery by yourself.
- Never insert fingers or any object to touch the impeller.
- The built-in battery must be removed by a skilled technician before it is scrapped.
- This pool vacuum contains a battery that are only to be removed by skilled persons.
- The pool vacuum must be disconnected from the supply mains as the battery is removed.
- For details regarding battery recycling/disposal, refer to the section "BATTERY DISPOSAL" in this manual and contact your local authorities for more information.
- The battery must be disposed safely in accordance with local ordinances or regulations.
- External adaptor and charging plug:
- Never use the external adaptor and charging plug for anything other than charging the battery of the pool vacuum that is supplied in the same pack.
- The external adaptor and charging plug should not be used outdoors, nor should it be exposed to rain, humidity, and any liquid or heat.
- The transformer (or external adaptor) is to be located outside zone 1.
- Keep the external adaptor and charging plug out of reach of children.
- Never use the external adaptor and charging plug if any damage is detected.
- DO NOT handle the external adaptor and charging plug with wet hands.
- DO NOT handle the pool vacuum, external adaptor, and charging plug while charging with wet hands and without shoes.
- Keep the external adaptor disconnected from power when it is not in use.
- Never attempt to open the external adaptor and charging plug.
- If the supply cord of the external adaptor is damaged, the external adaptor must be replaced by the manufacturer or its service agent to prevent hazards of any kind.
- Make sure the pool vacuum and the charging plug are completely dry before charging.
CAUTION!
- This pool vacuum is designed for underwater use only; it is not an all-purpose vacuum cleaner. DO NOT attempt to use it to clean anything other than your pool / spa.
- Use only original accessories delivered with this product.
- DO NOT use this pool vacuum right after pool-shocking. It is recommended to leave the pool circulating for at least 24-48 hours.
- If you are planning on using the pool vacuum in a saltwater pool, make sure all salt are dissolved before deploying the pool vacuum.
- DO NOT use this pool vacuum with another automatic cleaner/cleaner simultaneously in the pool/spa.
- Avoid picking up hard, sharp objects with this product. They may damage the pool vacuum and filter.
- Exercise caution when cleaning pool stairs.
- To avoid damages to the external adaptor and charging plug, do not attempt to carry the pool vacuum by the cord of external adaptor / charging plug or pull the cord to disconnect it from the power source and charging plug.
- Charge the pool vacuum indoor in a clean, dry area with good ventilation and an ambient temperature between 5°C (41°F) and 30°C (86°F).
- DO NOT leave the pool vacuum charged for over 10 hours.
- If the pool vacuum will not be used for an extended period, detach it from the charging plug and use a damp cloth to clean and dry the pool vacuum and accessories. Make sure to charge the pool vacuum to about 30% to 50% of the battery capacity before it is stored. Store in a well-ventilated area away from sunlight, heat, ignition sources, pool chemicals, and children. Never leave the pool vacuum plugged in for long-term storage. Recharge the pool vacuum every three months.
Above warnings and cautions are not intended to incorporate all possible instances for risks and / or severe injuries. Pool / spa owners should always exercise extra caution and common sense when utilizing the product.
GETTING STARTED
Charging The Battery
IMPORTANT NOTE: Fully charge the pool vacuum (about 6 hrs) before using it for the first time.
WARNING!
- Use only the original external adaptor and charging plug provided.
- Make sure the pool vacuum and the charging port are clean and dry before set-up and charging. (TIPS: use a cotton bud to dry the charging port and charging pins)
- Charging must be done indoors, in a well-ventilated area away from sunlight, children, heat, ignition sources, and with an ambient temperature between 5°C (41°F) and 30°C (86°F).
- Never use the external adaptor and charging plug if any damage is detected.
- The charging pins are waterproof. However, remnants of water in the port and around the pins could result in natural occurrence of stains (a byproduct of chemical reaction between water and electric currents). Otherwise, the stains can be removed by light scrubbing with a cotton bud soaked with juice of lemon or vinegar.
-
Make sure that the pool vacuum is turned off prior to charging.
-
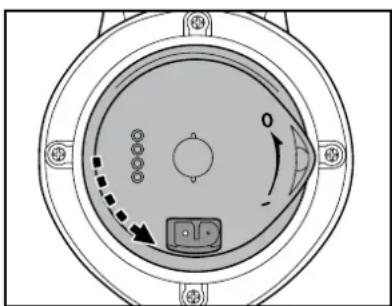
Place the unit on a flat surface. Set the pool vacuum to Power Off / Charging Mode by turning the switching knob anticlockwise until it clicks and completely exposes the charging port.
natural_image
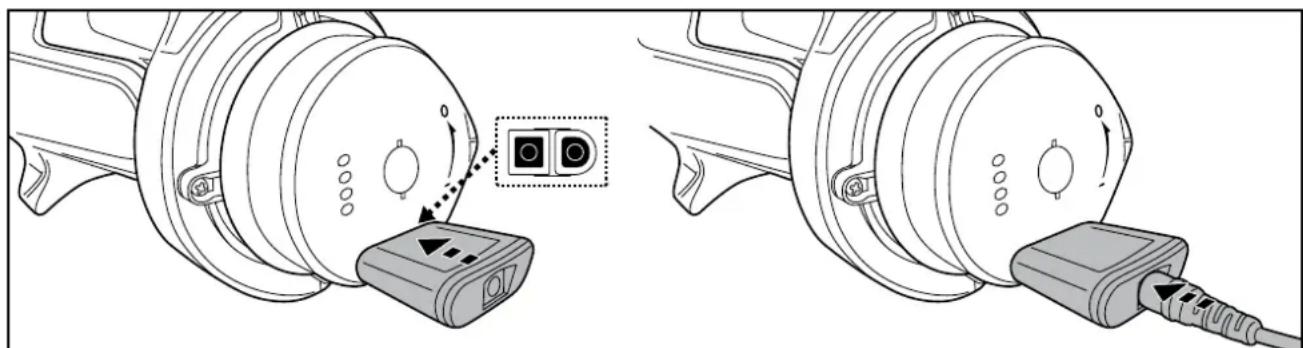
Circular mechanical component with internal components and directional arrows, no visible text or symbols- Align and insert the charging plug to the charging port.
WARNING! Be sure not to invert the charging plug and ensure both the charging plug and charging port are clean and dry before charging them. TIPS: Use cotton bud to dry the charging port and pins. Plug the charging cable of the external adaptor into the charging plug.
natural_image
Technical line drawing showing two mechanical components with a connector, one emitting a circular icon and the other inserted into a plug (no text or symbols present)- Connect the external adaptor to the power source. The indicator light on the external adaptor will turn red when the vacuum is charging and green when it is fully charged. Charge it for 5-6 hours for best performance.
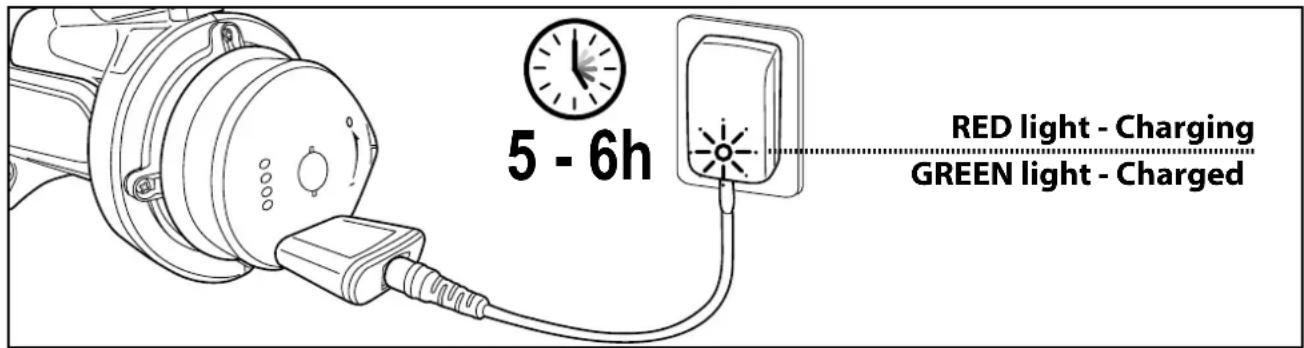
NOTE: if the motor is generating noise, turn off the unit by positioning the switching knob to Power Off/Charging Mode position.
- Immediately disconnect the external adaptor from the power source if you detect any of the following:
- Offensive or unusual odor
- Excessive heat
- Deformation, cracks, leaks
-
Smoke
-
When charging is complete, disconnect the external adaptor from the power source and detach the charging plug from the unit and external adaptor.
Normally, the pool vacuum can operate up to 75 minutes on a full charge (charged for 5-6 hours).
Note: Clean the cartridge filter/filter cone regularly. Excessive debris inside the cartridge filter /filter cone increases the burden to the motor operation and shortens the operating duration as a result.
FACT: Rechargeable Lithium-Ion battery is classified as a consumable item. It has a limited life and will gradually lose its capacity to hold a charge. Therefore, running time of the pool vacuum will gradually reduce through repeated charging and discharging in operation.
Once the lifespan of the battery reaches its end, refer to section "BATTERY DISPOSAL" for instructions regarding battery disposal.
NOTE: Let the pool vacuum rest for 30 to 40 minutes before charging it again.
Set-Up Before Use
This pool vacuum is equipped with a filter cone for cleaning general debris like leaves and larger particles on the pool bottom. Additional cartridge filter and garden hose adaptor to clean fine debris, silt and flocculant.
Set-up for LEAF-OUT™ and SAND-OUT™ function Cleaning fine debris (with cartridge filter)
This is intended for picking up fine debris (i.e., leaf, sand, fine dust etc.)
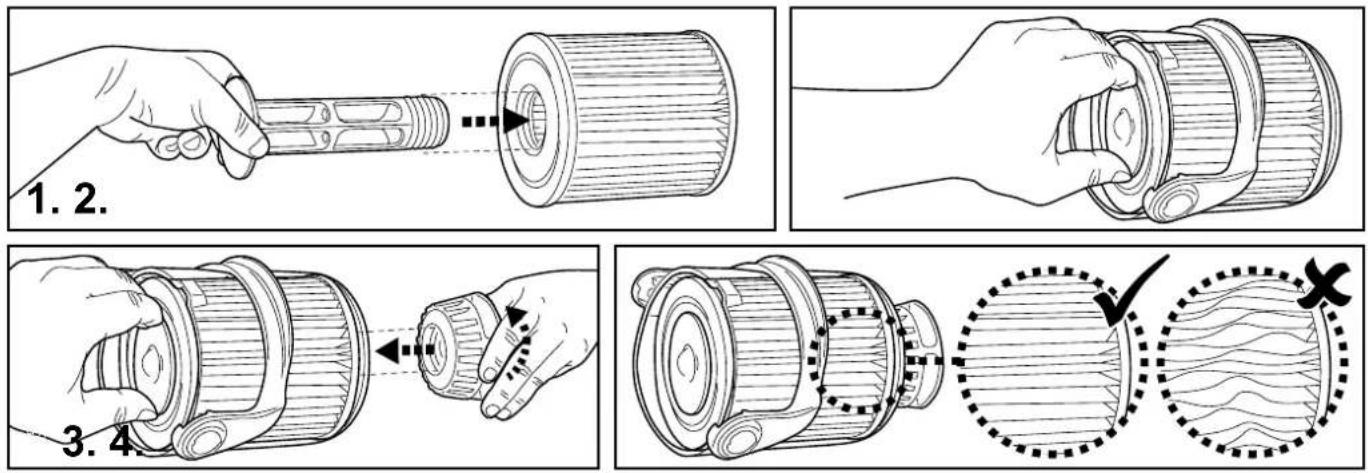
WARNING! do not overtighten the threaded valve.
natural_image
Technical line drawing of a mechanical assembly (no text or symbols)Set-up for FLOC-OUT™ function
Cleaning flocculant and silt
(Only use this set-up for cleaning the flocculant and silt. DO NOT use cartridge filter to clean the flocculant and silt because it will gum up the cartridge and then shorten its life in usage)
1. Connect the garden hose.
You will need a garden hose (not included) with the length at least the distance from the farthest cleaning spot in your pool to the location for discharging the water.
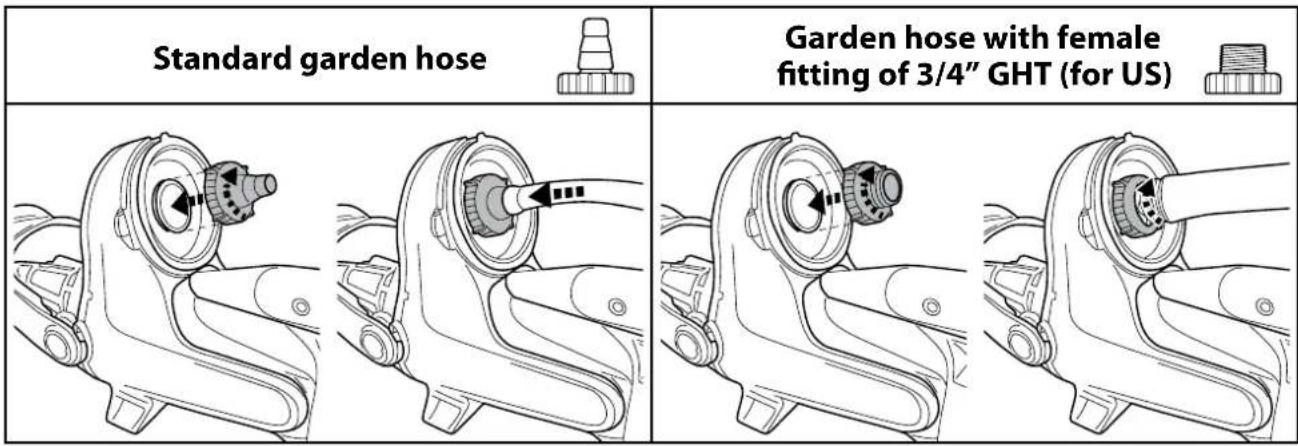
-
Assemble the telescopic pole as instructed in this manual.
-
Align the hose on the pole.
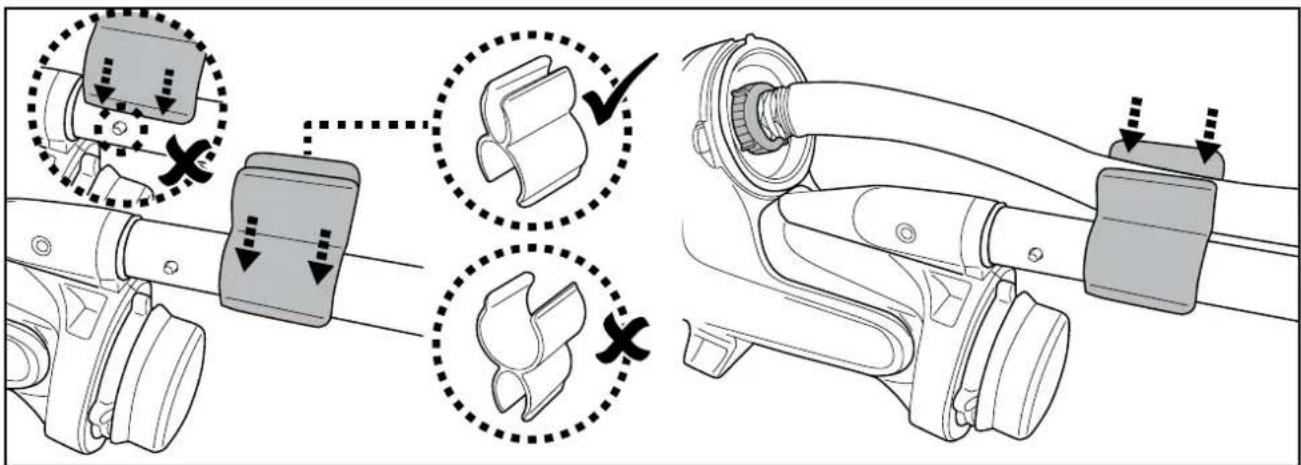
TIPS:
• To prevent the flocculant from floating, not sink to the bottom of the pool, it is advisable to turn off the pump before cleaning.
- To remove the flocculant on the pool bottom, you should use head provided with the pool vacuum and remove brush on side/corner from the suction head.
- When cleaning, it is important to work carefully and slowly to avoid stirring up the flocculant & debris. You will need to take a pause and wait for them to settle down again.
- It may take several rounds of vacuuming to remove all the flocculant & debris. After the first round, allow the debris to sink again and repeat the process to get more clean water.
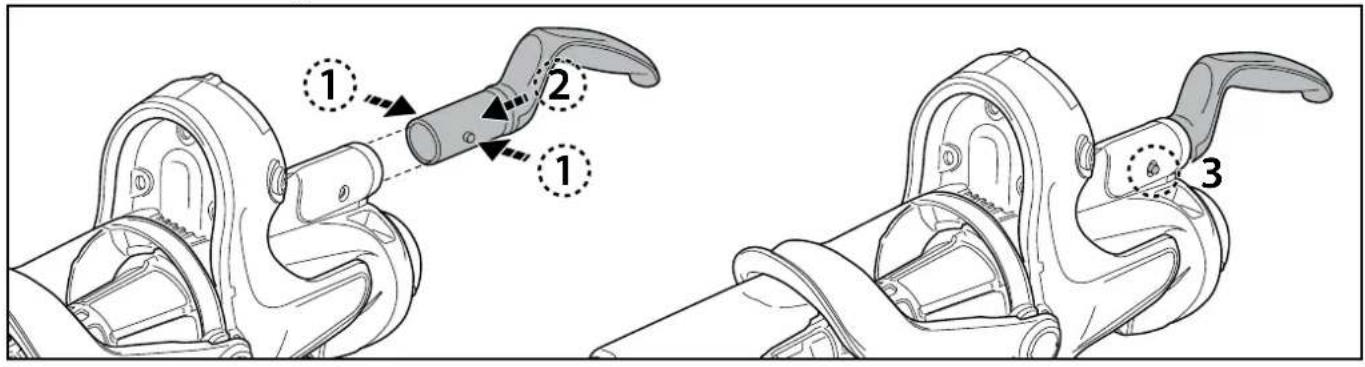
Curved handle assembly
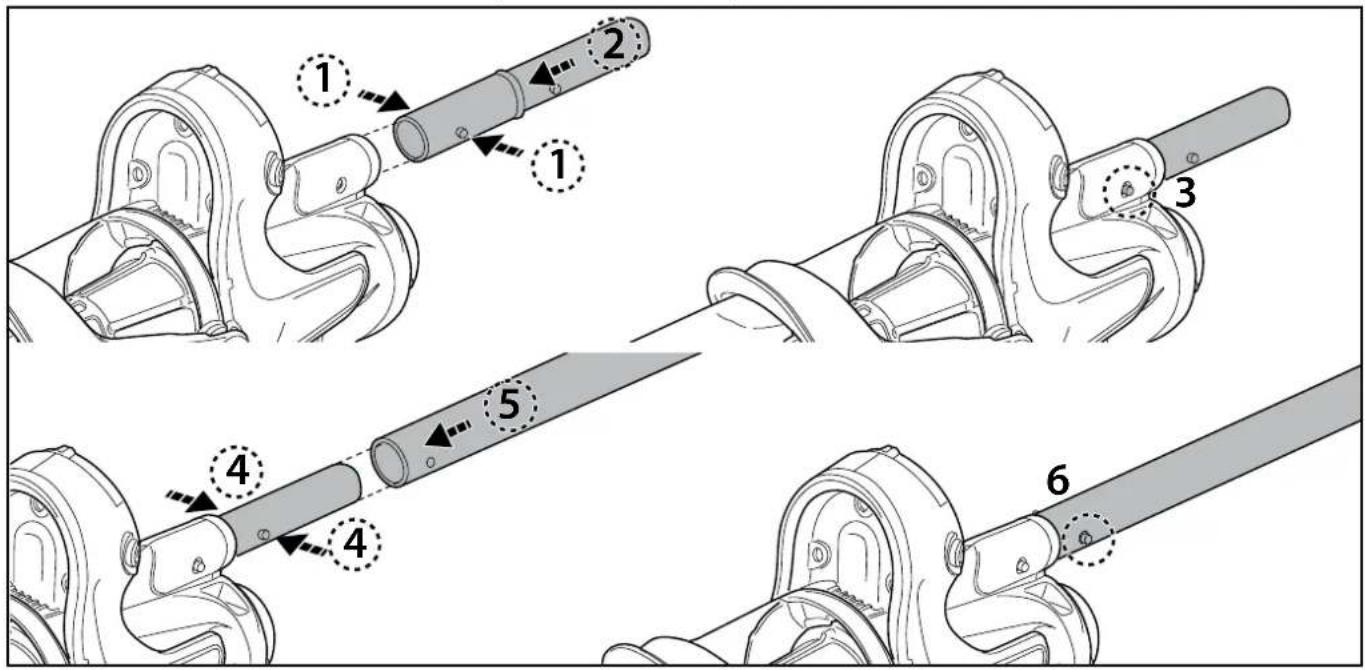
Telescopic Pole (Not Included) Assembly (For EU & USA only)
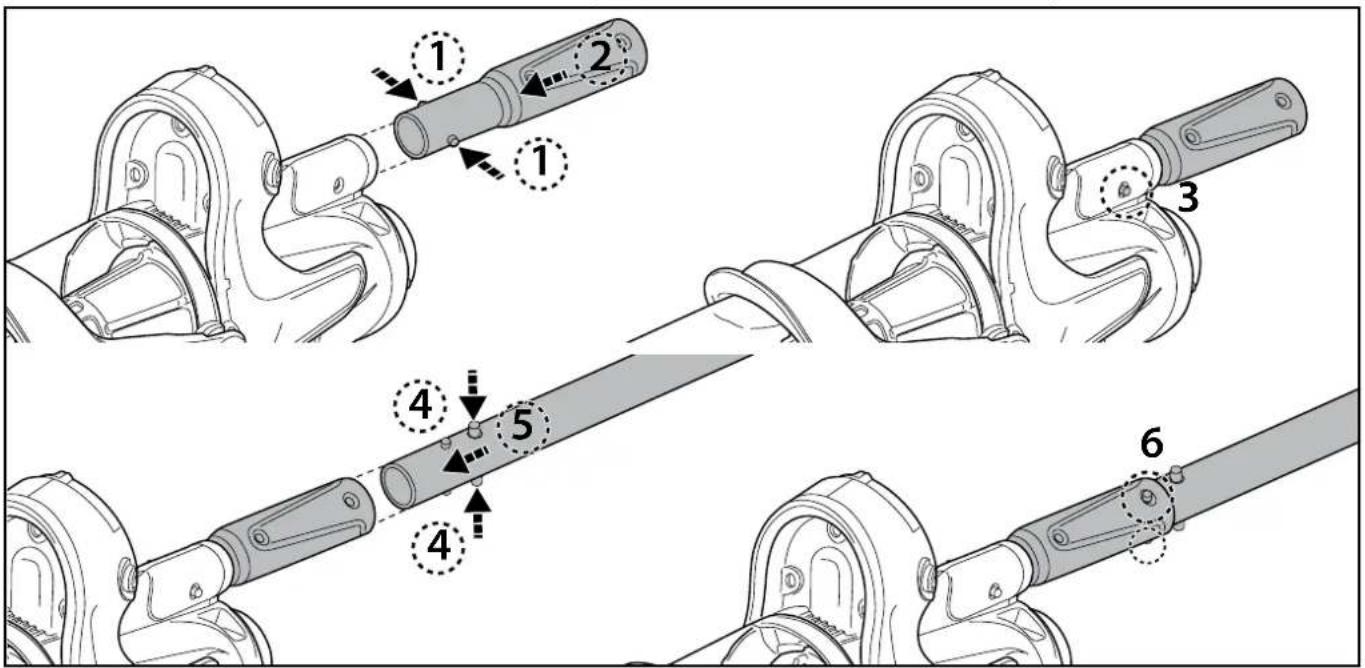
Specific Telescopic pole (not included) assembly (For Australia and New Zealand only)
Pool Preparation
- If there are stones, roots or metal corrosion in contact with the underside of the liner, discard them prior to using the pool vacuum. If necessary, seek assistance from a qualified professional.
- If the liner is brittle, damaged or wrinkled, contact a qualified professional to perform the necessary repairs or perform a liner replacement prior to using the pool vacuum.
- If you are using a saltwater pool, make sure all salt are dissolved before placing the pool vacuum into the water.
OPERATION
WARNING!
- Make sure the pool vacuum is off.
- Do not use the pool vacuum if any damage is detected.
- Oil stain could occur due to possible leakage of lubricants applied to the O-ring.
- Make sure the pool vacuum is fully immersed in the pool before initiating operation. The minimum water level required to operate the pool vacuum must reach above the power ON/OFF switch of the pool vacuum when it is held in a vertical position. Operating the pool vacuum when it is not immersed correctly could damage the unit and void the warranty.
- DO NOT use the pool vacuum without an intact filter cone in place. Using your pool vacuum without an intact filter cone in place will VOID your warranty.
- DO NOT leave the pool vacuum in the water when it is not in use.
- Ensure the charging plug is detached before the pool vacuum is deployed.
1) Bring your pool vacuum to the side of your pool / spa. Immerse the pool vacuum in water and turn the power switching knob clockwise to initiate operation.
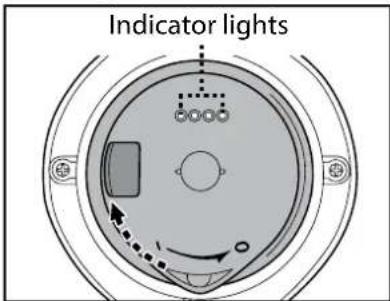
Power indicator lights:
 |  |  |  | Up to 75 minutes left.4 lights ON | ||
 |  |  | 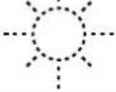 | Last light blinks | Only 10-15 minutes of usage remains once the last light starts blinking. |
CAUTION! Make sure the pool vacuum is always facing downwards when it is placed into the pool. Otherwise, it may bend the pole connector and damage it during the process.
2) To remove the pool vacuum from the pool / spa, turn over the pool vacuum, lift the pool vacuum while pointing it downwards. Water is going to escape via the pole, draining valve on the canister and bottom of the pool vacuum. Turn the pool vacuum to have the draining valve face to the pool to drain the water.
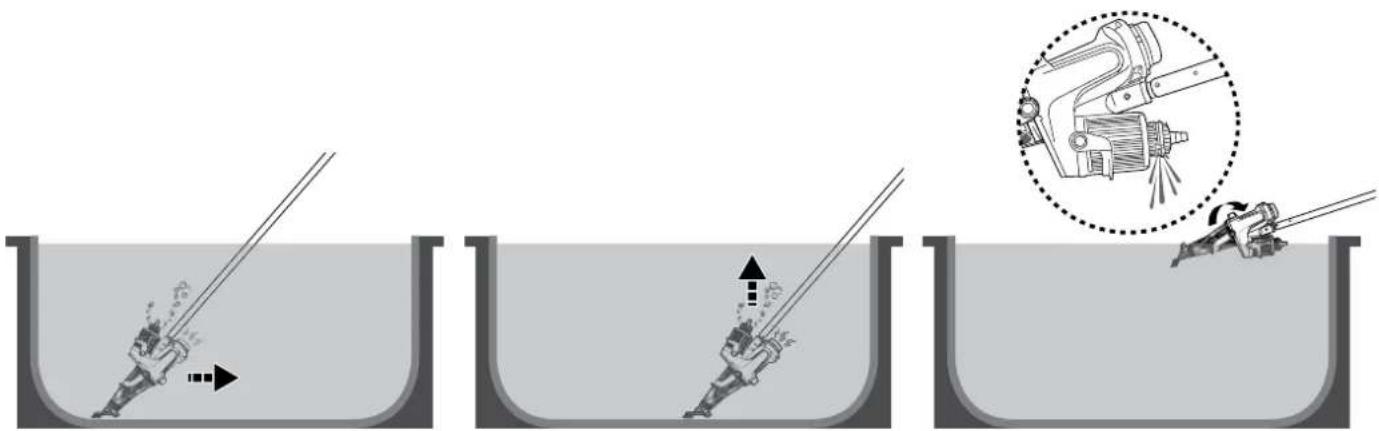
CAUTION! Make sure the pool vacuum is always facing downwards when it is removed from the pool. Otherwise, the pole connector may be bent and damage the pool vacuum in the process.
3) Rinse the pool vacuum with fresh water after every use. DO NOT use any detergent.
Cleaning the filter
WARNING! Using the pool vacuum without a filter cone in place will VOID your warranty.
In order to maximize the cleaning efficiency, be sure to clean the cartridge filter/filter cone before and after each use.
CAUTION! If the pool vacuum is charging, disconnect the external adaptor from the power source and detach the pool vacuum from the charging plug. Make sure the pool vacuum is OFF.
- Cleaning the filter cone
1) Place the pool vacuum on a stable surface.
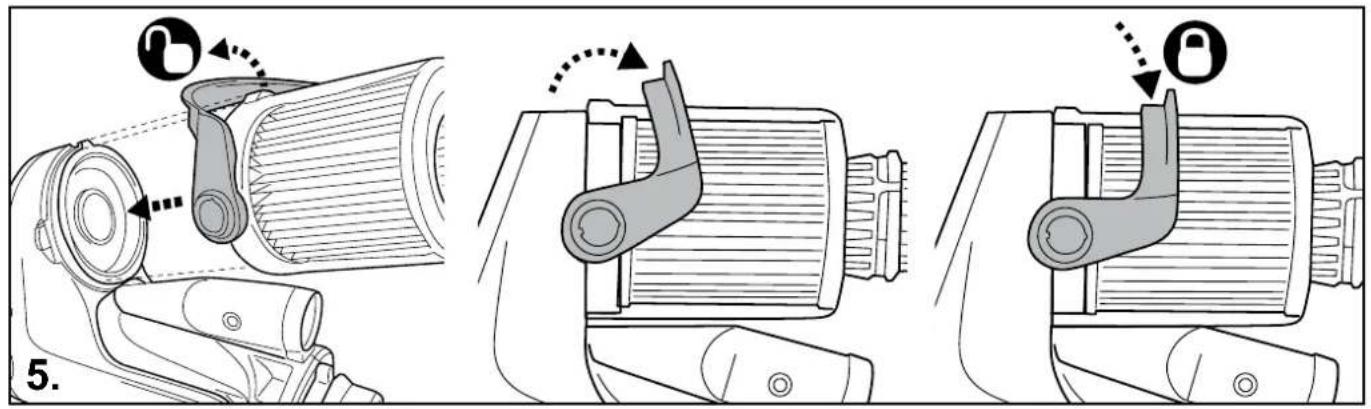
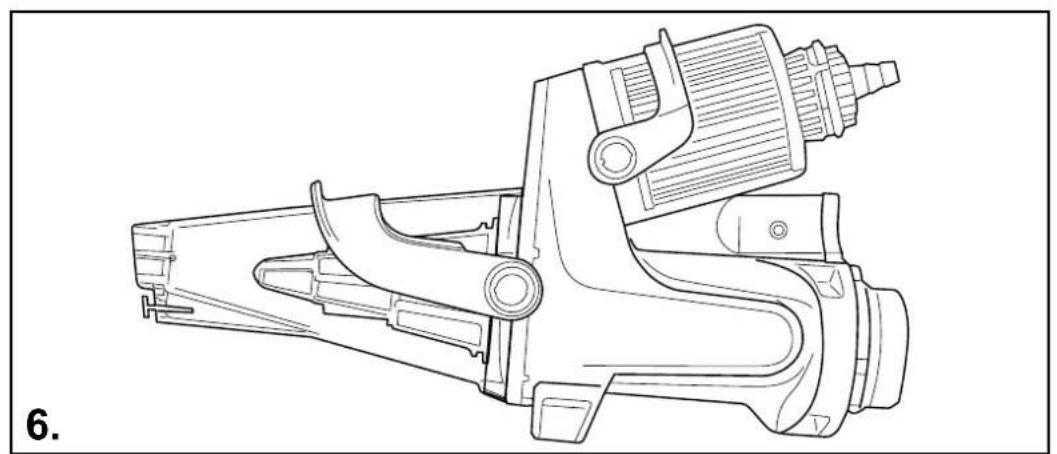
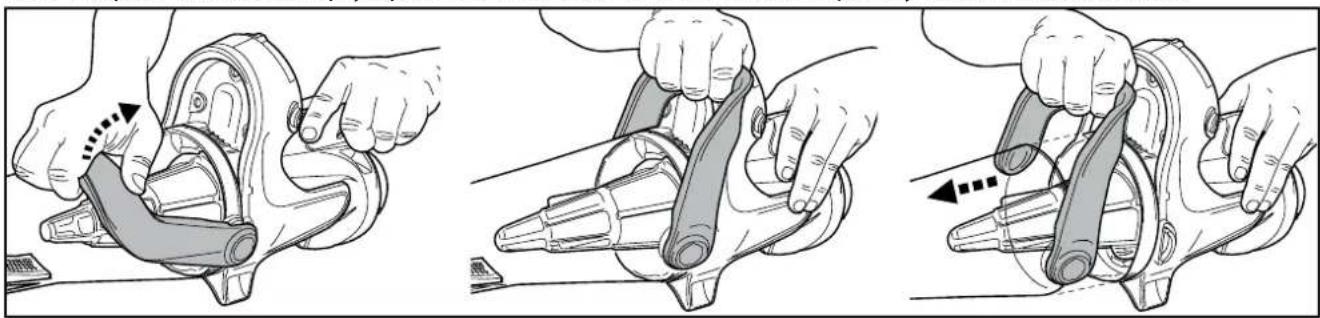
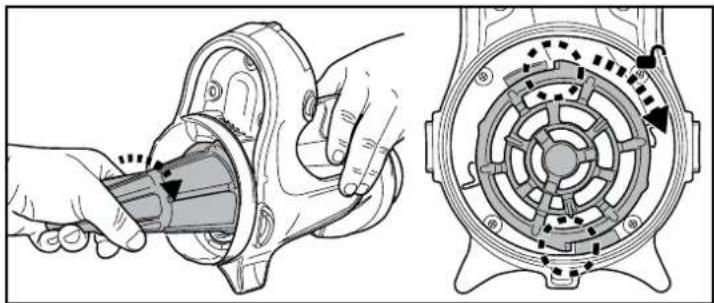
2) Hold the pool vacuum and pry up the canister lever to the end to completely release the side locks.
natural_image
Three-step illustration showing hands using a mechanical device to adjust the component (no text or symbols present)Detach the canister and turn the filter cone clockwise until its side tab out of the notch. Remove filter cone from the cleaner.
CAUTION! Replace the damaged filter cone immediately before the next operation.
natural_image
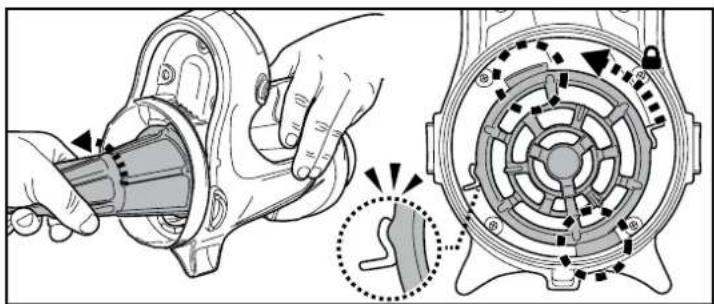
Technical illustration of a mechanical assembly showing hand operating a component and cross-sectional view of the motor (no text or symbols)3) Clean out the debris and rinse the filter cone with water. If brushing is deemed necessary, use only a soft brush to clean the filter cone gently and carefully.
4) Reverse the previous steps to re-assemble the filter cone. Turn the filter cone anticlockwise until its side tab is secured inside the notch on both sides as shown. You will hear a "click" sound.
5) Align and re-assemble the hood to the pool vacuum and make sure the lever is completely pushed down to the hood. You will hear a "click" sound.
natural_image
Mechanical assembly diagram showing hand turning a component into a motor housing with internal gear mechanism (no text or labels)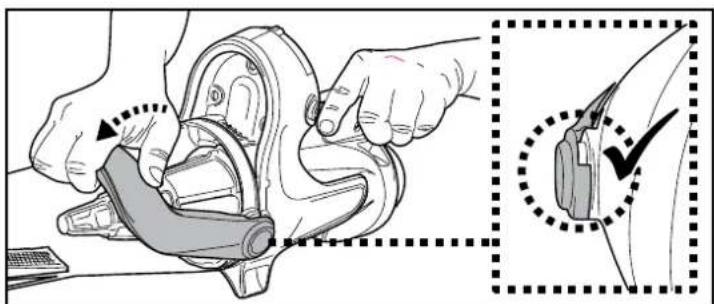
natural_image
Illustration of a hand adjusting a car seatbelt mechanism, with a magnified inset showing the detail (no text or symbols present)- Clean the cartridge filter
Follow the instruction in "Cartridge filter setting" to detach cartridge filter.
Inspect everything for damage and wear. If you find any damages or tears, it's time to replace the cartridge.
It is recommended to wash the cartridge filter with a water jet after each pool cleaning cycle. Spray at an angle to get rid of the debris between the pleats of the cartridge filter. Never use a pressure washer as it will damage the cartridges. If the cartridge is really dirty, soak it in water with detergent for 2-3 hours, then rinse it with a water jet. If brushing is deemed necessary, use only a soft brush to clean it carefully and gently to avoid any damages.
1) Be sure to clean and dry the areas around the charging port and charging pins after every use to avoid the forming of stains (byproduct of a natural chemical reaction between electric current and water). Otherwise, the stains can be removed by light scrubbing with a cotton bud soaked with juice of lemon or vinegar.
2) Battery discharges on its own during storage. Make sure to charge the pool vacuum to about 30% to 50% of the battery capacity before it is stored.
3) You must re-charge the battery at least once every three months when it is not in use.
- Unplug the external adaptor from socket and then unplug the adapter jack from the charging plug.
- Detach accessories from the pool vacuum. If necessary, rinse the pool vacuum and accessories with fresh water. DO NOT use detergent.
- Make sure to drain the water from the unit, handle and pole connector.
- Use a damp cloth to clean and dry the pool vacuum and its accessories.
- Store them in a well-ventilated area away from the sunlight, children, heat, ignition sources, and pool chemicals. Ambient temperature for storage should be 10^ - 25^ (50°F – 77°F). NOTE: A higher temperature may reduce the battery life during storage.
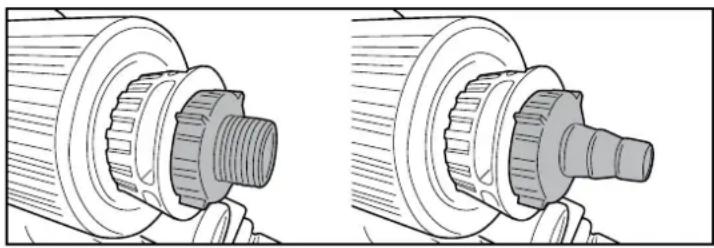
- To better organize the hose connector in storage, screw the connector onto the cartridge valve.
natural_image
Technical line drawing of two mechanical components with gear and shaft assembly (no text or symbols)WARNING!
- Never attempt in any way to disassemble the pool vacuum.
- Under no circumstances should you attempt to disassemble the pool vacuum and replace the impeller, motor and battery by yourself.
CAUTION!
- Excessive heat can damage the battery and reduce its lifespan as a result.
- Consult your dealer regarding battery replacement if the following happens:
- Battery does not charge fully.
- Battery operation time is noticeably reduced. Observe and record the run times of the first few operations (on a full charge). Use these run times as a reference point for comparison with run times in the future.
- The battery must be removed from the pool vacuum before it is scrapped.
- The pool vacuum must be disconnected from the supply mains when removing the battery
- The battery is to be disposed safely and according to local ordinances or regulations.
NOTE: Incorrect maintenance may reduce the battery life and affect its capacity as a result.
BATTERY DISPOSAL
( To be carried out by an authorized technician )
Your pool vacuum battery is a maintenance-free rechargeable lithium-ion battery pack, which must be disposed properly. Recycling is required; please contact your local authority for information.
WARNING! Never attempt to disassemble a battery pack.
- Remove all personal items such as rings, bracelets, necklaces and watches when the battery pack is unwired from the pool vacuum.
- A battery can produce a short circuit current high enough to weld a ring (or similar item) to metal, causing a severe burn in the process.
- Wear complete eye protection, gloves and protective clothing when the battery pack is being removed.
- Avoid touching the wires altogether and avoid allowing them to make contact with any metal items, which could cause sparking and/or short circuit the battery.
- Never smoke or allow a spark or flame in the vicinity of the battery or the pool vacuum.
- Do not expose the battery to fire or intense heat as this may result in an explosion.
CAUTION!
If a battery leak occurs, avoid any contact with the leaking fluids and place the damaged battery in a plastic bag.
- If leaking fluids come in contact with skin and clothing, wash immediately with plenty of soap and water.
- If leaking fluids come in contact with eyes, do not rub eyes, immediately flush eyes with cool running water for at least 15 minutes and do not rub them. Seek medical attention as soon as possible.
How to remove the battery pack for battery disposal only (To be done by authorized technician)
Recommended tools (not included): Flat & Philips screwdriver.
1) Follow abovementioned instruction to detach the canopy and the filter cone. Use Philips screwdriver to unfasten the screws on the front and side as shown.
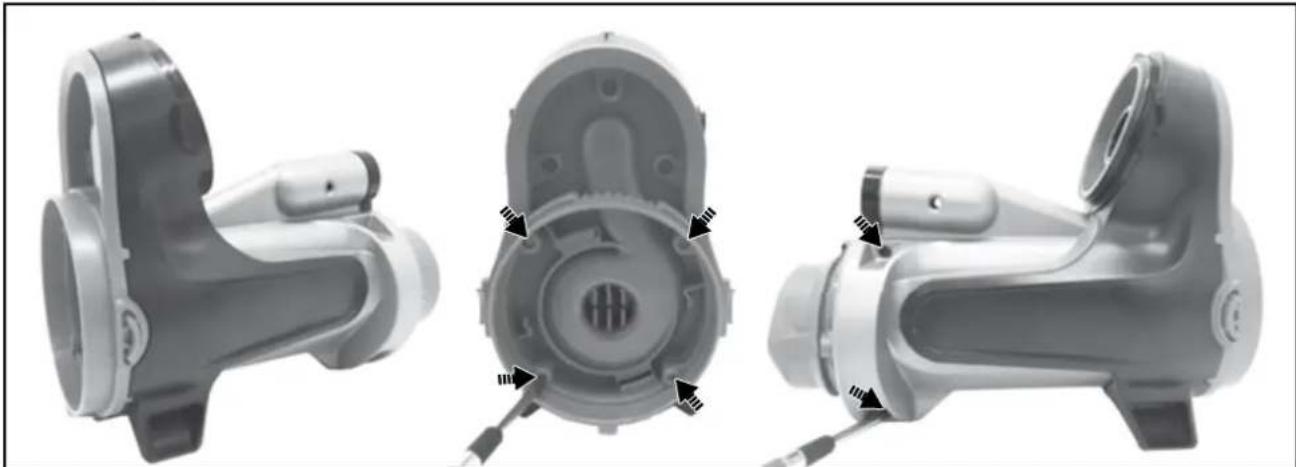
natural_image
Three views of a mechanical device showing internal components and mounting features (no text or symbols visible)2) Use flat screwdriver to pry detach the ring on the top and the end as shown. If it is hard to pry, use cutting plier to cut them.
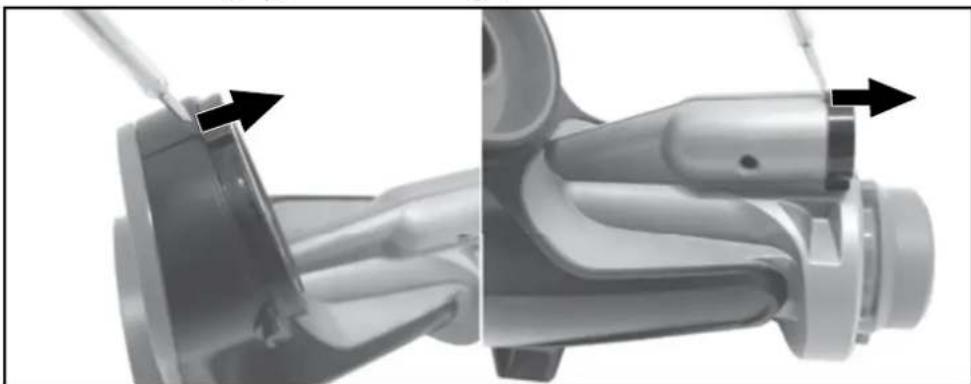
natural_image
Mechanical assembly diagram showing a tool interacting with a component, with no visible text or symbols.3) Use flat screwdriver to pry along the seam behind the front panel. Pull out the inner cover. If necessary, use plier wrench to detach the inner cover. Push the panel rear to detach whole front panel.
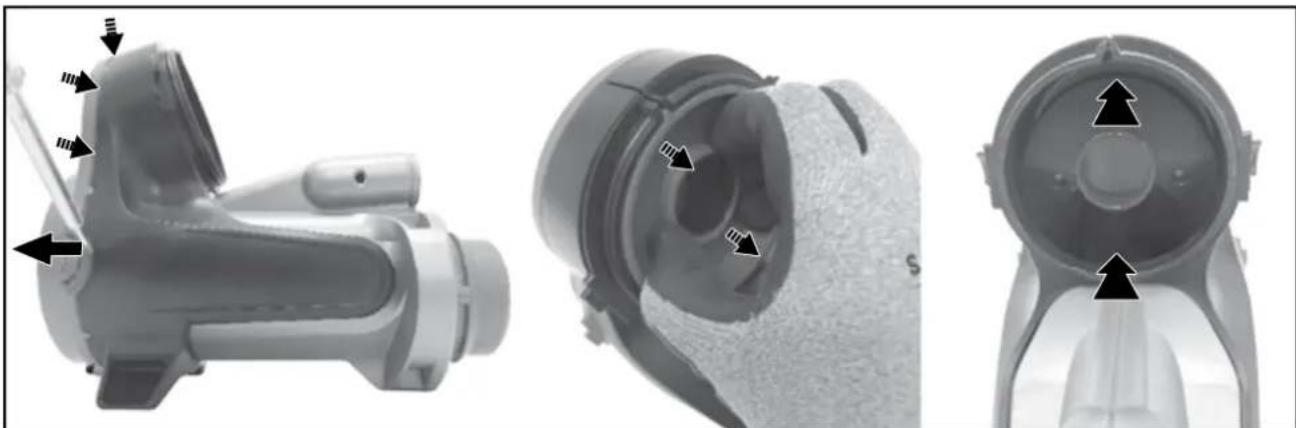
natural_image
Three views of a mechanical device showing internal components and mounting features (no text or symbols visible)4) Use flat screwdriver to pry along the seam to detach both side cover.
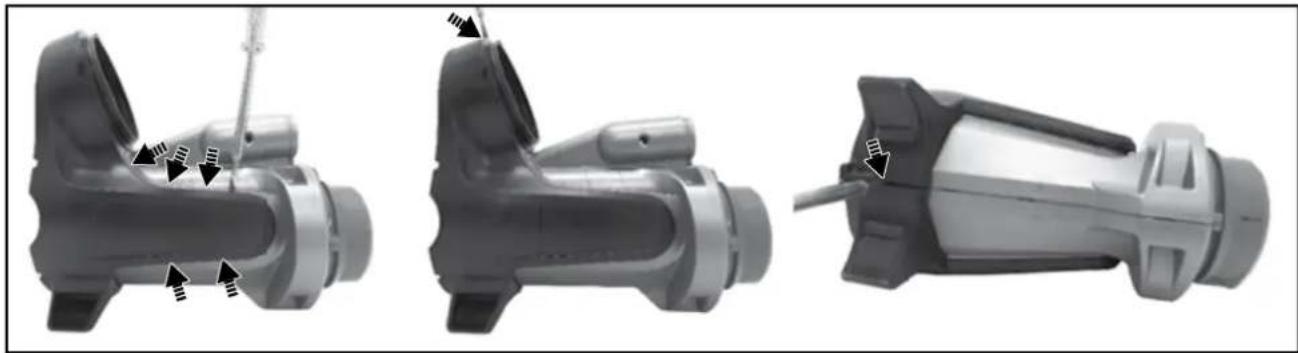
natural_image
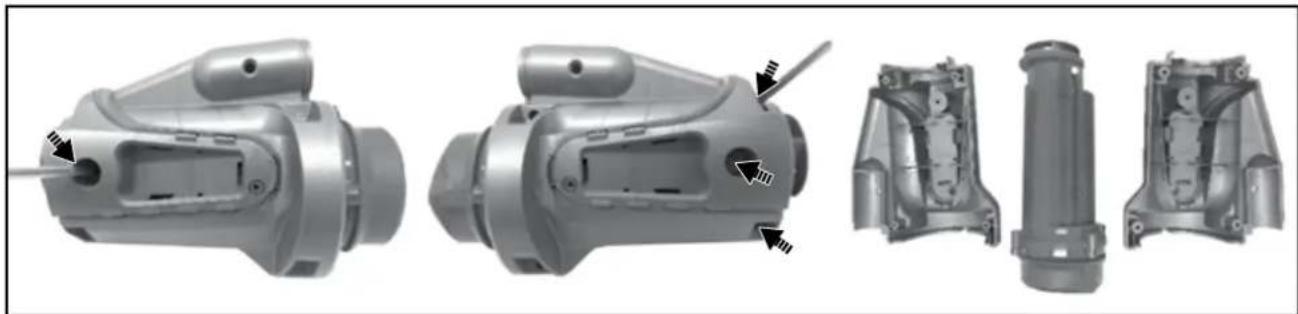
Three views of a mechanical component with arrows indicating motion or assembly, shown from different angles (no text or symbols present)5) Unfasten the screws on the front and side as shown. Detach the body halves to expose the operational unit.
natural_image
Technical illustration of a mechanical component with multiple views and mounting features (no text or symbols visible)6) Unfasten the screws and open the cap. Pull out the battery and locate its wire connector. Press the clip of the wire connector and detach it. NOTE: Wrap the wire connector of the battery immediately with insulating tape in order to avoid short circuit caused by contact of both wire terminals.

TROUBLESHOOTING
| Problem Possible Cause | Solution | ||
| Pool vacuum does not capture debris / fine particles | Battery is running out Charge the battery again. | ||
| Impeller is jammed | Power off the pool vacuum and visually check the gap in the middle of the pool vacuum to see if the impeller is jammed by large debris. If possible, use a small tool to remove the debris carefully. If necessary, contact your dealer for further instructions.WARNING! Make sure the pool vacuum is powered off when the unit is being serviced. | ||
| Impeller is broken Contact your dealer for impeller replacement. | |||
| Canister is full Empty the canister. | |||
| Filter cone is clogged by fine particles | Clean the filter net. If brushing is deemed necessary, use only a soft brush to clean the filter cone gently and carefully. | ||
| Cartridge filter is full Follow cleaning instruction to clean the cartridge. | |||
| Debris escapes from the canister | Suction nozzle flap is broken | Suction nozzle flap works like a door to prevent debris from escaping from the canister. Replace a new nozzle flap. | |
| Debris goes inside the filter cone | Filter cone is damaged Replace with a new filter cone. | ||
| Fine debris escapes from the cleaner | Cartridge filter is broken Replace a new cartridge filter. | ||
| Telescopic pole connector / curved handle cannot be secured in assembly | Side pin on pole connector / handle is broken | Replace with a new pole connector/handle. | |
| Pool vacuum cannot be charged / recharged | Battery is damaged | Contact dealer for battery replacement.WARNING! DO NOT open the pool vacuum and replace the battery by yourself. This could result in severe or fatal injury and the warranty will be voided as a result. | |
| Charging plug is not correctly connected to external adaptor and pool vacuum | Refer to instruction manual and connect the charging accessories correctly. | ||
| External adaptor damaged | Contact dealer for replacement.WARNING! Using the wrong external adaptor will result in damaging the pool vacuum / battery and voiding the warranty as a result. | ||
| Pool vacuum does not move smoothly | Wheel is jammed Clean out the debris from the wheel. | ||
| Charging time is longer than advertised | Stained charging pins | The stains can be removed by using a cotton bud soaked with juice of lemon or vinegar to clean the areas around the charging pins. | |
| Operation time is shorter as expected | Battery is not fully charged | Charge the pool vacuum for at least 6 hrs. NOTE: if any stains are found on the charging pins, remove them by using a cotton bud soaked with lemon juice or vinegar. | |
| Environmental Programmes, WEEE European Directive | |||
 | Please respect the European Union regulations and help to protect the environment.Return non-working electrical equipment to a facility appointed by your municipality that properly recycles electrical and electronic equipment. Do not dispose them in unsorted waste bins. For items containing removable batteries, remove batteries before disposing of the product. | ||
 | All rights reserved. No part of this document may be reproduced or transmitted in any form or by any means, electronic, mechanical, photocopying, recording, or otherwise, without prior written permission of Kokido Development Ltd. (L-23011001) | ||
If soft copy of this instruction manual is required, please contact our customer service by email: customerservice@kokido.com
SAVE THESE INSTRUCTIONS
natural_image
Circular mechanical component with internal components and directional arrows, no visible text or symbolsnatural_image
Technical line drawing showing two mechanical components with a connector, one emitting a circular icon and the other inserted into a plug (no text or symbols present)natural_image
Technical line drawing of a mechanical assembly (no text or symbols)CONSEILS:
natural_image
Three-step illustration showing hands using a mechanical device to adjust the component (no text or symbols present)natural_image
Technical illustration of a mechanical assembly showing hand operating a component and cross-sectional view of the motor (no text or symbols)natural_image
Mechanical assembly diagram showing hand turning a component into a motor housing with internal gear mechanism (no text or labels)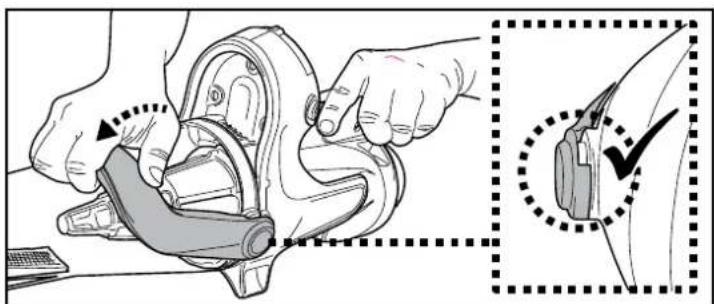
natural_image
Illustration of a hand using a mechanical device to adjust a component, with a magnified inset showing the close-up detail (no text or symbols present)natural_image
Technical line drawing of two mechanical components with gear and shaft (no text or symbols)AVERTISSEMENT!
natural_image
Three views of a mechanical device showing internal components and mounting features (no text or symbols visible)natural_image
Mechanical assembly diagram showing a shaft and housing with directional arrows indicating movement (no text or symbols)natural_image
Three views of a mechanical device showing internal components and mounting features (no text or symbols visible)natural_image
Three views of a mechanical component with arrows indicating motion or assembly, shown from different angles (no text or symbols present)natural_image
Technical illustration of a mechanical component with multiple views and mounting features (no text or symbols visible)DEPANNAGE
natural_image
Circular mechanical component with internal components and directional arrows, no visible text or symbolsnatural_image
Technical line drawing showing two mechanical components with a connector, one connected to a device and the other inserted into a cable (no text or symbols present)natural_image
Technical line drawing of a mechanical assembly (no text or symbols)CONSEJOS:
natural_image
Three-step illustration showing hands using a mechanical device to adjust the component (no text or symbols present)natural_image
Technical illustration showing a hand operating a mechanical component and its cross-sectional view of the motor stator (no text or symbols present)natural_image
Illustration of a hand using a mechanical device to adjust a component, with an inset showing a close-up of the component being checked (no text or symbols present)natural_image
Technical line drawing of two mechanical components with gear and shaft assembly (no text or symbols)¡ATENCIÓN!
natural_image
Three views of a mechanical device showing internal components and mounting features (no text or symbols visible)natural_image
Mechanical assembly diagram showing a tool interacting with a component, with no visible text or symbols.natural_image
Three views of a mechanical device showing internal components and mounting features (no text or symbols visible)natural_image
Three views of a mechanical component with arrows indicating motion or assembly (no text or symbols present)natural_image
Technical illustration of a mechanical component with multiple views and mounting features (no text or symbols visible)natural_image
Circular mechanical component with internal components and directional arrows, no visible text or symbolsnatural_image
Technical line drawing showing two mechanical components with a connector, one emitting a circular icon and the other inserted into a plug (no text or symbols present)natural_image
Technical line drawing of a mechanical assembly (no text or symbols)TIPS:
natural_image
Three-step illustration showing hands using a mechanical device to adjust the component (no text or symbols present)natural_image
Technical illustration of a mechanical assembly showing hand operating a component and cross-sectional view of the motor (no text or symbols)natural_image
Mechanical assembly diagram showing hand turning a component into a motor housing with internal gear mechanism (no text or labels)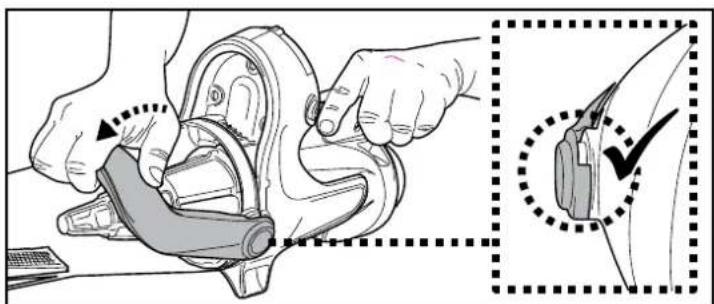
natural_image
Illustration of a hand adjusting a car seatbelt mechanism, with a magnified inset showing the detail (no text or symbols present)- De patroonfilter schoonmaken
natural_image
Technical illustration of two mechanical gear assemblies (no text or symbols)WAARSCHUWING!
natural_image
Three views of a mechanical device showing internal components and mounting features (no text or symbols visible)natural_image
Mechanical assembly diagram showing a component with arrows indicating parts of a tool or assembly (no text or symbols present)natural_image
Three views of a mechanical device showing internal components and mounting features (no text or symbols visible)natural_image
Three views of a mechanical device showing internal components and assembly (no text or symbols visible)natural_image
Technical illustration of a mechanical component with multiple views and mounting features (no text or symbols visible)PROBLEMEN OPLOSSEN
natural_image
Circular mechanical component with internal components and directional arrows, no visible text or symbolsnatural_image
Technical line drawing showing two mechanical components with a connector, one emitting a button and the other inserted into a plug (no text or symbols present)natural_image
Technical line drawing of a mechanical assembly (no text or symbols)SUGGERIMENTI:
natural_image
Three-step illustration showing hands using a mechanical device to adjust the component (no text or symbols present)natural_image
Technical illustration of a mechanical assembly showing hand operating a component and cross-sectional view of the motor (no text or symbols)natural_image
Mechanical assembly diagram showing hand turning a component into a motor housing with internal gear mechanism (no text or labels)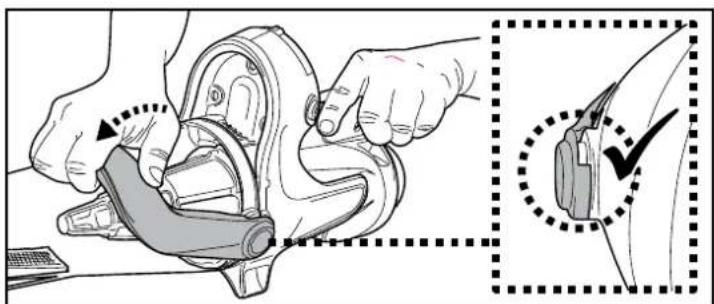
natural_image
Illustration of a hand adjusting a car seatbelt mechanism, with a magnified inset showing the detail of the component (no text or symbols present)natural_image
Technical illustration of two mechanical components with gear and shaft assembly (no text or symbols)ATTENZIONE!
natural_image
Three views of a mechanical device showing internal components and mounting features (no text or symbols visible)natural_image
Mechanical assembly diagram showing a shaft and housing with directional arrows indicating movement (no text or symbols)natural_image
Three views of a mechanical device showing internal components and mounting features (no text or symbols visible)natural_image
Three views of a mechanical device showing internal components and assembly (no text or symbols visible)natural_image
Exploded view of a mechanical component showing internal parts and assembly (no text or symbols visible)natural_image
Circular mechanical component with internal components and directional arrows, no visible text or symbolsnatural_image
Technical line drawing showing two mechanical components with a connector, one emitting a circular button (no text or symbols present)natural_image
Technical line drawing of a mechanical assembly (no text or symbols)TIPPS:
natural_image
Three-step illustration showing hands using a mechanical device to adjust the component (no text or symbols present)natural_image
Technical illustration of a mechanical component being inserted into a housing, with close-up views showing internal components (no text or symbols)natural_image
Mechanical assembly diagram showing hand turning a component and then inspecting internal gear (no text or symbols)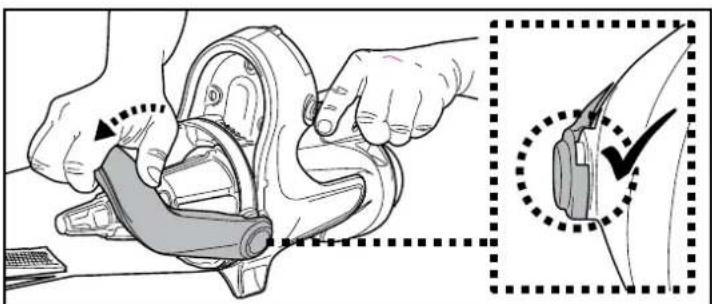
natural_image
Illustration of a hand using a tool to adjust a mechanical component, with an inset showing the close-up of the component (no text or symbols present)natural_image
Technical line drawing of two mechanical components with gear and shaft assembly (no text or symbols)WARNUNG!
natural_image
Three views of a mechanical device showing internal components and mounting features (no text or symbols visible)natural_image
Mechanical assembly diagram showing a shaft and housing with directional arrows indicating movement (no text or symbols)natural_image
Three views of a mechanical device showing internal components and mounting features (no text or symbols visible)natural_image
Three views of a mechanical component with arrows indicating motion or assembly, shown from different angles (no text or symbols present)natural_image
Technical illustration of a mechanical component showing exploded and assembled views (no text or symbols)FEHLERBEHEBUNG
Warranty applies to the original owner only and cannot be transferred. Contact your local dealer for warranty. The warranty does not cover:
- Normal wear and tear, including parts that might wear out over time (e.g., brush, rake, filter, filter bag, roller and its accessories, etc.).
- Accidental damage.
- Damage due to inappropriate use against the rating plate and/or instructions provided in the Operating Manual or other material.
- Damage caused by the lack of recommended maintenance.
- Damage from external sources such as transit, weather, electrical outages, or power surges.
- Failures caused by circumstances outside of recommendation (e.g., water temperature, storage temperature, instruction of use and charging environment, etc.).
- Faults caused by:
- Negligent use, misuse, neglect, or careless operation of the appliance.
- Use of the appliance not in accordance with the Operating Manual.
- Use of parts not assembled or installed in accordance with the Operating Manual.
- Use of parts and accessories which are not Genuine Components.
- Faulty assembly or installation.
- Repairs or alterations (if allowed) carried out by unauthorized agents.
GARANTIE LIMITÉE
We reserve the right to change all or part of the features of the articles or contents of this document, without prior notice. International patents pending
FR
© 2023 Kokido Development Limited
Unit 1319, Sunbeam Centre, 27 Shing Yip Street,
Kwun Tong, Kowloon, HK
- SAFETY WARNINGS & INSTRUCTIONS
- SAVE THESE INSTRUCTIONS
- WARNING!
- CAUTION!
- GETTING STARTED
- Charging The Battery
- Set-Up Before Use
- Set-up for LEAF-OUT™ and SAND-OUT™ function Cleaning fine debris (with cartridge filter)
- Set-up for FLOC-OUT™ function
- Cleaning flocculant and silt
- Connect the garden hose.
- TIPS:
- Pool Preparation
- OPERATION
- Cleaning the filter
- WARNING! Using the pool vacuum without a filter cone in place will VOID your warranty.
- BATTERY DISPOSAL
- WARNING! Never attempt to disassemble a battery pack.
- How to remove the battery pack for battery disposal only (To be done by authorized technician)
- CONSEILS:
- AVERTISSEMENT!
- DEPANNAGE
- CONSEJOS:
- ¡ATENCIÓN!
- WAARSCHUWING!
- SUGGERIMENTI:
- ATTENZIONE!
- TIPPS:
- WARNUNG!
- FEHLERBEHEBUNG
- GARANTIE LIMITÉE
Brand : KOKIDO
Model : EV60
Category : Vacuum Cleaner