Vision CAV220B - TV Caratec - Free user manual and instructions
Find the device manual for free Vision CAV220B Caratec in PDF.

| Product type | Full HD LED TV |
| Brand | Caratec |
| Model | Vision CAV220B |
| Screen size | 55 cm (21.5 inches) |
| Resolution | 1920 x 1080 pixels (Full HD) |
| Aspect ratio | 16:9 |
| Contrast ratio | 3000:1 |
| Brightness | 250 cd/m² |
| Viewing angles (H/V) | 89°/89° |
| Speakers | 2 × 3 Watts |
| Integrated tuners | DVB-S2, DVB-T2 HD (H.265), DVB-C, analog |
| Video inputs | HDMI (1x), SCART, YPbPr (3.5mm mini-jack), AV (3.5mm mini-jack), PC VGA |
| Audio outputs | Digital coaxial, headphone (3.5mm jack) |
| Additional connections | USB, CI+, PC audio input (3.5mm) |
| Special features | Smart-D (satellite dish control), teletext, EPG, timer, parental lock, hotel mode, subtitles, audio description |
| Power supply | 9-30 V DC (optional mains adapter ref. ETCV008) |
| Power consumption (on/standby) | 17.0 W / 0.50 W |
| Weight | 2.7 kg (with accessories) |
| Dimensions (without stand) | 507 x 302 x 48 mm |
| Wall mount | VESA 100 x 100 mm |
| Included accessories | Remote control with batteries, 12V cigarette lighter cable, magnetic DVB-T antenna, manual |
| Optional accessories | Stand (ETC0083), power supply (ETCV008), AV adapter (MCC29060) and YPbPr adapter (MCC29080) |
| Energy class | A+ |
Frequently Asked Questions - Vision CAV220B Caratec
User questions about Vision CAV220B Caratec
0 question about this device. Answer the ones you know or ask your own.
Ask a new question about this device
Download the instructions for your TV in PDF format for free! Find your manual Vision CAV220B - Caratec and take your electronic device back in hand. On this page are published all the documents necessary for the use of your device. Vision CAV220B by Caratec.
USER MANUAL Vision CAV220B Caratec
natural_image
Golden wheat field at sunset with a lone tree and distant mountains (no text or symbols)text_image
Screw hole A Screw hole C
text_image
Screw hole B Screw Screw hole DHINWEIS
natural_image
Technical line drawing of a mechanical assembly with two arms and internal components (no text or symbols)6.1. Common Interface (CI)
text_image
000009 / 000316 Pause FD IP Prev Next Stop RepeatAll Set Atext_image
Play 00:00:01 / 00:04:16 Face F5 IT Press Next Stop RepeatAll NETCtext_image
Pause Prev. Next Stop RepeatALL Music Playlist Info.text_image
2 ABC1 28 Mar 2008 11:04 11:00 - 11:32 Midday Report MPEG 576i DTV SD DOLBY Subtitle English Teletext Up-to-the minute local, national and international news, with special attention on business and the economy.- General Information....44
- Delivery Contents 45
- Set-Up and Use 46
3.1. Assembly 46
3.2. Control Buttons....47
3.3. Connections to the television set 48
3.4. Remote Control 49
3.5. Navigating within the menus 50
- Quick Set-Up 52
4.1. Electrical Connection....52
4.2. Turning the television set on....52
4.3. Set-Up for Satellite Reception....52
4.4. Initial Installation for Reception via DVB-C/DVB-T....54
4.5. Connection to External Sources....55
4.6. Important Operating Instructions 56
- Main Menu....58
5.1. Selecting the Main Menu 58
5.2. Channel Menu....58
5.3.Picture Menu 62
5.4.Sound Menu63
5.5.Time Menu....64
5.6. Setup Menu 66
5.7. Lock Menu 67
- CI-Modul....69
6.1.Common Interface (CI)....69
6.2. Inserting the smart card and the CI module....69
- Multimedia Operation....70
7.1. Prerequisites....70
7.2. Playback....70
7.3. Ending Playback 73
- Special Functions 74
8.1. Channel Display 74
8.2.Favourites 75
8.3. Channel Information....76
8.4.Subtitel Language 76
8.5. Programme Guide (EPG)....77
8.6. Radio 77
8.7. Teletext....78
-
Trouble Shooting 79
-
Specification 80
1. General Information
To avoid damaging the television set please observe the following safety instructions during setup and use.
| Attaching to a wall mount | Please ensure that the screws (M4) project into the television set by no more than 8 mm. The use of longer screws can damage the television set. |
| Cleaning the television set | Before cleaning, disconnect the television set. Use only a soft damp cloth or a special cleaning product for flat-screens. |
| LED Display Too much pressure on | the screen can damage the television set. |
| Heat/damp/humidity | The television set should not be exposed to high temperatures (direct sunlight, radiators, open fire) or to damp.The television set should not be used in areas with high humidity. |
| Condensation If moved from a cool area to one with a higher temperature, the television set should be left for at least an hour before plugging it in. A rapid change of temperature can lead to the formation of condensation in the television set itself. This can lead to damage if the television set is in use. | |
| Air Circulation | To prevent overheating of the television set the ventilation slots at the rear should always be clear. |
| Small Objects It is important to ensure that no small objects or liquids enter the television set. They can cause damage or even fire. | |
| Liquids/Candles | Do not place anything holding a liquid or any candles on the television set. |
| Crushing Take care to avoid crushing fingers or other objects when turning the television set in any direction. | |
| Electric Supply Use the television set only with the voltage indicated in the specifications.Ensure that there is easy access to the plug and that the television set can always be disconnected from the electricity supply.Do not disconnect the television set by pulling the power cable.Always take hold of the plug. The power cable must not be kinked or placed over sharp edges. | |
| Moving the Television Set When moving the television set, hold only the casing. | |
| Repairs/Accessories Repairs and servicing must be undertaken only by authorised and trained personnel. | |
| Recycling In accordance with EU Directive 2002/96/EC, electronic devices must be disposed of separately from household waste at authorised disposal sites or handed over to a specialised supplier.In accordance with the Batteries Regulation, batteries are to be disposed of only in containers provided for this purpose. | |
2. Delivery Contents
LED television
Remote control with 2 AAA batteries
12 volt cable for use with motor vehicle
DVB-T magnetic base antenna
Instructions
Optional available:
Foldable stand, Art.-No. ETC0083
Power supply unit (12V, 4A), Art.-No. ETCV008
AV-Adapter, Art.-No. MCC29060
YPbPr-Adapter, Art.-No. MCC29080
3. Set-Up and Use
3.1. Assembly
Stand Assembly (optional)
- To avoid damage, place the screen on a soft flat surface.
- Attach the stand to the underside of the television set by means of the four screws provided.

text_image
Screw hole A Screw hole C
text_image
Screw hole B Screw Screw hole DNOTE
Before attaching the stand ensure that it is the right way round (see the illustration).

natural_image
Technical line drawing of a mechanical assembly with two arms and internal components (no text or symbols)Wall Bracket Assembly (optional)
- Attach the wall bracket to the wall.
- To avoid damage, place the screen on a soft flat surface.
- If necessary, remove the stand.
- Attach the television set to the wall bracket by means of the VESA mounting.
3. Set-Up and Use
| NOTE | > Make sure that the mounting screws (M4) project into the television set by no more than 8 mm. Longer screws can damage the set.> A wall bracket can be bought separately.Product information available at http://halter.caratec.de> Use only a wall bracket suitable for the size and weight of the television set.> Follow the instructions for the assembly of the wall bracket. |
3.2. Control Buttons
The control buttons are on the backside of the casing. They control the most important functions.
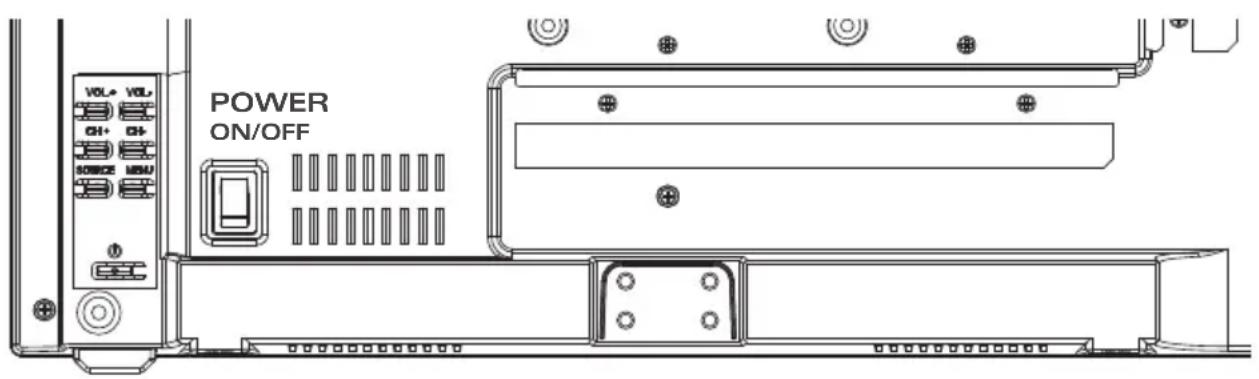
text_image
POWER ON/OFF| Designation Explanation | |
| SOURCE | Source selectionPress the button several times to select the signal source |
| MENU Show menu | |
| CH+ | Next channel |
| Navigation ▲ | |
| CH- | Previous channel |
| Navigation ▼ | |
| VOL+ | Increase volume |
| Navigation ▶ | |
| VOL- | Reduce volume |
| Navigation ◀ | |
| POWER Turn television | set on/off |
3. Set-Up and Use
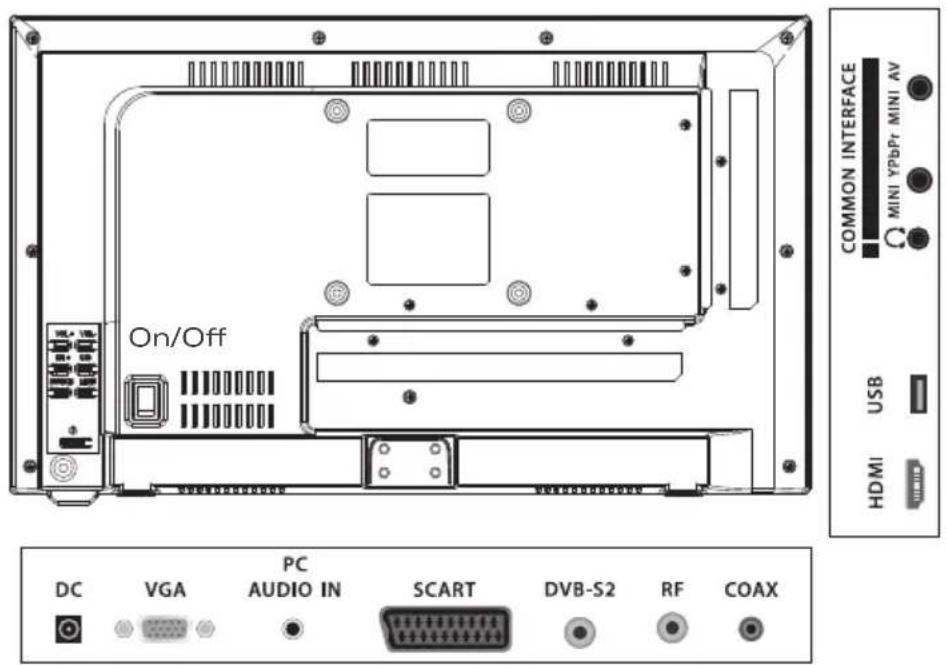
3.3. Connections to the television set
External devices or sources can be connected at the rear of the television set. Both passive and active antennas (with integrated amplifier and their own power source) can be connected to the antenna input.
text_image
COMMON INTERFACE MINI YPbPr MINI AV USB HDMI On/Off DC VGA PC AUDIO IN SCART DVB-S2 RF COAX| Designation Explanation | |
| On/off switch On/off switch reduces power consumption to 0 | |
| DC Power cord connection/power supply | |
| SCART AV input for external source | |
| DVB-S2 Satellite antenna connection | |
| RF Connection for DVB-T/DVB-T2 HD or cable television | |
| COAX Digital audio output (co-axial) | |
| Audio out Audio out connection | |
| HDMI/1/2 HDMI connection | |
| USB USB connection | |
| Mini YPbPR Component video input (adapter included) | |
| Mini AV AV input (adapter included) | |
| Headphones Connection for headphones/external speakers (3.5 mm jack) | |
| Common Interface | CI-slot for encrypted programmes (NOTE: insert the right way round) |
3. Set-Up and Use
3.4. Remote Control
Place batteries in the remote control
- Open the battery compartment of the remote control.
- Insert the batteries provided (AAA, 2 x 1.5 volts).
Key Assignment
| Designation Explanation | |
| POWER On/off, standby | |
| MUTE Mute | |
| PICTURE Change picture presets | |
| ASPECT Change picture format | |
| SOUND Change sound presets | |
| SUBTITLE Set subtitles | |
| SLEEP Set sleep timer | |
| CH.LIST Display programme list | |
| Number key Enter numbers | |
| FAV Display favourites | |
| RETURN | Switch to previous channel |
| VOL+/- | Increase/decrease volume |
| CH+/- | Next/previous channel |
| EPG | Programme guide |
| TV/RADIO | Switch between radio and TV |
| DISPLAY | Show information |
| INPUT Select input source | |
| Navigation buttons | Navigate up/down/right/left |
| OK | Confirm selection |
| MENU | Show main menu |
| EXIT | Quit menu |
| Colour buttons | Quick selection button (red, green, yellow, blue) |
| TV/TXT | Opening/closing teletext |
| CANCEL | Quitting |
| REVEAL | Displaying hidden text |
| NICAM/A2 | Toggling between NICAM / A2 |
| OPEN/CLOSE | Opening and closing the Satellite antenna |

text_image
POWER MUTE 1 2 3 4 5 6 7 8 9 SLEEP 0 PICTURE SOUND CH LIST DISPLAY INPUT OK MENU EXIT FAV CH EPG VOL OPEN/CLOSE TV/TXT CANCEL REVEAL NICAMA2 INDEX HOLD SIZE SUBPAGE SUBTITLE TV/RADIO ASPECT caratec▶ continue on the next page
3. Set-Up and Use
| Designation Explanation | |
| INDEX Opening Index | |
| HOLD Keep teletext sub-page (do not go to next page) | |
| SIZE Enlarging teletext main page/enlarging sub-page/standard size | |
| SUBPAGE Opening/closing teletext sub page |
3.5. Navigating within the menus
Navigating in the main menus
You can move through the menus with either the remote control or using the buttons on the television set.
| Operation control panel remote control | ||
| Opening the main menu MENU MENU | ||
| Selecting menu or sub-menu | VOL+ (forward)VOL- (back)CH+ (up)CH- (down) | ▸ (forward)◄ (back)▲ (up)▼ (down) |
| Selecting options within the menu | CH+ (up)CH- (down) | ▲ (up)▼ (down) |
| Switching to the set-up mask VOL+ (forward) | ▸ (forward) | |
| Navigating within the set-up mask | CH+ (up)CH- (down) | ▲ (up)▼ (down) |
| Exiting the set-up mask of a menu or exiting a menu MENU MENU | ||
| Confirming settings INPUT OK | ||
| Confirming setting and exiting set-up mask | MENU | OK |
| Back to next menu level up | MENU MENU | |
| Exiting menu | MENU EXIT |
3. Set-Up and Use
NOTE
Follow the navigation instructions in the individual menus and set-up masks.
4. Quick Set-Up
4.1. Electrical Connection
- Connect the television set to a suitable power supply.
4.2. Turning the television set on
- Turn on the television set using the on/off switch and press the POWER button on the remote control or on the device.
The standby lamp turns green when the television is switched on.
The standby lamp turns red when the television is switched off.
The standby lamp is not illuminated when the on/off switch is in the OFF position.
4.3. Set-Up for Satellite Reception
- Connect the satellite dish to the DVB-S2 inlet of the television set.
- Turn on the television set with the on/off switch and press the POWER button on the remote control or on the device.
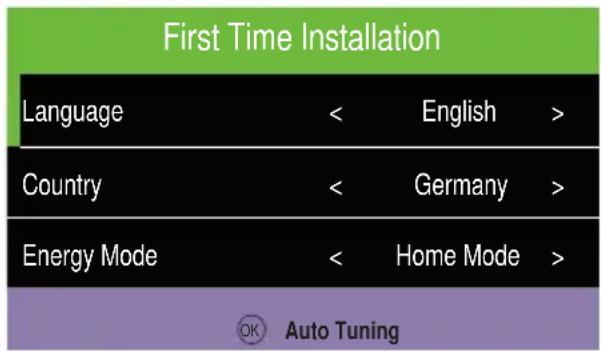
The First Time Installation Menu is automatically displayed the first time you switch on.

text_image
First Time Installation Language < English > Country < Germany > Energy Mode < Home Mode > OK Auto Tuning- Select menu Language and Country.
- Press OK.
The Tuning Setup Menu is displayed.
4. Quick Set-Up

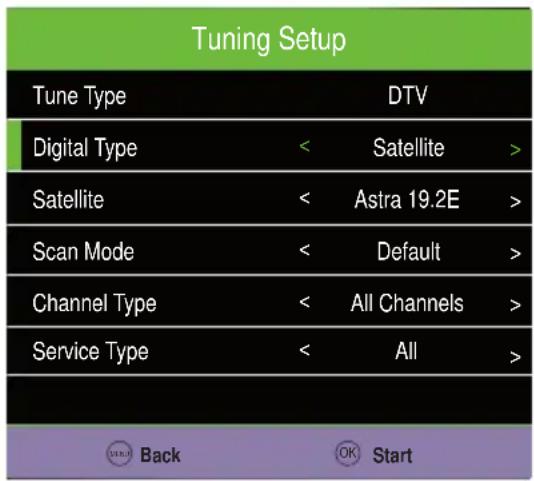
text_image
Tuning Setup Tune Type DTV Digital Type < Satellite > Satellite < Astra 19.2E > Scan Mode < Default > Channel Type < All Channels > Service Type < All >- Select DTV or ATV + DTV as the receiving mode (Tune Type).
- Select Satellite as the input source (Digital Type).
- Select the desired satellite (ASTRA/HOTBIRD are standard).
- Press OK.
First Time Installation Dialogue is displayed.
text_image
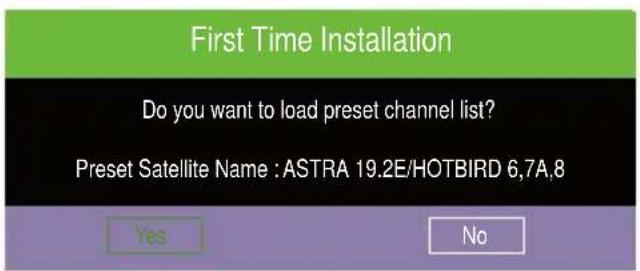
First Time Installation Do you want to load preset channel list? Preset Satellite Name : ASTRA 19.2E/HOTBIRD 6,7A,8 Yes No- Select Yes to load the preset channel list (for ASTRA and HOTBIRD).
Your television set is ready.
Select No to perform a manual search for programmes on the previously selected satellite.
Please follow the detailed instructions for searching for satellite channels and for editing channel lists in chapter „5.2. Channel Menu“ on page 62
4. Quick Set-Up
4.4. Initial Installation for Reception via DVB-C/DVB-T.
-
DVB-C: Connect the cable connection to the DBV-C input of the television set.
OR:
DVB-T/ T-2 HD: Connect the terrestrial antenna to the DVBT-input of the television set. If using an active antenna without independent power supply in the menu switch the „5V antenna power” On (Channel Menu). -
Turn on the television set with the on/off switch and press the POWER button on the remote control or on the device.
The First Time Installation Menu is automatically displayed the first time you switch on.
text_image
First Time Installation Language < English > Country < Germany > Energy Mode < Home Mode > OK Auto Tuning-
Sleet the menu Language and Country.
-
Press OK.
The Tuning Setup Menu is displayed.
text_image
Tuning Setup Tune Type DTV Digital Type < Satellite > Satellite < Astra 19.2E > Scan Mode < Default > Channel Type < All Channels > Service Type < All > Back OK Start- Select DTV or ATV + DTV as the receiving mode (Tune Type).
4. Quick Set-Up
- Select the input source (Digital Type)
DVB-T for input from an antenna,
DVB-C for cable input.
- Press OK.
The station search dialogue box is displayed (Auto Tuning Status)
The TV and radio station search may last several minutes.
Your television set is ready for use.
Please follow the detailed descriptions in Chapter „5.2. Channel Menu” on page 62.
4.5. Connection to External Sources
Connection via HDMI Cable
Connect the HDMI-input on the television set to the HDMI-output of the external device.
Please follow the detailed description for selection of the input source in Chapter „4.6. Important Operating Instructions" on page 60.
Connection via a SCART Cable.
Connect the SCART socket on the television to the SCART output of the external device.
Please follow the detailed description for selection of the input source in Chapter „4.6. Important Operating Instructions“ on page 60.
Connection via an AV Cable
Connect the AV adapter to the MINI AV input of the television set. Connect the adapter to the AV output of the external device.
Please follow the detailed description for selection of the input source in Chapter „4.6. Important Operating Instructions“ on page 60.
Connection via a YPbPr Cable
Connect the YPbPr adapter to the MINI YPbPr-input of the television set. Connect the adapter to the YPbPr-output of the external device.
Connect the AV adapter to the MINI AV-input of the television set. Connect the adapter to the audio cable and insert the cable into the audio-output of the external device.
Please follow the detailed description for the selection of the input source in Chapter „4.6. Important Operating Instructions“ on page 60.
4.6. Important Operating Instructions
Selection of the Input Source
- Open the Input Source Menu by pressing the INPUT (control panel on the television set or remote control).
- Select and then confirm the desired option.
Please follow the detailed description in Chapter „3.5. Navigating within the menus” on page 54.
| Input Source Explanation | |
| Satellite | Satellite televisionSee chapter► „Quick Set-Up“ on page 56► „Set-Up for Satellite Reception“ on page 56 |
| DTV | Digital TelevisionSee chapter „Initial Installation for Reception via DVB-C/DVB-T“ on page 58 |
| ATV Analog Television | |
| AV External device is connected via AV connection | |
| SCART External device is connected via SCART connection | |
| YPbPr External device is connected via YPbPr connection | |
| PC PC is connected | |
| HDMI External device is connected via HDMI connection | |
| USB External device is connected via USB connection | |
4. Quick Set-Up
Teletext
Turn the Teletext on or off by using the TV/TXT button on the remote control.
Please follow the detailed description in Chapter „9.7. Teletext“ on page 86.
EPG-Menu
Use the EPG button on the remote control to turn the programme guide on or off.
Please follow the detailed descriptions in Chapter „9.5. Programme Guide (EPG)“ on page 85.
Multimedia Operation (USB)
- Connect a device (e.g. USB stick, external hard drive) to the USB port.
- Press the INPUT key on the remote control.
- Select USB.
Please follow the detailed description in chapter „7. Multimedia Operation“ on page 74.
5. Main Menu
5.1. Selecting the Main Menu
- Open the main menu by pressing the MENU button (control panel on the television set or remote control).
- Select and confirm the desired option.
Please follow the detailed description in chapter „3.5. Navigating within the menus” on page 54.
The Main Menu contains the following sub-menus:

text_image
CHANNEL PICTURE SOUND TIME SETUP LOCK5.2. Channel Menu
- Open the Main Menu by pressing the MENU button (control panel on the television set or remote control).
- Select Channel and confirm with the OK button.
The Channels Menu is displayed.

text_image
CHANNELImportant functions in the Channel Menu:
Manual or automatic channel scan
Editing the channel list
NOTE
The functions may vary depending on the origin of the signal.
| Function Explanation | |
| Antenna1 | ▸ DVB-T (antenna reception)▸ DVB-C (cable reception) |
| Auto Tuning | Begin automatic channel searchMenu „Tuning Setup“ is displayed |
5. Main Menu
| Funktion Erklärung | |
| ATV Manual Tuning1 | Begin manual channel search for the selected source „ATV Manual Tuning” menus are displayed. |
| DVB-C Manual Tuning1DVB-T Manual Tuning1 | Beginning manual channel search for selected source. „DVB-C Manual Tuning” or „DVB-T Manual Tuning” menus are displayed |
| Programme Edit | Organising, deleting, skipping, marking as favourites. „Programme Edit” menu is displayed. |
| Signal Information Show signal information of the station. | |
| CI-Information | Show information on an inserted CI card.See chapter „6. CI-Modul” on page 29 |
| Dish Setup2 | Erasing, managing, re-setting satellites and transponders.Menu „Dish Setup” is displayed. |
| 5V antenna power1 | Turning set on with an active antenna in order to feed 5V to the antenna. |
^1 Input Source DTV // ^2 Input Source Satellite
Smart-D function DiSEqC settings for automatic dish alignment
For the use with a compatible Caratec Smart-D dish.
- In the Channel Menu select Dish Setup.
- Select the appropriate setting under DiSEqC 1.1 (see table):
| Satellite Setting | |
| HotBird 13E LNB 1 | |
| Astra 19.2E | LNB 2 |
| Eutelsat 5W | LNB 3 |
| Astra 23.5E LNB 4 |
It is sufficient to make settings only for the satellites used (e.g. Astra 19.2E und Hotbird 13E).
Automatic Channel Search/Receiver Settings
- In the Channels Menu select the automatic channel search function (Auto Tuning).
The Receiver Settings Menu (Tuning Setup) is displayed.
With Satellite selected as source:
| Function Explanation | |
| Country Set country | |
| Satellite Set satellite | |
| Scan Mode | ►Full*►Network Scan |
| Funktion Explanation | |
| Channel Type | All Channels*▶ FTA Channels |
| Service Type | ▶ All*▶ DTV▶ Radio |
* recommended settings are printed in bold
▶ continue on the next page
5. Main Menu
With DTV selected as source:
| Function Explanation | |
| Country Set country | |
| Tun e Ty pe | ▸ ATV (for reception of analogue channels)▸ DTV (for reception of digital channels)▸ ATV + DTV (for reception of analogue and digital channels) |
| Scan Type | ▸ Full*▸ Network Scan |
| Network ID | ▸ Auto*▸ 65535 |
| Frequency | ▸ Auto*▸ 770000 |
| Symbol(ks/s) | ▸ Auto*▸ 6900 |
| Sorting by LCN | ▸ On*▸ Off |
* recommended settings are printed in bold
1. Press OK to begin automatic channel search.
The status of the channel search (Auto Tuning) is displayed.
| Auto Tuning Status | ||
| TV | : 0 | Programme |
| DTV | : 0 | Programme |
| Radio | : 0 | Programme |
| Data | : 0 | Programme |
| 10832 MHz ASTRA 19.2EPlease press MENU key to skip | ||
Manual Analogue Search
- In the Channels Menu select ATV Manual Tuning.
The Menu ATV Manual Tuning is displayed.
- Enter and confirm the desired settings.
5. Main Menu
Manual DVB-C Search/Manual DVB-T Search
- In the Channel Menu select the CADTV Manual Tuning if on cable, or DTV Manual Tuning if receiving via antenna.
The Menu CADTV Manual Tuning or DTV Manual Tuning is displayed.
Managing List of Channels
- In the Channels Menu select Programme Edit.
The Programme Edit Menu is displayed.
- The following options are available:
Delete channels (red button on the remote control).
Move channels (yellow button on the remote control).
Skip channels (blue button on the remote control).
Add channels to favourites list (FAV button on the remote control).
NOTE
Please follow the instructions at the bottom of the screen.
Satellite Configuration
- In the Channels Menu select Dish Setup.
The Dish Setup Menu is displayed.

text_image
Dish Setup Satellite Transponder Ku_ASTRA19.2E 01 Ku_HOTBIRD 13E 001 10744 H 22000 LNB Typ 09750/10600 02 Ku_ASTRA 19.2E 002 10773 H 22000 LNB Versorgung 13/18V 03 Ku_Eutelsat 5W 003 10832 H 22000 22KHz Auto 04 Ku_Astra 23.5E 004 10862 H 22000 Toneburst Kein 05 Ku_TURKSAT 42E 005 10921 H 22000 DISEqC1.0 Kein 06 Ku_ASTRA 28.2E 006 11023 H 22000 DISEqC1.1 LNB2 07 Ku_EUTELSAT 16E 007 11171 H 22000 Motor None 08 Ku_Eutelsat 9E 008 11303 H 22000 Quality Delete Edit Add Scan Move ExitSelectImportant functions in the Dish Setup Menu:
Edit/add/delete satellites
Edit/add/delete transponders
Edit satellite settings (for example, DiSEq settings)
▶ continue on the next page
5. Main Menu
| Column Explanation | |
| Satellite | Satellite list. The satellite settings can be edited (green button). It is also possible to delete satellites (red button) and to add satellites (yellow button). |
| Transponder | List of the transponders corresponding to the selected satelliten („Satellite“ column). The transponder settings can be edited (green button). It is also possible to delete transponders (red button) and to add transponders (yellow button). |
| satellite settings (3rd column) | List of the settings for the selected satellite (“Satellite” column). Configure the DiSEqC function to guide a compatible satellite antenna. |
NOTE
Please follow the instructions at the bottom of the screen.
NOTE
You can obtain current information on satellite and transponder settings from the appropriate service provider or on websites such as www.lyngsat.com or www.flysat.com.
5.3. Picture Menu
- Call up the Main Menu by pressing the MENU button (control panel on the television set or remote control).
- Select Picture and confirm with the OK button.
Menu Picture is displayed.
Important functions in the Picture Menu:
Customising picture settings.

PICTURE
NOTE
Customising picture settings is only possible in Personal Mode.
| Function Explanation | |
| Picture Mode | ► Standard (pre-selected settings)► Mild (pre-selected settings)► Personal (settings can be adjusted manually)► Dynamic (pre-selected settings) |
| Contrast Setting contrast | |
| Brightness Setting brightness | |
| Colour Setting colour ratio | |
| Tint Setting tint (NTSC only) | |
| Sharpness Setting picture sharpness |
5. Main Menu
| Function Explanation | |
| Colour Temp | Setting colour temperature:▸ Normal▸ Warm▸ Cold |
| Noise Reduction | Setting noise reduction:▸ Low▸ Medium▸ High▸ Off |
| Screen Setting position and size of the PC image | |
| Dynamic CR | ▸ On▸ Off |
| Face Colour Setting skin tones | |
| Aspect Ratio | ▸ 16:9▸ 4:3▸ Auto▸ Zoom1▸ Zoom2 |
| Blue Screen | Is displayed when no signal available.▸ On▸ Off |
5.4. Sound Menu
- Display the Main Menu by pressing the MENU button (control panel on the television set or the remote control).
- Select Sound and confirm with the OK button.
The Sound Menu is displayed.

SOUND
Important functions in the Sound Menu: >Adjusting the sound settings
HINWEIS
Adjusting the sound settings is only possible in Personal Mode.
▶ continue on the next page
5. Main Menu
| Function Explanation | |
| Bass Adjust Bass | |
| Balance Setting balance between left and right speakers | |
| Auto Volume | Automatic volume control:▸ On▸ Off |
| Surround Sound | Surround reproduction:▸ Off▸ SRS TruSurround▸ TruSurround |
| SPDIF Mode | Setting digital audio output:▸ Auto▸ PCM |
| AD Switch „AD Switch” Menu is displayed | |
| Hearing Impaired | ▸ Off▸ On |
AD Switch
- In the Sound Menu select AD Switch.
The AD Switch Menu is displayed.
| Function Explanation | |
| AD Switch | ▸ On (audio description)▸ Off |
| AD Volume Setting level of the audio description | |
5.5. Time Menu
- Display the Main Menu by pressing the MENU button (Control panel on the television set or remote control).
- Select Time and confirm with OK button.
Time Menu is displayed.
| Important function in the Time Menu: |
| > Setting the time zone |
| > Setting an automatic on/off time |
| > Setting the sleep timer |
| > Setting automatic switch off |
| > Setting time before menu fade-out |

text_image
TIME5. Main Menu
| Function Explanation | |
| Clock Time and date display (set automatically) | |
| Time Zone Setting time zone | |
| Off Time | Setting switch-off time for the television„Off Time“ Menu is displayed |
| On Time | Setting switch-on time for the television„On Time“ Menu is displayed |
| Sleep Timer | Setting time after which the television set automatically switches off▸ Off▸ 10, 20, 30, 60, 90, 120, 180, 240 min. |
| Auto Standby | Setting whether and when the television set automatically switches off if no operations are performed▸ Off▸ 3, 4, 5 h |
| OSD Timer | Setting whether and when the menu automatically fades out▸ Off▸ 5, 10, 15, 20, 25, 30 s |
Switch-off Time
1. In the Time Menu select Off Time.
The Off Time Menu is displayed.
| Function Explanation | |
| Off Time | ▸ Off▸ Once▸ Everyday▸ Mon-Fri▸ Mon-Sat▸ Sat-Sun▸ Sun |
| Hour Setting time (Hour) | |
| Minute Setting time (Minute) |
Switch-on Time
1. In the Time Menu select On Time.
The On Time Menu is displayed.
▶ continue on the next page
5. Main Menu
| Function Explanation | |
| On Time | ▸ Off▸ Once▸ Everyday▸ Mon-Fri▸ Mon-Sat▸ Sat-Sun▸ Sun |
| Hour Setting time (Hour) | |
| Minute Setting time (Minute) | |
| Source | Selecting input source for playback when the television set is to be turned on. |
| Channel Selecting the channel at which the television is to be turned on. | |
| Volume Selecting the volume at which the television is to be turned on. | |
5.6. Setup Menu
- Display the Main Menu by pressing the MENU button (control panel on the television set or the remote control).
- Select Setup and confirm with the OK button.
The Setup Menu is displayed.

text_image
SETUP| Important functions in the Setup Menu: |
| > Setting the language for menu, audio and subtitles |
| > Resetting to factory default settings |
| > Performing software update |
| > Version information on model, panel type, and software version |
| Function Explanation | |
| Language | Setting menu language (German, Czech, Swedish, Finnish, Portuguese, Dutch, Italian, French, Spanish, English) |
| TT Language Setting font (West, | East, Russian, Arabic, Farsi) for the teletext display |
| Audio Language | Setting audio language 1 and 2 for multi-channel sound „Audio Language“ Menu is displayed |
| Subtitle Language | Setting sub-title language 1 and 2 „Subtitle Language“ Menu is displayed |
| Reset Reset to factory settings | |
| Software Update (USB) | Performing software update (a USB device with the update files must be connected) |
5. Main Menu
| Function Explanation | |
| Version Displaying version (Model, panel type, and software version) | |
| Import DefaultData | Loading ASTRA/HOTBIRD standard channel list (only for satellite reception) |
5.7. Lock Menu
- Display the Main Menu by pressing the MENU button (control panel on the television set or the remote control).
- Select Lock and confirm with OK button.
The Lock Menu is displayed.

LOCK
| Important functions in the Lock Menu: |
| > Setting a system lock |
| > Changing the password |
| > Locking channels, parental guidance, button lock |
NOTE
To change settings in the Lock Menu a password is required. Factory-set password: „0000”.
| Function Explanation | |
| System Lock | ▸ Off▸ On |
| Set Password Personalising the | password |
| Channel Lock | Locking individual channels. Access is only possible with the password. „Channel lock“ Menu is displayed. |
| Parental Guidance | Setting age limit for parental control settings▸ Off▸ 4 - 18 |
| Key Lock | Activating key lock. Only possible if the option On was selected in the System Lock function.▸ Off▸ On |
| Hotel Mode | Limiting functions of the television set for the user and importing pre-set database (a USB device with the database files must be connected). The „Hotel Mode“ Menu is displayed. |
▶ continue on the next page
5. Main Menu
Locking Channels
- In the Lock Menu select Channel Lock.
The Channel Lock Menu is displayed.
- Lock or release the desired channels and confirm.
Hotel Mode
- In the Lock Menu select Hotel Mode.
The Hotel Mode Menu is displayed.
| Function Explanation | |
| Hotel Mode | ▸ On▸ Off |
| Source Lock Locking individual input sources | |
| Default Source Selecting input source with which the television set is to be turned on. | |
| Default Prog | Selecting channel for playback when the television set is to be turned on |
| Default Volume Selecting volume | at which the television set is to be turned on |
| Max. Volume Selecting maximum | volume for the television set |
| Import Database Importing database from a USB device | |
| Export Database Exporting database to a USB device | |
| Clear Lock Resetting all locks | |
NOTE
To save and restore your personal channel list use the Export Database and Import Database functions.
6. CI module
6.1. Common Interface (CI)
The television set has a CI slot and supports both CI and CI+.
A CI module is a plug-in card the size of a credit card which fits into the slot of your DVB receiver and which in turn can also hold a smart card. With this combination you have access to encrypted pay channels.
NOTE
Use only CI modules which are authorised or certified by the service provider. This is the only way to guarantee compatibility.
6.2. Inserting the smart card and the CI module
- Turn the television set off.
- Insert the CI Module into the CI slot of the television set. Make sure you are inserting it the right way round (see illustration).
- Insert the smart card into the CI Module. Make sure it is the right way round (see the arrow).
- Turn the television set back on.

text_image
Up Down7. Multimedia Operation
7.1. Prerequisites
You can play back files saved on a USB device if the following file formats are on the storage device:
| Medium Format | |
| Movie | *.dat, *.mpg, *mpeg*.vob*.mkv*.mp4, *.mov*.avi*.flv*.asf, *.wmv |
| Music | *.mp3*.wav*.wma/asf*.aac*.ac3 |
| Photo | *.jpg, *.jpeg*.png*.bmp |
| Tex t *.txt |
7.2. Playback
- Press the INPUT button on the remote control.
- Select USB as the input source.
The Multimedia Menu is displayed.

text_image
PHOTO MUSIC MOVIE TEXTPlease follow the detailed description in Chapter „3.5. Navigating within the menus“ on page 54.
- Enter the desired media type (Photo, Music, Movie or Text) and confirm with OK.
The selection screen with the file/directory structure is displayed.
7. Multimedia Operation
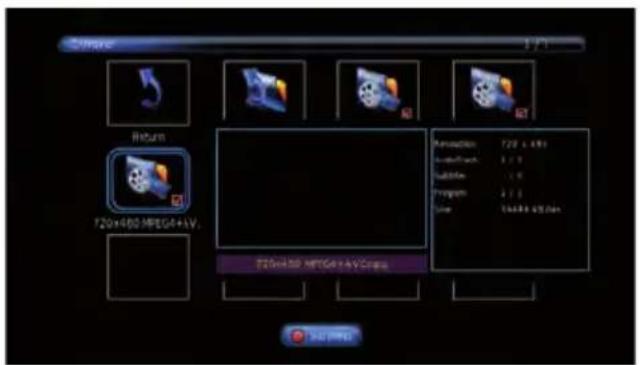
text_image
Video Return 720x480 MPEG+LV. 720x480 MPEG+LV Core Animation: 720 x 480 Audio Work: 3 / 5 Subtile: < 6 Program: 2 / 5 Line: 16484.45/16m OK Cancel- Select the storage location (C) of the medium and, if necessary, the subfolder. The files already present are displayed.
- Select the desired file. Use the green button on the remote control to mark the files (e.g. photos or music) to be shown/played.
- Press the Play/Pause button on the remote control.
The Media Player menu is displayed.
Movie
Press the OK button on the remote control to display the Movie menu.

text_image
000009 / 000316 Pause FD IF Press Next Stay RepeatALL Set A| Function Explanation | |
| Pause/Play Stopping and re-starting the film | |
| FB Rewinding | |
| FF Fast forward | |
| Prev. Previous film | |
| Next Next film | |
| Stop Stops play | |
| CharSet Changing character set | |
| RepeatNone Repeat1 RepeatALL | No repeat Repeat current film Non-stop playback of all films |
| Set A/Set B Use this to set point A and point B to repeat a film segment. | |
| Playlist Shows the play list | |
▶ continue on the next page
7. Multimedia Operation
| Function Explanation | |
| Info Displays movie info | |
| Slow Slow-motion playback | |
| Step Stop-start playback | |
| Goto Time Jump to playback time | |
| Zoom In Increases film size | |
| Zoom Out Decreases film size | |
| Aspect Ratio | Auto4:316:9 |
| Move View Move image in increased-size film with the arrow keys | |
Music
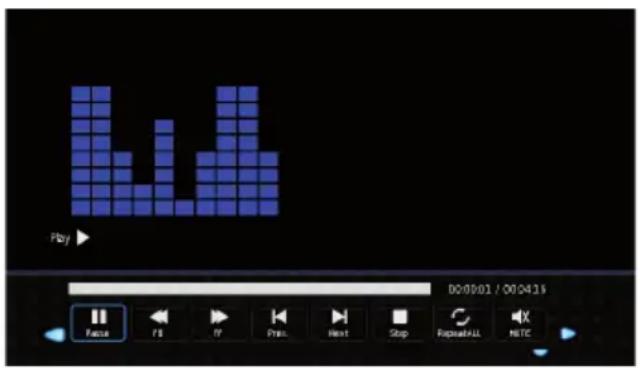
text_image
Play 00:00:01 / 00:04:16 Focus F/S IT Print Next Stop Repeat/ALL NETC| Function Explanation | |
| Pause/Play Stopping and re-starting track | |
| FB Rewinding | |
| FF Fast forward | |
| Prev. Previous track | |
| Next Next track | |
| Stop Stops play | |
| RepeatNone Repeat1 RepeatALL | No repeat Repeat current track Non-stop playback of all tracks |
| Mute | Mutes the track |
| Playlist | Shows the playlist |
| Info Displays track info | |
| Goto Time Jump to playback time | |
7. Multimedia Operation
Photo

text_image
Pause Prev. Next Stop RepeatALL Music Playlist Info.| Function Explanation | |
| Pause/Play Stopping then re-starting slide show | |
| Prev. Previous image | |
| Next Next image | |
| Stop Stop | |
| RepeatNone Repeat1 RepeatALL | No repeat Repeat current image Non-stop playback of all images |
| Musik Plays music from USB device during slide show | |
| Playlist Shows the play-back list | |
| Info Shows file info | |
| Rotate Turns the image 90° to the right | |
| Rotate Turns the image 90° to the left | |
| Zoom In Increases image size | |
| Zoom Out Reduces image size | |
| Move View Move image in zoomed view with the arrow keys | |
7.3. Ending Playback
- Press the EXIT button on the remote control to end the playback and return to file selection.
To change the media type press the EXIT button on the remote control repeatedly until the Multimedia Menu is displayed.
8. Special Functions
8.1. Channel Display
To open the channel list proceed as follows:
- Press the CH.LIST button on the remote control or press the OK button on the remote control (only if no menu is displayed).
The Channel List Menu is displayed.
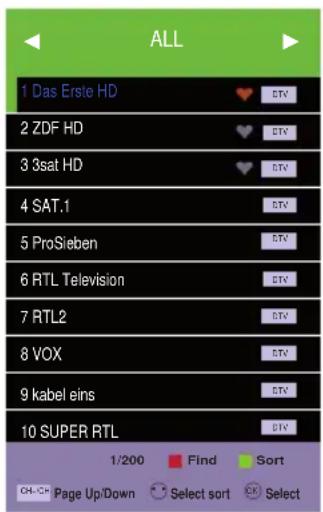
text_image
ALL 1 Das Erste HD 2 ZDF HD 3 3sat HD 4 SAT.1 5 ProSieben 6 RTL Television 7 RTL2 8 VOX 9 kabel eins 10 SUPER RTL 1/200 Find Sort CH-CH Page Up/Down Select sort SelectPlease follow the detailed description in Chapter „3.5. Navigating within the menus“ on page 54.
Symbols indicate whether a channel is locked, encrypted, to be skipped or a favourite.
Use the navigation buttons ◀/▶ on the remote control to filter the indicated channels.
| Name Explanation | |
| All Contains all the channels | |
| DTV List Contains only television channels | |
| Radio List Contains only radio channels | |
| Data List Contains only data channels | |
| FTA List Contains non-pay channels | |
| Scrambled List | Contains only encrypted Pay TV Channels |
| Satellit Lists | Contains all channels of a satellite |
▶ continue on the next page
8. Special Functions
- Select the desired channel and press OK.
| NOTE | To edit the channel list (delete, move, skip, add to favourites), in the Channel Menu select Programme edit. See also „5.2. Channel Menu“ on page 62. |
8.2. Favourites
To open the favourites list proceed as follows:
- Press the FAV button on the remote control.
The Favorite List Menu is displayed.
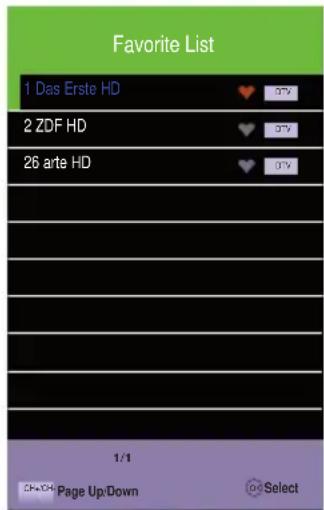
text_image
Favorite List 1 Das Erste HD 2 ZDF HD 26 arte HD 1/1 Page Up/Down SelectThe channels previously designated as favourites are displayed in this view. Symbols indicate if a channel is to be skipped or is marked as a favourite.
- Select the desired channel and press OK.
| NOTE | To edit the channel list (delete, move, skip, add to favourites), in the Channel Menu select Programme edit. See also „5.2. Channel Menu” on page 62. |
8. Special Functions
8.3. Channel Information
To open channel information, proceed as follows:
- Press the DISPLAY button on the remote control.
Channel Information is displayed.

text_image
2 ABC1 28 Mar 2008 11:04 11:00 - 11:32 Midday Report MPEG 576i DTV SD DOLBY Subtitle English Teletext Up-to-the minute local, national and international news, with special attention on business and the economy.8.4. Subtitle Language
To display the subtitle language, proceed as follows:
- Press the SUBTITLE button on the remote control.
The Subtitle Language Menu is displayed.

text_image
Subtitle Language Off English- Select the desired subtitle language and press OK.
| NOTE | The availability of subtitle languages is determined by the service provider. |
| NOTE | Editing the subtitle languages is not possible at this point.To edit the subtitle languages, in the Setup Menu select Subtitel Language. See also „5.6. Setup Menu“ on page 70. |
8. Special Functions
8.5. Programme Guide (EPG)
To display the programme guide proceed as follows:
- Press the EPG button on the remote control.
The 7 Day TV Guide Menu is displayed.

In this view you will find information on the current day's programming, that of the previous day, and also of the following day.
- Select the desired programme and press OK.
8.6. Radio
To switch between Radio mode and TV mode, proceed as follows:
- Press the TV/Radio button on the remote control.
You are in Radio mode.
- Press the blue button on the remote control to deactivate the screen. The radio will continue playing.
- Reactivate the screen by pressing any button on the remote control.
- Press the TV/Radio button on the remote control again to return to the TV mode.
NOTE
It is possible to use the Vol+/Vol- and the MUTE buttons with the screen deactivated. When using these buttons the screen remains deactivated.
8. Special Functions
8.7. Teletex t
Teletext is made available free of charge by most TV stations. It provides various types of information, e.g. News Ticker and updated news, weather forecasts, information on business, sport, culture, advice services, etc. and also on television programming.
- Press the button TV/TXT on the remote control. To display the teletext a station must be selected which provides this service.
To select a page, with the number buttons on the remote control enter the three-digit number of the desired page.
Use the CH▲ und CH▼ buttons on the remote control to move forwards and backwards between the pages.
Use the HOLD button on the remote control to set a page.
Use the INDEX button on the remote control to move to the opening page or the table of contents.
Use the SIZE button on the remote control to zoom the upper or the lower section of the page or to return to the normal display.
Use the REVEAL button on the remote control to reveal hidden information or to hide this information again.
Use the SUBPAGE button on the remote control to directly select subpages which are then automatically displayed:
- Press the TV/TXT button on the remote control again to leave the teletext and return to TV mode.
9. Trouble Shooting
| Problem Action | |
| Television set cannot be turned on | Make sure that the power cable is properly inserted.Make sure that the On/Off switch on the bottom of the television set is turned on.Make sure that the polarity of the power supply is correct. |
| No Picture | Make sure that the correct source (INPUT) is selected.Make sure that the correct source or antenna is properly connected. |
| No Sound | Check the volume setting.Check whether the Mute function is activated. |
| Poor Picture Quality | Make sure that the antenna cable is properly connected.Check the picture settings. |
| Picture too large/small, distorted. | Press the ASPECT button of the remote control to change the image display. |
| Blue screen | Make sure that the appropriate input (INPUT) is selected. |
| Television set does not react to the remote control | Make sure that the batteries have been inserted correctly. If necessary, insert new batteries. |
| DTV/DTB-T mode: error message “No signal” | Check the antenna connection.Re-start the automatic channel search. |
| PC-Mode: the picture is too small, too large, or shifted. | Select PC as input source and adjust the picture settings in the menu. |
| Satellite - no signal | Check the list of channels. In the configuration section of the menu you can restore the standard list of channels. |
10. Specification
| Technical Data | CAV190B |
| Energy efficiency class* A+ | |
| Visible diagonal screen size in cm | 47 |
| Visible diagonal screen size in inch | 18,5 |
| Power consumption ON | 13,0 Watt |
| Annual energy consumption | 19 Watt |
| Power consumption stand-by | 0,50 Watt |
| Power consumption OFF | 0,00 Watt |
| Resolution (Pixel) | 1366 x 768 (HD ready) |
| Image format | 16:9 |
| Contrast ratio | 3.000 : 1 |
| Brightness | 250 cd/m2 |
| Viewing angle (R/L/T/B) | 89°/89°/89°/89° (wide-angle) |
| Loudspeaker | 2 x 3 Watt |
| Smart-D control for satellite antenna | yes |
| Analog TV-Tuner | yes |
| DVB-T2 HD (H.265) Tuner | yes |
| DVB-S2 Tuner | yes |
| HDMI | yes (1x) |
| Scart | yes |
| Component (Y, Pb, Pr) 3,5 mm jack | yes, adapter optional: MCC29080 |
| Composite (FBAS) 3,5 mm jack | yes, adapter optional: MCC29060 |
| USB connection (media player) | yes |
| PC (VGA) | yes |
| PC Audio-In (3,5 mm) | yes |
| Antenna connection analogue/DVB-T2 | yes |
| 5V power supply for active DVB-T antennas | yes |
| Antenna connection DVB-S2 | yes |
| CI+-Slot | yes |
| Digital Audio output | yes |
| Headphone (3,5 mm) | yes |
| Remote control | yes |
| Foot (detachable) | optional: ETC0083 |
| 12V connection cable | yes |
| Power supply unit (100 ... 240 V), external | optional: ETCV008 |
| VESA mounting option 100 x 100 | yes |
| Set switch on/off | yes |
| Supported USB file formats | Video, Foto, Audio; Software Update |
| Operating voltage | 9...30V |
| Temperature range operation/storage | 0...50°C/-20...60°C |
| Pixel defect class to EN ISO 9241-307 | 0 |
| Weight (TV-set incl. accessories) | 2,3 kg |
| Dimensions (W x H x D in mm) without foot | 440 x 263 x 48 mm |
*scale A++ bis E
CAV220B
A+
55
21,5
17,0 Watt
25 Watt
0,50 Watt
0,00 Watt
1920 x 1080 (Full HD)
16:9
3.000:1
250 cd/m²
89°/89°/89°/89° (wide-angle)
2 × 3 Watt
yes
yes
yes
yes
yes (1x)
yes
yes, adapter optional: MCC29080
yes, adapter optional: MCC29060
yes
yes
yes
yes
yes
yes
yes
yes
yes
yes
optional: ETC0083
yes
optional: ETCV008
yes
yes
Video, Foto, Audio; Software Update
9...30V
0...50°C/-20...60°C
0
2,7 kg
507×302×48mm
Contenu
natural_image
Technical line drawing of a mechanical assembly with two arms and internal components (no text or symbols)Configuration satellite
6.1. Common Interface (CI)
text_image
Video Return 720x480 MPEG+LV. 720x480 MPEG+LV Core Animation: 720 x 480 Audio Work: 1 / 3 Video: 1 / 3 Program: 1 / 3 Time: 16:48:48:48:48:48:48:48:48:48:48:48:48:48:48:48:48:48:48:48:48:48:48:48:48:48:48:48:48:48:48:48:48:48:48: 500 MHztext_image
Play 00:00:01 / 00:04:16 Pause 75 77 Press Next Stop Repeat/Full NETCtext_image
Pause Prev. Next Stop RepeatALL Music Playlist Info.text_image
2 ABC1 28 Mar 2008 11:04 11:00 - 11:32 Midday Report MPEG 576i DTV SD DOLBY Subtitle English Teletext Up-to-the minute local, national and international news, with special attention on business and the economy.SIMPLIFIED EU DECLARATION OF CONFORMITY
Hereby, Caratec GmbH declares that the radio equipment type CAV196DSW, CAV226DSW and CAV246DSW is in compliance with Directive 2014/53/EU.
The full text of the EU declaration of conformity is available at the following internet address: http://doc.caratec.de
DECLARATION DE CONFORMITE UE SIMPLIFIEE
natural_image
Blank white image with no visible content, text, or symbols