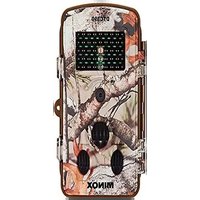
DTC 390 - Camera MINOX - Free user manual and instructions
Find the device manual for free DTC 390 MINOX in PDF.


| Product type | Digital surveillance camera |
| Brand | Minox |
| Model | DTC 390 |
| Sensor | CMOS 5 Megapixels |
| Image resolution (interpolated) | 12 MP, 8 MP (interpolated) |
| Maximum video resolution | 1920 x 1080 (15 fps) |
| Screen | 2.4" TFT color |
| Infrared flash | Yes, invisible, range > 10 m |
| Number of IR LEDs | 42 |
| Motion sensor | Passive PIR detectors (center + side) |
| Detection angle | Up to 120° |
| Capture modes | Photo, video, photo+video |
| PIR interval | 2 seconds to 60 minutes |
| Storage | SD/SDHC card up to 32 GB |
| Protection | IP54 (dust and splash resistant) |
| Power supply | 8 AA 1.5 V batteries (LR6) or 6 V DC adapter (min. 2000 mA) |
| Dimensions | 136 x 95 x 75 mm |
| Weight (without batteries) | 280 g |
| Password protection | Yes, 6-digit PIN code |
| Warranty | 2 years legal |
| Available languages | Multilingual (French included) |
| Included accessories | Mounting strap, wall bracket, USB cable, user manual |
Frequently Asked Questions - DTC 390 MINOX
User questions about DTC 390 MINOX
0 question about this device. Answer the ones you know or ask your own.
Ask a new question about this device
Download the instructions for your Camera in PDF format for free! Find your manual DTC 390 - MINOX and take your electronic device back in hand. On this page are published all the documents necessary for the use of your device. DTC 390 by MINOX.
USER MANUAL DTC 390 MINOX
natural_image
Close-up of a Minox DTC 390 camouflage camera module with visible targeting lenses and sensor grid (no text or symbols on main body)Einleitung
natural_image
Close-up of a Minox DTC 390 camouflage camera module with visible targeting lenses and sensor grid (no text or symbols on main body)Introduction
Congratulations on the purchase of your MINOX DTC 390 wildlife camera.
Like all other MINOX products, this wildlife camera boasts the traditional values fostered by MINOX. It combines functionality in the smallest possible space with the best optical quality. Simple and fast operation makes the MINOX DTC 390 ideal for digital photography and videos in the intended field of use.
These instructions are to help you take advantage of the full range of performance that your MINOX DTC 390 wildlife camera has to offer.
Note:
- We have done our best to produce a complete and accurate manual. However, we cannot ensure that there are no errors or omissions during the printing process.
- We cannot take responsibility for any damages caused by unauthorized attempts to upgrade software or for any data corruption while the product is being repaired.
- Please Back Up Your Files! We cannot be held liable for the loss of data caused by damaged products or damage due to unreadable memory cards or drives.
Contents
Introduction page 31
- Safety instructions 33
- Get to know your MINOX DTC 390 38
-
Elements and controls 38
-
Preparing the camera for use 40
-
Explanation of the controls 40
- Inserting the batteries 40
- Checking the battery level 41
- Inserting the memory card 41
- Language setting 42
-
Mounting the camera 43
-
Setup mode 43
-
Operating the camera 47
-
Image and video playback 49
-
Connecting the camera to a computer 50
-
Further information 51
-
Storage 51
- Disposal 51
- Legal information 52
- Declaration of conformity 52
- MPEG-4 Visual Patent Portfolio License 52
- Technical data 54
- Warranty terms 55
1. Safety instructions
If the camera and accessories are not handled correctly, there is a risk to you and others, or the camera may be damaged or destroyed. Please carefully read and adhere to the following safety instructions.
Intended use
- This camera is intended to record images and videos on your own private property or with the explicit permission of property owners. It is intended for private use only and not for commercial purposes.
Hazards for children and persons with limited abilities when operating electronic devices
- The camera, accessories and packaging are not toys and should be kept out of the hands of children. There is a risk of electric shock, poisoning and suffocation. The camera and its accessories should not be used by children or persons with limited abilities. The camera may only be used by persons who are physically and mentally capable of using them safely.
Electrical hazards
- If foreign bodies or liquids have entered the camera, turn it off and remove the batteries. Allow the camera to dry thoroughly as there is a risk of fire or electric shock.
- If the camera has dropped or the housing is damaged, turn the camera off and remove the batteries. There may be a risk of fire or electric shock.
-
The camera may not be disassembled, modified or repaired by unqualified persons. There may be a risk of fire or electric shock.
-
Only use a 6V mains adapter (not included in the scope of delivery) to power the camera externally, otherwise there is a risk of fire or electric shock. Disconnect the power supply by removing the mains adapter from the socket. If the mains adapter (not included in the scope of delivery) remains in the wall socket, it can still consume power and represent a source of danger.
- In the event of a thunderstorm, the mains adapter (not included in the scope of delivery) should not be used. There is a risk of electric shock.
Heat damage – risk of fire
- Do not leave the camera in places where the temperature can rise sharply (e.g. in a vehicle). This could damage the housing and internal parts, which in turn can cause a fire.
- Do not wrap or place the camera on textiles as this could lead to a build-up of heat inside the camera. This can cause the housing to deform and increase the risk of fire.
Possible hazards when using batteries
- Replace all batteries at the same time. Clean the contacts on the batteries and inside the camera before inserting fresh batteries. Before disposal, the batteries must be removed from the camera and disposed of separately from the unit.
-
Remove the batteries if the camera will not be used for a longer period of time. If the batteries have remained in the camera for an extended period of time, remove them immediately as they might overheat and thus increase the danger of fire when the camera has been activated.
-
There is a risk of explosion if the batteries are incorrectly inserted or if the wrong types are used. Use only LR6 or NiMH 1.5 V AA batteries.
- Do not expose the batteries to excessive heat such as direct sunlight, open flames etc. as this may cause a fire or explosion. Do not store batteries near fire, ovens or other sources of excessive heat.
- Batteries should never be stored at temperatures below 10°C (50°F) and not above 40°C (104°F).
- Keep the batteries out of the reach of children.
- Never transport batteries in a bag or toolbox as they may come into contact with metal objects and thus raise the risk of fire.
- Batteries should never be thrown into a fire, short circuited, forcefully discharged, deformed or taken apart. This will greatly raise the risk of fire or explosion.
- Do not touch batteries that have leaked without proper protection. If battery acid has come into contact with your skin, thoroughly wash the area with plenty of soap and water.
If you get battery acid in your eyes, rinse your eyes with plenty of water and contact a doctor immediately.
Batteries should be disposed of exclusively at specifically designated collection points or at your retailer.
Possible injuries and property damage
WARNING! To avoid injuries, the camera must be securely mounted on the ground, on a tree, on a post or on a wall.
- Place the camera only on stable surfaces. Otherwise, the camera may fall or tilt; it can be damaged and cause injury.
- Do not use the camera while walking or driving. You could stumble or cause a traffic accident.
- Only use a 6 V mains adapter (not included in the scope of delivery) to power the camera externally. MINOX is not liable for damages caused by the use of a wrong mains adapter.
- The power socket used for the mains adapter (not included in the scope of delivery) must be free and accessible at all times so that the mains adapter can be quickly disconnected if necessary.
- Ensure adequate ventilation and do not cover the mains adapter (not included in the scope of delivery) to avoid overheating.
- Do not place open sources of fire such as burning candles on or near the camera.
- Do not expose the LCD display to impact or pressure. This can damage the glass of the display or cause the liquid to leak from the interior of the display. If the liquid gets into your eyes or on the skin, rinse immediately with clear water. If the fluid gets into the eyes, immediately get medical treatment.
- Damage to the electronics, the display or the lens caused by external influences such as inadvertent blows, dropping the camera or inappropriate handling are not covered by the warrantee and are therefore subject to charges.
- Do not let the camera fall and avoid hard knocks. Taking good care of your MINOX DTC 390 will provide you with many years of fault-free use.
Scope of delivery
- MINOX DTC 390 wildlife camera
- Mounting strap
- Wall mount
- USB cable
- Instruction manual
Note: The actual contents may vary from this list. The scope of delivery is subject to change without prior notice.
Note: Please format the SD memory card before use. Files on the card from other devices may affect the functionality of the camera.
For further information about accessories for the DTC 390 can be found on the MINOX website: www.minox.com.
2. Get to know your MINOX DTC 390
Please take a few moments to carefully read the following guidelines:
- 5 megapixel resolution
- Convenient 2.4" colour display
- Daylight images in colour, night images in black & white
- Fast trigger release (< 1 sec.)
- Invisible IR-flash with a range of over 10 meters (33 feet)
- Low power consumption (Standby up to 6 months)
- SD memory card up to 32 GB
- Password protection
- Easy mounting by means of a separate bracket
- Splash-proof according to IP 54 specifications
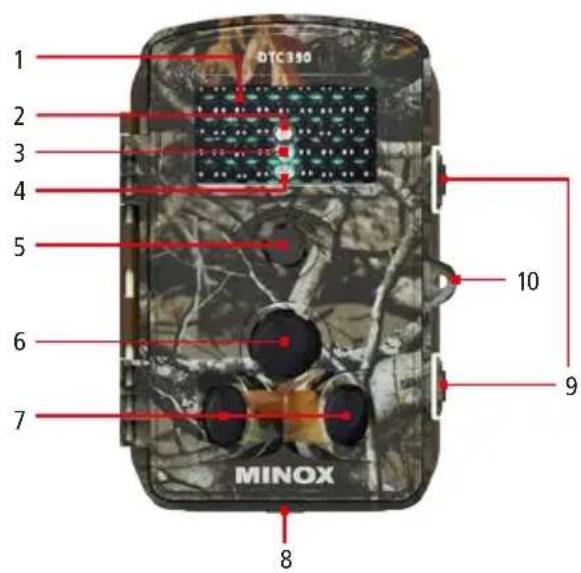
3. Elements and controls
1 IR LEDs for night images
2 Twilight sensor
3 Blue LED
4 Red LED
5 Lens
6 Central motion sensor
7 Side motion sensors
8 Microphone
9 Clamps
10 Eyelet for padlock
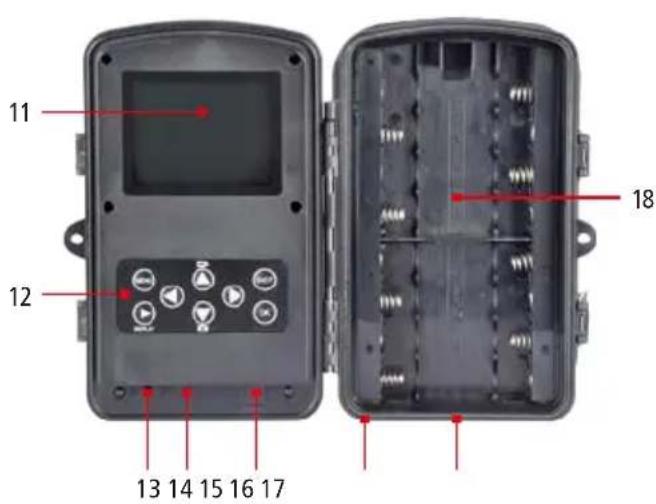
11 Display
12 Control buttons
13Mainswitch (ON, TEST, OFF)
14 USB port
15 SD memory card slot
166Vexternal power port
17 14 " tripod socket
18 Battery compartment
4. Preparing the camera for use
Explanation of the controls
To prepare your camera before use, proceed as follows:
- Place your DTC 390 in front of you.
- Open both clamps.
- Open the camera to the left.
On the bottom left, you will see the control buttons.
The switch for the three main functions can be found on the bottom of the left half of the camera:
- "OFF": main switch right
- "TEST": main switch centre
- "ON": main switch left
The SD memory card slot and USB port are also found on the bottom of the left half of the camera. At the upper left of the camera, you will find the 2.4" LCD display.
To the right, you will see the battery compartment for eight 1.5 Volt AA batteries.
The port to connect a 6 V mains adapter can be seen on the outside of the housing, at the bottom left of the camera.
Inserting the batteries
Your DTC 390 camera is designed to be used with alkaline, lithium or nickel-metal hydride (NiMH) AA batteries. To insert the batteries, open the camera as described above. Remove the battery compartment cover by pulling the clip lock down. Insert eight 1.5 Volt AA batteries, making sure that the batteries are inserted to match the +/- poles. The camera can be operated with just 4 batteries, but then with less operating time. If you choose to use only 4 batteries,
they can be inserted in either the upper or lower half of the battery compartment.
Note: An external 6V mains adapter can be used to power the camera. If the camera is attached to an external power source, the batteries will be bridged. This means that rechargeable batteries cannot be charged while in the camera, not even with a solar panel. Please do not use a mains adapter of more than 6 V as this will damage the camera, thus nullifying the warranty.
Checking the battery level
Switch your DTC 390 to "TEST" mode (main switch at the centre). The battery status will be indicated at the bottom right of the display.
Note: We recommend using high efficiency batteries for optimum performance. You can prolong battery life if you create shorter video sequences.
Memory card
To record images or videos, you will need an SD/SDHC memory card. Your DTC 390 camera supports memory cards up to 32 GB.
Inserting the memory card
Open the camera housing and insert the memory card into the slot, making sure that the gold-coloured contacts are at the top and away from you when inserting the card. Ensure that the SD card is not write-protected (SD card slider is not in the "Lock" mode).
Switch your DTC 390 to "TEST" (main switch at the centre). If the SD card has been inserted improperly, is not inserted at all or is not compatible, you will see the corresponding message in the display. After inserting the proper card correctly, you can continue with setting your camera.
Note: If the SD card was used to store data in other devices, reformat the SD card on a PC. By reformatting the card, all previous data will be deleted to ensure error-free operation. If the SD card has only been used in the DTC 390, formatting can be done with camera as well. It is recommended to take some test photos to make sure that the SD card is functioning properly.
Language setting
The default language settings of your DTC 390 wildlife camera are in German. To change the language, please follow these steps:
- Move the main switch to "TEST".
- You will now be in the manual photo release mode.
- Push the MENU button to enter the main menu of the camera.
- Push the "down" arrow button until you reach "Sprache".
- Push OK.
- Using the "up" and "down" buttons, choose your language.
- Push OK.
- The camera will now go back to the main menu. Your camera is now set to the language of choice.
Mounting the camera
- Mounting strap: The mounting bracket on the back of the camera can be used to mount the camera on a tree or post. The strap can be pulled through the bracket and around the tree or post and then tightened. Once the camera has been mounted, it can be turned 90° and removed from the bracket, and reattached in the same way. This enables a quick and easy removal of the camera to make necessary settings, exchange the batteries or remove the SD card, without having to reposition the camera afterwards.
- Tripod: The 14 " socket at the bottom of the mounting bracket can be used to mount the camera on a tripod or the wall mounting bracket included in the scope of delivery.
- Wall mount: The DTC 390 can be mounted on a wall or ceiling with the wall mount (included in the scope of delivery). Please make sure that the fastening screws are tight before attaching the camera.
5. Setup mode
Switch your DTC 390 to "TEST" mode (main switch at the centre). You will now be in the manual photo release mode – in this mode, you can take photos or videos to test the functionality of the camera. Push "MENU" to enter the main menu of the camera.
In this mode, you can make the following settings:
a) Mode: Photo, video, photo + video: Here you can choose if you wish to take photos or record videos.
In the photo + video mode, the camera first takes a predetermined number of photos and then a video is recorded. Select the desired setting and push OK.
b) PIRInterval: From 2 seconds to 60 minutes: Select the amount of time the camera should wait before the camera should trigger again after a photo or video has just been made. This function can prevent repeated and undesired recordings of the same occurrence. Select the desired setting and push OK.
c) PIR Level: Set the sensitivity of the infrared sensors here (they react to the difference between the surrounding temperature and the temperature of animals or persons moving within the sensor detection zone). In normal situations, it is recommended to use the "Middle" setting. In summer, where body temperatures are about the same as the surrounding temperature, it is recommended to use the "High" setting. Select the desired setting and push OK.
d) Capture Num: 1, 2 or 3 photos: Select the number of photos that should be made each time the camera is triggered and push OK. See also "PIR Interval".
e) Video Length: 10, 20 or 30 seconds, as well as 1, 2 or 5 minutes: Select the length of video that should be recorded each time the camera is triggered and push OK.
f) Video Size: High resolution videos provide higher quality videos but use considerably more storage space. It is recommended to use the default setting of 720p. Select the desired setting and push OK.
g) Language: Select the desired language and push OK.
h) Set Clock: Set time and date: Use the "right" and "left" arrow keys to select the unit that needs to be changed and the "up" and "down" arrow buttons to select the desired unit. Push OK to save your settings.
i) Stamp: Select "Yes" if you wish the timestamp to ap-
pear in your recorded images or "No" if the timestamp should not appear and push OK.
j) Photo Size: Select photo resolution: It is recommended to set your camera to "5M". Photos with higher resolutions use considerably more storage space. Select the desired setting and push OK.
k) Software: Choose from two options: Select "FW update" to update the firmware or "Version: ..." to check the currently installed firmware version. Select the desired option and push OK.
I) Audio Recording: Here you can choose whether audio should be recorded in video mode or not. Select the desired setting and push OK.
m) IR LED: Select the number of LEDs that should light up when a photo or video is made at night. It is recommended to set the number to 42 for the maximum range and illumination. Select the desired setting and push OK.
n) Beep Sound: Here you can activate or deactivate the beep sound of the control buttons. Select the desired setting and push OK.
o) Side PIR: Here you can set the PIR angle of detection. To maximise the detection angle, it is recommended to activate the side PIRs. If the area of detection is restricted to a minimum (e.g. hallway or similar), the side PIRs can be deactivated to minimise unwanted recordings. Select the desired setting and push OK.
p) Time Lapse: 15 sec., 30 sec., or 1 – 30 min.: If the Timer Setting has been activated, the camera will record images or videos in accordance with the selected time interval, regardless if the PIR sensors have been triggered or not – e.g. growth of plants, progress at a construction site etc. Select the desired setting and push OK.
q) Timer Setting: Here you can determine times of the day in which the camera should be activated – surveillance
of a construction site during working hours etc. Select the desired setting and push OK.
r) Camera Name: Here you can assign a 4 digit "name" to your camera. This can be helpful if more than one camera is being used in a particular area and to identify which camera recorded images in which particular area of surveillance. To set the name, push OK, select ON and use the arrow buttons to set the digits. Push OK to save your setting.
s) Security Code: This enables you to enter a six-digit PIN number to prevent unauthorized access to your camera. The PIN is requested while in TEST mode each time you turn the camera on and is required before you can use the camera. (If you cannot remember your PIN, the camera must be sent together with the purchase slip to our service centre.). To set the PIN, push OK, select ON and use the arrow buttons to set the digits. Push OK to save your setting.
t) Default: Here, all settings of the camera can be reset to the predefined factory settings. To set the Default, push OK, select YES and push OK to save your setting.
Further functions and settings found in the Playback Menu are described later.
6. Operating the camera
Switch your DTC 390 to "TEST" mode (main switch at the centre). In this mode, your DTC 390 will automatically use the most previous settings made while in the Settings Mode.
Note: The blue activation LED will blink several seconds before the camera enters operational mode. When the LED stops blinking, the camera is ready to record images and videos in accordance with your settings.
Night mode:
For night-shots, the necessary lighting is provided by the infrared LEDs on the front of the camera. The maximum recording distance in the dark is about 10 meters (33 feet). Due to the nature of the infrared lighting, night-shots are in black and white.
Aligning the camera:
The wide angle of the camera lens makes aligning your camera quite simple: a rough eye alignment is enough at first. Then pay particular attention to the vertical tilt, i.e. the correct inclination of the camera. This is especially important when the camera is not mounted on straight, vertical posts or surfaces. Once you have found a good position, switch the camera to TEST mode.
Now move in front of the camera from one side to the other. The blue LED will light up when one of the side sensor zones has been activated. The red LED lights up when the middle sensor zone has been activated. In this way, you can roughly determine if your camera is properly aligned, which is usually sufficient in most situations.
Note: The coloured LEDs light up only when in TEST mode. When the main switch has been moved to ON, the LEDs do not light up anymore.
If you wish to fine-tune the alignment of your camera, set the camera to ON mode (main switch to the left) and enter the camera's field of view from different directions. Then carefully turn the camera 90° and remove it from the mounting bracket. Go to TEST mode and push the REPLAY button to view your results. If necessary, you can correct the alignment and repeat the procedure. If the alignment of the camera is to your satisfaction, the camera can be switched to ON.
Note: To avoid undesired images or videos, do not set the camera up in sunny areas. Make sure that branches do not move in front of the camera. The MINOX DTC 390 is dust and splash proof and fulfils the IP 54 protection classification. It is suitable for outdoor use in all weather conditions.
How do infrared PIRs work?
When the camera is been switched to ON, it is then in standby mode. The trigger delay is approximately 1 second. If a fast moving animal moves through the PIR sensor zone, it is possible that only a part of the animal can be seen in the photo.
The passive, side PIR sensors counteract this effect - the sensitive angle of the camera is increased from 100irc to 120irc . If an animal enters the sensor zone from the side, the camera is activated and ready to make an image or video. If the animal then moves toward the centre of the sensor zone, the camera shutter is released with a mere 0.2 second delay. The probability of getting good images of animals is thus greatly increased.
If only the PIR has been activated by an animal and it does not enter the middle of the sensor zone, the camera will return to standby mode after 5 minutes. If this happens twice in a row, the camera will only be activated by the middle sensor area and the trigger delay is then one second. This function is intended to save battery power.
7. Image and video playback
If the camera has made images or videos, these can be viewed in the camera's display. To do this, the camera must either be in TEST mode (main switch in the middle) or in ON mode (main switch to the left). Now press the "REPLAY" button to view the photos and videos taken by the camera. Use the arrow keys to scroll.
When in REPLAY mode, a separate playback (Settings) menu can be found by pressing the MENU button. The following additional functions are then available for the currently viewed photo or video:
a) View Date/Time: Even if the timestamp has been deactivated, you can view the date and time of your file. Press OK to view the information and OK to go back to the previous menu.
b) Protect: Here you can protect particularly important files from accidental deletion. If a file is protected, and Delete All has been selected (see below), the protected file will not be deleted. Push OK and select Yes or No and then OK to go back to the previous menu.
c) Delete One: Here, you can delete the currently viewed file. Push OK and select Yes or No and then OK to go back to the previous menu.
d) Delete All: All images and videos on the SD card can be deleted at once, with the exception of protected files (see "Protect" above). Push OK and select Yes or No and then OK to go back to the previous menu.
e) Format: By formatting the SD card, ALL files will be deleted. Push OK and select Yes or No and then OK to go back to the previous menu.
f) Exit: You can exit the Settings menu only by selecting Exit and pressing the OK button. You will now enter the playback mode. To go back to the preview (TEST) mode push REPLAY.
8. Connecting the camera to a computer
Your MINOX DTC 390 saves your photos and videos in a folder named "DCIM/100Media" on your SD card. Photos have the file ending ".jpg" and videos ".avi".
There are two possibilities to transfer the files to your PC: either you remove the SD card and insert it into a card reader or you connect the DTC 390 to your PC with the USB cable included in the scope of delivery.
Transferring your files via USB cable
Always ensure that the camera is switched off before connecting it to a computer. Connect your camera to the computer using the USB cable (included in the scope of delivery) via the USB port. Switch the camera to TEST mode (main switch in the middle). The camera will now be recognized as a removable storage device. Your photos and videos can now be copied to a folder on your PC.
Transferring your files via SD card
Always ensure that the camera is switched off before the SD card is removed from the camera, otherwise the files on your memory card could be damaged. Remove the memory card from the slot and insert it into the card reader connected to your computer. Some computers also have an internal slot for SD cards - in this case, insert the SD card directly into the slot on your computer. Your photos and videos can now be copied to a folder on your PC.
9. Further information
Storage
If you will not be using your MINOX DTC 390 for an extended period of time, remove the batteries and store the camera in a cool and dry place.
Disposal
The packaging should be disposed of in a clean and environmentally safe manner. Batteries must not be disposed of in the household waste. The consumer is legally obliged to return dead batteries at designated collection points or at the retailer where the batteries were purchased.

Correct disposal of this product: This symbol indicates that within the EU, electronic devices are not allowed to be disposed of in the household waste. Please use the designated
collection points for the recycling of electrical and electronic equipment in your community or ask your dealer where
your device can be properly disposed of. This prevents possible harmful effects on the environment and health through improper disposal. Further information can be obtained from municipal services near you.
Legal information
The use of the MINOX DTC 390 is subject to a wide range of legal regulations which can vary from country to country, especially for recording images in public spaces. Please observe the national legislation for the protection of personal rights. It is especially important not to make photos or videos of persons in public places.
The use of the MINOX DTC 390 in forests and fields can be subject to other regulations. For example, the use of wildlife cameras in Germany is regulated by the National Hunting Legislation. Please also note the applicable legislation in your particular country and/or district.
Declaration of conformity
CE The manufacturer hereby declares that this CE marking has been affixed to this device in accordance with the essential requirements and other relevant provisions of the following European Directives:
- 2011/65/EG RoHs Directive
- 2014/30/EN EMV Directive
The EC declaration of conformity can be obtained from the address provided at the end of this manual.
MPEG-4 Visual Patent Portfolio License
This MINOX DTC 390 is licensed under the MPEG-4 Visual Patent Portfolio License for personal and non-commercial purposes to:
-
encode video files in compliance with the MPEG-4 standard and/or
-
decode MPEG-4 video files that was encoded by a consumer engaged in a personal and non-commercial activity and/or was obtained from a video provider licensed to provide MPEG-4 video. For other purposes, no license is granted or implied for the MPEG-4 standard.
Further information can be obtained from MPEG LA, LLC on http://www.mpegla.com
Technical data
| Sensor 5 MP hardware resolution, CMOS sensor | |
| Resolution Adjustable: | 12 MP (interpolated)8 MP (interpolated)5 MP |
| Trigger release < 1 sec. | |
| Photo burst 1 - 3 photos per release (adjustable) | |
| Video resolution | 1280 x 720 HD (30 fps)1920 x 1080 (15 fps)848 x 480 (30 fps)640 x 480 VGA (30 fps) |
| Video length 5 - 30 sec. (adjustable) | |
| High power IR flash Range > | 10 m (33 feet) |
| Display 2.4" TFT colour display | |
| Daylight images Colour | |
| Night images Black & white | |
| User-friendly interface | 8 button control panel |
| Real-time display | Photo / video playback |
| Settings | Date, time, temperature and moon phase on each image |
| External memory | SD/SDHC card: up to 32 GB |
| Ports | USB port, 6V port for an external power supply (min. 2000 mA) |
| Cable | USB cable (included in scope of delivery) |
| Batteries | Eight 1.5 V AA batteries alkaline, lithium-ion or NiMH | |
| Password protection | 6 digit combination | |
| Mounting aids | Mounting strap and wall mount (included in scope of delivery) | |
| Dimensions (H x W x D) | 5.4 x 3.7 x 3 in.136 x 95 x 75 mm | |
| Weight (without batteries) | 280 g (10 oz.) | |
| Order no. | Camouflage | 60726 |
| Grey | 60732 | |
| Brown | 60733 | |
Warranty terms
With the purchase of this MINOX DTC 390 you have acquired a product which has been manufactured and tested according to very high quality standards. The statutory warranty of 2 years provided for this product commences on the date of purchase from an authorized dealer and is subject to the following conditions:
1) During the warranty period, complaints based on faulty manufacture will be compensated free of charge either by repair, replacement of defective parts or replacement by an identical flawless product at our own discretion. Any further claims of any kind whatsoever, and irrespective of the legal basis in connection with this warranty, are excluded.
2) Claims under warranty are null and void if the defect has been caused by improper handling (which also includes the use of accessories made by other companies), if the product is serviced by unauthorized persons or workshops, or if the serial number has been obliterated.
3) Warranty claims can only be made by submission of an electronically printed sales slip from an authorized dealer.
4) When submitting claims under warranty, please return the MINOX camera together with the electronically printed sales slip, and a description of the complaint to the MINOX GmbH Customer Service or an international MINOX agency.
5) Tourists may, if required, make use of the MINOX agency in the country in which they are traveling. In accordance with the MINOX GmbH warranty terms, the electronically printed sales slip must nevertheless be presented.
MINOX GmbH
Walter-Zapp-Str. 4
D-35578 Wetzlar
Tel.: +49 (0) 6441 / 917-0
Fax: +49 (0) 6441 / 917-612
info@minox.com
www.minox.com
Notes
MINOX DTC 390
Français
Deutsch Seite 2
English page 30
natural_image
Close-up of a Minox DTC 390 camouflage camera module with visible targeting lenses and sensor grid (no readable text beyond branding)Introduction
Directive ROHS 2011/65/CE
Directive CEM 2014/30/UE
Design subject to alterations without notice.
MINOX is a registered trademark of MINOX GmbH, Wetzlar.
D-35578 Wetzlar, Germany
Tel.: +49 (0) 6441 / 917-0
Fax: +49 (0) 6441 / 917-612
E-Mail: info@minox.com
www.minox.com
- Einleitung
- Introduction
- Note:
- Contents
- Introduction page 31
- Safety instructions
- Intended use
- Hazards for children and persons with limited abilities when operating electronic devices
- Electrical hazards
- Heat damage – risk of fire
- Possible hazards when using batteries
- Possible injuries and property damage
- Scope of delivery
- Get to know your MINOX DTC 390
- Elements and controls
- Preparing the camera for use
- Explanation of the controls
- Inserting the batteries
- Checking the battery level
- Memory card
- Inserting the memory card
- Language setting
- Mounting the camera
- Setup mode
- Operating the camera
- Night mode:
- Aligning the camera:
- How do infrared PIRs work?
- Image and video playback
- Connecting the camera to a computer
- Transferring your files via USB cable
- Transferring your files via SD card
- Further information
- Storage
- Disposal
- Legal information
- Declaration of conformity
- MPEG-4 Visual Patent Portfolio License
- Warranty terms
- Notes
- MINOX DTC 390
- Français
Brand : MINOX
Model : DTC 390
Category : Camera