
CEN-SP-304 - Faucet FRANKE - Free user manual and instructions
Find the device manual for free CEN-SP-304 FRANKE in PDF.

| Product type | Kitchen faucet |
| Brand | Franke |
| Model | CEN-SP-304 |
| Ideal working pressure | 4 bars (400 kPa) |
| Maximum working pressure | 8 bars (800 kPa) |
| Minimum working pressure | 2 bars (200 kPa) |
| Ideal water temperature | 60 °C |
| Maximum water temperature | 70 °C |
| Mounting hole diameter | 35 mm (1 3/8 in) |
| Material | Chrome-plated brass |
| Cartridge type | Ceramic disc cartridge |
| Pull-out spray head | Yes |
| Aerator | Yes, removable |
| Supply | Supply hoses included |
| Maintenance | Clean with soft sponge and soapy water |
| Compliance | ASME A112.18.1 / CSA B125.1, NSF/ANSI/CAN 61-2020, NSF 372 |
| Replacement parts available | Cartridge, seals, aerator, handle, etc. |
| Repairability | Replaceable cartridge |
Frequently Asked Questions - CEN-SP-304 FRANKE
User questions about CEN-SP-304 FRANKE
0 question about this device. Answer the ones you know or ask your own.
Ask a new question about this device
Download the instructions for your Faucet in PDF format for free! Find your manual CEN-SP-304 - FRANKE and take your electronic device back in hand. On this page are published all the documents necessary for the use of your device. CEN-SP-304 by FRANKE.
USER MANUAL CEN-SP-304 FRANKE
natural_image
Line drawing of a kitchen faucet with handle and base (no text or symbols)CEN-SP-304
EN Installation manual Kitchen Faucet
Installation instructions 5
Cleaning and maintenance 7
Replacing the cartridge 7
General maintenance 7
Spare/replacement list 8
Contents in box
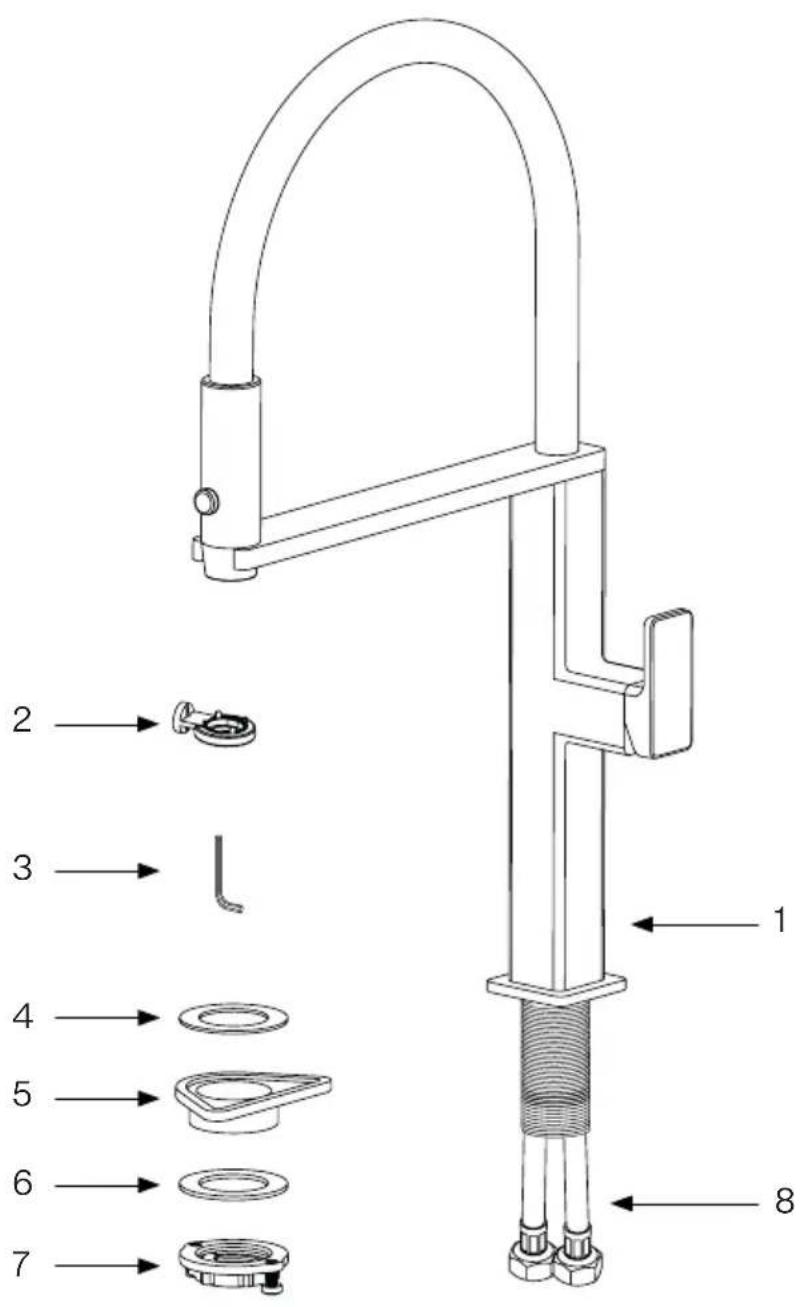
- Faucet Assembly
- Aerator Key
- Hex Key
- Rubber Washer
- Plastic Flange
- Fixing Plate
- Fixing Nut
- Supply Hoses
Technical data
| Operating data Value |
| Operating pressure (ideal) 60 PSI 4 bar 400 kPa |
| Operating pressure (max.)* 115 PSI 8 bar 800 kPa |
| Operating pressure (min.)* 30 PSI 2 bar 200 kPa |
| Water temperature (ideal) 140°F 60°C |
| Water temperature (max.) 158°F 70°C |
| Hole Size For Faucet 1 3/8" 35 mm |
Certifies this faucet complies with ASME A112.18.1 / CSA B125.1, NSF/ANSI/CAN 61-2020 (AB100 compliant, Q<1) & NSF 372. The faucet also complies with water usage requirements of the California Energy Commission and the US Department of Energy.
Installation instructions
- Remove all contents from the package and check for completeness.
- Turn off water supply.
- Cut a mounting hole 1 3/8" diameter (35 mm) in the desired mounting surface (if one isn't available).
- Ensure Base O-ring (2) is in place in the Faucet Base (1) (fig. 2A).
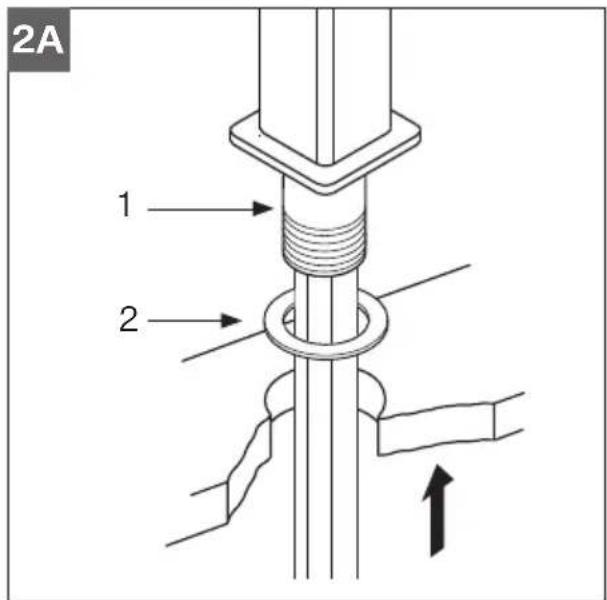
- Insert the faucet into the hole, hoses first (fig. 2B).
EN
Attention: Base-O-Ring (2) should be sitting between the countertop and faucet base.
Do not use putty or other sealant at this location.
Notes: Solid surface installation: The countertop mounting surface needs to be flat and free of debris; otherwise the faucet may not sit properly and could leak.
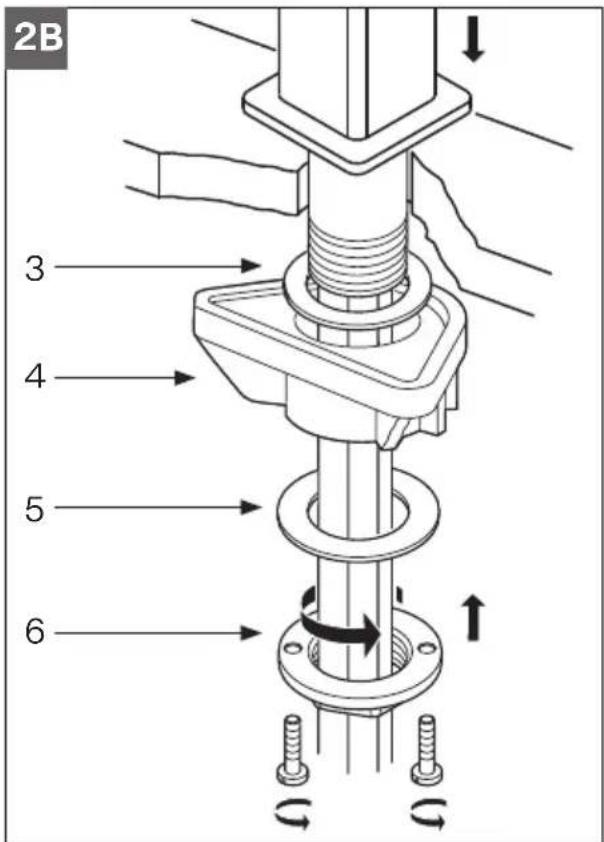
- Install the mounting hardware to the mounting shank of the Faucet Base (1) underneath the mounting surface in the following order: Rubber Washer (3), Plastic Flange (4) and Fixing Plate (5) (fig. 2B).
- Secure the faucet by tightening the Fixing Nut (6) onto the mounting shank of the Faucet Base (1) and tightening the screws in Fixing Nut (6) (fig. 2B).
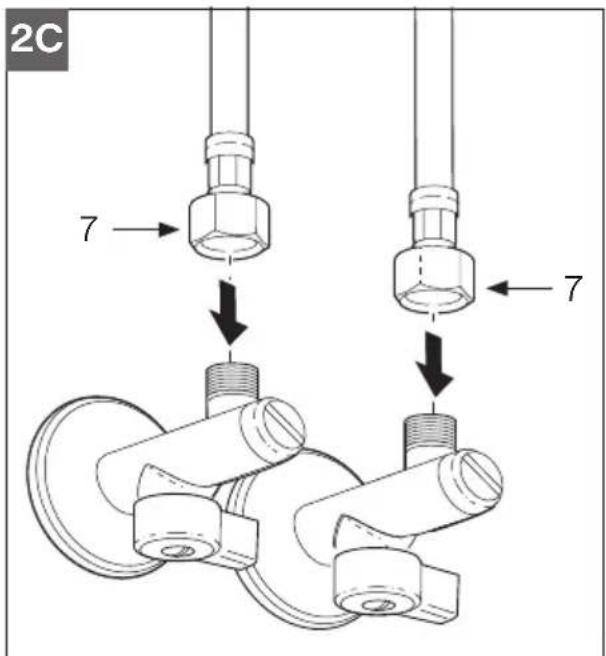
- Connect the Flexible Supply Hoses (7) to the water supply in the home (fig. 2C).
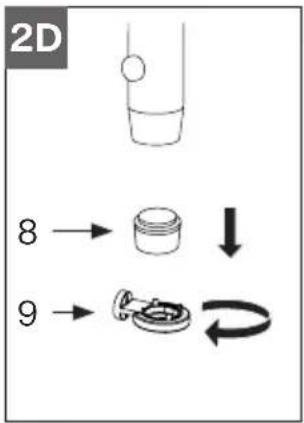
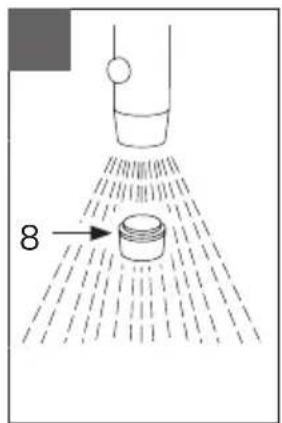
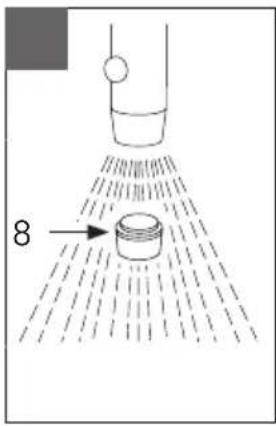
- Remove the Aerator (8) using the Aerator Key (9) (fig. 2D).
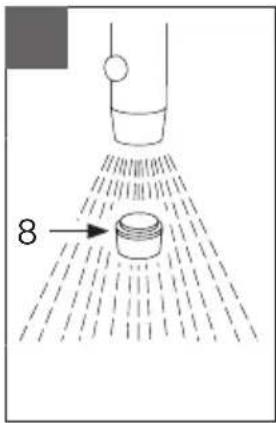
- Turn on water, flush the faucet and Aerator (8) to remove any debris and check for leaks (fig. 2E).
- Reinstall the Aerator (8) and ensure everything is functioning properly.
Replacing the cartridge
- Shut off the water supply to the faucet.
- Turn on the faucet briefly to relieve any pressure inside the faucet.
- Move the faucet handle to the "OFF" position.
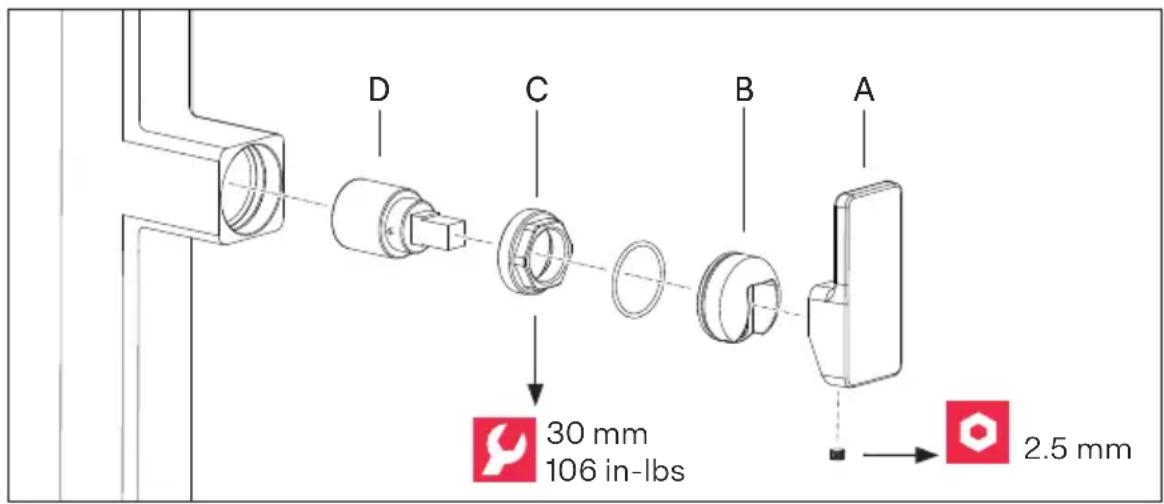
- Remove the set screw from the Handle Assembly (A) using a 2.5 mm hex key.
- Pull the Lever Handle (A) and Cartridge Cap (B) from the faucet body.
- Unscrew the Cartridge Lock Nut (C).
- Lift ceramic Disc Cartridge (D) from the body and replace it with a new one. Ensure the two lugs on bottom of the cartridge sit properly in the allocated holes at the base of the body.
- Re-assemble faucet in reverse order.
- Test for leakage.
General maintenance
Clean aerator periodically for any buildup (fig. 2D and 2E).
Do not use harsh detergents, solvents, chemical agents, especially CHLORINE or metallic sponges as these can damage the surface finish. Clean only with a soft sponge and soapy water.
Do not store chemicals or cleaning agents in the immediate vicinity of the faucet and connection hoses. Chemical vapors could cause damage.
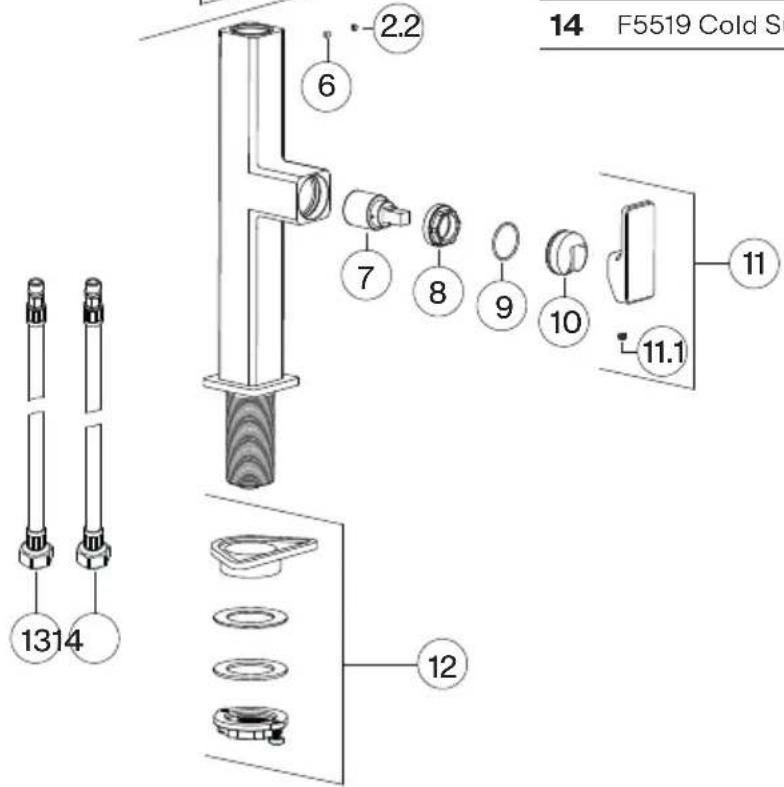
Spare/replacement list
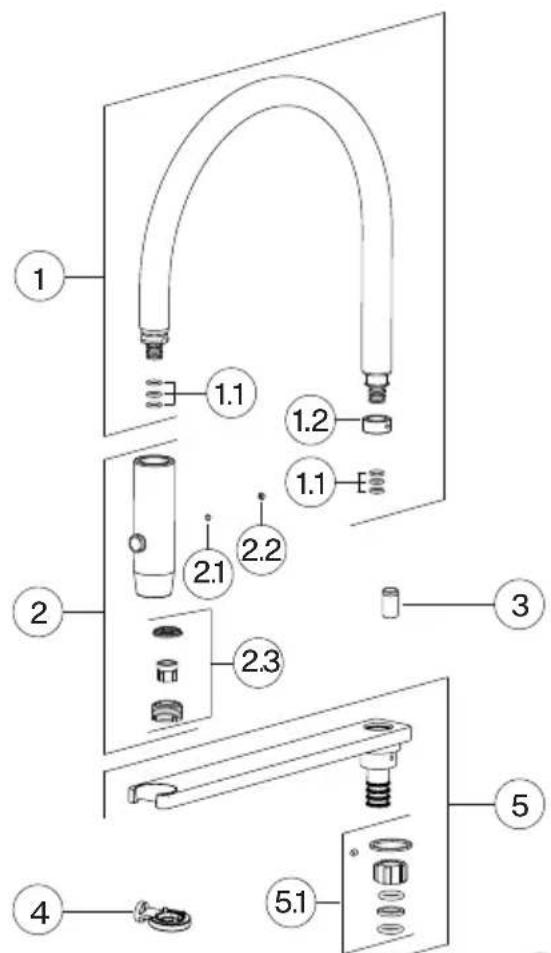
1 F5501 Spout Assembly
1.1 F5502 Spout O-ring Kit
1.2 F5503 Spout Bushing
2 F5504 Spray Head Assembly
2.1 F5505 Set Screw
2.2 F5506 Set Screw Cover
2.3 F5507 Aerator
3 F205513 Check Valve
4 F3306 Aerator Key
5 F5508 Spout Arm Assembly
5.1 F5509 Spout Bushing Kit
6 F5510 Set Screw
7 F5511 Cartridge
8 F5512 Cartridge Nut
9 F5513 Cartridge Nut O-ring
10 F5514 Cartridge Cap
11 F5515 Lever Handle
11.1 F5516 Set Screw
12 F5517 Fixing Kit
13 F5518 Hot Supply Hose
14 F5519 Cold Supply Hose
For any further information about our products, about the installation of them or about the warranty please contact our customer service department:
Franke Home Solutions
North America, LLC
800 Aviation Parkway
Smyrna, TN 37167, USA
Phone: 1-800-626-5771
HS-Warranty.US@Franke.com
Franke Kindred Canada Ltd.
1000 Franke Kindred Way
Midland, ON LR4 4K9
Phone: 1-866-687-7465
HS-Warranty.CA@Franke.com

Warranty website: https://www.franke.com/us/en/hs/support/warranty.html

Franke Home Solutions
North America, LLC
800 Aviation Parkway
Smyrna, TN 37167, USA
800 Aviation Parkway
Smyrna, TN 37167, USA
Téléphone: 1-800-626-5771
HS-Warranty.US@Franke.com
Franke Kindred Canada Ltd.
1000 Franke Kindred Way
Midland, ON LR4 4K9
Téléphone: 1-866-687-7465
HS-Warranty.CA@Franke.com

Site Web de la garantie : https://www.franke.com/us/en/hs/support/warranty.html

Canada
Franke Kindred Canada Ltd.
1000 Franke Kindred Way
Midland, ON LR4 4K9
Phone: 1-866-687-7465
USA, Mexico
Franke Home Solutions North America, LLC
800 Aviation Parkway
Smyrna, TN 37167, USA
Phone: 1-800-626-5771
Brand : FRANKE
Model : CEN-SP-304
Category : Faucet