
Winbot W2 Omni - Robot vacuum ECOVACS - Free user manual and instructions
Find the device manual for free Winbot W2 Omni ECOVACS in PDF.

| Product type | Window cleaning robot |
| Brand | ECOVACS |
| Model | Winbot W2 Omni |
| Robot dimensions (L x W x H) | 271 x 271 x 77 mm |
| Station dimensions (L x W x H) | 312 x 215 x 327 mm |
| Water tank capacity | 80 ml |
| Power cord length | 5.5 m |
| Rated power supply | 220-240 V ~ 50-60 Hz, 2.0 A |
| Station battery | Built-in, rechargeable (approx. 3 h charge) |
| Cleaning modes | Deep, full, quick, edge, zone, targeted, intensive |
| Control | ECOVACS HOME app via Bluetooth |
| Safety features | Safety rope with carabiner, station suction cup |
| Maintenance | Cleaning of drive wheel rails, fan, spherical sensors, side rollers; washable wiping pad |
| Spare parts | Wiping pad, ECOVACS WINBOT cleaning solution |
| Repairability | Safety battery replaceable only by an authorized technician |
| Package contents | Robot, station, power cord, safety rope, wiping pad, cleaning solution, manual |
| Operating temperature | 0 °C to 40 °C |
| Maximum window dimensions (zone mode) | 8 m (width) x 2.5 m (height) |
Frequently Asked Questions - Winbot W2 Omni ECOVACS
User questions about Winbot W2 Omni ECOVACS
0 question about this device. Answer the ones you know or ask your own.
Ask a new question about this device
Download the instructions for your Robot vacuum in PDF format for free! Find your manual Winbot W2 Omni - ECOVACS and take your electronic device back in hand. On this page are published all the documents necessary for the use of your device. Winbot W2 Omni by ECOVACS.
USER MANUAL Winbot W2 Omni ECOVACS
For the Instruction Manual in further languages, visit: https://www.ecovacs.com
Important Safety Instructions
When using an electrical appliance, basic precautions should always be followed, including the following:
READ ALL INSTRUCTIONS BEFORE USING THIS APPLIANCE. SAVE THESE INSTRUCTIONS
- This appliance can be used by persons with reduced physical, sensory or mental capabilities or lack of experience and knowledge if they have been given supervision or instruction concerning use of the appliance in a safe way and understand the hazards involved. Children shall not play with the appliance. The appliance is not to be used if it has been dropped, if there are visible signs of damage or if it is leaking. Keep the appliance out of reach of children when it is energized.
- Do not use and charge the Appliance in extremely hot or cold environments (below 0^ C/ 32^ F or above 40^ C/ 104^ F, above 85% humidity), or it may affect battery life span.
- The Appliance can be used to clean exterior windows if it is properly tethered to a safe position with the Carabiner, winds are calm,
and it is not raining or snowing.
- Before use, please use the Carabiner to lock the safety tether to a strong indoor railing, and make sure WINBOT is securely attached to it.
- Do not leave the Appliance unattended when using it. To prevent bodily injury or property damage caused by accidental falling of the Appliance, please make sure there are no people, animals, or valuable, fragile objects under the working area of WINBOT.
- Do not use the Appliance in whole gale storms and force-10 winds, or in areas where the altitude exceeds 2000 meters (6562 feet).
- Do not leave the Appliance unattended when it is plugged in.
- For household use ONLY (including exterior window). Do not use the Appliance in commercial or industrial environments.
-
Do not use on broken or uneven glass, such as glass with static cling stickers, advertising posters, or raised patterns, so as to prevent glass breaking or Appliance's falling. Do not use on surfaces with gaps, such as a piece of glass with gaps or holes, or two pieces of adjacent, frameless glass with a gap between them, so as to prevent the Appliance from falling due to poor attachment.
-
Only use accessories recommended or supplied by the manufacturer.
- Please ensure that the voltage of your power supply matches the voltage indicated on the label.
- Do not use the Appliance on a framed glass with a frame smaller than 5 mm (0.2 in).
- Do not use on glass less than 3 mm (0.12 in) thick or mirrors less than 4 mm (0.16 in) thick.
- Do not use on glass or mirrors with a handle height of 70\~105 mm (2.76\~4.13 in).
- Do not use the Appliance on greasy windows.
- When used in high humidity environment, the cleaning performance will be affected.
- Store the Appliance away from heat and flammable materials.
- In rainy weather, do not use the Appliance on the exterior window to avoid the risk of Appliance's damage or falling.
- Do not use the Appliance if it does not firmly attach to the glass or has visible signs of damage.
- To reduce the risk of electrical shock, do not put the Appliance in water or other liquid. Do not place or store Appliance where it can fall or be pulled into a tub or sink.
- Do not touch power plug with wet hands.
- When charging the Appliance, do not place it
on other electrical appliances and keep it away from fire and liquid.
- Take care not to damage the power cord. Do not pull on or carry the Appliance by the power cord, use the power cord as a handle, close a window on the power cord, or put heavy weights on the power cord. Keep power cord away from hot surfaces.
- Do not use with a damaged power cord or receptacle. Do not use the Appliance if it is not working properly, has been dropped, damaged, or come in contact with water. It must be repaired by the manufacturer or its service agent in order to avoid a hazard.
- If the supply cord is damaged, it must be replaced by the manufacturer or its service agent in order to avoid a hazard.
- The plug must be removed from the receptacle before cleaning or maintaining the Appliance.
- The Safety Battery must be replaced by the manufacturer or its service agent in order to avoid a hazard.
- The Safety Battery must be removed and discarded according to local laws and regulations before disposal of the Appliance.
- The Appliance must be disconnected from the receptacle before removing the battery for
disposal of the Appliance.
- Please dispose of used batteries according to local laws and regulations.
- Do not incinerate the Appliance even if it is severely damaged. The battery can explode in a fire.
- The Appliance must be used in accordance with the directions in this Instruction Manual. The company cannot be held liable or responsible for any damages or injuries caused by improper use.
- The robot contains batteries that are only replaceable by skilled persons.
- The plug and the station must be used indoor.
- If the insulated glass, which WINBOT is working on, is leaking, remove WINBOT immediately after cleaning is completed.
- Before cleaning, please observe the area to attach WINBOT for any small particles. If there are any, please remove them or switch to a particle-free area to avoid scratching the glass.
- Clean the Wiping pad in time and make sure that any small particles on it are completely removed to avoid scratching the glass.
-
To reduce the risk of injury, close supervision is necessary when an appliance is used near children.
-
Do not contact moving parts.
To satisfy RF exposure requirements, a separation distance of 20 cm or more should be maintained between this device and persons during device operation.
To ensure compliance, operations at closer than this distance is not recommended. The antenna used for this transmitter must not be co-located in conjunction with any other antenna or transmitter.
| Class II | |
| Short-circuit-proof safety isolating transformer | |
| Switch mode power supply | |
| For indoor use only | |
| --- | Direct current |
| ~ | Alternating current |
For EU Countries
For EU Declaration of Conformity information, visit https://www.ecovacs.com/global/compliance

Correct Disposal of this Product
This marking indicates that this product should not be disposed of with other household waste throughout the EU. To prevent possible harm to the environment or human health from uncontrolled waste disposal, recycle it responsibly to promote the sustainable reuse of material resources. To recycle your used device, please use the return and collection systems or contact the retailer where the product was purchased. They can safely recycle this product.
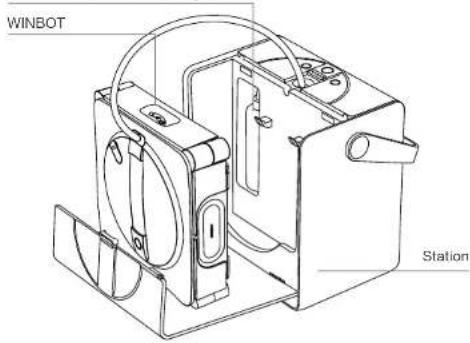
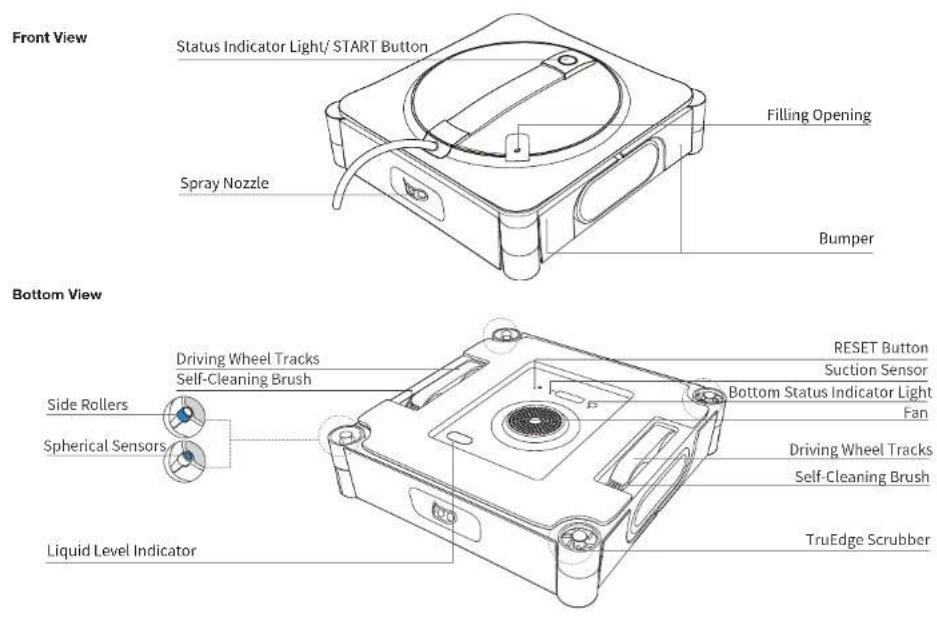
1. Product Overview
1.1 Package Contents
ECOVACS WINBOT Cleaning Solution
Wiping Pad
Instruction Manual
Note: Figures in this manual are for reference only and may differ from the appliance. Product design and specifications are subject to changes without notice.
1.2 Information Guide
The network configuration QR code is inside the station and on WINBOT's bottom.
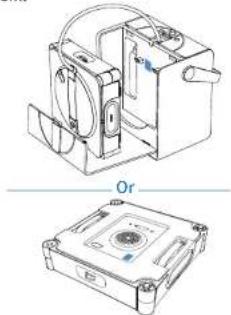
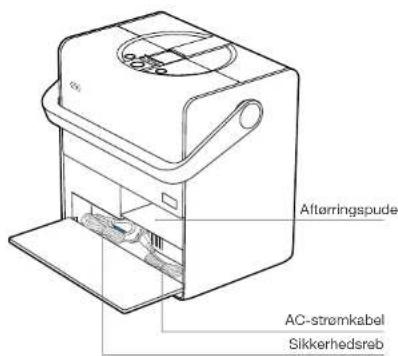
natural_image
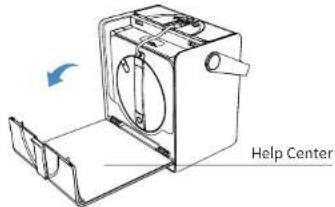
Technical line drawing of a mechanical device with two views: top shows internal components, bottom shows a labeled orifice housing (no text or symbols present)② For common issues regarding usage and applicability, refer to the "Help Center" inside the station's cover.
③ For troubleshooting, log in to the ECOVACS HOME App.
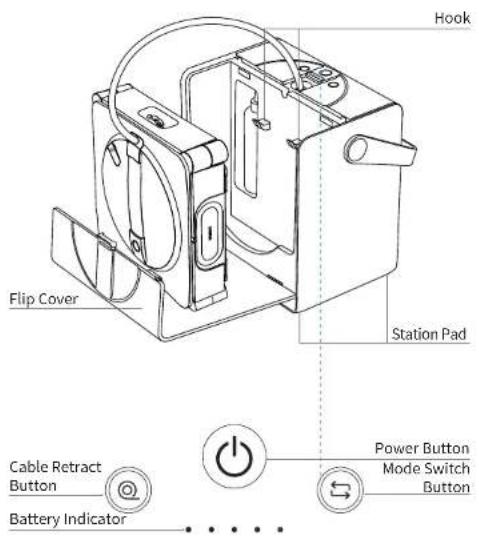
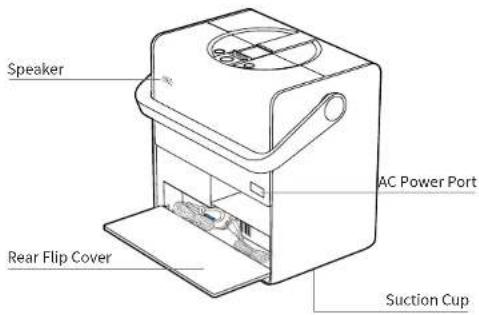
1.3 Product Diagram
2. Quick Start
2.1 Notes Before Cleaning
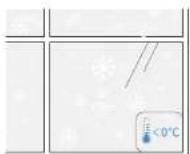
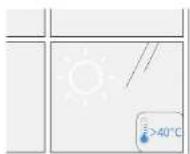
Do not use WINBOT on windows with condensation or oil stains or in extremely cold or hot environments.
2 Do not use WINBOT on windows that are too small or have irregular shapes.
WINBOT may have difficulty moving in the following conditions. WINBOT cannot move around in the following conditions.
Condensation

Oil stains

Small Glass
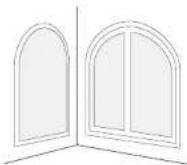
Irregular Shapes
below 0°C above 40°C

WINBOT delivers optimal performance on square and large windows.

WINBOT delivers optimal performance on dry surfaces and in temperatures above 0°C.
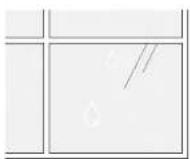
3 Do not use WINBOT on uneven windows.
WINBOT may experience insufficient air pressure in the following conditions.
Electrostatic Window Decals, Stickers, etc.
Cracks
Curved Glass Obstacle Height < 4 mm
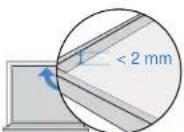
Frame Height < 2 mm
WINBOT performs better on a smooth and flat surface to ensure stable suction and smooth movement.
4 Do not use WINBOT on super large windows.
Limited by the length of Compound Cable, WINBOT may face challenges navigating across the entire window when it exceeds dimensions of 8m * 2.5m.
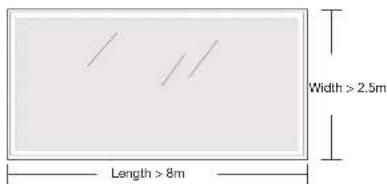
* Only available in zone cleaning mode.
5 Do not use WINBOT near narrow gaps close to its height.
WINBOT may get stuck when nearby narrow spaces, openings or gaps between window handles/door handles/ curtain boxes/cabinets and surfaces such as walls/windows, are close to its height.
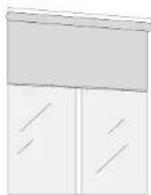
Try placing WINBOT between the gap to confirm safe passage; If it's stuck, refrain from using the robot there to prevent damage to either itself or surrounding furniture.
Before use, ensure the station's carabiner is securely attached to a stable, immovable object such as a table leg, chair leg, bed leg, sofa leg, curtain rod, or staircase handrail. Lock the carabiner to prevent any accidents.
The safety rope and its carabiner are pre-installed at the factory. Do not disassemble it at will.

natural_image
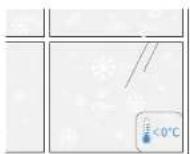
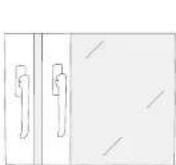
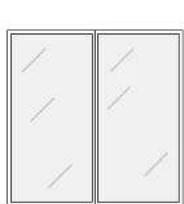
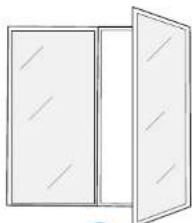
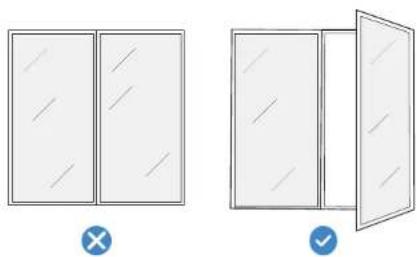
Simple line drawing of a simple electrical circuit connected to a table and a battery (no text or symbols)To clean glass panel doors, open the door before attaching WINBOT to avoid WINBOT falling due to narrow door gaps.
×

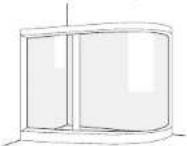
natural_image
Simple line drawing of a two-panel door with no text or symbols√
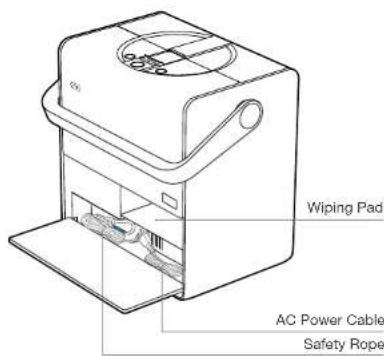
2.2 Preparation Before Use
1 Overview of Station and Light Effects
Button Functions

Press
Pause / Resume
Press and hold
Power On / Off

Press
Auto cable rewind

Press
Switch mode
Battery indicator
When WINBOT is working
Return to the starting point: Press and hold the @ button
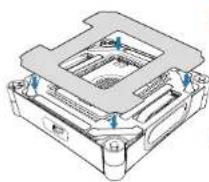
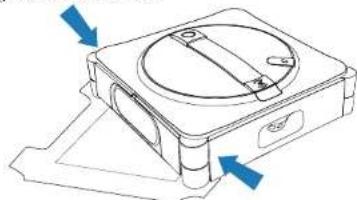
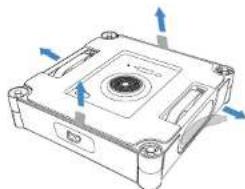
Note: Please remove all protective materials, including but not limited to the EPE protective strips wrapping WINBOT and the protective films on WINBOT's sides.

natural_image
Technical line drawing of a mechanical component with blue directional arrows indicating movement or force (no text or symbols)How to Open Flip Cover

natural_image
Diagram showing two views of a device with rotating components, no text or symbols presentStatus Indicator Light
| Indicator Light Effect Meaning | ||
| START Button/Bottom StatusIndicator Light | Solid Blue WINBOT is working properly. | |
| Flashing Red Malfunction, WINBOT is unable to function properly. | ||
| Station PowerButton | Solid Blue WINBOT and the station are functioning properly. | |
| Flashing Red WINBOT and the station are malfunctioning and cannot operate properly. | ||
| Station BatteryIndicator | Solid Blue (>1 Indicator lit) | Full battery. |
| Breathing Blue The station is charging. | ||
| Solid Blue (1 Indicator lit) | Insufficient battery. Please connect the power supply to use. | |
| Flashing Blue (1 Indicator lit) | Battery is too low. Please charge it until the indicator turns solid blue before use. | |
| Breathing Red Charging in progress with very low battery. | ||
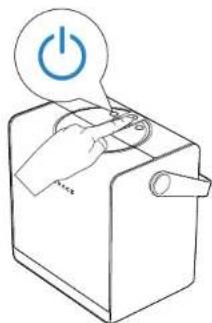
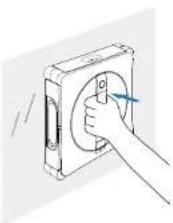
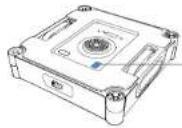
2 Power On
Press and hold the power button for more than 2 seconds to turn on both the station and WINBOT.
The station supports 2 working modes:
-
When not connected to a power outlet, the station uses its built-in battery to power WINBOT.
-
When connected to a power outlet, WINBOT can operate normally while the station's built-in battery charges slowly. For charging instructions, please refer to [2.4 Storage and Charging After Use].
natural_image
Line drawing of a hand pressing a button on a device with a power button icon (no text or symbols)* When WINBOT is powered on, but the fan is not running, it will automatically enter sleep mode and shut down if there is no operation on the station or WINBOT buttons for ≥slant 20 minutes. To restart, press and hold the station power button again.(WINBOT neither enters sleep mode nor shuts down automatically while charging)
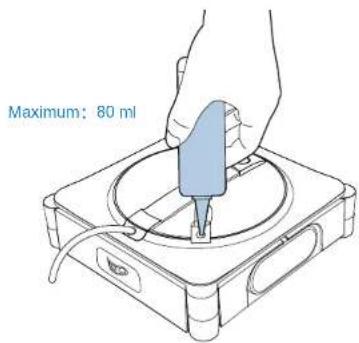
3 Add Cleaning Solution
Add the ECOVACS WINBOT cleaning solution to the water tank. The maximum capacity of the water tank is about 80 ml.

It is recommended that the ECOVACS WINBOT cleaning solution be used for optimal cleaning results.
* If the ECOVACS WINBOT cleaning solution runs out, tap water can be used temporarily. However, the ECOVACS WINBOT cleaning solution provides better cleaning results.

To avoid damage to the product, do not use any cleaning solutions other than the ECOVACS WINBOT cleaning solution. Do not use purified water or filtered water.
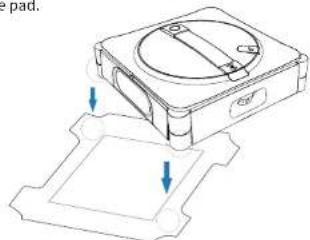
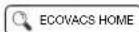
4 Install Wiping Pad
- Wet the wiping pad Before using, wet the wiping pad.

3.Stick the wiping pad
Stick the wiping pad onto the velcro on the bottom of WINBOT, ensuring the narrow and wide sides are aligned correctly. Then press firmly to secure the pad in place.
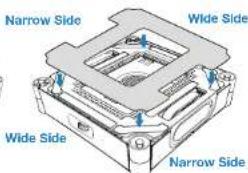
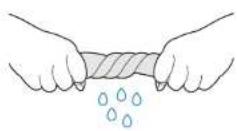
2. Wring out the wiping pad
Wring out the wiping pad to remove excess water. For optimal cleaning performance, ensure it is wrung out as much as possible.
2.3 Getting Started
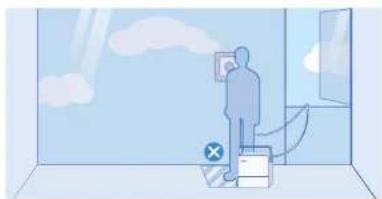
1 Place the Station
Place the station next to the window that needs to be cleaned.
Notes:
-
Position the station as close to the window as possible to prevent the compound cable from becoming a tripping hazard for people or pets.
-
When cleaning large full-length windows, place the station on the floor near the window opening to prevent power cable strain.
natural_image
Illustration of a person standing in a room with clouds and a window, no text or symbols present*WINBOT's power cable is 5.5 m long, and the maximum applicable single-window size is 8 m wide by 2.5 m high.
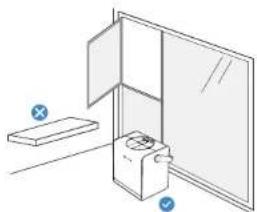
- Always place the station on flat, seamless ground.
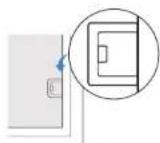
natural_image
Simple line drawing of a door with a box and a switch, no text or symbols present* Do not place the station on elevated surfaces such as tables or countertops.
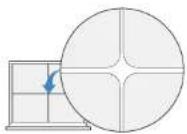
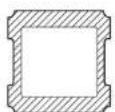
- Do not place the station on uneven surfaces, such as carpets or tiled/wooden floors with gaps.
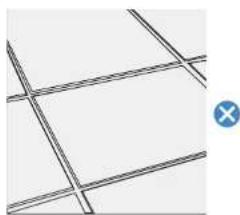
natural_image
Pure geometric grid lines forming a cross pattern without any text, numbers, or symbols* The suction cup at the bottom of the station is designed for smooth, seamless ground such as polished floors, tiles, and marble without gaps.
2 Start Cleaning
Ensure the station's power is turned on.
-
Before cleaning, ensure a clean area larger than WINBOT's size, then attach it to the glass.
-
Press and hold WINBOT's START button for 2 seconds to activate the fan.
-
After hearing the fan start, place WINBOT's bottom (the side with the wiping pad) against the glass. WINBOT will adhere to the window automatically and start cleaning.
Notes:
* Do not stick the WINBOT too close to the edge when cleaning the frameless glass. It is recommended to be more than 10cm away from the edge.
* WINBOT can only be used on flat, seamless surfaces.
* After powering on, keep the fan away from hair and small objects to prevent blockages.
* Do not stand below or near the WINBOT while it is cleaning.
3 Switch Cleaning Modes
While WINBOT is operating, cleaning modes can be switched by pressing the station's mode switch button. WINBOT will automatically begin cleaning in the newly selected mode.
Notes:
The station's mode switch button can cycle through Deep Cleaning, Thorough Cleaning, Fast Cleaning, Edge Cleaning in sequence. To access more cleaning modes, refer to the ECOVACS HOME App.
Select a Cleaning Mode
Use the station's button to choose the appropriate cleaning mode. If no selection is made, WINBOT will default to the last used mode.
Recommended Cleaning Modes:
Interior windows: In general, interior windows are not heavily soiled — Fast Cleaning is recommended.
Exterior windows: In general, exterior windows are heavily soiled — Deep Cleaning is recommended.
For more details on cleaning modes, please refer to the App.
Edge Cleaning is not saved. The default cleaning mode when WINBOT is first used is Deep Cleaning.
4 Pause and Move Station
Pause
To pause WINBOT's current operation, press the station's power button. Press the button again to resume the cleaning task.
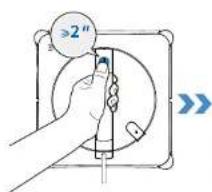
Move the Station
If you need to move the station during cleaning, firmly grip the station's handle and lift it. The suction cup will automatically unlock. Once the handle is released and falls back into place, the suction cup will automatically reattach and lock.
Note:
Before use, ensure there are no walls, furniture, or other obstructions within a 10 cm radius around the station's placement area. This allows the handle to naturally fall to its lowest point. If an obstruction prevents the handle from fully lowering, the suction cup's holding power may be reduced.

Maintenance During Cleaning
- Ensure WINBOT's fan is not activated.
- Place WINBOT on the wiping pad, ensuring both scrubbers fully contact the pad.
natural_image
Technical line drawing of a mechanical component with two downward arrows indicating force or movement (no text or symbols)- Press the bumpers simultaneously on both sides near the scrubbers. Release them when you hear the voice prompt "I'm starting to clean the scrubber."
natural_image
Technical line drawing of a mechanical device with blue arrows indicating direction (no text or symbols)- The voice prompt "The scrubber has been cleaned successfully" indicates that the cleaning process is finished.
* Clean the wiping pad in time and make sure that any small particles on it are completely removed to avoid scratching the glass.

inish
End Task Midway
To stop WINBOT's operation midway:
- Press and hold the station's ④ or 2 seconds or more. WINBOT will immediately stop the current task and return to the starting point, waiting to be removed.
- Press and hold the WINBOT's ⏻ for 2 seconds or more. The fan will stop, and follow the voice prompts to remove WINBOT.
Task Completed
Once WINBOT finishes its cleaning task, it will automatically return to the starting point and wait to be removed.
Press and hold WINBOT's ⏻ for 2 seconds or more to stop the fan. At this point, follow the voice prompts to remove WINBOT.
* When removing WINBOT, always grip the handle securely to prevent it from falling.
2.4 Storage and Charging After Use
Steps:
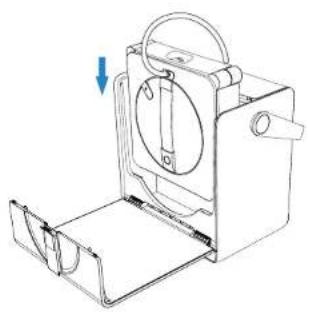
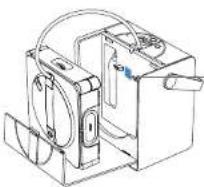
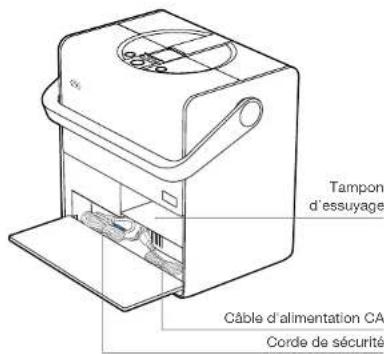
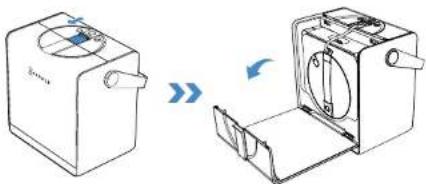
1. Store WINBOT
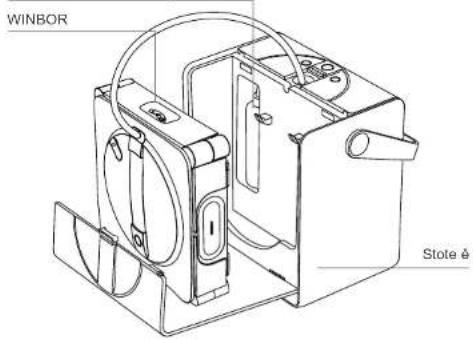
Place WINBOT into the station's storage box with the front facing outward and the compound cable outlet facing up. Lower it into the station from top to bottom, ensuring it hangs securely on the storage box's hook.
* Before storing WINBOT, remove the wet wiping pad. Allow it to dry completely before storage to prevent odors.
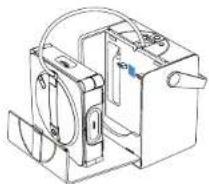
2. Retract the Cable
Once WINBOT is placed in the storage box, press the cable retract button. The station will begin retracting the cable.
* Near the end of retraction, the process will slow down. This is normal and not a cause for concern.
* The power cable may coil during retraction. This is normal. If needed, manually straighten the cable before pressing the cable retract button again to complete the retraction.
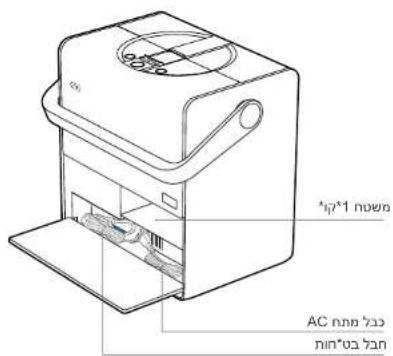
natural_image
Technical line drawing of a mechanical device with a handle and internal components, showing a downward arrow indicating motion (no text or symbols present)
natural_image
Line drawing of a hand operating a kitchen appliance with a circular icon above (no text or symbols)3. Power Off
Press and hold WINBOT's START button for 2 seconds to turn off WINBOT.
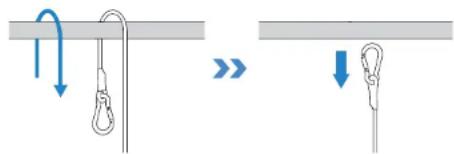
4. Unlock Safety Rope
5. Charge
Place the station near a power outlet and connect it to power. At room temperature, charging takes approximately 3 hours.
6. Store the Station
Store the station in a dry environment to prevent moisture damage to the battery and mainboard.
Note:
-
Low temperatures (e.g., 5°C) may slow down charging and extend charging time.
-
WINBOT is designed for use in temperatures between 0-40°C. Do not charge it outside this range.
-
To maintain charging time and efficiency, charge within a temperature range of 4-40°C.
-
WINBOT's fan cannot operate while charging. Use WINBOT only after charging is complete.
-
The station cannot charge while WINBOT is in operation. Wait until cleaning is complete and WINBOT is removed before charging.
-
If WINBOT is not used for an extended period, fully charge it before powering it off for storage. To prevent battery damage that could render it unusable, recharge WINBOT every six months.
-
If WINBOT is running while the station is charging, the charging speed will be significantly slower than when on standby. At room temperature (10–40°C), the estimated charging time is > 6 hours.
2.5 Advanced Features
Download the ECOVACS HOME App to control your WINBOT and unlock more features.
a. Multiple Cleaning Modes
Thorough Cleaning: Denser cleaning path for tackling heavy dust. Deep Cleaning: Intensive cleaning for a spotless finish.
Fast Cleaning: Quick removal of light dust.
Edge Cleaning: Cleaning along edges to clear accumulated dust. Zone Cleaning: Leftward & Rightward—flexible division for targeted cleaning.
Spot Cleaning: Repeated wiping to remove localized dust. Heavy-Duty Cleaning: Segmented wiping for enhanced efficiency.
b. Troubleshooting
If WINBOT triggers an alarm, do not panic. Visit the App for detailed troubleshooting guidance.
c. Omnidirectional Remote Control
Use the App to control WINBOT with full-range remote functionality. Features include: interior and exterior window views, 360° remote control, Spot Cleaning, and manual water spraying.
- Scan the QR Code on the bottom to download the ECOVACS HOME App, or search and download the APP in the APP store.
- Scan the QR code inside the station. Follow the App's instructions to connect to WINBOT.


3. Component Maintenance
Wiping Pad
a. Replace Wiping Pad
Remove the dirty wiping pad and attach a new one flatly within the wiping pad holder at the bottom of WINBOT. Press and smooth the pad down to ensure a secure fit. Make sure the wide and narrow sides of the wiping pad align with those of the holder.
- Be careful not to stick the wiping pad outside the holder to avoid affecting WINBOT's operation.
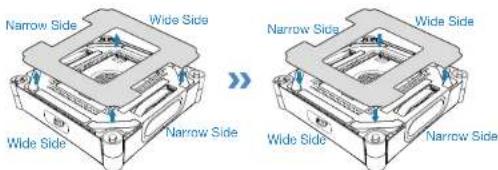
b. Wash Wiping Pad
Remove the wiping pad. Wash it with tap water, and wring it as dry as possible before use.
natural_image
Illustration showing a faucet spraying water into a bowl and a hand holding a towel with droplets (no text or symbols)* Regularly clean the wiping pad to extend its service life. If the wiping pad becomes worn or no longer adheres securely to the velcro, replace it with a new one to achieve optimal cleaning performance.
Explore more accessories at the ECOVACS HOME App or at https://www.ecovacs.com/global.
* If the velcro on the wiping pad holder is dusty, use a cleaning brush to remove the dust. Do not wash with water to prevent water from entering the bottom of the robot, which may cause damage.
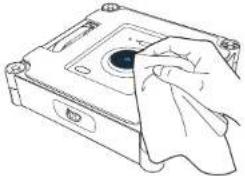
Driving Wheel Tracks
Before cleaning, ensure the fan is not running. Use the ECOVACS HOME App to remotely control WINBOT and check the driving wheel tracks. Pause the driving wheel tracks' operation if dirt is found. Then wipe the tracks clean with a clean cloth.
After cleaning the driving wheel tracks, install the wiping pad and resume cleaning tasks.
natural_image
Line drawing of a hand cleaning a CD or DVD disc (no text or symbols)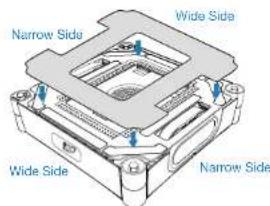
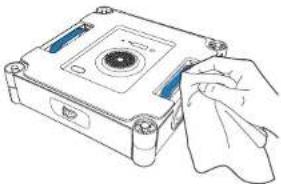
Bottom Component
Fan: Wipe clean with a dry cloth to prevent damage to WINBOT's suction force.
Spherical Sensors: Wipe clean with a dry cloth to maintain its sensitivity.
Side Rollers: Wipe clean with a dry cloth to maintain its sensitivity.
natural_image
Line drawing of a computer hard drive with a cloth partially covering the casing (no text or symbols)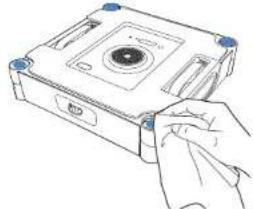
natural_image
Line drawing of a hand inserting a CD into a compact drive (no text or symbols)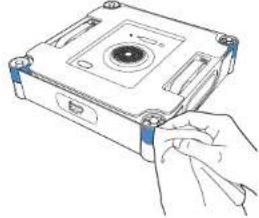
natural_image
Line drawing of a hand inserting a component into a CD drive (no text or symbols)* After WINBOT issues a low battery warning, ensure WINBOT is fully charged before using or storing it to avoid reducing battery service life.
* If WINBOT will not be used for an extended period, fully charge it, turn it off, and store it properly. To prevent battery damage and charging failure due to over-discharge, recharge it at least once every six months.
4. Troubleshooting
4.1 Issue Resolution
| No. | Issues Possible Causes Solutions | ||
| 1 | WINBOT slips, such as sliding sideways or body shaking. | The wiping pad is too wet. | Refer to [Component Maintenance] in this manual to replace the wiping pad. |
| WINBOT wipes non-recommended stains, such as oil stains. | Refer to [Component Maintenance] in this manual to clean the driving wheel tracks. | ||
| 2 | WINBOT voice prompts 'Insufficient air pressure'. | The wiping pad is not attached properly. | Remove the wiping pad and reattach. Make sure the wide and narrow sides of the wiping pad align with those of the holder. |
| There are gaps or cracks on the window. Do not use WINBOT on surfaces with gaps. | |||
| There are low obstacles on the window surface. | Manually cover the obstacles before using WINBOT. | ||
| 3 | WINBOT voice prompts 'Stuck'. | The driving wheel tracks are stuck. | Check if there is any dust or debris on the driving wheel tracks. If so, clean them with tools. Then restart WINBOT for auto cleaning. If the problem persists, please contact customer service. |
| There are low obstacles on the window surface. | WINBOT cannot detect obstacles or frames with a height lower than 4 mm. In this case, please go to the App and follow the instructions to help WINBOT out. | ||
| 4 | WINBOT voice prompts 'Stuck'. | There is no cleaning solution in the water tank. | Please add ECOVACS WINBOT cleaning solution in time. |
| The auto-spraying function is turned off in the App. | Please go to the App and turn on the auto-spraying function. | ||
| WINBOT is cleaning at a low water level. | 1. Turn off WINBOT, restart it, and reattach it.2. Visit the App and follow the auto-spraying precautions to solve the problem.3. If the problem persists, please contact customer service. | ||
| 5 | WINBOT voice prompts "WINBOT encounters an obstacle". | The internal components are abnormal. | Firmly hold the compound cable and do not stand directly below WINBOT to prevent being injured by the falling WINBOT. Slowly drag WINBOT until it can be reached. Press and hold the START button for 2 seconds, and then remove WINBOT. Turn off WINBOT, disconnect the power, and then restart it. If the issue persists after restarting, please contact customer service. |
| 6 | WINBOT has not returned to its origin and cannot be removed. | There is an error in the algorithm. | Affected by the calculation accuracy, there may be a slight error. The normal error is less than 21 cm. If the error of WINBOT returning to the origin is too large and it is inconvenient to retrieve WINBOT, please go to the App and remotely control WINBOT to return to a position that is easy to remove it. |
| The remote control function was used after WINBOT was adhered to, so WINBOT does not know the original position. | Go to the App and use remote control to help WINBOT return to a position that is easy to remove. | ||
| 7 | WINBOT voice prompts "Please avoid the window corners." | When cleaning frameless glass, the adhering position of WINBOT is too close to the window frame. | Hold WINBOT's handle, press and hold WINBOT's START button for 2 seconds, and then remove and reattach WINBOT. It is recommended that the adhering position be more than 10 cm away from the window corners. |
4.2 Connect WINBOT with APP
When connecting the robot via Bluetooth in the ECOVACS HOME App, please ensure the following conditions are met for both the robot and your phone:
- Bluetooth on your phone is turned on.
- The station is powered on, and the indicator light is on.
- Pair WINBOT via Bluetooth in the ECOVACS HOME App; avoid pairing through your phone's Bluetooth settings.
- Bluetooth and Wi-Fi may interfere with each other during pairing. For optimal connection, keep WINBOT close to the phone and away from the Wi-Fi router.
- If WINBOT fails to connect to the App, try disconnecting other connected Bluetooth devices, ensure WINBOT is not paired with another phone, and then try again.
- When using remote control, Bluetooth may disconnect if the phone is too far away or if there are walls in between. If disconnected, try reconnecting at a closer distance.
-
When using WINBOT, allow the ECOVACS HOME App to access location, Bluetooth, and phone storage permissions.
Please contact customer service if the above methods fail to help connect. -
Technical Specifications
| Model WG893-12 | ||
| Rated Input 220-240V~50-60Hz 2.0 A | ||
| Station Dimensions (mm) 312*215*327 | ||
| WINBOT Dimensions (mm) 271*271*77 | ||
| Off/Standby Mode Power Less than 0.50 W | ||
| Frequency Bands 2400-2483.5 MHz | ||
The max.EIRP of the window cleaning robot is 1.721dBm.
Note: Technical and design specifications may be changed for continues product improvement.
Access Complete Instruction Manual
Scan the QR code on the robot to access the full instruction manual.

Wischpad
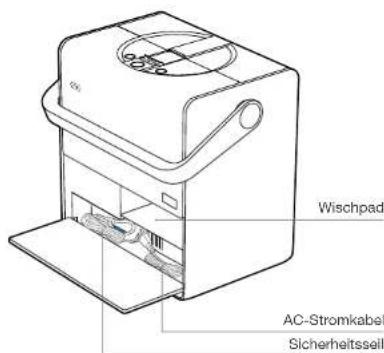

Betriebsanleitung
natural_image
Technical line drawing of a mechanical device with two views: top shows internal components, bottom shows a labeled case (no text or symbols present)natural_image
Two simple line drawings of cabinets, one open and one closed, with no text or symbols present.natural_image
Simple line drawing of a simple electrical circuit with a box connected to a table and a cable (no text or symbols)natural_image
Simple line drawing of a two-panel door with no text or symbols√
natural_image
Technical line drawing of a mechanical component with blue directional arrows indicating rotation or movement (no text or symbols)natural_image
Diagram showing two views of a device with rotating components, no text or symbols presentnatural_image
Line drawing of a hand pressing a button on a device with a power button icon (no text or symbols)natural_image
Illustration of a person standing in a room with cloud and window, no text or symbols presentnatural_image
Simple line drawing of a door with a box and a switch, no text or symbols presentnatural_image
Technical line drawing of a mechanical device with mounting base and internal components (no text or symbols)natural_image
Technical line drawing of a mechanical device with two blue arrows pointing to features (no text or symbols)natural_image
Technical line drawing of a mechanical device with a handle and mounting bracket (no text or symbols)
natural_image
Line drawing of a hand operating a kitchen appliance with a circular icon above (no text or symbols)3. Ausschalten
5. Aufladen
natural_image
Illustration showing a faucet spraying water into a bowl and a hand holding a towel with droplets (no text or symbols)natural_image
Illustration of a hand cleaning a CD-ROM drive into a circular button (no text or symbols visible)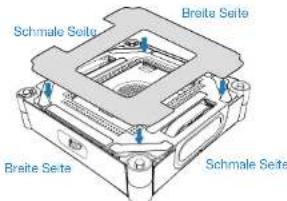
natural_image
Line drawing of a computer floppy disk with a cloth partially covering the interior (no text or symbols)
natural_image
Line drawing of a hand inserting into a CD into a compact case (no text or symbols)
natural_image
Line drawing of a hand inserting a CD into a compact drive (no text or symbols)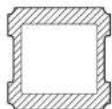
Tampon d'essuyage
natural_image
Technical line drawing of a mechanical device with two views: top shows internal components, bottom shows a flat base (no text or symbols)natural_image
Simple line drawing of a simple electrical circuit connected to a table with a power plug (no text or symbols)natural_image
Simple line drawing of a two-panel door with no text or symbols√
natural_image
Technical line drawing of a mechanical device with blue directional arrows indicating motion or force (no text or symbols)natural_image
Diagram showing two views of a device with rotating components, no text or symbols presentVoyant d'état
natural_image
Line drawing of a hand pressing a button on a device with a power button icon (no text or symbols)natural_image
Illustration of a person standing in a room with clouds and a window, no text or symbols presentnatural_image
Simple line drawing of a door with a box and a switch, no text or symbols present
natural_image
Technical line drawing of a mechanical device with two downward arrows indicating assembly or force (no text or symbols present)natural_image
Technical line drawing of a mechanical device with blue arrows indicating direction (no text or symbols)natural_image
Technical line drawing of a mechanical device with a handle and internal components, showing a downward arrow indicating motion (no text or symbols present)
natural_image
Line drawing of a hand operating a kitchen appliance with a circular icon above (no text or symbols)3. Mise à l'arrêt
5. Charge
6. Stocker la station
natural_image
Line drawing of a handheld electronic device with a cloth, no text or symbols present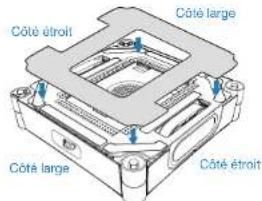
natural_image
Line drawing of a hand cleaning a compact electronic device with a cloth (no text or symbols)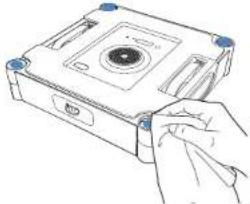
natural_image
Line drawing of a hand inserting a CD into a compact drive (no text or symbols)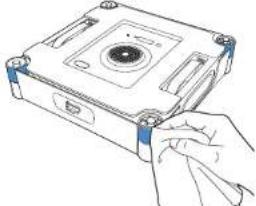
natural_image
Line drawing of a hand inserting a component into a CD drive (no text or symbols)natural_image
Technical line drawing of an open rear door and front view (no text or symbols)natural_image
Simple line drawing of a simple electrical circuit with a box and a table, connected by wires (no text or symbols)natural_image
Two identical rectangular panels with diagonal lines inside, no text or symbols present.×
natural_image
Simple line drawing of a two-panel door with no text or symbols√
natural_image
Technical line drawing of a mechanical component with blue directional arrows indicating rotation or movement (no text or symbols)natural_image
Diagram showing two views of a device with rotating components and a close-up view of the internal structure (no text or symbols)natural_image
Line drawing of a hand pressing a button on a device with a power button icon (no text or symbols)natural_image
Illustration of a person standing in a room with clouds and a window, no text or symbols presentnatural_image
Simple line drawing of a cabinet with an open door and a flat shelf, no text or symbols present.natural_image
Technical line drawing of a mechanical component with arrows indicating assembly or force direction (no text or symbols)natural_image
Technical line drawing of a mechanical device with blue arrows indicating direction (no text or symbols)natural_image
Technical line drawing of a mechanical device with a handle and mounting bracket (no text or symbols)
natural_image
Line drawing of a hand operating a kitchen appliance with a circular icon above (no text or symbols)3. Spegnimento
Download on the App Store

Get it on Google Play


ECOVACS HOME
natural_image
Illustration showing a faucet spraying water into a bowl and a hand holding a towel with droplets (no text or symbols)natural_image
Illustration of a hand cleaning a CD-ROM drive with a cloth (no text or symbols)
natural_image
Line drawing of a hand cleaning a compact floppy disk (no text or symbols)
natural_image
Line drawing of a hand inserting into a CD into a compact case (no text or symbols)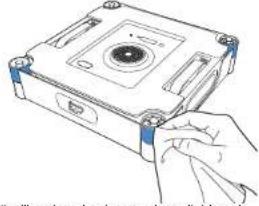
natural_image
Hand inserting a CD into a compact drive case (no text or symbols visible)natural_image
Technical line drawing of a mechanical device with two views: top shows internal components, bottom shows a base case (no text or symbols)natural_image
Simple line drawing of a simple electrical device connected to a table with a cable (no text or symbols)natural_image
Technical line drawing of a mechanical device with blue directional arrows indicating motion or force (no text or symbols)natural_image
Diagram showing two views of a device with rotating components, no text or symbols presentnatural_image
Line drawing of a hand pressing a button on a device with a power button icon (no text or symbols)natural_image
Illustration of a person standing in a room with clouds and a window, no text or symbols presentnatural_image
Simple line drawing of a door with a box and a switch, no text or symbols presentnatural_image
Technical line drawing of a mechanical component with arrows indicating force or movement (no text or symbols)natural_image
Technical line drawing of a mechanical device with blue arrows indicating directional components (no text or symbols)natural_image
Technical line drawing of a mechanical device with a handle and mounting bracket (no text or symbols)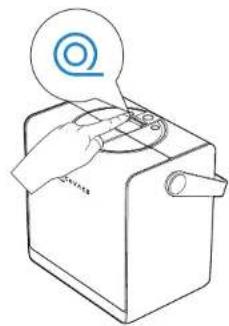
natural_image
Line drawing of a hand operating a kitchen appliance with a circular icon above (no text or symbols)3. Apagado
natural_image
Illustration showing a faucet spraying water into a bowl and a hand holding a towel with droplets (no text or symbols)natural_image
Line drawing of a hand cleaning a CD or DVD disc (no text or symbols)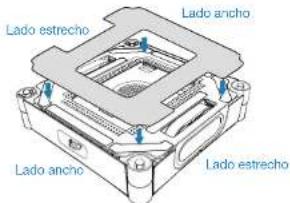
Componente inferior
natural_image
Line drawing of a computer case with a cloth partially covering the interior (no text or symbols)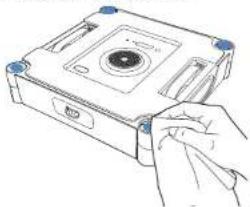
natural_image
Line drawing of a hand inserting a CD into a compact case (no text or symbols)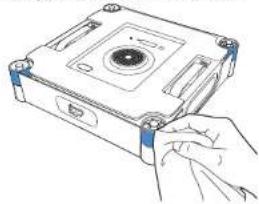
natural_image
Line drawing of a hand inserting a CD into a compact drive (no text or symbols)
Aftøringspude
natural_image
Technical line drawing of an electronic device with two views: top shows internal components, bottom shows a labeled case (no text or symbols present)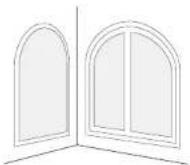
Uregelmæssige former
under 0°C over 40°C
natural_image
Simple line drawing of a simple electrical circuit connected to a table and a battery (no text or symbols)natural_image
Simple line drawing of a two-panel door with no text or symbols√
146DK
5SZL PH IPME OFEF (FOPQUBH 5¥OE 4MVI.

5SZL Qu
"VUPNBUJTL

SSZL Q
LIMTUBOF
LBCFMUJMCBHFTQPMJOH

• • •
BUUFSJJOEJLBUPS

IPME LOBQQFO
OFEF
FNYSL 'KESO WFOMJHTU BMMF CFTLZUUFOEF NBUFSJBMFS JOLMVTJWF
NFO JLLF CFHS#OTFU UJM &1& CFTLZUUFMTFTTUSJNMFSOF EFS QBLLFS 8*/#05 PH CFTLZUUFMTFT MNFOF Q= 8*/#05T TJEFS
natural_image
Technical line drawing of a mechanical component with blue directional arrows indicating force or movement (no text or symbols)natural_image
Diagram showing two views of a device with rotating components, no text or symbols presentStatusindikatorlys
natural_image
Line drawing of a hand pressing a button on a device with a power button icon (no text or symbols)2. Vrid aftorringspuden ud
natural_image
Illustration of a person standing in a room with clouds and a window, no text or symbols presentnatural_image
Simple line drawing of a door with a box and door, no text or symbols presentnatural_image
Technical line drawing of a mechanical component with downward arrows indicating force or movement (no text or symbols)natural_image
Technical line drawing of a mechanical device with two blue arrows indicating direction (no text or symbols)natural_image
Technical line drawing of a mechanical device with a handle and mounting bracket (no text or symbols)
natural_image
Line drawing of a hand operating a kitchen appliance with a circular icon above (no text or symbols)3. Sluk for strømmen
Tryk og hold WINBOTs START-knap nede i 2 sekunder for at slukke WINBOT.
5. Opladning
natural_image
Illustration of a hand cleaning a CD or DVD disc with a cloth (no text or symbols)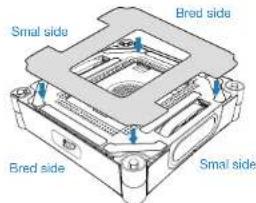
Nederste komponent
natural_image
Line drawing of a computer hard drive with a cloth partially covering the casing (no text or symbols)
natural_image
Line drawing of a hand inserting a CD into a compact drive (no text or symbols)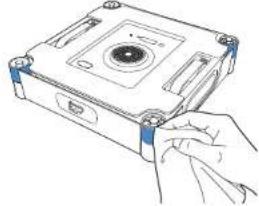
natural_image
Line drawing of a hand inserting a component into a CD drive (no text or symbols)natural_image
Technical line drawing of a mechanical device with two views: top shows internal components, bottom shows a labeled case (no text or symbols present)natural_image
Simple line drawing of a simple electrical circuit with a switch and resistor connected to a table (no text or symbols)natural_image
Simple line drawing of a two-panel door with no text or symbols√
natural_image
Technical line drawing of a mechanical component with blue directional arrows indicating rotation or force (no text or symbols)natural_image
Diagram showing two views of a device with rotating components, no text or symbols presentTilan merkkivalo
natural_image
Line drawing of a hand pressing a button on a device with a power button icon (no text or symbols)natural_image
Illustration of a person standing in a room with clouds and a window, no text or symbols presentnatural_image
Simple line drawing of a door with a box and a switch, no text or symbols presentnatural_image
Technical line drawing of a mechanical device with arrows indicating force or movement (no text or symbols)natural_image
Technical line drawing of a mechanical device with blue arrows indicating direction (no text or symbols)natural_image
Technical line drawing of a mechanical device with a handle and mounting bracket (no text or symbols)
natural_image
Line drawing of a hand operating a kitchen appliance with a circular icon above (no text or symbols)5. Lataa
natural_image
Illustration of a hand cleaning a compact electronic device with a cloth (no text or symbols visible)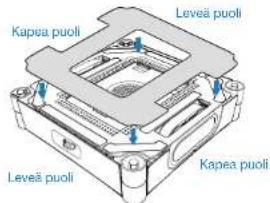
natural_image
Line drawing of a hand cleaning a compact electronic device with a cloth (no text or symbols)natural_image
Line drawing of a hand inserting a CD into a compact drive (no text or symbols)natural_image
Line drawing of a hand inserting a component into a device housing (no text or symbols)natural_image
Technical line drawing of an electronic device with two views: top shows internal components, bottom shows a labeled case (no text or symbols present)
Uregelmessige former

under 0 °C over 40 °C

natural_image
Simple line drawing of a simple electrical circuit connected to a table and a battery (no text or symbols)natural_image
Simple line drawing of a two-panel door with open lid (no text or symbols)√
198NO
natural_image
Technical line drawing of a mechanical component with blue directional arrows indicating force or movement (no text or symbols)Hvordan âpne flipdekselet

natural_image
Diagram showing two views of a device with a circular component, one with a blue arrow indicating rotation and the other with an arrow indicating compression (no text or symbols present)Statusindikatorlys
natural_image
Line drawing of a hand pressing a button on a device with a power button icon (no text or symbols)- Vri ut tørkeputen
natural_image
Illustration of a person standing in a room with clouds and a window, no text or symbols presentnatural_image
Simple line drawing of a door with a box and a switch, no text or symbols presentnatural_image
Technical line drawing of a mechanical component with downward arrows indicating force or movement (no text or symbols)natural_image
Technical line drawing of a mechanical device with two blue arrows indicating direction (no text or symbols)natural_image
Technical line drawing of a mechanical device with a handle and mounting bracket (no text or symbols)
natural_image
Line drawing of a hand operating a kitchen appliance with a circular icon above (no text or symbols)3. Skru av
5. Lad
natural_image
Illustration of a hand cleaning a compact electronic device with a cloth (no text or symbols)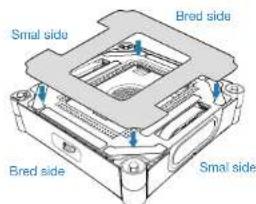
Nederste komponent
natural_image
Line drawing of a computer case with a cloth partially covering the interior (no text or symbols)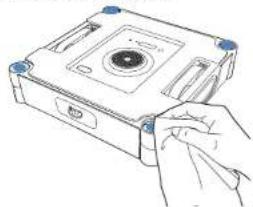
natural_image
Line drawing of a hand inserting a CD into a compact case (no text or symbols)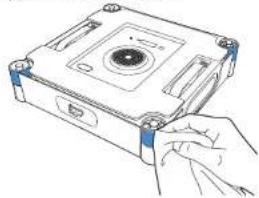
natural_image
Line drawing of a hand inserting into a CD drive into a compact case (no text or symbols)natural_image
Technical line drawing of a mechanical device with two views: top shows internal components, bottom shows a base housing (no text or symbols)natural_image
Simple line drawing of a simple electrical device connected to a table with a cable (no text or symbols)natural_image
Simple line drawing of a two-panel door with no text or symbols√
(224NL
natural_image
Technical line drawing of a mechanical component with blue directional arrows indicating force or movement (no text or symbols)natural_image
Diagram showing two views of a device with rotating components, no text or symbols presentnatural_image
Line drawing of a hand pressing a button on a device with a power button icon (no text or symbols)natural_image
Illustration of a person standing in a room with clouds and a window, no text or symbols presentnatural_image
Simple line drawing of a door with a box and door, no text or symbols presentnatural_image
Technical line drawing of a mechanical device with mounting base and internal components (no text or symbols)natural_image
Technical line drawing of a mechanical device with blue arrows indicating direction (no text or symbols)natural_image
Technical line drawing of a mechanical device with a handle and mounting bracket (no text or symbols)
natural_image
Line drawing of a hand operating a kitchen appliance with a circular icon above (no text or symbols)3. IN-/UITSCHAKELEN
5. Opladen
natural_image
Illustration showing a faucet spraying water into a bowl and a hand holding a towel with droplets (no text or symbols)natural_image
Line drawing of a hand cleaning a CD or DVD disc (no text or symbols)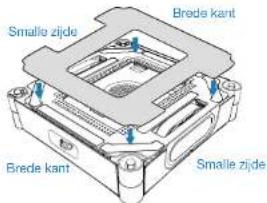
natural_image
Line drawing of a hand cleaning a compact floppy disk (no text or symbols)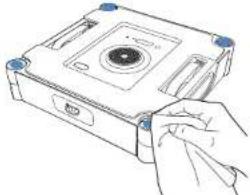
natural_image
Line drawing of a hand inserting into a CD drive into a memory unit (no text or symbols)
natural_image
Hand inserting a component into a CD drive case (no text or symbols visible)natural_image
Technical line drawing of a mechanical device with two views: top shows internal components, bottom shows a labeled housing (no text or symbols present)natural_image
Two simple line drawings of household appliances: one with a door and window, the other with a cabinet (no text or symbols)
natural_image
Simple line drawing of a simple electrical circuit with a box connected to a table and a cable (no text or symbols)natural_image
Simple line drawing of a two-panel door with no text or symbols√
natural_image
Technical illustration of a mechanical housing with blue directional arrows indicating force or movement (no text or symbols)Jak otworzyć klapkę
natural_image
Diagram showing two views of a device with rotating components, no text or symbols presentnatural_image
Line drawing of a hand using a power switch to press a device (no text or symbols)natural_image
Illustration of a person standing in a room with clouds and a window, no text or symbols presentnatural_image
Simple line drawing of a door with a box and two blue circular markers (no text or symbols)
natural_image
Technical line drawing of a mechanical component with arrows indicating downward motion (no text or symbols)natural_image
Technical line drawing of a mechanical device with blue arrows indicating direction (no text or symbols)natural_image
Technical line drawing of a mechanical device with a handle and mounting bracket (no text or symbols)2E Zwin kabel
natural_image
Line drawing of a hand operating a kitchen appliance with a circular icon above (no text or symbols)25BPL
3E Wyłącz zasilanie
5E Ładowanie
Download on the App Store

Get it on Google Play


ECOVACS HOME
260PL
natural_image
Illustration of a hand cleaning a compact electronic device with a cloth (no text or symbols visible)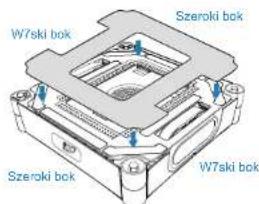
Dolny podzespol
natural_image
Line drawing of a hand cleaning a CD-ROM drive (no text or symbols)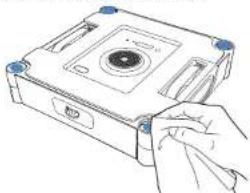
natural_image
Line drawing of a hand inserting into a CD into a drive case (no text or symbols)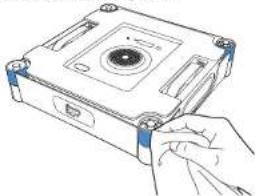
natural_image
Hand holding a compact electronic device with a circular top and mounting holes (no text or symbols visible)ECOVACS WINBOR va ymo tirpa as

Va ymo pagrindas
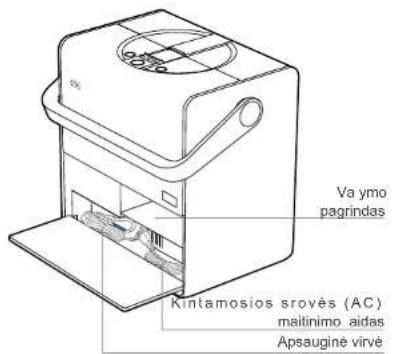
natural_image
Technical line drawing of a mechanical device with two views: top shows internal components, bottom shows a labeled component (Arba), both without any text or symbols.natural_image
Simple line drawing of a simple electrical circuit with a box, switch, and table (no text or symbols)natural_image
Technical line drawing of a mechanical component with blue directional arrows indicating force or movement (no text or symbols)natural_image
Diagram showing two views of a device with rotating components and a close-up view of the internal structure (no text or symbols)Büsenos indikatoriaus lemputé
| Indikatorius Lemput | Reikámé | |
| Paleidimo mygtukas /apa ios būsenos indikatoriaus lemput | M lyna spalva | WINBOR veikia tinkamai. |
| Mirksi raudona spa va | Gedimas. WINBOR nega i tinkamai veikti. | |
| Stote és maïtinimo mygtukas | Mé yna spa va WINBOR ir stote è veikia tinkamai. | |
| Mirksi raudona spa va WINBOR ir stote è veikia netinkamai ir nega i tinkamai veikti. | ||
| Stote és akumu iatoriaus indikatorius | Mé yna spa va (dega > 1 indikatorius) | Akumu iatorius pakrautas. |
| Dega mé ynos spa vos emputis | Stoto ó kraunasi. | |
| Mó yna spa va (dega 1 indikatorius) | Akumu iatorius nepakrautas pakankamai. Norōdami naudoli, prjunkite maïtinimo ša tinj. | |
| Mirksi mė yna spa va (dega 1 indikatorius) | Akumu iatorius yra mažai pakrautas. Prieš naudodami jkraukite, ko indikatorius degs mė yna spa va. | |
| Dega raudonos spa vos emputis | Akumu iatorius kraunasi. yra per mažai pakrautas. | |
2ljunkite maitinima
Paspauskite ir pa aikykite maitinimo mygtuk7 i giau nei 2 sekundes, kad jungtumete stote e ir WINBOR.
natural_image
Line drawing of a hand pressing a button on a device with a power button icon (no text or symbols)natural_image
Illustration of a person standing in a room with clouds and a window, no text or symbols presentnatural_image
Simple line drawing of a door with a box and a switch, no text or symbols presentnatural_image
Technical line drawing of a mechanical device with two downward arrows indicating assembly or force (no text or symbols present)natural_image
Technical line drawing of a mechanical device with blue arrows indicating direction (no text or symbols)natural_image
Technical line drawing of a mechanical device with a handle and internal components, showing a downward arrow indicating motion (no text or symbols present)
natural_image
Line drawing of a hand operating a kitchen appliance with a circular icon above (no text or symbols)3E lšjunkite
5E |kraukite
natural_image
Illustration showing a faucet spraying water into a bowl and a hand holding a towel with droplets (no text or symbols)natural_image
Illustration of a hand cleaning a compact electronic device with a cloth (no text or symbols visible)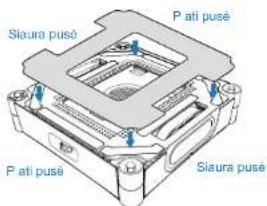
Apatinė dalis
natural_image
Line drawing of a computer hard drive with a cloth partially covering the casing (no text or symbols)
natural_image
Line drawing of a hand inserting a CD into a compact drive (no text or symbols)
natural_image
Line drawing of a hand inserting a component into a device housing (no text or symbols)natural_image
Technical line drawing of a mechanical device with two views: top shows internal components, bottom shows a base unit (no text or symbols)natural_image
Simple line drawing of a simple electrical circuit connected to a table with a bulb (no text or symbols)natural_image
Simple line drawing of a two-panel door with open lid (no text or symbols)√
304HR
2E2 Priprema prije upotrebe
1 Pregled sttanice i svjetlosnih efekata
Funkcije gumba

Pritisni
Stanka / nastavi
Pritisni i dr
natural_image
3D diagram of a mechanical housing with blue directional arrows indicating rotation or force (no text or symbols)natural_image
Diagram showing two views of a device with rotating components, no text or symbols presentSvjetlo indikatora statusa
| Indikator Svetlosni efekt | Značenje | |
| Gumb START / donje indikatorsko svjetlo statusa | Jednobojno plavo | WINBOT radi ispravno. |
| Trepćuće crveno Kvar. WINBOT ne može pravilno funkcionirati. | ||
| Gumb za napajanje stanice | Jednobojno plavo WINBOT i stanica rađe ispravno. | |
| Trepćuće crveno WINBOT i stanica su u kvaru i ne mogu ispravno raditi. | ||
| Indikator baterije stanice | Svijetlo plavo (> 1 indikator svijetli) | Puna baterija. |
| Pulsirajuće plavo Stanica se puni. | ||
| Postojano plavo (1 indikator svijetli) | Nedovoljno napunjena baterija. Za upotrebu spojte napajanje. | |
| Trepćuće plavo (1 indikator svijetli) | Napunjenost baterije je preniska. Prije upotrebe je punite dok indikator ne postane plav. | |
| Pulsirajuće crveno P | Anjenje u tijoku s vrlo slabo napunjenom batenjom. | |
2 Uključivanje
natural_image
Line drawing of a hand pressing a button on a device with a power button icon (no text or symbols)natural_image
Illustration of a person standing in a room with clouds and a window, no text or symbols presentnatural_image
Simple line drawing of a door with a box and a switch, no text or symbols presentnatural_image
Technical line drawing of a mechanical component with arrows indicating force or movement (no text or symbols)- Istovremeno pritisnite oba udara a s obje strane blizu etkica. Otpustite ih kada ujete glasovni poziv "Po eo sam istiti etkicu."
natural_image
Technical line drawing of a mechanical device with blue arrows indicating direction (no text or symbols)- Glasovni poziv " etkica je uspje no o i ena" ozna ava da je proces i enja zavr en.
1310HR
2E4 Pohranjivanje i punjenje nakon uporabe
Koraci:
1E Spremanje WINBO5
Stavite WINBOT u kutiju za pohranu stanice s prednjom stranom okrenutom prema van i spojnim izlazom kabela prema gore. Spustite ga u stanicu odozgo prema dolje, pazeći da sigurno visi na kuki kutije za pohranu.
* Prije spremanja WINBOT uklonite podlogu za mokro brisanje. Pustite da se potpuno osuši prije spremanja kako biste spriječili mirise.
2E Uvlačenje kabela
Nakon što WINBOT postavite u kutiju za pohranu, pritisnite gumb za uvlačenje kabela. Stanica će početi uvlačiti kabel.
natural_image
Technical line drawing of a mechanical device with a handle and internal components, showing a downward arrow indicating motion (no text or symbols present)
natural_image
Line drawing of a hand operating a kitchen appliance with a circular icon above (no text or symbols)3E Isključivanje
Pritisnite i držite 2 minute gumb START na WINBOT kako biste isključili WINBOT.
5E Punjenje
Postavite stanicu blizu utičnice i spojite je u napajanje. Na sobnoj temperaturi punjenje traje otprilike 3 sata.
6E Spremite stanicu
natural_image
Illustration of a hand cleaning a compact electronic device with a cloth (no text or symbols)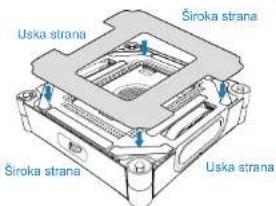
Donja komponenta
natural_image
Line drawing of a computer hard drive with a cloth partially covering the casing (no text or symbols)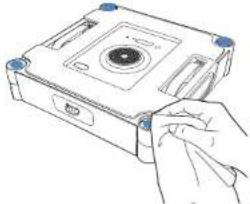
natural_image
Line drawing of a hand inserting a CD into a compact drive (no text or symbols)
natural_image
Line drawing of a hand inserting a CD into a compact drive (no text or symbols)* Nakon što WINBOT izda upozorenje o niskoj napunjenosti baterije, uvjerite se da je WINBOT potpuno napunjen prije upotrebe ili pohranjivanja kako biste izbjegli smanjenje vijeka trajanja baterije.
Torkplatta

Bruksanvisning
natural_image
Technical line drawing of an electronic device with two views: top shows internal components, bottom shows a labeled case (no text or symbols present)natural_image
Simple line drawing of a simple electrical circuit with a box and table connected by wires (no text or symbols)natural_image
Simple line drawing of a two-panel door with open lid (no text or symbols)√
3305E
natural_image
Technical line drawing of a mechanical component with blue directional arrows indicating rotation or force (no text or symbols)natural_image
Diagram showing two views of a device with rotating components, no text or symbols presentStatusindikatorlampa
natural_image
Line drawing of a hand pressing a button on a device with a power button icon (no text or symbols)2. Vrid ur torkplattan
natural_image
Illustration of a person standing in a room with clouds and a window, no text or symbols presentnatural_image
Simple line drawing of a door with a box and a switch, no text or symbols presentnatural_image
Technical line drawing of a mechanical component with arrows indicating force or movement (no text or symbols)natural_image
Technical line drawing of a mechanical device with blue arrows indicating direction (no text or symbols)natural_image
Technical line drawing of a mechanical device with a handle and mounting bracket (no text or symbols)
natural_image
Line drawing of a hand operating a kitchen appliance with a circular icon above (no text or symbols)3. Stänga AV
5. Ladda
natural_image
Illustration of a hand cleaning a compact electronic device with a cloth (no text or symbols)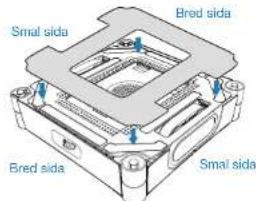
Komponenter på undersidan
natural_image
Line drawing of a computer hard drive with a cloth partially covering the casing (no text or symbols)
natural_image
Line drawing of a hand inserting a CD into a compact drive (no text or symbols)
natural_image
Line drawing of a hand inserting a component into a CD drive (no text or symbols)https://www.ecovacs.com/g_oba/comp_iance


*17*1 noon
ת.הוּרָם
.הכלההוֹרָה, 17:00'11'00'00'00'00'00'00'00'00'00'00'00'00'00'00'00'00'00'00'00'00'00'00'00'00'00'00'00'00'00'00'00'00'00'
הכלה 1.3
1.2
natural_image
Technical line drawing of a mechanical device with two views: top shows internal components, bottom shows a circular component (no text or symbols)natural_image
Two simple line drawings of household appliances: one with a door handle and the other with a cabinet (no text or symbols)WINBOT
natural_image
3D diagram of a mechanical device with blue directional arrows indicating rotation or force (no text or symbols)natural_image
Simple line drawing of a box connected to a table with a tool, no text or symbols presentWINBOT
natural_image
Two simple line drawings of a cabinet or shelf with diagonal lines, one open and one closed, both without any text or symbols.1356HE
natural_image
Diagram showing a device with a fan and arrow indicating rotation or change (no text or symbols present)הכלה
1358HE
הַרְשָׁה 2
natural_image
Line drawing of a hand inserting a power button into a machine (no text or symbols)natural_image
Technical line drawing of a mechanical housing or enclosure with mounting holes and internal components (no text or symbols)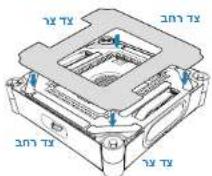
הכלהה
natural_image
Simple line drawing of a door with a box and a window, no text or symbols presentnatural_image
Pure geometric grid lines forming a cross pattern with no text or symbolsnatural_image
Illustration of a person standing in a room with cloud and window elements, no text or symbols present• WinBOT-n is the first

הכלה 3
natural_image
Technical line drawing of a mechanical component with arrows indicating force or movement (no text or symbols)natural_image
Technical line drawing of a mechanical device with blue arrows indicating direction (no text or symbols)natural_image
Line drawing of a hand operating a portable device with a circular icon above (no text or symbols)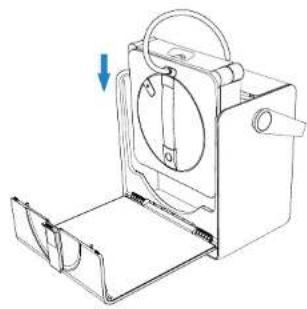
natural_image
Technical line drawing of a mechanical device with a handle and mounting bracket (no text or symbols)363HE
הכלה E5
Download on the App Store

Get it on Google Play


ECOVACS HOME
365HE
natural_image
Illustration of a hand cleaning a compact electronic device with a cloth (no text or symbols visible)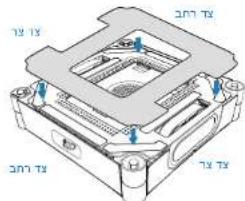
natural_image
Line drawing of a computer case with a cloth partially covering the interior (no text or symbols)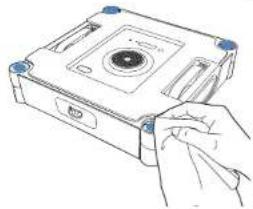
natural_image
Line drawing of a hand inserting a CD into a compact drive (no text or symbols)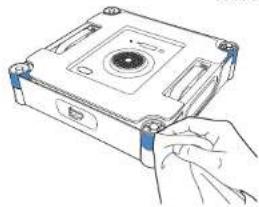
natural_image
Line drawing of a hand inserting a CD into a rectangular box (no text or symbols)KOH, ECOVACS HOME is a pro-100% Bluetooth.
Wi-Fi-a (2017) 1970 and WINBOT (2018)
• Men who are in the world, and that the world is being a great deal for the country's economic development. The world has been a strong deal for the country's economic development.
1
2
3
4
.5
.6
.03-9625902 :ope, 073-2446060 :so; support@ro .03-9625902 :ope, 073-2446060 :so; support@ro .03-9625902 :ope, 073-2446060 :so; support@ro
.11501.2017.10.11:46:19:35 10:00:17:18:35 10:00:17:18:35
Ecovacs Home Service Robotics Co., Ltd.
No. 518 Songwei Road, Wusongjiang industry Park, Guoxiang Street,
Wuzhong District, Suzhou, Jiangsu, China.