
Maverick MK2 Spot - Light projector Chauvet - Free user manual and instructions
Find the device manual for free Maverick MK2 Spot Chauvet in PDF.


| Product Type | Automatic Moving Head Light |
| Light Source | LED (estimated) |
| Power Consumption | 700 W (estimated) |
| Supply Voltage | 100-240 V AC, 50/60 Hz |
| Weight | Approximately 26 kg (estimated) |
| Dimensions (L x W x H) | 495 x 378 x 676 mm (estimated) |
| Control Protocol | DMX512 |
| DMX Personalities | 24 or 32 channels |
| Pan Rotation Angle | 540° |
| Tilt Rotation Angle | 270° |
| Number of Gobos | Rotating and fixed (details in manual) |
| Control Display | Touchscreen with battery display |
| Ventilation | Adjustable speed fan |
| Advanced Features | Touch calibration, screen lock, auto test |
| Maintenance | Regular cleaning of lenses and body |
| Safety | Minimum distance of 20 cm from body, do not look directly at the beam |
| Warranty | Limited manufacturer warranty (see website) |
Frequently Asked Questions - Maverick MK2 Spot Chauvet
User questions about Maverick MK2 Spot Chauvet
0 question about this device. Answer the ones you know or ask your own.
Ask a new question about this device
Download the instructions for your Light projector in PDF format for free! Find your manual Maverick MK2 Spot - Chauvet and take your electronic device back in hand. On this page are published all the documents necessary for the use of your device. Maverick MK2 Spot by Chauvet.
USER MANUAL Maverick MK2 Spot Chauvet
EDITION NOTES
The Maverick MK2 Spot User Manual includes a description, safety precautions, installation, programming, operation, and maintenance instructions for the Maverick MK2 Spot. Chauvet published this version of the User Manual for Maverick MK2 Spot in 2019.
LIMITED WARRANTY
FOR WARRANTY REGISTRATION AND COMPLETE TERMS AND CONDITIONS PLEASE VISIT OUR WEBSITE.
For Customers in the United States and Mexico: www.chauvetlighting.com/warranty-registration.
For Customers in the United Kingdom, Republic of Ireland, Belgium, the Netherlands, Luxembourg, France, and Germany: www.chauvetlighting.eu/warranty-registration.
Chauvet warrants that this product shall be free from defects in material and workmanship under normal use, for the period specified in, and subject to the exclusions and limitations set forth in the full limited warranty on our website. This warranty extends only to the original purchaser of the product and is not transferable. To exercise rights under this warranty, you must provide proof of purchase in the form of an original sales receipt from an authorized dealer that shows the product name and date of purchase. THERE ARE NO OTHER EXPRESS OR IMPLIED WARRANTIES. This warranty gives you specific legal rights. You may also have other rights that vary from state to state and country to country. This warranty is valid only in the United States, United Kingdom, Republic of Ireland, Belgium, the Netherlands, Luxembourg, France, Germany and Mexico. For warranty terms in other countries, please consult your local distributor.
Trademarks
CHAUVET, the Chauvet logo, and Maverick MK2 Spot are registered trademarks or trademarks of Chauvet & Sons, LLC (d/b/a Chauvet and Chauvet Lighting) in the United States and other countries. Other company and product names and logos referred to herein may be trademarks of their respective companies.
Copyright Notice
The works of authorship contained in this manual, including, but not limited to, all designs, texts, and images are owned by Chauvet.
© Copyright 2019 Chauvet & Sons, LLC. All rights reserved.
Electronically published by Chauvet in the United States of America.
Manual Use
Chauvet authorizes its customers to download and print this manual for professional information purposes only. Chauvet expressly prohibits the usage, copy, storage, distribution, modification, or printing of this manual or its content for any other purpose without written consent from Chauvet.
Document Printing
For best results, print this document in color, on letter size paper (8.5 x 11 in), double-sided. If using A4 paper (210 x 297 mm), configure the printer to scale the content accordingly.
Intended Audience
Any person installing, operating, and/or maintaining this product should completely read through this manual and the guide that shipped with the product before installing, operating, or maintaining this product.
Disclaimer
Chauvet believes that the information contained in this manual is accurate in all respects. However, Chauvet assumes no responsibility and specifically disclaims any and all liability to any party for any loss, damage or disruption caused by any errors or omissions in this document, whether such errors or omissions result from negligence, accident or any other cause. Chauvet reserves the right to revise the content of this document without any obligation to notify any person or company of such revision, however, Chauvet has no obligation to make, and does not commit to make, any such revisions. Download the latest version from www.chauvetprofessional.com.
RF Exposure Warning for North America and Australia
Warning! This equipment complies with FCC radiation exposure limits set forth for an uncontrolled environment. This equipment should be installed and operated with a minimum distance of 20 cm between the radiator and your body. This transmitter must not be co-located or operating in conjunction with any other antenna or transmitter.
Document Revision
This Maverick MK2 Spot User Manual is the 11 th edition of this document. Go to www.chauvetprofessional.com for the latest version.
NOTAS DE LA EDICIÓN
Mounting and Rigging 2
Power and Wiring 2
Operation 2
2. Introduction.... 3
Description 3
Features 3
Product Overview 3
Product Dimensions 4
3. Setup.... 5
AC Power 5
AC Plug 5
Fuse Replacement 5
Mounting 6
Orientation.... 6
Rigging 6
Procedure.... 6
Mounting diagram 6
DMX Linking 7
DMX personalities.... 7
Remote Device Management.... 7
Signal Connection 7
Art-Net™ Connection 7
sACN Connection.... 7
Kling-Net Connection 7
Connection Diagram 7
4. Operation.... 9
Control Panel Operation.... 9
Battery-Powered Display.... 9
Menu Map 10
Operating Settings Configuration 14
Home Screen 14
Start Address 14
Network Setup.... 14
IP mode.... 14
Universe.... 14
IP address.... 15
Subnet mask 15
Personality 15
Settings 16
Control mode 16
Pan/tilt orientation 16
Display orientation 16
Pan/tilt angle range 16
Blackout on pan/tilt movement.... 17
Blackout on color movement.... 17
Blackout on gobo movement 17
Touchscreen calibration.... 17
Touchscreen lock 17
Lock screen.... 18
Swap pan and tilt 18
Pan/tilt speed 18
WDMX reset.... 18
Backlight timer 18
Loss of data 19
Fan speed 19
Theatrical dimming.... 19
Dimmer curve.... 19
Dimmer speed.... 19
Preset select 20
Preset sync 20
Reset functions 20
Factory reset 20
Test Mode 21
Auto test 21
Manual test 21
System Information 21
DMX Values 22
32 Ch.... 22
24 Ch.... 25
Color Wheel 28
Gobo Designs 28
Gobo Dimensions.... 28
Gobo Replacement 29
Procedure.... 29
Offset Mode 30
Web Server 32
- Maintenance.... 33
Product Maintenance 33
- Technical Specifications.... 34
Photometrics Chart 35
Returns 36
Contact Us.... 37
ÍNDICE
Remote Device Management.... 44
Remote Device Management.... 82
Connexions de Signal 82
Connexion Art-Net™ 82
Connexion sACN 82
Connexion Kling-Net 82
Gradation théâtrale 94
Courbe de gradation 94
Remote Device Management.... 120
Signalanschlüsse 120
Remote Device Management.... 159
Signaalverbindingen.... 159
Art-Net™ Verbinding 159
sACN Verbinding.... 159
Kling-Net Verbinding 159
Verbindingsdiagram 159
4. Werking 160
- 2 Omega brackets with mounting hardware - Quick Reference Guide
Unpacking Instructions
Carefully unpack the product immediately and check the container to make sure all the parts are in the package and are in good condition.
Claims
If the box or the contents (the product and included accessories) appear damaged from shipping, or show signs of mishandling, notify the carrier immediately, not Chauvet. Failure to report damage to the carrier immediately may invalidate your claim. In addition, keep the box and contents for inspection. For other issues, such as missing components or parts, damage not related to shipping, or concealed damage, file a claim with Chauvet within 7 days of delivery.
Text Conventions
| Convention Meaning |
| 1–512 A range of values |
| 50/60 A set of values of which only one can be chosen |
| Settings A menu option not to be modified |
| A key to be pressed on the product's control panel |
| ON A value to be entered or selected |
Symbols
| Symbol Meaning | |
 | Critical installation, configuration, or operation information. Not following these instructions may make the product not work, cause damage to the product, or cause harm to the operator. |
 | Important installation or configuration information. The product may not function correctly if this information is not used. |
 | Useful information |


Any reference to data or power connections in this manual assumes the use of Seetronic IP-rated cables.
The term “DMX” used throughout this manual refers to the USITT DMX512-A digital data transmission protocol.
Expected LED Lifespan
LEDs gradually decline in brightness over time, primarily because of heat. LEDs that are arranged in clusters experience higher operating temperatures than single LEDs. For this reason, operating clustered LEDs at their fullest intensity significantly reduces the LEDs' lifespan. Under normal conditions, this lifespan is 40,000 to 50,000 hours. If extending this lifespan is vital, lower the operating temperature by improving the ventilation around the product, thus reducing the ambient temperature. In addition, limiting the overall projection intensity may extend the LEDs' lifespan.
Safety Notes
Read all the following safety notes before working with this product. These notes contain important information about the installation, usage, and maintenance of this product.

All applicable local codes and regulations apply to proper installation of this product.

This product contains no user-serviceable parts. Any reference to servicing in this User Manual will only apply to properly trained, certified technicians. Do not open the housing or attempt any repairs.
Personal Safety
- Avoid direct eye exposure to the light source while the product is on.
• Always disconnect the product from the power source before servicing.
• Always connect the product to a grounded circuit to avoid the risk of electrocution. - Do not touch the product's housing when operating because it may be very hot.
Mounting and Rigging
- Do not submerge this product (IP65). This product is for indoor use or for temporary use outdoors.
- When using this product in an outdoor environment, use IP65 (or higher)-rated power and data cables. Secure unused power and data ports with attached IP65 covers.
- CAUTION: When transferring product from extreme temperature environments, (e.g., cold truck to warm, humid ballroom) condensation may form on the internal electronics of the product. To avoid causing a failure, allow product to fully acclimate to the surrounding environment before connecting it to power.
-
Not for permanent outdoor installation in locations with extreme environmental conditions. This includes, but is not limited to:
-
Exposure to a marine/saline environment (within 3 miles of a saltwater body of water).
- Locations where the normal high or low temperatures exceed the temperature ranges in this manual.
- Locations that are prone to flooding or being buried in snow.
-
Areas where the product will be subjected to extreme radiation or caustic substances.
-
Mount this product in a location with adequate ventilation, at least 20 in (50 cm) from adjacent surfaces.
• Make sure there are no flammable materials close to the product when operating. - When hanging this product, always secure to a fastening device using a safety cable.
- Never carry the product by the power cord or any moving part.
Power and Wiring
- Make sure the power cord is not crimped or damaged.
- Always make sure you are connecting the product to the proper voltage in accordance with the specifications in this manual or on the product's specification label.
- To eliminate unnecessary wear and improve its lifespan, during periods of non-use completely disconnect the product from power via breaker or by unplugging it.
- Never connect this product to a dimmer pack or rheostat.
• Never disconnect this product by pulling or tugging on the power cable.
Operation
- Do not operate this product if there is damage on the housing, lenses, or cables. Have the damaged parts replaced by an authorized technician at once.
- Do not cover the ventilation slots when operating to avoid internal overheating.
- The maximum ambient temperature is 113°F (45 °C). Do not operate the product at higher temperatures.
• The minimum startup temperature is -4\ °F ( -20\ °C ). Do not start the product at lower temperatures. - The minimum ambient temperature is -22 °F (-30 °C). Do not operate the product at lower temperatures.
- In the event of serious operation problem, stop using this product immediately!

If your Chauvet product requires service, contact Chauvet Technical Support.
2. Introduction
Description
The stunningly bright Maverick MK2 Spot sets new standards in moving head LED spots with its precision-engineered optics and a color-mixing that will leave you breathless. Powered by an industry-leading 440W LED engine, this fixture boasts a CMY+CTO color-mixing system, two 6-position rotating slot and lock gobo wheels, a 7-position + white color wheel, variable frost, and 3-facet prism. All of this projected through a 13° to 37° zoom system. With the ability to control the Maverick MK2 Spot over DMX, Art-Net™, or by WDMX, there is an option for every situation. As an added feature, this fixture can receive Art-Net™ in and send out DMX, simplifying cable runs.
Features
- Fully featured 440 W LED yoke spot fixture, including CMY + CTO color mixing, a color wheel, zoom optics, and two gobo wheels
- 16-bit dimming of master dimmer for smooth control of fades
• Variable CMY + CTO color mixing system to create a wide pallet of colors
• Two rotating, indexing, and interchangeable slot and lock gobo wheels
• DMX, WDMX, sACN, and Art-Net™ for full flexibility of control options
• RDM-enabled for remote addressing and troubleshooting - 13° to 37° zoom angle for variable beam sizes
- Iris, 3-facet prism, and frost for beam control
• True 1 compatible power input
• Battery backup display with auto-rotate depending on fixture orientation - Three setup menu presets and preset sync for cross-loading to multiple like fixtures for easy shop setup
Product Overview
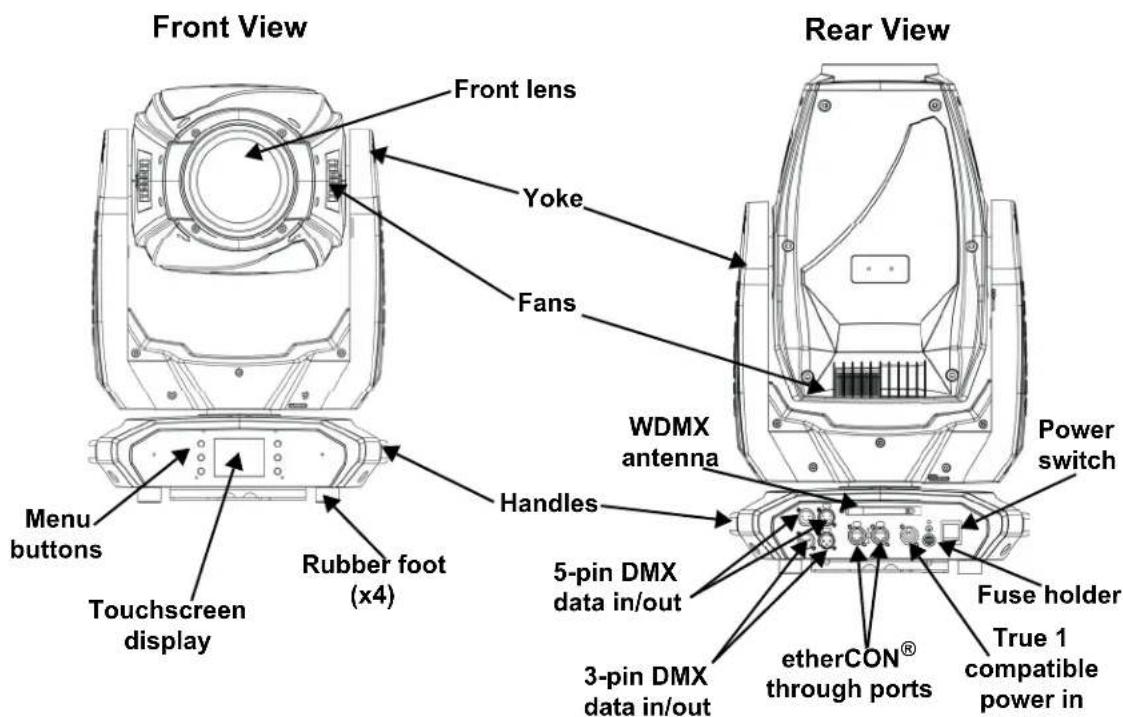
Product Dimensions
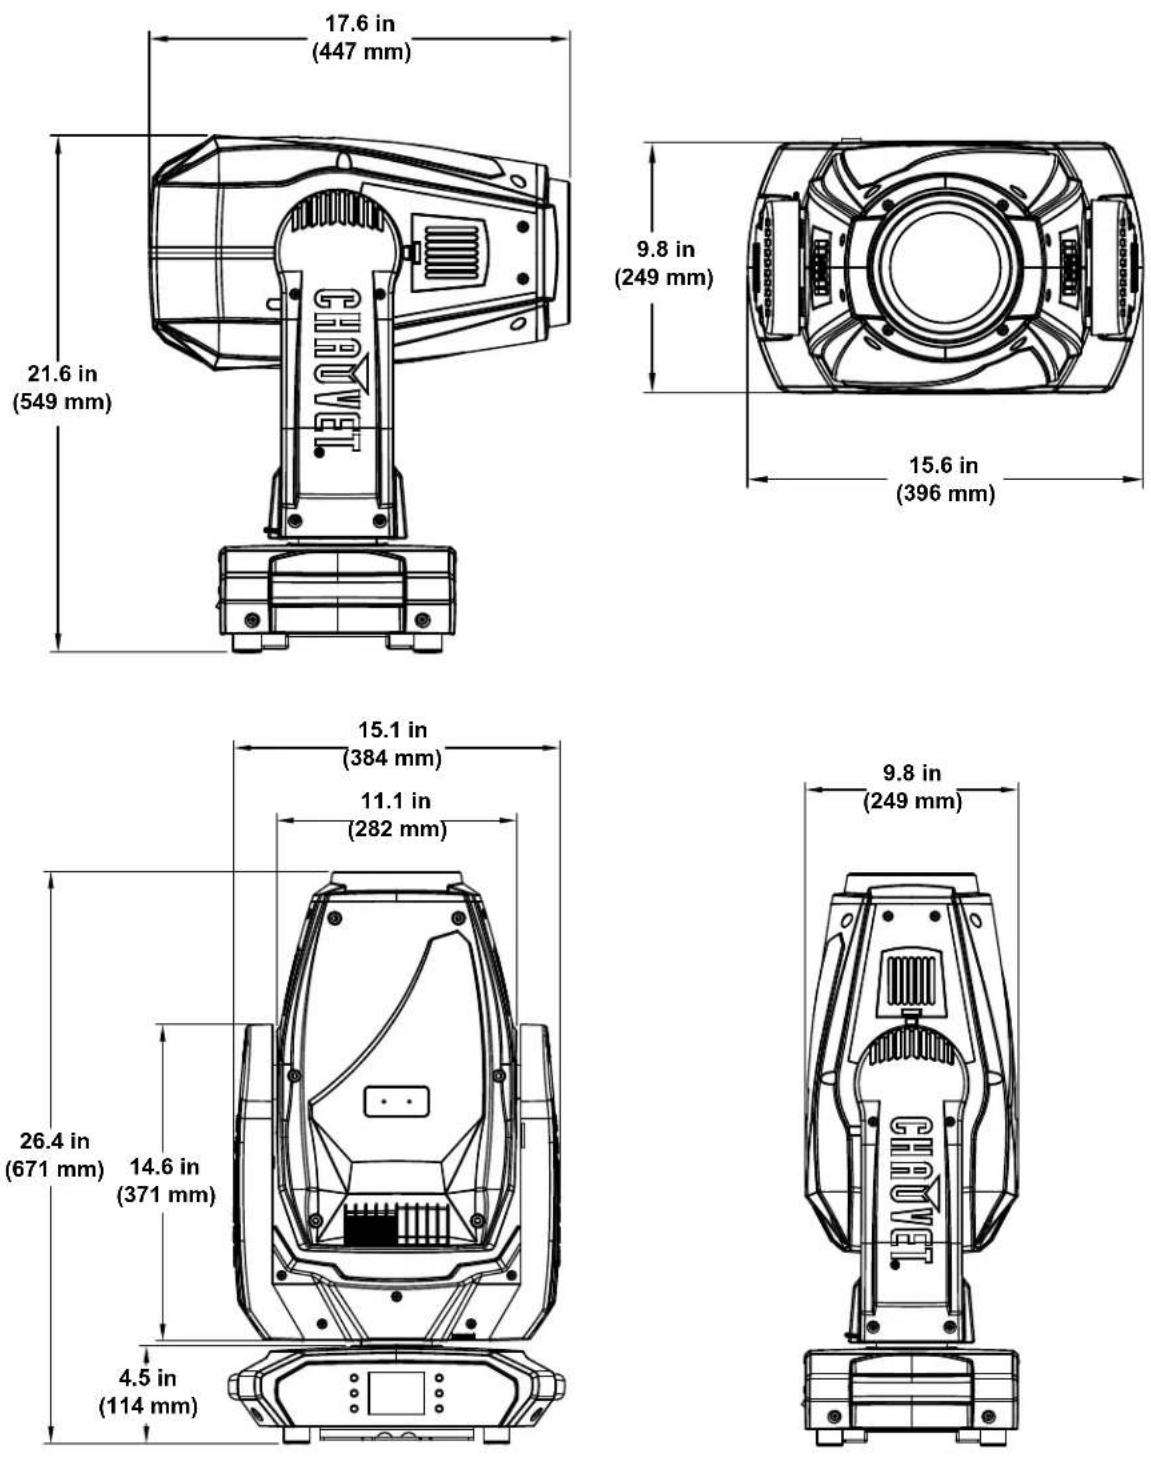
3. Setup
AC Power
The Maverick MK2 Spot has an auto-ranging power supply that works with an input voltage range of 100 to 240 VAC, 50/60 HZ. To determine the power requirements for each Maverick MK2 Spot, refer to the label affixed to the product. You can also refer to the Technical Specifications chart in this manual.
The listed current rating indicates the maximum current draw during normal operation. For more information, download Sizing Circuit Breakers from the Chauvet website: www.chauvetprofessional.com

• Always connect the product to a protected circuit (a circuit breaker or fuse). Make sure the product has an appropriate electrical ground to avoid the risk of electrocution or fire.
- To eliminate unnecessary wear and improve its lifespan, completely disconnect the product from power via breaker or by unplugging it during periods of non-use.

Never connect the product to a rheostat (variable resistor) or dimmer circuit, even if the rheostat or dimmer channel serves only as a 0 to 100% switch.
AC Plug
The Maverick MK2 Spot comes with a power input cord terminated with a True 1 compatible connector on one end and an Edison plug on the other end (US market). If the power input cord that came with your product has no plug, or if you need the change the plug, use the table below to wire the new plug.
| Connection | Wire (U.S.) | Wire (Europe) | Screw Color |
| AC Live Black Brown Yellow/brass | |||
| AC Neutral White | Blue | Silver | |
| AC Ground | Green/yellow | Green/yellow | Green |
Fuse Replacement
- Disconnect the product from power.
- Using a flat-head screwdriver, unscrew the fuse holder cap from the housing.
- Remove the blown fuse from the holder and replace with another fuse of the same type and rating (F 10 A, 250 V).
- Screw the fuse holder cap back in place and reconnect power.

Disconnect the product from the power outlet before replacing the fuse. Always replace the blown fuse with another of the same type and rating.
Mounting
Before mounting the product, read and follow the safety recommendations indicated in the Safety Notes. For our CHAUVET Professional line of mounting clamps, go to http://trusst.com/products/.
Orientation
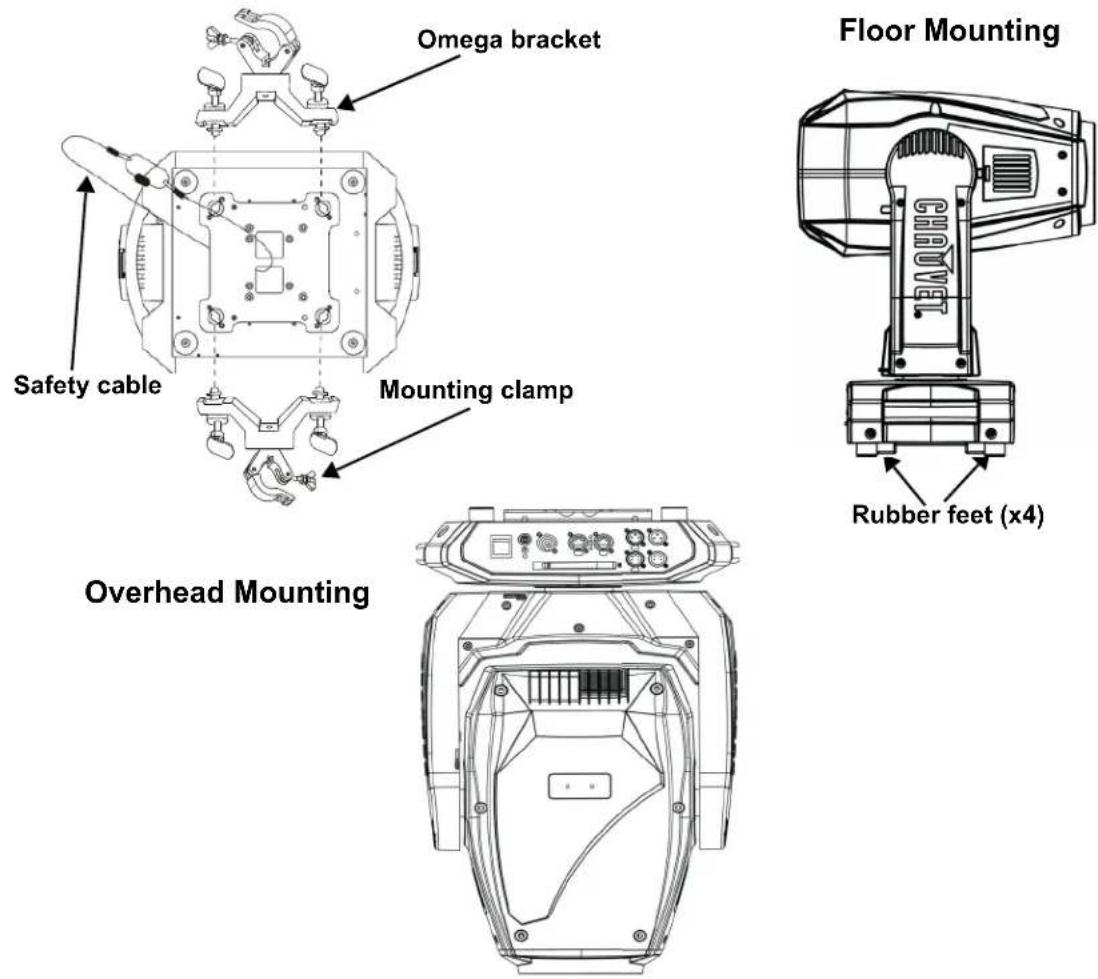
Always mount this product in a safe position and ensure that there is adequate room for ventilation, configuration, and maintenance. The Maverick MK2 Spot can be suspended upright or upside down using the two Omega brackets included, or it can be placed on it rubber feet on a flat-level surface.
Rigging
Chauvet recommends using the following general guidelines when mounting this product.
- When selecting an installation location, consider easy access to this product for operation, programming adjustments, and routine maintenance.
- Make sure to mount this product away from any flammable material.
- If hanging this product, make sure that the mounting location can support the product's weight. See the Technical Specifications for the weight-bearing requirements of this product.
- When hanging this product, always secure to a fastening device using a safety cable. For our CHAUVET Professional line of safety cables, go to http://trusst.com/products/.
Procedure
The Maverick MK2 Spot comes with a double-bracketed yoke to which you can either attach mounting clamps for hanging or simply use as a floor stand. You must supply the mounting clamps. Make sure the clamps can support the weight of this product. Use at least one mounting point per product. For the CHAUVET Professional line of mounting clamps, go to: http://trusst.com/products/.
Mounting diagram
DMX Linking
You can link the Maverick MK2 Spot to a DMX controller using a 3- or 5-pin DMX connection. If using other DMX-compatible products with this product, you can control each individually with a single DMX controller.
DMX personalities
The Maverick MK2 Spot uses a 3- and 5-pin DMX data connection for the 24- and 32-channel DMX personalities.
• Refer to the Introduction for a brief description of each DMX personality.
• Refer to the Operation chapter to learn how to configure the Maverick MK2 Spot to work in these personalities.
• The DMX Values section provides detailed information regarding the DMX personalities.
Remote Device Management
Remote Device Management, or RDM, is a standard for allowing DMX-enabled devices to communicate bi-directionally along existing DMX cabling. Check the DMX controller's User Manual or with the manufacturer, as not all DMX controllers have this capability. The Maverick MK2 Spot supports RDM protocol that allows feedback to make changes to menu map options.
Signal Connection
The Maverick MK2 Spot can receive DMX, Art-Net™, sACN, or Kling-Net signal. The Maverick MK2 Spot has two Neutrik® etherCON® through ports, and 3- and 5-pin DMX in and out ports. For more information about DMX, read the DMX primer at: https://www.chauvetprofessional.com/wp-content/uploads/2016/06/DMX_Primer.pdf
Art-Net™ Connection
Art-Net™ is an Ethernet protocol that uses TCP/IP that transfers a large amount of DMX512 data using a Neutrik® etherCON® RJ45 connection over a large network. An Art-Net™ protocol document is available from www.chauvetprofessional.com.
Art-Net™ designed by and copyright Artistic Licence Holdings Ltd.
sACN Connection
Streaming ACN, also known as ANSI E1.31, is an Ethernet protocol that uses the layering and formatting of Architecture for Control Networks to transport DMX512 data over IP or any other ACN-compatible network. ACN is maintained by the Professional Lighting and Sound Association (PLASA).
Kling-Net Connection
Kling-Net is a network protocol that allows auto configuration of display devices using an Ethernet connection. Refer to the ArKaos software manual for detailed instructions on programming this product.
Connection Diagram
![graph TD A["Laptop"] --> B["Switch or Router (such as the NET-Switch from CHAUVET Professional)"] B --> C["Maverick MK2 Spot"] C --> D["Other Art-Net™, sACN, or Kling-Net devices"] D --> E["Computer/Controller (running Art-Net™, sACN, or Kling-Net protocol)"] E --> B](/content/2026/04/674052/images/a8b295c3b887d69158a15b6926c273ffc3ddc75bee0912a697c931d03f91e91d.jpg)

The three LED indicators in between the Ethernet through ports indicate a connection to a network and activity on that network. They do not indicate whether or not the Maverick MK2 Spot is receiving a signal from a controller.
4. Operation
The Maverick MK2 Spot has a touchscreen display and six control buttons. Navigate the menu structure by pressing the buttons, touching the images of the buttons on the sides of the display, or touching the desired menu option on the display directly. The touchscreen can be locked and calibrated through the Setup options in the menu (see Touchscreen calibration and Touchscreen lock).
Control Panel Operation
| Button Function | |
| Navigates upwards through the menu list or increases the numeric value when in a function | |
| Exits from the current menu or function | |
| Navigates downwards through the menu list or decreases the numeric value when in a function | |
| Navigates leftwards through the menu list | |
| Enables the currently displayed menu or sets the currently selected value into the selected function | |
| Navigates rightwards through the menu list | |
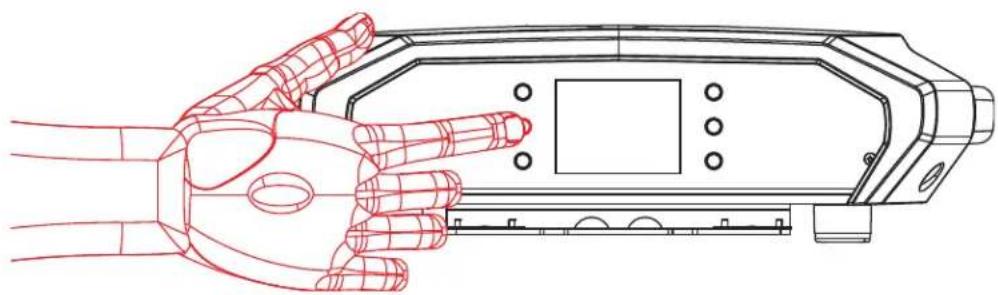
Battery-Powered Display
Press and hold until menu screen appears (approximately 15 seconds).
Menu Map
| Main Level Programming Levels Description | |||
| Start Address | 000-512 Network setting | ||
| Network Setup | IP Mode | Manual Manually sets IP address | |
| DHCP Network sets IP address | |||
| Static Product sets IP address | |||
| Universe 000-255 Set the universe | |||
| IP 002.243.075.222 Set IP address in Manual mode | |||
| SubMask 255.000.000.000 | Set Subnet Mask in Manual mode | ||
| Personality | DMX 24CH | YES | Choose 24 channels of DMX |
| NO | |||
| DMX 32CH | YES | Choose 32 channels of DMX | |
| NO | |||
| Settings | Control Mode | DMX Sets the DMX personality | |
| WDMX Sets the WDMX personality | |||
| sACN Sets the sACN personality | |||
| ArtNet Sets the Art-NetTM personality | |||
| Pan Reverse | NO Normal pan | ||
| YES Reversed pan | |||
| Tilt Reverse | NO Normal tilt | ||
| YES Reversed tilt | |||
| Screen Reverse | NO Normal display | ||
| YES Inverted display | |||
| AUTO Automatic display orientation | |||
| Pan Angle | 540 | 540° pan range | |
| 360 | 360° pan range | ||
| 180 | 180° pan range | ||
| Tilt Angle | 270 | 270° tilt angle | |
| 180 | 180° tilt angle | ||
| 90 | 90° tilt angle | ||
| BL. O. P/T Move | YES Enable blackout while pan/tilt moves | ||
| NO Disable blackout while pan/tilt moves | |||
| BL. O. Color Move | YES Enable color blackout | ||
| NO Disable color blackout | |||
| BL. O. Gobo Move | YES Enable gobo blackout | ||
| NO Disable gobo blackout | |||
| Calibration | YES Calibrate touchscreen | ||
| NO Keep current settings | |||
| Touchscreen Lock | YES Display does not respond to touch | ||
| NO Display responds to touch | |||
| Lock Screen | YES | Lock the buttons and touchscreen Passcode: 0920 | |
| NO | |||
| Swap XY | YES Do not swap pan and tilt | ||
| NO Pan controls tilt; tilt controls pan | |||
| XY Mode | Fast | Fast pan and tilt | |
| Slow | Slow pan and tilt | ||
| WDMX Reset | YES Reset the wireless DMX | ||
| NO Do not reset wireless DMX | |||
| Backlight Timer | 30S | Display turns off after 30 seconds | |
| 1M | Display turns off after 1 minute | ||
| 5M | Display turns off after 5 minutes | ||
| ON Display stays on | |||
| Loss of Data | Hold Holds last signal received | ||
| Close Blacks out fixture | |||
| Main Level Programming Levels Description | ||||
| Settings | Fans | Auto | Fan speed according to product temperature | |
| Full Fan speed | set on high | |||
| ECO Quiet mode | ||||
| Theatrical Dimming | NO Updated dimming | |||
| YES | Legacy dimming matches older Maverick MK2 profiles | |||
| Dimmer Curve | Linear | Set the dimmer curve | ||
| Square | ||||
| I Square | ||||
| SCurve | ||||
| Dimmer Speed | Smooth | Set the dimmer speed | ||
| Fast | ||||
| Preset Select | PRESET A | Recorded preset menu options PRESET B | ||
| PRESET C | ||||
| Preset Sync | NO Allows recorded preset menu options to be transferred to other Maverick MK2 Spots in the DMX daisy chain | |||
| YES | ||||
| Reset Function | Pan/Tilt | YES/NO | Reset individual functions or all functions from start-up | |
| Iris/Prism | ||||
| Color/CMY+CTO | ||||
| Gobo/GoboRotate | ||||
| Zoom/Frost/Focus | ||||
| All | ||||
| Factory Settings | YES | Reset all functions to default factory settings | ||
| NO | ||||
| Test | Auto Test Auto test the product | |||
| Manual Test | Pan | 000–255 | Shows all current values from input signals, 000–255 | |
| Pan Fine | ||||
| Tilt | ||||
| Tilt Fine | ||||
| P/T Speed | ||||
| Dimmer | ||||
| Dimmer Fine | ||||
| Shutter | ||||
| Virtual Shaking | ||||
| Cyan | ||||
| Magenta | ||||
| Yellow | ||||
| CTO | ||||
| Color | ||||
| Gobo 1 | ||||
| Gobo 1 Index Fine | ||||
| Gobo 1 Rotate | ||||
| Gobo 2 | ||||
| Gobo 2 Index Fine | ||||
| Gobo 2 Rotate | ||||
| Focus | ||||
| Focus Fine | ||||
| Focus Auto | ||||
| Zoom | ||||
| Zoom Fine | ||||
| Prism | ||||
| Prism Rotate | ||||
| Iris | ||||
| Frost | ||||
| CMY Macro | ||||
| CMY Macro Speed | ||||
| Special Function | ||||
| Main Level | Programming Levels | Description | ||
| Information | Fixture Information | Ver V_Shows firmware version | ||
| Running Mode | Shows current running mode | |||
| Address | Shows current starting address | |||
| Temperature | - | Shows current product temperature in °C | ||
| Fixture Hours | - | Shows number of hours product has been powered on | ||
| IP | Shows current IP address | |||
| SubMask | Shows current Subnet Mask | |||
| MAC | Shows current MAC address | |||
| Fan Information | Base Fan 1 Speed | - - - - | Shows speed of base and head fans in rpm | |
| Base Fan 2 Speed | - - - - | |||
| Head Fan 1 Speed | - - - - | |||
| Head Fan 2 Speed | - - - - | |||
| Error Information | No Error!* | Shows any errors, or “No Error!” | ||
| Channel Information | Frequency | Hz | Shows all current values from input signals, 000–255 | |
| Pan | 000–255 | |||
| Pan Fine | ||||
| Tilt | ||||
| Tilt Fine | ||||
| P/T Speed | ||||
| Dimmer | ||||
| Dimmer Fine | ||||
| Shutter | ||||
| Virtual Shaking | ||||
| Cyan | ||||
| Magenta | ||||
| Yellow | ||||
| CTO | ||||
| Color | ||||
| Gobo 1 | ||||
| Gobo 1 Index Fine | ||||
| Gobo 1 Rotate | ||||
| Gobo 2 | ||||
| Gobo 2 Index Fine | ||||
| Gobo 2 Rotate | ||||
| Focus | ||||
| Focus Fine | ||||
| Focus Auto | ||||
| Zoom | ||||
| Zoom Fine | ||||
| Prism | ||||
| Prism Rotate | ||||
| Iris | ||||
| Frost | ||||
| CMY Macro | ||||
| CMY Macro Speed | ||||
| Special Function | ||||
Operating Settings Configuration
Home Screen
The Maverick MK2 Spot has a home screen that shows the protocol mode, the IP address or DMX address, the DMX personality, and the current product temperature. To see the home screen, press.