
ADR70B6PC - Dehumidifier DANBY - Free user manual and instructions
Find the device manual for free ADR70B6PC DANBY in PDF.

| Product Type | Portable Dehumidifier |
| Brand | Danby |
| Model | ADR70B6PC |
| Extraction Capacity | 70 pints (33 L) per day (at 26.7 °C and 60% RH) |
| Power Supply | 120 V, 60 Hz, 15 A |
| Plug Type | 3-prong grounded |
| Humidity Adjustment Range | 35% to 85% RH (in 5% increments) |
| Fan Speeds | 2 (Turbo/High and Normal) |
| Timer | Programmable On/Off from 0 to 24 hours |
| Water Tank | Front, removable, with full-level indicator |
| Continuous Drainage | Yes, via hose (not included) or built-in pump |
| Built-in Pump | Yes, for vertical drainage up to 4.5 m |
| Air Filter | Removable and washable |
| Auto Defrost | Yes |
| Automatic Restart After Power Failure | Yes |
| Casters | 4 for easy movement |
| Operating Temperature | 5 °C to 35 °C |
| Use | Residential indoor only |
| Warranty | 24 months on functional parts |
| Model Number | ADR70B6PC |
Frequently Asked Questions - ADR70B6PC DANBY
User questions about ADR70B6PC DANBY
0 question about this device. Answer the ones you know or ask your own.
Ask a new question about this device
Download the instructions for your Dehumidifier in PDF format for free! Find your manual ADR70B6PC - DANBY and take your electronic device back in hand. On this page are published all the documents necessary for the use of your device. ADR70B6PC by DANBY.
USER MANUAL ADR70B6PC DANBY
FOR YOUR SAFETY: Read these instructions carefully before operating the unit.
Dear valued customer, we hope your Danby product purchase fulfills all your requirements. Your satisfaction is our priority! Please contact us at our toll free consumer service number for any inquiries you may have about your new unit.
NE PAS RETOURNER CET APPAREIL CHEZ LE DÉTAILLANT SANS CONSIGNES SUPPLEMENTAIRES
This product is factory equipped with a power supply cord that has a three-pronged grounded plug. It must be plugged into a mating grounding type receptacle in accordance with the National Electrical Code and applicable local codes and ordinances. If the circuit does not have a grounding type receptacle, it is the responsibility and obligation of the customer to exchange the existing receptacle in accordance with the National Electrical Code and applicable local codes and ordinances. The third ground prong should not, under any circumstances, be cut or removed. Never use the cord, the plug or the appliance when they show any sign of damage. Do not use your appliance with an extension cord unless it has been checked and tested by a qualified electrician or electrical supplier.

IMPORTANT - MÉTHODE POUR LA MISE À LA TERRE
Owner's Use and Care Guide 1-13
- Welcome
- Important Safety Information
- Features
- Installation Instructions
Operation Instructions
Care and Maintenance - Troubleshooting
Warranty
DESHUMIDIFCATEUR PORTATIF
Read and follow all safety rules and operating instructions before first use of this product.

PRECAUTION:
Improper connection of the grounding plug can result in risk of fire, electric shock and/or injury to persons associated with the appliance. Check with a qualified service representative if in doubt that the appliance is properly grounded.

AVERTISSEMENT
Thank you for choosing Danby
We know you're excited. We are too! However, the more familiar you are with your new appliance, the better experience you will have. We therefore strongly suggest that you read this Owner's Manual before plugging in your new appliance. It contains important operational information that will help you make full use of the technical features available in your Danby appliance. The manual also contains information designed to enhance operating reliability and safety, as well as tips to maintaining your new appliance so that it brings you happiness for years to come.
Please visit www.danby.com to access self-service tools, FAQs and more. Should you need additional assistance, please call 1-800-26-DANBY (1-800-263-2629).
Note: You will need the below information to obtain service under warranty. To receive service, you must provide the original receipt.
Model Number:
Serial Number:
Date of Purchase:
NEED HELP?
Before you call for service, here are a few things you can do to help us serve you better:
Read this Owner's Manual:
It contains instructions to help you use and maintain your appliance properly.
If you received a damaged appliance:
Immediately contact the retailer (or builder) that sold you the appliance.
Save time and money:
Check the Troubleshooting section at the end of the guide before calling. This section helps you solve common problems that may occur.
If you do need service, you can relax, knowing help is only a phone call away.

1-800-26 Danby
(1-800-263-2629)
NOTE
The WARNING instructions issued in this manual are not meant to cover all possible conditions and situations that may occur. Person(s) installing, maintaining, or operating the appliance must exercise caution and care. Failure to install, maintain, and/or operate the equipment according to the manufacturer's instructions may result in conditions which can produce personal injury and damage to your unit and/or property damage. Contact your dealer, service agent, and/or the manufacturer about any problems or conditions you do not fully understand. For Danby Consumer Service call (1-800-263-2629).
ELECTRICAL REQUIREMENTS
To reduce the risk of fire, electric shock, or personal injury, all wiring and grounding must conform with the latest edition of Local and National Electrical codes.
- It is the customer's responsibility to have the wiring and fuses checked by a qualified electrician to make sure adequate electrical power is available.
- This appliance is designed to operate on an effectively grounded, separately branched, polarized, 3-wire, 120 Volt 60 Hertz (alternating current) circuit protected by a 15 ampere fuse, equivalent fuse or circuit breaker. The three-prong grounding plug on the power cord should be plugged directly into the aforementioned receptacle rated 110/120 V.A.C.
- Do not connect the dehumidifier to a multiple socket outlet that is also being used for other electrical appliances.
FOR YOUR SAFETY: To reduce the risk of fire or explosion, do not store or use gasoline or other flammable vapors or liquids in the vicinity of this or any other appliance.
GROUNDING INSTRUCTIONS
Improper connection of the equipment-grounding conductor can result in a risk of electrical shock. Check with a qualified electrician or serviceperson if you are in doubt as to whether your appliance outlets are properly grounded.
- This appliance must be grounded. In the event of malfunction or breakdown, grounding will reduce the risk of electrical shock by providing a path of least resistance for electrical current. This appliance is equipped with a cord that has an equipment-grounding conductor and 3 prong grounding plug. The plug must be connected into an outlet that is properly installed and grounded in accordance with all local codes and ordinances.
- Do not modify the plug provided with this appliance. If it will not fit the outlet, have a proper outlet installed by a qualified electrician.
- If the household electrical supply does not meet the above specifications, or if you are not sure your home has an effective ground, have a qualified electrician or your local electrical utility company check it and correct any problems.
SAVE THESE INSTRUCTIONS
SAFETY PRECAUTIONS
When using this dehumidifier, always follow basic safety precautions, including the following:
- Use this appliance only for its intended purpose as described in this Owner's Manual.
- Do not remove the Styrofoam in the float which is located in the bucket.
- This dehumidifier must be properly installed and grounded as described in this manual before it is used.
- Never operate this dehumidifier in an area that is likely to accumulate standing water. If this condition develops, for your safety disconnect the power supply before stepping into the water.
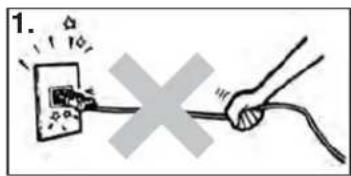
- Never unplug your dehumidifier by pulling on the power cord. Always grip the plug firmly and pull straight out from the receptacle.
- Replace immediately all electric service cords that have become frayed or otherwise damaged. A damaged power supply cord must be replaced with a new power supply cord obtained from the manufacturer and not repaired. Do not use a cord that shows cracks or abrasion damage along its length or at either the plug or connector end.
- If the receptacle does not match the plug, the receptacle must be changed out by a qualified electrician.
- Turn the dehumidifi er OFF and unplug it before cleaning.
- For your safety, do not store or use combustible materials, gasoline or other flammable vapors or liquids in the vicinity of this or any other appliance.
- All dehumidifiers contain refrigerants, which under federal law must be removed prior to product disposal. If you are disposing of a product with refrigerants, check with the company handling disposal about what to do. Check for local regulatory compliance regarding the approved and safe disposal of this appliance.
- Do not use outdoors.
- This dehumidifier is intended for indoor residential applications only. This dehumidifier should not be used for commercial or industrial applications.
SAVE THESE INSTRUCTIONS
LOCATION
-
Select a suitable location, making sure you have easy access to an electrical outlet (avoid the use of extension cords).
-
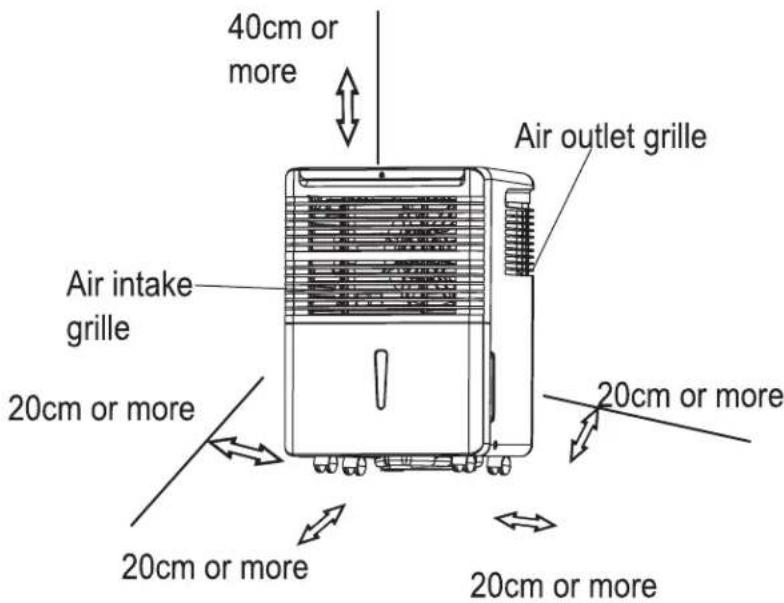
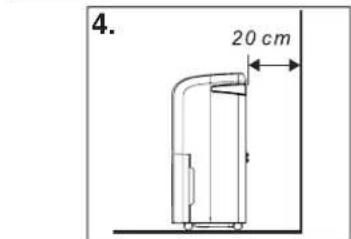
Make sure there are no obstructions restricting airflow through the front air intake grill. Maintain a minimum clearance of at least 20~cm (8") between adjacent walls and the back of the unit, to allow for proper air circulation and maximum efficiency. To achieve maximum operating efficiency from your dehumidifier, the recommended (room ambient) operating temperatures should be between 5^ (41°F) and 35^ (95°F).
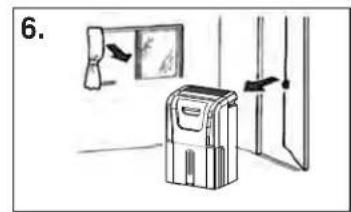
It is important to remember the efficiency of a dehumidifier will be affected/influenced by the rate at which new humid air (moisture) is allowed to infiltrate the same space/area. To maintain efficiency, the dehumidifier must be operated in an enclosed area. Keep all doors and windows closed.
-
Do not use this unit outdoors. This dehumidifier is intended for indoor residential applications only. This dehumidifier should not be used for commercial or industrial applications.
-
Place the dehumidifier on a smooth, level floor strong enough to support the unit with a full bucket of water.
-
Place the unit where it has access to an electrical outlet.
This unit has 4 castors which can move freely. Do not force castors to move over carpet, and refrain from moving the unit with water in the bucket (the unit may tip over and spill water). Protect wood floors from possible spillage or scratches when moving unit.
- Remove accessories and store them in a safe place.
FEATURES
- Soft touch (Electronic) Control Key Pads
- Auto-Sensing Humidity Control
- Adjustable Humidity Settings (35% - 85%)
2 Fan Speed Settings (Turbo/Normal) - Delay Start Protection (Compressor)
- Auto-Defrost (De-Icer)
Full Bucket Indicator Light
Easy Roll Castors (4)
- Front Mounted Water Tank (Removable)
- Direct Drain Option (Hose not included)
- Quiet Operation
- Removable Air Filter

Operating Instructions
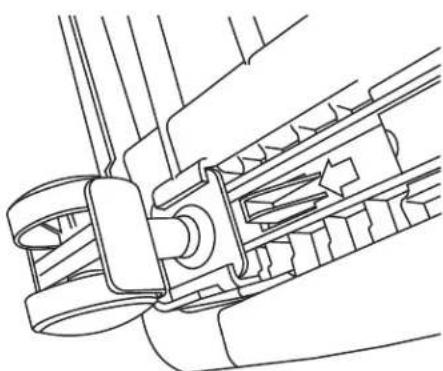
CASTOR INSTALLATION (some models)
Castor installation is recommended to avoid damage to floors.
- Remove the castors from the bucket of the dehumidifi er.
- Position the dehumidifi er on its side.
- Locate the arrow on the bottom of the dehumidifier and insert the castor according to the arrow direction.
- Slide the castor in as far as it will go. The castor will snap into place.
- Repeat steps 1 to 4 for the other 3 castors.
CONTROL PANEL INSTRUCTIONS
NOTE: The control panel of the unit you purchased may be slightly different depending on the model number.
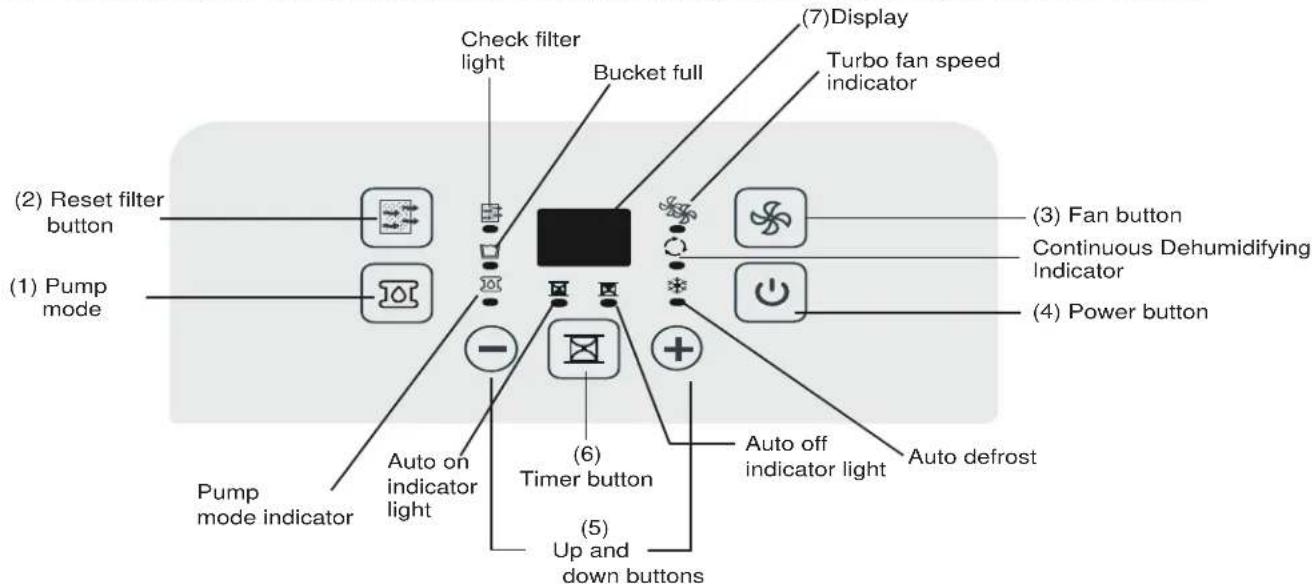
When you push the button to change operation modes, the unit will make a beeping sound to indicate that it is changing modes.
- Pump Button: Press to activate pump operation. Note: make sure the pump hose is installed and that the continuous drain hose has been removed.
- Filter Button: This product has a check filter feature that is a reminder to clean the air filter for more efficient operation. The check filter light will illuminate after 250 hours of operation. To reset this function after cleaning the filter, press the reset fi tter button and the light will go off.
- Fan button: Controls the fan speed. Press to select either high (turbo) or normal fan speed. Set the fan control to high for maximum moisture removal. When the humidity has been reduced and quiet operation is preferred, set the fan control back to normal.
- Power Button: Press to turn the dehumidifier on or off.
- (+/-) Buttons: The humidity level can be set within a range of 35% RH (Relative Humidity) to 85% RH in 5% increments using these buttons. For drier air, press the (-) button and set to a lower percentage value (%) . For more damp air, press the (+) button and set a higher percentage value (%) .
- Timer Button: Press to initiate the auto-start and auto-stop feature. Set a start or stop time from 0.0 to 24 hours using the (+) and (-) keys.
- Display: Shows the actual (± 5% accuracy) room humidity level in a range of 30% RH to 90% RH. Otherwise, displays selection when programming humidity or timer.
To activate Continuous Dehumidifying, press the (-) button until 35% RH is set, then hold the (-) button until the continuous indicator lights up. To cancel press the (+) button and reset the RH.
Note: The fan does not shut off the moment you remove the bucket, the fan will shut off after 2-3 minutes.

Operating Instructions
ERROR CODES
AS - Humidity sensor error -- Unplug the unit and plug it back in. If error repeats, call for service.
ES - Temperature sensor error -- Unplug the unit and plug it back in. If error repeats, call for service.
P2 - Bucket is full or the bucket is not in correct position -- Empty the bucket and/or adjust it to the proper position.
EC - Unit malfunction. Please ensure that the room ambient temperature matches the recommended operating temperature for the unit, 5^ (41^) - 35^ (95^) . If the temperature is within this range, call for service.
Eb - Bucket has been removed or is not in the correct position. Please replace the bucket or correct positioning.
INDICATOR LIGHT FUNCTIONS
Note: Depending on the humidity conditions of the surrounding environment, the dehumidifier may not start automatically when the "on/off" button is pressed (see dehumidifying mode instructions for details).
Memory Setting: Each time the unit is disconnected / re-connected and/or in the event of a power failure, the electronic circuit board automatically defaults to the last program setting that was used. After the unit has stopped, it may take several minutes before operating conditions resume.
Auto_restart: If the unit shuts off unexpectedly due to a power outage, it will restart with the previous function settings automatically when the power resumes.
Bucket Full Indicator Light: When the bucket is full and/or incorrectly positioned inside the cabinet, the bucket full light will turn on and remain on until the bucket is emptied and/or correctly re-positioned. This condition will result in the immediate shut down of the dehumidifying system (both compressor and fan motor operation are terminated). This is a safety feature. When the bucket is emptied and/or correctly re-positioned, the dehumidifier will resume operation automatically. NOTE: It may take several minutes before operating conditions resume.
Auto-defrost: When frost builds on the evaporator coils, the compressor will cycle off and the fan will continue to run until the frost disappears.
TIMER FUNCTIONS
Follow these steps to program the Auto-on or Auto-off feature using the control panel:
Auto-off:
- When the unit is on, and the TIMER button is pressed, the timer off indicator light illuminates to indicate that the autooff program is initiated.
- Press or hold the UP or DOWN button to change the 'Auto' time by 0.5 hour increments, up to 10 hours (then at 1 hour increments up to 24 hours). The unit control will count down the time remaining until start.
- Within 5 seconds of setting auto-off time, press the TIMER button again to complete the auto-off program.
Auto-on:
- When the unit is off, and the TIMER button is pressed, the auto-on program is initiated. Set the auto-on time as in step 2 above. Within 5 seconds of setting auto-on time, press the TIMER button again to complete the auto-on program.
NOTE: When the auto-on and auto-off times are set, within the same program sequence, TIMER ON OFF indicator lights illuminate indicating that both ON and OFF times are now programmed.
NOTE: Turning the unit ON or OFF at any time, changing the on/off timer setting to 0.0, and a P2 error code will cancel the Auto-on/off functions.

Operating Instructions
The water tank holds accumulated condensed water and, by means of a safety switch, controls both the water level and operation of the dehumidifi cation process.
When the water tank is full and/or accidentally displaced inside the cabinet, the float switch actuator (inside the tank) breaks contact with the safety switch. This condition results in the immediate shut down of the compressor and fan motor system, preventing moisture from being condensed.
Note: On some models, the fan will continue to run for approximately 2-3 minutes after the unit has stopped and the bucket has been removed. As a result, water may drip from the tray onto the base of the unit, and then onto the floor. Please ensure that you protect your wood and carpet from such leakage.

IMPORTANT
Never tamper with or attempt to defeat the water level (safety) float switch system. Proper installation of the water tank is crucial in maintaining reliable dehumidiser operation.
DEHUMIDIFYING
Dehumidifying is a means of removing moisture from the air. A dehumidifier will help to protect your home and valued possessions from damage due to swelling caused by moisture in the air. Essentially a dehumidifier removes moisture from air as moist air passes over a dehumidifying (evaporator) coil. Moisture is condensed on the evaporator coil, drained, and collected inside an internal (removable) water tank located at the front of the unit. The exhausted air being returned into the room environment is elevated several degrees causing the surrounding air temperature to increase (slightly). This process also contributes to lowering the relative humidity of the surrounding air.
Note: For optimal performance, ensure that the unit is set at least 10% lower than the relative humidity level. It is normal for the humidity to vary by 5% above or below the set humidity. It is recommended that in normal conditions, the humidity be set at 40 - 45% .
DEHUMIDIFYING MODE INSTRUCTIONS
When the unit is first connected to the electrical outlet, the (green) power light will not light up until the "on/off" button is pressed. When the "on/off" button is pressed, the power light turns on and the dehumidifier automatically defaults to:
Display: Current ambient room humidity (RH%)
Humidity Setting: 40% RH
Fan Speed: High.
Note: Depending on humidity conditions of the surrounding environment, the dehumidifier may not start automatically under the default setting (this is an indication that the humidity level of the surrounding environment is lower than the "default" setting).
Dehumidifying Mode Selection:
- The unit enters dehumidify mode when the ON/OFF button is pressed.
2a. Press the + / - buttons to select a desired RH operating value (35% -85%)
OR
2b. Press the continuous button. When continuous mode is selected, the humidistat (sensor) will be by-passed and the compressor will operate non-stop regardless of humidity conditions.
Fan Speed Selection:
- You can choose a fan speed (normal/turbo) using the keypad. The speed you select is identified by the (illuminated) indicator light located directly above the selection made.
Operating Instructions
AIR FILTER
Note: All the pictures in the manual are for explanatory purposes only. The actual shape of the unit you purchased may be slightly different, but the operation and functions are the same.
Your dehumidifier features a removable Air Filter. This filter is located at the front of the unit (behind the air intake grill) directly above the water tank compartment. The air filter plays an important role in helping to reduce (minimize) dust/dirt particles from the surrounding environment. A blocked/clogged air filter reduces air intake, impacting negatively on operating efficiency. To maintain maximum operating efficiency, the filter must be checked and cleaned regularly (every 2 weeks). More frequent cleaning may be required depending upon indoor air quality.
IMPORTANT: Never operate the unit without the air filter in place.
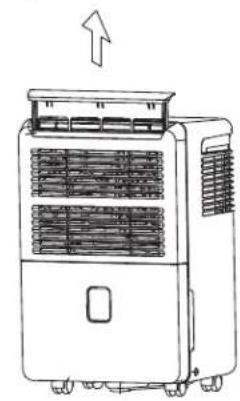
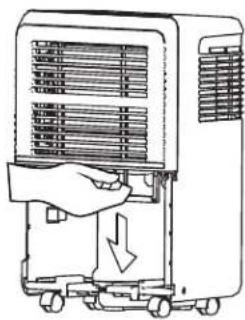
AIR FILTER REMOVAL:
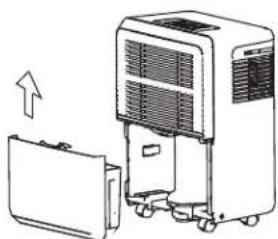
- There are two options depending on your model. Option A: Grasp the filter handle, and pull the filter out. The filter will slide out easily (Fig. 2). Option B: Remove the bucket and pull the filter downwards.
- Clean the filter thoroughly using a vacuum cleaner or wash using lukewarm water and mild detergent. Dry thoroughly before re-installing.
- To re-install the air filter, slide the filter back inside the tracks and push inward.
- Press the reset filter button.
Front:
- Control Panel
- Air Intake Grill
- Air Outlet Grill
- Air Filter (behind the grill)
- Water Bucket
- Handle (both sides)
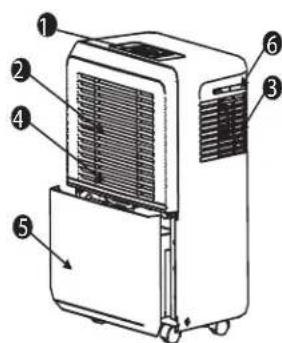
Fig.2
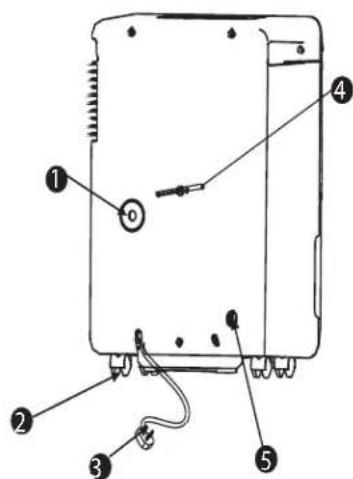
Back:
- Continuous Drain Hose Outlet
- Castor
- Power Cord and Plug
- Band (used only when storing unit)
- Pump Drain Hose Outlet

Operating Instructions
REMOVING COLLECTED WATER
A1.Pull the bucket out a little

A2. Hold both sides of the bucket with even strength, and pull it out from the unit. Pour the water out.
B1.
B2.
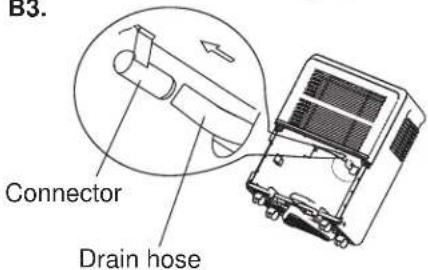
B3.
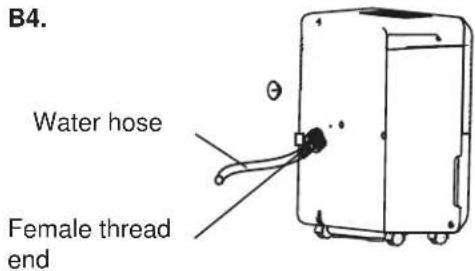
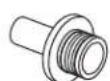
B4.
There are two ways to remove collected water:
1. Use the bucket
When the unit is off and the bucket is full, the unit will beep 8 times, the bucket full indicator light will flash, and the digital display shows P2. When the unit is on and the bucket is full, the compressor turns off and the fan turns off after drying the water off the condenser for 30 seconds. The unit will then beep 8 times and the bucket full indicator light will flash, and the digital display shows P2.
To empty the full bucket, slowly pull out the bucket. Grip the left and right handles securely, and carefully pull it straight out so water does not spill. Do not put the tank on the floor because the bottom of the bucket is uneven. Otherwise the bucket will fall and cause water to spill. Discard the water and return the bucket to the unit. The bucket must be placed and properly positioned for the dehumidifier to operate. The machine will restart when the bucket is restored in its correct position.
Note: When you remove the bucket, do not touch any parts inside of the unit. Doing so may damage the product. Be sure to push the bucket gently all the way into the unit. Banging the bucket against anything or failing to push it in securely may cause the unit not to operate. When you remove the bucket, if there is some water inside the unit you must dry it. The power button fl ashes when the bucket is not properly in place.
2. Continuous draining:
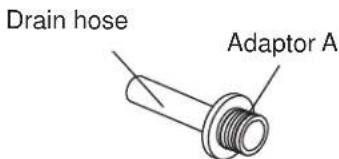
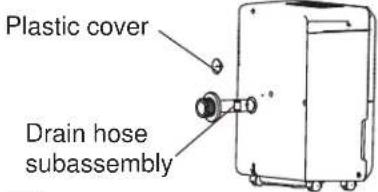
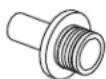
Water can be automatically emptied into a floor drain by attaching the unit to an ID ≥ 5 / 16 water hose with a OD:M=1 male threaded end (not included, a standard garden hose works well). Install the drain hose onto the adaptor A (see B1). The adaptor is found in the accessory bag located in the bucket. Remove the plastic cover from the back drain outlet of the unit and set it aside. Remove the bucket, then insert the drain hose through the drain outlet of the unit and securely press it into the connector on the front of the unit (see B2 and B3).
Tighten the adaptor A and the unit by using two screws (found in the Owner's manual bag). Install the female threaded end of the water hose into the adaptor A (see B4), then lead the water hose to the floor drain or a suitable drainage facility. Make sure the hose is secure so there are no leaks. Direct the hose toward the drain, making sure that there are no kinks that will stop the water from flowing. Place the end of the hose into the drain and make sure the end of the hose is level or declining to let the water flow smoothly. Place the bucket back in the unit and make sure that it is located correctly. Select the desired humidity setting and fan speed on the unit for continuous draining to start.
Accessories (for continuous drain):
Drain hose (1 pc) Adaptor A (1 pc) Screw (2 pc)


Operating Instructions
REMOVING COLLECTED WATER
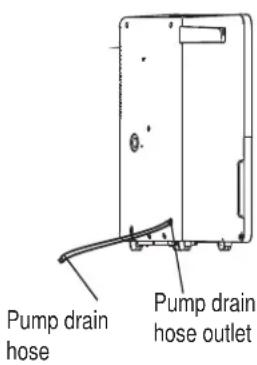
3. Continuous draining using a pump:
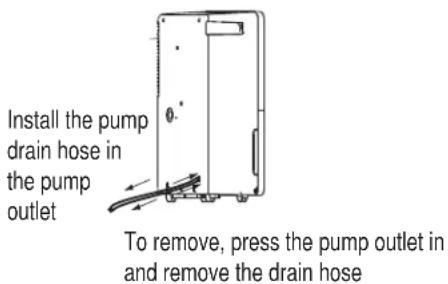
Water can be automatically emptied into a floor drain or suitable drainage receptacle by inserting the supplied pump hose in to the drain pump outlet. Ensure the continuous drain hose is not installed to the unit and that the plastic cover is securely placed on the continuous drain outlet. Insert the pump drain hose into the drain pump outlet ensuring there is a depth of at least 15mm . Once properly inserted lead the pump hose to the floor drain. Once the hose is placed where water can easily drain out, press the "Pump" button on the control panel to activate the pump draining feature. To remove the pump hose, press the "Pump" button again on the control panel and remove the hose in the reverse order of installing it.
Note: It is normal for the pump to make a little bit of noise when it is running. Ensure there are no bends or kinks in the hose that will stop the water from flowing freely.
Note: If the "Pump" indicator light is flashing that means that the pump has failed to operate.
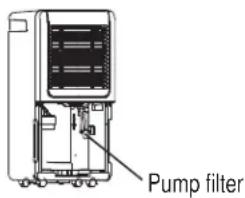
- Check that the pump filter is clean, to check the pump filter, turn the unit off and unplug it, remove the water bucket from the unit, pull the pump down, gently pull the filter off and clean the filter if needed. Once clean, reinstall the fiiter by reversing how it came off and gently pushing the pump back in to place.
- Check that the pump hose is not kinked or blocked.
- Empty the water in the bucket.
- If the pump hose has dropped, reinstall it.

Operating Instructions
CAUTION
- DO NOT pull on the power cord to avoid breakage, potential danger or injury.
- DO NOT use insecticide/ repellents, oil or paint/spray paint around the machine, these might cause damage to plastic parts or start a fire.
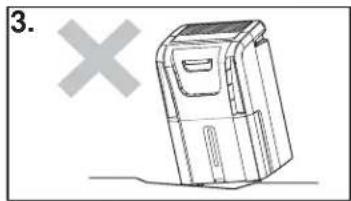
- DO NOT place the unit on uneven ground to avoid shaking, noise and water leakage.
- Always keep the unit 20cm or more from the wall to dissipate heat properly.
- DO NOT drop anything into the machine.
- Close all windows to allow for the maximum possible efficiency for removing moisture.
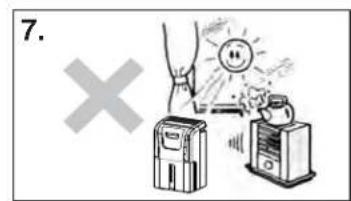
- Keep the machine away from any type of heat source.
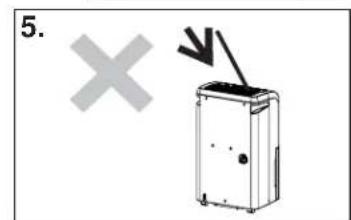
- When moving or putting in storage, do not place the dehumidifier on its side or upside down.


CLEANING

IMPORTANT
- Be sure to unplug the unit before cleaning or servicing.
- Do not use gasoline, paint thinner or other chemicals to clean the unit.
- Do not wash the unit directly under a tap or using a hose. It may cause electrical damage.
- If the power cord is damaged, contact the service depot immediately.
1. Clean the grill and case
Use water and a mild detergent. Do not use bleach or abrasives. Do not splash water directly onto the main unit. Doing so may cause an electric shock, cause the insulation to deteriorate, or cause the unit to rust. The air intake and outlet grills become dirty easily, so use a vacuum attachment or brush to clean.
2. Clean the bucket
Every few weeks, clean the bucket to prevent growth of mold, mildew and bacteria. Partially fill the bucket with clean water and add a small amount of mild detergent. Swish it around in the bucket, empty and rinse. Note: Do not use a dishwasher to clean the bucket. After cleaning, the bucket must be placed and properly positioned for the dehumidifi er to operate.
3. Clean the air filter
Remove and clean the fi iter every two weeks based on normal operating conditions. Remove the filter from the top of the unit (option A), or you can choose to remove the bucket and then pull the filter downwards (option B). Wash the fi iter with clean water, then dry. Re-install the filter, replace the bucket (option B). Press the "reset fi iter" button.
Caution: DO NOT operate the dehumidiser without a filter because dirt and lint will clog it and affect performance.
4. When not using the unit for long periods of time
After turning the unit off, wait one day before emptying the bucket. Clean the main unit, water bucket and air filter. Cover the unit with a plastic bag. Wrap the cord and bundle it with the band (as shown in Fig. 3). Store the unit upright in a dry, well ventilated place.
Option A
Option B
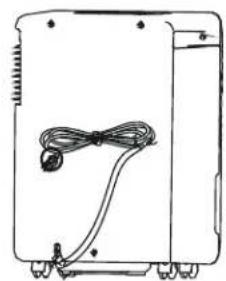
Fig.3

Troubleshooting
Occasionally, a minor problem may arise, and a service call may not be necessary- use this troubleshooting guide for a possible solution. If the unit continues to operate improperly, call an authorized service depot or Danby's Toll Free Number for assistance.
Tel: 1-800-26-Danby (1-800-263-2629)
| PROBLEM POSSIBLE CAUSE SOLUTION | ||
| Dehumidii er does not start | ·The dehumidifi er is unplugged ·The fuse is blown/circuit breaker is tripped ·Dehumidifi er has reached its preset level or bucket is full ·Bucket is not in the proper position ·Power failure | ·Make sure the plug is pushed completely into the outlet ·Check the house fuse/circuit breaker box and replace the fuse or reset the breaker ·The unit turns off automatically when either condition occurs. Change to a lower setting or empty the bucket and replace properly ·The bucket must be in place and securely seated for the unit to operate. ·There is a protective time delay (up to 3 minutes) to prevent tripping of the compressor overload. For this reason, the unit may not start normally for 3 minutes after it is turned back on. |
| Dehumidii er does not dry the air as it should | ·Did not allow enough time to remove the moisture ·Airflow is restricted ·Dirty fi liter ·The humidity control may not be set low enough ·Doors and windows may not be closed tightly ·Clothes dryer may be blowing moisture-laden air into the room ·Room temperature is too low | ·When first installed, allow at least 24 hours to maintain the desired dryness ·Make sure there are no curtains, blinds or furniture blocking the front or back of the dehumidifi er. See the “Location” section. ·See the “Air fi liter” section ·For drier air, press the▼ button and set to a lower percent value (%) ·Check that all doors, windows and other openings are securely closed ·Install the dehumidifi er away from the dryer. The dryer should be vented to the outside. ·Moisture removal is best at higher room temperatures. Lower room temperatures will reduce the moisture removal rate. Modes are designed to be operated at temperatures above 5°C (41°F) |
| Dehumidii er runs too much but does not collect water | ·Need to reset controller | ·Set to 40% RH. Allow bucket to fill and then empty bucket. Adjust controller to desired % RH. |
| Dehumidifer runs too much collects water | ·Area to be dehumidified is too large ·Doors and windows are open | ·The capacity of your dehumidifi er may not be adequate ·Close all doors and windows |
| Frost appears on the coils | ·Unit has been recently turned on, or room temperature is below 5°C (41°F) | ·This is normal. Frost will usually disappear within 60 minutes. See the “Defrost” section |
| Controls cannot be set | ·The compressor will turn off and the fan will automatically continue to run for approx. 3 minutes at a fi xed setting | ·This is normal. Wait approximately 3 minutes and set the fan as desired. |
| Fan noise · Air is moving through the dehumidifi er | ·This is normal | |
| Water on floor | ·Hose connection may be loose ·Bucket used to collect water, but the hose is attached | ·Check the hose connection. See “Continuous Drain” section ·Disconnect the hose if using the bucket to collect water, see “Contin-uous Drain” section. |
| The pump operation light is blinking | ·The fi liter may be blocked ·There may be a kink in the hose | ·Clean the pump fi liter ·Check that the hose has no kinks in it. |
LIMITED CARRY-IN APPLIANCE WARRANTY
This quality product is warranted to be free from manufacturer's defects in material and workmanship, provided that the unit is used under the normal operating conditions intended by the manufacturer.
This warranty is available only to the person to whom the unit was originally sold by Danby Products Limited (Canada) or Danby Products Inc. (U.S.A.) (hereafter "Danby") or by an authorized distributor of Danby, and is non-transferrable.
TERMS OF WARRANTY
Plastic parts, are warranted for thirty (30) days only from purchase date, with no extensions provided.
First 24 months During the first twenty four (24) months, any functional parts of this product found to be defective, will be repaired or replaced, at warrantor's option, at no charge to the ORIGINAL purchaser.
To obtain service Danby reserves the right to limit the boundaries of "In Home Service" to the proximity of an Authorized Service Depot. Any appliance requiring service outside the limited boundaries of "In Home Service", it will be the consumer's responsibility to transport the appliance (at their own expense) to the original retailer (point of purchase) or a service depot for repair. See "Boundaries of In Home Service" below. Contact your dealer from whom your unit was purchased, or contact your nearest authorized Danby service depot, where service must be performed by a qualified service technician. If service is performed on the units by anyone other than an authorized service depot, or the unit is used for commercial application, all obligations of Danby under this warranty shall be void.
Boundaries of If the appliance is installed in a location that is 100 kilometers (62 miles) or more from the nearest in-home service service center your unit must be delivered to the nearest authorized Danby Service Depot, as service must only be performed by a technician qualified and certified for warranty service by Danby. Transporta tation charges to and from the service location are not protected by this warranty and are the responsi bility of the purchaser.
Nothing within this warranty shall imply that Danby will be responsible or liable for any spoilage or damage to food or other contents of this appliance, whether due to any defect of the appliance, or its use, whether proper or improper.
EXCLUSIONS
Save as herein provided, by Danby, there are no other warranties, conditions, representations or guarantees, express or implied, made or intended by Danby or its authorized distributors and all other warranties, conditions, representations or guarantees, including any warranties, conditions, representations or guarantees under any Sale of Goods Act or like legislation or statute is hereby expressly excluded. Save as herein provided, Danby shall not be responsible for any damages to persons or property, including the unit itself, howsoever caused or any consequential damages arising from the malfunction of the unit and by the purchase of the unit, the purchaser does hereby agree to indemnify and hold harmless Danby from any claim for damages to persons or property caused by the unit.
GENERAL PROVISIONS
No warranty or insurance herein contained or set out shall apply when damage or repair is caused by any of the following: 1) Power failure.
2) Damage in transit or when moving the appliance.
3) Improper power supply such as low voltage, defective house wiring or inadequate fuses.
4) Accident, alteration, abuse or misuse of the appliance such as inadequate air circulation in the room or abnormal operating conditions (extremely high or low room temperature).
5) Use for commercial or industrial purposes (ie. If the appliance is not installed in a domestic residence).
6) Fire, water damage, theft, war, riot, hostility, acts of God such as hurricanes, floods etc.
7) Service calls resulting in customer education.
8) Improper Installation (ie. Building-in of a free standing appliance or using an appliance outdoors that is not approved for outdoor application). Proof of purchase date will be required for warranty claims; so, please retain bills of sale. In the event warranty service is required, present this document to our AUTHORIZED SERVICE DEPOT.
Warranty Service
Carry-In
Danby Products Limited
PO Box 1778, Guelph, Ontario, Canada N1H 6Z9
Telephone: (519) 837-0920 FAX: (519) 837-0449
1-800-263-2629
07/14
Danby Products Inc.
PO Box 669, Findlay, Ohio, U.S.A. 45840
Telephone: (419) 425-8627 FAX: (419) 425-8629
Manguera de drenage (1 und) Adaptador A (1 und) Tornillo (2 unds)


Danby Products Limited
PO Box 1778, Guelph, Ontario, Canada N1H 6Z9
Telephone: (519) 837-0920 FAX: (519) 837-0449
1-800-263-2629
07/14
Danby Products Inc.
PO Box 669, Findlay, Ohio, U.S.A. 45840
Telephone: (419) 425-8627 FAX: (419) 425-8629
NOTES / REMARQUES / NOTAS :
NOTES / REMARQUES / NOTAS :
NOTES / REMARQUES / NOTAS :
ArcticAire®
PORTABLE DEHUMIDIFIER
All repair parts are available for purchase or special order when you visit your nearest service depot. To request service and/or the location of the service depot nearest you, call the TOLL FREE number.
When requesting service or ordering parts, always provide the following information:
Product Type
- Model Number
Part Number
Part Description
DESHUMIDIFICADOR PORTÁTIL
Danby Products Limited, Guelph, ON, Canada N1H 6Z9
Danby Products Inc., Findlay, Ohio, USA 45840