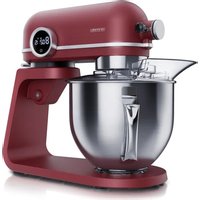
303919 - Food Processor Arendo - Free user manual and instructions
Find the device manual for free 303919 Arendo in PDF.


| Product type | Food processor |
| Brand | Arendo |
| Model | 303919 |
| Power supply | 220-240 V AC, 50/60 Hz |
| Power consumption | 800 W |
| Bowl capacity | Approximately 5 litres |
| Bowl material | Stainless steel |
| Included accessories | Whisk, dough hook, flat beater, splash guard |
| Agitator system | Planetary for even mixing |
| Speed setting | 8 levels (1-8) + stop |
| Built-in timer | Yes, with countdown |
| Safety feature | Safety lock (motor unit must be lowered) |
| Overheat protection | Yes |
| Bowl cleaning | Dishwasher or soapy water |
| Cleaning of agitators | By hand with soapy water (not dishwasher) |
| Cleaning of base | Soft, slightly damp cloth |
| Cable length | Not specified (estimated: about 1 m) |
| Weight | Not specified (estimated: about 4 kg) |
| Dimensions (L x W x H) | Not specified (estimated: 30 x 25 x 35 cm) |
Frequently Asked Questions - 303919 Arendo
User questions about 303919 Arendo
0 question about this device. Answer the ones you know or ask your own.
Ask a new question about this device
Download the instructions for your Food Processor in PDF format for free! Find your manual 303919 - Arendo and take your electronic device back in hand. On this page are published all the documents necessary for the use of your device. 303919 by Arendo.
USER MANUAL 303919 Arendo
ENG: Latest information, drivers, user manuals and data sheets can be found at www.ganzeinfach.de in our download area.
natural_image
Line drawing of a kitchen mixer with a side arm, showing no text or symbolsnatural_image
Diagram of a mechanical device with rotating arrows indicating motion (no text or symbols)Important safety guidelines for this appliance
- Read the user manual completely before using this appliance. There is risk of injury if used incorrectly!
- You can be seriously or fatally injured if you do not follow these instructions.
- The appliance is not intended for use by persons, including children, with reduced physical, sensory or mental abilities as well as inexperienced and uninformed people. Such people may use the appliance only under supervision or with instructions on safe use of the appliance and the associated risks.
- Never use this appliance without placing the lid on it! There is a risk of injury!
- Never operate the appliance in dry condition.
arendic
- Check the product for damage every time before use. Do not operate the appliance if the cable, the plug or the appliance show any visible signs of damage.
- Do not make any modifications or repairs to the appliance.
- Caution! The blade unit is very sharp!
- Plug the appliance only into a properly installed power socket!
- Never leave the food processor unattended and choose a location such that the appliance is out of reach of animals and children.
- Children should not play with the appliance.
- Keep the appliance out of the reach of children under 8 years of age.
-
Keep it on an suitable surface so that it does not tip over.
-
Do not keep the food processor directly next to heat sources (e.g. electric stove).
- Disconnect the power plug from the mains socket when the appliance is not being used or for cleaning.
- Do not move the appliance when it is being operated.
- Ensure that the power cable does not come into contact with any hot surfaces.
- If you want to pull out the plug from the socket, pull by holding the plug and not the cable.
- Never touch the plug with wet hands.
- Protect the appliance against fire.
- Do not immerse the cable, the plug or the entire appliance in water or any other liquids.
- Keep the entire appliance away from water or other liquids.
arendio
- The product should not be used by children. Keep this appliance and the power plug out of reach of children.
- Switch off the appliance and pull the power plug when you want to replace any accessories or to move the appliance to another location.
- Do not allow the power cable to protrude over edges (e.g., table edge or edge of a countertop, etc.).
- Remove the power plug from the socket when the appliance is not being used, during cleaning and assembly.
- If the power cord is damaged, this must be replaced by the manufacturer or by a qualified person in the event of a defect, in order to prevent damage.
- Do not remove the expansion cover. This function is not supported.
- Do not insert any body parts or objects that they are not intended for the purpose, into the mixer or into the spiral drive behind the expansion cover.
- Avoid contact with moving parts of the appliance. During mixing or if the appliance is turned on, all the body parts as well as hair, clothes and all utensils have to be kept away from the appliance to avoid the risk of injury and damage to the appliance.
- Only use accessories recommended by the manufacturer.
- Remove the mixing attachments before cleaning the appliance.
- This product is intended for personal use only!
arendio
- Connect the cable to a properly installed and earthed socket. Do not use an extension cable, adapter or power strip.
- Do not use outdoors.
- Close supervision is required if the appliance is used by children or near children.
- Be careful when handling the sharp cutting blades, emptying the bowl and during cleaning.
- Allow the appliance to cool down completely (at least 10 min) after use, before reusing it!
Thank you for choosing an Arendo product. Please read the following user manual carefully to get the most from the product you have purchased. Before using the product, first check that the delivered item is complete, accurate and undamaged.
1. Scope of delivery
- Food processor
- User manual
• 3 mixing attachments (whisk, kneader, stirrer) - Stainless steel bowl
- Splash guard
2. Technical data
| Power supply 220-240 V AC 50/60 Hz | |
| Power consumption 800 W KB 2min | |
| Capacity (blender jar) approx. 5 l | |
| Features • Non-slip base | • Overheating protection• Safety lock (does not work is the motor unit is raised)• Planetary mixing system for uniform processing• Speed adjustment |
3. Initial use
Take the appliance out of the package and remove all the packaging material. Clean the stainless steel bowl and the mixing attachments. The stainless steel bowl can be cleaned in the dishwasher or using soap water. The mixing attachments are not dishwasher safe and can be cleaned using soap water. Do not use any aggressive or strong cleaning agents.
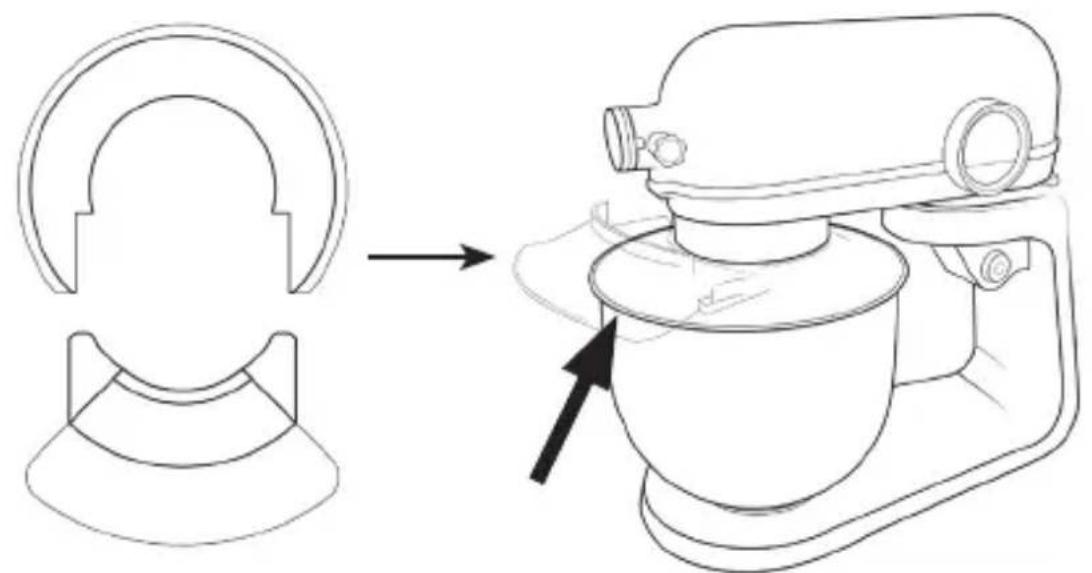
Insert the desired mixing attachment. Mount the splash guard on the appliance and place the stainless steel bowl. The food processor is now ready for use.
4. Product details
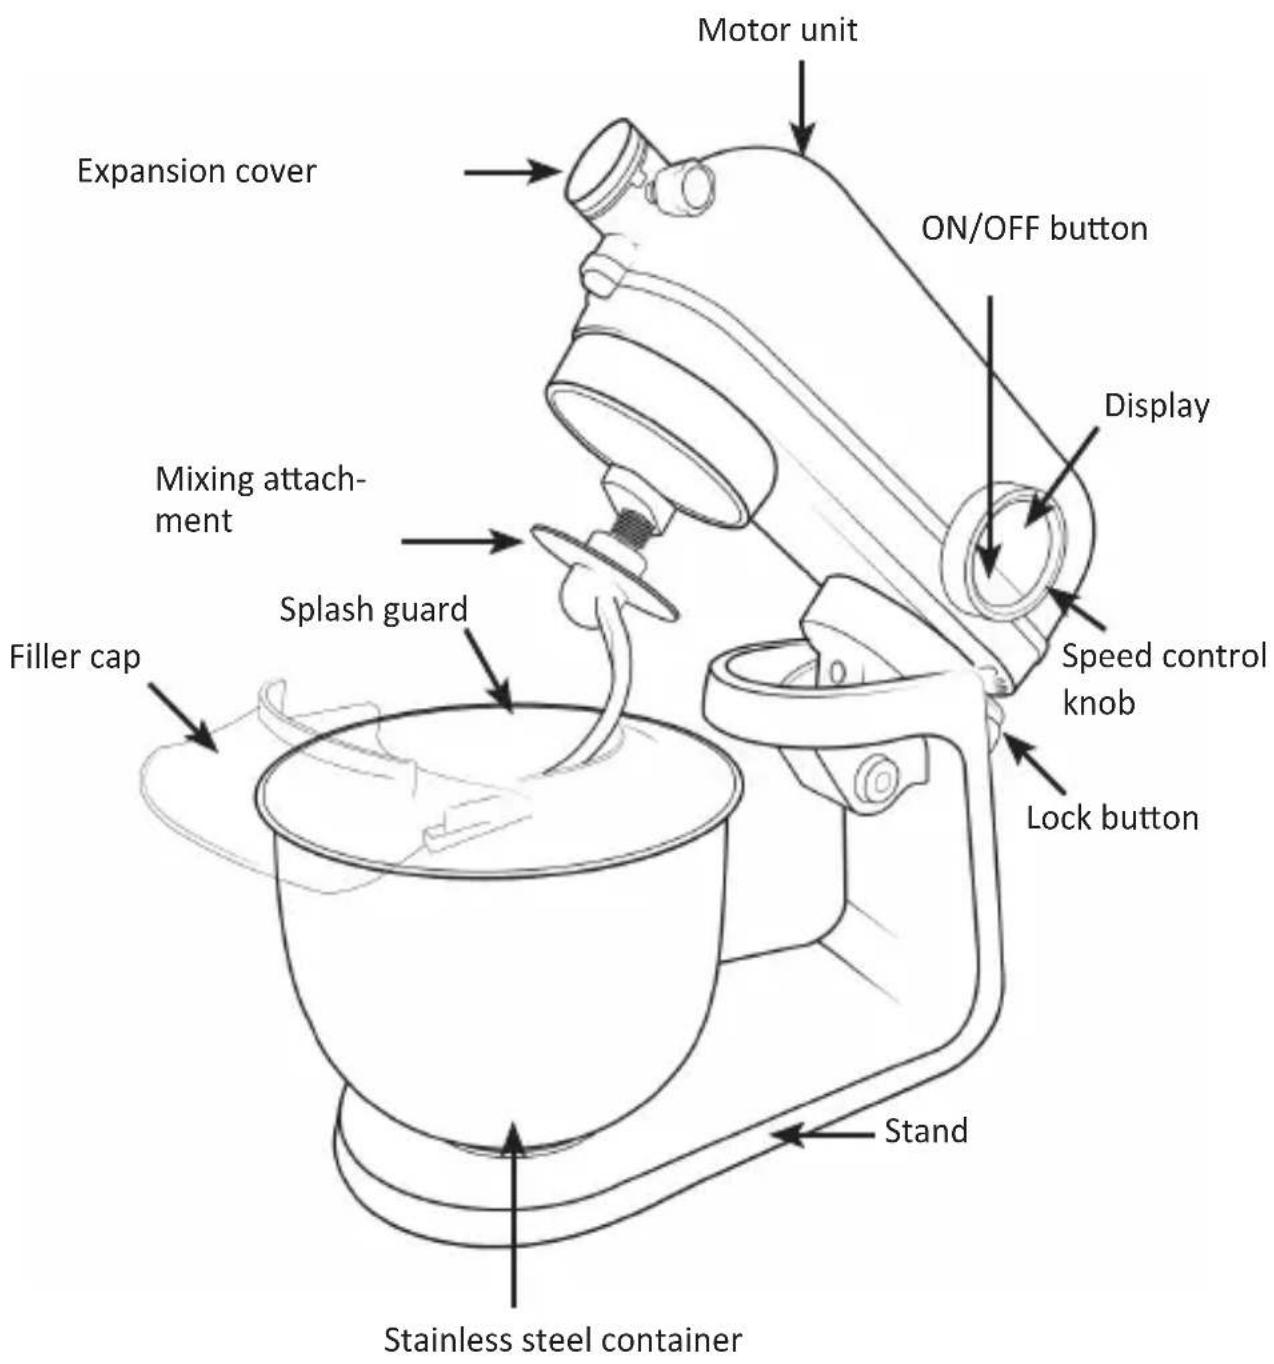
| Mixing attachment Usage (Example) | |
 | StirrerThe stirrer is mainly used for medium to heavy mixes, such as:Cake mix (sponge cake), shortcrust pastry, pasta dough, pancake mix, pastry dough, mixing of meat, waffle batterRecommended speed level: 3-5Recommended quantity of dough: 1500 g |
 | WhiskThe whisk is used mainly for food, where air needs to be mixed into the mixture, such as:Mayonnaise, biscuit dough, whipped cream (ideally with high fat content and stored in cold condition), egg, egg whiteCaution! Use the whisk only for light dough and liquids!Recommended speed level: 6-8Maximum recommended liquid quantity: 800 ml |
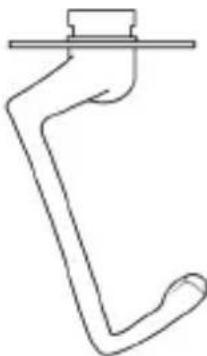 | KneaderThe kneader is mainly used for preparing yeast dough for bread, rolls and pizza dough.Caution! Do not exceed speed level 2 when kneading yeast dough!Recommended speed level: 1-3Recommended quantity of dough: about 1500 g |
Display
The display shows the current speed level and a timer. This timer can be reset by moving the "speed control knob" to the left till the timer resets itself. Move the "speed control knob" to the right to hide the timer.
Speed level
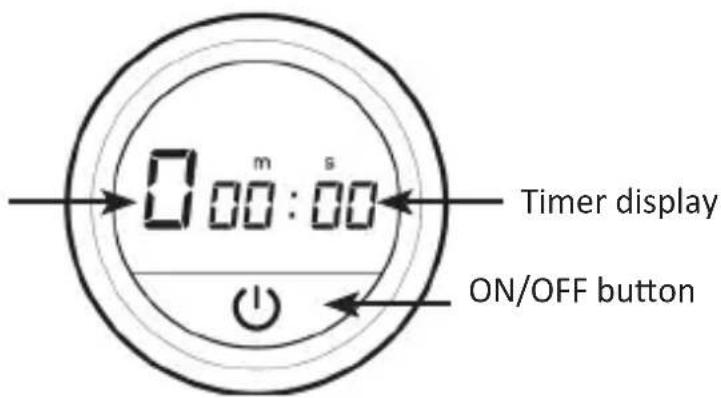
Speed control knob
The appliance has an in-built timer. The table below shows the speed levels and the respective function.
| Speed level Function | |
| 1-8 Speed levels | |
| 1 minimum speed | |
| 8 maximum speed |
5. Operation / Use

Caution! Make sure that the splash guard is mounted correctly at all times during operation!
- Press the "Lock button" at the back of the appliance to bring the motor unit to the position shown in the figure below.
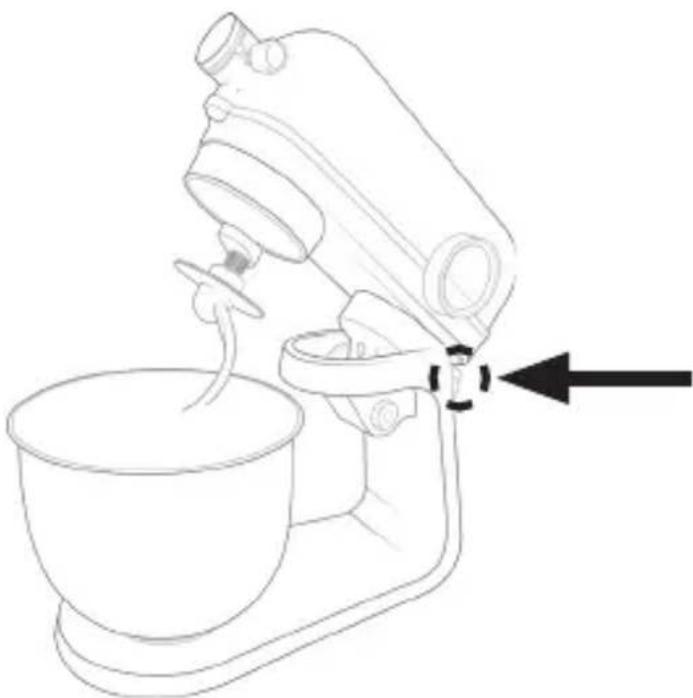
natural_image
Line drawing of a kitchen mixer with a side arm and control panel (no text or symbols)-
Fill the stainless steel bowl with the desired ingredients that you want to process. Then place the stainless steel bowl in the holder provided and turn it until it locks.
-
Now you need to decide which mixing attachment you want to use. You can use the table on page 11 of this user manual as reference.
-
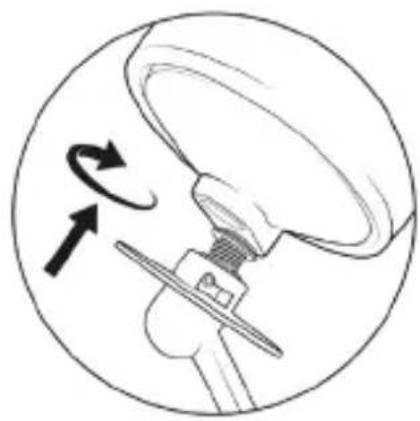
Insert the mixing attachment as described in the following figure. Insert the mixing attachment and turn it with a little pressure so that it snaps into the motor unit. Make sure that it is firmly attached and can not come loose.
natural_image
Diagram of a mechanical device with rotating arrows indicating motion (no text or symbols)- Then press the "lock" key and press the motor unit down slightly to bring the motor unit into position.

Note: Due to the safety circuit, the appliance only works when the motor unit is lowered and locked!
- Mount the splash guard and the filler cap to the motor unit.
- Select the desired speed level using the "Speed control knob". To increase the speed, turn the knob to the left and to reduce the speed turn it to the right.
Note: The timer shown in the display can be reset by moving the "speed control knob" to the left till the timer resets itself. Move the "speed control knob" to the right to hide the timer.
- After mixing is completed, press the "lock" button to tilt the motor unit upwards.
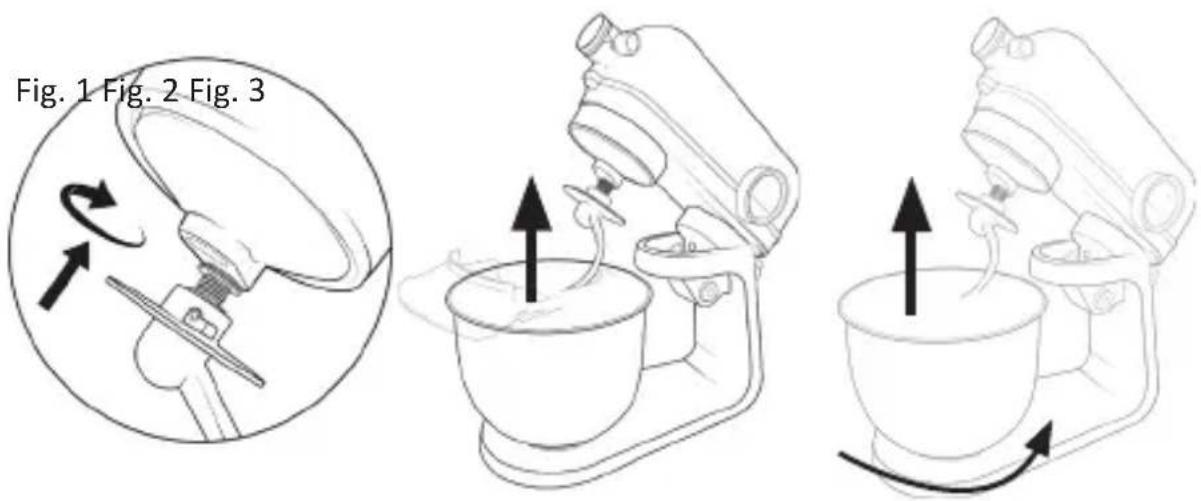
- Now remove the mixing attachment (Figure 1), the splash guard (Figure 2) and detach the stainless steel bowl from the appliance (Fig. 3)
Mixing the egg with a whisk requires about 3min.

Short operation time: If the items being mixed are heavy, do not operate the appliance for more than 10 minutes and then let it cool down for 10 minutes.
Use the splash guard for protection when mixing liquids.
6. Countdown function
- To set the countdown time, turn the "Speed control knob" anticlockwise for approx. 3 seconds.
- The preset time is 2 minutes and is displayed as 02:00 on the LED screen.
- Turn the knob clockwise once, the time increases by 10 seconds, i.e. 2 minutes 10 seconds. Turn the knob anticlockwise once, the time decreases by 10 seconds, i.e. 1 minute 50 seconds.
- Then turn the "Speed control knob" anticlockwise again for 3 seconds, the timer is fixed and the countdown is set.
- Turn the "Speed control knob" clockwise to select the speed. The appliance starts to work. It switches off automatically when the timer has finished counting down.
7. Safety switch
Operation is only possible if the motor unit is lowered. Make sure it is placed properly. Only then can the appliance be started.
8. Cleaning and Care
Unplug the power cord from the mains outlet. Clean the base unit with a slightly dampened soft cloth. Caution! Do not use liquids to wipe the base unit and the power connections. Do not use any aggressive, strong or abrasive cleaning agents.
The stainless steel bowl can be cleaned in the dishwasher or using soap water. The mixing attachments are not dishwasher safe and can be cleaned using soap water.
To clean the appliance quickly and immediately after use, fill the stainless steel jar with warm water up to about 60%, add some detergent and let the appliance run briefly with the mixing attachment. Then remove the stainless steel bowl and shake it a little. Finally, rinse the stainless steel bowl and the mixing attachment with clean water until all the residues and detergent are removed.
Allow all parts of the appliance to dry completely!
9. Safety instructions and disclaimer
Never try to open the appliance to carry out repairs or modifications. Avoid contact with the mains voltage. Do not short-circuit the product. The appliance is not waterproof, therefore please use it only in dry surroundings. Protect it from high humidity, water and snow.
Keep the appliance away from high temperatures. Do not expose the appliance to sudden changes in temperature or strong vibrations, as this could damage the electronic components. Check the appliance for any damage before using it. The appliance should not be used if it was subject to impact or has been damaged in some other manner. Please comply with the local regulations and restrictions. Do not use the appliance for purposes other than those described in the user manual. This product is not a toy. Keep it out of the reach of children or mentally disabled persons. Any repair or modifications to the appliance, which is not carried out by the original supplier will void any warranty and guarantee claims. The appliance should only be used by those who have read and understood this user manual. The specifications of the appliance may be changed without prior intimation.
10. Disposal instructions
In line with the European WEEE directive, electrical and electronic appliances should not be disposed of along with domestic waste. Their components have to be sent separately for recycling or disposal, as improper disposal of toxic and dangerous components may permanently damage the environment. According to the electrical and electronic equipment act (ElektroG), you are obliged (as a consumer) to return (free of charge) all electrical and electronic appliances to the manufacturer, the point of sale or public collection points at the end of their service life. The relevant local laws regulate the details in this regard. The symbol displayed on the product, in the user manual or/and on the packaging refers to these regulations. With this manner of sorting, recycling and disposal of used appliances, you make an important contribution towards protecting our environment.
11. Error codes
Error E01: Machine head is raised during operation.
Error H:
- Overheating (unplug for approx. 1 hour and then restart).
- Overload (unplug for approx. 1 hour and then restart).
- MOS damaged.
- Hall sensor does not recognise that the motor is working.

WEEE directive 2012/19/EU WEEE Register no.: DE 67896761
The company WD Plus GmbH hereby certifies that the appliance 303919/305453/305458 complies with the fundamental requirements and all other relevant stipulations. A complete conformity statement can be obtained from: WD Plus GmbH, Wohlenbergstraße 16, 30179 Hanover

natural_image
Line drawing of a kitchen mixer with a bowl and fan, showing no text or symbolsnatural_image
Diagram of a mechanical device with rotating arrows indicating motion (no text or symbols)natural_image
Line drawing of a kitchen mixer with a bowl and fan, showing no text or symbolsnatural_image
Diagram of a mechanical device with rotating arrows indicating motion (no text or symbols)62 Italiano
natural_image
Line drawing of a kitchen mixer with a hand operating the cup (no text or symbols)natural_image
Diagram of a mechanical device with rotating arrow and rotation indicator (no text or symbols)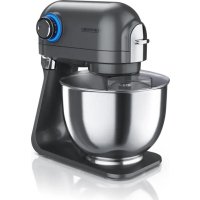
- Important safety guidelines for this appliance
- arendic
- arendio
- Scope of delivery
- Technical data
- Initial use
- Product details
- Display
- Speed control knob
- Operation / Use
- Caution! Make sure that the splash guard is mounted correctly at all times during operation!
- Note: Due to the safety circuit, the appliance only works when the motor unit is lowered and locked!
- Countdown function
- Safety switch
- Cleaning and Care
- Safety instructions and disclaimer
- Disposal instructions
- Error codes
Brand : Arendo
Model : 303919
Category : Food Processor