Groove Agent 4 - Audio software STEINBERG - Free user manual and instructions
Find the device manual for free Groove Agent 4 STEINBERG in PDF.


| Product Type | Virtual drum software and beat creation software |
| Version | Groove Agent 4 |
| Publisher | Steinberg Media Technologies GmbH |
| Minimum System Requirements (Windows) | Windows 7 or 8 (32/64-bit), Intel or AMD dual-core processor, 4 GB RAM, 10 GB disk space, ASIO-compatible audio interface, 1280x800 screen resolution |
| Minimum System Requirements (Mac) | Mac OS X 10.8 or 10.9, Intel dual-core processor, 4 GB RAM, 10 GB disk space, CoreAudio audio interface, 1280x800 screen resolution |
| Supported Formats | VST 3, VST 2, AU, standalone |
| Copy Protection | USB-eLicenser key (not included) |
| Included Content | Recreated sound library, user manual (796 pages in PDF format) |
| Main Features | Three agents (Acoustic Agent, Beat Agent, Percussion Agent), 128 pads, pattern editor, MIDI effects, mixing console with built-in effects, sample management, import/export of MIDI and REX files |
| Maximum Polyphony | Configurable via the Max Voices parameter (not specified) |
| MIDI Channels | 16 |
| Required Disk Space | 10 GB |
| Recommended RAM | 4 GB |
| Maintenance | Software updates via MySteinberg, online support, community forum |
| Repairability | Software, no physical spare parts |
| Manual Languages | French, English, German, Japanese and others |
| Compatibility | VST/AU compatible digital audio workstations, standalone use |
Frequently Asked Questions - Groove Agent 4 STEINBERG
User questions about Groove Agent 4 STEINBERG
0 question about this device. Answer the ones you know or ask your own.
Ask a new question about this device
Download the instructions for your Audio software in PDF format for free! Find your manual Groove Agent 4 - STEINBERG and take your electronic device back in hand. On this page are published all the documents necessary for the use of your device. Groove Agent 4 by STEINBERG.
USER MANUAL Groove Agent 4 STEINBERG
This PDF provides improved access for vision-impaired users. Please note that due to the complexity and number of images in this document, it is not possible to include text descriptions of images.
The information in this document is subject to change without notice and does not represent a commitment on the part of Steinberg Media Technologies GmbH. The software described by this document is subject to a License Agreement and may not be copied to other media except as specifically allowed in the License Agreement. No part of this publication may be copied, reproduced, or otherwise transmitted or recorded, for any purpose, without prior written permission by Steinberg Media Technologies GmbH. Registered licensees of the product described herein may print one copy of this document for their personal use.
All product and company names are ^TM or ⑧ trademarks of their respective holders. For more information, please visit www.steinberg.net/trademarks.
© Steinberg Media Technologies GmbH, 2014.
All rights reserved.
Table of Contents
6 Installation and Setup
6 Welcome
7 Typographical Conventions
7 USB-eLicenser
8 System Requirements
8 Launching Installation via the Start Center
9 Launching Installation Manually
9 How You Can Reach Us
9 Setting Up
10 Setting Up Groove Agent as a VST Instrument
11 Selecting Outputs
11 Using Groove Agent in an AU-Compatible Application
12 Using the Instrument as Standalone Application
13 Introduction
13 Window Overview
14 About Kits, Presets, and Groove Agent ONE Content
16 Managing Your Sounds
30 Common Editing Methods
16 Loading Kits
16 Kit Slot
17 Kit Rack
18 Kit Context Menu
19 Managing and Loading Files
20 Managing Files via the MediaBay
24 Loading Files Using the Browser
30 Encoders and Sliders
30 Multi Selection and Par ameter Controls
31 Adjusting the Value Ranges
31 Buttons
31 Value Fields
32 Using Key Commands
33 Presets
33 Handling Section and Module Presets
33 Handling VST Presets
35 Working With Pads
36 Instrument Pads
37 Using an Alternative MIDI Note Assignment
38 Pad Section
40 Pattern Section
42 Performance Section
43 Using MIDI Effects
47 Pattern Pads
47AssigningMIDIFiles to Pads
48Assigning Multiple MIDI Files to Pads
48 Removing MIDI Files from Pads
48 Using MIDI Port B for Pattern Pads
49 Locking Pad Settings
49 Moving and Copying Pattern Pads
50 Overview Tab
52 Pattern Editor
61 Common Pad Settings
62 Pad Functions
63 Beat Agent
63 Sound Editing
64 Absolute and Relative Editing
64 Editing Selection or All
64Assigning Samples to Pads
66 Changing the Order of Pads
67 Mapping View
68 Main Tab
71 Editing the Envelope
76 Pitch Tab
78 Filter Tab
80 Amp Tab
81 Sample Tab
91 Slice Tab
96 Pattern Editing
96 Mixing
97 Agent Mixer
98 Importing and Exporting Files
98 Importing MPC and GAK Files
98 Importing REX Files and Sliced Loops
99 Exporting Kits with Samples
99 Finding Missing Samples
101 Acoustic Agent
117 Percussion Agent
126 Mixing and Effect Handling
131 Effects Reference
101 Sound Editing
102 About the 24 Bit and 16 Bit Sample Versions
102 Instrument Preview
102 Sound Parameters
107 Pattern Editing
108 Agent Tab
113 Mixing
113 Agent Mixer
117 Sound Editing
118 About the 24 Bit and 16 Bit Sample Versions
118 Instrument Preview
119 Sound Parameters
120 Pattern Editing
120 Agent Tab
123 Mixing
123 Agent Mixer
124 Agent Mixer Overview
124 Channel Parameters
125 Agent Mixer Equalizer and Effects
126 Mixer Page
126 AUX Mixer
127 Kit Mixer
128 Master Mixer
128 Effect Handling
129 Using the Insert Effect Slots
131 Reverb and Delay Effects
131 REVerence
132 Reverb
135 Multi Delay
136 EQ Effects
136 Studio EQ
137 Graphic EQ
138 DJ-EQ
139 Filter Effects
139 Auto Filter
142 MorphFilter
143 Distortion Effects
143 Distortion
144 Tape Saturator
145 Tube Saturator
145 Modulation Effects
145 Chorus
146 Flanger
147 Step Flanger
148 Phaser
149 Ring Modulator
151 Frequency Shifter
153 Vintage Ensemble
154 Dynamics Effects
154 Compressor
156 VintageCompressor
157 Tube Compressor
158 Lmiter
159 Brickwall Limiter
160Maximizer
160 Expander
162 Gate
163 Envelope Shaper
164 Panner Effects
164 Stereo Pan
164 StereoEnhancer
165 Automation and MIDI Controllers
165 Automation
166 MIDI Controllers
167AssigningMIDIControllers
167 Setting the Parameter Range
169 Global Functions and Settings
169 Plug-in Functions Section
169 Multi Slot Section
169 Master Section
170 Performance Displays
170 The Plug-in Name and Steinberg Logo
171 Toolbar
172 The Keyboard
173 Options Page
178 Using the Standalone Version of the Plug-In
178 Making Preferences Settings
178 Preferences Dialog
180 Selecting the MIDI Input and the Audio Output
181 Scratch Pad
181 Transport Controls
181 The Info Icon
181 Song Position Indicator
182 Tempo and Time Signature
182 Recording Your Performance
183 Using the Metronome
183 Loading a MIDI File
183 MIDI Channel Filter
183 Saving a MIDI File
184 Master Volume
185 Mixer Routing Diagrams
188 Index
Installation and Setup
Welcome
Congratulations and thank you for purchasing Steinberg's Groove Agent 4.
With the fourth incarnation of your favorite virtual drummer, Groove Agent emerges as an entirely revamped instrument that raises the level in terms of quality, functionality, and authenticity. The whole library was created from scratch to meet the requirements of contemporary music producers, for both acoustic and electronic music productions. Many innovative features have found their way into the new version to enhance the initial design that made Groove Agent exceptional in its class.
All the new features and functionalities are described in detail in this manual. Please don't forget to register at MySteinberg in order to gain access to online support offers and additional exclusive services. And check out the official Steinberg community at www.steinberg.net/forum for tips and tons of other useful information.
We wish you lots of musical inspiration while working with your brand-new drum studio!
The Steinberg Team
The Agent Concept
Groove Agent 4 combines the creative power of 3 different rhythm modules: the Acoustic, Beat, and Percussion Agents.
Each of these tools offers its own approach to drums and rhythms, with special ways of creating your own inspiring beats in a huge range of styles. The creative potential of each agent can even be combined with any of the others. 4 agent slots allow you to mix and match your ideal rhythm section or combine Acoustic Agent and Beat Agent to create ultra-modern hybrid beats.
Typographical Conventions
Many of the default key commands use modifier keys, some of which are different depending on the operating system. For example, the default key command for Undo is [Ctrl]-[Z] on Windows and [Command]-[Z] on Mac OS X.
When key commands with modifier keys are described in this manual, they are shown with the Windows modifier key first, in the following way:
- [Win modifier key]/[Mac modifier key]-[key]
For example, [Ctrl]/[Command]-[Z] means "press [Ctrl] on Windows or [Command] on Mac OS X, then press [Z)".
Similarly, [Alt]/[Option]-[X] means "press [Alt] on Windows or [Option] on Mac OS X, then press [X]".
USB-eLicenseer
Operation of Steinberg software often requires a USB-eLicenser, a hardware copy protection device.
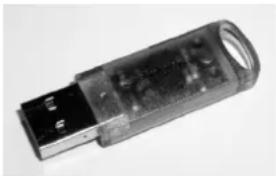
The USB-eLicenser is a USB device on which your Steinberg software licenses are stored. All hardware-protected Steinberg products use the same type of device, and you can store several licenses on one device. Also, licenses can – within certain limits – be transferred between USB-eLicensers.
If your Steinberg software product does not include a USB-eLicenser, you can purchase one through the Steinberg online shop.
In the eLicenser Control Center, you can activate new licenses and check which licenses are installed on your USB-eLicenser. After installation of your Steinberg application, the eLicenser Control Center can be opened via the Start menu on Windows systems or the Applications folder on Mac OS X systems.
If you are using other copy-protected Steinberg products, you may want to transfer all licenses for your applications to one USB-eLicenser, thus using up only one USB port of your computer. Refer to the eLicenser Control Center Help for information on how to transfer licenses between USB-eLicensers.
System Requirements
Your computer must meet the following minimum requirements:
| Mac OS X Windows | |
| Mac OS X Version 10.8/10.9*Intel dual-core processorCoreAudio-compatible audio hardwareVST 3 or AU-compatible host application for using Groove Agent as a plug-in | Windows 7/Windows 8*Intel or AMD dual-core processorWindows-compatible audio hardware**VST 3 or VST 2-compatible host application for using Groove Agent as a plug-in |
| 4GB RAM10 GB of free hard-disk spaceDisplay resolution of 1280 x 800 pixelsDVD ROM dual-layer driveUSB-eLicenser (not included)Internet connection required for installation, activation, account setup, and personal/product registration. | |
| *Native 32-bit and 64-bit program version.**ASIO-compatible audio hardware recommended for low-latency performance. | |
Launching Installation via the Start Center
From the Start Center application you can easily install your program and inform yourself about the package contents.
- For Steinberg software delivered with an installation medium, the Start Center launches automatically as soon as you insert the disc in your computer's CD/DVD drive, provided that autorun is activated.
- For Steinberg software downloaded from the internet, the Start Center launches when you double-click the downloaded file.
NOTE
The installer allows you to save the content files on a different hard drive than the program files.
PROCEDURE
- In the Start Center, choose your preferred language.
- Click Install.
- Follow the instructions on screen.
Launching Installation Manually
If you do not want to install the program via the Start Center, you can install it manually.
- On Windows systems, double-click the file "Setup.exe" and follow the instructions on screen.
- On Mac OS X systems, double-click the file "Groove Agent.mpkg" and follow the instructions on screen.
How You Can Reach Us
Click the Steinberg logo in the top right corner of the control panel to open a pop-up menu containing items for getting additional information and help.
- This menu contains links to various Steinberg web pages. Select a link to open the corresponding page. On the web pages, you can find support and compatibility information, answers to frequently asked questions, links for downloading new drivers, etc.
- To open the Operation Manual, select Help.
- You also find a menu item for the registration of your product. As a registered user, you are entitled to technical support, you gain access to exclusive offers such as software updates and upgrades, and more.
Setting Up
The following sections describe how to use Groove Agent as a plug-in in different host applications.
NOTE
Groove Agent can also be used as a standalone application.
Setting Up Groove Agent as a VST Instrument
Steinberg DAWs provide two ways of working with VST instruments: the VST Instruments rack and instrument tracks.
Accessing Groove Agent via the VST Instruments Rack
PREREQUISITE
You have correctly set up your Steinberg DAW, as well as your MIDI and audio hardware, and the DAW receives MIDI data from your external MIDI keyboard.
PROCEDURE
-
Select Devices > VST Instruments.
-
In the VST Instruments window, click the Add Rack Instrument button and select Groove Agent.
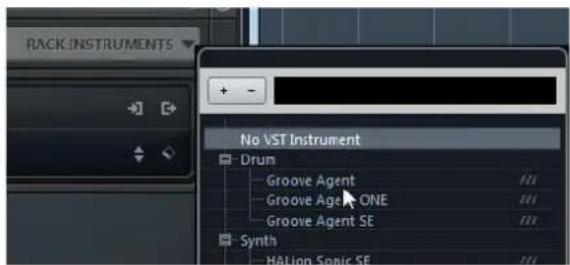
You are asked whether you want to create an associated MIDI track connected to the VST instrument.
3. Click Create.
RESULT
Groove Agent is loaded and activated, and its control panel opens. A corresponding MIDI track is added to the track list. The output of this track is routed to Groove Agent.
NOTE
If you want to use Groove Agent in another VST host application, please refer to the documentation of the corresponding application.
Accessing Groove Agent via an Instrument Track
PROCEDURE
-
In the Steinberg DAW, you can add instrument tracks in the following way:
-
Select Project > Add Track > Instrument.
In the VST Instruments window, click the Add Instrument Track button.
The Add Instrument Track dialog opens.
- On the Instrument pop-up menu, select Groove Agent.
- Click Ad d Track to create the instrument track.
- Click the Edit Instrument button in the Inspector to open the Groove Agent control panel.
RESULT
Groove Agent is set up as a VST instrument in your DAW. For more information about working with VST instruments, see the Operation Manual of your DAW.
Selecting Outputs
Groove Agent loads with a stereo output configuration by default. However, you can use additional outputs in the Steinberg DAW. This allows you to route all kit slots to a dedicated channel in the MixConsole.
PROCEDURE
- To make the outputs available, open the VST Instruments window.
- Click the Activate Outputs button for the instrument.
- Activate the outputs that you want to use.
RESULT
The Steinberg DAW automatically adds an output channel for each additional output to the MixConsole.
Using Groove Agent in an AU-Compatible Application
You can use Groove Agent in an AU host application, for example, Logic. The AU version of Groove Agent is installed in your AU plug-ins folder and lets Groove Agent work in an AU environment without any performance loss or incompatibilities.
PROCEDURE
- For Logic Pro, open the Track Mixer and select the instrument channel that you want to use.
- Click in the I/O field and select AU Instruments > Steinberg > Groove Agent.
- Select one of the available channel configurations.
RESULT
Groove Agent is now loaded as an AU instrument.
Using the Instrument as Standalone Application
Groove Agent can be used as a standalone application, independently of any host application. In this case, you can connect the instrument directly to your audio hardware.
RELATED LINKS
Using the Standalone Version of the Plug-In on page 178
Introduction
Window Overview
The application interface follows a fixed-size single window concept.
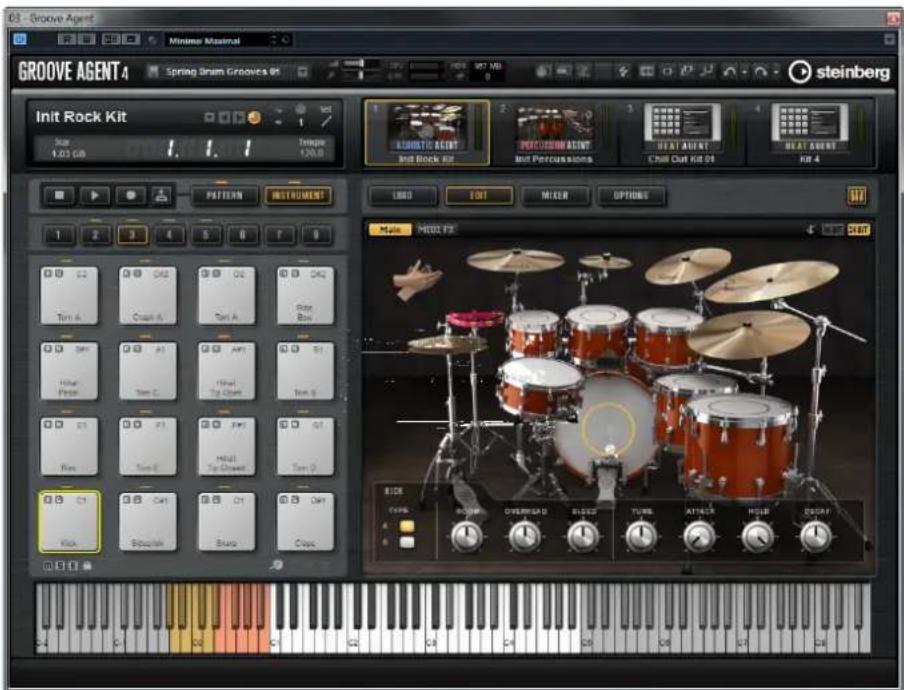
The window is subdivided into several sections:
- The plug-in functions section at the top.
- The kit slot section and the kit rack below the plug-in functions section.
- The pad section on the left.
- The edit display on the right. It c contains the Load, Edit, Mixer, and Options pages.
- At the bottom of the panel, you can display a keyboard.
- If you are using the standalone version of Groove Agent, you find a number of specific functions in an extra section at the top of the application window.
About Kits, Presets, and Groove Agent ONE Content
Kits
Kits contain all information about the kit or sliced loop and about the insert effects that are used on the mixer channel. Kits can also contain MIDI patterns.
Kits can be saved and loaded via the kit rack or the kit slot section.

Kit Rack
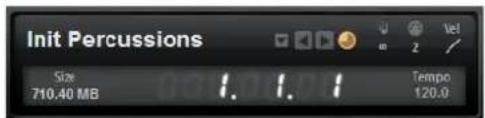
Kit Slot Section
Sliced Loop Kits
Instead of MIDI patterns, sliced loop kits contain the MIDI phrase that is needed to play back the loop. Other than that, sliced loop kits are similar to regular kits, in that they can use insert effects, etc.
Plug-in Presets (VST Presets)
A plug-in preset contains all information necessary to restore the complete state of the plug-in. This includes all 4 kits, the MIDI patterns, as well as any insert and AUX effects. All of these settings are also saved with the project in your host application.
Groove Agent ONE Content
Groove Agent can load Groove Agent ONE presets. The presets can either be loaded as kits in the kit rack or the kit slot section or as plug-in presets via the preset management menu in the plug-in header.
If you load a Groove Agent ONE preset as a plug-in preset, the global plug-in parameters are set to the default values.
If you load a preset as a kit, all global plug-in parameters remain unchanged.
NOTE
Groove Agent ONE presets always show the icon for a plug-in preset in the MediaBay, even if they are shown in the preset loader.
Content Files and Folder Structure
Groove Agent comes with a large amount of ready-to-use sound content. This content is write-protected. You can edit files while they are loaded, but you cannot overwrite the factory content files.
To save edits to the factory content, save the files under a new name. These files get the file name extension .vstpreset and are referred to as user content. They can be searched and categorized in the same way as factory content.
User content is saved in a predefined folder structure on your hard disk. You can create sub folders within this structure to facilitate moving or exchanging content.
Managing Your Sounds
Loading Kits
There are several ways to load kits:
- Via drag & drop from the Windows Explorer/Mac OS Finder.
- Via the context menu in the kit rack.
- By clicking the Load Kit button at the right of the kit name in the kit slot section.
- Via the Med iaBay or the Browser
Kit Slot
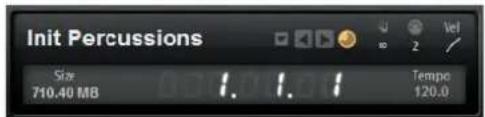
This section shows the name of the loaded kit. In addition, the following global controls are available:
Load button
Click this button to show the list of available kits.
You can also click the kit name to open this list. Right-click the kit name to open the kit context menu.
Load Previous/Next Kit
Click these buttons to load the previous/next kit from the list of available kits.
Load Kit with Patterns
Activate this button to make sure that kits are always loaded together with their patterns.
Size
Shows the size of all loaded samples.
Polyphony
Adjusts the polyphony of the kit.
MIDI Channel
Sets the MIDI channel for the kit.
MIDI Input Indicator
The MIDI symbol starts blinking if incoming MIDI signals are detected.
Velocity Curve
Sets the velocity response curve of the kit. This allows you to adapt the kit to your hardware MIDI controller or playing style.
Song Position Counter
The song position counter shows the current song position in bars, beats, and 16th notes. If you activate the Play button in Groove Agent, the song position counter always starts at 1.0.0.0 and runs until you click stop.
Tempo Display
The tempo display next to the position counter shows the tempo of the host application.
Kit Rack

The Kit rack can be found to the right of the kit slot section. It gives you an overview over the loaded kits and their corresponding agent, and allows you to perform some kit editing for the selected kit via the context menu.
- To select a kit, click on it.
Kit Context Menu
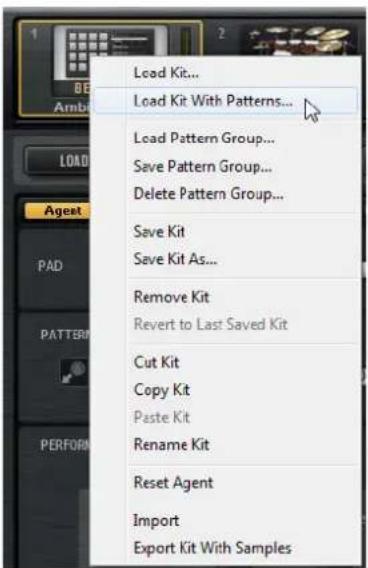
Load Kit
Opens a pop-up menu containing the available kits. Double-click a kit to load it.
Load Kit With Patterns
Allows you to load a kit with its MIDI patterns, if any.
Load Pattern Group
Allows you to load a predefined set of MIDI file assignments and play parameter settings for the 16 pads of the selected group.
Save Pattern Group
Allows you to save the 16 pads of the current group and their settings as a pattern group.
Delete Pattern Group
Allows you to delete a pattern group.
Save Kit
Saves the kit. If you try to overwrite write-protected factory content, a dialog opens that allows you to save the edited kit under a new name.
Save Kit As
Allows you to save the kit under a new name.
Remove Kit
Removes the kit and its patterns from the slot.
Revert to Last Saved Kit
Reverts to the kit that was originally loaded on the slot. If the kit was loaded without patterns, only the kit and no patterns are loaded.
Cut Kit
Copies the kit and its patterns and removes it from the slot.
Copy Kit
Copies the kit and its patterns.
Paste Kit
Pastes the copied kit into the slot. If the slot already contains a kit, it is replaced.
Rename Kit
Allows you to rename the kit.
Reset Agent
Loads the Init preset of the agent.
Import
Allows you to import MPC and GAK files.
Export Kit With Samples
Exports the kit together with its associated samples.
NOTE
Samples that are part of protected content, such as the VST Sound content, cannot be exported.
Managing and Loading Files
On the Load page, you can switch between the MediaBay and the Browser. These can be used to manage, navigate to, load, and preview different file types.
The MediaBay gives you access to presets, such as multis and kits.
In the Browser, you can browse for samples and presets. The Browser also shows samples that are part of VST Sound content.
- To switch between Med on the Load page.
iaBay and Browser, click the corresponding button
Managing Files via the MediaBay
In the top section of the MediaBay, you specify which sounds to look for. The lower section presents the corresponding results.
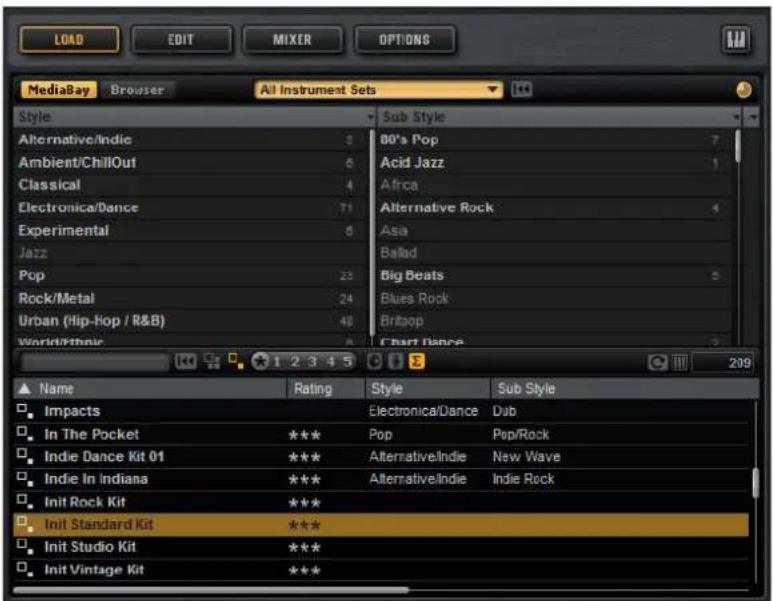
- To adjust the size of the two sections, drag the divider at the top of the results list.
Applying Filters
Category Filter
You can filter the results list based on up to 3 filter criteria using the configurable attribute columns. Standard attributes are Style and Sub Style.
Only the files that match the filter are displayed in the results list.
- To define the filter, click on specific values in the columns.
To refine the filter, select mor e values from other columns. - To select different filter criteria, click the column header and select a different attribute from the submenu.
Instrument Set Filter
Use the Select Content Set pop-up menu to search a specific content set only. By default, the search is performed in all installed content sets.
Results List
The results list shows all files that have been found according to the category filter.

Text Search
In the text search field on the results list toolbar, you can enter text contained in the name or any of the attributes of a preset that you are looking for. The results list updates immediately and the Category search section above shows all categories that contain presets matching the text search.
To reset the text-based result filter, click the Reset button next to the search field.
View Filters
The toolbar has 2 filter buttons to define which preset types to display: multis or kits. In the results list, the corresponding icon is shown to the left of the preset name.
Rating Filter
You can limit the results list according to the rating of the presets. Use the rating slider to define the minimum rating.
Content Filter
The content filter buttons allow you to define whether to show all presets, only the factory presets, or only your user presets.
Columns
The columns show all the attribute values for the presets that match the filters that you set up in the top section.
Setting Up the Result Columns
You can select which attribute columns to display by clicking the Set up Result Columns button on the toolbar.
Results Counter
The number of presets that match the filter criteria is displayed at the right of the toolbar.
Configuring the Results List
- To configure which attributes are shown in the results list, click the Set up Result Columns button in the upper right corner of the results list and activate the corresponding entries. New attributes are added at the right of the list.
- To reorder the columns in the results list, drag the column headers to another position.
- To change the sorting of the list entries, click the column header. The triangle in the column header shows the sorting direction.
Loading Kits into Slots
To load a kit into the selected agent slot, you have the following possibilities:
- Select the slot into which you want to load the kit, and doubt the results list.
- Drag a kit from the results list to a kit in the kit rack or onto the slot in the kit slot section.
If a kit is already loaded, it is replaced with the new kit.
- Right-click the kit in the results list and select Lo ad Kit from the context menu.
Importing Presets
You can import presets from any file location using the Windows Explorer/Mac OS Finder.
PROCEDURE
- Select the preset in the Windows Explorer/Mac OS Finder.
- Drag it to the MediaBay.
RESULT
The imported presets are copied to your user folder.
Editing Preset Attributes
Presets can be described by using a predefined set of attributes.
PROCEDURE
- In the New Preset Attributes section of the Save dialog, click in the field of the attribute value that you want to set.
Depending on the attribute, a menu or a dialog opens.
- Select a value.
Attribute values are written directly into the corresponding preset files.
NOTE
If you change the attributes for write-protected factory presets, these changes are only saved in the MediaBay database, not in the preset file.
Available Attributes
The predefined media and musical attributes can be set in the results list and in the Save dialog.
Media Attributes
Name
For user presets, you can edit the name via the context menu. For all other elements, this attribute is display only.
Rating
Drag to set the rating.
Comment
Click to select, double-click to edit.
Content Summary
Click to select, double-click to edit.
Write Protection
Display only, use context menu to set protection.
Library Name
Click to select, double-click to edit.
Library Manufacturer
Click to select, double-click to edit.
Author
Click to select, double-click to edit.
Musical Attributes
Category
Click to select.
Sub Category
Click to select.
Style
Click to select.
Sub Style
Click to select.
Character
Click to open an editor.
Tempo
Click to select, double-click to edit.
Bars & Beats
Click to select, double-click to edit.
Signature
Click to select, double-click to edit.
Key
Click to select.
GM Sound
Click to select.
Deleting User Presets
- To delete a user preset, right-click it and select Delete from the context menu.
NOTE
Factory presets cannot be deleted.
Loading Files Using the Browser
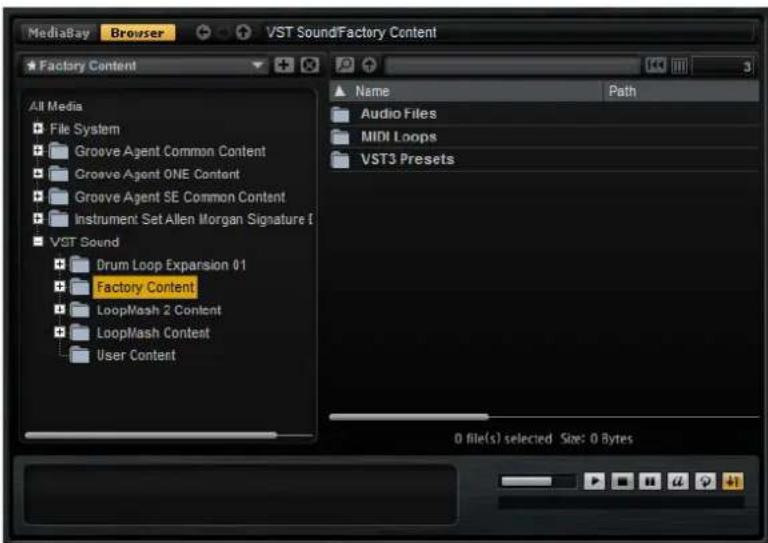
In the Browser, you can search and load the following files:
- Samples from the file system or from within loaded kits.
NOTE
Samples can only be loaded for Beat Agent kits.
Path Section

- To step through the recent locations, click the Previous/Next Location buttons.
- To navigate to the folder one level up in the location tree, click the Browse Containing Folder button.
- The path field shows the current location. To specify a new location, enter or copy a new path.
- To open the navigation history, click at the very right of the path field.
Location Tree
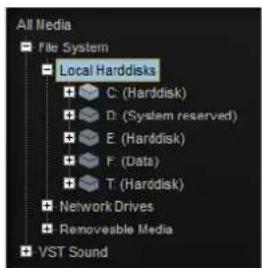
The location tree on the left in the Browser allows you to navigate through your samples, in any folder. You can even access files contained in VST Sound containers and ISO files. If you select an entry in the tree, the results list on the right shows the corresponding content.
Location Tree Context Menu
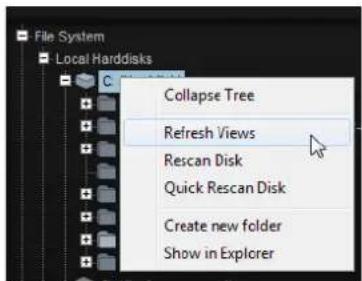
Refresh Views
Updates the tree. This is useful if you added a new disk to your setup or created a new folder on the hard disk.
Rescan Disk
Rescans the selected element in the tree. The corresponding files are opened, the information is extracted, and the database file is updated accordingly.
Quick Rescan Disk
Rescans only the folders that have changed since the last scan.
Show in Explorer (Win)/Reveal in Finder (Mac)
Shows the location of the selected file on your system.
Locations
Locations are folders or directories on your system that contain media files. By setting up locations, you can organize the files that are available in the results list according to context.
The text field above the tree shows the name of the selected folder. If the name is preceded by an asterisk, the folder has not been saved as a location yet.
Managing Locations
-
To open the list of favorite locations, click in the text field.
-
To add the current folder to the favorite locations, click the Add Select Media Node as Favorite Location button.
You can keep the folder name or specify a new name for the location.
- To delete the current location from the list, click the Re move Favorite Location button.
Results List
The results list shows the files found in the selected folder. It displays all files that Groove Agent can read, such as VST presets or samples. In addition to information like file name and path, the columns in the results list can be configured to show different attributes.
The results list also shows any sub folders of the selected folder, but does not include the files contained in the sub folders themselves. To see the content inside sub folders, select the corresponding subfolder.
Navigating in the Results List
- To open a folder or location, double-click it in the results list. If you double-click a preset, its contents are shown.
- To move up one level in the folder hierarchy, click the Browse Containing Folder button.
Performing a Text Search
You can limit the number of results in the results list using the text search function. This way, you can search for files with specific names, for example. For presets, the search also takes any attributes into account. The value field in the top right corner indicates the number of files that match the search text.
- To clear the search text, click the Clear Filter Text button.
Searching for Files on Your System
Instead of searching the current results list, you can also use the text search to look for files on your hard disks or in VST Sound archives.
PROCEDURE
- Select the location that you want to use as the starting point for the search. The higher up in the hierarchy the location, the longer the search takes. Therefore, it is not recommended to search entire hard drives.
- In the top left corner of the results list, click the Search Location Content button and enter the search text in the text field.
- Optional: Click the button to the right of the search field to specify whether you want to search for samples, kits, or all types.
- To start the search, press [Return] or click the Search/Stop Search button to the right of the search text. The files that match the search criteria are listed in the results list.
NOTE
The maximum of files that can be displayed in the list is 10,000.
- Double-click a result to show it in the location tree.
Preview and File Info Section

File Info Section
Provides the following information about the focused sample: length, channels, bit depth, and sample rate. If available, root key, key, and velocity range are also shown.
Preview Section
You can listen to the samples using the controls in the Preview section.
Level
Adjusts the playback level.
Play
Plays back the focused sample.
Stop
Stops playback. The play locator jumps back to the sample start.
Pause
Pauses playback. Click again to continue.
Auto Play
Automatically starts playback of the selected sample.
LoopPlayback
If this button is activated, the selected sample is played back repeatedly.
Play Position
Displays the playback position within the sample. To select another position for playback, click on the slider or drag the handle to the new position.
Missing Samples
If you browse the samples of a program and you cannot load them or listen to them, they may have been moved or deleted. In this case, the sample info displays "Sample not found". To remedy this, load the program again and make sure that no samples are missing. Afterwards, be sure to save the program with the restored sample paths.
RELATED LINKS
Finding Missing Samples on page 99
Loading Files
- To load the sample that is focused in the results list into the selected instrument pad, use the key commands [Return] or [L], or double-click the file.
- To load selected kits, drag them from the results list to the kit slot, the kit rack, or onto a pad.
NOTE
This replaces the current samples and resets the sound settings.
Some file types are not supported. In this case, an icon is displayed to indicate that the file format cannot be loaded.
Protected kits are shown with a lock icon to indicate that you cannot extract single samples. However, you can load the kit as a whole.
Replacing the Focused Sample
When you load a sample via double-click or key command in the Browser, all samples on the selected pad are replaced. But you also have the possibility to replace only a particular sample of a pad.
NOTE
You can also replace samples that are part of the factory VST Sound content.
PROCEDURE
- On the Edit page, select the sample that you want to replace.
- In the Browser, activate the Replace Focused Sample button in the lower right corner.
- In the location tree, browse to the new sample and double-click it.
RESULT
The focused sample on the Edit page is replaced with the new sample. All sound settings of the previous sample are maintained.
NOTE
The Replace Focused Sample function affects only the loading of samples via double-click or key commands. It does not affect the loading of samples via drag & drop from the Browser to pads.
Common Editing Methods
Encoders and Sliders
Encoders and sliders can be unidirectional or bidirectional. Unidirectional values, for example level values, start at a minimum value and go up to the maximum.
Bidirectional controls start from the middle position and go to the left for negative and to the right for positive values.
Most of the editing methods are the same for encoders and sliders.
- To adjust a value, click an encoder or a fader and drag up and down, or use the mouse wheel.
If you press [Alt]/[Option] when clicking an encoder, a small fader appears, allowing you to set the parameter.
- To make fine adjustments, press [Shift] and move the encoder or use the mouse wheel.
To restore the default value for a paramet er, press [Ctrl]/[Command] and click on the control.
Multi Selection and Parameter Controls
To edit multiple pad parameters at the same time, select the pads that you want to edit.
If several pads are selected and they are not set to the exact same values, most of the controls indicate this by turning red. This is true for encoders, switches, combo boxes, value fields, and text faders.
For example, if you have selected 3 pads with cutoff frequency values of 1200, 1400, and 2500Hz , the corona of the frequency encoders shows a range from 1200 to 2500. The corresponding field shows the value of the focused pad in red.
NOTE
More complex controls, such as the envelope editors, only show the values of the focused pad.
Adjusting the Value Ranges
You can adjust the value range of a parameter using the corona of the encoder. The values for the pads are distributed within the new range, keeping their relative distances.
- To compress or expand the value range, drag the corona.
- To adjust the upper limit of the range, hold down [Ctrl]/[Command] and drag the corona.
- To adjust the lower limit of the range, hold d own [Alt]/[Option] and drag the corona.
Buttons
On/Off Buttons
These controls normally have two states, off and on. If you move the mouse over an On/Off button, it changes its appearance to show that you can click it.
Push Buttons
Push buttons only trigger an action and then go back to their inactive state. These buttons can be found for opening menus or file dialogs.
Value Fields
To set a value, you have the following possibilities:
- Click in a value field, enter a new value, and press [Enter].
If the entered value exceeds the parameter range, it is automatically set to the maximum or the minimum value, respectively.
-
Click in the value field and drag up or down to change the value.
-
Position the mouse over a value field an
d use the mouse wheel to adjust the
value.
- To set the parameter to its default value, [Ctrl]/[Com
field.
- To use a fader to adjust the value,
[Alt]/[Option]-click a value field.
-
Click the up/down triangles next to the field.
-
You can adjust musical values, such as key ranges or the root key, using your MIDI keyboard.
To enter a value with your MIDI keyboard, double-click the value field, press a key on your MIDI keyboard, and press [Return].
- To navigate to the next parameter, press [Tab]. To jump backwards to the previous parameter, press [Shift]-[Tab].
If no parameter is selected inside the focused view, pressing [Tab] always jumps to the first parameter.
Using Key Commands
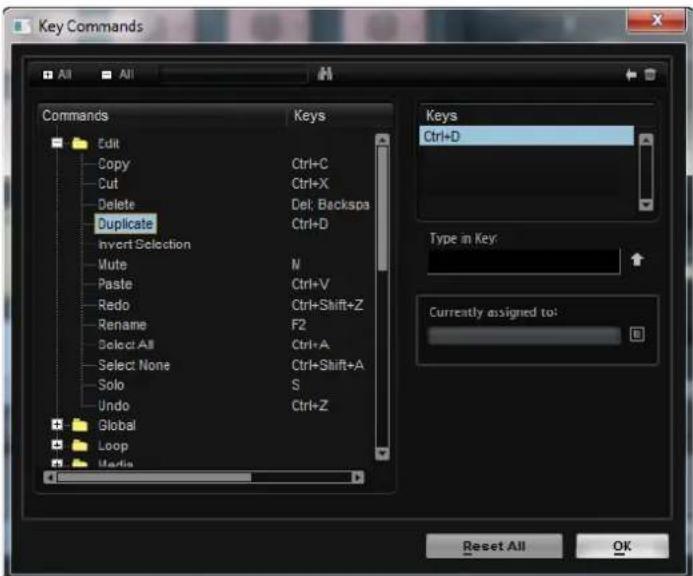
- To open the Key Commands dialog, open the Options page and click the Key Commands button.
The commands are arranged in a hierarchical folder structure on the left. When you open a category folder, the items and functions are displayed with any currently assigned key commands.
- To set up a key command, select the function in the list, enter the key command in the Type in Key field and click the Assign button to the right of the field. If this key command is already used for another function, this is displayed in the field below.
- To delete a key command, select the corresponding command, select the key command in the Keys list and click the Delete button (the trash icon).
- To search for a specific function, enter its name in the search field at the top of the dialog and click the search button (the magnifying glass).
NOTE
You can set up several key commands for the same function.
Presets
Groove Agent offers two types of presets: section/module presets and VST presets. VST presets contain all information necessary to restore the complete state of the plug-in. Section and module presets store and recall the setup of a specific component on the Groove Agent panel.
During setup, the factory presets are installed in a dedicated folder and a user folder is created for your own presets. The handling of presets is the same throughout the program.
NOTE
Factory presets are write-protected, but may be overwritten when a software update is executed. Presets in your user folder are never changed by the software update.
NOTE
For more information on VST presets, see the Cubase/Nuendo Operation Manual.
Handling Section and Module Presets
The preset controls can be found throughout the program. The handling is always the same.
- To save a preset, click the Save button (the disk icon).
NOTE
You cannot overwrite factory presets. If you want to save changes made to a factory preset, save the preset under a new name or in a new location.
- To load a preset, click the arrow icon and select a preset from the list.
- To delete a preset, click the Delete but ton (the trash icon). Note that factory presets cannot be deleted.
Handling VST Presets
Loading VST Presets
PROCEDURE
- In the header of the plug-in panel, click the Preset management button next to the preset name field and select Load Preset.
- Select a preset to load it. Double-click a preset to load it and close the preset loader.
Saving VST Presets
PROCEDURE
- In the header of the plug-in panel, click the Preset management button next to the preset name field and select Save Preset.
Working With Pads
The Pad section on the left can show the instrument pads or the pattern pads.
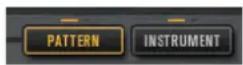
- To switch between the instrument pads and the pattern pads, click the corresponding button above the pads.
Transport Controls
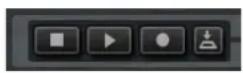
- To start or stop playback of the selected pad, use the corresponding controls.
- To record MIDI live, click the Record button.
- To activate Jam Mode, click the Jam Mode button.
RELATED LINKS
Recording MIDI Events Live on page 60
Jam Mode on page 39
Instrument Pads
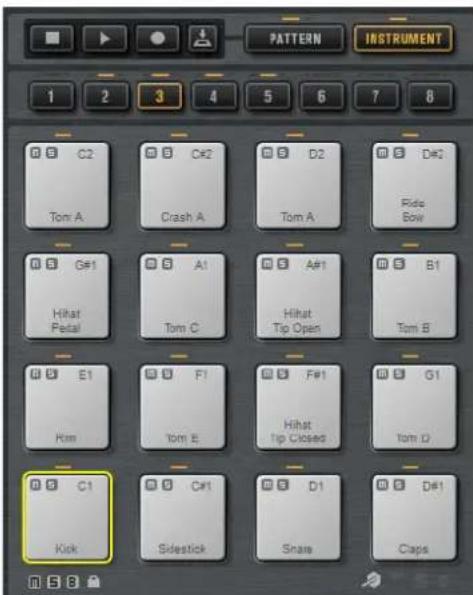
The pad section provides up to 128 pads, organized in 8 groups of 16 pads. The instrument pads can be used to trigger sounds. Each pad is mapped to a MIDI note, which triggers a sample. If samples are assigned to a pad, the LED above the pad lights up.
You can switch between the groups by clicking on the group buttons below the pads. The button of the active group is highlighted. If one or more pads of a group have samples mapped to them, an orange LED above the group button lights up. If a pad within a group receives a MIDI note, a green MIDI indicator LED lights up.
By default, group 3 is active when you open Groove Agent.
Below the pad section, you find several buttons. These are different for the different agents.
Showing Information about the Instrument Pads (Beat Agent Only)
Activate the i button below the pad section to show the following information for the pads: the pad number, the number of samples, and the output.
- Activate the E butto n to show the exclusive group settings for the pads. If you move the mouse over a pad that belongs to an exclusive group, all pads that belong to the same exclusive group are highlighted. If a hidden pad group contains pads that belong to the same exclusive group, a red LED above the group button lights up.
Setting the Output for the Pads (Beat Agent Only)
You can set the output of the samples via the pad context menu.
- Right-click the pad, open the Assign Output submenu, and select the output that you want to use.
This sets all samples of the pad to this output.
Locking Color and Output Settings (Beat Agent Only)
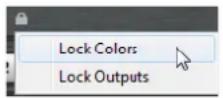
- You can lock the color and output settings for the pads. For example, this allows you to lock the output configuration for the pads, and then switch between kits while keeping these outputs. You can specify which parameters you want to lock for the pads on the context menu for the Lock button below the pads. If the button lights up, at least one setting is locked for the pads.
Locking Pad Settings (Acoustic and Percussion Agent)
You can lock the color settings for the pads by activating the Lock Pad Colors button. The button lights up when it is active.
Using an Alternative MIDI Note Assignment
If you use an external hardware drum controller that sends specific MIDI notes for specific instruments, you can specify an alternative MIDI trigger note mapping.
PROCEDURE
- Activate the Use Hardware Controller Mapping button in the lower right corner of the pad section.
Now you can load, save, and delete different trigger note configurations.
-
Specify a new trigger note for the pad.
-
Right-click a pad, select Edit/Learn Trigger Note and specify the new trigger note by entering it into the value field or by playing the corresponding note on your hardware controller.
-
On the pad context menu, open the Assi gn Trigger Note submenu and select the note from the submenus.
-
Groove Agent jumps to the next pad. Assign a MIDI note to all the pads that you want to use and press [Enter] to stop assigning MIDI notes.
Pad Section
For instrument pads, the Pad section on the Agent page contains several playback functions and settings.

Active
Activates/Deactivates playback for the pad.
Exclusive
Activates/Deactivates exclusive playback for a pad. Triggering an exclusive pad stops playback of the current pattern, according to the set restart mode. Pads for which this button is not activated can play simultaneously with other patterns.
If Exclusive mode is activated for a pad, this is indicated by an icon in the upper left corner of a pad.
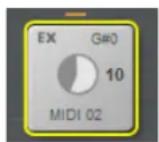
Jam State
Determines the play order of the pads if the Jam Mode button is activated and the pattern pad is in exclusive mode.
Play Mode
- To play a pattern for as long as you hold down a key, select Ho Id.
- To start and stop playback with the trigger note for a pad, select Toggle. Toggle mode is best used for live performances. Otherwise, it can lead to unpredictable results, for example, when stopping and restarting playback in the host application or when locating to another position during playback.
- To play a pattern completely to its end, select One Shot. In this mode, note-off events are ignored. Playback stops automatically at the end of the pattern. To make sure that the pattern plays from start to end, deactivate Sync to Beat.
Restart Mode
Determines whether a pattern starts to play immediately, at the next beat, or at the next full measure.
Sync to Beat
If Sync to Beat is activated, triggering a pattern starts the pattern in sync with any other patterns that are playing. For example, if you trigger a pattern and trigger the next pattern after 3 beats, this pattern starts playing at beat 3. If Sync to Beat is deactivated, the second pattern starts from the beginning.
Velocity Mode
Specifies how the velocity of the notes that you play affects the notes of the pattern.
- I original is selected, the notes of the pattern are played with the velocity that is saved with the pattern.
- If As Played is selected, the notes of the pattern are played with the velocity that you are playing on the keyboard.
If Original + As Played is selected, the pattern velocity is determined by the combination of the velocity saved with the pattern and the velocity of your playing.
Jam Mode
Jam mode allows you to automatically switch between pattern pads during playback. For example, you can switch from an intro to a verse, or from a fill back to the previous verse, or even automatically stop playback.
Jam mode is useful if you want to play along and jam with Groove Agent. But it is much more flexible than a static song or pattern list.
If the Jam Mode button is activated, the Play Mode and Restart Mode parameters are not available for pads in exclusive mode. These pads are played back with a single click. Patterns only switch after entire bars. Pattern pads for which the Exclusive Mode button is deactivated behave like normal.
Jam States
How the pattern pads behave in jam mode is defined by the Jam States setting. This parameter is available if the Jam Mode button and the Exclusive Mode button are activated for a pattern pad.
Standard
If a pad with Standard jam state is triggered, any previous pads stop playing. The new pad plays exclusively.
Next
In this mode, playback jumps automatically to the first pad for which Standard jam state is selected and which is mapped higher up on the keyboard. If no pad with Standard jam state exists, the current pad plays back in a loop.
Return
In this mode, playback jumps back to the previous pad. Use this mode to switch from a pad with a fill back to the previous pad, for example. If you trigger several pads for which Return is activated in sequence, Groove Agent returns to the last pad in Standard, Next, or Stop mode. If no pad was triggered before, the current pad plays back in a loop.
Stop
Playback stops automatically after the entire pattern was played back.
The jam state is indicated by different icons in the upper left corner of the pads.
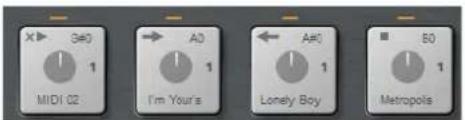
Pads in Standard, Next, Return, and Stop mode.
Using Jam Mode
PROCEDURE
-
Load an intro, a verse, a fill, and an ending to 4 consecutive pattern pads.
-
Activate Exclusive Mode for all 4 pads and set up the Jam State as follows:
-
Set the first pad with the intro to Next.
- Set the second pad with the verse to Standard.
- Set the third pad with the fill to Return.
-
Set the fourth pad with the Ending to Stop.
-
Activate the Jam Mode button.
The Play button starts blinking to indicate that Groove Agent is waiting for a pattern pad to be triggered.
- Trigger the pad with the intro.
The intro is played back and afterwards, playback automatically switches to the pad with the verse. The verse is then played back in a loop.
- Trigger the pad with the fill. After the fill, playback automatically switches back to the pad with the verse. Now, the verse is played back in a loop.
- Trigger the pad with the ending. Playback stops automatically once playback of the ending is completed.
Pattern Section
For instrument pads, the Pattern section on the Agent page contains MIDI pattern and pattern player functions.

Pattern Player On/Off
Activates/Deactivates the pattern player.
Pattern Library
Allows you to select a MIDI pattern. Click to select the file from the list.
To access the folder where the user MIDI patterns are saved, right-click the Pattern Library field and select Show in Explorer/Finder. In this location, you can add, remove and rename files and create sub folders to organize your MIDI patterns.
NOTE
Pattern pads always contain the MIDI data and do not reference the original MIDI files.
Original Tempo
Displays the original tempo as saved in the MIDI file.
Start
Specifies the beat from which the pattern starts to play.
End
Specifies the end of the pattern. Initially, this parameter is set to the original length of the MIDI pattern.
Import Field
To import MIDI files from your file system or MIDI parts from your host application into the user pattern library, drag them onto the MIDI import field.
You can import multiple MIDI files at the same time by dropping them on the import field. The first file is assigned to the selected pad.
MIDI Export Field
To export a pattern, click the MIDI export field and drag it onto a MIDI track in your host application. You can also drag the field to other locations and applications that support MIDI files.
Import/Export and Alternative Trigger Note Mappings
If you are working with alternative trigger note mappings, this is taken into account and the MIDI pattern is adapted automatically on import/export. This is important if you are recording MIDI with a hardware drum controller and you want to import MIDI parts from the host application or export patterns from Groove Agent to the host application during that process.
If you recorded the MIDI file with the standard trigger note mapping, deactivate alternative trigger note mapping in the Pad section.
Performance Section
For instrument pads, the Performance section on the Agent page contains MIDI pattern player settings.
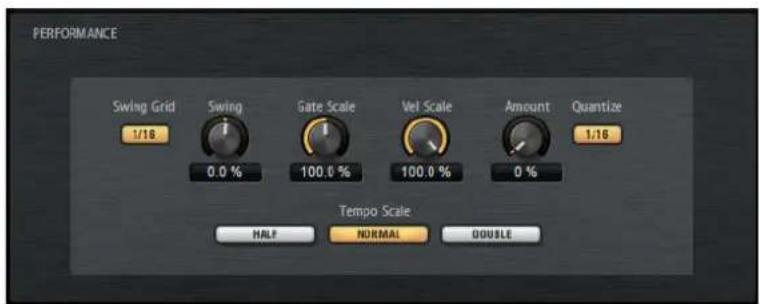
Swing Grid
Determines the grid for applying Swing. For example, to shift the timing of every 16th note in a pattern, set this to 1/16.
Swing
Allows you to shift the timing of notes on even numbered beats to give the pattern a swing feeling. Negative values shift the timing backward, and the notes are played earlier. Positive values shift the timing forward, and the notes are played later.
Gate Scale
Allows you to shorten or lengthen the notes of the pattern. At a value of 100% , the notes play with their original gate length.
NOTE
Gate Scale has no effect on samples that are played in One Shot mode. They always sound until the end.
Velocity Scale
Raises or lowers the note-on velocities of the pattern. At a value of 100% , the notes are played with their original velocity.
Quantize Amount
This parameter defines how much of the quantization grid is applied. A value of 100% means the MIDI note events play back only at the specified quantize note value. Smaller values move the notes only partially towards the next quantize note value. With a value of 0% , no quantization is applied.
Quantize Grid
This parameter allows you to set up a quantization grid, in fractions of beats. You can also specify dotted and triplet values.
Tempo Scale
Defines the speed at which the pattern is running. You can choose between half, normal, and double speed.
Using MIDI Effects
For each instrument pad, you can set up MIDI effects.
To open the MIDI effects page, activate the Instrument button in the pad section, open the Edit page on the right side of the panel, and click the MIDI Fx tab.
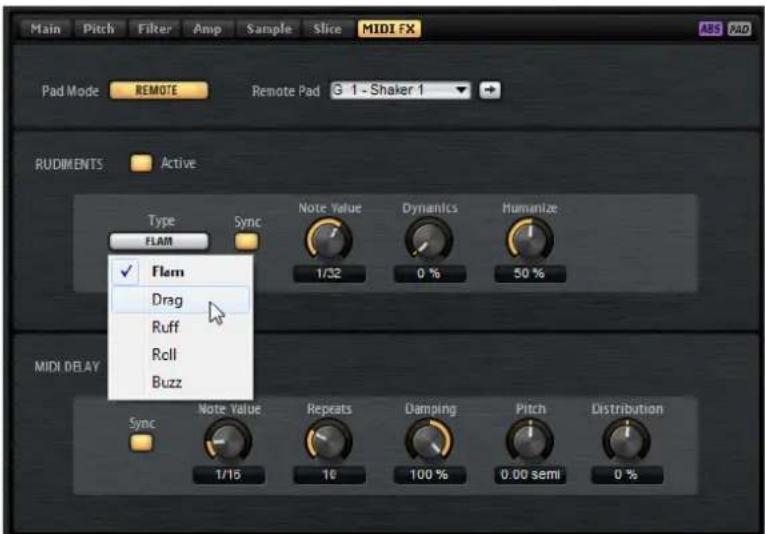
Pad Mode
Pad mode determines to which pad the settings on the MIDI FX page are applied.
Internal
In Internal mode, the MIDI effects are applied to the samples on the selected pad.
Remote
In Remote mode, you can select to which destination pad you want to apply the MIDI effects.
This allows you to trigger an instrument with and without MIDI effects. Also, any sound editing can be performed on one pad.
NOTE
- If the destination pad also contains MIDI effects, these are not taken into account.
- If you set up remote MIDI effects on a pad for which samples are assigned, the remote MIDI effects are applied only to the samples on the destination pad.
If you activate Remote mode for a pad, a remote icon is displayed on the pad in the pad section.
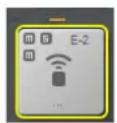
- To bypass the remote effects, click the Di button to the left of the remote icon.
sable MIDI to Remote Pad
Rudiments Section
Active
Click this to activate the articulation.
Type
Determines the rudiment type.
- Flam pla ys 2 hits very close together.
- Drag plays 3 hits very close together.
Ruff plays 4 hits very close together.
Roll continually plays drum hits to produce a sustaining drum sound.
- Buzz emulates the effect of a drummer pressing the stick into the drum while hitting it. The stick bounces on the drum, producing multiple hits that sound like a decaying drum roll.
Flam, Drag, and Ruff
For Flam, Drag, and Ruff, the following parameters are available:
Sync
Synchronizes the hits to the project tempo. The time span between the hits is set in fractions of beats.
Time
Adjusts the time span between the hits.
Note Value
If Sync is activated, this parameter adjusts the time span in fractions of beats.
Dynamics
Adjusts the dynamics of the hits.
- With negative values, the first hit is softer than the following hit or hits.
- With positive values, the first hit is louder than the following hit or hits.
Humanize
Use this parameter to randomize the timing, the dynamics, and the pitch of the hits.
Roll
For Roll, the following parameters are available:
Sync
Activate this button to synchronize the hits to the project tempo. The time span between the hits is set in fractions of beats.
Time
Adjusts the time span between the hits.
Note Value
If Sync is activated, this parameter adjusts the time span in fractions of beats.
Dynamics
Adjusts the dynamics of the hits. Higher values attenuate the even-numbered hits of the roll.
Humanize
Use this parameter to randomize the timing, the dynamics, and the pitch of the hits.
Buzz
For Buzz, the following parameters are available:
Grip
Adjusts the grip of the drum. Higher settings produce a shorter decay of the buzz.
Pressure
Adjusts the pressure on the stick. Higher settings produce a longer decay of the buzz.
Humanize
Use this parameter to randomize the timing, the dynamics, and the pitch of the hits.
MIDI Delay
MIDI Delay produces echo effects by repeating the notes that you play.
The subsequent note events can be modified, for example, you can vary the time span between the echoes with the Distribution parameter.
Active
Activates/Deactivates the MIDI Delay effect.
Sync
Synchronizes the echoes to the project tempo. The time span between the echoes is set in fractions of beats.
Time
Adjusts the time span between the echoes.
Note Value
If Sync is activated, this parameter adjusts the time span in fractions of beats.
Repeats
Determines the maximum number of the echoes.
Damping
Determines whether the echoes fade-in or fade-out with the MIDI velocity. If you set this parameter to negative values, the MIDI velocity gradually increases. If you set this parameter to positive values, the MIDI velocity gradually decreases.
NOTE
Damping shows only an effect if the sound settings of the samples use velocity.
Pitch
Determines how much the pitch changes from echo to echo.
Distribution
Determines the time distribution of the echoes. If you set this parameter to negative values, the time span between echoes gets shorter, that is, the echoes speed up. With positive values, the echoes slow down.
Pattern Pads
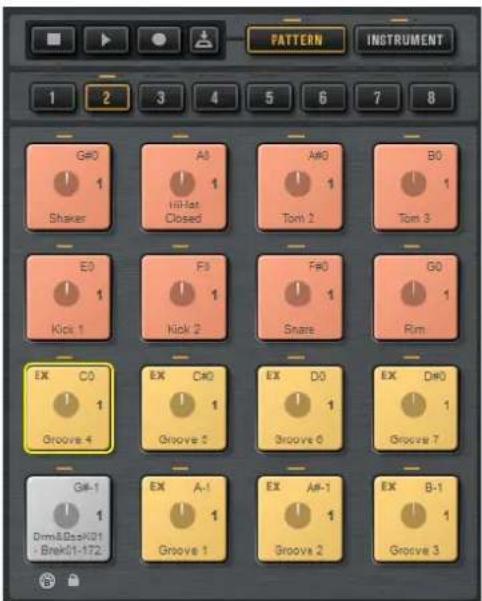
The pad section provides up to 128 pads, organized in 8 groups of 16 pads. Each pad is mapped to a MIDI note. You can assign MIDI patterns to each pattern pad, to trigger complete drum patterns or single instrument patterns, depending on the MIDI files. The pads are used to switch between patterns.
If a MIDI file is assigned to a pad, the pad shows a progress indicator and a beat counter. When the pattern is triggered, the progress indicator shows the playing progress graphically. In addition, the beat counter shows the current beat during playback. This allows you to see which patterns are currently running and at which playing position, relative to the length of the pattern. This can be particularly helpful when Toggle mode is selected, because it provides a quick overview of the patterns that will be stopped and those that will be triggered.
The Transport controls above the pads allow you to trigger the focused pattern pad without playing a MIDI note. Click the Stop button to end playback. If you switch between pattern pads during playback, the pattern changes according to the set Restart Mode.
Assigning MIDI Files to Pads
-
Drag a MIDI file from the Explorer/Finder or from the MediaBay onto a pad
-
Drag a MIDI part from the h ost application onto a pad.
-
Drag a file from the Explorer/Finder onto the import field. The file is imported to your user pattern library and assigned to the selected pad.
-
Select a pad and open the Agent ta b on the Edit page. In the Pattern section, open the Pattern Library pop-up menu and select one of the factory or user MIDI patterns.
Assigning Multiple MIDI Files to Pads
You can drag and drop several MIDI files to pads at the same time.
PROCEDURE
- Move the mouse over the lower part of the pad on which you want to drop the first MIDI file.
A yellow frame indicates which pads receive a MIDI file.
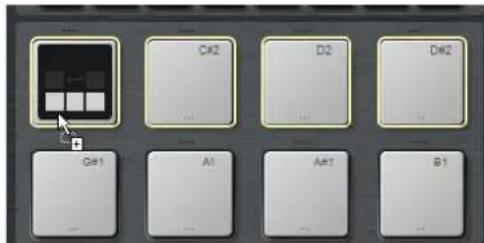
- Drop the files.
RESULT
The MIDI files are imported to your user MIDI pattern library and are automatically assigned to the pads.
Removing MIDI Files from Pads
To remove a MIDI pattern, right-click a pad and select Remove Pattern from the context menu.
- To remove the MIDI patterns from all selected pads right-click one of the pads and select Remove Pattern from the context menu.
Using MIDI Port B for Pattern Pads
By default, instrument and pattern pads share the same MIDI port. If two pads are triggered in parallel, the pattern pad always gets priority, therefore, instrument pads that use the same trigger note as a pattern pad cannot be played via MIDI.
To be able to play all instrument and pattern pads via MIDI, assign MIDI port B to the pattern pad section. This way, you can trigger instruments on one MIDI port and patterns on the other.
PROCEDURE
To use Port B, activate the Use MIDI Port B for Pattern Pads button in the lower left corner of the pattern pad section.
If port B is used, MIDI data is received on all MIDI channels.
Locking Pad Settings
The settings in the Pad section (Exclusive, Jam State, Play Mode, etc.) are common to all slots, that is, you set them up only once. However, these settings are part of kit presets, and are replaced when you load a preset to a kit slot.
- To avoid overwriting your existing pad settings with the preset settings when loading a preset to a kit slot, activate the Lock Pad Settings button below the pad section.
If this button is activated, the pad settings from the preset are not applied and the existing settings remain active.
- I f k Pad Slettings buttobis deactivated and you load kit preset to different slots, the pad settings saved in the presets overwrite the existing pad settings.
Any active pattern pads from the new preset overwrite the current pad settings on the associated pads. Inactive pads are not restored from the preset, that is, existing settings for these pads remain active.
Moving and Copying Pattern Pads
You can copy or move pattern pads with all their settings to other pattern pads of the same or a different pattern group.
- To move the active pattern pad with all its settings to another pad, drag the pad and drop it on the destination pad.
- To copy a pattern pad to another pad, hold down [Alt]/[Option] and drag the pad on the destination pad.
- To move or copy one or more pads onto other pads, use the context menu commands Cut Pad, Copy Pad, and Paste Pad.
This way, you can move or copy multiple pads at the same time.
NOTE
You can also move or copy pads between pad groups. To do so, first drag the pad onto the group button for the group to which you want to move or copy the pad, then drop it onto the destination pad.
Overview Tab
The Overview tab shows which patterns and styles are assigned to the pattern pads of the 4 agents.
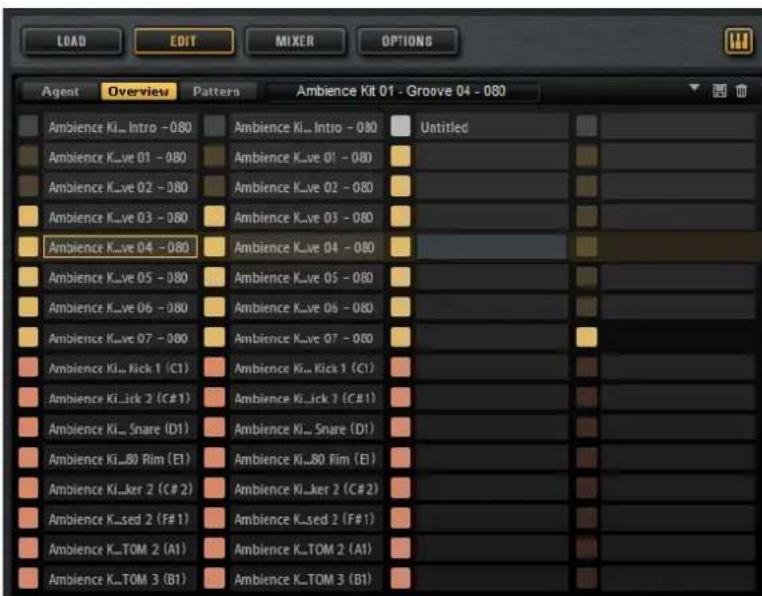
Cells in which a name is displayed have a pattern or style assigned. If a pattern is assigned to a pad, its background is gray and if a style is assigned, its background is dark blue.
The 4 columns represent the 4 agents. For each agent, the 16 pattern pads of the selected pattern group are displayed.
- To select a pattern pad of a specific agent, click the corresponding cell.
The name of the selected pattern or style is displayed in the top section of the tab.
- To activate/deactivate a pad, click its button.
Only active pads are played back.
- To find out where a user MIDI pattern is stored on your system, right-click the cell and select Show in Explorer (Win)/Reveal in Finder (Mac).
Assigning Patterns and Styles to Cells
You can assign patterns or styles to the cells on the Overview tab.
PROCEDURE
-
Move the mouse pointer over a cell so that an arrow icon is displayed on the right.
-
Click the arrow to open a window that shows the available patterns or styles.
-
Select an entry in the list.
-
Optional: To preview the pattern or style, trigger the pattern pad.
- Double-click an entry to load it.
Unassigning Patterns and Styles
- To remove the assignment for a single pattern pad, right-click the cell and select Clear.
- To remove all pattern pad assignments for the 16 pads of an agent, right-click one of the cells in the corresponding column and select Clear Column.
Moving and Copying Patterns and Styles
- To switch the content of 2 cells, drag a cell to another cell.
- To copy a pattern or style of a cell to another cell, hold down [Alt]/[Option] and drag the cell to another cell.
- To move or copy patterns or styles to other groups, hold down [Alt]/[Option] and drag the cell first over the corresponding group button.
This switches the Overview page to display this group. Now, you can drop the content on the destination cell.
NOTE
- Some agents do not support styles, for example, the Beat Agent. If you try to move or copy a style to a cell for an agent that does not support them, the styles are automatically converted to MIDI patterns.
- If you load a pattern group that contains styles into a slot for an agent that does not support styles, the styles are automatically converted to MIDI patterns.
Opening Patterns in the Pattern Editor
- To create a new pattern, double-click an empty cell.
This opens the Pattern editor where you can enter events to create a new pattern.
- To edit an existing pattern, double-click the cell.
This opens the Pattern editor where you can edit the events of the pattern.
NOTE
You can only edit patterns in the Pattern editor, not styles. If you want to edit your styles this way, you must first convert the part of the style as MIDI pattern.
RELATED LINKS
Converting Intros, Main Patterns, Fills, or Endings into MIDI Patterns on page 109
Pattern Editor on page 52
Managing Pattern Groups
You can save the 16 pads of a group with their patterns and settings as a pattern group. This allows you to quickly restore and reuse particular patterns and settings. Pattern groups include all pad settings, that is, the settings for Exclusive Mode, Jam State, Play Mode, etc.
-
To save the current pattern group for a kit, right-click the kit in the kit rack or the corresponding slot on the Overview tab and select Save Pattern Group....
-
To load a pattern group, right -click the kit in the kit rack and select Load Pattern Group...
NOTE
If you load a pattern group, the pad settings are only restored on empty pads. If you have assigned a pattern to a pad, your pad settings are not overwritten by the pattern group.
Pattern Editor
In the Pattern editor, you can create and edit MIDI drum patterns.
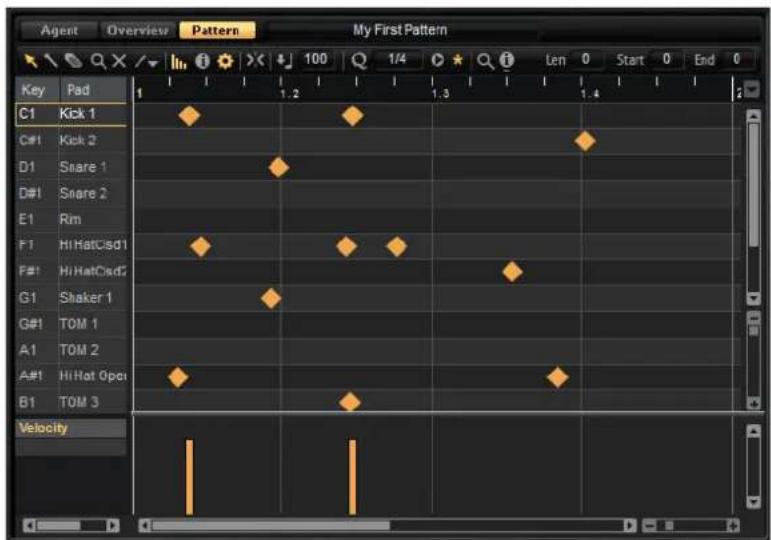
To open the Pattern editor, click the Pattern tab on the Edit page.
The editor is subdivided into several sections:
- The title bar showing the name of the current pattern at the top.
- The toolbar below the title bar.
- The drum sounds list on the left.
- The event display on the right. In the event display, the drum notes are shown.
- The controller lane at the bottom.
Drum Sounds List
In the list on the left, the drum sounds are listed. What is shown in the list depends on the Visibility setting on the Configuration pop-up menu.
The columns show the key, the pad name, the quantize setting, and the mute status of the pads.
NOTE
The column sorting is fixed, you cannot change it.
Drum Sounds List Context Menu
In the column header, the following menu options are available on the context menu:
Select All Notes
Selects all notes in the Pattern editor.
Clear Pattern
Deletes all notes in the Pattern editor.
Delete Double Notes
Deletes all double notes in the Pattern editor, that is, all notes that are placed on top of other notes at the exact same positions.
Double notes can occur when quantizing, drawing in notes, etc.
Trim Pattern to Start/End
Deletes all notes outside the pattern start and end markers.
Duplicate Pattern
Copies all events between the pattern start and end markers and pastes them after the end marker. If any events are located after the end marker, these are deleted.
Classify Pattern
- Use Best Classified Slices: Moves the notes of each class to the cleanest sounding slice of the class.
For example, if a sliced loop has clean sounding kicks and kicks with a crash or hijat on top, Use Best Classified Slices moves the notes to the slice with the cleanest sounding kick. This way, the sliced loop plays only with the cleanest sounding slices.
Use Longest Slices: Moves the notes of each class to the longest slice of the class.
This is useful if you want to play a sliced loop slower than its original tempo. If you slow down the tempo of a sliced loop, shorter slices can produce gaps. But if the sliced loop plays only with the longest slice of each class, these gaps are avoided.
On the context menu for the instrument lanes, the following options are available:
Select All Notes on Key
Selects all notes on the selected key.
Delete All Notes on Key
Deletes all notes on the selected key.
Delete Double Notes on Key
- Deletes all double notes on the selected key, that is, all notes that are placed on top of other notes at the exact same positions.
Double notes can occur when quantizing, drawing in notes, etc.
Toolbar
The toolbar contains tools, visibility options, and settings for creating and editing your patterns in the Pattern editor.

Object Selection
Use this tool to select drum notes.
Drumstick
Use this tool to draw in individual drum notes. To remove a note, click on it.
Erase
Use this tool to remove drum notes.
Zoom
Use this tool to zoom in on the click position. Hold down [Alt]/[Option] to zoom out.
Mute
Use this tool to mute individual drum notes.
Line
Use this tool to enter a line of drum notes or controller values.
Show Controller Lane
Activate this button to show the controller lane at the bottom of the editor. In the controller lane, you can enter and edit MIDI controller values.
Show Note Length
Switches the display of the notes between diamonds and bars. If bars are shown, you can edit the note length.
Show Info Line
Shows/Hides the info line. The info line shows the start, end, length, key, and velocity of the selected note event.
- To edit a parameter, double-click on the value, enter a new value, and press [Return].
Configuration
If you click the Configuration button, the following options are available:
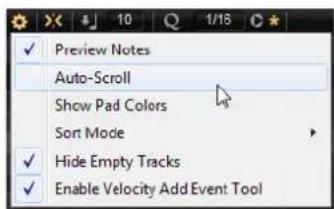
Preview Notes
If this button is activated, notes are played back automatically when you create or select them.
Auto-Scroll
Activates/Deactivates auto-Scroll.
If Auto-Scroll is activated, the grid scrolls automatically during playback so that the position cursor is always visible.
Show Pad Colors
If this button is activated, the notes in the editor are shown in the colors of the corresponding pads.
This allows you to keep a better overview over the different instruments if you are working with sliced loops that have been classified into kick, snare, hijat, etc.
Visibility
- If you select Show AI I Keys, the list is sorted chromatically, starting with the lowest key (C-2) at the top and ending with the highest key (G8) at the bottom of the list.
- Select Show Keys with Events to show all keys for which MIDI notes are available at the top of the list. Keys that do not contain MIDI notes are not shown.
- Select Show Keys with Pad Assignments to show all keys for which samples are assigned to the pads. Keys without sample assignments are not shown.
Create Notes when drawing Velocity
If this is activated, MIDI note events are automatically created when you draw in velocity events on the controller lane.
To the right of the Configuration button, the following tools and options are available:
Snap
- If Snap is activated, notes snap to the grid when you create or move them.
If Snap is deactivated, you can move notes freely to any position.
Velocity for new notes
Determines the velocity of notes that are entered in the Pattern editor.
- Click the button to select one of the 4 predefined velocity values, or enter the velocity value directly in the value field on the right.
Iterative Quantize On/Off
Determines whether the notes are quantized exactly to the set quantize grid, or whether they are quantized iteratively, that is, moved half the way to the next quantize note value.
Global Quantize On/Off
Allows you to select which value is used when Snap is activated - the global quantize value on the toolbar or the individual quantize values for the drum sounds.
Record MIDI
Enables the live recording of MIDI events.
Auto Quantize
If this button is activated, Groove Agent automatically quantizes the recorded notes according to either the note value set in the Q column of the instrument or, if Global Quantize is activated, according to the global quantization note value.
Metronome
Activates/Deactivates the metronome for live recording of MIDI events.
Precount Click
Activates/Deactivates a 1-bar precount for the metronome for live recording of MIDI events.
Metronome Volume
Sets the volume of the click for live recording of MIDI events. To reset the setting, [Ctrl]/[Command]-click the button.
Pattern Length
Displays the length of the pattern.
- To change the pattern length, enter a new value.
Start Beat
Displays the start beat of the pattern.
- To change the pattern start, enter a new value or drag the start marker in the display to a new position.
NOTE
Notes before the pattern start are not played back. However, they are not deleted when you change the pattern start.
End Beat
Displays the end beat of the pattern.
- To change the pattern end, enter a new value or drag the end marker in the display to a new position.
NOTE
Notes after the pattern end are not played back. However, they are not deleted when you change the pattern end.
Sign (time signature)
Determines the time signature. You can enter the new signature as fractions of beats.
Creating and Editing Patterns
PREREQUISITE
- To edit an existing pattern, select the corresponding pad and open the Pattern editor.
- To create a new user pattern, select an empty pad and open the Pattern editor.
PROCEDURE
- Select the drumstick tool.
- Enter new notes or modify the existing notes.
- Optional: Add controller values for the se lected drum sound by using the Line or the Draw tool in the controller lane.
- Optional: Enter a name for the pattern in the title bar.
- Click the Save MIDI Pattern button in the title bar.
RESULT
The pattern is saved in the User folder and can now be loaded via the pattern menu on the title bar.
Entering, Editing, and Previewing Notes
- To enter notes, select the Drumstick tool and click in the event display.
To enter a note and specify its velocity at the same time, hold down [Ctrl]/[Command]-[Shift], click in the event display and drag up to increase the velocity, and down to decrease the velocity. - To preview an instrument, click in the Key column for the Instrument.
-
To mute a drum sound, click in the Mut e column for the sound.
-
To change the length of a note, activate the Show Note Length button on the toolbar, move the mouse pointer over the border of the note so that a double-arrow is shown, then click and drag left or right.
If Snap to Grid is activated, the note end or start snaps to the grid when you change the note length.
- To move a note, drag it to another position.
- To delete a note, click it with the Erase tool.
- To cut, copy, and paste notes, use the standard key commands.
Notes are pasted at the cursor position.
- To duplicate notes, select them and press [Ctrl]/[Command]-[D].
Duplicated notes are inserted after the last note of the selection, according to the set grid.
NOTE
When entering, editing, and duplicating notes, double notes can occur, that is, notes that are placed exactly on top of other notes. To remedy this, right-click the header of the drum sounds list and select Delete Double Notes.
Quantizing Notes
You can draw notes with a global quantization grid or with an individual quantization grid for each instrument.
- To draw notes with the global quantization grid, set the Quantize Presets pop-up menu to the quantize value that you want to use and activate the Global Quantize button.
NOTE
If you activate Iterative Quantize, the notes are not aligned with the exact quantize note positions, but are moved halfway there.
- To change the quantize value for a pad, click the Q column for the sound and select another value from the pop-up menu.
Defining the Length of a Pattern
- To define the length of the pattern, drag the end marker on the time line.
This is useful if you started with an empty pattern or if you want to have a pause behind the last MIDI event of the pattern.
If you drag the end marker to the left and the bars behind the end marker are empty, the length of the pattern is shortened automatically.
If you drag the end marker to the left and the bars behind the end marker contain MIDI events, the length of the pattern is shortened only to the bar that contains the last MIDI event. No MIDI events are deleted.
You can also set the start and end positions for a pattern manually on the Agent tab.
Defining the Playback Range
You can specify the range of the pattern that you want to be played back.
- To define which part of a pattern is played back, drag the start and end markers of the pattern on the time line.
MIDI events before the start or after the end marker are not played back. They are grayed out to indicate this.
Trimming Patterns
If you edit a pattern by changing its length, you can remove the notes and controllers that are no longer part of the pattern.
PROCEDURE
- Set up the pattern start and end to encompass the range that you want to use for the pattern.
- Right-click in the column header section of the drum sounds list, and select Trim Pattern to Start/End.
RESULT
All events outside the pattern start and end borders are removed.
Editing Controllers on the Controller lane
The controller lane below the event display shows MIDI controller events for the selected drum sound. You can show one MIDI controller at a time.
- To switch to another controller, click the name of the active controller and select another one from the list.
- To draw in controller events for the notes of the selected drum sound, move the mouse pointer over the controller lane, so that it turns into a Draw tool, and click.
- To draw in a series of controller events, use the Lin e tool, and click and drag in the controller lane.
- To control the open state of the hiat of an Acoustic Agent, select the controller CC#4 Foot and enter the controller events.
Line Tool Modes
To select the mode for the Line tool, click the tool button and select an option from the menu.
Line
In this mode, you can click and drag to create a straight line of controller values.
Parabola, Sine, Triangle, Square
In these modes, you can insert a series of controller events representing different curve shapes.
Paint
This mode allows you to freely draw in a series of controller events.
Recording MIDI Events Live
Instead of entering notes one by one using the tools in the Pattern editor, you can also record MIDI events live.
PROCEDURE
- To enable the live recording of MIDI events, click the Record MIDI button on the tool bar of the pattern editor or the Record button in the transport section above the pad section.
This enables MIDI recording. The Record button in the transport section blinks to indicate that it is armed.
-
Optional: Activate the Metronome and specify a Precount Click.
-
To start live recording, do one of the following:
C I C k t h e Play button in the pad section.
- Trigger the pattern pad for which you want to record the notes.
- Start playback in the sequencer application. This is especially useful if you want to record Groove Agent in the project context.
- Play notes and MIDI controllers on your MIDI keyboard.
If Auto Quantize is activated, the notes are recorded at the quantize grid positions.
The recording runs in a cycle over the whole length of a pattern.
RESULT
The notes that you play are added to the existing notes in the pattern.
NOTE
If you record notes or controller events over already existing notes or controllers, these are replaced by the new ones.
NOTE
Jam Mode and MIDI Record cannot be used together. The Record button is not active in Jam Mode. If you activate Jam Mode while you record, recording is stopped.
Common Pad Settings
- Pads show the associated MIDI note in the top right corner.
For pattern pads, you can change the MIDI note assignment. For instrument pads, you can only change this if Use Hardware Controller Mapping is activated.
- In the lower section, the name of the pad is displayed.
- If samples are assigned to an instrument pad, the LED above the pad lights up.
- If a MIDI file is mapped to a pattern pad, th e LED above the pad lights up.
- A pad lights up if the associated MIDI note is triggered.
- A yellow frame around a pad indicates that this pad is selected for editing.
Pad Colors
You can colorize the instrument pads and the pattern pads using up to 16 different colors.
This can be used to improve the overview of instruments within your kit, for example. You can set the bass drum to one color, the snare to another, toms and cymbals to another, and so on.
- To apply a color to a pad or to several selected pads, open the context menu and select a color from the Set Color submenu.
Selecting Pads
Apart from the regular selection options, you can use the additional selection options on the pad context menu.
- Select All Pads - All 128 pads are selected.
- Select All Pads in Group - All 16 pads of the pad group are selected.
- Invert Selectio n - Selects all unselected pads and deselects all selected pads.
- Invert Selectio n in Group - As above, but only for the pad group.
Pad Functions
- To change the name of a pad, right-click the pad, select Rename Pad from the context menu, enter a new name and press [Enter].
This is useful if the names of the samples are either too long or not very intuitive. Renaming pads also allows you to indicate that more than one sample is mapped to a pad, for example.
-
You can edit multiple selected pads. The first selected pad shows a yellow frame, the rest of the selected pads a lighter yellow frame.
-
To select a pad without triggering a sample or pattern, [Alt]/[Option]-click the pad.
-
In Instrument mode, the pads can be used to trigger sounds. You can trigger them with different velocities. Velocities are lower the further down towards the bottom of a pad you click. Clicking towards the top of the pad results in higher velocities.
-
To mute or solo an instrument pad, click the corresponding icon in the upper left corner of a pad. Click again to unsolo or unmute.
-
To unmute or unsolo all instrument pads, click the Reset All Mute/Reset All Solo buttons below the pads.
-
To remove samples from an instrument pad, right-click the pad and select Remove All Samples from the context menu.
-
To reset a pad, right-click the pad and select Reset Pad from the context menu. To reset all 128 pads, right-click a pad and select Reset All Pads from the context menu.
For instrument pads, this removes all samples and resets name, color, and trigger note for the pads to their default values.
For pattern pads, this removes the MIDI file and the name from the pads and resets color and trigger note to the default values.
Beat Agent
Beat Agent is a full beat production instrument with all the tools and sounds to create amazing beats for any electronic or urban music genre.
100 amazing sounding drum kits are included, alongside all the advanced features that you need to edit existing kits and create your own ones. Beat Agent also excels in manipulating samples and loops, with features like automatic loop slicing, one-click drum hit replacement, an onboard FX rack and much, much more.
Sound Editing
On the Edit page for instrument pads, you set up the sound of the kits.
- To open the Edit page, click plug-in panel.
the Edit button in the upper right section of the
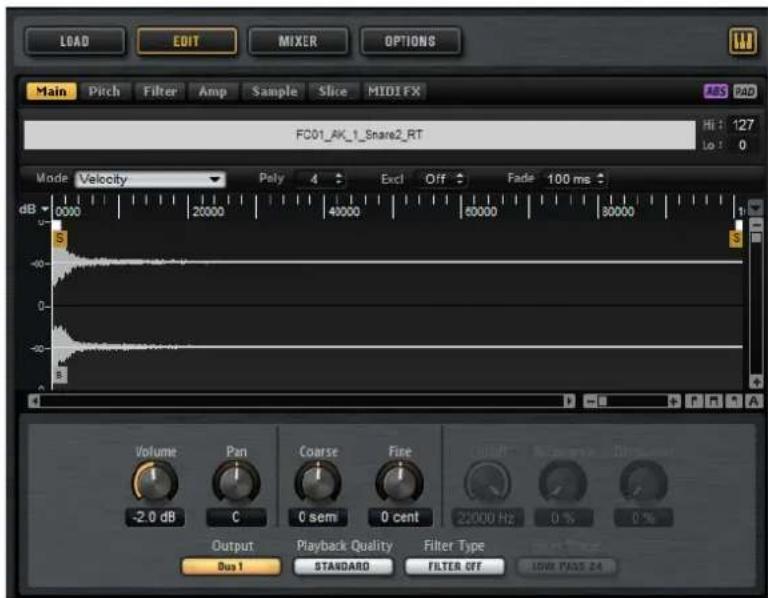
The Edit page contains the Main, Pitch, Filter, Amp, Sample, Slice, and MIDI FX tabs.
Absolute and Relative Editing
When editing multiple samples, you can either change values absolutely for all the samples (ABS) or make relative changes (REL), depending on the setting of the corresponding button on the toolbar.
If you use absolute editing and you change a parameter from 50% to 60% for one sample, all other samples are also set to 60% .
If you use relative editing and you change a parameter from 50% to 60% in one zone, another selected zone that was set to 70% is set to 80% .
NOTE
Relative changes can be made for all parameters that can be adjusted continuously. Changes of parameters that select one of multiple modes or switch between two states are always absolute.
Editing Selection or All
You can apply your editing either to the selection (SEL) or to all samples of the pad (PAD), depending on the setting of the corresponding button on the toolbar.
Assigning Samples to Pads
You can assign samples to pads by using drag and drop, replace existing samples using the Mapping View context menu, or add samples to pads using the Browser.
Assigning Samples to Pads using Drag and Drop
You can drag one or more samples from the Explorer/Finder and from your host application onto Groove Agent. Samples can be mapped to the same pad, or to different pads.
You can drag files from the following locations:
M ed i a B a y
- Project window
- Pool
- Sample Editor (regions)
Audio Part Editor - LoopMash slices
- To assign a sample to a pad, drag it onto the pad.
When you drag one or more samples onto a pad, the drop icons are shown. These determine whether the samples are added to the pad, whether the current sample is replaced with the one you are dragging, or whether the samples that you drag are assigned to multiple consecutive pads.
- Drag samples to the topmost drop icon to add them to the pad.
You can assign up to 8 samples to a pad.
- Drag one or more samples to the middle drop icon to replace the currently assigned samples with the ones that you are dragging.
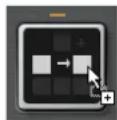
- Drag several samples to the lowest drop icon to assign them to several consecutive pads in one or in several groups.
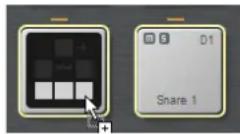
A yellow border is shown around the pads that receive one of the samples.
NOTE
How many samples can be dropped to several pads depends on the number of available pads.
If Groove Agent cannot supply a sufficient number of free pads for the number of dropped samples, a dialog is displayed, allowing you to proceed or cancel the operation. If pads already contained samples, these are replaced.
RELATED LINKS
Mapping View on page 67
Moving and Copying Samples between Pads
Samples can be moved and copied between pads.
- To move the samples from one pad to another pad, drag the pad to either the top, the middle, or the bottom drop icon of the destination pad.
NOTE
To copy the samples instead of moving them, keep [Alt]/[Option] pressed when dragging the samples.
NOTE
When you copy pads that are part of a sliced loop, they are pasted as normal instrument pads, that is, they are no longer related to the loop.
Moving and Copying Samples between Groups
To move or copy the samples to pads in another group, drag the samples on the group button first to show the group, and then to the new pad.
The options are the same as when moving samples between pads of the same group.
Moving Sliced Loops
You can move sliced loops with one drag and drop operation.
- Drag the first slice of the loop and move it onto the pad section.
When you start dragging, Groove Agent shows the pads on which the sliced loop can be dropped, that is, the pads that are followed by enough empty pads to insert all the slices. Pads on which the loop cannot be dropped are grayed out.
- Drop the slice on the pad from which you want to start inserting slices.
Changing the Order of Pads
By default, instrument pads are sorted chromatically, based on the standard mapping. However, in some cases, you may want to display pads from other groups within a particular group. Therefore, you can exchange the position of pads.
For example, often a second bass drum is mapped to B0, which can be found in pad group 2. Most of the other common drum kit instruments are, however, located in group 3. If you want to see the second bass drum together with the other instruments of group 3, exchange the B0 pad with an unused pad in group 3.
- To exchange 2 pads, hold down [Shift] a nd drag one pad onto another pad.
This exchanges the entire contents of the pads with all their settings.
- To see whether the order of the pads differs from the standard sorting, you can either check the trigger notes of the pads to see whether they are mapped chromatically or not, or you can click the Info button to see the pad index of all pads.
- To reset the order of all pads to a chromatic order, open the context menu for a pad and select Reset Pad Order.
Mapping View
The mapping view shows the current sample mapping of the selected pad.

You can replace and remove samples in the mapping view and adjust their velocity ranges. The focused sample is displayed in a lighter color.
NOTE
The mapping view always shows the velocity ranges, even if they are not used to trigger samples. However, the values only have an effect in Velocity mode.
Changing the Velocity Ranges of Samples
- Select the sample in the mapping view and enter new values in the Hi and Lo fields on the right.
- Position the mouse between two samples, so that a double-arrow is shown, and drag to the left or right.
NOTE
Changing the velocity range of a sample automatically adapts adjacent samples, that is, velocity ranges cannot overlap.
Editing the Mapping of a Pad
A pad can contain up to 8 samples.

- You can add samples by dropping them onto the mapping view. They can be inserted between two other samples, behind the last sample, or in front of the first sample. This is indicated by a red insert line.
-
To replace a sample, drag a new sample onto an existing sample. Which sample will be replaced is indicated by a red frame.
-
To change the order of the samples, drag them to a new position.
- To map a sample to another pad, drag it onto the pad.
This removes the sample from the current pad. To map the sample to another pad without losing the current mapping, hold down [Alt]/[Option] while dragging.
Replacing Samples
You can replace individual samples in the Mapping View with other samples on your hard disk.
PROCEDURE
- Right-click the sample and select Replace Sample from the context menu.
- In the file dialog, navigate to the file that you want to use instead, select it, and click Open.
RESULT
The sample is replaced.
Removing Samples From Pads
- To remove a sample from a pad, right-click it and select Remove Sample from the context menu.
- To remove all samples of a pad, right-click one of the samples and select Remove Selected Samples.
NOTE
If the PAD/SEL button is set to PAD, you cannot select individual samples and Remove Selected Samples removes all samples of the pad.
Main Tab
The Main tab gives you access to the sample mapping of the pad as well as to the most important parameters, like Volume, Pan, Cutoff etc.
The Maintab also shows a simplified sample editor. You can adjust the sample start and end markers as well as fade-in and fade-out markers and fade curves in the display.
Mode
Determines the trigger mode for the samples of a pad:
- n city mode, Velociming velocity determines which sample is played.
In Layer mode, all samples are played at the same time, regardless of their velocity.
In Round Robin mode, the samples are played repeatedly one after the other, from left to right.
In Random mode, samples are played randomly. Repetitions can occur.
- In Random Exclusive mode, samples are played randomly, but repetitions are not allowed.
Poly
Sets the maximum polyphony of a pad. For example, if this is set to 4, you can trigger a pad 4 times before notes are stolen.
NOTE
The polyphony value represents the number of notes that can sound simultaneously, therefore triggering layered samples on a pad may lead to a much higher number of actual sample voices.
Fade
Specifies the time it takes for a voice to fade out when voices are stolen.
NOTE
You can specify different fade settings for the different samples of a pad.
Exclusive Group
This allows you to assign a pad to one of 32 exclusive groups. Pads within a group are never played back simultaneously. When a new note is played, the previous note stops.
Volume
Sets the level of the sample.
Pan
Sets the position of the sample in the stereo panorama.
Coarse
Adjusts the tuning in semitones.
Fine
Adjusts the fine tuning in cents.
Cutoff
Controls the cutoff frequency of the filter.
NOTE
Cutoff, Resonance, and Distortion are only available if a filter is used.
Resonance
Sets the filter resonance.
Distortion
Sets the amount of distortion. The effect of this parameter depends on the selected filter mode.
Output
The output to which the samples are routed.
- By default, samples are routed to the Kit mixer, where they are also sent through the insert effects.
- You can route samples to one of the 16 agent busses that are available on the Agent submenu. If samples are sent to an agent bus, they are also sent through the insert effects of this bus.
- You can route samples to one of the 16 available stereo outputs. The first stereo out is always the Master output. This output is always active and can also contain insert effects.
- You can also route a pad directly to one of the 4 AUX channels, to create sub groups, for example.
NOTE
Samples that are routed to an output that is deactivated in your host application are automatically sent to the Master output of the plug-in.
Playback Quality
Sets the quality.
- Standard: Select this mode to play back the samples with their original bit depth and sample rate.
- Vintage: Select this mode to emulate the sound quality of early 12-bit drum machines. The detuning of the samples produces the typical aliasing effect. The sample rate is limited to 26040Hz .
- Turntable mode is similar to Vintage mode. The samples are played with 12bit/26040 Hz. Use this mode to emulate the typical workflow of hip hop producers. Because the first digital drum machines only had a very limited amount of RAM, turntables were sampled at a speed of 45 RPM instead of 33 1/3 RPM. This way, more samples could be saved into the available RAM. During playback, the samples were tuned down, to correct for the change in pitch. This added the typical crunch and aliasing that the early drum machines are famous for.
NOTE
If Vintage or Turntable is selected for a sample, you cannot edit the sample using the AudioWarp functions on the Sample tab. If you try to select one of these modes for a sample that uses AudioWarp, a warning message is displayed.
Filter Type
Sets the filter type. You can choose between Classic, Tube Drive, Hard Clip, Bit Reduction and Rate Reduction.
To deactivate the filter, select Off.
Filter Shape
- LP 24, 18, 12, and 6 are low-pass filters with 24, 18, 12, and 6 dB/oct. Frequencies above the cutoff are attenuated.
BP 12 and BP 24 are band-pass filters with 12 and 24dB /oct. Frequencies below and above the cutoff are attenuated. - HP6+LP18 and HP6+LP12 are combinations of a high-pass filter with 6 dB/oct and a low-pass filter with 18 and 12 dB/oct, respectively (asymmetric band-pass filter). Frequencies below and above the cutoff are attenuated. Attenuation is more pronounced for the frequencies above the cutoff.
- HP12+LP6 and HP18+LP6 are combinations of a high-pass filter with 12 and 18 dB/oct and a low-pass filter with 6 dB/oct (asymmetric band-pass filter). Frequencies below and above the cutoff are attenuated. Attenuation is more pronounced for the frequencies below the cutoff.
HP 24, 18, 12, and 6 are high-pass filters with 24, 18, 12, and 6 dB/oct. Frequencies below the cutoff are attenuated. - BR 12 and BR 24 are band-reject filters with 12 and 24 dB/oct. Frequencies around the cutoff are attenuated.
- BR12+LP6 and BR12+LP12 are combinations of a band-reject filter with 12 dB/oct and a low-pass filter with 6 and 12 dB/oct, respectively. Frequencies around and above the cutoff are attenuated.
- BP12+BR12 is a band-pass filter with 12 dB/oct plus a band-reject filter with 12 dB/oct. Frequencies below, above, and around the cutoff are attenuated.
HP6+BR12 and HP12+BR12 are combinations of a high-pass filter with 6 and 12 dB/oct and a band-reject filter with 12 dB/oct. Frequencies below and around the cutoff are attenuated. - AP is an all-pass filter with 18 dB/oct. Frequencies around the cutoff are attenuated.
- AP+LP6 is an all-pass filter with 18dB/oct plus a low-pass filter with 6 dB/oct. Frequencies around and above the cutoff are attenuated.
HP6+AP is a high-pass filter with 6 dB/oct plus an all-pass filter with 18 dB/oct. Frequencies around and below the cutoff are attenuated.
Editing the Envelope
An envelope section is available on the Pitch, Filter, and Amp tabs. Each multisegment envelope has up to 128 nodes with the Time, Level, and Curve parameters. The nodes and their parameters specify the overall shape of the envelope. You can edit one or multiple nodes in the graphical envelope editor or by entering values.
Fixed
- If Fixed is activated and you move selected nodes on the time axis, only the selected nodes are moved.
- f activiFied as idedes that follow the edited nodes are also moved.
Snap
You can select a second envelope to be displayed in the background of the edited envelope. If Snap is activated and you change the position of nodes, they snap to the nodes of the envelope that is shown in the background.
- To specify the envelope for the background, open the pop-up menu to the right of the Snap button and select an envelope from the list.
Selecting Nodes
- To select a node, click on it in the graphical editor.
Selected nodes turn light blue. The focused node is indicated by an orange frame. The value fields to the left of the graphical envelope editor display the parameters of the focused node.
- If multiple nodes are selected, you can use the Nod e pop-up menu to set the focus to a different node without losing the current selection.
- To add a node to a selection, [Shift]-cl i ck the node. Selected nodes are edited together.
- You can select multiple nodes by drawing a re ctangle around the nodes with the mouse.
- If the graphical editor has the focus, you can select the next or the previous node with the left and right arrow keys.
Adjusting the Time Parameter
The Time parameter specifies the period of time between two nodes. Depending on the Sync mode, the Time parameter is displayed in milliseconds and seconds, or in fractions of beats.
- To set the Time par ameter, select the nodes that you want to adjust and enter a value in the Time field.
- You can also adjust the Time parameter in the graphical envelope editor, by dragging the nodes left or right, to decrease or to increase the time span. For a higher resolution, hold [Shift] while moving the nodes.
To limit the movement to the time axis, that is, to change only the horizontal position of a node, hold down [Ctrl]/[Command] while dragging.
Adjusting the Level Parameter
The Level parameter specifies the amplitude of the envelope at the position set by the Time parameter.
T o s parametet, select the hodes that ydveht to adjust and enter a value in the Level field.
- You can also adjust the Level parameter in the graphical envelope editor by dragging the selected nodes up or down, to decrease or increase the levels. For a higher resolution, hold [Shift] while moving the nodes.
To limit the movement to the level axis, that is, to change only the vertical position of a node, hold down [Alt]/[Option] while dragging.
Adjusting the Curve Parameter
The Curve parameter allows you to adjust the curvature of the envelope curve between two nodes from linear to logarithmic or exponential behavior.
- To set the Curve parameter, select the nodes that you want to adjust and enter a value in the Curve field. Positive curve values change the curvature towards logarithmic and negative values towards exponential behavior.
- You can also adjust the Curve parameter in the graphical envelope editor by dragging the curve between two nodes.
[Ctrl]/[Command]-click a curve to reset it to linear.
Adding and Removing Nodes
All nodes added after the sustain node always affect the release phase of the envelope.
- To add a node, double-click at the positio n where you want to add the node.
- To remove a node, double-click it.
- To delete several selected nodes, pr ess [Delete] or [Backspace].
NOTE
You cannot remove the first, the last, or the sustain node.
Adding Nodes Using the Fill Function
The Fill function allows you to add multiple envelope nodes after the selected nodes.
PROCEDURE
- On the pop-up menu to the right of the Fill button, select the number of nodes that you want to add.
- In the graphical envelope editor, select the node after which you want to add nodes.
If several nodes are selected, the new nodes are inserted after the last selected node.
If the Fixed function is deactivated, the added nodes are placed with the interval specified by the Time parameter of the selected node. If multiple nodes are selected, the interval is specified by the focused node.
By activating Sync, you can specify the interval with the Sync note value. For example, if 1/4 is selected, new nodes are added at exact quarter note intervals.
If the Fixed function is activated, the added nodes fill the space between the last selected node and the following one.
- Click the Fill button.
RESULT
The nodes are added.
Using Sync
You can synchronize the envelopes to the tempo of your host application. This allows you to set envelope times that relate to musical time intervals, regardless of any tempo changes.
PROCEDURE
- Click Sync to activate sync mode for the envelope.
Sync mode is active if the button is highlighted. A grid spaced in fractions of beats is displayed in the graphical envelope editor.
- On the pop-up menu located to the right of the Sync button, select a note value.
This sets the resolution of the grid.
NOTE
The Time field of a node displays times in fractions of beats. The fraction is always reduced to the smallest possible value. 2/16 is displayed as 1/8, for example.
-
To use triplet note values, activate the T button.
-
Envelope nodes that do not exactly match a note value display the closest note value.
-
Nodes that exactly match a note value are indicated by a red dot inside the handle of the node. This is useful if you switch the grid between triplets and normal note values, for example. The triplet nodes still indicate that they match a note value, even if the grid shows normal note values.
-
You can also enter note values and triplets manually in the value field.
Envelope Modes
On the Mode pop-up menu, you can select one of 4 envelope modes, to specify how the envelope is played back each time you hit a key.
Sustain
The envelope starts playback from the first node to its sustain. The sustain level is held as long as you play the note. When you release the note, the envelope continues with the phases after the sustain. This mode is ideal for looped samples.
Loop
The envelope starts playback from the first node to the loop nodes. The loop is repeated for as long as the key is held. The envelope plays the phases after the sustain when you release the note. This mode is ideal for adding motion to the sustain.
One Shot
The envelope is played from the first to the last node, even if you release the key. The envelope has no sustain. This mode is ideal for drum samples.
Sample Loop
Preserves the natural attack of the sample. The decay of the envelope does not start until the sample has reached the sample loop start.
If you set the second node to the maximum level and use the following nodes to shape the decay during the loop phase of the sample, the envelope only affects the loop phase. The attack of the envelope is still executed.
Setting Up the Loop
You can set up the envelope to repeat its playback between the selected nodes.
PROCEDURE
- Set the envelope mode to Loop.
-
Adjust the loop with the graphical envelope editor.
-
The loop is indicated by the green region in the graphical envelope editor. Specify the loop start and end by dragging the borders of the region. The loop region can only be set up in the decay phase of the envelope.
Pitch Tab
Key Range
Activate this button to specify the key range of the sample, that is, the range over which it is mapped chromatically to pads.
- Lo w Key specifies the first key for the mapping.
- High Key specifies the last key for the mapping.
If you deactivate the Key Range button, the Low Key and High Key fields are reset.
Fixed Pitch
- fd Pitch is deactivated, the sample plays chromatically within the key range.
- If Fixed Pitch is activated, the sample plays with its original pitch on all of the keys within the key range. This is useful if you want to layer a pad with the neighboring pads, for example.
Coarse
Adjusts the tuning in semitones.
Fine
Adjusts the fine tuning in cents.
Random
Determines how much the pitch of a sample is changed randomly with each note that is played.
Env Amnt
Determines how much the pitch is affected by the pitch envelope.
Level Velocity (Vel>Lev)
Determines how the velocity affects the level of the envelope. The level depends on this parameter and on how hard you hit a key. Positive values increase the level of the envelope the harder you hit a key. Negative values decrease the level of the envelope the harder you hit a key.
Time Velocity (Vel>Time)
Adjusts the influence of velocity on the phases of the envelope. Positive values decrease the times for higher velocity values. Negative values increase the times for higher velocity values.
Segments
Here, you can select which phases of the envelope are affected by the Time Velocity parameter.
- A ttack - The velocity affects the attack only.
Attack + Decay - The velocity affects all phases until the sustain. - Decay - The velocity affects all phases until the sustain but without the attack.
Attack + Release - The velocity affects the attack and the release phases. - All - The velocity affects all phases.
Level Velocity Curve
You can select the curve type to specify how the incoming velocity translates to the level of the envelope. The characteristic of each curve is displayed by a small icon.
Mapping Samples Chromatically over Multiple Pads
The Key Range settings on the Pitch tab allow you to map samples chromatically over multiple pads.
NOTE
If Edit Selected Sample or Pad (SEL) is activated, you adjust the key range for each sample individually.
PROCEDURE
- Set up the range with the Low Key and High Key value fields.
When you adjust the key range for chromatically mapped samples, the pads within the key range inherit the name of the pad to which the original sample is assigned. The name is only set if the corresponding pad does not have a name. The offset in semitones from the original pad is added as suffix to the name. This helps you to find the original pad more easily.
-
Optional: Set up the Fixed Pitch parameter.
-
If Fixed Pitch is activated, the sample is played with its original pitch on all the pads in the key range.
- I xed Pitch is defunctivated, the sample is played chromatically within the key range.
RESULT
The samples are mapped to the pads. An icon with two notes indicates which pads play a chromatically mapped sample.
AFTER COMPLETING THIS TASK
The context menu of pads that contain chromatically mapped samples offers the Chromatically Mapped from function, allowing you to locate the original pad for the mapped samples. The original pad itself does not contain this function.
Filter Tab
The Filter tab allows you to adjust the tone color of the sound. The filter envelope controls the cutoff frequency to shape the harmonic content over time.
Filter Type
Sets the filter type. You can choose between Classic, Tube Drive, Hard Clip, Bit Reduction and Rate Reduction.
To deactivate the filter, select Off.
Filter Shape
- LP 24, 18, 12, and 6 are low-pass filters with 24, 18, 12, and 6 dB/oct. Frequencies above the cutoff are attenuated.
BP 12 and BP 24 are band-pass filters with 12 and 24dB / Frequencies below and above the cutoff are attenuated. - HP6+LP18 and HP6+LP12 are combinations of a high-pass filter with 6 dB/oct and a low-pass filter with 18 and 12 dB/oct, respectively (asymmetric band-pass filter). Frequencies below and above the cutoff are attenuated. Attenuation is more pronounced for the frequencies above the cutoff.
- HP12+LP6 and HP18+LP6 are combinations of a high-pass filter with 12 and 18 dB/oct and a low-pass filter with 6 dB/oct (asymmetric band-pass filter). Frequencies below and above the cutoff are attenuated. Attenuation is more pronounced for the frequencies below the cutoff.
HP 24, 18, 12, and 6 are high-pass filters with 24, 18, 12, and 6 dB/oct. Frequencies below the cutoff are attenuated. -
BR 12 and BR 24 are band-reject filters with 12 and 24 dB/oct. Frequencies around the cutoff are attenuated.
-
BR12+LP6 and BR12+LP12 are combinations of a band-reject filter with 12 dB/oct and a low-pass filter with 6 and 12 dB/oct, respectively. Frequencies around and above the cutoff are attenuated.
- BP12+BR12 is a band-pass filter with 12 dB/oct plus a band-reject filter with 12 dB/oct. Frequencies below, above, and around the cutoff are attenuated.
HP6+BR12 and HP12+BR12 are combinations of a high-pass filter with 6 and 12 dB/oct and a band-reject filter with 12 dB/oct. Frequencies below and around the cutoff are attenuated. - AP is an all-pass filter with 18 dB/oct. Frequencies around the cutoff are attenuated.
- AP+LP6 is an all-pass filter with 18 dB/oct plus a low-pass filter with 6 dB/oct. Frequencies around and above the cutoff are attenuated.
- HP6+AP is a high-pass filter with 6 dB/oct plus an all-pass filter with 18 dB/oct. Frequencies around and below the cutoff are attenuated.
Cutoff
Controls the cutoff frequency of the filter.
Resonance
Sets the filter resonance.
Distortion
Sets the amount of distortion. The effect of this parameter depends on the selected filter mode.
Velocity
This parameter determines the influence that velocity has on the cutoff frequency. If Velocity is set to 0% , the setting has no effect. At any other value, the cutoff frequency changes with the velocity.
Env Amnt
Determines how much the filter is affected by the filter envelope.
Level Velocity (Vel>Lev)
Determines how the velocity affects the level of the envelope. The level depends on this parameter and on how hard you hit a key. Positive values increase the level of the envelope the harder you hit a key. Negative values decrease the level of the envelope the harder you hit a key.
Time Velocity (Vel>Time)
Adjusts the influence of velocity on the phases of the envelope. Positive values decrease the times for higher velocity values. Negative values increase the times for higher velocity values.
Segments
Here, you can select which phases of the envelope are affected by the Time Velocity parameter.
-
A ttack - The velocity affects the attack only.
Attack + Decay - The velocity affects all phases until the sustain. -
Decay - The velocity affects all phases until the sustain but without the attack.
Attack + Release - The velocity affects the attack and the release phases. - All - The velocity affects all phases.
Level Velocity Curve
You can select the curve type to specify how the incoming velocity translates to the level of the envelope. The characteristic of each curve is displayed by a small icon.
RELATED LINKS
Editing the Envelope on page 71
Amp Tab
Volume
Sets the level of the sample.
Pan
Sets the position of the sample in the stereo panorama.
AUX 1-4
Here, you can specify the signal level that is sent to the 4 integrated AUX FX channels.
Level Velocity (Vel>Lev)
Determines how the velocity affects the level of the envelope. The level depends on this parameter and on how hard you hit a key. Positive values increase the level of the envelope the harder you hit a key. Negative values decrease the level of the envelope the harder you hit a key.
Time Velocity (Vel>Time)
Adjusts the influence of velocity on the phases of the envelope. Positive values decrease the times for higher velocity values. Negative values increase the times for higher velocity values.
Segments
Here, you can select which phases of the envelope are affected by the Time Velocity parameter.
- A ttack - The velocity affects the attack only.
Attack + Decay - The velocity affects all phases until the sustain. - Decay - The velocity affects all phases until the sustain but without the attack.
Attack + Release - The velocity affects the attack and the release phases. - All - The velocity affects all phases.
Level Velocity Curve
You can select the curve type to specify how the incoming velocity translates to the level of the envelope. The characteristic of each curve is displayed by a small icon.
Output
The output to which the samples are routed.
- By default, samples are routed to the Kit mixer, where they are also sent through the insert effects.
- You can route samples to one of the 16 agent busses that are available on the Agent submenu. If samples are sent to an agent bus, they are also sent through the insert effects of this bus.
- You can route samples to one of the 16 available stereo outputs. The first stereo out is always the Master output. This output is always active and can also contain insert effects.
- You can also route a pad directly to one of the 4 AUX channels, to create sub groups, for example.
NOTE
Samples that are routed to an output that is deactivated in your host application are automatically sent to the Master output of the plug-in.
Norm (Use Normalized Velocity)
- If you are working with normalized samples, keep this button deactivated.
- If you are using velocity-layered samples that are not normalized, activate this button. Otherwise, you might create unrealistic level transitions between different velocity layers when setting the Vel<Lev parameter.
Sample Tab
The Sample tab is divided into different sections. The upper section shows the waveform display and the lower section gives you access to all relevant sample parameters.
Toolbar
The toolbar contains different tools for editing sample markers, loop markers, and loop slices.
Play Sample
Activate this button to play back the raw sample.
Play Selection Looped
Activate this button to play back the selection repeatedly.
Auto Scroll
If this button is activated, the waveform display is scrolled during playback, keeping the playback cursor visible.
Follow Sample Playback
Activate this button to see a play locator when triggering a sample via MIDI.
Range Selection Tool
Click and drag with this tool to create a selection.
Zoom Tool
If this tool is selected, you can click in the waveform to zoom in on the position where you click.
Play Tool
If this tool is selected, click in the waveform display to play back the sample. It is played back from this position until you release the mouse button.
Scrub Tool
If this tool is selected, you can click in the waveform and drag sideways to play back the audio. The playback direction and speed depend on how far you move the mouse left or right from the position you clicked.
Snap
If the Snap button is activated, the selection start and end points and markers snap to other markers.
Snap to Zero Crossing
If this button is activated, markers and selection start and end points are only placed at zero crossings (positions in the audio where the amplitude is zero). This helps you avoid pops and clicks that are caused by sudden amplitude changes.
Edit Loop
If this icon is activated, the editor shows the looped region repeatedly instead of the original sample data. This provides a better overview over the transition between loop end and loop start and allows you to set the loop markers to the best positions.
If loop mode is deactivated when you activate the Edit Loop icon, loop mode is automatically set to Continuous and the loop markers are placed at the start and end of the sample.
Show Resulting Loop Crossfade
Activate this button to see the effect of your crossfade settings in the waveform display. If this button is activated, the resulting waveform is displayed in red.
NOTE
This button only has an effect if Edit Loop is activated.
Trim Sample
Trims the sample, either to the selection, or to the range that is set with the sample start/end markers.
Normalize Sample
Normalize the sample by detecting the highest peak level of the sample and adjusting the gain to reach a predefined level.
Normalize Level
Sets the level for the Normalize function.
Revert to Full Sample
Undoes the trimming, so that the entire sample is restored.
NOTE
After undoing the trim functions, make sure to set the start/end markers to their original positions, otherwise these parts are not included in the playback.
Show Fades in Waveform
Activate this button to show your fade settings directly in the waveform.
Show Channel Sum
Activate this button to show the sum of the left and right channels in the waveform display.
Show Left Channel
Activate this button to show the left channel in the waveform display.
Show Right Channel
Activate this button to show the right channel in the waveform display.
Preview Volume
Click this icon to display a level slider. Use the slider to specify the level for previewing your samples.
Output
On this pop-up menu, you can specify to which plug-in output the Sample editor sends its signals.
This is especially useful if the Master output uses insert effects that you do not want to hear while editing the samples.
Ruler
The ruler shows the timeline in the specified display format.
- To select the format, click the arrow button to the right of the ruler and select an option from the pop-up menu.
You can choose to display bars and beats, seconds, or samples.
If the Slice tab is selected, the ruler shows the timeline in bars and beats.
Waveform Display and Level Scale
The waveform display shows the waveform image of the sample. To the left of the waveform display, a level scale is shown, indicating the amplitude of the audio.
- To select whether the level is shown as a percentage or in dB, click the level scale label (dB or %), and select an option from the pop-up menu.
- To display the half level axes, right-click in the waveform display and select the corresponding option on the context menu.
Parameter Section
Velocity Start Range
Determines the influence of the velocity on the sample start. Move the start range marker to the right to start the sample later for lower velocities. Maximum velocity starts the sample at the original sample start.
Key On Delay
With this parameter, you can delay the playback of the zone by a specified time or a note value.
- To synchronize the delay time to the host tempo, activate the Sync button and select a note value from the pop-up menu.
To change the selected note value to a triplet, activate the T button.
If Sync is deactivated, the delay is specified in milliseconds. If Sync is activated, the delay is specified in fractions of beats.
Loop Mode
- One Shot - the sample is played from start to end.
No Loop - the sample is played for as long as the note is held.
Continuous - the loop is played even if you release the note. - Until Release - the loop is played for as long as the note is held and then continues to the end of the sample.
Reverse
Reverses the sample, so that you hear it backwards.
Sample Start
The start marker of the sample.
Sample End
The end marker of the sample.
Link Sample Start and End
If this button is activated, moving the sample start also moves the sample end, and vice versa.
Loop Start
Specifies where the loop begins. You can enter a value numerically or move the start marker in the waveform display.
Loop End
Specifies where the loop ends. You can enter a value numerically or move the end marker in the waveform display.
Link Loop Start and End
If this button is activated, moving the loop start also moves the loop end, and vice versa.
Loop Crossfade
Specifies the time of the crossfade.
The Curve parameter defines the curve of the crossfade, from linear to equal power.
Loop Tuning
Here you can adjust the frequency of the loop in cents.
Detune
Allows you to tune the sample by + / - 1200 cents.
Gain
Determines the level of the sample.
NOTE
When using the Normalize function, this parameter is set automatically.
Pan
Determines the panorama position of the sample.
AudioWarp Parameters
In the AudioWarp section, you can apply time stretching and formant shifting to your samples.
NOTE
The AudioWarp functionality is not available if the playback quality is set to Vintage or Turntable on the Main tab.
Mode
On this pop-up menu, you select the mode that is used for the AudioWarp functions.
-
Solo m ode offers parameters for time stretching and formant shifting. This mode is suitable for loops and samples with solo instruments or vocals.
-
Music mode offers parameters for time stretching. This mode is suitable for complex material like drum loops and samples with mixed music. It uses considerably more CPU time than Solo mode. Note that the more the sample is stretched, the higher the CPU load.
S e l e c t Off to deactivate the AudioWarp function
Sync Mode
The Sync modes are used to match the playback speed of the sample to the tempo of the host application.
- If this is set to Off, you can specify the playback speed manually, in percent.
- If this is set to Tempo, the playback speed is calculated using the ratio between the original tempo of the sample and the tempo of the host.
- If this is set to Beats, the playback speed is calculated using the note length of the beats, the number of beats, and the tempo of the host.
NOTE
For the Sync modes to work properly, the loop of the sample has to be set up correctly. In Tempo mode, the original tempo must be set as exactly as possible.
Speed
This control adjusts the playback speed of the sample in percent. You can speed up the tempo by up to 800% of the original. In Music mode, the lower limit of the playback speed adjustment is 12.5% . Values below this limit have no effect.
Original BPM
If Sync Mode is set to Tempo, you can enter the original tempo of the sample in beats per minute. Groove Agent adjusts the playback speed of the sample to match the tempo of the host application.
NOTE
If you load a sample that contains tempo information in the file header, this information is used to set the Original Tempo parameter. If a sample does not contain any tempo information, the value is estimated. You can modify the parameter values manually.
Note Length and Number of Beats
When Sync Mode is set to Beats, Groove Agent calculates the tempo of the sample, based on the note length and the number of beats you enter. For example, if the sample is a drum loop with four quarter notes, set Note to 1/4 and Beats to 4. Groove Agent adjusts the playback speed of the sample to match the tempo of the host application.
NOTE
If you load a sample that contains tempo information in the file header, this information is used to set the Note Length and Number of Beats parameters. If a sample does not contain any tempo information, the values are estimated. You can modify the parameter values manually.
Formant (Solo Mode Only)
Specifies the amount of formant shifting.
Markers
You can use a set of different markers to specify important positions in a sample.
Sample Start
Defines where the sample starts to play. Audio before this marker is ignored.
Sample End
Defines where the sample stops playing. Audio after this marker is ignored.
Loop Start
Defines where the loop starts.
Loop End
Defines where the loop ends.
Velocity Start Range
Defines the attack phase of a sample, which can be used for the modulation of the sample start via velocity.
Creating Fades
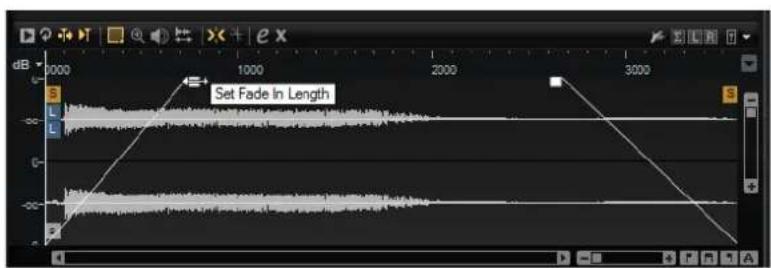
- To create fades, drag the fade handles in the waveform display on the Sample tab or specify the length for fade in and fade out on the Slice tab (if you created slices from the audio).
- To adjust the curvature, drag the fade line in the display up or down. To reset the fade curve back to linear, hold down [Ctrl]/[Command] and click on the fade line.
NOTE
The fades directly influence sample playback. They are not part of the amp envelope.
Zooming
- To zoom in/out on the time and level axis, use the horizontal and vertical zoom sliders.
Vertical zoom slider
- The three buttons to the right of the horizontal zoom slider allow you to zoom to the start, the end, and to the full range.

Depending on your work situation, these options refer to the sample, the selection, or a loop. Clicking several times increases the zoom level.
- To toggle between full zoom and the previous zoom setting, click the A button to the right of the horizontal zoom slider.
- To zoom in/out on the locator position, press [G] and [H].
- You can click and drag the ruler to zoom in/out on the position you have clicked.
- Use the options on the Zoom su bmenu of the context menu.
View Range
When changing from one sample to another, you can specify which range to show in the waveform display for the new sample.
These options can be found on the View Range submenu of the waveform display context menu.
Auto
Follows the visible view range of the previous sample.
Last
Each sample stores the visible range individually. When you select a sample again, its view range is restored.
Full
Shows the entire sample.
Sample
Shows the range between sample start and sample end markers.
Sample Start
Shows the sample start marker with the current zoom factor.
Sample Start Range
Shows the sample start range marker with the current zoom factor.
Sample End
Shows the sample end marker with the current zoom factor.
Loop
Shows the entire loop.
Loop Start
Shows the loop start marker with the current zoom factor.
Loop End
Shows the loop end marker with the current zoom factor.
Auditioning Samples
You can play back the sample using the Play Sample icon on the toolbar.
The following applies:
- If you have not made a selection, the whole sample is played back.
- If you have made a selection, this selection is played back.
- I dit Loop idon is activated, playback continues repeatedly until you deactivate the audition function.
Making Selections
PROCEDURE
-
To make a selection, click and drag with the Range Selection tool.
-
If Snap to Zero Crossing is activated, start and end of the selection are always placed at zero crossings.
-
To resize the selection, drag its left or right border, or [Shift]-click at the position where you want the selection to start/end.
- To move a selection, position the mouse pointer inside the selection and drag.
Defining Sample Start and End from a Selection
Make a selection, right-click in the Sample editor, open the Selection submenu, and select Set Sample Start/End to Selection.
Defining Loop Start and End from a Selection
- Make a selection, right-click in the Sample editor, open the Selection submenu, and select Set Loop to Selection.
Assigning a Portion of a Sample to another Pad
- Make a selection, position the mouse pointer inside it, click and drag the selection to a new pad.
This assigns only the selected part of the sample to the pad.
NOTE
The sample portion that is assigned to the new pad still references the original sample, that is, no new sample is created on disk.
Normalizing Samples
The Normalize function detects the highest peak level of the sample, and adjusts the gain to reach a predefined level.
PROCEDURE
- On the toolbar, in the Normalize Level field, specify the level that you want to normalize the sample to.
- Click the Normalize Sample button on the toolbar, or right-click the sample and selectNormalizeSample from the Sample submenu of the context menu.
RESULT
The Gain parameter of the sample is adjusted to conform with the predefined Normalize level. The amplitude of the waveform in the Sample editor changes accordingly.
NOTE
If you adjust the gain of the sample, the amplitude of the waveform in the Sample editor changes. This might be confounded with an adjustment to the vertical zoom of the waveform. To get a better visual feedback, set the vertical zoom to the minimum before you adjust the gain.
To play back the sample at its original level, set the Gain parameter to 0.0dB.
Trimming Samples
In the Sample editor, you can trim samples to the start and end markers, or to the selection.
- To trim the sample to the start and end markers, adjust the markers and click the Trim button on the toolbar.
- To trim the sample to a selection, make a sele c tion and click the Trim button on the toolbar.
NOTE
The trim functions are also available on the context menu of the Sample editor.
All trim operations can be undone.
- To undo a trim operation, click the Rev ert to Full Sample button on the toolbar, or right-click the sample and select Revert to Full Sample from the context menu.
NOTE
After undoing the trim functions, make sure to set the start/end markers to their original positions, otherwise these parts are not included in the playback.
Slice Tab
On the Slice tab, you can slice audio loops and automatically map the slices to instrument pads. During this process, a MIDI track is created and is associated with the first empty pattern pad.
After slicing a loop, you can play back the entire loop via the pattern pad or trigger individual slices with the instrument pads.
Toolbar
The toolbar contains several tools that are also available on the Sample tab. In addition, the following tools are available:
Play Slice
Activate this button to play back slices when clicking on them.
Lock Slices
Activate this button to prevent slice markers from being moved. Locked slices are shown with red markers.
Jump to Previous/Next Slice
Click these buttons to jump to the next/previous slice.
BPM
Displays the tempo of the loop, as read from the sample file or calculated from the sample length.
You can adjust this value manually.
Bars/Beats
Shows the length of the sample found by the automatic tempo detection, in bars and beats. You can adjust this value manually, which has an effect on the grid and the tempo.
Parameter Section
Create/Remove Slices
Click this button to create slices for the selected loop. If slices exist, click this button to remove them.
Slice Detection Mode
The slice detection automatically sets slice markers in the sample waveform. The following modes for slice detection are available:
- Transient mode allows you to specify the minimum peak level that a transient needs to become a slice marker.
- Grid mode sets the slice markers according to a beat grid.
You can combine the Transient and Grid modes to detect slices that match both conditions.
In Manual mode, no automatic slice detection is performed. Instead, you can add and remove slices manually by [Alt]/[Option]-clicking in the waveform.
Threshold
Determines the minimum level that a transient must have to be detected as the start of a new slice.
Min Length
Determines the minimum length of a slice. Use this to avoid creating unwanted short slices.
Grid Catch
In Transient+Grid mode, you can use this control to specify how close to the grid a transient marker must be.
Fade In/Out
Sets the length of the fade in and the fade out for all slices of the loop.
MIDI Export Field
You can export the MIDI phrase by dragging the MIDI export field on a MIDI track in your host application.
Slicing a loop
PREREQUISITE
To slice a loop, it is best to start with an empty kit.
NOTE
The maximum number of slices is 128. Therefore, it is recommended to start on a pad that is assigned to a lower note, so that enough empty pads are available.
PROCEDURE
- Drop the audio loop on the instrument pad that you want to start with.
- Open the Slice tab and click Create Slices.
If the number of slices exceeds the number of available pads, some slices cannot be mapped to instrument pads. These slices are shown in red in the waveform display. In this case, the loop plays only with the length of the mapped slices.
- Adjust the parameters on the Slice tab to create the best set of slices.
Any changes that lead to more or less slices will create slices on or remove slices from pads.
Automatically Classifying Drum Sounds
The Slice page offers a sophisticated Classify Slices feature to analyze sliced drum loops. This function analyzes the slices and assigns them automatically to one of five basic classes: kick, snare, hhat, tom, and percussion.
Each slice is assigned to the class it comes the closest to. For example, a kick drum with some hijat on top will still be assigned to the "kick" class. The name of the class and its predefined color is displayed in the classifier section in the lower part of the waveform display. You can also define your own default class colors. Class colors and class names are transferred to the instrument pads as soon as you classify the slices. This helps you to get a better overview when working with sliced loops.
NOTE
Some slices are hard to analyze. For example, a kick drum with a crash cymbal on top could be recognized as a snare drum, or a very deep tom could be recognized as kick drum. You can assign these slices manually to classes.
PROCEDURE
- Open a kit and load a drum loop onto an instrument pad.
-
On the Slice page, click Create Slices.
-
Optional: Adjust the Threshold and Min Length parameters.
- Activate Classify Slices.
RESULT
The slices are analyzed and automatically assigned to one of the five classes. The color and the names of the instrument pads change accordingly.
NOTE
Very short slices cannot be recognized correctly and are not assigned to classes. In this case, the color and the name of the slices do not change. You can assign these slices manually to classes.
NOTE
Claps and sidestick are recognized as snare class. Cymbals, shaker, and tambourine are part of the hijat class.
Manually Classifying Slices
If the automatic classifying did not work because the slices are too short or if slices were classified wrongly, you can manually set the class for a slice.
- To manually set the class for a slice, click the classifier section of the slice that you want to modify, and select the correct class from the menu.
- To discard you modifications, right-click the classifier section and select Reset Classes.
Selecting all Slice Pads of the Same Class
You can select all pads that contain slices of the same drum class. This is useful if you want to apply the same editing on all slices of a drum class.
PREREQUISITE
Use the Classify function for a sliced loop.
This function is available on the pad context menu and on the context menu for the slice classes in the classifier section.
- Right-click a pad in the pad on the context menu.
section and select Select Pads of Same Class
on the context menu.
- On the Slice tab,
A right-click the classifier section of a slice that has the right to select Select Pads of Same Class on the context menu.
RESULT
All pads of the current sliced loop that contain slices of the same class are selected.
Pads containing slices from other loops are not taken into account.
Replacing Slices With Slices of the Same Drum Class
In the Pattern editor, you can set all notes that belong to slices of the same drum class to a specific key out of that drum class. This way, all notes of a drum class play with the same slice. If some of the kick slices play in combination with a hijat and other kick slices play alone, you can set all notes of the kick class to a slice that plays alone. This allows for a more consistent sound.
PROCEDURE
- Load a sliced drum loop.
- Classify the slices.
- Open the Pattern n editor, right-click the slice that you want to use for playing all note events of that drum class, and select Set Notes of Same Class to [key].
RESULT
The notes of the other slices of the same class are set to the key of the slice that you selected.
Drum Class Colors
- To modify a class color, right-click the classifier section of a slice and select a new color from the Set Class Color submenu. All slices that belong to the same class change to this color.
- To return to the default class colors, right-click the classifier section of a slice and select Apply Default Class Colors.
- To save your class colors as default, rig ht-click the classifier section of a slice and select Save Class Colors as Default. From now on, the classes use your class color settings.
- To reset the colors to the factory settings, righ t-click the classifier section of a slice and select Reset Class Colors to Factory.
Adding and Removing Slices
- To add a slice marker, [Alt]/[Option]-click in the editor.
- To remove a slice marker, [Alt]/[Option]-click it.
NOTE
The number of slices that can be created is limited to the number of available empty instrument pads.
Pattern Editing
On the Edit page for pattern pads, you can make settings for the MIDI patterns.
- To open the Edit page, click the Edit button in the upper right section of the plug-in panel.
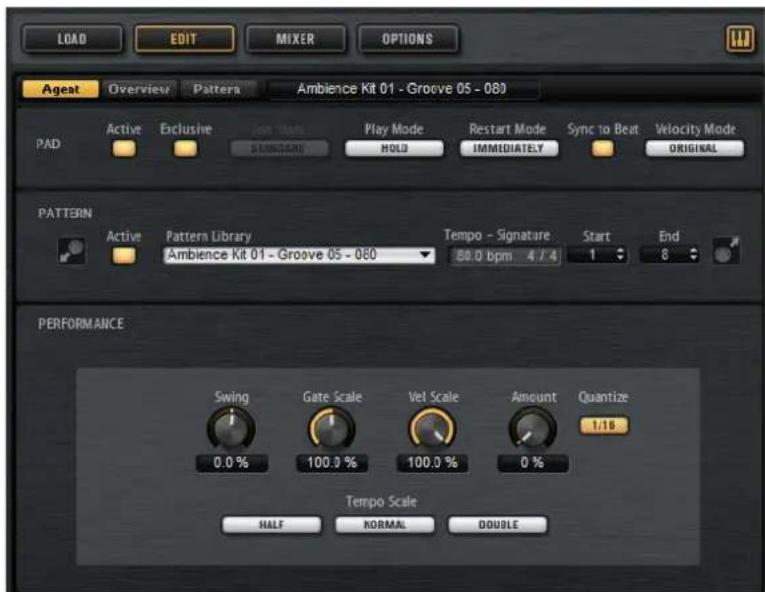
The Edit page contains the Agent, Overview, and Pattern tabs.
The pattern editing functions for the Beat Agent are all described in the chapter "Working with Pads".
RELATED LINKS Working With Pads on page 35
Mixing
Each agent comes with a dedicated Agent mixer that contains agent-specific options and settings.
The AUX mixer, Kit mixer, and Master mixer are available for all agents, and are described in a separate chapter.
RELATED LINKS Mixing and Effect Handling on page 126
Agent Mixer
The Beat Agent Agent Mixer offers 16 busses. You can assign the output of the individual samples to one of these busses. By default, the output of the Agent mixer busses is routed to the Kit mixer, but you can also assign the busses to one of the plug-in outputs and to the AUX FX 1 to 4.
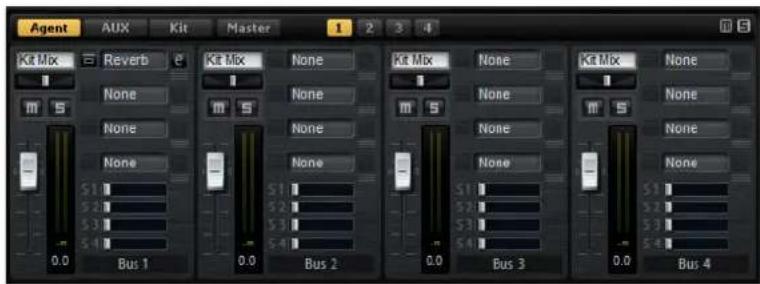
In the top right corner of the Agent mixer, you can find the global Mute and Solo buttons.
T o r e sof theeAgent mixer clickthe global Wuttebuttons
T o r e s the Agent mixerclick the glbbal Sddcboutibons of
You can access the busses via the numbered buttons at the top.
- Click the buttons 1, 2, 3, or 4 to display the busses 1 to 4, 5 to 8, 9 to 12, and 13 to 16, respectively.
- To assign a sample to an Agent mixer bus, open the Edit page for the Instrument page. Then open the Main tab, select the pad that you want to edit, and select the bus from the Output pop-up menu.
Parameters
Level
The level fader allows you to adjust the volume of the bus.
Pan
Sets the position of the bus in the stereo panorama.
Mute
Activate this to mute the bus.
Meter
The meters of the mixer channel show the output level of the bus.
Peak Level Meter
The meter indicates the highest level on the bus in dB. To reset the peak meter, click on the value field.
Insert Effect Slots
You can use the 4 slots on the right of the channel strip to add insert effects to the bus.
Sends 1-4
Use these sliders to send the channel signal to the corresponding AUX busses.
Bus Name
At the bottom of a channel strip, the name of the bus is displayed.
- To rename a bus, double-click its name and enter a new name.
Importing and Exporting Files
Importing MPC and GAK Files
You can import AKAI MPC 500 and MPC 1000 files and GAK files created in Groove Agent ONE into Groove Agent.
You can import the files in the following ways:
- Drag a file from the Windows Explorer/Mac OS Finder onto the slot in the kit slot section or on the kit name in the kit rack.
- On the context menu for the kit, select Impo rt, select the file in the dialog, and click OK.
NOTE
When importing GAK files, you will be asked to specify the folder in which to save the included files.
Importing REX Files and Sliced Loops
You can import REX files and sliced audio parts from Cubase/Nuendo into Groove Agent.
- To import a REX file or a sliced audio part into Groove Agent, drop it onto an empty pad.
The slices are automatically distributed across the pads, and a MIDI phrase is created and assigned to the first empty pattern pad.
Once the file is imported, you can trigger the slices with the instrument pads, or play back the entire loop by triggering the pattern pad.
Imported REX files and sliced audio parts are treated like audio loops that were sliced in Groove Agent.
Pads that are part of the sliced loop display a loop icon. The pad that contains the first slice displays a larger loop icon.
NOTE
If the number of available pads is not high enough to map all slices to pads, the slices that could not be added are shown in red on the slice edit page. You can move pads using drag and drop to free the necessary pads. As soon as enough pads are available, the slices that could not be mapped are automatically added.
NOTE
If you import a REX file, the Slice Mode in the slice editor is automatically set to Manual, to preserve the slice markers specified in the REX file. Note, however, that in some cases, the slices saved in a REX file may not represent a useful audio loop.
Exporting Kits with Samples
Groove Agent kits can be exported together with the associated samples.
PROCEDURE
- Right-click the kit in the kit bar and select Export Kit with Samples from the context menu.
- In the dialog, specify a name and a location for the file.
RESULT
The kit file is created together with a folder containing the samples.
NOTE
Samples that are part of the protected factory content cannot be exported.
Finding Missing Samples
There might be situations where loaded programs cannot find the samples they use. This can happen if the referenced samples are located on a different drive and the drive name has changed, or because the program was created on a different computer system.
When this happens, the Find Missing Sample dialog opens, showing a list of all samples that are missing, with additional information about the format, size, and creation date. The list groups all samples that are located in the same subfolder.
Entering a Search Path
In the Find Missing Sample dialog, below the list of missing samples, you can enter the search path to find the missing samples.
NOTE
All subdirectories are searched before the results are displayed, therefore the search takes longer if you specify entire drives.
Starting the Search
Once you have specified the search path, click the Start Search button to start the search process.
If the search only finds a single result for each missing sample, the sample path is automatically corrected in the program and the sample disappears from the Missing Files list. If all samples are found, the dialog is closed.
Multiple Results
If sample files with the same name are found in more than one location, an additional Found File list appears below the Missing File list. This shows the available samples and their file locations.
- To select a sample or a complete folder that is to be used to resolve the missing samples, double-click it in the Found Files list.
Each sample or folder that is resolved this way disappears from the Missing File list.
Once all samples are resolved the dialog closes.
Favorite Paths
If a path might be helpful for future searches, you can add it to the search path list. The next time the dialog opens, it allows you to select one or multiple predefined paths to specify which places to include in the search.
- To add a path, click the + sign.
Search Options
By default, Groove Agent searches for samples that do not only have the same file name, but also correspond in terms of time, size, and format information. A sample is considered "found" only if all of the information is identical. However, you can exclude this information by activating the Ignore File Time and Size and Ignore Audio Format options.
Acoustic Agent
Acoustic Agent is a next-generation virtual acoustic drummer offering not only first-class drum sounds but also an integrated player that creates the perfect accompaniment for your songs.
3 outstanding drum kits are included, ready to be played by the style player, who can conjure over 50 different grooves in a wealth of genres including Blues, Punk, Hip Hop and Indie Rock – perfect for any contemporary music style. And you retain full control, both over intensity and complexity of the style player's drumming and over the sound, thanks to the included Agent mixer.
Sound Editing
On the Edit page for instrument pads, you set up the sound of the kits.
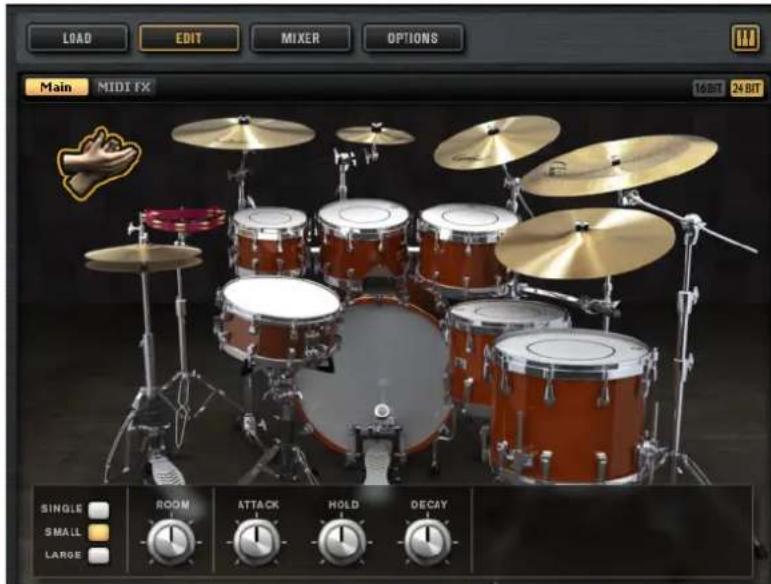
-
To open the Edit page, click the Edit button in the upper right section of the plug-in panel.
-
To show the parameters for a particular drum instrument, click on it. Depending on the setting of the Mute Instrument Trigger on Editor button in the upper right corner of the Edit page, this also previews the instrument.
If a drum instrument is triggered, this is shown by the instrument turning dark.
About the 24 Bit and 16 Bit Sample Versions
All Acoustic Agent and Percussion Agent kits come with dedicated samples in 16 and 24bit. The 24bit versions have the better audio quality at the cost of longer loading times and higher RAM usage. The 16bit versions load faster and utilize less RAM at the cost of a lower audio quality.
You can set up which samples are loaded by default with the Load Preference setting on the Options page.
However, you can also switch between the 16 and 24 bit versions without changing the Load Preference setting and reloading the preset. This can be done on the Edit page.
- In the upper right corner of the button.
e Instrument page, click the 16 Bit or the 24 Bit
NOTE
Not all agents come with 16 and 24 bit versions of the samples. The 16 Bit and 24 Bit buttons are only available if the agent supports this function.
Instrument Preview
On the Edit page, you can specify whether you want to preview and select an instrument when clicking on it, or whether you only want to select it and show its sound parameters.
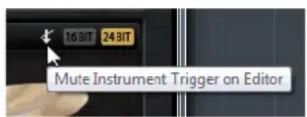
- To preview an instrument when clicking on it, deactivate the Mute Instrument Trigger on Editor button in the upper right corner of the Edit page. Instruments that have multiple articulations play the standard articulation. For example, a snare can be played open, with a rimshot, or with sidestick. For preview, the open articulation is used. To trigger the other articulations, use the instrument pads.
- To select an instrument and show its settings when clicking on it, activate Mute Instrument Trigger on Editor.
Sound Parameters
If you select an instrument in the picture on the right, its sound parameters are available at the bottom of the panel.
Each instrument has its own set of parameters.
Kick Drums
Room Level
Adjusts the level of the room microphone.
Overhead Level
Adjusts the level of the overhead microphone.
Bleed
Adjusts how much the kick drum bleeds into the snare bottom microphone.
Tune
Adjusts the pitch.
Attack
Adjusts the attack time of the amplifier envelope.
Hold
Adjusts the hold time of the amplifier envelope. Turn the control all the way to the right to play the entire sample.
Decay
Adjusts the decay time of the amplifier envelope.
Kick A/B
Each kit of the Acoustic Agent allows you to choose between two alternative kick drums. Click the buttons to switch between kick A and kick B.
Snare Drums
Room Level
Adjusts the level of the room microphone.
Overhead Level
Adjusts the level of the overhead microphone.
Master Bleed
Adjusts how much the kick and the toms bleed into the snare bottom microphone. This control serves as master control by attenuating the snare bottom samples of the kick and toms.
Tune
Adjusts the pitch.
Attack
Adjusts the attack time of the amplifier envelope.
Hold
Adjusts the hold time of the amplifier envelope. Turn the control all the way to the right to play the entire sample.
Decay
Adjusts the decay time of the amplifier envelope.
Snare A/B
Each kit of the Acoustic Agent allows you to choose between two alternative snare drums. Click the buttons to switch between snare A and B.
Toms
Room Level
Adjusts the level of the room microphone.
Overhead Level
Adjusts the level of the overhead microphone.
Bleed
Adjusts how much the tom bleeds into the snare bottom microphone.
Tune
Adjusts the pitch.
Attack
Adjusts the attack time of the amplifier envelope.
Hold
Adjusts the hold time of the amplifier envelope. Turn the control all the way to the right to play the entire sample.
Decay
Adjusts the decay time of the amplifier envelope.
Cowbell
Room Level
Adjusts the level of the room microphone.
Overhead Level
Adjusts the level of the overhead microphone.
Tune
Adjusts the pitch.
Attack
Adjusts the attack time of the amplifier envelope.
Hold
Adjusts the hold time of the amplifier envelope. Turn the control all the way to the right to play the entire sample.
Decay
Adjusts the decay time of the amplifier envelope.
Tambourine
Room Level
Adjusts the level of the room microphone.
Overhead Level
Adjusts the level of the overhead microphone.
Attack
Adjusts the attack time of the amplifier envelope.
Hold
Adjusts the hold time of the amplifier envelope. Turn the control all the way to the right to play the entire sample.
Decay
Adjusts the decay time of the amplifier envelope.
Claps
Room Level
Adjusts the level of the room microphone.
Attack
Adjusts the attack time of the amplifier envelope.
Hold
Adjusts the hold time of the amplifier envelope. Turn the control all the way to the right to play the entire sample.
Decay
Adjusts the decay time of the amplifier envelope.
Single, Small Group, Large Group
Determines whether the D#1 key triggers a single clap, or claps from a small or a large group.
Cymbals
Room Level
Adjusts the level of the room microphone.
Overhead Level
Adjusts the level of the overhead microphone.
Choke On/Off
A choke effect for cymbals is created by hitting a cymbal, and then grabbing it with the hand, dampening the sound. If Choke is activated, you can choke a cymbal using poly pressure, aftertouch, or note-off events.
Choke Controller
Specifies which MIDI event triggers the choke for the cymbal.
- Note-off: To play the cymbal, hit the key and hold it. To choke the cymbal, release the key.
- Aftertouch: To play the cymbal, trigger the corresponding note. To choke the cymbal, send an aftertouch event that is greater than 64.
- Poly Pressure: To play the cymbal, trigger the corresponding note. To choke the cymbal, send a poly pressure event that is greater than 64.
Ride Cymbal
You can play the ride cymbal with the shoulder of the stick on the bell of the cymbal, with the tip of the stick on the bow of the cymbal, or you can hit the cymbal on the edge for a crash sound.
Room Level
Adjusts the level of the room microphone.
Overhead Level
Adjusts the level of the overhead microphone.
Bow
Adjusts the level of the Bow articulation that is triggered with D#2.
Bell
Adjusts the level of the Bell articulation that is triggered with F2.
Edge
Adjusts the level of the Edge articulation that is triggered with B2.
Hihat

Room Level
Adjusts the level of the room microphone.
Overhead Level
Adjusts the level of the overhead microphone.
Shank, Tip, Foot
You can play the hihat with the shoulder of the stick on the edge or with the tip of the stick on the bow of the hihat. When you close the hihat, it produces a foot chick. You can adjust the level for each of these articulations.
- Shank adjusts the level of the shank hijat articulation that is triggered with F#0 and A#0.
Tip adjusts the level of the tip hiat articulation that is triggered with F#1 and A#1. - Foot adjusts the level of the foot and pedal hiat articulation that are triggered with G#0/G#1 (Foot) and A0/A-1 (Pedal).
Hihat Min/Max
These controls adjust the minimum and the maximum opening state of the hihat, that is, they specify how much the hihat can be opened or closed with the corresponding hihat controller.
Hihat Controller
The open state of the closed hijat on A#1 and the shank hijat on A#0 can be controlled with MIDI controller #1 (modulation wheel) or with MIDI controller #4 (foot controller). Use these buttons to filter out any incoming MIDI data for controllers #1 or #4.
For example, activate MW to avoid that any incoming MIDI controller #1 is received from your MIDI keyboard.
Pattern Editing
On the Edit page for pattern pads, you can make settings for the MIDI patterns.
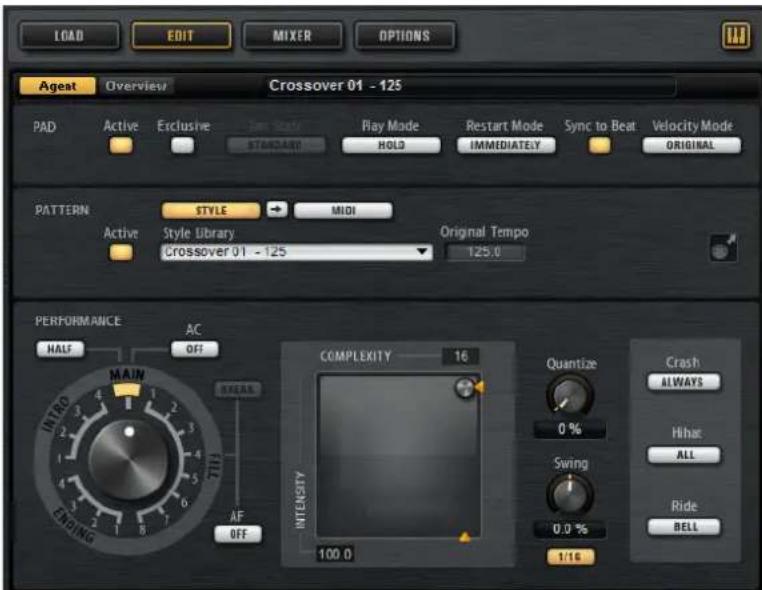
Agent Tab
The Agent tab contains the Pad, Pattern, and Performance sections.
The common pad and pattern functions are described in the chapter "Working with Pads". Those functions that are agent-specific are described in the following sections.
RELATED LINKS Working With Pads on page 35
Pattern Section

Use Style
Activates the style player.
MIDI Export Field
If the MIDI pattern player is active, the following applies:
If the style player is active, the following applies:
- To export a pattern, set the dial in the Per formance section to the MIDI pattern that you want to export, adjust the playback parameters, and click the MIDI export field and drag it onto a MIDI track in your host application. You can also drag the field to other locations and applications that support MIDI files.
If you export a main pattern, it will be 4 bars long. The lengths for intro, ending, and fill vary.
Your settings for Halftime, Complexity, Intensity, Quantize, Crash Mode, Hihat Mode, and Ride Mode are taken into account. Not taken into account are the parameters that vary the playback automatically, like Auto Complexity and Auto Fill.
Using the Style Player
If the Use Style button is activated and a style is selected on the pop-up menu, the style player is active and you can assign intros, fills, and endings to pattern pads by using the large dial in the Performance section.
- To do so, activate the pattern pad and set the dial to the intro, fill, or ending that you want to use.
The pattern pad plays the selected part each time you trigger it.
You can choose between 4 intros, 8 fills, and 4 endings.
NOTE
- Intros and endings are not affected by the parameters Halftime, Complexity, Auto Complexity, Auto Fill, and Crash Mode.
Fills are not affected by the parameters Halftime, Complexity, Auto Complexity, and Auto Fill.
Removing a Style
To remove the selected style, right-click the Style Library pop-up menu and select Clear.
Converting Intros, Main Patterns, Fills, or Endings into MIDI Patterns
You can convert the selected part of a style to a MIDI pattern. This allows you to edit this part in the Pattern editor, for example.
The conversion takes into account the playback parameters of a style, for example, Intensity, Quantize, Swing, and Crash Filter and converts them into MIDI events in the MIDI pattern. The resulting MIDI pattern for the main pattern of a style also reflects the set Complexity.
NOTE
Auto Complexity and Auto Fill are not taken into account.
You can convert styles on the Agent tab or on the Overview tab.
- On the Agent tab, select a style, and select the main pattern, intro, fill, or ending that you want to convert. Set up the playback parameters, and click the Convert Style to MIDI Pattern button between the Use Style and Use MIDI File buttons.
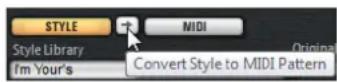
- On the Overview tab, right-click the cell that contains the style and select Convert Style to MIDI Pattern on the context menu.
NOTE
Once you have converted a part of a style into a MIDI pattern, it cannot be used in the style player any longer.
Performance Section (Style Player)
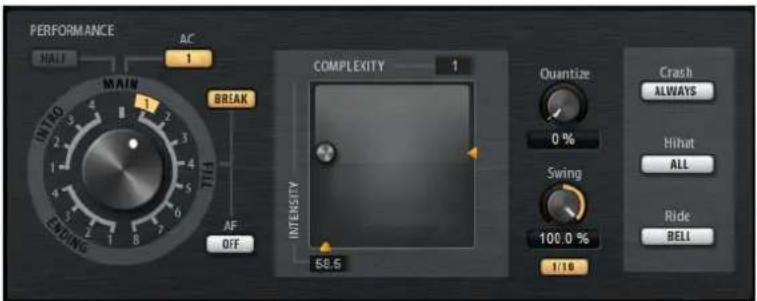
Pattern Dial
Allows you to specify whether you want the style player to play a main pattern, a fill, an ending, or an intro. Depending on which part of the style you select, you can choose between different variations, for example, 8 different fills are available.
Complexity
You can modify the complexity of drum patterns. Increasing the complexity can add more notes, change from hìhat to ride or from snare to toms, for example. This allows you to introduce a feel of free-style playing to a pattern. You can set the complexity in the following ways:
- Move the Complexity handle below the display to the right or left. Drag to the right to increase the complexity, and to the left to decrease the complexity.
- Click in the display and move the combined Complexity/Intensity control to the left or right.
You can modify complexity and intensity at the same time by moving the control both on the x and the y axis.
- Double-click in the Complexity value field above the display and enter a new value.
NOTE
The Complexity parameter is only available for main and halftime patterns, not for intros, fills, and endings.
Intensity
The intensity is controlled via the y-axis of the x/y control of the Style Player. All patterns support the Intensity parameter. The patterns play with their original velocity at the top position of the y-axis. Decreasing the intensity means decreasing the velocity. You can set the intensity in the following ways:
- Move the Intensity handle to the right of the display up or down.
- Click in the display and move the combined Complexity/Intensity control up or down.
You can modify complexity and intensity at the same time by moving the control both on the x and the y axis.
- Double-click in the Intensity value field below the display and enter a new value.
Half Time On/Off
Activates halftime rhythmic feel for the playback of the main pattern. This is reached by extending the normal rhythm over two bars rather than by halving the tempo. If a style does not contain halftime patterns, this parameter is not available.
NOTE
This parameter affects only the main patterns. Intros, endings, and fills do not support halftime playing.
Auto Complexity
This parameter varies the set Complexity randomly, creating a less static playback of the styles.
To set up the Auto Complexity parameter, click the Auto Complexity button and select an option from the menu:
- 1/1 bar - The complexity varies randomly after a full bar.
1/2 bar - The complexity varies randomly after half of a bar.
1 - The complexity is increased on the first beat of a bar. All other beats of the bar have the same or a lower complexity. - 1 + 3 - The complexity is increased on the first and the third beat of a bar. The other beats have the same or a lower complexity.
- 2 + 4 - The complexity is increased on beat 2 and 4 of the bar. All other beats of the bar have the same or a lower complexity.
- 1 + 4 - The complexity is increased on beat 1 and 4 of the bar. All other beats of the bar have the same or a lower complexity.
To deactivate Auto Complexity, select Off.
If Auto Complexity is activated, the dot in the background of the complexity/intensity display indicates which complexity is currently played.
Break
The fills from the style player do not have to cover an entire bar. For example, a fill might cover only the last two beats of a bar.
- If you want the previous pattern to play up to the start of the fill, deactivate the Break button. This way, no gaps occur.
If no pattern is playing when you trigger a fill, the main pattern of the style that is used by the pad is played until the fill starts. The Complexity setting of the pad is taken into account.
If you want a pause before the fill starts, activate the Break button.
Auto Fill
With the Auto Fill function, the main pattern can play back a fill after a specified interval of bars. This is useful for jamming with Groove Agent. For example, with a setting of 4, you get a fill every 4 bars. Each time, the fill is randomly chosen from the eight available fills.
If Auto Fill is activated, the number of the fill that is playing lights up in yellow.
NOTE
This setting affects only the main pattern. Intros, endings, and fills are not affected. They play back as usual, that is, they do not change into a fill after the set interval.
Quantize Amount
Adjusts the timing of the pattern, from live-played to hard-quantized timing.
- At a setting of 0% , the pattern plays with the original timing.
- At a setting of 100% , the timing is hard-quantized.
NOTE
Flams and rolls are not affected by this parameter.
Swing
Allows you to shift the timing of notes on even numbered beats to give the pattern a swing feeling. Negative values shift the timing backward, and the notes are played earlier. Positive values shift the timing forward, and the notes are played later.
Crash Mode
Determines whether main pattern, intro, fill, and ending play with crash cymbals.
- I lays is selecAed, the style player plays the crash cymbals of the main pattern and a crash cymbal on the first beat after the fill.
- If Fill is selected, the style player plays all crash cymbals of the fill and one crash cymbal on the first beat after the fill. The crash cymbals of the main pattern are not played.
- If Main is selected, the style player plays only the crash cymbals of the main pattern.
If Off is selected, the style player leaves out all crash cymbals.
Hihat Mode
Specifies whether a pattern plays the hihat with all articulations, or only with the tip or the shank articulation.
NOTE
- This setting is taken into account when you export a pattern by dragging the MIDI export field to a MIDI track in your host application.
- External MIDI input is not affected by this setting, that is, you can play all articulations.
Ride Mode
Specifies whether a pattern plays the ride cymbal with or without bell articulation.
NOTE
- This setting is taken into account when you export a pattern by dragging the MIDI export field to a MIDI track in your host application.
- External MIDI input is not affected by this setting, that is, you can play all articulations.
Mixing
Each agent comes with a dedicated Agent mixer that contains agent-specific options and settings.
The AUX mixer, Kit mixer, and Master mixer are available for all agents, and are described in a separate chapter.
RELATED LINKS
Mixing and Effect Handling on page 126
Agent Mixer
The Agent mixer is where you perform your mixing for kits that come with the Acoustic Agent.
The drum kits for the Acoustic Agent were recorded with multiple microphones. The Agent mixer contains a channel strip for each microphone, as well as dedicated group channels for kick, snare, hhat, toms, cymbals, and percussion.
Agent Mixer Overview
The left section of the mixer gives you access to all recorded microphones for the different drums, as well as to group channels that are applied to the sum of all microphone channels of a particular drum instrument.
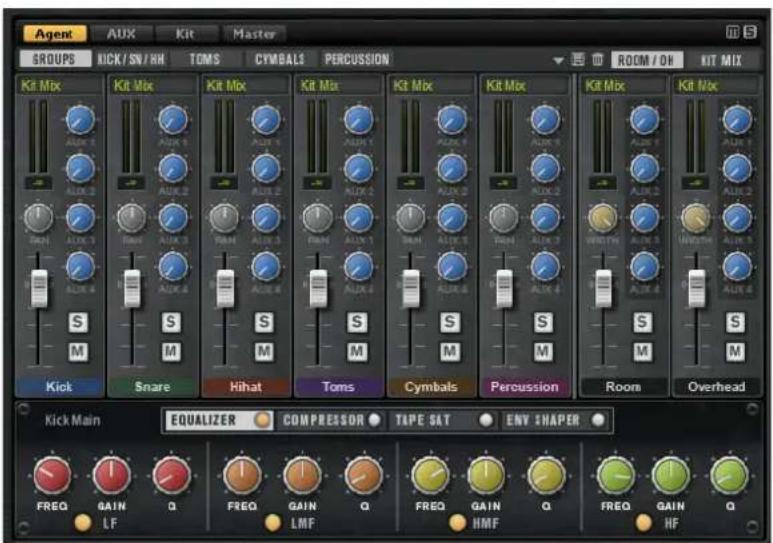
In the top right corner of the Agent mixer, you can find the global Mute and Solo buttons.
T o r e sof theeAgent mixer, clickthe global Mutterbuttons
T o r e s the Agent mixeraclick the glbbal Sddobottnans of
Groups
If the Groups tab is active, the Agent mixer shows one channel strip each for all kick drums, snare drums, hihits, toms, percussion instruments, and cymbals.
- To make settings for all instruments of a group simultaneously, select the Group tab.
Close Microphone Channels
If the Kick/Sn/HH (kick, snare, hijat), Toms, Cymbals, or Percussion tabs are active, the mixer displays separate channel strips for the close microphone channels for the selected instrument.
Kick and snare drum were recorded with two microphones: kick main and additional, and snare top and bottom. The other instruments were recorded with only one close microphone.
Room and Overhead Microphones
The Room/OH tab contains channels for the room and the overhead microphones.
Kit Mix Channel
The Kit Mix tab contains the channel strip for the Kit Mix output.
For the Kit Mix output channel, you can add a Tube Saturator effect.
To activate the Tube e Saturator effect, click its On/Off button.
- To change the effect sound, adjust the Dri ve parameter.
Channel Parameters
The channels have the following parameters:
Level
Adjusts the volume of the channel.
Pan
Defines the position of the sound in the stereo panorama.
Mute
Mutes the channel.
Solo
Soloes the channel and mutes all other channels. Several channels can be soloed at the same time.
Peak Level
Indicates the highest level on the bus.
- To reset the peak level, click the text field.
Output
Each channel can be routed to the main output of Groove Agent or to one of the individual outputs.
- Click the Output field to open the pop-up menu with the available outputs.
AUX Sends 1-4
Use these controls to send the signal to the corresponding AUX busses of the agent.
Width (Room and Overhead Channel Strips Only)
Adjusts the stereo width of the signal from mono to stereo.
Agent Mixer Equalizer and Effects
In the lower section of the Agent mixer, you can make equalizer and effect settings for the channels and groups.
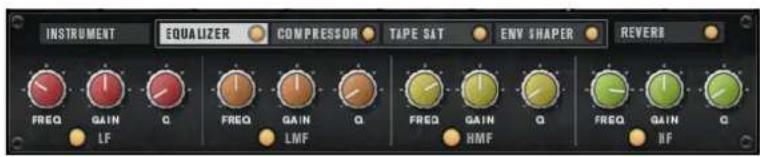
To make settings for an entire group, open the Groups tab and click the label of the channel strip for the group.
- To make settings for a single microphone channel, select the tab for the instrument that you want to edit, and click the label of the channel strip for that channel.
If a channel strip is selected, the section below the mixer channels shows the insert effects for this channel. The order of the effects can be modified by dragging the tabs. To show the parameters of an insert effect, select the corresponding tab.
To activate an insert effect, click the corresponding On/Off button.
Each channel offers an equalizer, a vintage compressor, a tape saturator, and an envelope shaper for the insert effects. These effects correspond to the included effect plug-ins of the same name.
RELATED LINKS
Studio EQ on page 136
VintageCompressor on page 156
Tape Saturator on page 144
Envelope Shaper on page 163
Mixer Presets
You can create mixer presets for the Acoustic Agent. These presets contain all Agent mixer, AUX mixer, and Kit mixer settings for the loaded kit.
Mixer presets can only be applied to the kit they were saved for, because the number of used instruments and mixer channels varies between the kits. Each kit comes with its own set of presets.
The controls for loading, saving, and deleting mixer presets can be found to the left of the ROOM/OH tab.
Percussion Agent
Percussion Agent specializes in instruments, grooves, and styles that feature percussive elements.
Not only does this agent play perfect accompaniments to many of Acoustic Agent's grooves, but it offers an ideal way to create your own percussion tracks from scratch in just a few clicks using the integrated style player. Over 20 percussion instruments, such as bongs, congas, shakers, tambourines, and many more, have been recorded in minute detail using multiple microphones. Percussion Agent also offers a dedicated Agent mixer for full control of your sound.
Sound Editing
On the Edit page for instrument pads, you set up the sound of the kits.
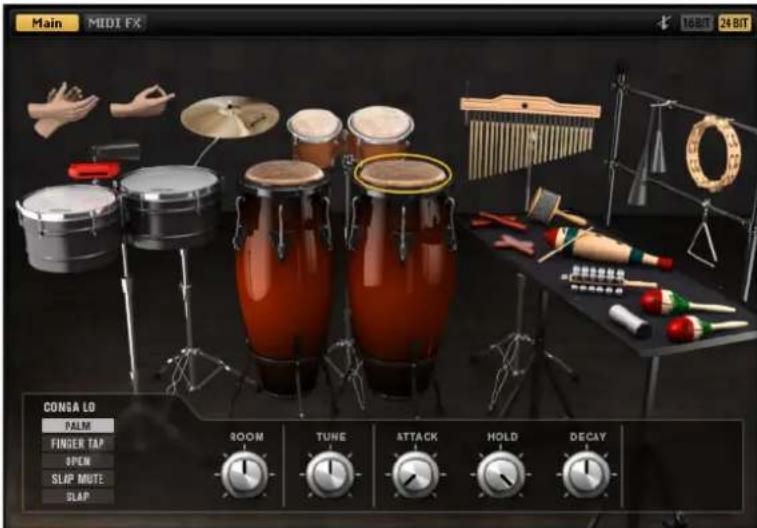
- To open the Edit page, click plug-in panel.
the Edit button in the upper right section of the
-
To show the parameters for a particular percussion instrument, click on it.
-
If a percussion instrument is triggered, the dark.
is is shown by the instrument turning
About the 24 Bit and 16 Bit Sample Versions
All Acoustic Agent and Percussion Agent kits come with dedicated samples in 16 and 24bit. The 24bit versions have the better audio quality at the cost of longer loading times and higher RAM usage. The 16bit versions load faster and utilize less RAM at the cost of a lower audio quality.
You can set up which samples are loaded by default with the Load Preference setting on the Options page.
However, you can also switch between the 16 and 24 bit versions without changing the Load Preference setting and reloading the preset. This can be done on the Edit page.
- In the upper right corner of the button.
e Instrument page, click the 16 Bit or the 24 Bit
NOTE
Not all agents come with 16 and 24 bit versions of the samples. The 16 Bit and 24 Bit buttons are only available if the agent supports this function.
Instrument Preview
On the Edit page, you can specify whether you want to preview and select an instrument when clicking on it, or whether you only want to select it and show its sound parameters.
- To preview an instrument when clicking on it, deactivate the Mute Instrument Trigger on Editor button in the upper right corner of the Edit page.
Instruments that have multiple articulations play the standard articulation. For example, a conga can be played with the palm, open, or slapped. For preview, the open articulation is used. To trigger the other articulations, use the instrument pads.
- To select an instrument and show its settings when clicking on it, activate Mute Instrument Trigger on Editor.
Sound Parameters
If you select an instrument in the picture on the right, its sound parameters are available at the bottom of the panel.
Each instrument has its own set of parameters. These parameters can be set up separately for the available articulations of the instruments.
The following sound parameters are common for all percussion instruments and their articulations, except for the crash cymbal:
Room Level
Adjusts the level of the room microphone.
Tune
Adjusts the pitch.
Attack
Adjusts the attack time of the amplifier envelope.
Hold
Adjusts the hold time of the amplifier envelope. Turn the control all the way to the right to play the entire sample.
Decay
Adjusts the decay time of the amplifier envelope.
Crash Cymbal
For the crash cymbal, the following parameters are available.
Room Level
Adjusts the level of the room microphone.
Choke On/Off
A choke effect for cymbals is created by hitting a cymbal, and then grabbing it with the hand, dampening the sound. If Choke is activated, you can choke a cymbal using poly pressure, aftertouch, or note-off events.
Choke Controller
Specifies which MIDI event triggers the choke for the cymbal.
- Note-off: To play the cymbal, hit the key and hold it. To choke the cymbal, release the key.
- Aftertouch: To play the cymbal, trigger the corresponding note. To choke the cymbal, send an aftertouch event that is greater than 64.
- Poly Pressure: To play the cymbal, trigger the corresponding note. To choke the cymbal, send a poly pressure event that is greater than 64.
Pattern Editing
On the Edit page for pattern pads, you can make settings for the MIDI patterns.
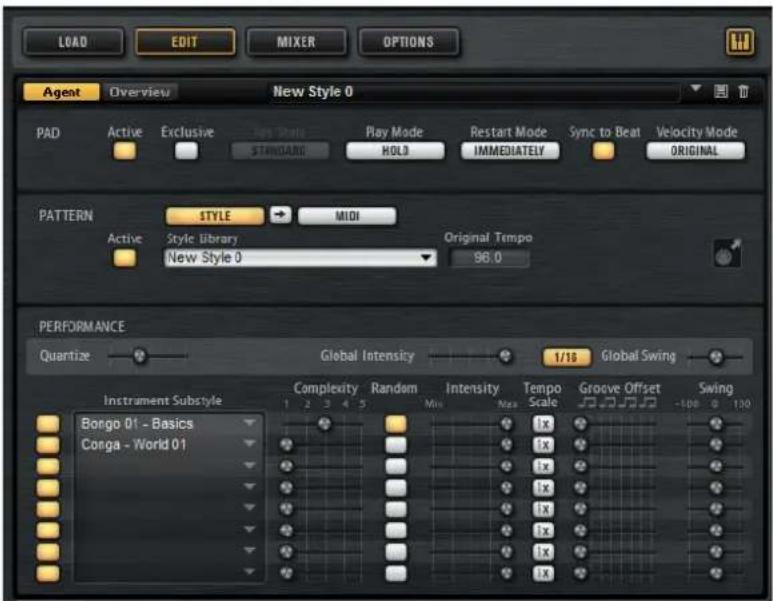
Agent Tab
The Agent tab contains the Pad, Pattern, and Performance sections.
The common pad and pattern functions are described in the chapter "Working with Pads". Those functions that are agent-specific are described in the following sections.
RELATED LINKS
Working With Pads on page 35
Pattern Section

Use Style
Activates the style player.
MIDI Export Field
If the MIDI pattern player is active, the following applies:
If the style player is active, the following applies:
- To export a pattern, set the dial in the Performance section to the MIDI pattern that you want to export, adjust the playback parameters, and click the MIDI export field and drag it onto a MIDI track in your host application. You can also drag the field to other locations and applications that support MIDI files.
If you export a main pattern, it will be 4 bars long. The lengths for intro, ending, and fill vary.
Your settings for Halftime, Complexity, Intensity, Quantize, Crash Mode, Hihat Mode, and Ride Mode are taken into account. Not taken into account are the parameters that vary the playback automatically, like Auto Complexity and Auto Fill.
Style Player
The style player allows you to combine up to 8 individual instrument substyles. Each substyle plays a typical rhythm pattern with a specified percussion instrument.
The substyles are organized into folders according to their musical style. By combining several instrument substyles, you can create a complete percussion style.
Each substyle has its own set of performance parameters that allow you to further modify playback. For example, the Complexity parameter allows you to select one of five variations for a particular substyle. Once you made all your settings, you can save your compilation of instrument substyles together with the performance parameters as a percussion style.
In addition, substyles for accompanying particular styles from Acoustic Agent are available. These can be found in folders that are named after the corresponding Acoustic Agent style.
Compiling a Percussion Style
If the Use Style button is activated and a style is selected on the pop-up menu, the style player is active and you can compile a percussion style using up to 8 substyles.
- Select the substyles from the pop-up menus and adjust the performance parameters.
Style Player Context Menu
- Clear removes the selected style.
- Show in Explorer/Finder opens the preset folder for user styles in the Windows Explorer/Mac OS Finder.
This function is only available for user styles, not for the factory content.
Percussion Styles Presets
Groove Agent comes with a number of factory presets for percussion styles.
You can also create and manage your own percussion styles via the preset controls in the top right corner of the Agent tab.
Performance Section (Style Player)
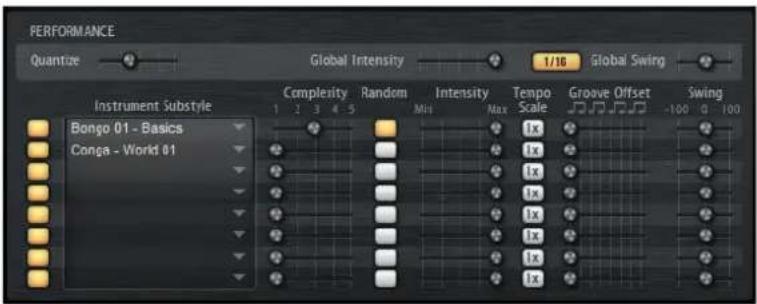
Style parameters
The following parameters affect the playback of the entire percussion style.
Quantize
Adjusts the timing of the pattern, from live-played to hard-quantized timing.
- At a setting of 0% , the pattern plays with the original timing.
- At a setting of 100% , the timing is hard-quantized.
NOTE
Rudiments in the MIDI patterns are not affected by this parameter.
Global Intensity
Decreases the intensity (velocity) for the style.
Global Swing
Allows you to shift the timing of notes on even-numbered beats to give the pattern a swing feeling. Negative values shift the timing backward, and the notes are played earlier. Positive values shift the timing forward, and the notes are played later.
Global Swing Grid
Determines the grid for applying Swing. For example, to shift the timing at every 16th note position in a pattern, set this to 1/16.
Substyle Parameters
The following parameters affect only the playback of the substyles:
Instrument On/Off
Activates/Deactivates playback for the corresponding instrument.
Instrument Substyle Context menu
-
Clear removes the selected substyle.
-
Clear All Inactive removes all substyles that are not active.
- Clear All removes all substyles.
Complexity
Allows you to select one of 5 variations.
The higher the complexity, the more intense the rhythm pattern.
This way, you can have more intensity in the bongo than in the cowbell, for example.
Random Complexity
Randomizes the playback. The substyle automatically switches to a random complexity at each full bar.
Intensity
Decreases the intensity (velocity) for each substyle separately.
Tempo Scale
Allows you to set the tempo of a substyle to half speed (1/2), normal speed (1x) and double speed (2x).
Groove Offset
Offsets playback of the substyle by up to 8 eighth notes. For example, with an offset of 2, the playback starts on the second quarter note.
Swing
Adjusts the swing factor for each substyle individually. The swing grid is defined globally with the Global Swing Grid parameter.
Mixing
Each agent comes with a dedicated Agent mixer that contains agent-specific options and settings.
The AUX mixer, Kit mixer, and Master mixer are available for all agents, and are described in a separate chapter.
RELATED LINKS
Mixing and Effect Handling on page 126
Agent Mixer
The Agent mixer is where you perform your mixing for kits that come with the Percussion Agent.
The Agent mixer contains a channel strip for each percussion instrument and its articulations.
Agent Mixer Overview
The left section of the mixer gives you access to all recorded instruments that are grouped on the tabs A, B, C, and D. The channel order in the mixer corresponds to the mapping of the instruments on the MIDI keyboard.
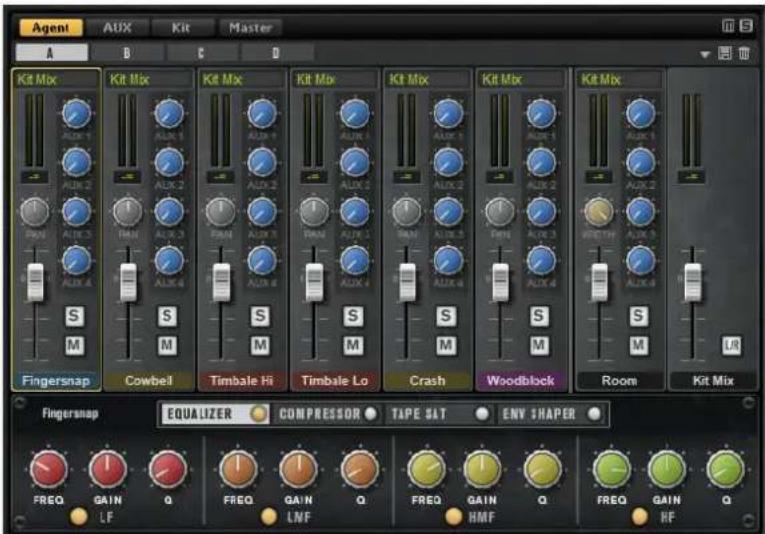
In the top right corner of the Agent mixer, you can find the global Mute and Solo buttons.
T o r e sof theeAgent mixer clickthe global Wuttebuttons
T o r e s the Agent mixerclick the glbbal Sddobottnans of
Room Microphone
The Room tab contains the channels for the room microphone.
Kit Mix Channel
The Kit Mix tab contains the channel strip for the Kit Mix output.
For the Kit Mix output channel, you can add a Tube Saturator effect.
To activate the Tub
e Saturator effect, click its On/Off button.
- To change the effect sound, adjust the Dri
ve parameter.
Channel Parameters
The channels have the following parameters:
Level
Adjusts the volume of the channel.
Pan
Defines the position of the sound in the stereo panorama.
Mute
Mutes the channel.
Solo
Soloes the channel and mutes all other channels. Several channels can be soloed at the same time.
Peak Level
Indicates the highest level on the bus.
- To reset the peak level, click the text field.
Output
Each channel can be routed to the main output of Groove Agent or to one of the individual outputs.
- Click the Output field to open the pop-up menu with the available outputs.
AUX Sends 1-4
Use these controls to send the signal to the corresponding AUX busses of the agent.
Width (Room Channel Strip Only)
Adjusts the stereo width of the signal from mono to stereo.
Agent Mixer Equalizer and Effects
In the lower section of the Agent mixer, you can make equalizer and effect settings for the channels.
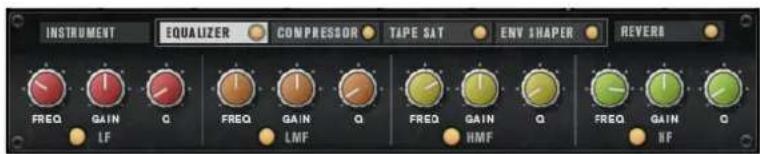
- To make settings for an instrument channel, select the tab for the instrument that you want to edit, and click the label of the channel strip for that channel.
If a channel strip is selected, the section below the mixer channels shows the insert effects for this channel. The order of the effects can be modified by dragging the tabs. To show the parameters of an insert effect, select the corresponding tab.
To activate an insert effect, click the corresponding On/Off button.
Each channel offers an equalizer, a vintage compressor, a tape saturator, and an envelope shaper for the insert effects. These effects are reduced versions of the included effect plug-ins.
Mixing and Effect Handling
You perform your mixing operations on the Mixer page.
For each agent, a specific Agent mixer is available. The Agent mixer functions are described in the separate chapters for the agents.
Mixer Page
The Mixer page contains tabs for the Agent mixer, the AUX mixer, the Kit mixer, and the Master mixer. The order of the tabs represents the signal flow.
AUX Mixer
The AUX mixer features 4 AUX busses that can be used to realize classic send effects.
Each bus hosts up to 4 insert effects, which allows you to set up complex effects. The busses can be routed to the Master output of the plug-in or to one of the individual outputs. Each agent has its own AUX mixer. This means that you can use different Reverb send effects for the different agents, for example. All settings of the AUX mixer are saved in kit presets.
Parameters
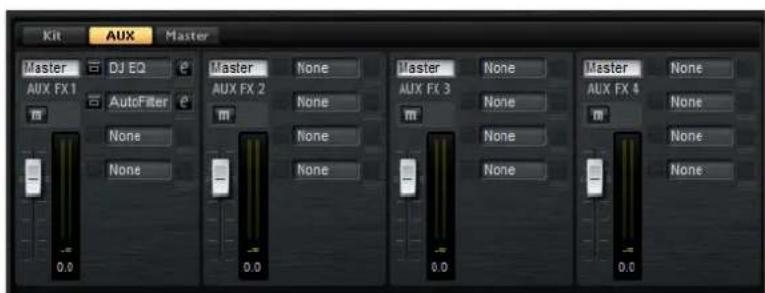
Output
On this pop-up menu, you can select one of the 16 available outputs for the AUX bus or you can route the signal to the Kit mixer.
Level
Allows you to set the level of the AUX bus.
Pan
Sets the position of the AUX bus in the stereo panorama.
Mute
Mutes the AUX bus.
Effect Slots
You can use the 4 slots on the right of each channel strip to add insert effects to the slot.
Kit Mixer
The Kit mixer contains the channel strip for the bus that is assigned to the kit slot.
Groove Agent allows you to load up to 4 kits into the kit slots. Each slot comes with a dedicated mixer channel that can be used to adjust levels between the different kits, for example. You can also solo and mute kits, to listen to individual kits, or combinations of them. Each mixer channel provides 4 insert effect slots to apply effects to the overall output signal of the kit.
Parameters
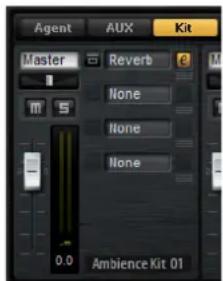
Output
On this pop-up menu, you can select one of the 16 available outputs.
Level
The level fader allows you to adjust the volume of the slot.
Pan
Sets the position of the slot in the stereo panorama.
Mute
Mutes the slot.
Solo
Solos the slot.
Meter
The meters of the mixer channel show the output level of the kit.
Peak Level Meter
The meter indicates the highest level on the bus in dB. To reset the peak meter, click on the value field.
Effect Slots
You can use the 4 slots on the right of the channel strip to add insert effects to the slot.
Master Mixer
The Master mixer shows the channel for the Master stereo output bus. It can host up to 4 insert effects that can be used to add a global EQ or compressor to the signal chain, for example.
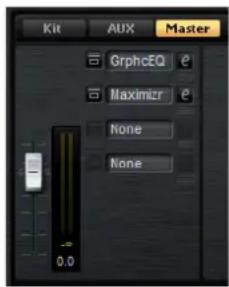
Level
Allows you to set the level of the Master bus.
Effect Slots
You can use the 4 slots on the right to add insert effects to the slot.
Effect Handling
Each agent in Groove Agent features an AUX mixer with 4 AUX busses that can be used to realize classic send effects. Each bus hosts up to 4 insert effects, which allows you to set up complex effects. The busses can be routed to the Master output of the plug-in or to one of the individual outputs.
The Kit Mixer provides access to the mixer channel of the kit which also features 4 inserts.
Furthermore, the Mixer provides access to the master output bus. This can be used to add a global EQ or compressor to the signal chain, for example.
Default Effect Settings
Each effect comes with factory default settings. However, you can save your own default settings for each effect as a preset.
- Set up the effect.
C | i c kton irt the title bareof the Sivet Bresieir band save the preset under the name --Default--".
The preset is saved in the presets folder of the effect and is loaded each time you load the effect.
- To return to the factory default settings, delete your d efault preset.
Using the Insert Effect Slots
On the Mixer page, you can set up insert effects for the agent channels, the kit channels, the AUX busses, and the master channel.
- To assign an insert effect, click the effect slot and select the effect from the menu.
- To remove an insert effect including its current settings, click the effect slot and select None from the menu.
- To bypass an effect, activate the Bypass button of the slot. Bypass is active when the button lights up.
- To edit an insert effect, click the e button of the corresponding slot. You can edit only one effect at a time. The parameters of the insert effect are displayed in the bottom section.
- To move an effect to another slot, move the mouse below the edit button until the drag icon appears and drag it to another slot. This replaces any effect loaded in this slot.
- To change the order of the effects, move the mouse below the edit button until the drag icon appears and drag it to a new position between two slots.
- To copy an effect into another slot, hold down [Alt]/[Option], move the mouse below the edit button until the drag icon appears and drag it onto the new slot. This replaces any effect loaded in this slot.
NOTE
You can also copy effects between the different mixers. First drag an effect to the corresponding mixer tab. Then drag it to the position where you want to insert it.
- To copy an effect and insert it between two effect slots, hold down
[Alt]/[Option], move the mouse below the edit button until the drag icon appears and drag between two slots.
NOTE
You can also copy effects between the different mixers. First drag an effect to the corresponding mixer tab. Then drag it to the position where you want to insert it.
Effects Reference
Reverb and Delay Effects
REverence
REVerence is a convolution tool that allows you to apply room characteristics (reverb) to the audio.
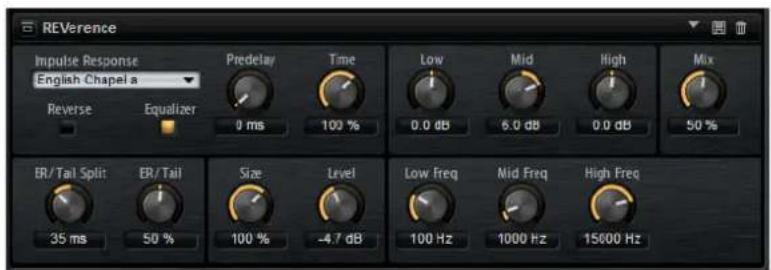
By recording an impulse in a room, you capture the characteristics of this room. Convolution superimposes these characteristics to the sound. The result is a very natural sounding reverb. Included with this effect is a collection of high-quality reverb impulse responses.
Impulse Response
Allows you to select an impulse response. This determines the basic sound character of the reverb.
Reverse
Reverses the impulse response.
Predelay
Determines the amount of time between the dry signal and the onset of the reverb. With higher predelay values, you can simulate larger rooms.
Time
Controls the reverb time. At a setting of 100% , the impulse response is applied with its original length.
Size
Scales the size of the simulated room. At a setting of 100% , the impulse response is applied as recorded in the original room.
Level
Adjusts the level of the impulse response.
Equalizer
Activates the built-in three-band equalizer.
ER Tail Split
Sets the split point between the early reflections and the reverb tail.
ER Tail Mix
Sets the balance between the early reflections and the reverb tail. At a setting of 50% the early reflections and the tail have the same volume level. Settings below 50% raise the early reflections and lower the tail, as a result the sound source moves towards the front of the room. Settings above 50% raise the tail and lower the early reflections, as a result the sound source moves towards the back of the room.
Reverb
This effect produces a high-quality algorithmic reverb with early reflections and reverb tail.
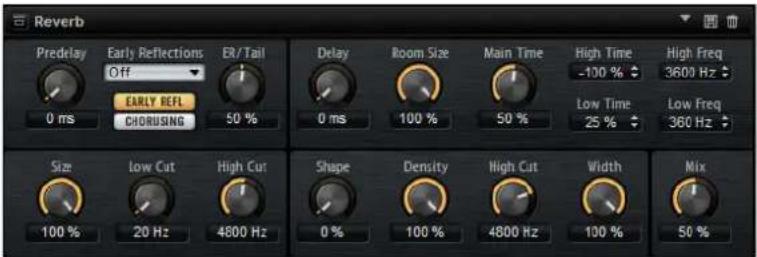
The early reflections are responsible for the spatial impression in the first milliseconds of the reverb. For emulating different rooms, you can choose between different early reflections patterns and adjust their size. The reverb tail, or late reverberation, offers parameters for controlling the room size and the reverb time. You can adjust the reverb time individually in 3 frequency bands.
Predelay
Determines the amount of time between the dry signal and the onset of the reverb. With higher predelay values, you can simulate larger rooms.
Early Reflections
Here, you select an early reflections pattern. The early reflections pattern contains the most important delays that deliver the key information for the spatial impression of the room.
Show Early Reflections/Chorusing Page
With the two buttons below the Early Reflections pop-up menu, you can choose whether to display the early reflections settings or the chorus settings in the lower left part of the effect panel.
ER/Tail Mix
Sets the level balance between the early reflections and the reverb tail. At a setting of 50% , early reflections and tail have the same volume. Settings below 50% raise the early reflections and lower the tail, as a result the sound source moves towards the front of the room. Settings above 50% raise the tail and lower the early reflections, as a result the sound source moves towards the back of the room.
Size
Adjusts the length of the early reflections pattern. At a setting of 100% , the pattern is applied with its original length and the room sounds the most natural. At settings below 100% , the early reflections pattern is compressed and the room is perceived smaller.
Low Cut
Attenuates the low frequencies of the early reflections. The higher this value, the less low frequencies are present in the early reflections.
High Cut
Attenuates the high frequencies of the early reflections. The lower this value, the less high frequencies the early reflections will have.
Delay
Delays the onset of the reverb tail.
Room Size
Controls the dimensions of the simulated room. At a setting of 100% , the dimensions correspond to a cathedral or a large concert hall. At a setting of 50% , the dimensions correspond to a medium-sized room or studio. Settings below 50% simulate the dimensions of small rooms or a booth.
Main Time
Controls the overall reverb time of the tail. The higher this value, the longer the reverb tail will decay. At a setting of 100% , the reverb time is infinitely long. The Main Time parameter also represents the mid band of the reverb tail.
High Time
Controls the reverb time for the high frequencies of the reverb tail. With positive values, the decay time of the high frequencies is longer. With negative values, it is shorter. Frequencies are affected depending on the High Freq parameter.
Low Time
Controls the reverb time for the low frequencies of the reverb tail. For positive values, low frequencies decay longer and vice versa. Frequencies will be affected depending on the Low Freq parameter.
High Freq
Sets the cross-over frequency between the mid and the high band of the reverb tail. You can offset the reverb time for frequencies above this value from the main reverb time with the High Time parameter.
Low Freq
Sets the cross-over frequency between the low and the mid band of the reverb tail. The reverb time for frequencies below this value can be offset from the main reverb time with the Low Time parameter.
Shape
Controls the attack of the reverb tail. At a setting of 0% , the attack is more immediate, which is a good setting for drums. The higher this value, the less immediate the attack.
Density
Adjusts the echo density of the reverb tail. At a setting of 100% , single reflections from walls cannot be heard. The lower this value, the more single reflections can be heard.
High Cut
Attenuates the high frequencies of the reverb tail. The lower this value, the less high frequencies the reverb tail will have.
Width
Adjusts the output of the reverb signal between mono and stereo. At a setting of 0% , the output of the reverb is mono, at 100% it is stereo.
Mix
Sets the ratio between the dry and the wet signal.
Chorusing
Chorusing allows you to enrich the reverb tail through subtle pitch modulations. To access the chorusing parameters, click the Show Chorusing Page button.
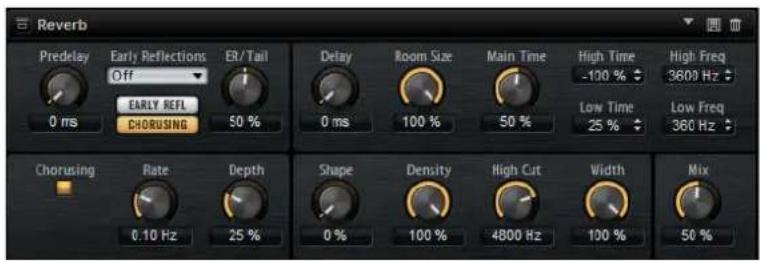
Chorusing On/Off
Activates/Deactivates the chorusing effect.
Chorusing Rate
Specifies the frequency of the pitch modulation.
Chorusing Depth
Sets the intensity of the pitch modulation.
Multi Delay
This effect produces delays, with adjustable time, feedback, and filters.
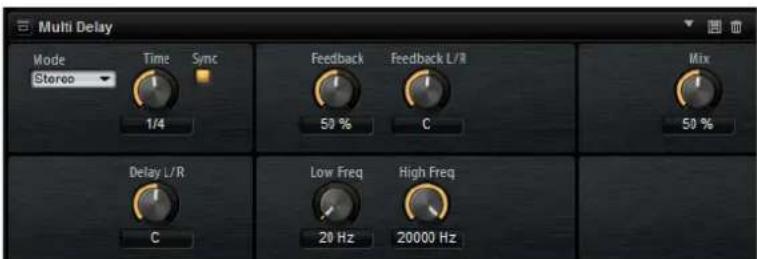
With the Mode parameter, you can set up this effect as Stereo, Cross, or Ping-Pong delay effect. Depending on the selected mode, the echoes repeat in varying patterns across the stereo panorama.
Mode
Multi Delay offers three different modes:
- Stere o mode has two independent delay lines, one for the left and one for the right audio channel, each with a feedback path of its own.
Cross mode has two delay lines with cross feedback. Cross feedback means that the delay of the left channel is fed back into the delay of the right channel, and vice versa. - Ping-Pong mode mixes the left and right input channel and sends it to hard-panned left and right delays. This way, the echoes bounce like a ping-pong ball between left and right in the stereo panorama.
Time
Sets the overall time for the left and right delay. Use the Delay L/R parameter to shorten the time for the left or right delay. Activate Sync to set the delay time as a note value.
Sync
Activate Sync to synchronize the delay time to the host tempo. When Sync is activated, the time is set as a note value.
NOTE
The maximum delay time is 5000ms. If the note length exceeds this value, it is automatically shortened.
Delay L/R
Offsets the time of the left or right delay from the overall delay time. At a factor of 1, the right or left delay time has the same length as the overall delay time. At a factor of 0.5, the time is half as long as the overall delay time. To offset the left delay time, turn the control to the left. To offset the right delay time, turn the control to the right.
Feedback
Sets the overall amount of feedback for the left and right delay. Feedback means that the output of the delay is fed back to its input. At a setting of 0% , you hear one echo. At a setting of 100% , the echoes repeat endlessly.
Feedback L/R
Offsets the amount of feedback of the left or right delay from the overall feedback. A factor of 1 means that the amount of feedback corresponds to the overall feedback. A factor of 0.5 means that the amount is half the overall feedback. To offset the left feedback, turn the control to the left. To offset the right feedback, turn the control to the right.
NOTE
This parameter is only available in Stereo mode.
Filter Low
Attenuates the low frequencies of the delays.
Filter High
Attenuates the high frequencies of the delays.
Mix
Sets the ratio between the dry and the wet signal.
EQ Effects
Studio EQ
Studio EQ is a high-quality 4-band parametric equalizer.
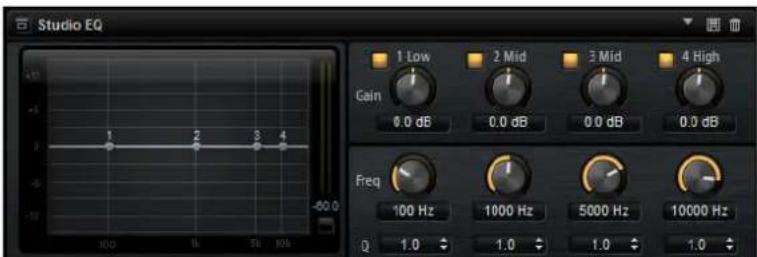
With the 4 frequency bands, you can shape the tone color, to create a brighter or darker sound, for example. The two mid-range bands act as peak filters and the low and high bands act as shelving filters. All bands are fully parametric with adjustable gain, frequency, and Q factor.
Each frequency band offers the following controls:
Gain
Sets the amount of cut or boost for the corresponding band.
Freq
Sets the frequency that is cut or boosted with the Gain parameter.
Q (Quality)
Use this parameter to adjust the bandwidth of the mid-range peak filters from wide to narrow. By increasing the Q value on the low and high shelving filters, you can add a dip to their shape.
To adjust the parameters Ga EQ curve display.
in and Freq simultaneously, drag the points in the
Graphic EQ
Graphic EQ is an equalizer with ten frequency bands that can be cut or boosted by up to 12 dB. In addition, you can specify the overall range and output of the equalizer.
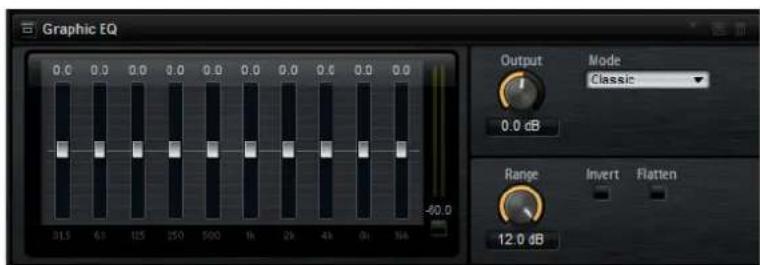
Output
Controls the overall output level of the equalizer.
Mode
Allows you to add color or character to the equalized output. The following options are available:
- True Response se mode uses serial filters with accurate frequency response.
Classic mode uses parallel filters where the resonance depends on the amount of gain. - Constant Q mode uses parallel filters where the resonance is raised when boosting the gain.
Range
Adjusts the maximum cut or boost for all frequency bands together.
Invert
Activate this to invert the EQ curve.
Flatten
Resetssall frequency bands to 0 dB.
DJ-EQ
This plug-in is an easy-to-use 3-band parametric equalizer that resembles the EQs found on typical DJ mixers. This plug-in is designed for quick sound fixes.
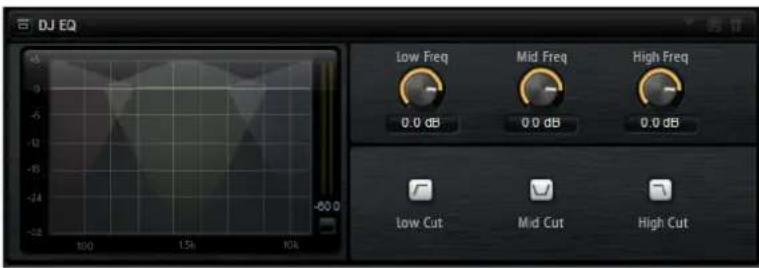
To set the Low, Mid, and Hi frequency bands, click and drag the EQ points.
- To fine-adjust the Lo w, Mid, and Hi frequency bands, press [Shift] and drag the EQ points.
- To set a parameter to zero, press [Ct r] [/Command] and click it.
To change the Ga in values, click them and move the mouse up or down.
Low Gain
Sets the amount of attenuation/boost for the low band.
Low Kill (Activates Low Cut)
Cuts the low band.
Mid Gain
Sets the amount of attenuation/boost for the mid band.
Mid Kill (Activates Mid Cut)
Cuts the mid band.
Filter Effects
Auto Filter
Auto Filter provides 2 morphable filter shapes with distortion.
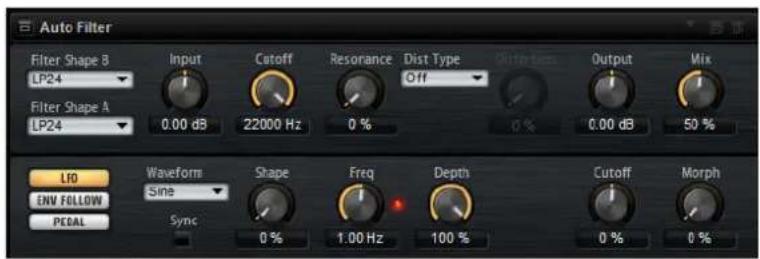
The morphing between the two shapes, as well as the cutoff, can be controlled with a manual pedal control, an LFO, or an envelope shaper.
Filter Parameters
Filter Shapes
- LP 24, 18, 12, and 6 are low-pass filters with 24, 18, 12, and 6 dB/oct. Frequencies above the cutoff are attenuated.
BP 12 and BP 24 are band-pass filters with 12 and 24dB /oct. Frequencies below and above the cutoff are attenuated.
HP 24, 18, 12, and 6 are high-pass filters with 24, 18, 12, and 6 dB/oc. Frequencies below the cutoff are attenuated. - BR 12 and BR 24 are band-reject filter with 12 and 24dB /oct. Frequencies around the cutoff are attenuated.
- AP is an all-pass filter with 18 dB/oct. Frequencies around the cutoff are attenuated.
Input
Adjusts the gain before the filter and distortion. This parameter only affects the wet signal.
Cutoff
Specifies the cutoff frequency of the filter.
Resonance
Emphasizes the frequencies around the cutoff. At higher resonance settings, the filter self-oscillates, which results in a ringing tone.
Distortion
Adds distortion to the signal. The effect depends on the selected distortion type. At higher settings, it creates a very intense distortion effect.
NOTE
This parameter is only available for the Tube Drive, Hard Clip, Bit Red, and Rate Red types.
Type
The following options are available:
- When this parameter is set to Off, the filter offers no distortion.
- Tube Drive offers a lot of character by adding warm, tube-like distortion.
- Hard Clip adds bright, transistor-like distortion.
- Bit Red adds digital distortion by means of quantization noise.
- Rate Red adds digital distortion by means of aliasing.
Output
Adjusts the gain after the filter and distortion. This parameter only affects the wet signal.
Mix
Sets the ratio between the dry and the wet signal.
LFO Section
LFO Waveform and Shape
Waveform selects the basic type of waveform. Shape changes the characteristic of the waveform.
- Sine produc es smooth modulation. Shape adds additional harmonics to the waveform.
- Triangle is similar in character to Sine. The waveform periodically ramps up and down. Shape continuously changes the triangle waveform to a trapezoid.
- Saw produces a ramp cycle. Shape continuously changes the waveform from ramp down to triangle to ramp up.
- Pulse produces stepped modulation, where the modulation switches abruptly between two values. Shape continuously changes the ratio between the high and low state of the waveform. At 50% , it produces a square wave.
Ramp is similar to the Saw waveform. Shape increasingly puts silence before the sawtooth ramps up. -
Log is a logarithmic curvature. Shape continuously changes the curvature from negative to positive.
-
S&H 1 produces random stepped modulation, where each step is different. Shape puts ramps between the steps and produces a smooth random signal when fully turned right.
- S&H 2 is similar to S & H 1. The steps alternate between random high and low values. Shape puts ramps between the steps and produces a smooth random signal when fully turned right.
Freq
Determines the frequency of the cutoff modulation.
Sync
Activate this to set the Freq parameter in fractions of beats.
Depth
Determines the output level of the LFO modulation signal.
Cutoff
Determines the modulation intensity of the LFO on the filter cutoff.
Morph
Determines the modulation intensity of the LFO on the filter morph.
Envelope Follower Section
The Envelope Follower traces the input signal with an adjustable attack and release time and delivers a modulation signal representing the level envelope of the signal.
Sensitivity
All input signals are mixed down to mono before they are sent to the Envelope Follower. This parameter sets the optimum input level for the Envelope Follower.
Attack
Adjusts the attack time, that is, the time the Envelope Follower needs to approach increasing input levels.
Release
Adjusts the release time, that is, the time the Envelope Follower needs to approach decreasing input levels.
Depth
Determines the output level of the modulation signal of the Envelope Follower.
Cutoff
Determines the modulation intensity of the Envelope Follower on the filter cutoff.
Morph
Determines the modulation intensity of the Envelope Follower on the filter morph.
Pedal Section
Pedal
Sets the position of the pedal.
Depth
Determines the output level of the pedal modulation signal.
Cutoff
Determines the modulation intensity of the pedal on the filter cutoff.
Morph
Determines the modulation intensity of the pedal on the filter morph.
MorphFilter
MorphFilter lets you mix low-pass and high-pass filter effects, allowing for creative morphings between two filters. You can specify the filter shapes independently for filter shape A and B.
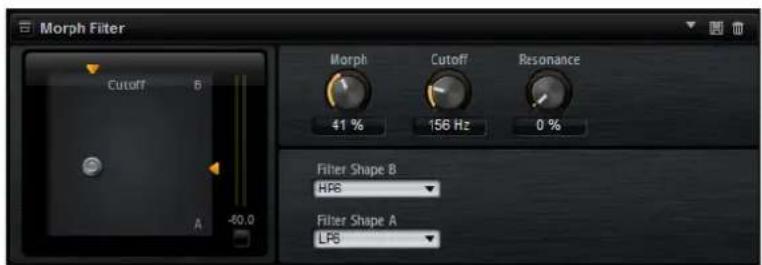
Filter Shape B
Here, you can choose between several high-pass and band-rejection filter shapes.
Filter Shape A
Here, you can select a low-pass or a band-pass filter shape.
Morph
Lets you mix the output between the two selected filters.
Cutoff
Adjusts the cutoff frequency of the filters.
NOTE
You can also set the Cutoff and Morph parameters simultaneously by clicking in the display and dragging.
Resonance
Emphasizes the frequencies around the cutoff frequency. For an electronic sound, increase the resonance. At higher resonance settings, the filter self-oscillates, which results in a ringing tone.
Distortion Effects
Distortion
This effect offers the whole range of distortion, from low fidelity, digital distortion to high fidelity, analog sounding distortion. The available distortion types (Rate Red, Tube Drive, Hard Clip, and Bit Red) can be freely combined.
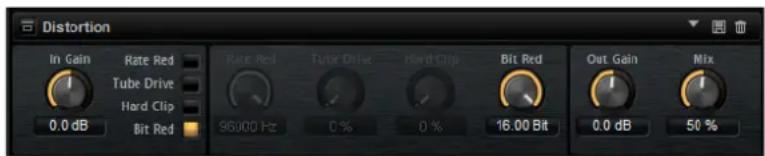
In Gain
Adjusts the input level of the sound.
Rate Red (Rate Reduction)
Rate reduction distorts the sound by means of aliasing. Enable the Rate Red option to activate the control that adjusts the amount of aliasing. The lower the setting, the more aliasing is added.
Tube Drive
Adds warm, tube-like distortion to the sound. Enable the Tube Drive option to activate the control that adjusts the amount of distortion. The higher the setting, the more distortion is added.
Hard Clip
Adds bright, transistor-like distortion to the sound. Enable the Hard Clip option to activate the control that adjusts the amount of distortion. The higher the setting, the more distortion is added.
Bit Red (Bit Reduction)
Bit reduction distorts the sound by means of quantization noise. Enable the Bit Red option to activate the control that adjusts the amount of quantization noise. The lower the setting, the more quantization noise is added.
Out Gain
Adjusts the output level of the sound.
Mix
Sets the ratio between the dry and the wet signal.
Tape Saturator
Tape Saturator simulates the behavior of classic tape recorders. These machines produced a specific saturation when recording higher input levels, which led to a compressed signal with light distortion.
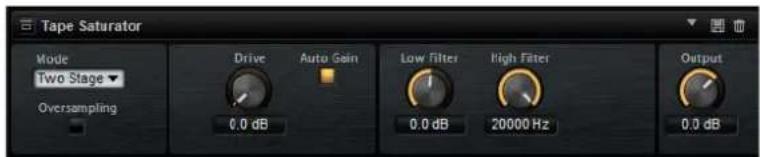
Mode
Here, you can choose between the effect of a single (One Stage) or two cascaded tape machines (Two Stage). Two Stage mode leads to higher saturation and compression.
Oversampling
Activate this parameter to increase the accuracy of the effect by oversampling.
NOTE
If this parameter is activated, the effect requires more processing power.
Drive
Determines the level of the input signal and thus the amount of saturation.
Auto Gain
Activate this option for an automatic level compensation.
Low Filter
Here, you can adjust the low frequency range below 1000Hz by +/- 3dB.
High Filter
Here, you can attenuate the high frequency range. This high-cut filter works with a slope of 24 dB/octave.
Output
Determines the level of the output signal.
Tube Saturator
This effect enriches the sound by adding the characteristic harmonics of a saturated tube to the audio signal.
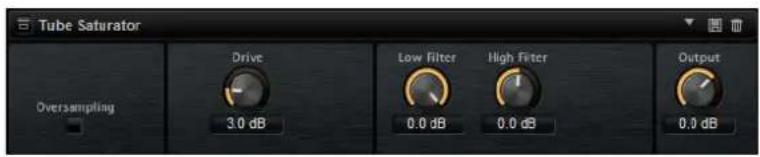
Oversampling
Increases the accuracy of the effect by oversampling.
NOTE
If this parameter is activated, the effect requires more processing power.
Drive
Determines the level of the input signal and thus the amount of saturation.
Low Filter Gain
Allows you to reduce the low frequency range by up to 6dB before saturation.
High Filter Gain
Allows you to adjust the high frequency range by - / + 6dB before saturation.
Output
Determines the level of the output signal.
Modulation Effects
Chorus
Chorus thickens and broadens the sound by means of pitch modulation.
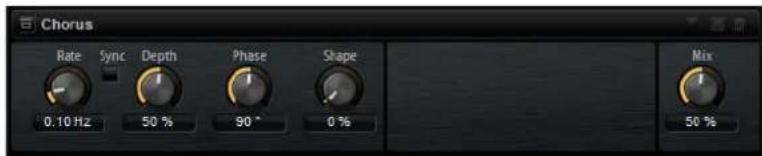
Rate
Determines the frequency of the pitch modulation, in Hertz.
Sync
Activate this to set the Rate value in fractions of beats.
Depth
Sets the intensity of the pitch modulation.
Phase
Widens the sound image of the effect from mono to stereo.
Shape
Adjusts the characteristics of the modulation. At a setting of 0% , the pitch changes continuously, producing a steady modulation. At a setting of 100% , the pitch does not change all the time, producing a less steady modulation.
Mix
Sets the ratio between the dry and the wet signal.
Flanger
This effect thickens and broadens the sound by means of pitch modulation.
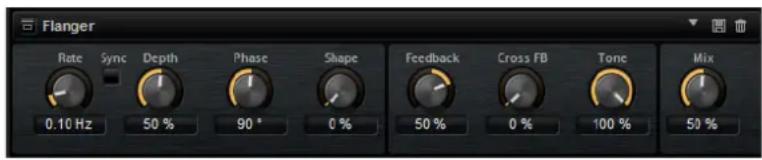
Rate
Allows you to specify the frequency of the pitch modulation in Hertz.
Sync
Activate this to set the Rate value in fractions of beats.
Depth
Sets the intensity of the pitch modulation.
Phase
Widens the sound image of the effect from mono to stereo. This parameter also changes the characteristic of the Cross FB parameter.
Shape
Adjusts the characteristics of the modulation. You hear this best when
Feedback is activated. At a setting of 0% , the sound sweeps linearly up and down. At a setting of 100% , the sound sweeps exponentially up and down.
Mix
Sets the ratio between the dry and the wet signal.
Feedback
Adds resonances to the effect. This allows for jet-like sweeps of the sound.
Cross FB
Mixes the feedback of the left channel with the right channel, and vice versa. The effect of this parameter is influenced by the Phase parameter.
NOTE
This parameter only takes effect if the Feedback parameter is set to a value above 0% .
Tone
Adjusts the tone color of the feedback. At lower values, the feedback is less bright.
Step Flanger
The Step Flanger expands the Flanger with a Sample and Hold section that divides the modulation signal into a definable number of steps.
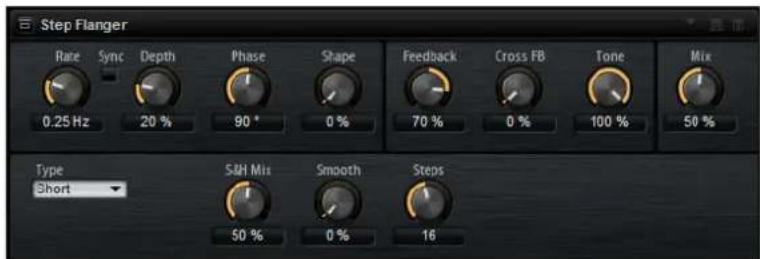
Rate
Allows you to specify the frequency of the pitch modulation in Hertz.
Sync
Activate this to set the Rate value in fractions of beats.
Depth
Sets the intensity of the pitch modulation.
Phase
Widens the sound image of the effect from mono to stereo. This parameter also changes the characteristic of the Cross FB parameter.
Shape
Adjusts the characteristics of the modulation. You hear this best when Feedback is activated. At a setting of 0% , the sound sweeps linearly up and down. At a setting of 100% , the sound sweeps exponentially up and down.
Mix
Sets the ratio between the dry and the wet signal.
Feedback
Adds resonances to the effect. This allows for jet-like sweeps of the sound.
Cross FB
Mixes the feedback of the left channel with the right channel, and vice versa. The effect of this parameter is influenced by the Phase parameter.
NOTE
This parameter only takes effect if the Feedback parameter is set to a value above 0% .
Tone
Adjusts the tone color of the feedback. At lower values, the feedback is less bright.
Type
Defines the length of the delay line that is modulated. Short produces a sharper and Long a less defined, more blurred flanger sound.
S&H Mix
Use this parameter to blend the normal modulation signal with the stepped modulation signal. At 100% , only the stepped modulation is used.
Smooth
Use this parameter to create ramps between the steps. This way, the stepped modulation signal sounds smoother.
Steps
Determines into how many steps the modulation signal is divided. You can use up to 32 steps.
Phaser
The Phaser effect thickens and broadens the sound by means of phase modulation.
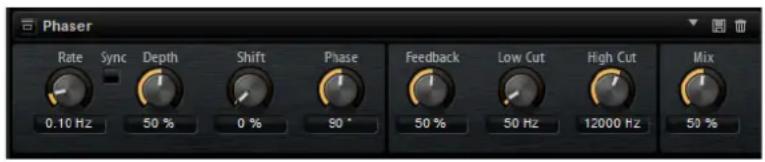
Rate
Use this to specify the frequency of the phase modulation.
Sync
Activate this to set the Rate value in fractions of beats.
Depth
Sets the intensity of the phase modulation.
Shift
Shifts the phase modulation upwards to higher frequencies of the spectrum.
Phase
Widens the sound image of the effect from mono to stereo.
Low Cut
Attenuates the low frequencies.
High Cut
Attenuates the high frequencies.
Mix
Sets the ratio between the dry and the wet signal.
Ring Modulator
The Ring Modulator provides a sine oscillator that is multiplied with the input signal. This creates metallic, or bell-like, frequencies.
The integrated LFO modulates the frequency of the sine oscillator to vary the created frequencies over time. In addition, an envelope follower is available, which can be used to modulate the frequency of the sine oscillator depending on the level of the input signal.
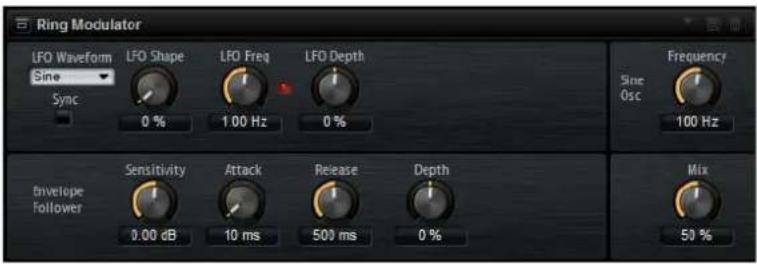
LFO Waveform and Shape
Waveform selects the basic type of waveform. Shape changes the characteristic of the waveform.
- Sine produces smooth modulation. Shape adds additional harmonics to the waveform.
- Triangle is similar in character to Sine. The waveform periodically ramps up and down. Shape continuously changes the triangle waveform to a trapezoid.
- Saw produces a ramp cycle. Shape continuously changes the waveform from ramp down to triangle to ramp up.
- Pulse produces stepped modulation, where the modulation switches abruptly between two values. Shape continuously changes the ratio between the high and low state of the waveform. At 50% , it produces a square wave.
Ramp is similar to the Saw waveform. Shape increasingly puts silence before the sawtooth ramps up. -
Log is a logarithmic curvature. Shape continuously changes the curvature from negative to positive.
-
S&H 1 produces random stepped modulation, where each step is different. Shape puts ramps between the steps and produces a smooth random signal when fully turned right.
- S&H 2 is similar to S & H 1. The steps alternate between random high and low values. Shape puts ramps between the steps and produces a smooth random signal when fully turned right.
LFO Freq
Use this to specify the frequency of the LFO for modulating the frequency of the sine oscillator.
Sync
Activate this to set the Rate value in fractions of beats.
LFO Depth
Sets the intensity of the LFO modulation of the sine oscillator frequency.
Frequency
Determines the frequency of the sine oscillator.
Mix
Sets the ratio between the dry and the wet signal.
Envelope Follower
The Envelope Follower traces the input signal with an adjustable attack and release time and delivers a modulation signal representing the level envelope of the signal.
Sensitivity
All input signals are mixed down to mono before they are sent to the Envelope Follower. The Sensitivity parameter sets the optimum input level for the Envelope Follower.
Attack
This adjusts the attack time, that is, the time the Envelope Follower needs to approach increasing input levels.
Release
This adjusts the release time, that is, the time the Envelope Follower needs to approach decreasing input levels.
Depth
Determines the output level of the modulation signal of the Envelope Follower.
Frequency Shifter
A frequency shifter shifts each frequency of the input signal by a fixed amount.
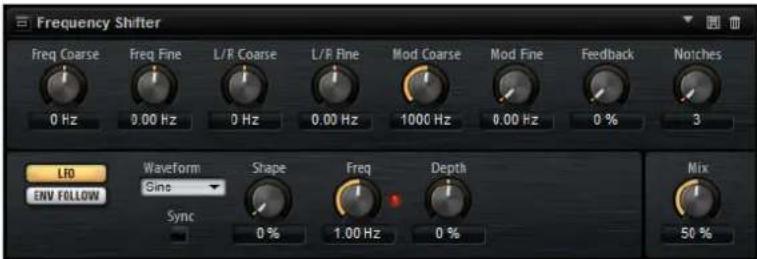
Unlike pitch shifters, where the frequencies are shifted by a factor, and where the harmonic relations are kept, a frequency shifter alters the harmonic relations. Therefore, a larger frequency shift usually results in a disharmonic sound.
Furthermore, a frequency shifter alters the frequencies by adding an offset, while a pitch shifter multiplies the frequencies by a factor. The frequency shifter alters lower frequencies more than higher frequencies.
For example, if the input signal has the frequencies 100Hz , 1000Hz , and 10000Hz and you shift the frequency by +100Hz , the resulting frequencies are 200Hz , 1100Hz , and 10100Hz .
Frequency Coarse
Here you set the amount of frequency shift.
Frequency Fine
Here you can fine adjust the amount of frequency shift.
L/R Offset Coarse
Sets an offset for the left and right channels. Positive values shift the right channel upwards and the left channel downwards, and vice versa.
L/R Offset Fine
Allows for fine-adjustments of the offset between the left and right channels. Positive values shift the right channel upwards and the left channel downwards, and vice versa.
Modulation Range Coarse
Sets the maximum amount of frequency shift via modulation from LFO and Envelope Follower.
Modulation Range Fine
Allows for fine-adjustments to the amount of frequency shift via modulation from LFO and Envelope Follower.
Feedback
Sets the amount of feedback, that is, the amount of signal that is sent from the output of the effect back to its input. The sound is similar to that of a phaser. You can control the direction and speed of this effect with the Frequency Fine parameter.
Notches
Here you set the number of notches the phaser effect produces when you use larger amounts of Feedback.
LFO Section
LFO Waveform and Shape
Waveform selects the basic type of waveform. Shape changes the characteristic of the waveform.
- Sine produc es smooth modulation. Shape adds additional harmonics to the waveform.
- Triangle is similar in character to Sine. The waveform periodically ramps up and down. Shape continuously changes the triangle waveform to a trapezoid.
- Saw produces a ramp cycle. Shape continuously changes the waveform from ramp down to triangle to ramp up.
- Pulse produces stepped modulation, where the modulation switches abruptly between two values. Shape continuously changes the ratio between the high and low state of the waveform. At 50% , it produces a square wave.
Ramp is similar to the Saw waveform. Shape increasingly puts silence before the sawtooth ramps up. - Log is a logarithmic curvature. Shape continuously changes the curvature from negative to positive.
- S&H 1 produces random stepped modulation, where each step is different. Shape puts ramps between the steps and produces a smooth random signal when fully turned right.
S&H 2 is similar to S & H 1. The steps alternate between random high and low values. Shape puts ramps between the steps and produces a smooth random signal when fully turned right.
LFO Rate
Specifies the frequency of the LFO in Hertz.
Sync
Activate this to set the Rate parameter in fractions of beats.
Depth
Determines the direction and amount of frequency shift from the LFO modulation signal.
Envelope Follower
The Envelope Follower traces the input signal with an adjustable attack and release time and delivers a modulation signal representing the level envelope of the signal.
Sensitivity
All input signals are mixed down to mono before they are sent to the Envelope Follower. This parameter sets the optimum input level for the Envelope Follower.
Attack
Adjusts the attack time, that is, the time the Envelope Follower needs to approach increasing input levels.
Release
Adjusts the release time, that is, the time the Envelope Follower needs to approach decreasing input levels.
Depth
Determines the direction and amount of frequency shift from the envelope follower modulation signal.
NOTE
The maximum frequency shift via modulation from LFO or the Envelope Follower is determined by the parameters Modulation Range Coarse and Modulation Range Fine.
Mix
Sets the ratio between the dry and the wet signal.
Vintage Ensemble
This effect emulates the sound of classic ensemble modulation effects. It is based on a delay with LFO-modulated delay times. A secondary LFO with higher frequencies is used to produce the so-called shimmer.
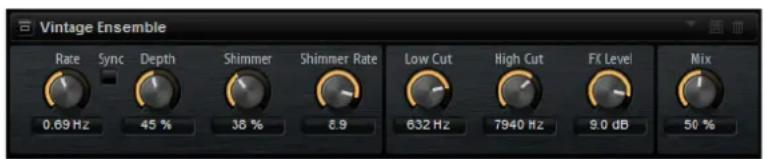
Rate
Sets the frequency of the LFO.
Sync
Activate this to set the Rate value in fractions of beats.
Depth
Sets the intensity of the delay time modulation by the LFO.
Shimmer
Sets the intensity of a secondary faster delay time modulation.
Shimmer Rate
Determines the relation between the speed of the primary and the secondary delay modulation. For example, with a value of 10, the secondary modulation is 10 times faster.
Low Cut
Applies a low-cut filter to the signal. Only frequencies above the set frequency are sent to the effect.
High Cut
Applies a high-cut filter to the signal. Only frequencies below the set frequency are sent to the effect.
Level
Allows you to adapt the effect signal level to compensate for level reductions caused by the low-cut and high-cut filters.
Mix
Sets the ratio between the dry and the wet signal.
Dynamics Effects
Compressor
The Compressor reduces the dynamic range of a sound. This way, the sound gains headroom. You can use this extra headroom to make the overall sound louder again.
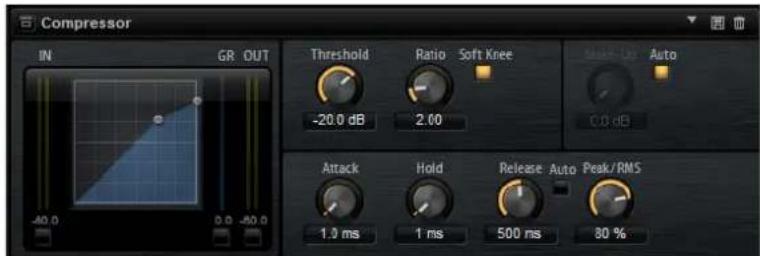
The graphical control to the left indicates the compression curve. You can edit the Threshold and Ratio values with the handles of this control. The input and output VU meters indicate the level before and after the compression. The Gain Reduction meter indicates the current attenuation of the level.
Threshold
Sets the threshold. Sounds that are louder than the threshold are reduced in gain. Sounds below the threshold stay untreated.
Ratio
Sets the amount of gain reduction for sounds that are louder than the threshold. The higher the ratio, the more the output is lowered. For example, if the ratio is set to 2:1 and the amplitude of the sound is 4dB above the threshold, the output is lowered by 2dB . If the amplitude is 8dB above the threshold, the output is lowered by 4dB .
Soft Knee
If this button is deactivated, signals above the threshold are compressed instantly according to the set ratio. When Soft Knee is activated, the onset of the compression is more gradual, producing a less drastic result.
Make-Up
Raises the overall sound. This can become necessary if too much gain reduction is introduced by the Threshold and Ratio parameters. You can see the amount of gain reduction in the Gain Reduction meter.
NOTE
This parameter is not available when the Auto button is activated.
Auto
Sets the Make-Up value automatically, depending on the current Threshold and Ratio settings.
Attack
Determines how fast the Compressor reacts to sounds that exceed the threshold. The longer the attack time, the longer the time it takes to reduce the gain. With longer attack times, the onset of sounds exceeding the threshold pass through unprocessed.
Hold
Sets the time period during which the compression is applied after the sound exceeds the set threshold.
Release
Determines how fast the Compressor effect reacts to sounds that fall below the set threshold. The longer the release time, the longer it takes to return to the original level.
NOTE
This parameter is not available when the Auto Release button is activated.
Auto Release
Activate this to set the release time automatically. The Compressor analyzes the input sound continuously to find the optimal setting.
Peak - RMS
Determines whether the input signal is analyzed according to peak or RMS values or a mixture of both. At a setting of 0% , the Compressor uses Peak sensing only and at 100% , RMS sensing only. Peak means that the Compressor directly senses the peak level of the sound. RMS means that the Compressor senses the average power of the sound. Peak sensing responds faster than RMS sensing. Typically, Peak sensing is used for transient and RMS sensing for sustained sounds.
VintageCompressor
VintageCompressor is modeled after vintage type compressors.
This compressor features separate controls for Input and Output gain, Attack, and Release. In addition, there is a Punch mode which preserves the attack phase of the signal and a program-dependent Auto feature for the Release parameter.
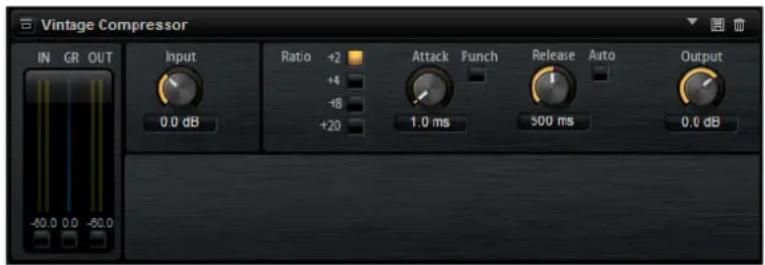
Input (-24 to 48 dB)
In combination with the Output setting, this parameter determines the compression amount. The higher the input gain setting and the lower the output gain setting, the more compression is applied.
Output (-48 to 24 dB)
Sets the output gain.
Attack (0.1 to 100 ms)
Determines how fast the compressor responds. If the attack time is long, more of the early part of the signal passes through unprocessed.
Punch
If this is activated, the early attack phase of the signal is preserved, retaining the original punch in the audio material, even with short Attack settings.
Release (10 to 1000 ms or Auto mode)
Sets the time after which the gain returns to its original level. If the Auto button is activated, Vintage Compressor automatically finds the best release setting for the audio material.
VU Meter
Shows the amount of gain reduction.
In/Out Meters
Show the highest peaks of all available input and output channels.
Tube Compressor
This versatile compressor with integrated tube-simulation allows you to achieve smooth and warm compression effects. The VU meter shows the amount of gain reduction. Tube Compressor features an internal side-chain section that lets you filter the trigger signal.
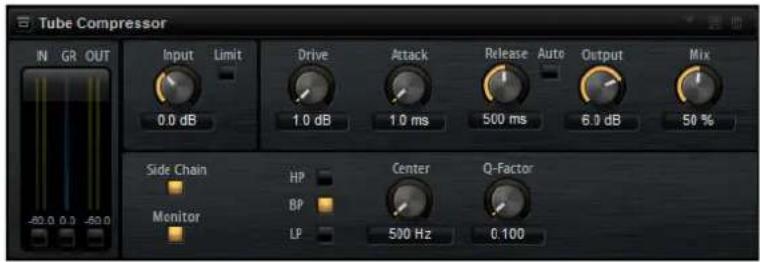
Drive (1.0 to 6.0)
Controls the amount of tube saturation.
Input (-24.0 to 48.0)
Determines the compression amount. The higher the input gain, the more compression is applied.
Limit
Increases the ratio of the compressor for a limiting effect.
Output (-12.0 to 12.0)
Sets the output gain.
Attack (0.1 to 100.0)
Determines how fast the compressor responds. If the attack time is long, more of the initial part of the signal passes through unprocessed.
Release (10 to 1000 ms or Auto mode)
Sets the time after which the gain returns to the original level. If the Auto button is activated, Tube Compressor automatically finds the best release setting for the audio material.
Mix (0 to 100)
Adjusts the mix between dry and wet signal preserving the transients of the input signal.
In/Out Meters
Show the highest peaks of all available input and output channels.
VU Meter
Shows the amount of gain reduction.
Side-chain
Activates/Deactivates the internal side-chain filter. The input signal can then be shaped according to the filter parameters. Internal side-chaining is useful for tailoring how the compressor operates.
Filter section (LP, BP, and HP)
If the Side-Chain button is activated, you can use these buttons to set the filter type to low-pass, band-pass, or high-pass.
Side-chain section
Center
Sets the center frequency of the filter.
Q-Factor
Sets the resonance or width of the filter.
Monitor
Allows you to monitor the filtered signal.
Limiter
The Limiter effects prevents the sound from exceeding the set output level. This can be used to avoid clipping in following effects, for example.
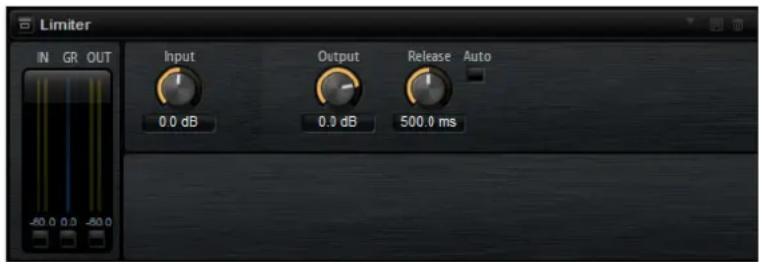
The input and output VU meters indicate the level before and after the Limiter. The Gain Reduction meter in the middle indicates the current attenuation of the level.
Input
Adjusts the input level of the sound. By increasing the input level, you can drive the sound more and more into limiting.
Output
Sets the maximum output level of the sound.
Release
Sets the time that the gain needs to return to its original level. The longer the release time, the longer it takes to return to the original level.
NOTE
This parameter is not available if the Auto button is activated.
Auto
Activate this to set the release time automatically. The Limiter analyzes the input sound continuously to find the optimal setting.
Brickwall Limiter
Brickwall Limiter ensures that the output level never exceeds a set limit.
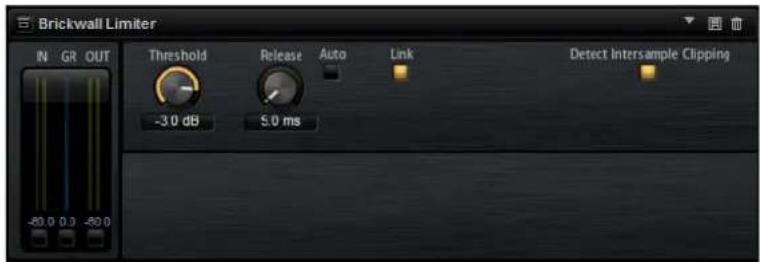
Due to its fast attack time, Brickwall Limiter can reduce even short audio level peaks without creating audible artifacts. However, this plug-in creates a latency of 1ms. Brickwall Limiter features separate meters for input, output, and the amount of limiting. Position this plug-in at the end of the signal chain, before dithering.
Threshold (-20 to 0 dB)
Only signal levels above the set threshold are processed.
Release (ms)
Sets the time after which the gain returns to the original level when the signal drops below the threshold. If the Auto button is activated, Brickwall Limiter automatically finds the best release setting, depending on the audio material.
Link
If this button is activated, Brickwall Limiter uses the channel with the highest level to analyze the input signal. If the button is deactivated, each channel is analyzed separately.
Detect Intersample Clipping
If this option is activated, Brickwall Limiter detects and limits signal levels between two samples to prevent distortion when converting digital signals into analog signals.
NOTE
Brickwall Limiter is designed for the reduction of occasional peaks in the signal. If the Gain Reduction meter indicates constant limiting, try raising the threshold or lowering the overall level of the input signal.
Maximizer
This plug-in raises the loudness of audio material without the risk of clipping.
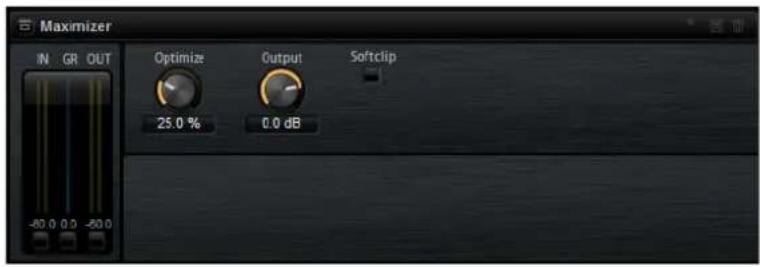
Output (-24 to 6 dB)
Determines the maximum output level. Set this to 0dB to avoid clipping.
Optimize (0 to 100)
Determines the loudness of the signal.
Soft Clip
If this button is activated, Maximizer starts limiting or clipping the signal softly, at the same time generating harmonics which add warm, tube-like characteristics to the audio material.
Expander
Expander reduces the output level in relation to the input level for signals below the set threshold. This is useful to enhance the dynamic range or reduce the noise in quiet passages.
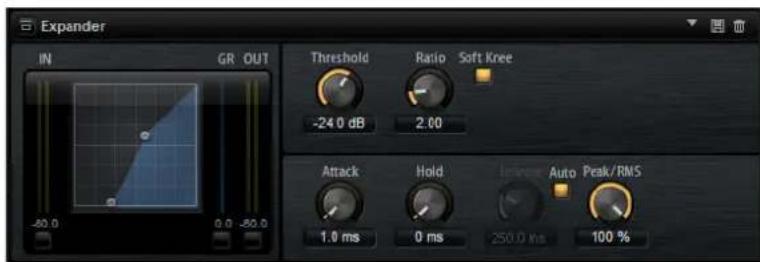
The graphical control to the left shows the expansion curve. You can edit the Threshold and Ratio values with the handles of this control. The input and output VU meters indicate the level before and after the expansion. The Gain Reduction meter indicates the current attenuation of the level.
Threshold
Sets the threshold. Sounds that are softer than the threshold are reduced in gain. Sounds above the threshold stay untreated.
Ratio
Sets the amount of gain reduction for sounds that are softer than the threshold. The higher the ratio, the more the output is lowered. For example, if the ratio is set to 2:1 and the amplitude of the sound is 4dB below the threshold, the output is lowered by 2 dB. If the amplitude is 8dB below the threshold, the output is lowered by 4 dB.
Soft Knee
If this button is deactivated, signals above the threshold are compressed instantly according to the set ratio. When Soft Knee is activated, the onset of the expansion is more gradual, producing a less drastic result.
Attack
Determines how fast the Expander reduces the gain when the sound falls below the set threshold. The longer the attack time, the longer it takes to reduce the gain.
Hold
Sets the time period during which the expansion is applied after the sound falls below the set threshold.
Release
Determines how fast the Expander effect raises the gain after the sound exceeds the set threshold. The longer the release time, the longer it takes to raise the gain.
NOTE
This parameter is not available when the Auto Release button is activated.
Auto Release
Activate this to set the release time automatically. The Expander analyzes the input sound continuously to find the optimal setting.
Peak - RMS
Determines whether the input signal is analyzed according to peak or RMS values or a mixture of both. At a setting of 0% , the Expander uses Peak sensing only and at 100% , RMS sensing only. Peak means that the Expander directly senses the peak level of the sound. RMS means that the Expander senses the average power of the sound. Peak sensing responds faster than RMS sensing. Typically, Peak sensing is used for transient and RMS sensing for sustained sounds.
Gate
The Gate effect passes sound only to its output if the input sound exceeds the set threshold. Sounds below the threshold are silenced.
An internal side-chain filter allows you to analyze a filtered version of the input sound instead. This way, the gate detects only certain frequencies of the input sound.
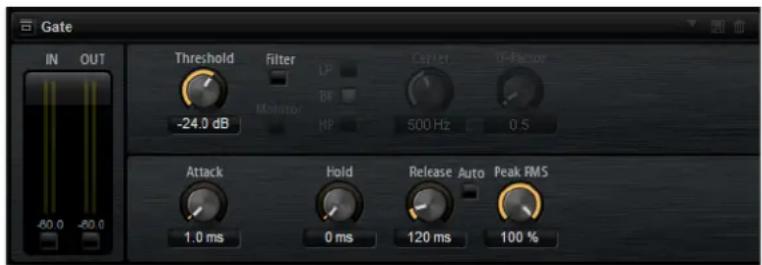
Threshold
Determines the level that activates the gate. Signal levels above the set threshold trigger the gate to open, and signal levels below the set threshold close the gate.
Filter
Activates the internal side-chain filter. If this button is activated, the input sound is filtered before it is analyzed. The gate opens only if the filtered sound exceeds the set threshold. When the Filter button is deactivated, the filter controls are not available.
Filter Type
Sets the filter type for the side-chain filter. Select high-pass (HP) to detect high frequencies, band-pass (BP) to detect mid frequencies, and low-pass (LP) to detect low frequencies only.
Monitor
Activate this button to listen to the sound of the side-chain filter. The gate is inactive when the Monitor button is activated.
Center
Sets the center frequency of the side-chain filter.
Q-Factor
Activate this button to adjust the bandwidth of the band-pass filter from wide to narrow.
Attack
Determines how fast the gate opens when the sound exceeds the set threshold. The longer the attack time, the longer it takes for the sound to fade in.
Hold
Sets the time period during which the gate is applied after the sound falls below the set threshold.
Release
Determines how fast the gate closes after the sound falls below the set threshold. The longer the release time, the longer it takes for the sound to fade out.
NOTE
This parameter is not available when the Auto button is activated.
Auto
Activate this to set the Release time automatically. The Gate analyzes the input sound continuously to find the optimal setting.
Peak-RMS
Determines whether the input signal is analyzed according to peak or RMS values (or a mixture of both). At a setting of 0% , the Gate uses Peak sensing only and at 100% , RMS sensing only. Peak means that the Gate directly senses the peak level of the sound. RMS means that the Gate senses the average power of the sound. Peak sensing responds faster than RMS sensing. Typically, Peak sensing is used for transient and RMS sensing for sustained sounds.
Envelope Shaper
This effect can be used to attenuate or boost the gain of the attack and release phase of audio material.
Be careful with levels when boosting the gain and, if needed, reduce the output level to avoid clipping.
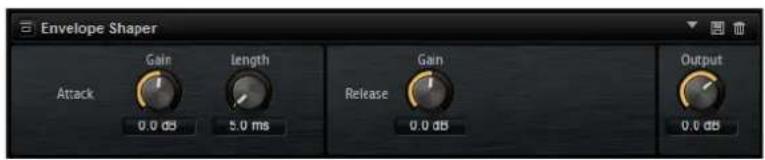
Attack - Gain
Changes the gain of the attack phase of the signal.
Attack - Length
Determines the length of the attack phase of the signal.
Release - Gain
Changes the gain of the release phase of the signal.
Output
Sets the output level.
Panner Effects
Stereo Pan
This effect allows you to set the stereo position and width of the signal.
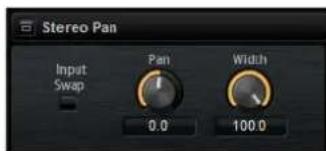
Input Swap
Swaps the stereo channels.
Pan
Sets the pan position of the signal. The panning is available for mono and stereo input signals.
Width
Adjusts the stereo width of the signal from stereo to mono.
StereoEnhancer
This plug-in expands the stereo width of (stereo) audio material. It cannot be used with mono files.
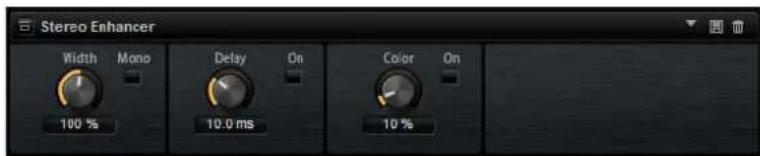
Width
Controls the width or depth of the stereo enhancement. Turn clockwise to increase the enhancement.
Delay
Increases the amount of differences between left and right channels to further increase the stereo effect.
Color
Generates additional differences between the channels to increase the stereo enhancement.
Mono
Switches the output to mono, to check for possible unwanted coloring of the sound which sometimes can occur when enhancing the stereo image.
Automation and MIDI Controllers
Automation
You can automate most of the Groove Agent parameters from within you host application, whether these are kit parameters or global parameters such as AUX effects.
Groove Agent provides 512 automation parameters that can be addressed from the host application. You can assign Groove Agent parameters to one of these automation parameters, and even assign multiple parameters to the same automation parameter, to control these parameters at the same time.
If you are working with Beat Agent kits, automated parameters always control the parameters of whole pads and not of single samples. Therefore, individual settings of samples are overwritten. For example, if the samples of a pad have different cutoff values, and you start automating the cutoff parameter, the samples are all set to the same cutoff value.
Setting Up Automation
By default, the most important parameters for the 16 pads of group 3 are already assigned to automation parameters.
- To assign a parameter to an automation parameter, right-click the parameter control and select Assign to New Automation.
The automation parameter is created on the first free automation parameter.
- To add a parameter to an existing automation parameter, right-click the control, select Add to Automation and select the automation parameter.
- To remove a parameter from the automation, right-click an automated control and select Forget Automation.
Automation Page
All assigned automation parameters are shown on the Automation page.
To access this page, open the Options page and activate the Automation tab at the top.
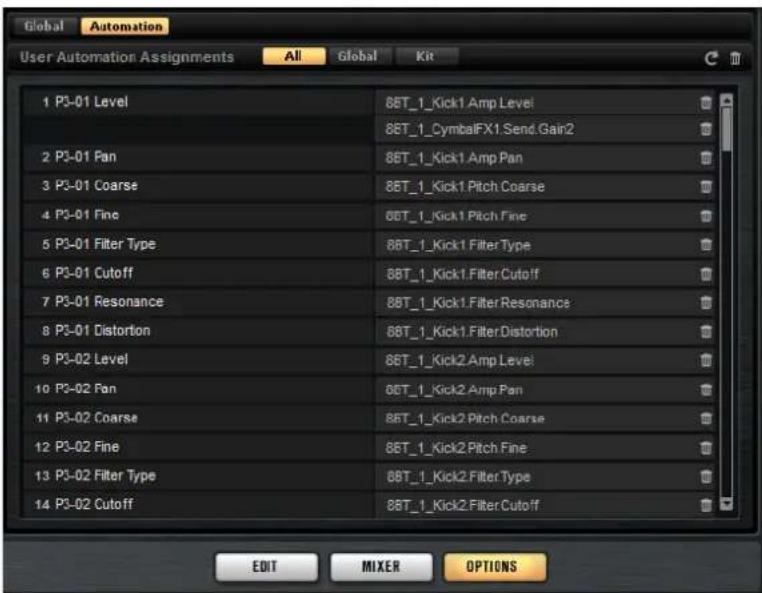
With the tabs at the top of the Automation page, you can specify whether you want to show automation parameters for the kit, the global parameters, or all automation parameters.
On the left, the name of the automation parameter is shown, and on the right, the name of the assigned Groove Agent parameter. If multiple Groove Agent parameters are assigned to one automation parameter, these are listed below each other on the right.
- To remove an automation parameter, click the trash icon to the right of the parameter name.
- To remove all automation parameters, click k the trash icon at the top of the page.
- To rename an automation parameter, double -click the parameter name and enter the new name. This name is then used in your host application.
- To replace the names for all automation parameters with the names of the pads, click the Refresh All Parameter Names button on the toolbar.
MIDI Controllers
You can assign Groove Agent parameters to MIDI controllers.
Some parameters are assigned to controllers by default, but you can customize this factory controller mapping. This way, you can adapt the mapping to your MIDI keyboard or controller.
To provide more control, you can set the minimum and maximum range for each assignment separately.
NOTE
The controller assignments for the parameters Volume (CC 007) and Pan (CC 010) are fixed and cannot be edited or removed. To change volume or pan of a kit slot, send CC#7 or CC#10 messages on the corresponding MIDI channel of the slot.
Assigning MIDI Controllers
To assign a MIDI controller to a parameter, proceed as follows:
PROCEDURE
- Right-click the control that you want to control remotely.
- On the context menu, select Learn CC.
- On your MIDI keyboard or controller, use the potentiometer, fader, or button.
RESULT
The next time you right-click the control, the menu shows the assigned MIDI controller.
NOTE
You can assign the same MIDI controller several times to different parameters. However, you cannot assign different MIDI controllers to the same parameter.
RELATED LINKS
MIDI Controller on page 176
Unassigning MIDI Controllers
PROCEDURE
- To remove a MIDI controller assignment, right-click the control and select Forget CC.
Setting the Parameter Range
You can set the minimum and maximum values for the parameter for each assignment separately. This gives you more control over the parameter, for example, when you are performing live on stage.
PROCEDURE
- Set the parameter to the minimum value.
-
Right-click the control and select Set Minimum from the context menu.
-
Set the parameter to the maximum value.
- Right-click the control and select Set Maximum.
Global Functions and Settings
Plug-in Functions Section
The plug-in functions section at the top of the window gives you access to global functions that affect both the currently loaded programs, and the general working of the plug-in.
The plug-in functions section contains the kit slot section, the master section, and the performance displays.
Multi Slot Section

Load Multi-Program
Opens a window that allows you to navigate to, and load, multi-programs.
Save Multi-Program
Opens a window that allows you to save your settings as multi-program.
Master Section
The master section can be used to set volume and tuning of the plug-in.
Master Volume
Adjusts the overall volume of the plug-in.
Master Tune
You can set the Master Tune slider from 415.3Hz to 466.2Hz , which equals -100 cents to +100 cents.
Performance Displays
The meters and text displays indicate the system load of the plug-in.
CPU
This meter shows the processor load during playback. The more voices you play, the higher the processor load. If the red overload indicator lights up, reduce the Max Voices setting on the Options page.
Disk
This meter shows the hard disk transfer load during the streaming of samples or when loading presets. If the red overload indicator lights up, the hard disk is not supplying data fast enough. In such a case, adjust the Disk vs. RAM slider on the Options page towards RAM or decrease the Max Voices setting on the Options page.
Polyphony
This display indicates the number of samples that are currently played back, to help you trace performance problems. For example, if you have to reduce the Max Voices setting on the Options page, you can verify your settings by monitoring the number of samples that are currently playing.
MEM (Memory)
This display indicates the overall amount of RAM currently used. The number refers to the streaming buffer and the preloaded samples. The MEM display helps you trace performance problems. For example, if you need to free up memory for other applications, you can do so by adjusting the Disk vs. RAM slider on the Options page towards Disk. You can verify your settings by monitoring the MEM display.
The Plug-in Name and Steinberg Logo
To get information regarding the version and build number of the plug-in, click the plug-in logo. This opens the About box. To close the About box, click it or press [Esc] on your computer keyboard.
If you click the Steinberg logo in the top right corner of the plug-in interface, a pop-up menu opens.
- Select one of the options to navigate to Steinberg web pages containing information on software updates, troubleshooting, etc.
Toolbar
The toolbar contains useful global functions.

MIDI Follow
If this button is activated and you trigger a sample or play an instrument via the keyboard, they are automatically shown in the corresponding editor, that is, the sample is automatically shown in the Sample editor, and the instrument is automatically shown in the Pattern editor.
Controller Selector
By default, incoming velocity values determine which sample is played. You can use another controller instead. This allows you to select the sample via the modulation wheel, for example.
- To use another controller, activate this button, right-click it and select the controller that you want to use from the list.
NOTE
You cannot change the controller for sample playback if Fix Velocity is activated.
Fix Velocity
To trigger all pads with the same velocity, activate this button. Use the button to the right to set the velocity value. This velocity is used for incoming MIDI notes, as well as for notes that are triggered by clicking a pad.
Global insert, AUX, and Pattern Player buttons
Use these buttons to switch off all insert effects, AUX effects, and pattern players for the entire plug-in at once. You can use this to compare sounds with and without effects or to use a preset without the pattern player, for example.
Undo/Redo
You can undo or redo the last 20 operations. To undo or redo a single operation, click the Undo or Redo buttons. To undo or redo multiple operations, click the arrow next to the button to open the history and select the step to which you want to return.
MIDI Reset
Click this button to stop playback and reset all MIDI controllers to their default values.
RAM Save
The RAM Save function scans the playback of your project and unloads unused samples.
- Click the RAM Save button.
In the dialog, click Yes to start collecting the necessary samples. The RAM Save button starts blinking.
- Play back the project in your host application from the beginning to the end or to the point where no new notes are played.
- Click the RAM Save button again. In the dialog, click Yes to unload the unused samples.
To deactivate RAM Save and reload the unused samples, click the RAM Save button again.
RAM Save mode always keeps samples that are within the range of the highest and lowest note of the played programs.
The Keyboard
You can use the keyboard to get a better overview of the mapping and for triggering MIDI notes.

To open the keyboard, click the Show/Hide Keyboard button in the lower right corner of the panel.
The keyboard shows the pattern pads and the instrument pads of the selected kit. If pads share the same keys, the pattern pads have priority, that is, only the pattern pad is shown on the keyboard.
If Use MIDI Port B for Pattern Pads is activated on the Pattern page, instrument pads are not shown on the keyboard if the Pattern page is shown, and vice versa.
The following color scheme is used in the keyboard:
- Keys that are not assigned are graved out.
- Keys that are assigned are shown in white and black, respectively.
- Keys that belong to a pad for which a color is assigned are shown in this color.
Previewing Notes Using the Keyboard
The vertical position where you click a key on the keyboard defines the velocity that is used to trigger a note. Click the lower part of a key to use the highest velocity, and the upper part to use the lowest velocity.
-
To play a key and all following keys at t he same velocity, for as long as you keep the mouse button pressed, hold down [Ctrl]/[Command] and click the key on the keyboard.
-
To play each note 10 times at increasing velocities between 1 and 127, hold down [Ctrl]/[Command]-[Alt]/[Option] and click a key.
Options Page
The Options page contains global settings regarding performance issues, global functions, and MIDI controllers.
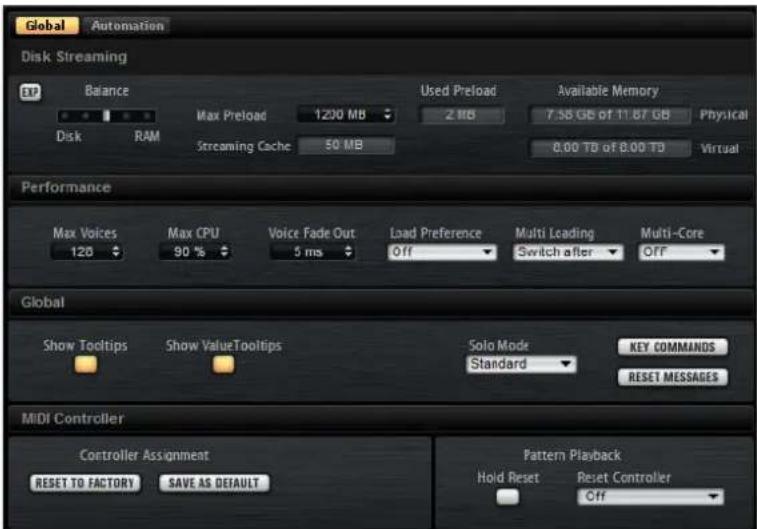
Disk Streaming
Some of the programs come with a large amount of data. Ideally, the computer would load all the program data into the RAM for fast access. However, this would leave less RAM for other applications. Also, your computer may not be able to handle this kind of load. Therefore, Groove Agent loads only the initial milliseconds of each sample into RAM. You can specify how much RAM should be used and how much Groove Agent should rely on accessing the hard-disk.
Balancing Disk vs. RAM
Use the Balance slider to balance the hard disk versus the RAM usage.
- If you need more RAM for other applications, drag the slider to the left towards the Disk setting.
- If your hard disk is not supplying data fast enough, drag the slider to the right towards the RAM setting.
NOTE
The Disk vs. RAM setting always applies to all plug-in instances. It is not saved with the project. You set it up only once for your computer system.
Used Memory and Available Memory
These displays provide information of the memory load in MB according to the current balance slider setting.
Max Preload
Determines the maximum amount of RAM that Groove Agent uses for preloading samples. In most cases, the default values are sufficient. However, it may become necessary to reduce this value, for example, when working with other applications or plug-ins that require a lot of memory.
Expert Mode
Activate this button if you want to adjust the Disk Streaming settings in greater detail.
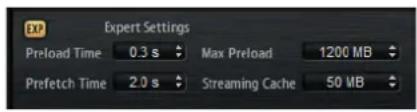
-
Pre load Time defines how much of the start of the samples is preloaded into the RAM. Larger values allow for more samples to be triggered in a short time.
-
Prefetch Time determines the read-ahead capacity into the RAM while streaming samples for a voice that is playing. Larger values allow for better transfer rates from disk, and usually for more voices. However, this requires larger streaming cache in RAM. If you increase the Prefetch Time, it is a good idea to also increase the Streaming Cache.
- Streaming Cache determines the amount of RAM that is reserved for prefetching. The actually needed size depends on the prefetch time, the number of simultaneously streaming voices and the audio format of the samples. For example, higher sample and bit rates need more RAM.
Performance
The performance section contains settings to optimize the overall CPU performance of the plug-in.
Max Voices
Determines the total number of voices that a plug-in instance can play back. As soon as this limit is reached, Groove Agent starts stealing voices.
Max CPU
To avoid clicks from CPU overloads, you can specify a maximum limit for the CPU load of the plug-in instance. Groove Agent steals voices automatically when this limit is exceeded. At a setting of 100% , this parameter is deactivated.
NOTE
Because of the reaction time of the plug-in, it is possible that you get CPU peaks that exceed the set limit. This can lead to artifacts, such as audio drop-outs. Therefore, it is good practice to set the Max CPU setting at a value a bit lower than actually needed.
Voice Fade Out
Sets the time to fade out voices that need to be stolen because the Max Voices setting or the Max CPU setting have been reached.
Load Preference
Determines how agents that come with 16 and 24 bit samples are loaded by default. Set this to 16 Bit to get faster loading times and to 24 Bit to get better audio quality.
NOTE
Not all agents feature 16 and 24 Bit versions of their samples.
Multi Loading
Normally, when loading multi-programs, the previous multi is kept in the RAM until the new multi has been completely loaded. Therefore, replacing a large multi by another can lead to RAM overload on 32-bit systems.
- To clear a multi before loadin g a new one, select Clear before on the pop-up menu.
Multi-Core
On this pop-up menu, you can specify how many of the available CPU cores of your system can be used by the plug-in. This allows Groove Agent to compute each program on a different core, for example. The best setting here depends on multiple factors, and varies from system to system, and project to project. A good starting point is to set this value to one core less than the available number of cores.
NOTE
If problems occur, reduce the number of cores, or set the pop-up menu to Off and load multiple instances of Groove Agent instead. This way, the host application distributes the work load across the available cores.
Global
NOTE
The settings in this section are not saved with a project, but affect the plug-in as a whole.
Show Tooltips
If this is activated, a tooltip is shown when you move the mouse over a control.
Show Value Tooltips
If this is activated, parameters without a value field display their value in a tooltip when using the corresponding control.
Solo Mode
- I n dStandard do multiple instrument pads and mixer channels to hear them combined.
In Exclusive mode, only one instrument pad or mixer channel can be soloed at a time.
Key Commands
Opens the Key Commands dialog, where you can view and assign key commands.
Reset Messages
Click this button to see all message dialogs again that have been suppressed with the Don't Show Again option.
MIDI Controller
Controller Assignment
With the two buttons in this section, you can save your customized MIDI controller assignments as default or restore the factory MIDI controller assignments.
NOTE
Save as Default does not include any of the MIDI controller assignments of the AUX FX.
The current MIDI controller mapping is also saved with each project. This way, you can transfer your settings to other systems. The project includes the MIDI controller assignments of the AUX FX as well.
NOTE
The controller assignments for the parameters Volume (CC 007) and Pan (CC 010) are fixed and cannot be edited or removed. To change volume or pan of a kit slot, send CC#7 or CC#10 messages on the corresponding MIDI channel of the kit slot.
Pattern Playback
The Hold Reset button sends a global Hold Reset message to all patterns that are used.
The Reset Controller pop-up menu allows you to assign a dedicated MIDI controller to the Hold Reset button for remote-controlling it.
RELATED LINKS
Automation and MIDI Controllers on page 165
Using the Standalone Version of the Plug-In
If you use Groove Agent as a standalone application, an additional section is available at the top of the control panel. Here, you can define key commands, set up audio and MIDI interface routings, adjust the master volume, and access the integrated MIDI scratch pad, which allows you to record your musical ideas without having to start a MIDI sequencer application.
Making Preferences Settings
You can configure the standalone version of Groove Agent in the Plug-In Preferences dialog.
- To open the Plug-In Preferences dialog, click the Open Preferences button to the right of the audio output field or right-click in the topmost section of the control panel and select Plug-In Preferences on the context menu.
Preferences Dialog
The Preferences dialog has several pages on which you can make settings.
MIDI Routing Page
On the MIDI Routing page, you can access the Main and Pattern input ports and make routing settings.
MIDI Input Ports
Use this pop-up menu to specify a MIDI input.
Channel Filter
Determines whether MIDI events are recorded on all MIDI channels, or only on one specific channel.
Filter 'All Notes Off' Controller
Activate this parameter to avoid unwanted "All Notes Off" messages. Such messages are sent by some keyboards when the last key is released. This causes Groove Agent to stop playback, even when the sustain pedal is still in use.
Audio Routing Page
You can use the Audio Output Ports pop-up menus to assign different audio outputs. Groove Agent supports 16 channels. You can assign different audio outputs for each channel.
- To map an output to a channel, select it from the pop-up menu.
- To set the front and rear channels to incrementing audio output ports, hold down [Shift] and select an audio output.
- To assign the audio outputs in pairs to the front and rear channels, hold down [Alt]/[Option]-[Shift] and select an audio output.
Metronome Page
On the Metronome page, a number of settings can be made regarding the use of a metronome.
Mode
Activates/Deactivates the metronome or sets it to Count In mode.
Accent
Accentuates the first beat of each bar.
Level
Adjusts the volume of the metronome.
Connections
Allows you to select a separate stereo output for the metronome.
General Page
- If you want the plug-in to close without prompting when you quit the program, activate Don't prompt for confirmation when quitting Groove Agent.
ASIO Driver Page
Select your audio hardware driver from the ASIO Driver pop-up menu.
Release Driver when Application is in Background
Activate this if you plan to use several audio applications simultaneously.
Input/Output Latency
The input and output latency values for your audio hardware are displayed. Latency is the amount of time it takes for your system to respond to any messages that are sent to it. High latency results in a noticeable delay between when you press a key and when you hear the sound.
Sample Rate
Below the latency values, you can set the sample rate for the connected audio hardware.
Audio Priority
Determines which of the Groove Agent processes gets priority when accessing processor resources on your computer.
- I n Normaio processes and audio playback get roughly equal priorities.
In Boost mode, audio precedes MIDI in priority. Try this mode if audio playback problems occur when playing back MIDI and audio material.
Advanced
Once you have selected the driver, open the Advanced tab to specify which inputs and outputs to use and name these. Click the Control Panel button to open the control panel for the audio hardware and adjust the settings as recommended by the audio hardware manufacturer.
Selecting the MIDI Input and the Audio Output
The MIDI input pop-up menu lists all MIDI devices that are installed on your system.
- Select the MIDI device that you want to use from the MIDI input menu.
The MIDI activity LED in the top left corner of the control panel indicates incoming MIDI messages via the selected MIDI input. The LED lights up on receiving note-on and controller messages. This way, you can check if Groove Agent and your MIDI keyboard are connected to the same MIDI device input.
The Audio output pop-up menu lists all outputs of the selected ASIO device.
- To select an audio output for the main stere o channel of the plug-in, open the Audio output pop-up menu.
RELATED LINKS ASIO Driver Page on page 179
Scratch Pad
The scratch pad allows you to record and play back MIDI files in Standard MIDI File format. You can load existing MIDI files and you can record your own files and save them.

The transport section provides buttons for play, stop, record, and loop. The display shows the song position, the tempo, and the time signature of the MIDI file. In addition, there is a metronome that you can use for recording and practicing.
The scratch pad can play back multi-track MIDI files sending notes on all 16 MIDI channels.
Transport Controls
Play
Click the Play button to start playback of the MIDI file. Playback always starts at the song position.
Stop
Click the Stop button to pause the MIDI file at the current position. Click the button twice to reset the song position to the start.
Record
Click the Record button to start recording.
Loop
Activate the Loop button to play the whole MIDI file in a loop.
The Info Icon
To check which MIDI file is currently loaded, point the mouse at the info icon in the top left corner of the scratch pad. A tooltip appears, showing the name of the MIDI file.
Song Position Indicator
The song position indicator shows the position of the transport. Above the song position indicator, the position is displayed numerically.
After loading a MIDI file, the display shows the full length of the file.
-
To move the transport to a different song position, drag the song position indicator to the new position.
-
To switch the time format between Time and Bars, click the time format symbol in the top right corner of the display.
Tempo and Time Signature
Below the song position display, the Tempo and Time Signature fields are located. These fields provide Groove Agent with tempo and time signature information. These settings are used by the scratch pad and the metronome.
Tempo Track/Fixed
Set this parameter to Track to follow the original tempo of the MIDI file and to Fixed to specify a tempo manually.
Tempo Value
Determines the tempo of the MIDI file.
Adjust Tempo
If the Tempo Track option is selected, this parameter is available, allowing you to scale the playback relatively to the original tempo of the MIDI file.
Sign (time signature)
Determines the time signature. You can enter the new signature as fractions of beats.
Recording Your Performance
PROCEDURE
- Click the record symbol below the Record button to select a record mode.
To start recording immediately when you click the record button, select Direct.
To start recording with the first MIDI note, select MIDI.
To start the recording after a count-in of one bar, select Count In 1.
- To start the recording after a count-in of 2 bars, select Cou nt In 2.
- Click the Record button to start recording.
To indicate that the recording is running, the song position indicator moves from left to right.
- When you are done recording, click the Stop button.
RELATED LINKS
Saving a MIDI File on page 183
Using the Metronome
PROCEDURE
- To select the playback mode of the metronome, click the metronome icon and select one of the options from the pop-up menu:
If On is selected, the metronome is activated and plays continuously.
- I ft In is selecd the metronome plays only during the count-in of a recording.
To deactivate the metronome, select Off.
Loading a MIDI File
PREREQUISITE
You can load MIDI files in Standard MIDI File format (file name extension .mid).
PROCEDURE
- Click the Load File button below the transport buttons.
- In the dialog, select the file that you want to use.
- Click Open to load the MIDI file.
MIDI Channel Filter
If a multitrack MIDI file is loaded, you can play back all MIDI events or only the events of a specific MIDI channel.
- To specify which events to play back, click the MIDI Channel Filter field to the right of the info icon and select an option from the pop-up menu.
Saving a MIDI File
PROCEDURE
- Click the Save File button below the transport buttons.
- In the file dialog, specify a location and a file name.
- Click Save to save your recorded performance as a MIDI file.
Master Volume

Use the volume control on the right to set the master volume of the outputs of the standalone version of Groove Agent. This includes the volume of the outputs of Groove Agent and the output of the metronome.
Mixer Routing Diagrams

Beat Agent Routing
Acoustic Agent Routing
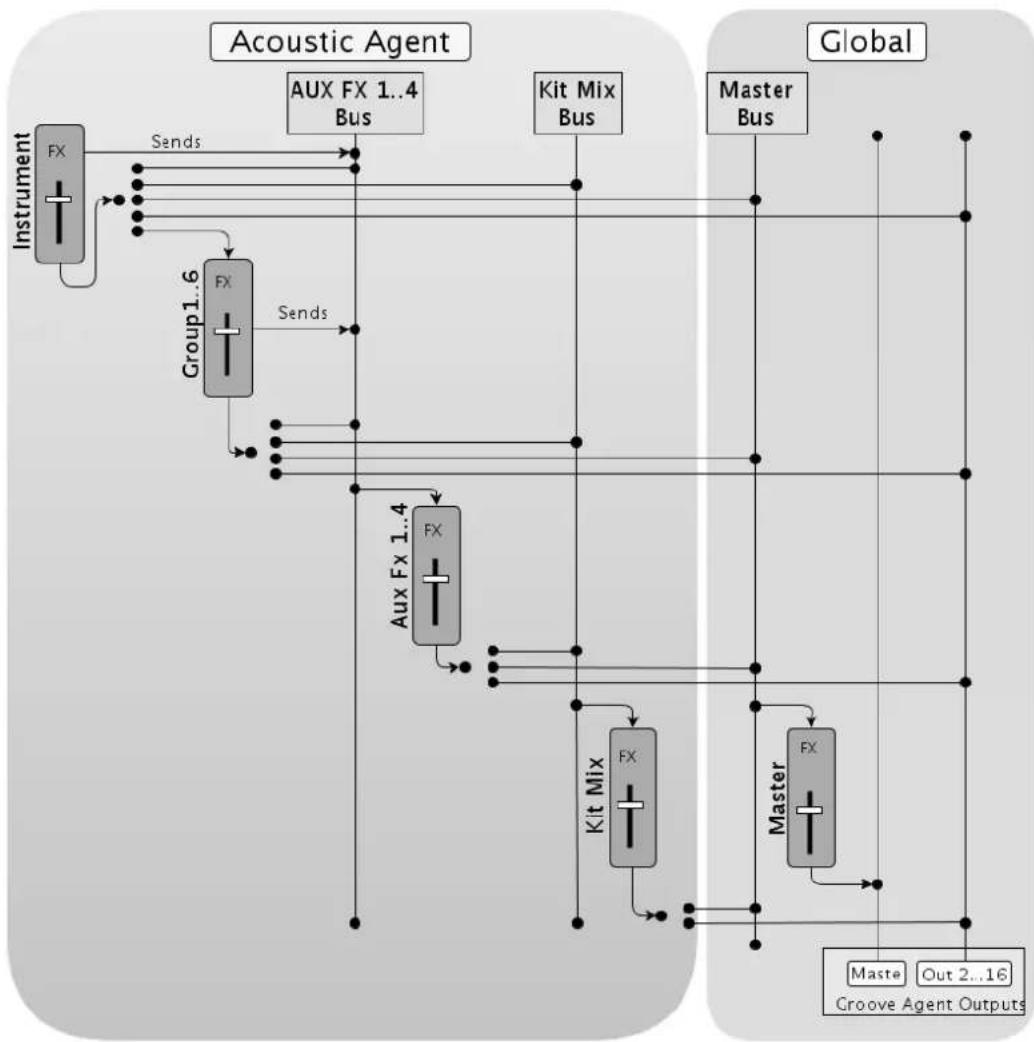
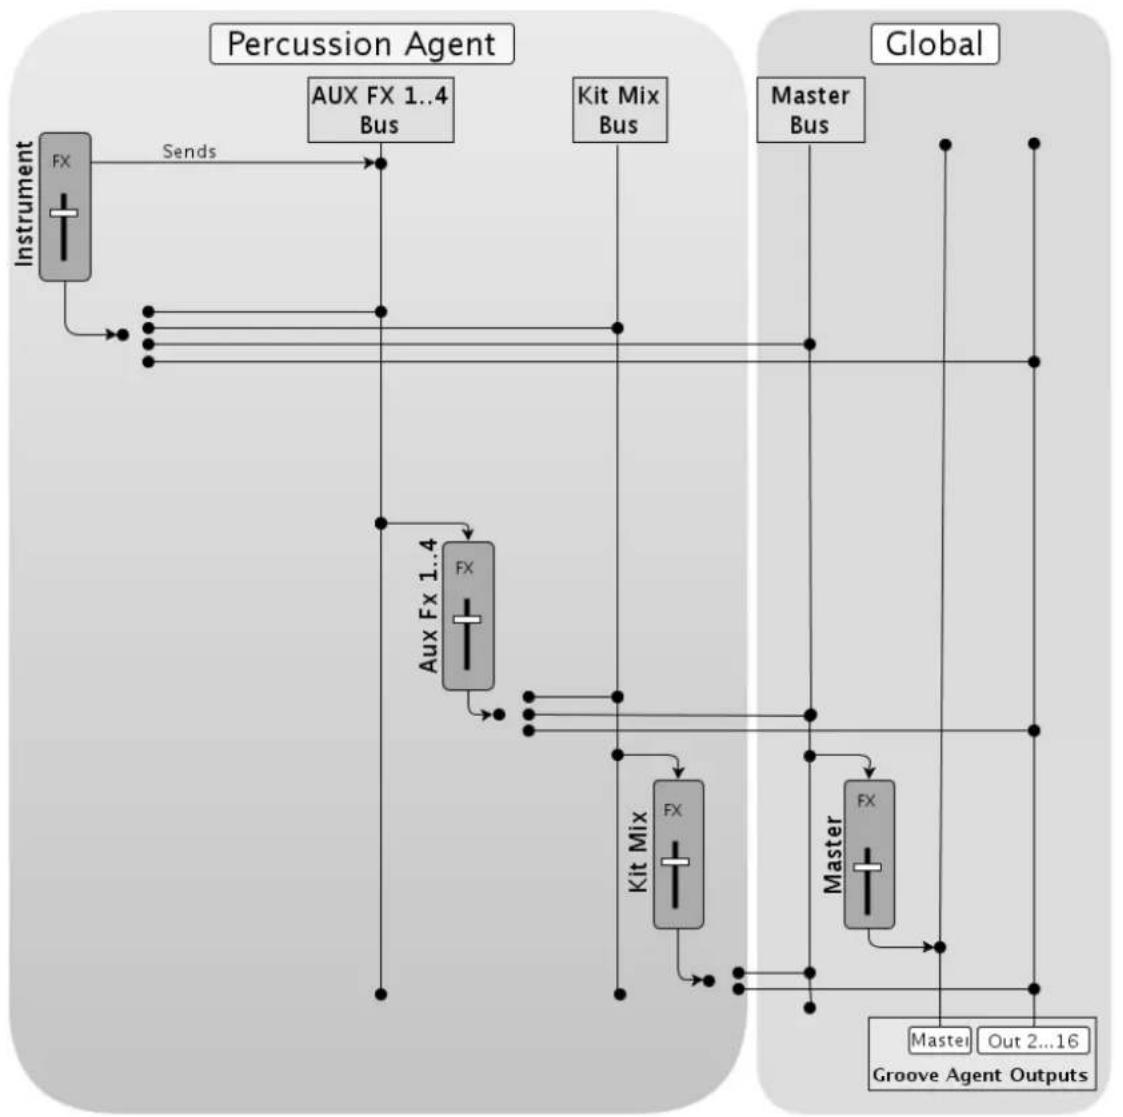
Percussion Agent Routing
A
ABS button 64
Absolute Editing 64
Acoustic Agent 101
Mixing 113
Pattern Editing 107
Sound Editing 101
Audio Output 180
Automation
About 165
AUX Mixer 126
B
Beat Agent 63
Exporting Files 98
Importing Files 98
Mixing 97
Pattern Editing 96
Sound Editing 63
Browser
Loading Files 24
Replacing Samples 29
C
Compressor 156
D
Delay Effects 131
Distortion Effects 143
Dynamics Effects 154
E
Edit Page
Amp Tab 80
Filter Tab 78
Main Tab 68
Mapping View 67
Pitch Tab 76
Sample Tab 81
Slice Tab 91
Effect Slots 129
Effects 126
About 128
Auto Filter 139
Chorus 145
Compressor 154
Distortion 143
Envelope Shaper 163
Envelope Stereo Pan 164
Expander 160
Flanger 146
Gate 162
Graphic EQ 137
Limiter 158
MorphFilter 142
Multi Delay 135
Phaser 148
REVerence 131
Ring Modulator 149
Step Flanger 147
Studio EQ 136
Tape Saturator 144
Using 129
Vintage Ensemble 153
Effects Page 129
Envelopes
Editing 71
EQ Effects 136
Exporting
Kit with Samples 99
F
Filter Effects 139
Finding Missing Samples 99
G
GAK Files
Importing 98
Groove Agent ONE Content 14
1
Instrument Pads 36
MIDI Effects 43
K
Kit Context Menu 18
Kit Mixer 126
Kit Rack 17
Kit Slot 16
Kits
About 14
Loading 16
M
Macro Pages
About 14
Managing Files 20
Master Mixer 126
Master Section 169
MediaBay 20
Filters 20
Loading Kits 22
Results List 21
MIDI Controllers
About 166
Assigning 167
Parameter Range 167
MIDI File
Loading 183
Saving 183
MIDI Input 180
Missing Samples
Finding 99
Mixer Page 126
Mixing 126
Modulation Effects 145
MPC Files
Importing 98
Multi Selection 30
0
Options Page 173
P
Pad Section 35
Instrument Pads 36
Pattern Pads 47
Panner Effects 164
Pattern Editor 52
Recording MIDI 60
Pattern Pads 47
Overview Tab 50
Percussion Agent 117
Mixing 123
Pattern Editing 120
Sound Editing 117
Preferences Dialog 178
Preferences Settings 178
Presets
About 14
Module Presets 33
VST Presets 33
Programs
About 14
R
Recording MIDI 60
REL button 64
RelativeEditing 64
Reverb Effects 131
REX Files
Importing 98
Routing Effects 164
S
Sliced Loops
Importing 98
V
Value Ranges
Adjusting 30
Deutsch
Matthias Klag, Michael Ruf
Cristina Bachmann, Heiko Bischoff, Christina Kaboth, Insa Mingers, Sabine Pfeifer, Kevin Quarshie, Benjamin Schütte
Load Previous/Next Kit
Load Kit With Patterns
Load Kit With Patterns
Delete Pattern Group
Revert to Last Saved Kit
Export Kit With Samples
Programme in Slots laden
Library Manufacturer
Show in Explorer (Win)/Reveal in Finder (Mac)
VST-Presents speichern
VORGEHENSWEISE
Pattern Player On/Off
Trim Pattern to Start/End
Select All Notes on Key
Delete All Notes on Key
Delete Double Notes on Key
Create Notes when drawing Velocity
Velocity for new notes
Iterative Quantize On/Off
Global Quantize On/Off
Parabola, Sine, Triangle, Square
Jam Mode und MIDI Record让他们觉得自己很不高兴,于是就向自己发起了怒气。Jami and Mimi had been so angry that they decided to go home.
Pad-Einstellungen
Level Velocity Curve
Level Velocity Curve
Level Velocity Curve
Norm (Use Normalized Velocity)
Play Selection Looped
Range Selection Tool
Revert to Full Sample
Show Fades in Waveform
Velocity Start Range
Link Sample Start and End
Link Loop Start and End
Velocity Start Range
Jump to Previous/Next Slice
Create/Remove Slices
Single, Small Group, Large Group
Close Microphone Channels
Width (Room Channel Strip Only)
Bit Red (Bit Reduction)
Modulation Range Fine
Controller Assignment
Release Driver when Application is in Background
Input/Output Latency
575 Section Multi Slot
575 Section Master
Load Previous/Next Kit
Load Kit with Patterns
Load Kit With Patterns
Delete Pattern Group
Revert to Last Saved Kit
Export Kit With Samples
Character (caractere)
Show in Explorer (Win)/Reveal in Finder (Mac)
Pattern Player On/Off
Trim Pattern to Start/End
Select All Notes on Key
Delete All Notes on Key
Delete Double Notes on Key
Show Controller Lane
Create Notes when drawing Velocity
Velocity for new notes
Iterative Quantize On/Off
Global Quantize On/Off
Parabola, Sine, Triangle, Square
Level Velocity Curve
Level Velocity Curve
Level Velocity Curve
Play Selection Looped
Range Selection Tool
Snap to Zero Crossing
Revert to Full Sample
Show Fades in Waveform
Velocity Start Range
Link Sample Start and End
Link Loop Start and End
Velocity Start Range
Jump to Previous/Next Slice
Create/Remove Slices
Single, Small Group, Large Group
Show Early Reflections/Chorusing Page
Section Envelope Follower
Rate Red (Rate Reduction)
Bit Red (Bit Reduction)
Modulation Range Fine
Charger multi-programme
Release Driver when Application is in Background
Input/Output Latency
Selection multiple 424
Slot de kit 408
Slots d'effets 531
Sortie audio586
日本語
Cristina Bachmann, Heiko Bischoff, Christina Kaboth, Insa Mingers, Sabine Pfeifer, Kevin Quarshie, Benjamin Schutte
All rights reserved.
目次
759 Vintage Ensemble
760 ロイナミクス工アクト
760 Compressor
762 VintageCompressor
763 Tube Compressor
764 Limiter
765 Brickwall Limiter
766Maximizer
767 Expander
768 Gate
770 Envelope Shaper
770 PAnn-aEnFεKtU
770 Stereo Pan
771 StereoEnhancer
- 「デバイス (Devices)」>「VST ネンストウルメntb (VST Instruments)」を選択いたします。
- 「VSTインストウルメnton (VST Instruments)」ウindsロー「ラックイ ````````````````````````````````````````````````````````````````````````````````````````````````````````````````````````````````````````````````````````````````````````````````````````````````````````>
Level Velocity Curve
Level Velocity Curve
Level Velocity Curve
NORM (Use Normalized Velocity)
Play Selection Looped
Range Selection Tool
Snap to Zero Crossing
Revert to Full Sample
Show Fades in Waveform
Velocity Start Range
Link Loop Start and End
Link Sample Start and End
sʌnˈpɪlərɪdʒiːkɪn ɪdʒiːn ɪdʒiːn ɪdʒiːn ɪdʒiːn ɪdʒiːn ɪdʒiːn ɪdʒiːn ɪdʒiːn ɪdʒiːn ɪdʒiːn ɪdʒiːn ɪdʒiːn ɪdʒiːn ɪdʒiːn ɪdʒiːn
Loop Start
ルーパフの開始位置を設定します。
Loop End
ルーパフの終了位置を設定します。
Velocity Start Range
Show Early Reflections/Chorusing Page
FIILTARUMEING#F#JUUN#E#JUN#EJUN#EJUN#EJUN#EJUN#EJUN#EJUN#EJUN#EJUN#EJUN#EJUN#EJUN#EJUN#EJUN#EJUN#EJUN#EJUN#EJUN#EJUN#EJUN#EJUN#EJUN#EJUN#EJUN#EJUN#EJUN#
MorphFilter
FIILTUNFTHWUHOTFJFTHWUHOT
補足
Modulation Range Fine
Controller Assignment
Release Driver when Application is in Background
Input/Output Latency
SIGN (Time Signature)
Vintage Ensemble 759
工八口一斯才770
概要732
使用733
工表克卜口733
工心口一
編集670
才一丁才出力787
才一トメ一」
概要772
加
環境設定785
去
丰
概要608
□一610
卡卜卡卡卡卡卡卡卡卡卡卡卡卡卡卡卡卡卡卡卡卡卡卡卡卡卡卡卡卡卡卡卡卡卡卡卡卡卡卡卡卡卡卡卡卡卡卡卡卡卡卡
卡卜口610
卡卜兰克611
L
所在不明のサングル701
所在不明のサングルの検索701
才
スライスたループ
1nbo- 699
世
絕對的左編集 662
乙
相对的左編集 662
龙
DAVNIOMKsEaF760
乙
デイスローエフク卜748
デイレイエフク卜735
は
八夕一工日夕-649
MIDIの錄音58
八夕一丁643
「Overview」ケフ646
八味子630
InnsstUlMeNtBbD631
八夕一丶卜643
八牛一工克卜770
示
7416
菲尔専一工丶克卜744
複数選択 625
1
VST P168 628
概要608
毛紺一ル総卜628
□G
概要608
末
卡斯卡776
三幸730
毛
Mogudre-shonEnFekT 751
U
135
的
ルーダインガエフク卜770
- Table of Contents
- Installation and Setup
- Introduction
- Managing Your Sounds
- Common Editing Methods
- Working With Pads
- Beat Agent
- Acoustic Agent
- Percussion Agent
- Mixing and Effect Handling
- Effects Reference
- Automation and MIDI Controllers
- Global Functions and Settings
- Using the Standalone Version of the Plug-In
- Installation and Setup
- Welcome
- The Agent Concept
- Typographical Conventions
- USB-eLicenseer
- System Requirements
- Launching Installation via the Start Center
- NOTE
- PROCEDURE
- Launching Installation Manually
- How You Can Reach Us
- Setting Up
- Setting Up Groove Agent as a VST Instrument
- Accessing Groove Agent via the VST Instruments Rack
- PREREQUISITE
- Click Create.
- RESULT
- Accessing Groove Agent via an Instrument Track
- Selecting Outputs
- Using Groove Agent in an AU-Compatible Application
- Using the Instrument as Standalone Application
- Introduction
- Window Overview
- About Kits, Presets, and Groove Agent ONE Content
- Kits
- Sliced Loop Kits
- Plug-in Presets (VST Presets)
- Groove Agent ONE Content
- Content Files and Folder Structure
- Managing Your Sounds
- Loading Kits
- Kit Slot
- Load button
- Load Previous/Next Kit
- Load Kit with Patterns
- Size
- Polyphony
- MIDI Channel
- MIDI Input Indicator
- Velocity Curve
- Song Position Counter
- Tempo Display
- Kit Rack
- Kit Context Menu
- Load Kit
- Load Pattern Group
- Save Pattern Group
- Delete Pattern Group
- Save Kit
- Save Kit As
- Remove Kit
- Revert to Last Saved Kit
- Cut Kit
- Copy Kit
- Paste Kit
- Rename Kit
- Reset Agent
- Import
- Export Kit With Samples
- Managing and Loading Files
- Managing Files via the MediaBay
- Applying Filters
- Category Filter
- Instrument Set Filter
- Results List
- Text Search
- View Filters
- Rating Filter
- Content Filter
- Columns
- Setting Up the Result Columns
- Results Counter
- Configuring the Results List
- Loading Kits into Slots
- Importing Presets
- Editing Preset Attributes
- Available Attributes
- Media Attributes
- Name
- Rating
- Comment
- Content Summary
- Write Protection
- Library Name
- Library Manufacturer
- Author
- Musical Attributes
- Category
- Sub Category
- Style
- Sub Style
- Character
- Tempo
- Bars & Beats
- Signature
- Key
- GM Sound
- Deleting User Presets
- Loading Files Using the Browser
- Path Section
- Location Tree
- Location Tree Context Menu
- Refresh Views
- Rescan Disk
- Quick Rescan Disk
- Show in Explorer (Win)/Reveal in Finder (Mac)
- Locations
- Managing Locations
- Navigating in the Results List
- Performing a Text Search
- Searching for Files on Your System
- Preview and File Info Section
- File Info Section
- Preview Section
- Level
- Play
- Stop
- Pause
- Auto Play
- LoopPlayback
- Play Position
- Missing Samples
- RELATED LINKS
- Loading Files
- Replacing the Focused Sample
- Common Editing Methods
- Encoders and Sliders
- Multi Selection and Parameter Controls
- Adjusting the Value Ranges
- Buttons
- On/Off Buttons
- Push Buttons
- Value Fields
- Using Key Commands
- Presets
- Handling Section and Module Presets
- Handling VST Presets
- Loading VST Presets
- Saving VST Presets
- Working With Pads
- Transport Controls
- Instrument Pads
- Showing Information about the Instrument Pads (Beat Agent Only)
- Setting the Output for the Pads (Beat Agent Only)
- Locking Color and Output Settings (Beat Agent Only)
- Locking Pad Settings (Acoustic and Percussion Agent)
- Using an Alternative MIDI Note Assignment
- Pad Section
- Active
- Exclusive
- Jam State
- Play Mode
- Restart Mode
- Sync to Beat
- Velocity Mode
- Jam Mode
- Jam States
- Standard
- Next
- Return
- Using Jam Mode
- Pattern Section
- Pattern Player On/Off
- Pattern Library
- Original Tempo
- Start
- End
- Import Field
- MIDI Export Field
- Import/Export and Alternative Trigger Note Mappings
- Performance Section
- Swing Grid
- Swing
- Gate Scale
- Velocity Scale
- Quantize Amount
- Quantize Grid
- Tempo Scale
- Using MIDI Effects
- Pad Mode
- Internal
- Remote
- Rudiments Section
- Type
- Flam, Drag, and Ruff
- Sync
- Time
- Note Value
- Dynamics
- Humanize
- Roll
- Buzz
- Grip
- Pressure
- MIDI Delay
- Repeats
- Damping
- Pitch
- Distribution
- Pattern Pads
- Assigning MIDI Files to Pads
- Assigning Multiple MIDI Files to Pads
- Removing MIDI Files from Pads
- Using MIDI Port B for Pattern Pads
- Locking Pad Settings
- Moving and Copying Pattern Pads
- Overview Tab
- Assigning Patterns and Styles to Cells
- Unassigning Patterns and Styles
- Moving and Copying Patterns and Styles
- Opening Patterns in the Pattern Editor
- Managing Pattern Groups
- Pattern Editor
- Drum Sounds List
- Drum Sounds List Context Menu
- Select All Notes
- Clear Pattern
- Delete Double Notes
- Trim Pattern to Start/End
- Duplicate Pattern
- Classify Pattern
- Select All Notes on Key
- Delete All Notes on Key
- Delete Double Notes on Key
- Toolbar
- Object Selection
- Drumstick
- Erase
- Zoom
- Mute
- Line
- Show Controller Lane
- Show Note Length
- Show Info Line
- Configuration
- Preview Notes
- Auto-Scroll
- Show Pad Colors
- Visibility
- Create Notes when drawing Velocity
- Snap
- Velocity for new notes
- Iterative Quantize On/Off
- Global Quantize On/Off
- Record MIDI
- Auto Quantize
- Metronome
- Precount Click
- Metronome Volume
- Pattern Length
- Start Beat
- End Beat
- Sign (time signature)
- Creating and Editing Patterns
- Entering, Editing, and Previewing Notes
- Quantizing Notes
- Defining the Length of a Pattern
- Defining the Playback Range
- Trimming Patterns
- Editing Controllers on the Controller lane
- Line Tool Modes
- Parabola, Sine, Triangle, Square
- Paint
- Recording MIDI Events Live
- Common Pad Settings
- Pad Colors
- Selecting Pads
- Pad Functions
- Beat Agent
- Sound Editing
- Absolute and Relative Editing
- Editing Selection or All
- Assigning Samples to Pads
- Assigning Samples to Pads using Drag and Drop
- Moving and Copying Samples between Pads
- Moving and Copying Samples between Groups
- Moving Sliced Loops
- Changing the Order of Pads
- Mapping View
- Changing the Velocity Ranges of Samples
- Editing the Mapping of a Pad
- Replacing Samples
- Removing Samples From Pads
- Main Tab
- Mode
- Poly
- Fade
- Exclusive Group
- Volume
- Pan
- Coarse
- Fine
- Cutoff
- Resonance
- Distortion
- Output
- Playback Quality
- Filter Type
- Filter Shape
- Editing the Envelope
- Fixed
- Selecting Nodes
- Adjusting the Time Parameter
- Adjusting the Level Parameter
- Adjusting the Curve Parameter
- Adding and Removing Nodes
- Adding Nodes Using the Fill Function
- Using Sync
- Envelope Modes
- Sustain
- Loop
- One Shot
- Sample Loop
- Setting Up the Loop
- Pitch Tab
- Key Range
- Fixed Pitch
- Random
- Env Amnt
- Level Velocity (Vel>Lev)
- Time Velocity (Vel>Time)
- Segments
- Level Velocity Curve
- Mapping Samples Chromatically over Multiple Pads
- AFTER COMPLETING THIS TASK
- Filter Tab
- Velocity
- Amp Tab
- AUX 1-4
- Norm (Use Normalized Velocity)
- Sample Tab
- Play Sample
- Play Selection Looped
- Auto Scroll
- Follow Sample Playback
- Range Selection Tool
- Zoom Tool
- Play Tool
- Scrub Tool
- Snap to Zero Crossing
- Edit Loop
- Show Resulting Loop Crossfade
- Trim Sample
- Normalize Sample
- Normalize Level
- Revert to Full Sample
- Show Fades in Waveform
- Show Channel Sum
- Show Left Channel
- Show Right Channel
- Preview Volume
- Ruler
- Waveform Display and Level Scale
- Parameter Section
- Velocity Start Range
- Key On Delay
- Loop Mode
- Reverse
- Sample Start
- Sample End
- Link Sample Start and End
- Loop Start
- Loop End
- Link Loop Start and End
- Loop Crossfade
- Loop Tuning
- Detune
- Gain
- AudioWarp Parameters
- Sync Mode
- Speed
- Original BPM
- Note Length and Number of Beats
- Formant (Solo Mode Only)
- Markers
- Creating Fades
- Zooming
- View Range
- Auto
- Last
- Full
- Sample
- Sample Start Range
- Auditioning Samples
- Making Selections
- Defining Sample Start and End from a Selection
- Defining Loop Start and End from a Selection
- Assigning a Portion of a Sample to another Pad
- Normalizing Samples
- Trimming Samples
- Slice Tab
- Play Slice
- Lock Slices
- Jump to Previous/Next Slice
- BPM
- Bars/Beats
- Create/Remove Slices
- Slice Detection Mode
- Threshold
- Min Length
- Grid Catch
- Fade In/Out
- Slicing a loop
- Automatically Classifying Drum Sounds
- Manually Classifying Slices
- Selecting all Slice Pads of the Same Class
- Replacing Slices With Slices of the Same Drum Class
- Drum Class Colors
- Adding and Removing Slices
- Pattern Editing
- Mixing
- Agent Mixer
- Parameters
- Meter
- Peak Level Meter
- Insert Effect Slots
- Sends 1-4
- Bus Name
- Importing and Exporting Files
- Importing MPC and GAK Files
- Importing REX Files and Sliced Loops
- Exporting Kits with Samples
- Finding Missing Samples
- Entering a Search Path
- Starting the Search
- Multiple Results
- Favorite Paths
- Search Options
- Acoustic Agent
- About the 24 Bit and 16 Bit Sample Versions
- Instrument Preview
- Sound Parameters
- Kick Drums
- Room Level
- Overhead Level
- Bleed
- Tune
- Attack
- Hold
- Decay
- Kick A/B
- Snare Drums
- Master Bleed
- Snare A/B
- Toms
- Cowbell
- Tambourine
- Claps
- Single, Small Group, Large Group
- Cymbals
- Choke On/Off
- Choke Controller
- Ride Cymbal
- Bow
- Bell
- Edge
- Hihat
- Shank, Tip, Foot
- Hihat Min/Max
- Hihat Controller
- Agent Tab
- Use Style
- Using the Style Player
- Removing a Style
- Converting Intros, Main Patterns, Fills, or Endings into MIDI Patterns
- Performance Section (Style Player)
- Pattern Dial
- Complexity
- Intensity
- Half Time On/Off
- Auto Complexity
- Break
- Auto Fill
- Crash Mode
- Hihat Mode
- Ride Mode
- Agent Mixer Overview
- Groups
- Close Microphone Channels
- Room and Overhead Microphones
- Kit Mix Channel
- Channel Parameters
- Solo
- Peak Level
- AUX Sends 1-4
- Width (Room and Overhead Channel Strips Only)
- Agent Mixer Equalizer and Effects
- Mixer Presets
- Percussion Agent
- Crash Cymbal
- Style Player
- Compiling a Percussion Style
- Style Player Context Menu
- Percussion Styles Presets
- Style parameters
- Quantize
- Global Intensity
- Global Swing
- Global Swing Grid
- Substyle Parameters
- Instrument On/Off
- Instrument Substyle Context menu
- Random Complexity
- Groove Offset
- Room Microphone
- Width (Room Channel Strip Only)
- Mixing and Effect Handling
- Mixer Page
- AUX Mixer
- Effect Slots
- Kit Mixer
- Master Mixer
- Effect Handling
- Default Effect Settings
- Using the Insert Effect Slots
- Effects Reference
- Reverb and Delay Effects
- REverence
- Impulse Response
- Predelay
- Equalizer
- ER Tail Split
- ER Tail Mix
- Reverb
- Early Reflections
- Show Early Reflections/Chorusing Page
- ER/Tail Mix
- Low Cut
- High Cut
- Delay
- Room Size
- Main Time
- High Time
- Low Time
- High Freq
- Low Freq
- Shape
- Density
- Width
- Mix
- Chorusing
- Chorusing On/Off
- Chorusing Rate
- Chorusing Depth
- Multi Delay
- Delay L/R
- Feedback
- Feedback L/R
- Filter Low
- Filter High
- EQ Effects
- Studio EQ
- Freq
- Q (Quality)
- Graphic EQ
- Range
- Invert
- Flatten
- DJ-EQ
- Low Gain
- Low Kill (Activates Low Cut)
- Mid Gain
- Mid Kill (Activates Mid Cut)
- Filter Effects
- Auto Filter
- Filter Parameters
- Filter Shapes
- Input
- LFO Section
- LFO Waveform and Shape
- Depth
- Morph
- Envelope Follower Section
- Sensitivity
- Release
- Pedal Section
- Pedal
- MorphFilter
- Filter Shape B
- Filter Shape A
- Distortion Effects
- In Gain
- Rate Red (Rate Reduction)
- Tube Drive
- Hard Clip
- Bit Red (Bit Reduction)
- Out Gain
- Tape Saturator
- Oversampling
- Drive
- Auto Gain
- Low Filter
- High Filter
- Tube Saturator
- Low Filter Gain
- High Filter Gain
- Modulation Effects
- Chorus
- Rate
- Phase
- Flanger
- Cross FB
- Tone
- Step Flanger
- S&H Mix
- Smooth
- Steps
- Phaser
- Shift
- Ring Modulator
- LFO Freq
- LFO Depth
- Frequency
- Envelope Follower
- Frequency Shifter
- Frequency Coarse
- Frequency Fine
- L/R Offset Coarse
- L/R Offset Fine
- Modulation Range Coarse
- Modulation Range Fine
- Notches
- LFO Rate
- Vintage Ensemble
- Shimmer
- Shimmer Rate
- Dynamics Effects
- Compressor
- Ratio
- Soft Knee
- Make-Up
- Auto Release
- Peak - RMS
- VintageCompressor
- Input (-24 to 48 dB)
- Output (-48 to 24 dB)
- Attack (0.1 to 100 ms)
- Punch
- Release (10 to 1000 ms or Auto mode)
- VU Meter
- In/Out Meters
- Tube Compressor
- Drive (1.0 to 6.0)
- Input (-24.0 to 48.0)
- Limit
- Output (-12.0 to 12.0)
- Attack (0.1 to 100.0)
- Mix (0 to 100)
- Side-chain
- Filter section (LP, BP, and HP)
- Side-chain section
- Center
- Q-Factor
- Monitor
- Limiter
- Brickwall Limiter
- Threshold (-20 to 0 dB)
- Release (ms)
- Link
- Detect Intersample Clipping
- Maximizer
- Output (-24 to 6 dB)
- Optimize (0 to 100)
- Soft Clip
- Expander
- Gate
- Filter
- Peak-RMS
- Envelope Shaper
- Attack - Gain
- Attack - Length
- Release - Gain
- Panner Effects
- Stereo Pan
- Input Swap
- StereoEnhancer
- Color
- Mono
- Automation and MIDI Controllers
- Automation
- Setting Up Automation
- Automation Page
- MIDI Controllers
- Assigning MIDI Controllers
- Unassigning MIDI Controllers
- Setting the Parameter Range
- Global Functions and Settings
- Plug-in Functions Section
- Multi Slot Section
- Load Multi-Program
- Save Multi-Program
- Master Section
- Master Volume
- Master Tune
- Performance Displays
- CPU
- Disk
- MEM (Memory)
- The Plug-in Name and Steinberg Logo
- MIDI Follow
- Controller Selector
- Fix Velocity
- Global insert, AUX, and Pattern Player buttons
- Undo/Redo
- MIDI Reset
- RAM Save
- The Keyboard
- Previewing Notes Using the Keyboard
- Options Page
- Disk Streaming
- Balancing Disk vs. RAM
- Used Memory and Available Memory
- Max Preload
- Expert Mode
- Performance
- Max Voices
- Max CPU
- Voice Fade Out
- Load Preference
- Multi Loading
- Multi-Core
- Global
- Show Tooltips
- Show Value Tooltips
- Solo Mode
- Key Commands
- Reset Messages
- MIDI Controller
- Controller Assignment
- Pattern Playback
- Using the Standalone Version of the Plug-In
- Making Preferences Settings
- Preferences Dialog
- MIDI Routing Page
- MIDI Input Ports
- Channel Filter
- Filter 'All Notes Off' Controller
- Audio Routing Page
- Metronome Page
- Accent
- Connections
- General Page
- ASIO Driver Page
- Release Driver when Application is in Background
- Input/Output Latency
- Sample Rate
- Audio Priority
- Advanced
- Selecting the MIDI Input and the Audio Output
- Scratch Pad
- Record
- The Info Icon
- Song Position Indicator
- Tempo and Time Signature
- Tempo Track/Fixed
- Tempo Value
- Adjust Tempo
- Recording Your Performance
- Using the Metronome
- Loading a MIDI File
- MIDI Channel Filter
- Saving a MIDI File
- Mixer Routing Diagrams
- Acoustic Agent Routing
- A
- B
- C
- D
- E
- Effects 126
- F
- G
- 1
- K
- M
- 0
- P
- R
- S
- V
- Programme in Slots laden
- VST-Presents speichern
- VORGEHENSWEISE
- Pad-Einstellungen
- Character (caractere)
- Section Envelope Follower
- Charger multi-programme
- 目次
- 補足
Brand : STEINBERG
Model : Groove Agent 4
Category : Audio software