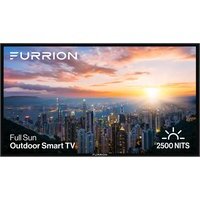
Aurora FDUP75CSA - TV Furrion - Free user manual and instructions
Find the device manual for free Aurora FDUP75CSA Furrion in PDF.


User questions about Aurora FDUP75CSA Furrion
0 question about this device. Answer the ones you know or ask your own.
Ask a new question about this device
Download the instructions for your TV in PDF format for free! Find your manual Aurora FDUP75CSA - Furrion and take your electronic device back in hand. On this page are published all the documents necessary for the use of your device. Aurora FDUP75CSA by Furrion.
USER MANUAL Aurora FDUP75CSA Furrion
SMART 4K UHD FULL SUN, FULL SHADE & PARTIAL SUN TV SMART 4K UHD PLEIN SOLEIL, PLEINE OMBRE ET SOLEIL PARTIEL SMART TV 4K UHD PARA SOMBRA TOTAL O PARCIAL, O LUZ SOLAR TOTAL
MODEL/MODÈLE/ MODELO: FDUB**CSA, FDUF**CSA, FDUP**CSA, FDUF**CSA-CA, FDUP**CSA-CA
USER MANUAL/MANUEL DE L'UTILISATEUR/MANUAL DE USUARIO
natural_image
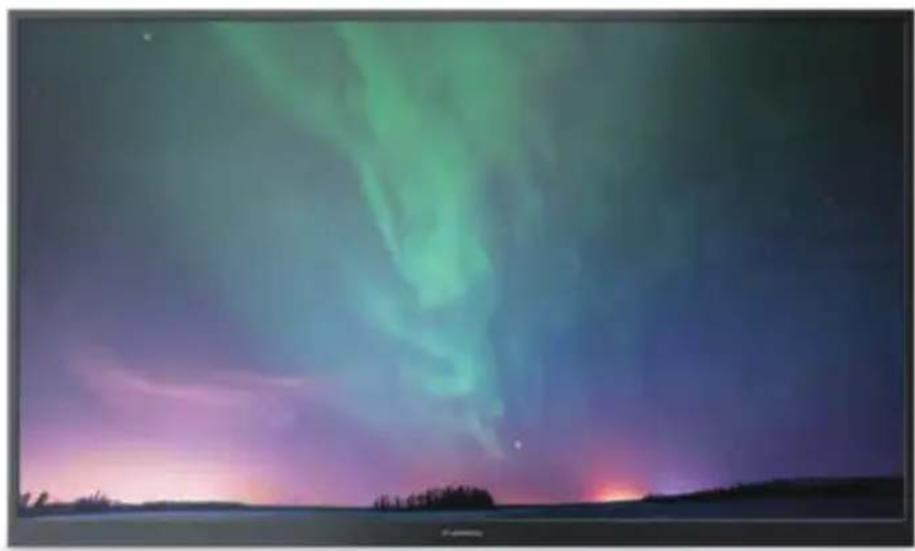
Nighttime aurora bore scene with vibrant green and purple clouds rising above a calm lake, silhouetted trees on the left (no text or symbols)* Product picture for reference only
Thank you and congratulations for purchasing this Furrion product. Before operating your new product, please read these instructions carefully. This user manual contains information for safe use, installation and maintenance of the product.
Please keep this user manual in a safe place for future reference. This will ensure safe use and reduce the risk of injury. Be sure to pass on this manual to new owners of this product.
The manufacturer does not accept responsibility for any damages due to not observing these instructions.
Supplier's Declaration of Conformity
47 CFR § 2.1077 Compliance Information
Unique Identifier
Trade Name: Furrion
Model No.: FDUB43CSA, FDUF43CSA, FDUP43CSA, FDUF50CSA, FDUP50CSA, FDUB55CSA, FDUF55CSA, FDUP55CSA, FDUB65CSA, FDUF65CSA, FDUP65CSA, FDUF43CSA-CA, FDUP43CSA-CA, FDUF50CSA-CA, FDUP50CSA-CA, FDUF55CSA-CA, FDUP55CSA-CA, FDUF65CSA-CA, FDUP65CSA-CA
Responsible Party – U.S. Contact Information
Furrion Innovation Center & Institute of Technology 52567 Independence Ct., Elkhart, IN 46514, USA Toll free:1-800-789-3341; Email: support@furrion.com
FCC Compliance Statement
This device complies with Part 15 of the FCC Rules. Operation is subject to the following two conditions: (1) This device may not cause harmful interference, and (2) this device must accept any interference received, including interference that may cause undesired operation.
CONTENTS
IMPORTANT SAFETY INSTRUCTIONS....3
CONDENSATION....5
COMPLIANCE....7
Safety Precautions....9
PRODUCT OVERVIEW 10
Control Panel....10
Rear Panel....11
Remote Control....12
WHAT'S IN THE BOX 13
CONNECTIONS 13
INSTALLATION....15
Choose a Proper Location for your TV....15
Mount on the Wall....16
Connect Power 17
INSTALL REMOTE CONTROL BATTERY....17
GETTING STARTED WITH WEBOS TV....18
Initial Setup....18
Watching TV Broadcasting....18
Connecting to the Network....19
Using the Home Feature of the webOS TV....21
Manage webOS TV Home 22
SETTINGS 23
TROUBLESHOOTING 24
SPECIFICATIONS....25
CAUTION
RISK OF ELECTRIC SHOCK DO NOT OPEN

CAUTION: TO REDUCE THE RISK OF ELECTRIC SHOCK, DO NOT REMOVE COVER (OR BACK). NO USER-SERVICEABLE PARTS INSIDE. REFER SERVICING TO QUALIFIED SERVICE PERSONNEL.
This ‘bolt of lightning’ indicates uninsulated material within your unit which may cause an electric shock. For the safety of everyone in your household, please do not remove product covering.
The ‘exclamation mark’ calls attention to features within the enclosed literature to prevent operating and maintenance problems.
WARNING: To reduce the risk of fire or electric shock, this apparatus should not be exposed to rain / moisture or placed in the vicinity of objects filled with liquids (such as vases).
CAUTION: To prevent electric shock, fully insert the plug. For regions with polarized plugs: Please match wide blade to wide slot.
IMPORTANT SAFETY INSTRUCTIONS
- Read these instructions.
- Keep these instructions.
- Heed all warnings.
- Follow all instructions.
- Do not use this apparatus near water.
-
Clean only with a dry cloth.
-
Do not block any of the ventilation openings. Install in accordance with the manufacturer's instructions.
-
Do not install near any heat sources such as radiators, heat registers, stoves or other apparatus (including amplifiers) that produce heat.
-
Do not defeat the safety purpose of the polarized or grounding-type plug. A polarized plug has two blades with one wider than the other. A grounding type plug has two blades and a third grounding prong. The wide blade or the third prong are provided for your safety. When the provided plug does not fit into your outlet, consult an electrician for replacement of the obsolete outlet.
-
Protect the power cord from being walked on or pinched, particularly at plugs, convenience receptacles and the point where they exit from the apparatus.
-
Only use attachments/accessories specified by the manufacturer.
- Use only with a cart, stand, tripod, bracket or table specified by the manufacturer or sold with the apparatus. When a cart is used, use caution when moving the cart/apparatus to avoid injury from tip-over.
- Unplug this apparatus during lightning storms or when unused for long periods of time.
- Refer all servicing to qualified service personnel. Servicing is required when the apparatus has been damaged in any way, such as if the power-supply cord or plug is damaged, liquid has been spilled or objects have fallen into the apparatus, or when the apparatus has been exposed to rain or moisture, does not operate normally, or has been dropped.
- Apparatus should not be exposed to dripping or splashing, and objects filled with liquids, such as vases, should not be placed on the apparatus.
- An outside antenna system should not be located in the vicinity of overhead power lines or other electric light or power circuits, or where it can fall into such power lines or circuits. When installing an outside antenna system, extreme care should be taken to eliminate touching power lines or circuits as contact might be fatal.
- Do not overload wall outlets, extension cords, or integral convenience receptacles as this can result in a risk of fire or electric shock.
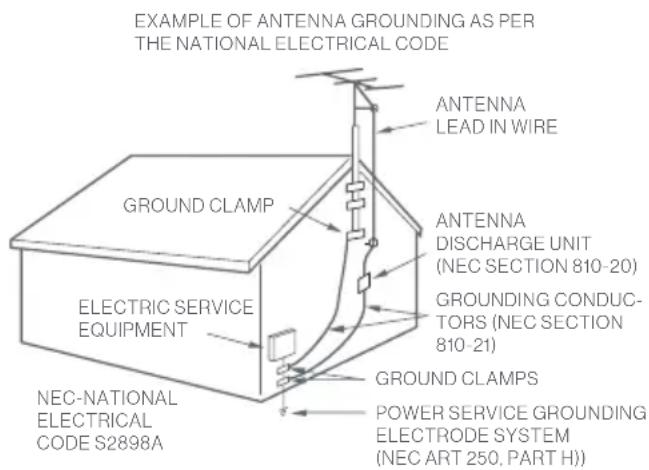
- Never push objects of any kind into this product through openings as they may touch short-out parts or dangerous voltage points that could result in a fire or electric shock. Never spill liquid of any kind on the product. EXAMPLE OF ANTENNA GROUNDING AS PER THE NATIONAL ELECTRICAL CODE
- If an outside antenna is connected to the television equipment, be sure the antenna system is grounded so as to provide some protection against voltage surges and built up static charges. Section 810 of the National Electrical Code provides information with respect to proper grounding of the mast and supporting structure, grounding of the lead-in wire to
an antenna discharge unit, size of grounding conductors, location of antenna discharge unit, connection to grounding electrodes, and requirements for the grounding electrodes.
- NOTE TO CABLE/TV INSTALLER: This reminder is provided to call the CATV system installer's attention to Article 820-40 of the National Electric Code (U.S.A.). The code provides guidelines for proper grounding and, in particular, specifies that the cable ground shall be connected to the grounding system of the building, as close to the point of the cable entry as practical.
text_image
EXAMPLE OF ANTENNA GROUNDING AS PER THE NATIONAL ELECTRICAL CODE GROUND CLAMP ELECTRIC SERVICE EQUIPMENT NEC-NATIONAL ELECTRICAL CODE S2898A ANTENNA LEAD IN WIRE ANTENNA DISCHARGE UNIT (NEC SECTION 810-20) GROUNDING CONDU- TORS (NEC SECTION 810-21) GROUND CLAMPS POWER SERVICE GROUNDING ELECTRODE SYSTEM (NEC ART 250, PART H)
- When replacement parts are required, be sure the service technician uses replacement parts specified by the manufacturer or those that have the same characteristics as the original part. Unauthorized substitutions may result in fire, electric shock or other hazards.
- Upon completion of any service or repairs to this unit, ask the service technician to perform safety checks to determine that the unit is in proper operating condition.
- When you connect the product to other equipment, turn off the power and unplug from the wall outlet. Failure to do so may cause an electric shock and serious personal injury. Read the owner's manual of the other equipment carefully and follow the instructions when making any connections.
- Sudden high volume may cause hearing or speaker damage. When you use headphones (if the unit is equipped with a headphone jack), keep the volume at a moderate level. If you use headphones continuously with high volume, you may suffer hearing damage.
- Do not allow the product to output distorted sound for extended periods of time. This may cause speaker overheating and fire.
- The socket-outlet must be installed near the unit and easily accessible.
- The mains plug is used as the disconnect and shall remain readily operable.
- Batteries (battery pack or installed batteries) should not be exposed to excessive heat such as direct sunlight, fire or other heat sources.
CONDENSATION
Moisture will form in the operating section of the unit if the unit is brought from cool surroundings into a warm room or if the temperature of the room rises suddenly.
When this happens the unit's performance will be impaired. To prevent this, let the unit stand in its new surroundings for about an hour before switching on, or make sure the room temperature rises gradually.
Condensation may also form during the summer if the unit is exposed to the breeze from an air conditioner. In such cases, change the location of the unit.
How to Handle the LCD Panel
- Do not press hard or jolt the LCD panel. It may cause the LCD panel glass to break and injury may occur.
- If the LCD panel is broken, make absolutely sure you do not touch the liquid in the panel. This may cause skin inflammation.
- If the liquid gets in your mouth, immediately rinse and consult with your doctor. Also, if the liquid gets in your eyes or touches your skin, consult your doctor after rinsing for at least 15 minutes in clean water.
Possible Adverse Effects on LCD Panel: If a fixed (non-moving) pattern remains
on the LCD panel for long periods of time, the image can become permanently engrained and cause subtle but permanent ghost images. This type of damage is NOT COVERED BY YOUR WARRANTY. Never leave your LCD panel on for long periods of time while it is displaying the following formats or images:
- Fixed images, such as stock tickers, video game patterns, TV station logos and websites.
- Special formats that do not use the entire screen. For example, viewing letterbox style (16:9) media on a normal (4:3) display (black bars at top and bottom of screen); or viewing normal style (4:3) media on a wide screen (16:9) display (black bars on left and right sides of screen).
The following symptoms are not signs of malfunction but technical limitation. Therefore we disclaim any responsibility for these symptoms.
- LCD panels are manufactured using an extremely high level of precision technology, however sometimes parts of the screen may be missing picture elements or have luminous spots. This is not a sign of a malfunction.
- Do not install the LCD panel near electronic equipment that produces electromagnetic waves. Some equipment placed too close to LCD may cause interference.
- Effect on infrared devices – there may be interference while using infrared devices such as infrared cordless headphones.
Power source: This LED TV is designed to operate on 100\~240 volt 50/60 Hz, AC current. Insert the power cord into a 100\~240 volt 50/60 Hz outlet.
To prevent electric shock, do not use the LED TV's (polarized) plug with an extension cord, receptacle, or other outlet unless the blades and ground terminal can be fully inserted to prevent blade exposure.
Warning: To reduce the risk of fire or electric shock, do not expose this apparatus to rain or moisture.
Caution: Never remove the back cover of the LED TV as this can expose you to very high voltages and other hazards. If the TV does not operate properly, unplug the LED TV and call your authorized dealer or service center.
Adjust only those controls that are covered in the instructions, as improper changes or modifications not expressly approved by Furrion could void the user's warranty.
Internet security caution: It is strongly recommended for security purposes to connect your TV to the Internet via a router/modem that includes router functionality. Direct connection of your TV to the Internet may expose your TV to a security threat such as extraction or tampering of content or personal information.
Wireless Function of the unit (For TV with wireless function only)
- Do not operate this unit near medical equipment (pacemaker, etc.), as this may result in the malfunction of the medical equipment.
- Although this unit transmits/receives scrambled signals, be careful of unauthorized interception. We cannot be responsible for any trouble as a result.
COMPLIANCE
FCC Statement
Note: This equipment has been tested and found to comply with the limits for a Class B digital device, pursuant to Part 15 of the FCC Rules. These limits are designed to provide reasonable protection against harmful interference in a residential installation. This equipment generates, uses and can radiate radio frequency energy and, if not installed and used in accordance with the instructions, may cause harmful interference to radio communications.
However, there is no guarantee that interference will not occur in a particular installation. If this equipment does cause harmful interference to radio or television reception, which can be determined by turning the equipment off and on, the user is encouraged to try to correct the interference by one or more of the following measures:
-Reorient or relocate the receiving antenna.
- Increase the separation between the equipment and receiver.
- Connect the equipment into an outlet on a circuit different from that to which the receiver is connected.
- Consult the dealer or an experienced radio/TV technician for help.
WARNING: Changes or modifications to this unit not expressly approved by the party responsible for compliance could void the user's authority to operate this equipment under FCC Rules.
This device complies with part 15 of the FCC Rules. Operation is subject to the following two conditions:
- This device may not cause harmful interference.
- This device must accept any interference received, including interference that may cause undesired operation.
FCC Radio Frequency Interference Requirements (for UNII devices)
High power radars are allocated as primary users of the 5.25 to 5.35 GHz and 5.65 to 5.85 GHz bands. These radar stations can cause interference with and/or damage this device. This device cannot be co-located with any other transmitter.
FCC RF Radiation Exposure Statement
[For having wireless function (WLAN, Bluetooth,...)]
This equipment complies with FCC radiation exposure limits set forth for an uncontrolled environment. This transmitter must not be co-located or operating in conjunction with any other antenna or transmitter. This equipment should be installed
and operated with a minimum distance of 20 cm (7.8 inches) between the radiator and your body. Users must follow the specific operating instructions for satisfying RF exposure compliance.
Industry Canada Statement
(For Canada)
[For having wireless function (WLAN, Bluetooth,...)]
This device complies with Industry Canada's applicable licence-exempt RSSs.
Operation is subject to the following two conditions:
(1) This device may not cause interference; and
(2) This device must accept any interference, including interference that may cause undesired operation of the device.
IC Radiation Exposure Statement
(For Canada)
[For having wireless function (WLAN, Bluetooth,...)]
This equipment complies with IC radiation exposure limits set forth for an uncontrolled environment. This equipment should be installed and operated with a minimum distance of 20 cm (7.8 inches) between the antenna & your body.
NOTE: THE MANUFACTURER IS NOT RESPONSIBLE FOR ANY RADIO OR TV INTERFERENCE CAUSED BY UNAUTHORIZED MODIFICATIONS TO THIS EQUIPMENT. SUCH MODIFICATIONS COULD VOID THE USER'S AUTHORITY TO OPERATE THE EQUIPMENT.
(For Canada)
[For product having the wireless function using 5 GHz frequency bands]
- The device for operation in the band 5150–5250 MHz is only for indoor use to reduce the potential for harmful interference to co-channel mobile satellite systems;
- For devices with detachable antenna(s), the maximum antenna gain permitted for devices in the bands 5250-5350 MHz and 5470-5725 MHz shall be such that the equipment still complies with the e.i.r.p. limit;
- For devices with detachable antenna(s), the maximum antenna gain permitted for devices in the band 5725-5850 MHz shall be such that the equipment still complies with the e.i.r.p. limits specified for point-to-point and non-point-to-point operation as appropriate; and
- The worst-case tilt angle(s) necessary to remain compliant with the e.i.r.p. elevation mask requirement set forth in Section 6.2.2(3) shall be clearly indicated. (devices operating in the band 5250-5350 MHz with a maximum e.i.r.p. greater than 200 mW)
- High-power radars are allocated as primary users (i.e. priority users) of the bands 5250–5350 MHz and 5650–5850 MHz and that these radars could cause interference and/or damage to LE-LAN devices.
Safety Precautions
WARNING: Never place a television set in an unstable location. A television set may fall, causing serious personal injury or death. Many injuries, particularly to children, can be avoided by taking simple precautions such as:
– Using cabinets or stands recommended by the manufacturer of the television set.
– Only using furniture that can safely support the television set.
- Ensuring the television set is not overhanging the edge of the supporting furniture.
- Not placing the television set on tall furniture (for example, cupboards or bookcases) without anchoring both the furniture and the television set to a suitable support.
- Not placing the television set on cloth or other materials that may be located between the television set and supporting furniture.
- Educating children about the dangers of climbing on furniture to reach the television set or its controls.
If your existing television set is being retained and relocated, the same considerations as above should be applied.
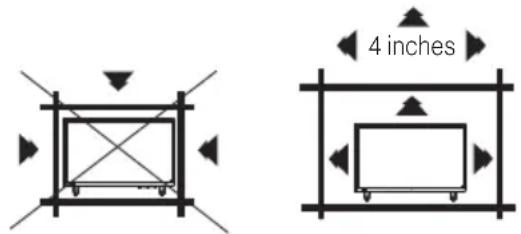
The unit emits heat when in operation. Do not place any covers or blankets on the unit, this may cause overheating. Do not block ventilation holes, or set up near radiators. Do not place in direct sunlight. When placing on a shelf, leave 4 inches (10 cm) free space around the entire unit.
text_image
4 inchesNotes when mounting the LED TV on the wall
If the unit is to be mounted on the wall, contact the retailer where you purchased the LED TV for advice, and have the equipment professionally installed. Incomplete or improper installation may cause injury to you and/or damage to the LED TV.
WARNING:
- Do not use this TV with wall mounts that allow the TV to tilt vertically. Vertical tilting wall mounts may cause structural damage to the TV.
- Use ONLY fixed or horizontal swiveling wall mounts with this TV.
Notice for TV Cabinet
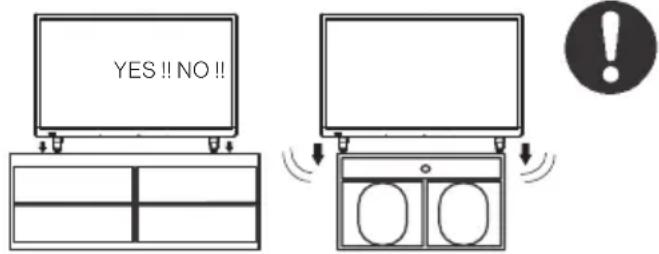
If the unit is to be mounted on a cabinet smaller than the length of the unit, it could result in an unstable location. The unit may
text_image
YES !! NO !!tumble over, making a risk of personal, possibly fatal injury. This would also damage the product seriously. Accordingly, Furrion accepts no responsibility or liability for any injuries or property damage resulting from the improper installation.
PRODUCT OVERVIEW
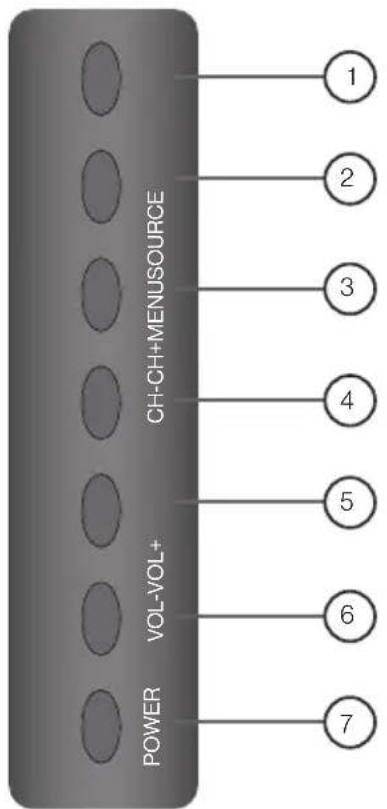
Control Panel
flowchart
graph TD
    A["POWER"] --> B["CH-CH+MENUSOURCE"]
    B --> C["1"]
    B --> D["2"]
    B --> E["3"]
    B --> F["4"]
    B --> G["5"]
    B --> H["6"]
    B --> I["7"]
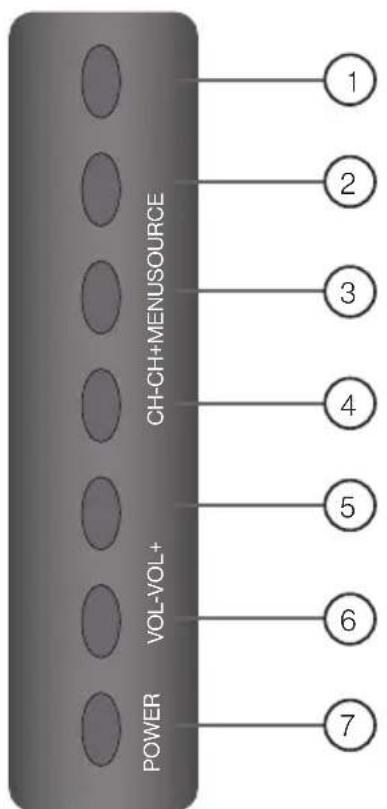
* Please note that the button layout of the controls may vary from model to model.
| Item Button Function | ||
| 1 | SOURCE | Select the input source |
| 2 | MENU | Enter the main menu |
| 3 | CH+ | Skip to the next channel |
| 4 | CH- | Skip to the previous channel |
| 5 | VOL+ | Increase volume |
| 6 | VOL- | Decrease volume |
| 7 | POWER | Switch the TV on/off |
Rear Panel
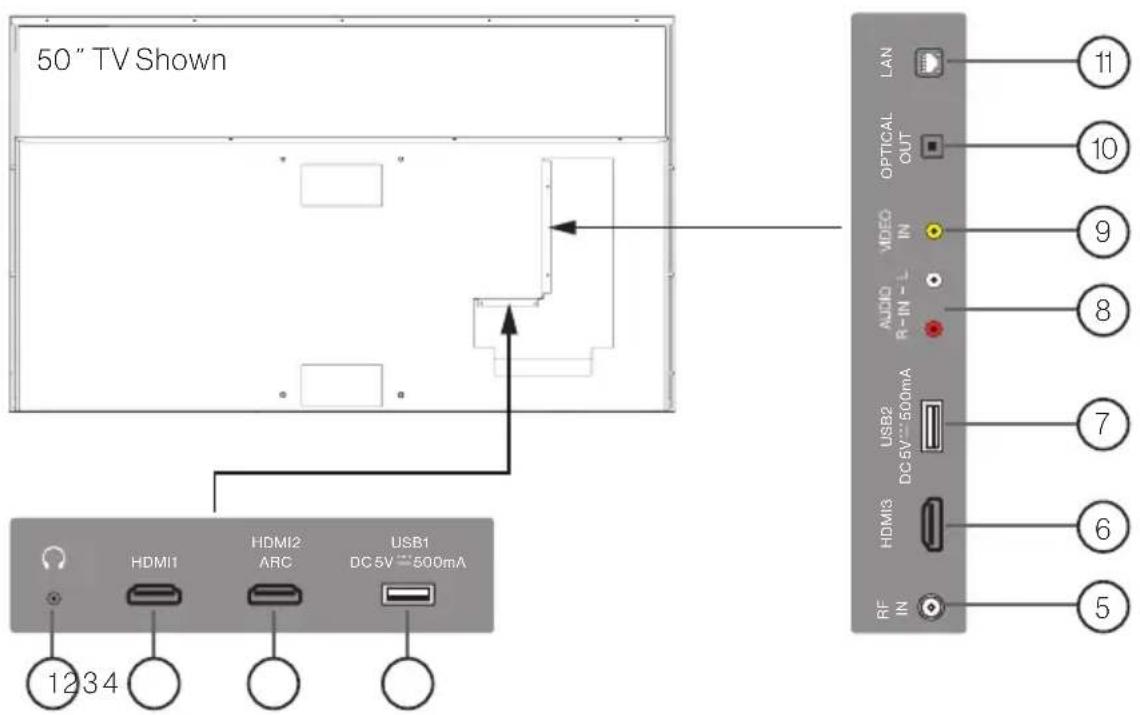
text_image
50" TV Shown HDMI1 HDMI2 ARC USB1 DC 5V 500mA 1234 LAN OPTICAL OUT VIDEO IN AUDIO R-IN - L USB2 DC 5V 500mA HDMI3 RF IN 11 10 9 8 7 6 5| No. I/O port Description | ||
| 1 | ○ | Connect a stereo headphone for private listening. |
| 2 | HDMI 1 | Connect to theHDMI OUTport of a DVD Player, Games Console, Cable Box or other HDMI device.ARC (Audio Return Channel)When connected with a HDMI 1.4 cable to an ARC compatible audio system, the TV links with the device to give extra audio functionality. |
| 3 | HDMI 2 ARC | |
| 6 | HDMI 3 | |
| 4 | USB1 | Connect to portable USB device such as USB flash/hard drive. |
| 7 | USB 2 | |
| 5 | RF IN | Connect to external modem or network access equipment. |
| 8 | AUDIO IN(R-L) | Connect to theCOMPOSITE VIDEO/AUDIO OUTports of a DVD Player, Cable Box or other compatible devices. |
| 9 | VIDEO IN | |
| 10 | OPTICAL OUT | Connect to an AV Receiver for high quality digital audio. |
| 11 | LAN | Connect to external modem or network access equipment. |
Remote Control
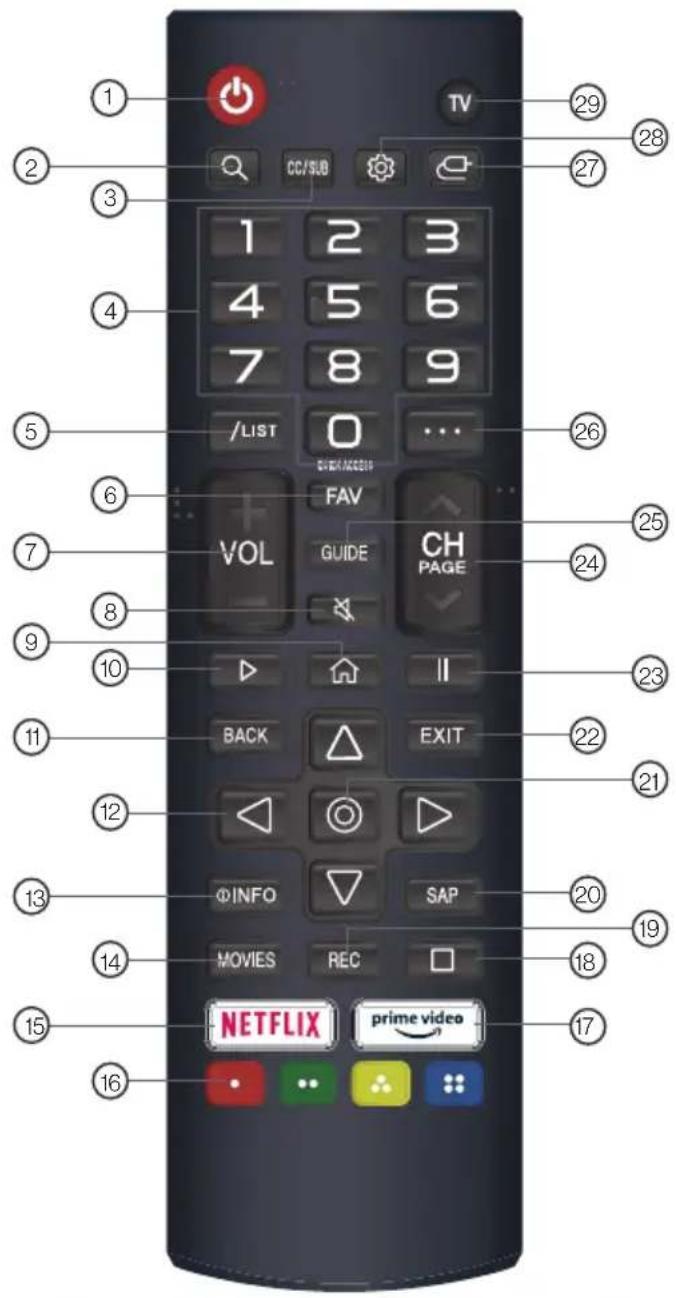
text_image
1 2 3 4 5 6 7 8 9 /LIST 0 ... 26 6 7 VOL FAV GUIDE CH PAGE 24 8 10 II 11 BACK EXIT 23 12 ΦINFO SAP 22 13 14 MOVIES REC 21 15 NETFLIX prime video 16 17 18 19 20 21 22 25 26 27 28 29 TV| No. | Button Function | |
| 1 | # | ON/OFF |
| 2 | Q | Search. |
| 3 | CC/SUB | Closed Caption selection: ON/OFF/CC On Mute. Enable/disable subtitles. |
| 4 | 0-9 | Number selection key. |
| 5 | /LIST | Enter multiple program channel number such as 2-1. The QUICK ACCESS edit screen appears. |
| No. | Button Function | |
| 6 | FAV | Press to display a listing of your favorite TV channels. |
| 7 | VOL | It adjusts the volume level. |
| 8 | Mutes the sound. | |
| 9 | Displays the Home menu. | |
| 10 | Play. | |
| 11 | BACK | Move to the previous step. |
| 12 | RIGHT/LEFT/UP/DOWN buttons to navigate the on-screen menus. | |
| 13 | INFO | Press to display the source and channels display. |
| 14 | MOVIES | Search Movies. |
| 15 | NETFLIX | Go to Netflix. |
| 16 | Corresponds to various colour functions in the menu or teletext. | |
| 17 | prime video | Go to prime video. |
| 18 | Pause. | |
| 19 | REC | Launch Record. |
| 20 | SAP | Audio Language. |
| 21 | Select current option thats highlighted. | |
| 22 | EXIT | Closes the menu. |
| 23 | II | Pause. |
| 24 | CH PAGE | You can change the programme. |
| 25 | GUIDE | You can check the programme. |
| 26 | It displays the additional buttons on the remote control. | |
| 27 | Selects an input source. | |
| No. | Button Function | |
| 28 | Enters the Quick Settings menu. | |
| No. | Button Function | |
| 28 | TV | Switch to TV. |
WHAT'S IN THE BOX
Thanks for purchasing this Furrion Aurora® TV. This manual will help you set up and begin using your TV. First, check the contents of your box with the parts checklist below:
• TV
- Remote Control (x1)
- AAA Battery (x2)
• Wall mount screws (x4)
- Screw adaptors (x4)
- RCA cable
- Printing materials
Now you can get started!
CONNECTIONS
Your Furrion Aurora ^® TV offers multiple connection options. You can choose one or more of the connections below to operate. Please consult the manual of DVD player, Games Console or other devices to ensure proper connection and use.
WARNING: Do not connect the power source before making connections. Open the cable access door to connect the cables.
NOTE: All external devices and cables shown in the diagram are for reference only and not included in the package.
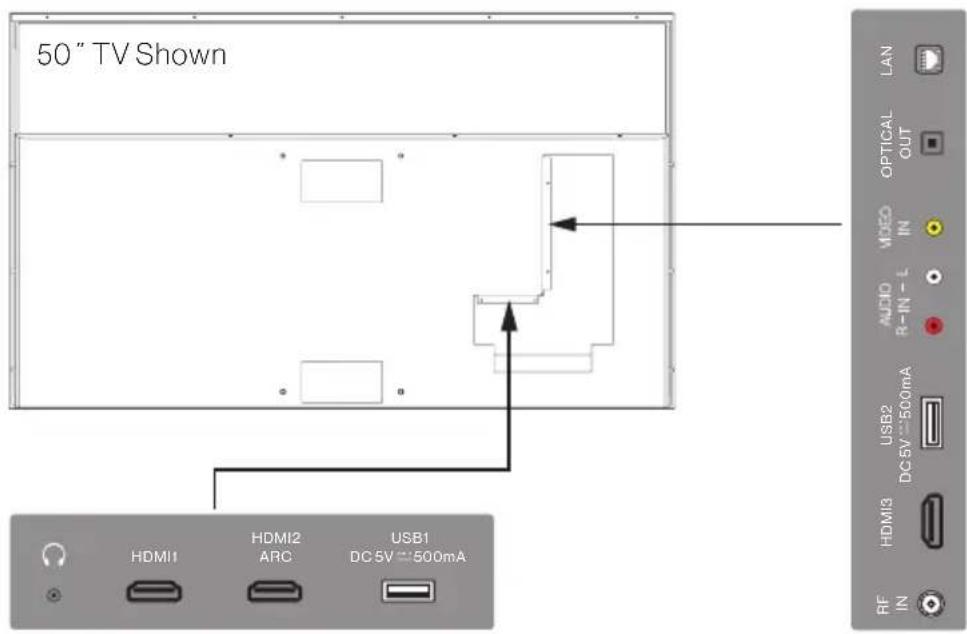
text_image
50" TV Shown HDMI1 HDMI2 ARC USB1 DC 5V = 500mA AUDIO R-IN - L DHMI3 RF IN LAN OPTICAL OUT MOEO IN USB2 DC 5V = 500mAConnect to External Devices
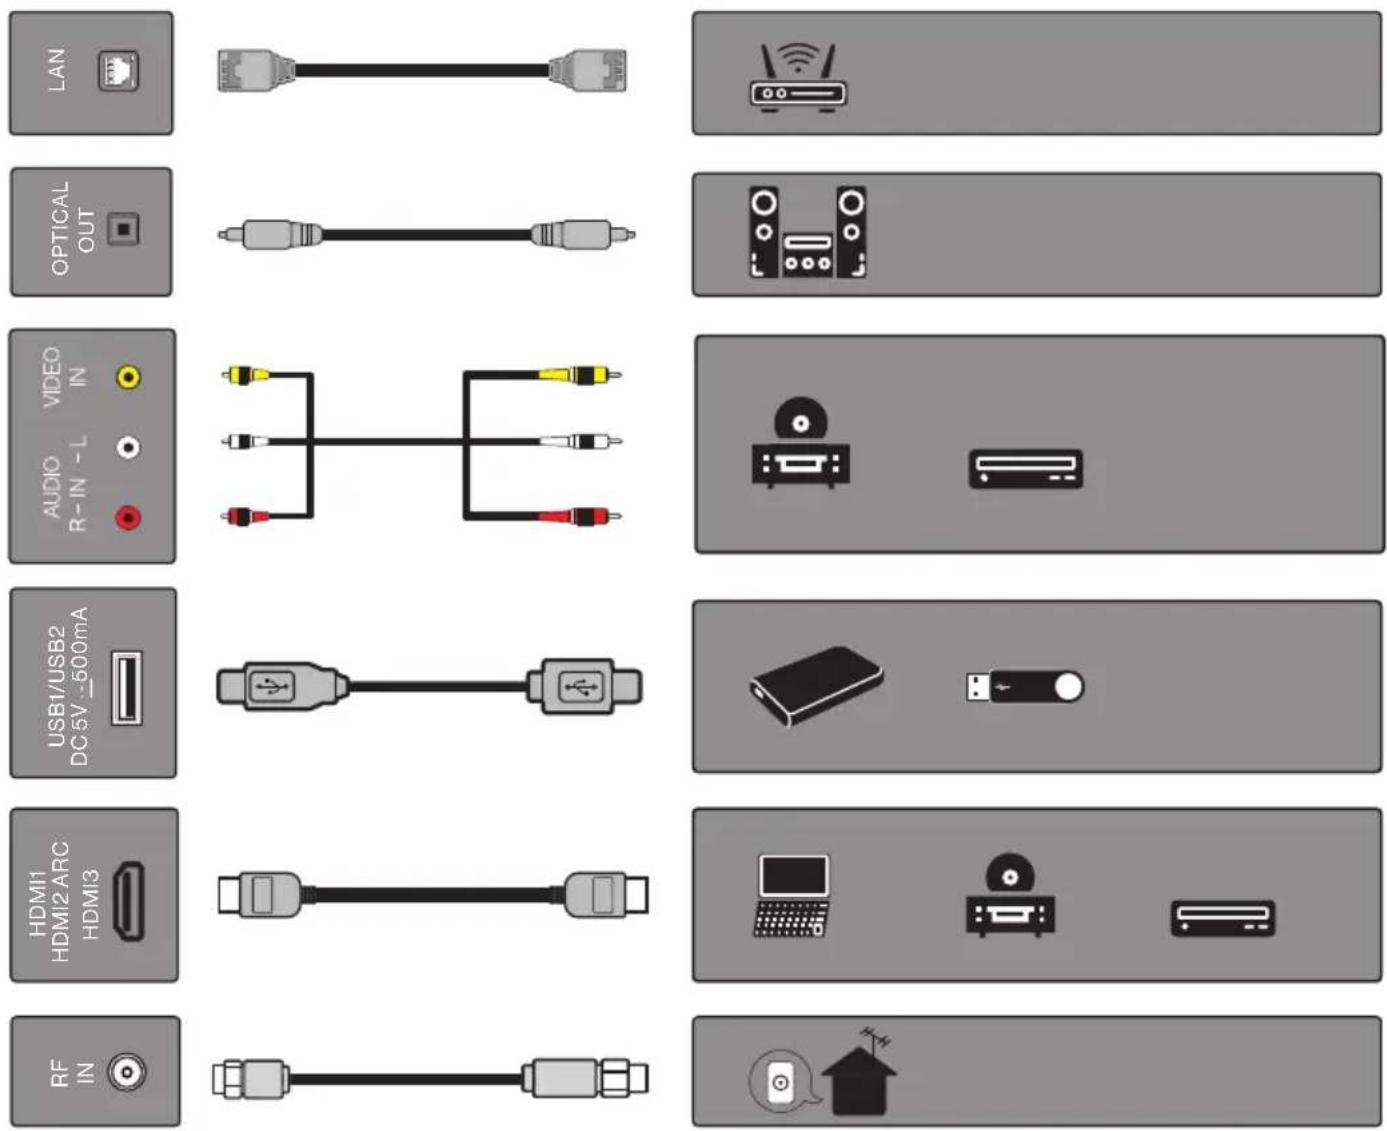
text_image
LAN OPTICAL OUT AUDIO R-IN -L VIDEO IN USB1/USB2 DC5V_600mA HDMI1 HDMI2 ARC HDMI3 RF IN
natural_image
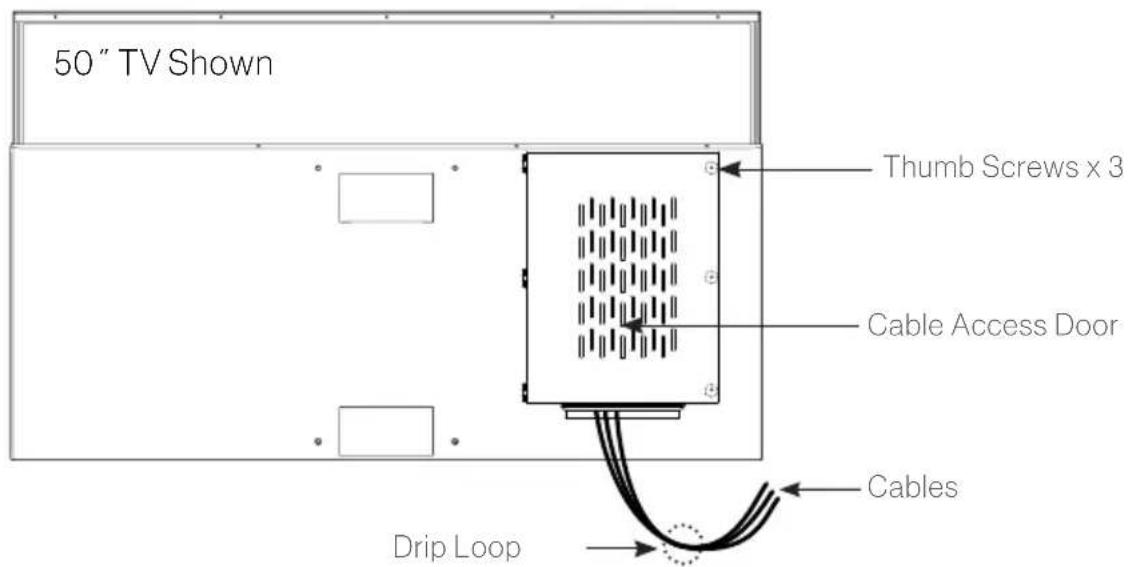
Diagram showing a headset connected via cable to a device panel (no text or symbols)Cable Management
text_image
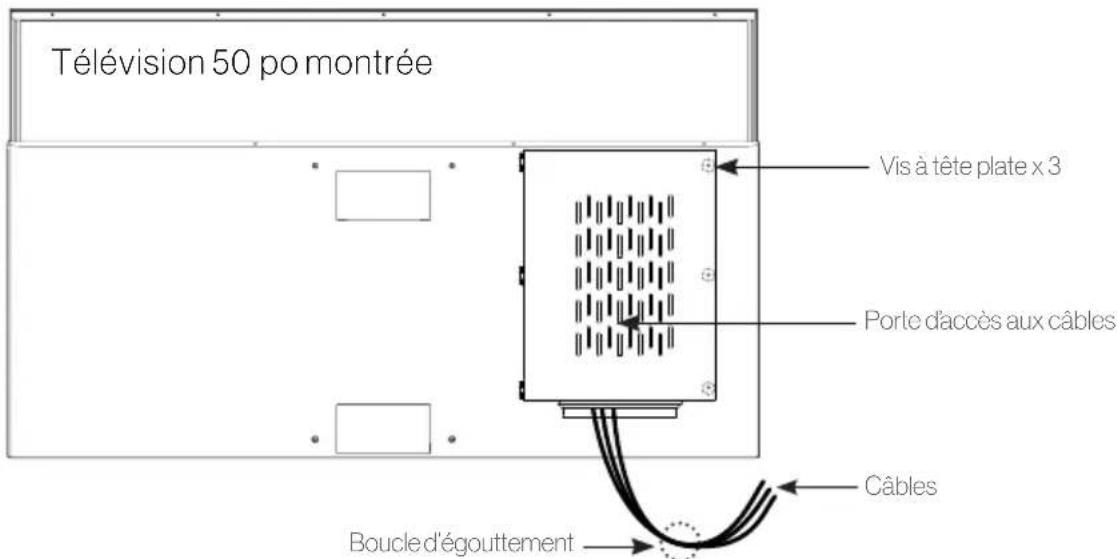
50" TV Shown Thumb Screws x 3 Cable Access Door Drip Loop Cables- After all connections are completed, lead all connecting cables downwards through the duct at the bottom of the cable access door.
- Leave a drip loop when cables enter the compartment. This will prevent water from dripping down the cord and possibly entering the door area.
- Close the door and tighten the thumb screws for the best weatherproof effect.
INSTALLATION
Choose a Proper Location for your TV
Important: The TV must be installed a safe distance away from any water source.
For best viewing we recommend you install it in a shaded environment.
- Avoid installing the TV where the screen is facing direct sunlight. The ideal location is in one place where the TV is shaded by structures, or under a patio cover or gazebo.
- If the sun shines directly on the screen for long periods of time, dark areas may appear on the screen. This is a normal reaction for the LCD panel, and will not cause damage to the screen. Either turn the screen away from the sun, or shade the TV, and the dark areas will soon disappear.
NOTE: DO NOT use the TV if ambient air temperature exceeds the operating temperature limits.
Mount on the Wall
It is recommended you install the TV in an area shaded by trees, landscape and/or structures, or under a patio cover or gazebo.
 | Full SunTV designed for direct bright sunlight outdoor spaces.(Model: FDUB43CSA, FDUB55CSA, FDUB65CSA) |
 | Full Shade(Covered gazebos, patios, porches)TV designed for fully shade spaces.(Model: FDUF43CSA, FDUF50CSA, FDUF55CSA, FDUF65CSA, FDUF43CSA-CA, FDUF50CSA-CA, FDUF55CSA-CA, FDUF65CSA-CA) |
 | Partial Sun(Pergolas, partially covered decks)TV designed for partial sun exposure and brighter spaces.(Model: FDUP43CSA, FDUP50CSA, FDUP55CSA, FDUP65CSA, FDUP43CSA-CA, FDUP50CSA-CA, FDUP55CSA-CA, FDUP65CSA-CA) |
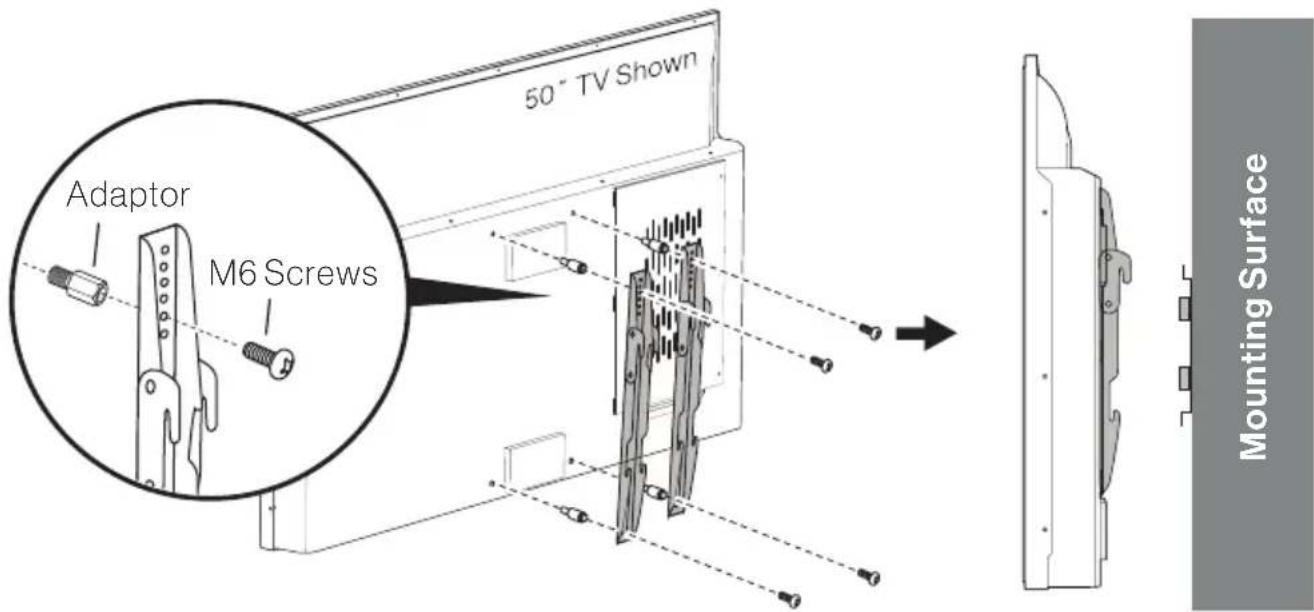
NOTE: Connect all cables prior to mounting the TV on the wall or TV mount. The cable access door on the rear panel will be obstructed once the TV is mounted.
- Follow the installation guide supplied with the Wall-Mount Bracket when installing the TV.
- Choose an appropriate location and refer to the VESA pattern for mounting.
- It is recommended to contact a professional for installation and use at least two people to move or install the TV.
| VESA MOUNTING PATTERN | ||||
| Model Width (mm) | Height (mm) Screw | Size Screw Quantity | ||
| 43" TV 200 200 | M6 * 15mm 450' | TV 200 400 | ||
| 55" and 65" TV 400 200 | ||||
text_image
50° TV Shown Adaptor M6 Screws Mounting SurfaceConnect Power
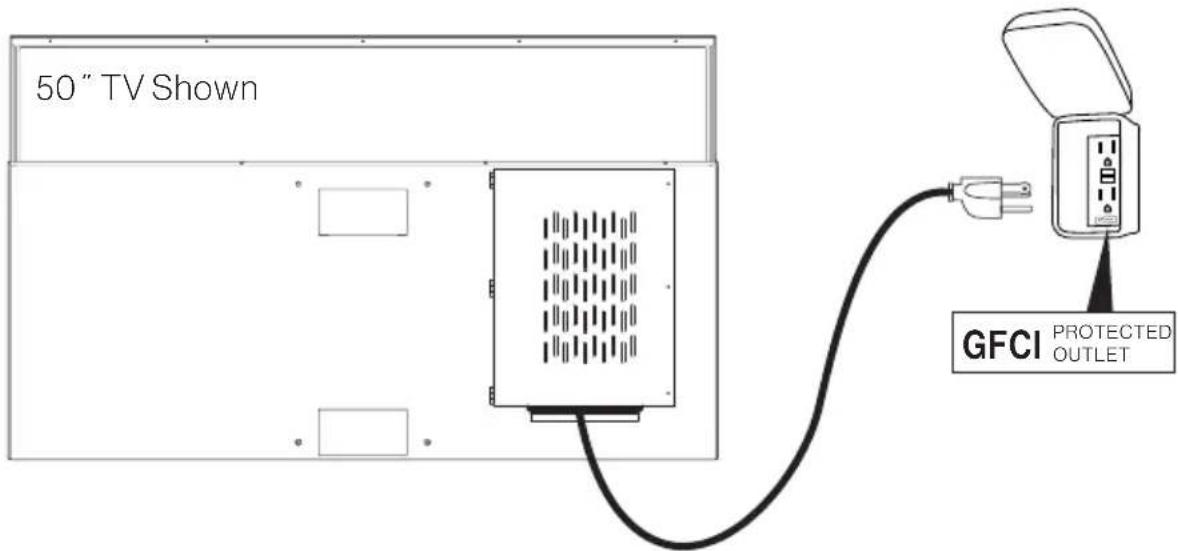
Connect the power cord to a GFCI protected AC outlet with an "in-use" waterproof cover.
CAUTION: Do not connect power cord during cable connecting and TV installation.
text_image
50" TV Shown GFCI PROTECTED OUTLETWARNING: TV and GFCI receptacle must be installed a safe distance away from any water source. Be sure to check local electrical codes and comply with their local standards.
INSTALL REMOTE CONTROL BATTERY
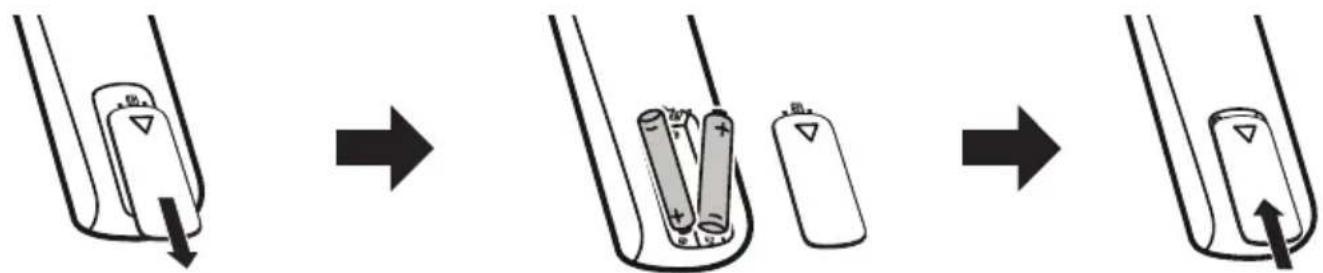
Your remote control is powered by two (2) AAA batteries.
- Turn the remote over and remove battery cover.
- Place two (2) "AAA" batteries into the battery compartment with the "+" and "-" ends facing as indicated.
- Replace the cover.
text_image
Diagram illustrating the process of battery charging and discharging with labeled components and directional arrowsNOTE: Improper use of batteries can result in a chemical leakage or explosion.
• Use only the size and type of battery specified.
- Danger of explosion if batteries are incorrectly replaced.
- If the device is not to be used for a long period of time, remove the battery to prevent damage or injury from possible battery leakage.
- The batteries should not be exposed to excessive heat due to sunlight, fire or other heat sources.
GETTING STARTED WITH WEBOS TV
Initial Setup
Press the ⏻ button on the control panel or on the remote control to turn on the TV, follow the on-screen instructions to finish the initial setup.
Watching TV Broadcasting
Your TV must be connected to an antenna/cable or a set-top box that can receive broadcasting for broadcasting.
Prepare Live TV
Follow the steps below to finish an antenna/cable connection if your TV is not connected to a broadcast antenna.
-
Connect the broadcast antenna/cable to the TV. You may also connect a piece of equipment that can receive broadcasting such as a set-top box instead of the antenna/cable.
-
Launch / Connection / Device Connection Settings / Universal Control Settings.
-
Start the 🎨 / 🥐 Channels Channel / Tuning / Auto Tuning. Finds and adds only channels being broadcast.
Enjoy Live TV
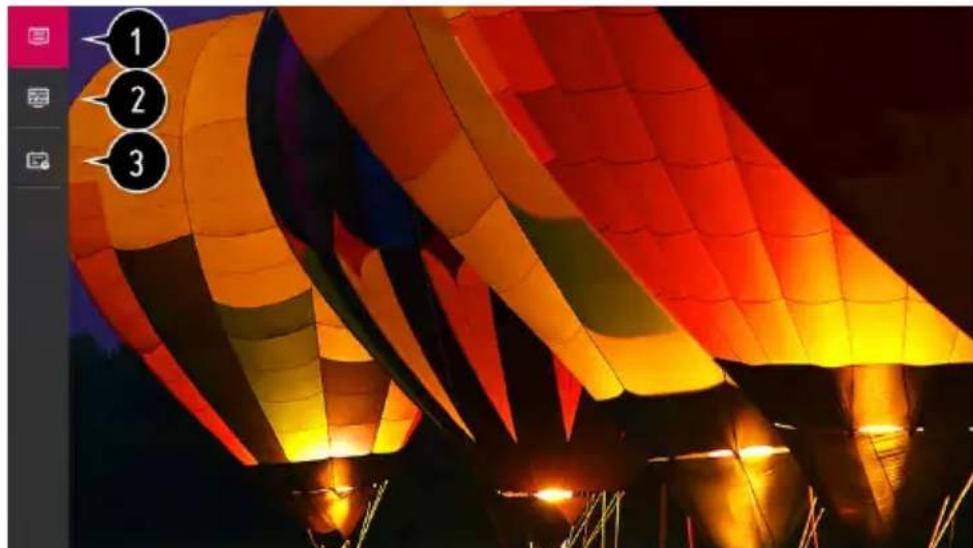
Press the /LIST button on the remote control. Use the △▽◀▶ buttons to move to the desired channel then press @ button to select the channel.
text_image
Nighttime photo of hot air balloons with numbered callouts highlighting key points1 Channels: View a list of broadcast content that is currently being broadcast.
2 Guide: You can view programs and the schedule of each program.
3 TV Scheduler: You can set the date and time of the desired broadcasting program, and watch the program.
NOTES:
- The channels displayed in Channel List are a configuration of channels provided by the broadcast service provider. If the broadcast service provider has changed its channel configuration without notice, the channels displayed in Channel List may differ from the actual TV channels.
- You must complete the settings of the network, region, and auto-channel to receive normal live broadcast service.
Using Set-Top Box Remote Control or Universal Remote Control
If you would like to use an universal remote control, or you have your set-top box connected to your TV, you need to program the universal remote control or the set-top box remote control to control the Furrion TV.
- Refer to the user manual of the set-top box remote control or that of the universal remote control on how to change the settings to control the Furrion TV.
• Furrion branded TV is compatible with LG codes.
Connecting to the Network
If you configure settings for the network, you can use various services such as online contents and applications.
Setting up a Wired Network
Connect the LAN port of the TV and the router using a LAN cable.
NOTE: The router should be connected to the Internet beforehand. When you connect the TV to the network with a LAN cable, the TV is automatically connected to the network if the router supports DHCP.
If the Network Is Not Automatically Connected
Press ⚙️ / ⚫ Connection / Network Connection Settings / Wired Connection (Ethernet).
Setting up a Wireless Network
- Turn on the power of the router connected to the Internet.
- Press the ⚙ button on the remote control.
- Select / Connection / Network Connection Settings / Wi-Fi Connection.
- When the network search is complete, the list of networks available for connection is shown.
- Select a network to connect. If your Wireless Router is password protected, enter the password configured for the router.
Network Setting Warnings
• Use standard LAN cable.
- Resetting the modem may fix some network connection problems. Turn the power OFF, disconnect and reconnect it, and then turn the power on to solve the problem.
- The manufacturer is not responsible for any network connection problems or any faults, malfunctions, or errors caused by network connection.
- The network connection may not work properly because of network settings or the Internet service provider.
- DSL service must use a DSL modem and cable service must use a cable modem. Since only a limited number of network connections may be available, TV network settings may not be used depending on the contract with Internet service provider. (If the contract does not allow more than one device per line, only the already-connected PC may be used.)
- A wireless network can experience interference from other devices that use the 2.4 GHz frequency (wireless phone, Bluetooth device, or microwave oven). Although interference can also happen when using the 5GHz frequency, it is less likely to occur.
- The wireless environment can make wireless network service run slowly.
- Failure to turn off all local home networks may cause excessive traffic on some devices.
- The access point device must support wireless connections and wireless connection feature must be enabled on the device to have AP (access point) connection. Contact the service provider for availability of wireless connections on the access point.
- Check SSID and security settings of the AP. Refer to the appropriate documentation for SSID and security settings of the AP.
- Invalid settings of network devices (wired/wireless line sharer, hub) can cause the TV to operate slowly or not operate properly. Install the devices correctly according to the appropriate manual and network.
• The connection method may differ depending on the AP manufacturer.
• To solve a problem related to this function, please go to:
/ Connection / Network Connection Settings / Wired Connection (Ethernet)
- or - / Connection / Network Connection Settings / Wi-Fi Connection / Advanced Wi-Fi Settings
Using the Home Feature of the webOS TV
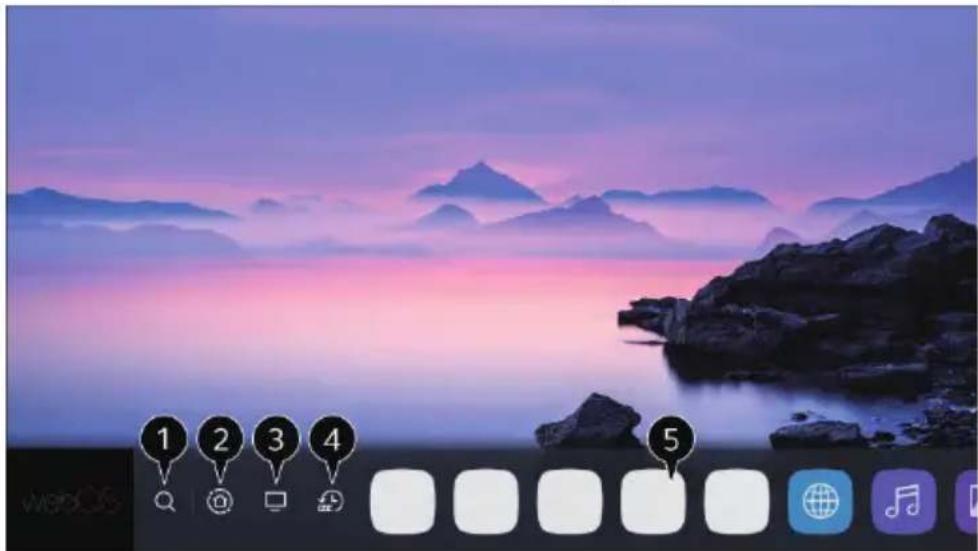
The home screen will be displayed automatically when the TV is turned on. If not, press the button on the remote control to pop it up.
text_image
1 2 3 4 51 Launch search
Use △▽◀▶ buttons to navigate to and highlight Q, then press Ⓑ to start searching. You can search for a variety of content and information using the desired search terms.
NOTE: You must connect to the network to use the search feature. The search results may vary depending on the channel, region, network settings, and whether you have agreed to the terms and conditions.
2 Use home dashboard
Use △▽◀▶ buttons to navigate to 🔒 or press and hold the 🔔 button to select home dashboard. You can select or control a device (mobile, external device, Home IoT Devices, etc.) connected to the TV.
3 Switch the TV input used recently
Use △▽◀▷ buttons to navigate to and focus on □, you can switch to the recently used TV input in the list quickly.
4 Run or close a recently used app
Long-press the button or use △buttons to navigate to and focus on . You can run or close a recently used app in the list of preview area.
5 Run, move or delete the apps installed
Use △▽◀▶ buttons to navigate to and focus on the app, it will provide the preview of the app at the top. You can check or run useful features of the app and recommended content on the preview without entering into the app.
NOTE: Some apps may not provide the preview.
Manage webOS TV Home
You can view a list of all apps installed on your TV, change their positions or delete them.
NOTE: The default TV app cannot be edited.
-
Use △▼buttons to move to the app you want to edit, then press and hold the Ⓞ button on the remote control to activate the app edit mode. Or you can select the Edit mode button at the right corner of the Home list to enter the App Edit mode.
-
To move the app to your desired position, go to the position and press the @ button. You can also move apps with the◀ buttons on your remote control.
-
To delete an app, select the X icon above the app. You can move and delete as many apps as you wish before exiting the edit mode. After the editing is done, press the X icon at the top right to exit the App Edit mode.

text_image
Edit Mode Intelligent Edit Edit Add DocQooo Add You can do you access your favorite. You can go to add them to your home. You can quickly access your favorite. You can choose your home. To charge the location of apps, select an app, move it to the desired place, and press OK button on your remote. To delete apps, select X button over the app you want to delete1 You can automatically arrange the app list in the order of most frequently used based on your accumulated app usage pattern.
2 You can add your favorite video service channel to the list.
NOTE: This feature is available only when the network is connected.
SETTINGS
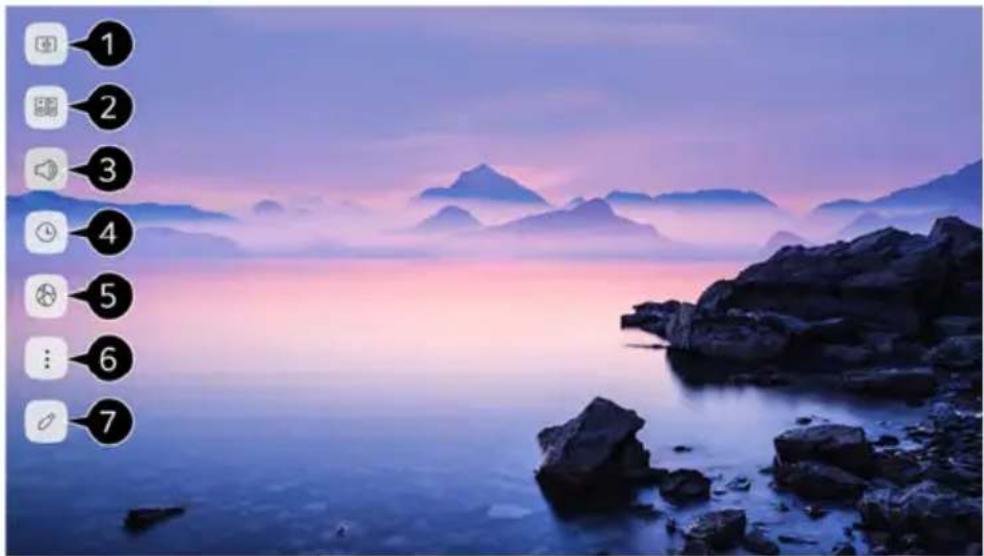
Displays a set of light-weight controls quickly and simply such as Picture Mode, Sound Mode, Sound Out, Sleep Timer and so on.
Press the ⚙ button on the remote control.
text_image
Screenshot of a desktop navigation menu with seven app icons labeled 1 through 7, overlaid on a scenic lake landscape.1 You can set the Picture Mode.
2 You can set the Sound Mode.
3 You can choose the Sound Out.
4 You can set the Sleep Timer.
5 Move to the Connection screen.
6 You can set more options.
7 You can add/delete the quick setting items or change their order.
After entering each item, press and hold the Ⓞ button on the remote control to go to the corresponding menu.
TROUBLESHOOTING
| Problem Solution/Issue | |
| TV does not operate | Make sure the power cord is plugged in.Try another AC outlet.Power is off, check fuse or circuit breaker.Unplug unit for an hour, then plug it back in. |
| Normal picture, but no sound | Check the volume settings.Sound muted? Press 📋 button.Try another channel.Check audio cable connections. |
| The remote control does not work | Make sure the remote control is in range with no obstructions.Check the batteries.Correct operating mode set: TV, VCR etc. |
| Poor sound or no sound | Station or Cable TV experiencing problems, tune to another station.Check sound adjustments (Volume or Mute).Check for sources of possible interference. |
| Poor picture or no picture | Station or Cable TV experiencing problems, tune to another station.Make sure channels are set into memory.Check antenna or Cable TV connections, adjust antenna.Check for sources of possible interference.Check picture control adjustments. |
| Poor TV reception | Ensure the antenna amplifier is turned on for Antenna TV.Adjust the antenna position to a stronger signal receiving angle.Check if the Antenna connection is tight.Check if there is power supplied to the Antenna distribution box.Check if your incoming cable is connected to the correct cable / antenna wall connection. |
| Poor Cable / Satellite TV Reception | Ensure antenna amp is turned off for cable signal.Check if incoming cable is connected correctly.Ensure cable splitter box has power.Check if the incoming cable is connected to the correct cable / Satellite wall connection.Ensure Dish has no obstruction. |
| TV shuts off | Sleep Timer is set.Power interrupted. |
| Black and white image from the connected AV device | Check video connections on both the TV and connected AV device. Ensure all video cables are connected firmly. |
SPECIFICATIONS
Product specifications may be changed without prior notice due to upgrade of product functions.
Estimated yearly energy consumption indicated on the energy label is measured in accordance with the test procedures for television sets (USA only). The actual energy consumption depends on the usage environment (the content watched, TV settings, etc.).
| Broadcasting Specifications | |||
| Full Shade Partial Sun | Full Sun | ||
| Resolution 3840 x 2160 | |||
| Refresh Rate 60Hz | |||
| Contrast Ratio 4000:1 | |||
| View Angle 178° / 178° | |||
| Response Time 6.5ms | |||
| Brightness 400 nits 750 nits 1000 nits | |||
| Wifi 802.11a/b/g/n/ac | |||
| Bluetooth 5.0 | |||
| Television System | ATSC / NTSC | ||
| Input Voltage | 100-240V AC (50-60Hz) | ||
| Water & Dust Resistance | IP54-rated | ||
| DIMENSION & RESOLUTION | ||
| Model | Dimension (W x H x D) | Max Resolution |
| 43" TV 38 ^13/_32 x 23 ^5/_64 | 4 x 4 ^19/_32 " (976 x 586 x 117mm) | 3840 x 2160@ 60Hz UHD |
| 50" TV 44 ^13/_32 x 26 ^29/_64 | 64 x 4 ^33/_64 " (1128 x 672 x 115 mm) | |
| 55" TV | 48 ^15/_16 x 29 ^1/_16 x 4 ^1/_4 " (1243 x 739 x 105 mm) | |
| 65" TV 57 ^9/_16 x 33 ^15/_16 | x 4 ^17/_32 " (1463 x 862 x 115 mm) | |
| INPUT & OUTPUT CONNECTIONS | |||||||
| Earphone Jack | LAN | Optical Out | R-AUDIO IN-L | Video in | HDMI in | RF in | USB |
| 1 | 1 | 1 | 1 x Red1 x White | 1 x Yellow | 3 | 1 | 2 |
| Modèle N° Lippert | |
| FDUB43CSA 2021132330 | |
| FDUF43CSA 2021130705 | |
| FDUP43CSA 2021130709 | |
| FDUF43CSA-CA 2021135658 | |
| FDUP43CSA-CA 2021135662 | |
| FDUF50CSA 2021130706 | |
| FDUP50CSA 2021130710 | |
| FDUF50CSA-CA 2021135659 | |
| FDUP50CSA-CA 2021135663 | |
| FDUB55CSA 2021132194 |
| Modèle N° Lippert | |
| FDUF55CSA 2021130707 | |
| FDUP55CSA 2021130711 | |
| FDUF55CSA-CA 2021135660 | |
| FDUP55CSA-CA 2021135664 | |
| FDUB65CSA 2021132196 | |
| FDUF65CSA 2021130708 | |
| FDUP65CSA 2021130712 | |
| FDUF65CSA-CA 2021135661 | |
| FDUP65CSA-CA 2021135665 |
Furrion Innovation Center & Institute of Technology
52567 Independence Ct., Elkhart, IN 46514, USA
APERÇU DU PRODUIT 35
text_image
OUI!! NON!!Panneau de commande
flowchart
graph TD
    A["POWER VOL-VOL+"] --> B["CH-CH+MENUSOURCE"]
    B --> C["1"]
    B --> D["2"]
    B --> E["3"]
    B --> F["4"]
    B --> G["5"]
    B --> H["6"]
    B --> I["7"]
natural_image
Diagram showing a headset connected via cable to a device panel (no text or symbols)Gestion des câbles
natural_image
Simple line drawing of a landscape with sun, mountains, and trees inside a circle (no text or symbols)
natural_image
Simple line drawing of a classical building with a triangular pediment, enclosed in a circle (no text or symbols)
natural_image
Simple line drawing of a table with a circular border (no text or symbols)Plein soleil
text_image
Diagram illustrating the process of battery charging and discharging with labeled components and directional arrowstext_image
Nighttime photo of hot air balloons with numbered callouts highlighting key pointstext_image
Edit Mode Intelligent Edit Edit Add DooDoo Add You can do you access your favorite You can do you to add them to your home. You can orally access your favorite my partner channels. To arrange the location of apps, select an app, move it to the desired place, and press Ok button on your remote. To delete apps, select X button over the app you want to delete.text_image
Screenshot of a landscape photo editing interface with numbered UI buttons for app functions, showing a misty lake and mountains.Furrion Innovation Center & Institute of Technology
52567 Independence Ct., Elkhart, IN 46514, USA
Control remoto....62
QUÉ HAY EN LA CAJA....63
CONEXIONES....63
INSTALACIÓN 65
natural_image
Diagram showing a headset connected via cable to a device (no text or symbols present)text_image
Diagram illustrating the process of battery charging and discharging, showing stages from battery insertion to discharging.text_image
Nighttime photo of hot air balloons with numbered callouts highlighting key pointstext_image
Edit Mode Intelligent Edit Edit Add DocDooo Add 1 2 You can't do access your favorite You can't wait to add them to your home. You can quantify access your favorite You like channels. To arrange the location of apps, select an app, move it to the desired place, and press OK button on your remote. To delete apps, select X button over the app you want to choose.text_image
Screenshot of a digital camera menu with seven app icons labeled 1 through 7, overlaid on a scenic lake at dusk.natural_image
Abstract geometric pattern with three parallel gray shapes on white background (no text or symbols)FURRION
Furrion Innovation Center & Institute of Technology
• 52567 Independence Ct., Elkhart, IN 46514, USA
- Toll free/Numéro gratuit/Línea telefónica gratuita:1-800-789-3341
- Email/Courriel/Correo electrónico: support@furrion.com
©2007-2022 Furrion Ltd. Furrion® and the Furrion logo are trademarks licensed for use by Furrion Ltd. and registered in the U.S. and other countries.
For Patent Info: www.furrion.com/pages/patents