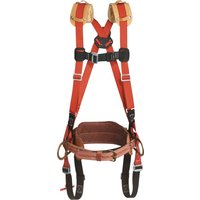
LH5266-23-L - Industrial safety equipment Klein Tools - Free user manual and instructions
Find the device manual for free LH5266-23-L Klein Tools in PDF.


User questions about LH5266-23-L Klein Tools
0 question about this device. Answer the ones you know or ask your own.
Ask a new question about this device
Download the instructions for your Industrial safety equipment in PDF format for free! Find your manual LH5266-23-L - Klein Tools and take your electronic device back in hand. On this page are published all the documents necessary for the use of your device. LH5266-23-L by Klein Tools.
USER MANUAL LH5266-23-L Klein Tools
Instructions for the Proper Use and Care of Klein® Lineman's Body Belts and Positioning Straps
This instruction manual explains how to use, inspect and maintain Klein lineman's body belts and positioning straps.
Klein manufactures a full line of lineman's body belts and positioning straps, designed to meet OSHA criteria for positioning applications.
Note: Klein's lineman's body belts are for positioning applications only and should not be used alone as a personal fall-arrest system, as defined under Subpart M of OSHA standard 1926.
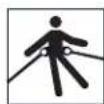
The positioning symbol shown in Figure 1 appears on warning tags attached to each body belt. This symbol identifies the belt's OPE function.
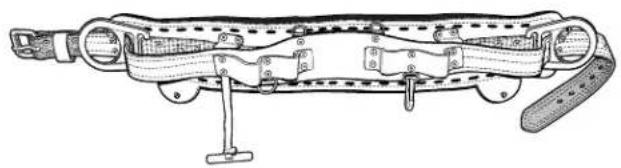
Klein lineman's body belts are available in full-floating, semi-floating, or fixed styles. They combine the features of an OPE (occupational protective equipment) positioning belt with a specialized tool belt. They meet or exceed all OSHA regulations, which apply to positioning device systems, for power utilities (OSHA 1926.959) and telecommunications (OSHA 1910.268 and 1910.269). They also meet or exceed standards ASTM F 887, CSA Z259.1 and CSA Z259.11. Each belt is affixed with a permanent tag, which identifies model number, serial number, size, and date of manufacture.
Klein positioning straps are available in the following lengths: 5'8" (1.7 m), 6' (1.8 m), 6'6" (2.0 m), 7' (2.1 m), and 8' (2.4 m). They are designed to conform with OSHA standards 1910.268, 1910.269 and 1926.959.
All individuals who use Klein lineman's body belts and positioning straps must be instructed in how to use that equipment correctly. Also, they must read, understand and follow all instructions and warnings contained in this booklet or packed with the product before each use.
Note: For clarity, illustrations in this instruction booklet do not show any warning tags or labels, which are attached to each product.
natural_image
Technical line drawing of a mechanical device with no visible text or symbols
natural_image
Technical line drawing of a belt drive with two metal clips and a looped strap (no text or symbols)▲WARNING: Save these instructions. This equipment must not be used by anyone who has not read, understood and followed all the instructions and inspection procedures contained in this booklet. Failure to read, understand and follow all instructions may result in serious injury or death. Training and instruction review should be repeated at regular intervals by the user and his or her employer.

natural_image
Simple black silhouette of a person falling (no text or symbols)WARNING
A fall could result in serious injury or death.
Do not use unless properly trained.
Read and follow all instructions and warnings.
Materials Used in Lineman's Body Belts & Positioning Straps
Klein-Kord®
The load-bearing material in Klein positioning straps is our exclusive Klein-Kord, an exceptionally strong, multi-ply filament nylon fabric that is neoprene-impregnated, folded, and vulcanized.
Klein-Kord is abrasion-resistant, non-conductive, virtually free from stretch, and flexible for ease of use and durability. It has excellent chemical resistance, and is virtually unaffected by creosote and other pole-treatment chemicals. In addition, its properties and wear characteristics remain essentially unchanged at temperatures up to 250^ F ( 121^ C).
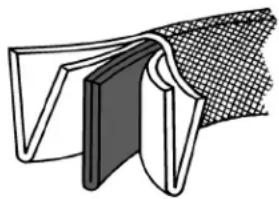
Shown below is Klein's six-ply Klein-Kord, which is 1-3/4" (44 mm) wide. The center plies of Klein-Kord are red at the core. When the red plies appear, remove the strap from use immediately and replace it. This "early warning" feature is yet another safety measure provided by Klein Tools.
Note: The red center plies may become discolored in use. Therefore, visual inspection for wear before each use is mandatory.
natural_image
Pure technical line drawing of a mechanical component with no text or symbolsSix-ply Klein-Kord with red center plies
Drop-Forged Steel
Klein D-rings and tongue buckles are made of drop-forged steel with a corrosion-resistant finish. All Klein hardware is tested to meet or exceed applicable OSHA standards.
Nylon Webbing
Klein uses a high-quality, commercial-grade nylon. The nylon webbing is impregnated with latex or resin for extra durability and abrasion resistance.
Leather
Rolled-edge, chrome-tanned leather is used for cushioning in all Klein lineman's belts. These cushions have sponge-rubber cores for added comfort. Other components, such as tool loops, are made of harness leather. Body pads are made of latigo leather, hand laced and stitched to the belt cushion.
Buckles and Billets
Klein lineman's belts have drop-forged, single-tongue buckles. Belt straps and billets are made of Klein-Kord. On top-of-the-line belts, straps are covered with harness leather.
▲WARNING: Klein strongly recommends using fall-arrest protection when working at any elevated position. Therefore, independent fall-arrest equipment should be used in addition to Klein's body belts and positioning straps unless a competent person, as defined by OSHA, has determined that such fall-arrest equipment is not necessary or appropriate.
▲WARNING: Klein's lineman's body belts and positioning straps are designed for positioning purposes only, and are not to be used for any other OPE function (such as fall arrest, suspension, or retrieval).
▲WARNING: Klein strongly recommends that only Klein components be used with any Klein lineman's equipment. Klein components should NOT be interchanged with other components made by other manufacturers, because Klein cannot guarantee that components made by other manufacturers are properly designed or are free of defects in materials or workmanship.
Physical Properties of Materials*
| Type of Material | Exposure to Excessive Heat | Exposure to Chemicals | Exposure to Molten Metal or Flame | Exposure to Paints or Solvents |
| Nylon Poor resistance. Becomes brittle, has a shriveled brown appearance. Fibers will break when flexed. Weakens at 300°F (149°C). | Generally good resistance except around strong acids and phenolic compounds (phenol is present in coal tar and wood tar), which cause it to become brittle. | Poor resistance. Strands fuse together and form hard shiny spots. Has hard and brittle feel. Will not support combustion. | Generally offers good resistance. However, paint can penetrate into the weave and dry. This can cause webbing to become hard and brittle and can eventually break the fibers. Some solvents may affect fibers (see “Exposure to Chemicals”). | |
| Klein-Kord® | Similar to nylon; however, neoprene will protect nylon fabric for a period of time. | Excellent resistance to hydrocarbons as used in wood treatment, due to neoprene. | Similar to nylon; however neoprene helps protect nylon fabric from welding splatter. | Excellent resistance; however, some strong solvents could soften neoprene and attack nylon. |
| Leather Poor resistance. Excessive heat destroys strength. Will burn at 330°F (165°C). Dry leather slowly at room temperature. | Generally poor resistance. Chemicals tend to dry leather out. | Will burn; however, chrome leather is excellent protection against welding splatter. | Generally poor resistance. Chemicals tend to dry leather out. | |
* This chart shows the general physical qualities of the materials used in Klein lineman's body belts and positioning straps. Due to the wide variety of conditions in the workplace, this information should only be considered as a general guide, and a qualified person should evaluate the specific applications and hazards to which the materials will be exposed.
If you need more information, call Klein Tools at 1-800-553-4676.
How to Select a Lineman's Body Belt
-
Know the job and regulations governing performance requirements for the equipment needed.
-
Select the belt style. Klein lineman's body belts are available in a choice of fixed, semi-floating and full-floating styles, and feature the choice of belt pad size. All Klein lineman's body belts have chrome-tanned leather cushions for greater comfort. Full-floating belts allow lateral movement of the D-rings during use. Semi-floating belts only allow lateral movement prior to wearing. Fixed-style belts are lightweight and the most economical.
-
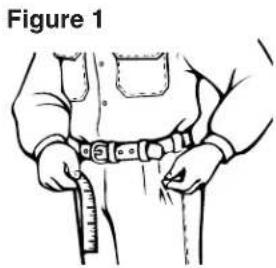
Select the proper belt size. The comfort of a lineman's belt depends on the construction of the belt and the location of the D-rings. The D-rings should be located about 1" (25 mm) in front of the hip bones.
Never order Klein lineman's body belts by waist size. Always order Klein lineman's body belts by the desired distance between D-rings.
text_image
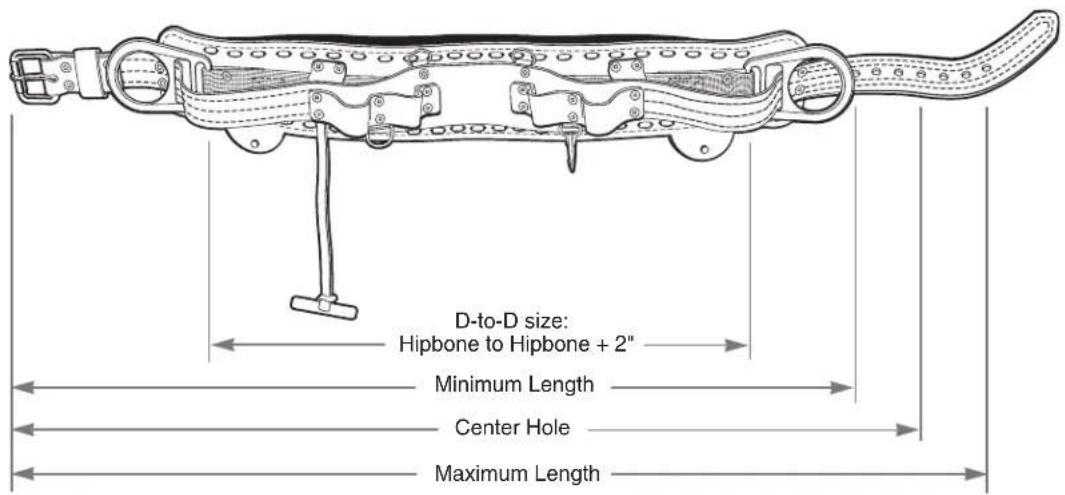
Figure 1Size your body belt using a tape measure (Figure 1). To obtain the correct D-to-D (D-ring to D-ring) size, measure from hipbone to hipbone, and then add 2" (51 mm).
The Lineman's Belt Sizing Table (shown below) contains more information on selecting the proper belt size. For non-standard sizes, please call the Klein Tools Sales Department at 1-800-553-4676.
text_image
D-to-D size: Hipbone to Hipbone + 2" Minimum Length Center Hole Maximum LengthLineman's Belt Sizing Table*
| D-to-D | 18D | 19D | 20D | 21D | 22D | 23D | 24D | 25D | 26D | 27D | 28D | 29D | 30D |
| Distance** | (46) | (48) | (51) | (53) | (56) | (58) | (61) | (64) | (66) | (69) | (71) | (74) | (76) |
| Minimum Length | 32 | 33 | 34 | 36 | 37 | 38 | 40 | 41 | 42 | 44 | 45 | 46 | 47 |
| (81) | (84) | (86) | (91) | (94) | (97) | (102) | (104) | (107) | (112) | (114) | (117) | (119) | |
| Center Hole | 36 | 37 | 38 | 40 | 41 | 42 | 44 | 45 | 46 | 48 | 49 | 50 | 51 |
| Distance | (91) | (94) | (97) | (102) | (104) | (107) | (112) | (114) | (117) | (122) | (124) | (127) | (130) |
| Maximum Length | 40 | 41 | 42 | 44 | 45 | 46 | 48 | 49 | 50 | 52 | 53 | 54 | 55 |
| (102) | (104) | (107) | (112) | (114) | (117) | (122) | (124) | (127) | (132) | (135) | (137) | (140) |
* All measurements are listed in inches and (cm). This table shows the maximum and minimum lengths and center-hole distances for the full range of standard D-to-D measurements. A belt sized for the proper D-to-D size will fit correctly with buckle tongue engaged in the center hole.
** The following D-to-D sizes can be special ordered: 19" (48 cm), 25" (64 cm), 27" (69 cm) and 29" (74 cm).
How to Use a Lineman's Body Belt
- These belts are for use only by individuals who have been properly trained and who are qualified to use this positioning equipment.
- Read all the warning labels and instructional materials provided with Klein's lineman's belts and related OPE equipment. They provide important information on usage and care. Leave all affixed labels in place, and keep all instructions for future reference.
- Buckle the belt securely around the waist. Be sure the buckle is fully closed, and the belt tab is in its keeper. A lineman's belt should fit snugly around the waist. If you cannot achieve a snug fit, replace the belt with one that fits properly.
- When using a lineman's belt, positioning D-rings should be equally spaced on either side of the lineman's body.
- Attach one end of the positioning strap (or other positioning connecting device) to one of the positioning D-rings.
-
Pass the positioning strap around the pole (the positioning anchorage), and then attach the other end of the strap to the other positioning D-ring.
-
Make sure by visual inspection that both snap hooks freely engage the positioning D-rings and that both keepers are closed completely.
- When properly connected, the positioning strap will not be twisted, and both snap hooks will face outward.
- Do not connect any tools, wires, or other snap hooks to the positioning D-rings.
Note: See pages 6-7 for complete information on how to use a Klein positioning strap.
How to Select a Lineman's Positioning Strap
Depending on your application, choose a positioning strap that allows you to work at arms' length from the pole you'll be working on.
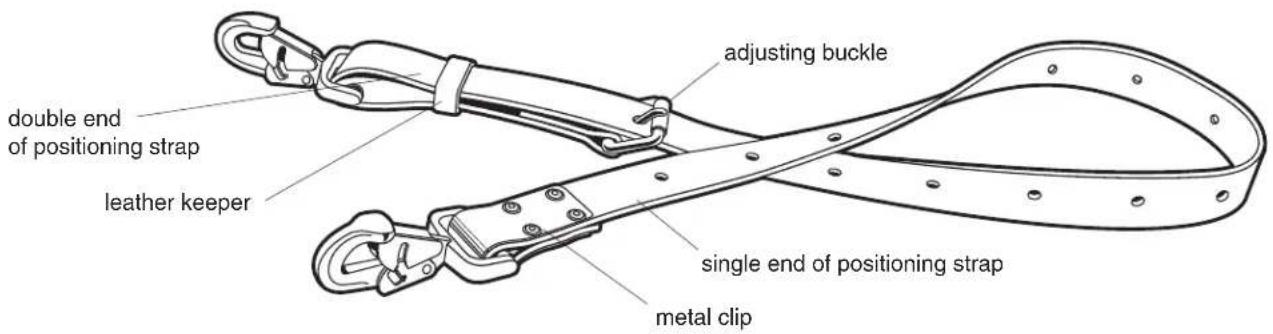
Lineman's positioning straps are available in five sizes and with two snap-hook styles: 5'8" (1.7 m), 6' (1.8 m), 6'6" (2.0 m), 7' (2.1 m), and 8' (2.4 m). For more information, see the following chart.
| Cat. No.Klein-Lok® Series | Cat. No.Klein-GardTM Series | Maximum Length | Minimum Length | Adjustable Range |
| KL5295L | KG5295L | 5'8" (1.7 m) | 3'10" (1.17 m) | 1'10" (0.5 m) |
| KL5295-6L | KG5295-6L | 6' (1.8 m) | 4' (1.2 m) | 2' (0.6 m) |
| KL5295-6-6L | KG5295-6-6L | 6' 6" (2.0 m) | 4'3" (1.3 m) | 2'3" (0.7 m) |
| KL5295-7L | KG5295-7L | 7' (2.1 m) | 4'6" (1.35 m) | 2'6" (0.8 m) |
| KL5295-8L | KG5295-8L | 8' (2.4 m) | 5'6" (1.7 m) | 2'6" (0.8 m) |
text_image
double end of positioning strap leather keeper adjusting buckle single end of positioning strap metal clipHow to Use a Lineman's Positioning Strap
Note: The following instructions apply to right-handed people.
-
These positioning straps are for use only by individuals who have been properly trained and who are qualified to use this positioning equipment.
-
Before climbing a pole, make sure that both locking snap hooks of the positioning belt are attached to the left D-ring of the body belt.
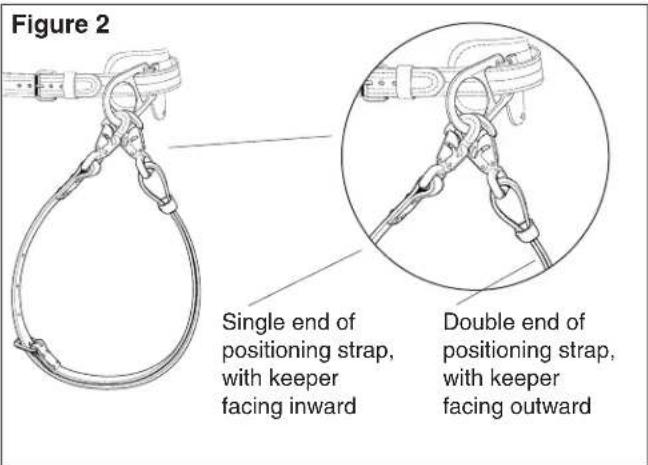
Note: The snap hook closest to the body should be the snap hook on the positioning strap's double end. That snap hook should be engaged so that the keeper faces outward. The outer snap hook will be the snap hook on the positioning strap's single end. That snap hook should be engaged so that the keeper faces inward (see Figure 2).
Note: To engage or release the locking snap hook, depress both the keeper and the lock at the same time. This can easily be done with one free hand (see Figure 3).
text_image
Figure 2 Single end of positioning strap, with keeper facing inward Double end of positioning strap, with keeper facing outward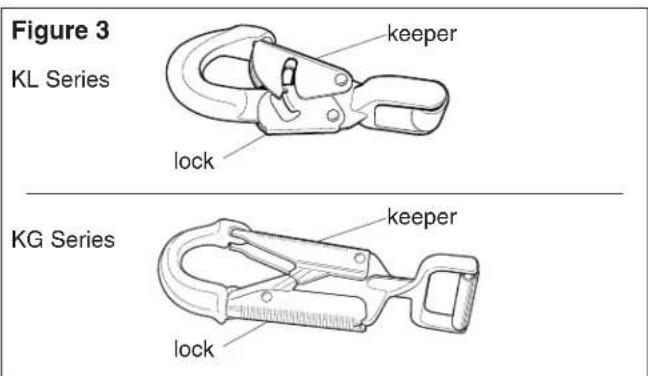
text_image
Figure 3 KL Series keeper lock KG Series keeper lockHow to Use a Lineman's Positioning Strap (continued)
- Upon reaching working position, plant both gaffs firmly into the pole, and hold onto the pole with both hands.
- Unsnap the outer snap hook whose keeper faces inward (that is, the snap hook on the single end of the positioning strap) with the left hand, while grasping the pole with the right hand.
- Pass the single end of the strap around the back of the pole to the right hand, while maintaining a firm grip on the pole.
- Carry the positioning strap to the right D-ring with the right hand, and fasten the snap hook so that the keeper faces outward.
- Make sure the positioning strap lies flat without twists against the pole, and that the buckle tongue is turned outward.
- Before placing your full weight on the positioning strap, visually check that each locking snap hook freely engages the D-ring and that the keepers are completely closed. Never rely solely on the feel or sound of a snap hook engaging.
-
Removing the positioning strap (before descending the pole). Grasp the pole with the left hand and release tension on the positioning strap by moving the body slightly toward the pole.
-
With the right hand, unfasten the snap hook on the single end of the positioning strap from the right D-ring.
- Pass the single end of the positioning strap around the back of the pole with the right hand until the strap can be grasped by the left hand.
- Now grasping the pole with the right hand, fasten the snap hook of the single end of the positioning strap to the left D-ring with the keeper facing in (above the snap hook that's already engaged).
- When the positioning strap is not being used for support, both ends should be fastened to the left D-ring (see Figure 2 on page 6).
Maintenance Procedures
A written log of all service and inspection dates for this equipment should be maintained by the company safety officer or other competent individual.
-
Clean and maintain equipment as recommended. Wash in warm water and mild detergent. Avoid harsh chemical agents such as degreasing compounds, turpentine, paint thinner, gasoline, and other solvents.
-
Inspect and lubricate all snap hooks after cleaning to make sure they operate properly and close securely. Use an all-purpose spray lubricant or light motor oil.
- Maintain leather parts with Neat's-foot oil, saddle soap or equivalent to help prolong life. Let leather dry slowly at room temperature.
General Inspection Procedures
- Check for wear and deterioration. Before each use, carefully inspect your OPE equipment for signs of wear or deterioration or evidence of impact loading. Visually inspect for loose threads, pulled rivets, burns, cuts, abrasions, or evidence of chemical or physical deterioration that may have weakened the material or assembly.
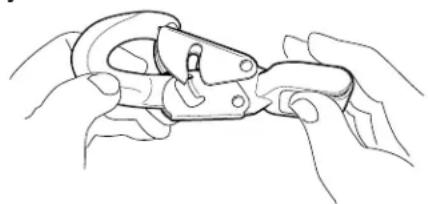
- Inspect hardware for malfunctions and cracks, including belt buckles, D-rings, and positioning-strap snap hooks. Check that snap hooks are not distorted or cracked and that the keepers are free of burrs, functioning properly, clean, and not bent.
KL Style Shown
natural_image
Line drawing of hands holding a mechanical clamp or tool (no text or symbols)▲WARNING: Should any unusual conditions be noted during the inspection which are not specified here, do not use the suspect equipment until a qualified individual has made a decision on its usability.
- Destroy and replace all worn or damaged equipment. Immediately destroy and replace any OPE system component which does not pass inspection.
Inspection of Belts & Straps
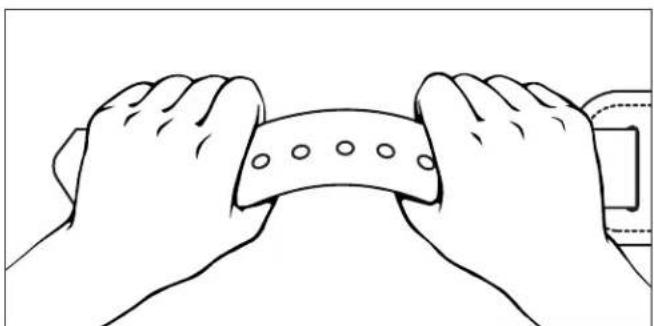
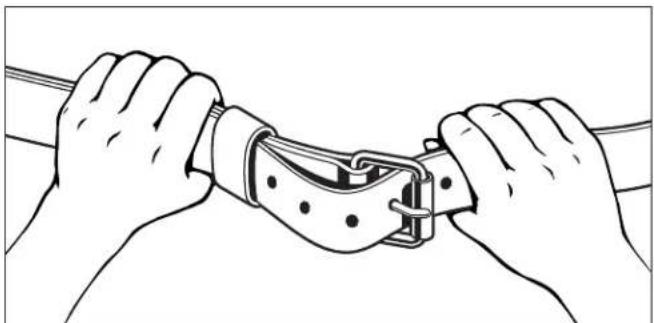
- Straps, stitching and webbing. Check entire length of the strap for excessive wear. Inspect the tongue or billet end carefully. This end is subject to considerable wear as a result of repeated buckling and unbuckling of the belt. Also, check for torn or excessively enlarged buckle-tongue holes. Check stitching for broken, cut or pulled stitches. Check webbing for broken strands, which appear as tufts on the surface.
natural_image
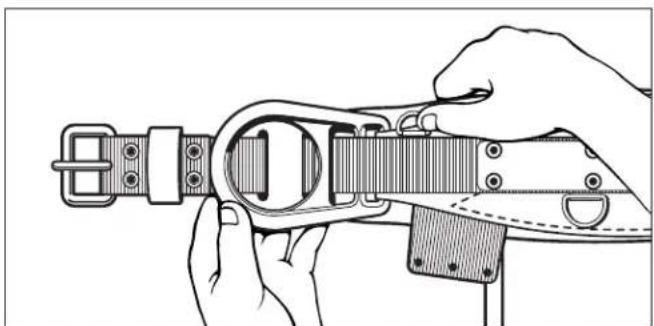
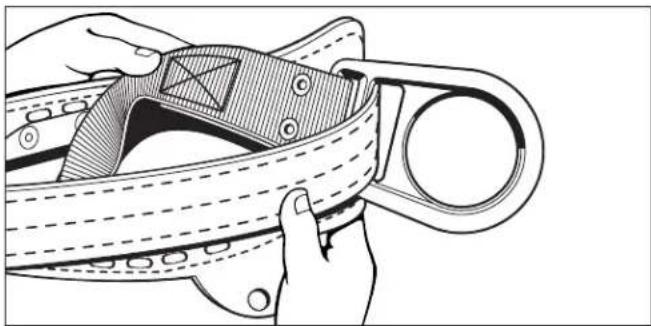
Line drawing of two hands gripping a textured object with circular holes (no text or symbols)- D-rings. Check all D-rings for distortion. Check D-ring attachment points for unusual wear or damaged fibers. Badly pitted D-rings could indicate chemical corrosion, and the equipment should be replaced immediately.
natural_image
Line drawing of hands operating a mechanical device with no visible text or symbols- Tongue buckles. Check tongue buckles for distortion, sharp edges and cracks. The tongue should move freely and overlap the frame. Rollers should not be distorted and should roll freely.
natural_image
Illustration of hands fastening a cable buckle (no text or symbols)- Stitching or rivets at hardware attachment points. For stitching-attachment points, check that stitching is not broken, burned, cut or pulled. For riveted attachment points, check all rivets for tightness, especially those at D-ring wear pads. Badly-pitted rivets indicate chemical corrosion, and equipment should be replaced immediately.
natural_image
Illustration of hands adjusting a belt buckle with a handle (no text or symbols)-
Destroy and replace all worn or damaged OPE equipment. If any evidence of excessive wear, deterioration, or mechanical malfunction is observed, replace equipment immediately. Never work with worn or damaged OPE equipment. Using damaged or worn equipment can cause serious injury or death.
-
The inspector is the most important part of any inspection procedure. Check all equipment thoroughly and follow all safety procedures and guidelines. Do not take any shortcuts.
Important Note: OSHA specifies that all employers covered by the Occupational Safety and Health Act are responsible for inspection and maintenance of all tools and equipment used by employees — whether owned by the employees or by the company. Personal-protective equipment should be inspected before each use, and immediately removed from service if any sign of wear or damage is found.
▲WARNING: If you note any unusual conditions during the inspection that are not specified here, do NOT use the suspect equipment until a qualified individual has made a decision on its usability.
Lineman's Equipment Warning Tags
Klein permanently attaches highly durable warning and instruction tags to its lineman's body belts and positioning straps.
If any of these tags become unattached, lost, or damaged, call Klein Tools, toll-free at 1-800-553-4676, for information on how to have the tags replaced free of charge.
▲WARNING: Klein strongly recommends using fall-arrest protection when working at any elevated position. Therefore, independent fall-arrest equipment should be used in addition to Klein's body belts and positioning straps unless a competent person, as defined by OSHA, has determined that such fall-arrest equipment is not necessary or appropriate.
Tags for Lineman's Body Belts

For Positioning Use Only
C1b1. 997
Read Other Side
■ Use this product for positioning only, NOT for fall arrest.
■ If possible, the use of fall arrest equipment is highly recommended in addition to this belt.
■ Assume the responsibility for determining that your be good condition at all times.
WARNINGS
■ Do NOT use connecting devices made of leather or manila rope.
■ Never use side D-rings for fall arrest.
■ Positioning anchorages must support your weightplus any additional job related load.
■ Never allow belt to come in contact with edged or pointedtools; or come near a radiator, steam pipe, stove, heater, engine exhaust pipe or other heat source.
Read Next Tag
WARNINGS
B1-2 2. 007
Read Other Side
■ For personal use only. NOT for towing or hoisting.
■ Snap hooks attached to D-rings must have less than 3/4" (19mm) throat opening. Never attach ladder or ebar hooks onto D-rings.
■ Never attach multiple snap hooks onto a D-ring
■ Never punch additional holes in or alter any beless in any way.
ever work without independent fall arrest protection if is danger of a fall.
INSTRUCTIONS
INSTRUCTIONS
■ NOT for recreational or sporting use
■ Employer— instruct employee as to proper use and warnings before use of equipment.
■ Read, understand and follow all instructions and cautions attached to and/or packed with this and all occupational protective equipment before each use.
■ Klein strongly recommends that Klein components NOT be interchanged with other components made by other manufacturers because Klein cannot guarantee that other manufacturers' components are free of defects in materials or workmanship.
Read Next Tag
B1-2 1 007
Read Other Side
■ For use by properly trained professionals only.
■ Only use locking snap hooks.
■ OPE equipment must only be used for the specific purpose for which it is designed and intended.
■ OPE equipment must be destroyed if subjected to impact loading.
■ Always visually check that all buckles are properly closed before each use.
■ Never allow a positioning strap to become twisted before engaging D-ring.
INSTRUCTIONS
■ Always visually check that: 1) each snap hook freely engages D-ring or anchor point, 2) keeper is completely closed with each use. Never rely solely on the feel or sound of a snap hook engaging.
■ Before each use check that: 1) fabric or belt strap is free of burns, cuts, broken stitches or excessive wear, 2) rivets are not bent, loose or missing, 3) buckles and D-rings are not distorted or cracked4) if tongue buckle, tongue does not bind on buckle and buckle holes are not
damaged. 5) Remove from service, destroy and discard belt or harness if it fails inspection and replace immediately.
INSTRUCTIONS
Lineman's Equipment Warning Tags (continued)
Klein permanently attaches highly durable warning and instruction tags to its lineman's body belts and positioning straps.
If any of these tags become unattached, lost, or damaged, call Klein Tools, toll-free at 1-800-553-4676, for information on how to have the tags replaced free of charge.
▲WARNING: Klein strongly recommends using fall-arrest protection when working at any elevated position. Therefore, independent fall-arrest equipment should be used in addition to Klein's body belts and positioning straps unless a competent person, as defined by OSHA, has determined that such fall-arrest equipment is not necessary or appropriate.
Tags for Lineman's Positioning Straps

C6b 997
Read Other Side
For Positioning Use Only
■ Always attach snap hooks to positioning D-rings on both sides of the belt or harness with keepers facing outward.
- Never attach multiple snap hooks onto a D-ring.
- Never allow a positioning strap to become twisted before engaging D-ring.
WARNINGS
■ Never attach multiple positioning straps together.
■ Never attach a positioning strap back onto itself.
■ Assume the responsibility for determining that your positioning strap is in good condition at all times.
■ Never allow positioning strap to come in contact with edged or pointed tools, welding; or near a radiator, steam pipe, stove, heater, engine exhaust pipe, or other heat source.
■ Never use a positioning strap which has worn to the point of showing the red-colored interior plies.
Read Next Tag
C6b2 007
Read Other Side
■ For human support only, NOT for towing or hoisting material.
■ Never disable locking keeper on hook, punch ho in or alter a positioning strap in any way
■ Use only with positioning belt or harness with positioning D-rings meeting government standards for intended use.
■ Klein strongly recommends that Klein components NOT be intechanged with other components made by other manufacturers, because Klein cannot guarantee the other manufacturers' components are free of defects in materials or workmanship.
WARNINGS
■ Before each use check that: 1) unit is free of burns, cuts, abrasions, kinks, knots, broken strands and excessive wea2) hooks, buckle (and D-rings, if any) are not distorted or cracked, 3) hook keepers are free of burrs, functioning properly, clean, and not bent, 4) positioning strap has not worn the point of showing the red-colored interior plies, 5) Remove from service, destroy and discard unit if it does not pass this inspection and replace immediately.
Read Next Tag
■ For use by properly trained professionals only.
■ OPE equipment must only be used for the specific purpose for which it is designed and inten
■ Connecting devices must be destroyed if subjected to impact loading.
■ Always visually check that: 1) each snap hook engages D-ring or anchorage, 2) keeper is completely closed with each use. Never rely solely to feel or sound of a snap hook engaging.
take sure each hook is positioned so that its keeper or load bearing.
C6b3. 997
Read Other Side
WARNINGS
WARNINGS
■ Never join two snap hooks together. They are NOT intended to be used that way, and could twist apart.
■ Never work without independent fall arrest protection if there is danger of a fall.
■ Employer — instruct employee as to proper use and warnings before use of equipment.
■ Read, understand and follow all instructions and cautions attached to and/or packed with this and all occupational protective equipment before each use.
Read Next Tag
Notes / Notas
natural_image
Technical line drawing of a mechanical device with no visible text or symbols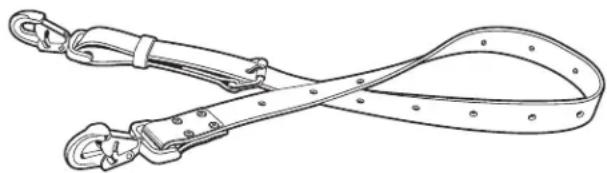
natural_image
Technical line drawing of a belt drive with two looped clips and a curved handle (no text or symbols)natural_image
Simple black silhouette of a person falling (no text or symbols)ADVERTENCIA
natural_image
Pure diagram of a mechanical or architectural component with no text, numbers, or symbolsnatural_image
Line drawing of a person holding a belt and cap, no text or symbols presentnatural_image
Line drawing of hands holding a mechanical clamp or clip (no text or symbols)natural_image
Line drawing of two hands gripping a circular object with dots, no text or symbols presentnatural_image
Line drawing of hands operating a mechanical device with a handle and belt (no text or symbols)natural_image
Line drawing of hands fastening a belt buckle (no text or symbols)natural_image
Illustration of hands adjusting a belt buckle with a ring and belt (no text or symbols)natural_image
Technical line drawing of a mechanical device with no visible text or symbols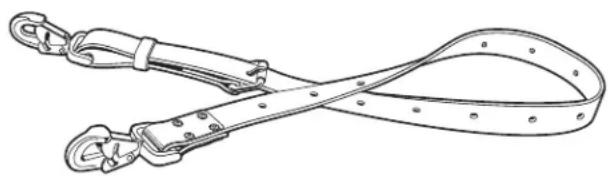
natural_image
Technical line drawing of a belt drive with attached clips (no text or symbols)natural_image
Simple black silhouette of a person falling (no text or symbols)▲ AVERTISSEMENT
natural_image
Pure diagram of a mechanical joint or bracket with no text, numbers, or symbolsnatural_image
Line drawing of two hands gripping a circular object with dots, no text or symbols presentnatural_image
Line drawing of hands holding a mechanical device with a belt buckle (no text or symbols)natural_image
Illustration of hands fastening a cable buckle (no text or symbols)natural_image
Illustration of hands holding a belt buckle with dashed lines indicating material (no text or symbols)For Professionals...Since 1857®
Mail/Por correo/Courrier: 450 Bond Street, P.O. Box 1418, Lincolnshire, IL 60069-1418 U.S.A.
Shipping/Envíos/Expédition: 450 Bond Street, Lincolnshire, IL 60069-4225 U.S.A.
© 2007 Klein Tools, Inc.
Printed in U.S.A.
Impreso en EE.UU.
Imprimé aux U.S.A.