
AFWB7QBK13 - Deep fryer WestBend - Free user manual and instructions
Find the device manual for free AFWB7QBK13 WestBend in PDF.


| Product Type | Air Fryer |
| Brand | WestBend |
| Model | AFWB7QBK13 |
| Capacity | 6.6 L (7 qt) |
| Power Supply | 120 V ~ 60 Hz (polarized plug) |
| Temperature Range | 90 to 200 °C (170 to 400 °F) |
| Timer | 1 to 60 minutes (up to 960 min in dehydration mode) |
| Preset Functions | Fry, Bake, Grill, Chicken, Dehydrate, Fish, Fries, Frozen, Keep Warm, Preheat, Reheat, Roast, Vegetables |
| Control Type | Digital with display and touch buttons |
| Display | LED display of temperature and time |
| Basket Coating | Non-stick Diamond Shield™ PTFE-free |
| Material | Stainless steel and heat-resistant plastic |
| Cleaning | Grid and basket dishwasher safe (top rack) |
| Safety | Polarized plug, auto shut-off at end of cycle, cool-touch handle, overheat protection |
| Warranty | 1-year limited (parts and labor) |
| Spare Parts | Available at westbend.com |
| Usage | Household, on countertop |
| Destination Countries | United States and Canada |
Frequently Asked Questions - AFWB7QBK13 WestBend
User questions about AFWB7QBK13 WestBend
0 question about this device. Answer the ones you know or ask your own.
Ask a new question about this device
Download the instructions for your Deep fryer in PDF format for free! Find your manual AFWB7QBK13 - WestBend and take your electronic device back in hand. On this page are published all the documents necessary for the use of your device. AFWB7QBK13 by WestBend.
USER MANUAL AFWB7QBK13 WestBend
natural_image
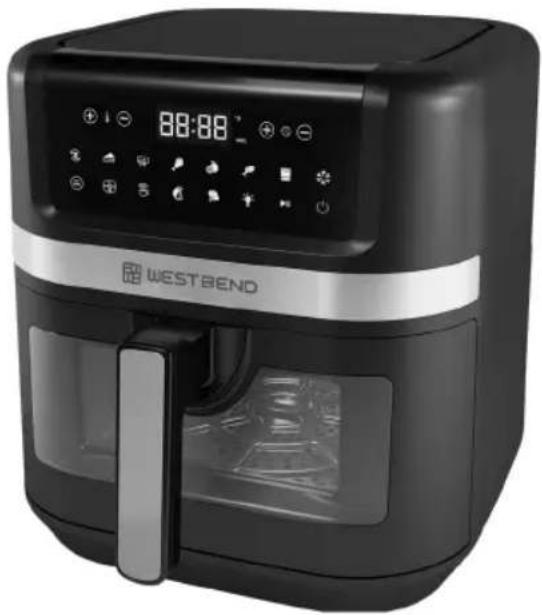
Black and white photo of a West Bend air fryer with digital display and control buttons (no visible text or symbols on device body)Register this and other West Bend products through our website: http://registerproducts.online
Product registration is not required to activate warranty.
Important Safeguards ....2
Polarized Plug....3
Product Diagram....4
Before Use....4
Preset Guide ....5
Using Your Air Fryer 6
Cleaning Your Air Fryer 7
Helpful Hints 7-8
Temperature Guide 8-9
Warranty 10
SAVE THIS INSTRUCTION MANUAL FOR FUTURE REFERENCE
IMPORTANT SAFEGUARDS
When using electrical appliances, basic safety precautions should always be followed to reduce the risk of fire, electric shock, and/or injury to persons including the following:
- Read all instructions before using this product.
- This appliance generates heat during use. Do not touch hot surfaces. Use handles or knobs.
- To protect against electric shock, do not place or immerse cord, plugs, or appliance in water or other liquid.
- This appliance is not intended for use by children or by persons with reduced physical, sensory, or mental capabilities, or lack of experience and knowledge. Close supervision is necessary when any appliance is used near children. Children should be supervised to ensure that they do not play with the appliance. Keep the appliance and its cord out of reach of children.
- Unplug from outlet when not in use, before putting on or taking off parts and before cleaning. Allow to cool before putting on or taking off parts, and before cleaning. To disconnect, turn any control to OFF, then unplug power cord from outlet. Do not disconnect by pulling on cord.
- Do not operate any appliance with a damaged cord or plug or after the appliance malfunctions, or has been damaged in any manner. Do not attempt to replace or splice a damaged cord. Return appliance to the manufacturer (see warranty) for examination, repair or adjustment.
- The use of accessory attachments not recommended by the appliance manufacturer may cause injuries.
- Do not use outdoors or for commercial purposes.
- Do not let cord hang over edge of table or counter, or touch hot surfaces.
- Do not place on or near wet surfaces, or heat sources such as a hot gas or electric burner, or in a heated oven.
- Extreme caution must be used when moving an appliance containing hot oil or other hot liquids.
- The heating base is subject to residual heat from cooking cycle. Do not touch heating base immediately after using. Allow to cool before handling.
- Use caution when pulling out the basket during or after a cooking cycle. Escaping steam can cause burns.
- Do not use appliance for other than intended use. Misuse can cause injuries.
- Intended for household countertop use only. Keep 6 inches (152 mm) clear from the wall and on all sides. Always use appliance on a dry, stable, level surface.
- Never operate this appliance by means of an external timer or separate remote-control system.
- WARNING: Spilled food can cause serious burns. Keep appliance and cord away from children. Never drape cord over edge of counter and never use outlet below counter.
SAVE THESE INSTRUCTIONS
HOUSEHOLD USE ONLY
POLARIZED PLUG
North American models with polarized plugs:
natural_image
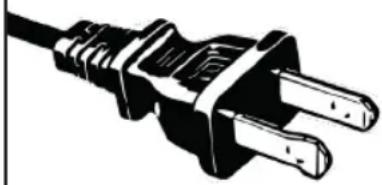
Illustration of a black and white electrical outlet plug with two leads (no text or symbols)This appliance has a polarized plug, (one blade is wider than the other). As a safety feature to reduce the risk of electrical shock, this plug is intended to fit in a polarized outlet only one way. If the plug does not fit fully in the outlet, reverse the plug. If it still does not fit, contact a qualified electrician. Do not attempt to
defeat this safety feature or modify the plug in any way. If the plug fits loosely into the AC outlet or if the AC outlet feels warm do not use that outlet.
POWER CORD INSTRUCTIONS:
A short power-supply cord or detachable power-supply cord is provided to reduce risks resulting from becoming entangled in or tripping over a longer cord. Longer detachable power-supply cords or extension cords are available and may be used if care is exercised in their use. If a long detachable power-supply cord or extension cord is used on short-cord models:
a. The marked electrical rating of the detachable power-supply cord or extension cord should be at least as great as the electrical rating of the appliance;
b. When the product is of the grounded type, the extension cord shall be a grounding type 3-wire cord; and
c. The longer cord should be arranged so that it will not drape over the counter top or table top where it can be pulled on by children or tripped over unintentionally.
Do not pull, twist or otherwise abuse the power cord.
NOTICES
-
Some countertop and table surfaces are not designed to withstand the prolonged heat generated by certain appliances. Do not set the heated unit on a finished wood table. We recommend placing a hot pad or trivet under your air fryer to prevent possible damage to the surface.
-
During initial use of this appliance, some slight smoke and/or odor may be detected. This is normal with many heating appliances and will not recur after a few uses.
Congratulations on your purchase of a West Bend Air Fryer!
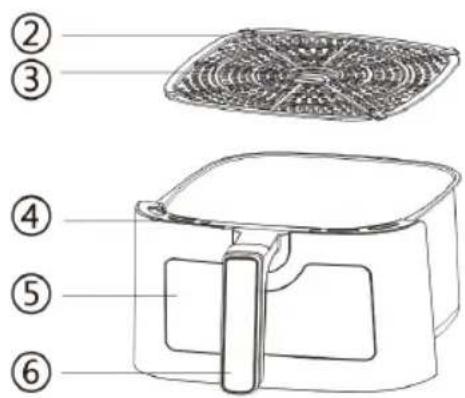
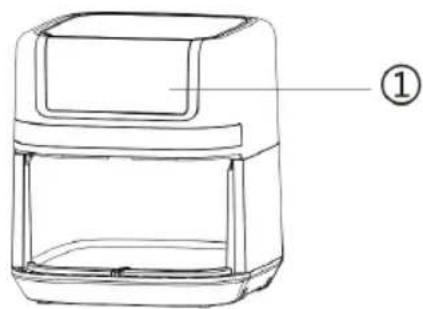
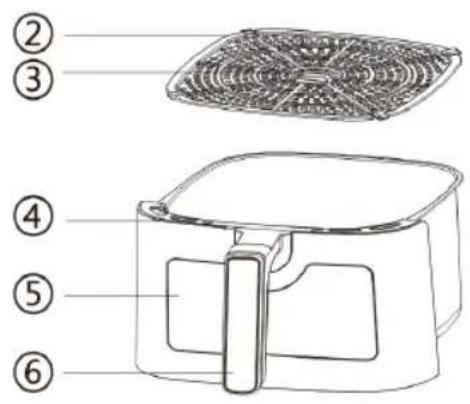
PRODUCT DIAGRAM
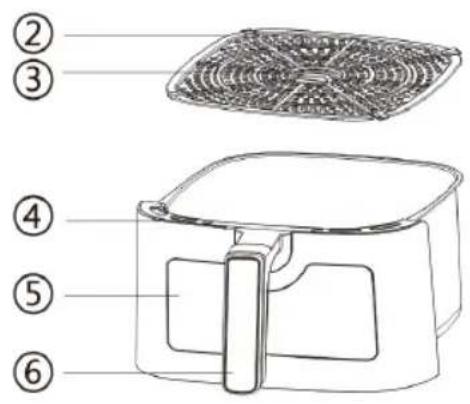
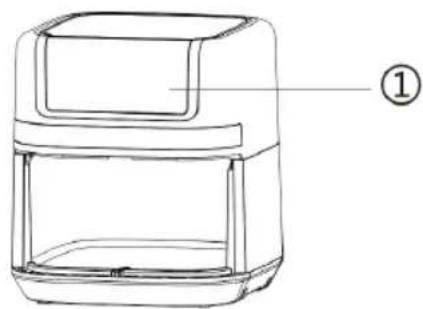
- Control Panel
- Air Fry Rack
- Lift Handle
- Air Fry Basket
natural_image
Line drawing of a rectangular oven or toaster with a labeled component (①), no text or symbols present.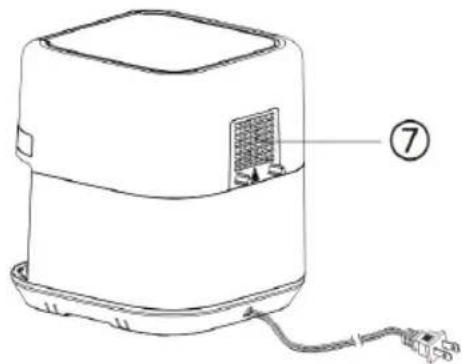
natural_image
Line drawing of a portable air purifier with attached cable and connector (no text or symbols)- Viewing Window
- Basket Handle
- Vent windows
BEFORE USE
Congratulations on your purchase of a West Bend Air Fryer. You will now be able to cook a wide variety of food in a healthier manner – with little or no oil!
The air fryer uses hot air, in combination with high-speed air circulation, and a top grill to prepare a variety of foods.
- Before using the Air Fryer, remove all packing material, promotional materials, and stickers from the appliance other than the rating label.
- Wash the Air Fry Rack and Air Fry Basket in hot soapy water. Rinse and dry thoroughly.
Note: These parts can also be washed in the top rack of your dishwasher.
PRESET GUIDE
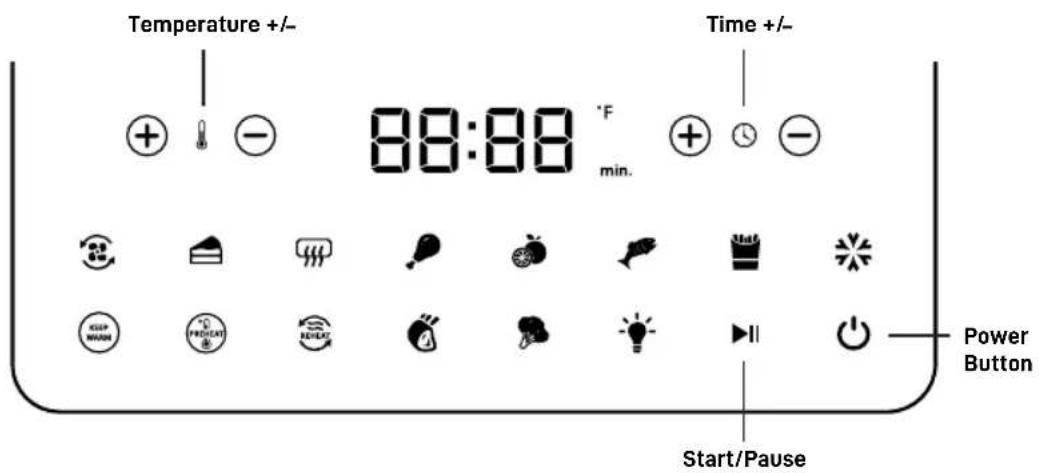
| PRESETS | DEFAULT TIME (MIN) | DEFAULT TEMPERATURE (°F) | SHAKE/TURN REMINDER | |
 | Air Fry | 20 (1-60) 400 (170-400) | ||
 | Bake | 25 (1-120) 320 (170-400) | ||
 | Broil | 12 (1-60) 400 (400) | √ | |
 | Chicken | 25 (1-60) 400 (170-400) | √ | |
 | Dehydrate | 480 (30-960) 130 (90-170) | ||
 | Fish | 10 (1-60) 360 (170-400) | √ | |
 | Fries | 18 (1-60) 400 (170-400) | √ | |
 | Frozen | 20 (1-60) 140 (90-200) | ||
 | Keep Warm | 30 (1-480) 200 (150-200) | ||
 | Preheat | 3 (1-60) 360 (170-400) | ||
 | Reheat | 15 (1-60) 300 (170-400) | ||
 | Roast | 30 (1-120) 400 (170-400) | √ | |
 | Vegetables | 10 (1-60) 320 (170-400) | √ | |
USING YOUR AIR FRYER
Note: When using the Air Fryer for the first time, a little smoke or odor may be emitted. If this happens, ensure there is sufficient ventilation around the appliance.
- Place the appliance on a dry, stable, heat-resistant surface, away from any edge.
- Place the Air Fry Rack in the Air Fry Basket.
- Plug the power cord into wall outlet. The Air Fryer will beep, and the power light will illuminate. The Air Fryer will remain on standby mode until the power button is pressed. Press the power button ⏻ to turn on the Air Fryer.
- Select the type of food you want to cook by touching any of the one touch presets. Depending on your selection, the cooking temperature and time will automatically be set to the default values.
- The default temperature will appear on the screen, then flash to display the default to time. The default time and temperature can be adjusted by pressing the +/- buttons associated with the time or temperature.
- The unit can also be used manually by setting the desired time and temperature without selecting one of the preset functions.
- Once the desired preset has been selected and desired cooking temperature and time set, the selected preset icon and Pause/Start will both blink, press the start button ▶II. The button will stop blinking, and an audible alert will sound indicating the cooking cycle has begun.
- When its time to shake or turn the food, the unit will beep 3 times.
- During the cooking cycle, you can adjust the time and temperature by pressing the +/- buttons associated with the time or temperature. Once the cooking cycle is complete, pull the basket using the easy grip handle to check on doneness.
Note: you can check on progress mid cycle by simple pulling out the Air Fry basket. To resume cooking, press the start button ▶II. - The air fryer also features a preheat preset. To preheat the unit before cooking, press the preheat icon. The default temperature will appear on the screen, then flash to display the default to time. Press the start button ▶II.
- Once preheat is complete, the unit will go back to standby mode. Open the basket and place the food on the rack, then push the basket back in the unit. Select one of the preset that best correspond to the type of food in the Air Fry Basket. Once the desired preset has been selected and the desired cooking temperature and time set, press the start button ▶II. The button will stop blinking, and an audible alert will sound indicating that the cooking cycle has begun.
- Using kitchen tongs, empty the contents of the tray into a bowl or onto a plate.
CLEANING YOUR AIR FRYER
Clean the air fryer after each use. Air Fry Rack and Air Fry Basket are coated with a PTFE free Diamond Shield™ non stick coating for enhanced durability and easy clean up. Do not use metal kitchen utensils or abrasive cleaning materials to clean them, as this may damage the coating.
- Unplug the unit from the wall outlet
- Let the unit cool down.
- Wipe the outside of the appliance with a damp cloth.
- Wash the Air Fry Rack and Air Fry Basket in hot soapy water. Rinse and dry thoroughly.
Note: These parts can also be washed in the top rack of your dishwasher. - Clean the heating element with hot soapy water and a cleaning brush to remove food residue.
Tip: If food residue has adhered to the air fry rack or the bottom of the air fry basket, fill the air fry basket with hot soapy water. Place the air fry rack in the air fry basket and soak for approximatley 10 minutes.
This appliance has no user serviceable parts. Any servicing beyond that described in the Cleaning Section should be performed by an Authorized Service Representative only. See warranty available online.
HELPFUL HINTS
Tips:
- Smaller food usually require a slightly shorter preparation time than larger food.
- Shaking smaller foods halfway through the cooking time improves the end result and can help prevent unevenly fried ingredients.
- Lightly coat fresh potatoes with a little oil for a crispier result.
- Do not air fry extremely greasy ingredients such as sausages in the air fryer.
- Snacks that can be prepared in an oven can also be prepared in the air fryer.
- For optimal result, we recommend air frying up to 500 grams (16oz) of fries at a time.
- Use pre-made dough to prepare filled snacks quickly and easily. Pre-made dough also requires a shorter preparation time than home-made dough.
- The air fryer can also be used to reheat food. To reheat food, simply press the reheat preset. The default temperature will appear on the screen, then flash to display the default to time. The default time and temperature can be adjusted by pressing the +/- buttons associated with the time or temperature.
HOME-MADE FRIES: For the best results, pre-baked fries are recommended. If you want to make home-made fries, follow the steps below:
- Peel the potatoes and cut them into sticks.
- Soak the potato sticks in a bowl of water for at least 30 minutes. Then remove the sticks from the water, and dry them on paper towels.
- Pour 12 tablespoon of olive oil in a bowl, add the potato sticks, and mix until the sticks are coated with oil.
- Remove the potato sticks from the bowl with kitchen tongs or other utensil so that excess oil stays behind in the bowl. Put the sticks in the tray.
Note: To prevent excess oil from collecting at the bottom of the frying tray, do not tilt the bowl to pour all the sticks into the tray at once.
- Fry the potato sticks according to the instructions provided in the Temperature Guide below.
TEMPERATURE GUIDE
Default Cooking Times & Temperatures
Note: We recommend preheating the air fryer before cooking.
- To preheat the air fryer, press the preheat button.
- The temperature and time will automatically be set to the default values.
- The default temperature will appear on the screen, then flash to display the default to time.
- The default time and temperature can be adjusted by pressing the +/- buttons associated with the time or temperature
- Press the start ⏻ button. The button will blink, and an audible alert will sound indicating that the Preheat cycle has begun.
- Once preheat is complete, the air fryer will turn off.
- Press the power button to turn off the appliance, then select your desired cooking function.
Time (min.) Temperature Shake Extra information
Potatoes & fries
| Thin frozen fries 12-16 400 °F / 200 °C Shake | |||
| Thick frozen fries 12-20 400 °F / 200 °C Shake | |||
| Home-made fries (8x8mm) | 18-25 350 °F / 180 °C Shake add 1/2 tbsp of oil | ||
| Home-made potato wedges | 18-22 350 °F / 180 °C Shake add 1/2 tbsp of oil | ||
| Home-made potato cubes | 12-18 400 °F / 200 °C Shake add 1/2 tbsp of oil | ||
| Rösti 15-18 350 °F / 180 °C | |||
| Potato gratin 18-22 350 °F / 180 °C | |||
Meat & Poultry
| Steak 8-12 350°F / 180°C | ||||
| Pork chops 10-14 350°F / | 180°C | |||
| Hamburgers | 7-14 | 350°F / 180°C | ||
| Sausage roll | 13-15 400°F / 200°C | |||
| Drumsticks | 18-22 350°F / 180°C | |||
| Chicken breast | 10-15 350°F / 180°C |
Snacks
| Spring rolls | 8-10 400°F / 200°C Shake | ||
| Frozen chicken nuggets | 6-10 400°F / 200°C Shake | ||
| Frozen fish sticks | 6-10 400°F / 200°C | ||
| Frozen breaded cheese sticks | 10 | 400°F / 200°C | |
| Stuffed vegetables | 10 | 325°F / 160°C |
PRODUCT WARRANTY
Appliance 1 Year Limited Warranty
West Bend ® ("the Company") warrants this appliance from failures in the material and workmanship for one (1) year from the date of original purchase with proof of purchase, provided that the appliance is operated and maintained in conformity with the Instruction Manual. Any failed part of the appliance will be repaired or replaced without charge at the Company's discretion. This warranty applies to indoor household use only.
This warranty does not cover any damage, including discoloration, to any non-stick surface of the appliance. This warranty is null and void, as determined solely by the Company, if the appliance is damaged through accident, misuse, abuse, negligence, scratching, or if the appliance is altered in any way.
THIS WARRANTY IS IN LIEU OF ALL IMPLIED WARRANTIES, INCLUDING WARRANTIES OF MERCHANTABILITY, FITNESS FOR A PARTICULAR PURPOSE, PERFORMANCE, OR OTHERWISE, WHICH ARE HEREBY EXCLUDED. IN NO EVENT SHALL THE COMPANY BE LIABLE FOR ANY DAMAGES, WHETHER DIRECT, INDIRECT, INCIDENTAL, FORSEEABLE, CONSEQUENTIAL, OR SPECIAL ARISING OUT OF OR IN CONNECTION WITH THIS APPLIANCE.
If you think the appliance has failed or requires service within its warranty period, please contact the Customer Care Department through our website at www.westbend.com
"Support" -> "Contact Us". A receipt proving the original purchase date will be required for all warranty claims, hand written receipts are not accepted. You may also be required to return the appliance for inspection and evaluation. Return shipping costs are not refundable. The Company is not responsible for returns lost in transit.
Valid only in USA and Canada
REPLACEMENT PARTS
Replacement parts, if available, may be ordered online at www.westbend.com.
This manual contains important and helpful information regarding the safe use and care of your product. For future reference, attach dated sales receipt for warranty proof of purchase and record the following information:
Date purchased or received as gift: ____
Where purchased and price, if known: ____
Item number and Date Code (shown bottom/back of product): ____
WEST BEND®
FRITEUSE À AIR CHAUD DE 6,6 L
Mode d'emploi
natural_image
Black and white photo of a West Bend air fryer with digital display and control buttons (no visible text or symbols on the device itself)natural_image
Illustration of a black and white electrical outlet plug with two leads (no text or symbols)DIAGRAMME DU PRODUIT
natural_image
Line drawing of a rectangular oven or toaster with a labeled component (①), no text or symbols present.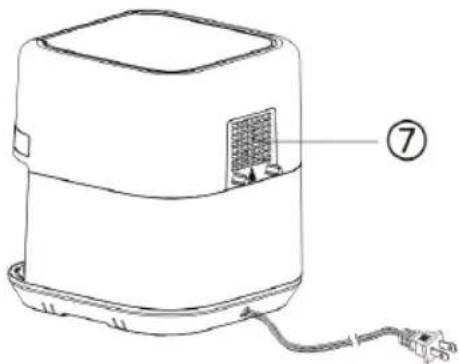
natural_image
Line drawing of a device with a labeled component (⑦) and cable, no readable text or symbols present.natural_image
Black and white photo of a West Bend air fryer with digital display and control buttons (no visible text or symbols on the device body)natural_image
Illustration of a black and white electrical outlet plug with two leads (no text or symbols)DIAGRAMA DEL PRODUCTO

natural_image
Line drawing of a food appliance with a labeled component (①), no text or symbols present.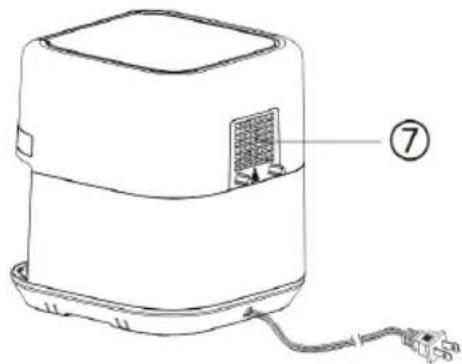
natural_image
Line drawing of a portable air purifier with attached cable and connector (no text or symbols)Prop. 65 Warning for California Residents

WARNING: CANCER AND REPRODUCTIVE HARM - www.P65Warnings.ca.gov


- SAVE THIS INSTRUCTION MANUAL FOR FUTURE REFERENCE
- IMPORTANT SAFEGUARDS
- When using electrical appliances, basic safety precautions should always be followed to reduce the risk of fire, electric shock, and/or injury to persons including the following:
- SAVE THESE INSTRUCTIONS
- HOUSEHOLD USE ONLY
- POLARIZED PLUG
- North American models with polarized plugs:
- POWER CORD INSTRUCTIONS:
- NOTICES
- Congratulations on your purchase of a West Bend Air Fryer!
- PRODUCT DIAGRAM
- BEFORE USE
- USING YOUR AIR FRYER
- CLEANING YOUR AIR FRYER
- HELPFUL HINTS
- Tips:
- TEMPERATURE GUIDE
- Default Cooking Times & Temperatures
- Time (min.) Temperature Shake Extra information
- PRODUCT WARRANTY
- Appliance 1 Year Limited Warranty
- REPLACEMENT PARTS
- WEST BEND®
- FRITEUSE À AIR CHAUD DE 6,6 L
- DIAGRAMME DU PRODUIT
- DIAGRAMA DEL PRODUCTO
Brand : WestBend
Model : AFWB7QBK13
Category : Deep fryer