UDDARP 405.279.86 - Washing machine IKEA - Free user manual and instructions
Find the device manual for free UDDARP 405.279.86 IKEA in PDF.

| Brand | IKEA |
| Model | UDDARP 405.279.86 |
| Product type | Washer-dryer (washing machine) |
| Washing capacity | 8 kg |
| Energy class | A++ |
| Voltage | 220-240 V, 50 Hz |
| Programs | Synthetics, Eco Cotton, Delicate, Wool, Silk, Sport, Quick 30, Cotton, Mixed, Bed Linen, Duvet, Shirts, Jeans, Easy Iron, Refresh |
| Options | Drying level, Delayed start, Timed drying, End of cycle, Quick, Fresh Plus |
| Safety | Child lock (long press), open door detection, automatic stop at end of cycle |
| Dimensions (approx) | H 85 x L 60 x P 60 cm |
| Weight (approx) | 70 kg |
| Noise level | 64 dB(A) |
| Annual energy consumption | 194 kWh/year |
| Condensation efficiency class | B |
| Maintenance | Clean the filters (door and lower) after each cycle; empty the water tank; clean the air inlet regularly |
| Spare parts and repairability | Available from IKEA or authorized after-sales service |
| Installation ambient temperature | 5°C to 35°C |
| General information | Consult the complete manual for assembly and safety instructions |
Frequently Asked Questions - UDDARP 405.279.86 IKEA
User questions about UDDARP 405.279.86 IKEA
0 question about this device. Answer the ones you know or ask your own.
Ask a new question about this device
Download the instructions for your Washing machine in PDF format for free! Find your manual UDDARP 405.279.86 - IKEA and take your electronic device back in hand. On this page are published all the documents necessary for the use of your device. UDDARP 405.279.86 by IKEA.
USER MANUAL UDDARP 405.279.86 IKEA
⚠️ Install the dryer in rooms with adequate ventilation (open door, ventilation grid or slot larger than 500 cm²) in order to avoid the backflow of gases into the room from appliances burning other fuels, including open fires. If the dryer is installed under a worktop, provide a distance of 10 mm between the upper panel of the dryer and any objects above it, and 15 mm between the sides of the appliance and the walls or furniture units adjacent to it.
⚠️ If the dryer is installed near to a gas or coal stove, provide a heat insulating plate (85 cm x 57 cm) in between, as the side facing the stove is covered with aluminium foil.
Exhaust air must not be discharged into a flue which is used for discharging fumes from appliances burning gas or other fuels.
The appliance must not be installed behind a lockable door, a sliding door or a door with a hinge on the opposite side to that of the tumble dryer, in such a way that a full opening of the tumble dryer door is restricted.
Warning! Read the safety booklet and refer to assembly instruction. The manufacturer does not accept any responsibility for damage or injury through failure to comply with the safety precaution.
Make sure that hoses and cable are correctly connected.

Product description
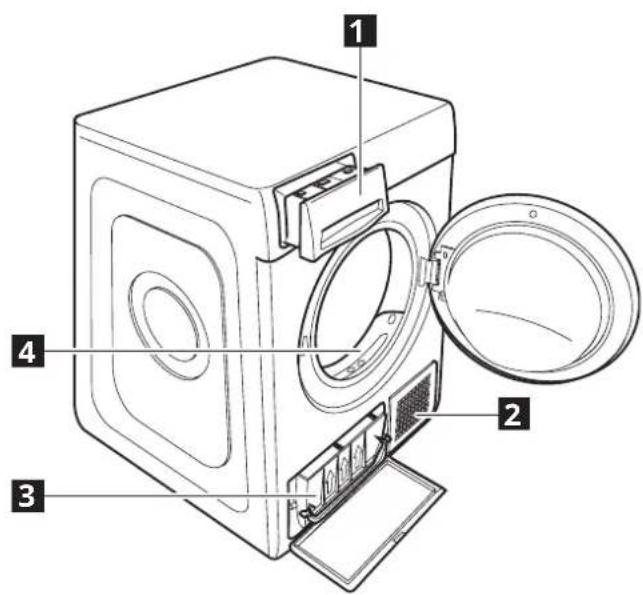
1 Water Tank
2 Air Intake
3 Bottom filter
4 Door filter
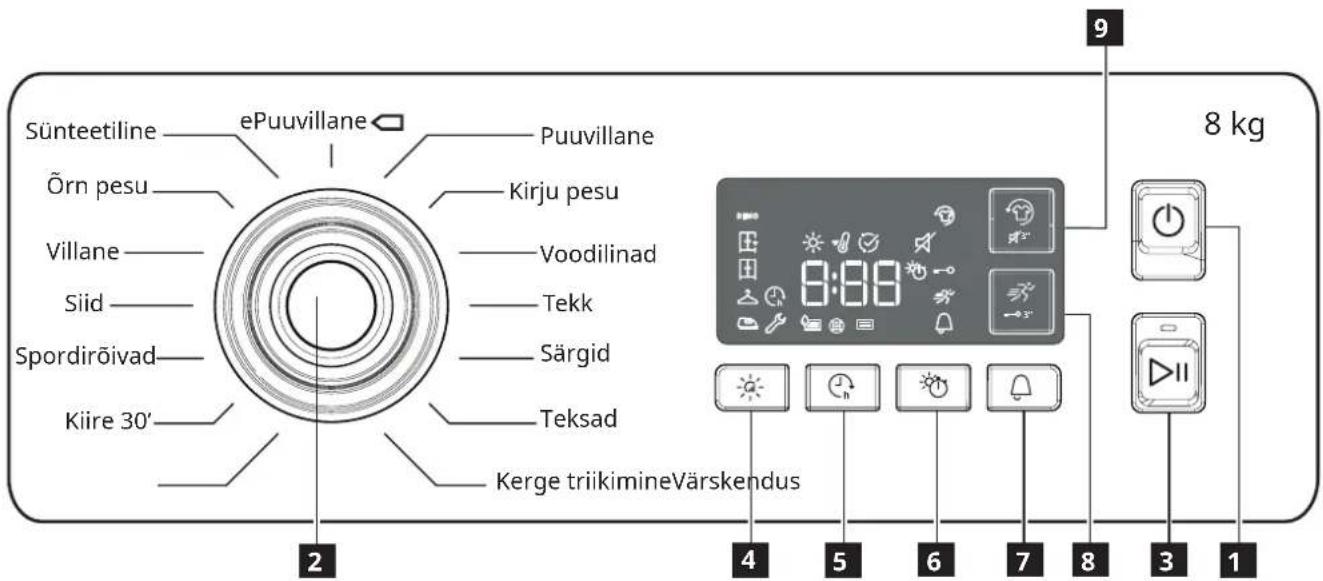
Control Panel
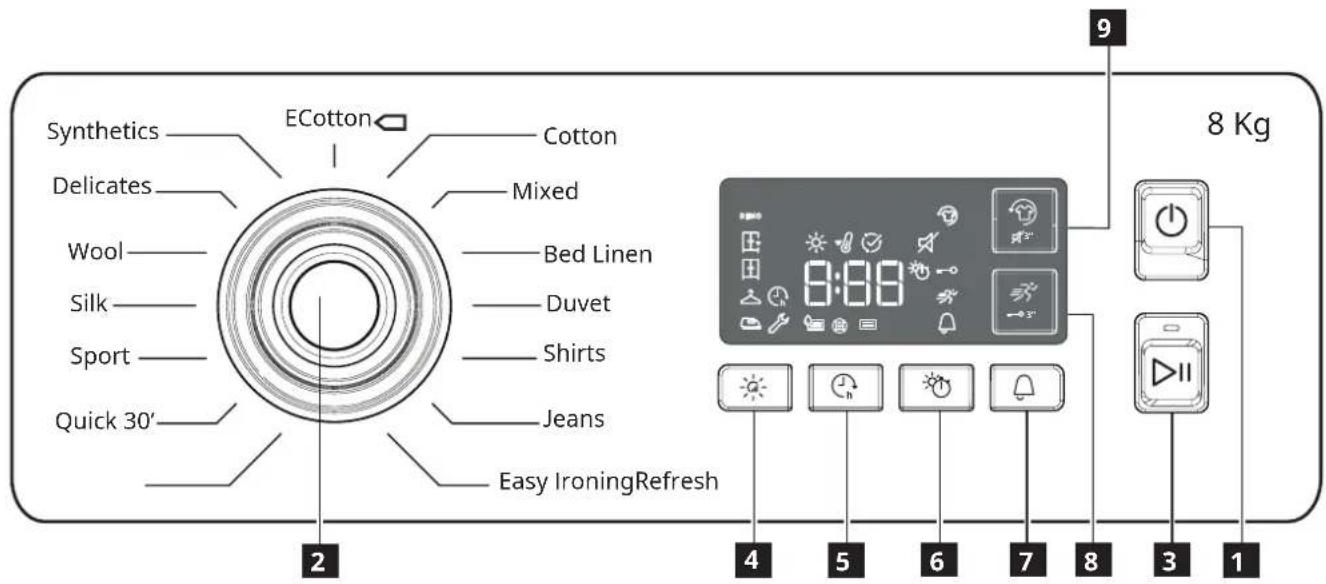
1 ON/OFF button (Reset if long pressed)
2 Programme selection Knob
3 Start/Pause
Options Buttons
4 Dryness level
5 Start delay
6 Timed drying
7 Cycle end
8 Rapid (Key lock if long pressed)
9 Fresh Plus (mute if long pressed)
DISPLAY INDICATORS
 Dryness level Dryness level | |
 | Iron dry |
 | Hanger dry |
 | Cupboard dry |
 | Extra dry |
| Cycle phase | |
 | Drying |
 | Cool down |
 | End of cycle |
 | Empty water tank |
 | Clean door filter |
 | Clean bottom filter |
| Refer to troubleshooting section | |
 Failure Failure | Call after sales service |
 -_MO Demo mode -_MO Demo mode |
First Use
Before using the appliance carefully read the Safety Instruction.
Make sure that the water tank is correctly inserted. Make sure that the drain hose on the back of the dryer is fixed correctly, either to the dryer's water tank, or to your domestic sewage system.
The dryer must be installed in a room with a temperature ranging between 5°C and 35°C to ensure proper operation. Before you use your dryer ensure that it has been in a upright position for at least 6 hours.
Programme Chart
| Programs Temp Functions | ||||||||||
| Dryness level | Start delay | Timed drying | Cycle end | Rapid | Fresh Plus/Mute 3 sec | Key lock 3 sec | ON-OFF | START/PAUSE | ||
| Eco Cotton 90 | ● | ● | ● | ● | ● | ● | ● | ● | ||
| Cotton 90 | ● | ● | ● | ● | ● | ● | ● | ● | ||
| Mixed 75 | ● | ● | ● | ● | ● | ● | ● | ● | ||
| Bed Linen 87 | ● | ● | ● | ● | ● | ● | ● | ● | ||
| Duvet 90 | ● | ● | ● | ● | ● | ● | ||||
| Shirts 90 | ● | ● | ● | ● | ● | ● | ● | |||
| Jeans 87 | ● | ● | ● | ● | ● | ● | ● | ● | ||
| Easy Ironing 90 | ● | ● | ● | ● | ||||||
| Refresh - | ● | ● | ● | ● | ||||||
| Quick 30' 90 | ● | ● | ● | ● | ● | ● | ||||
| Sport | 75 | ● | ● | ● | ● | ● | ● | |||
| Silk | 60 | ● | ● | ● | ● | |||||
| Wool | 90 | ● | ● | ● | ● | |||||
| Delicates 65 | ● | ● | ● | ● | ● | ● | ● | |||
| Synthetics | 75 | ● | ● | ● | ● | ● | ● | ● | ● | |
Daily use
Doing this will keep your machine working at its BEST! Remember to empty your water tank after each drying cycle. Remember to clean your filters after each drying cycle.
1. Load laundry
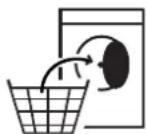
Open the door and load garments. Always refer to instructions on clothing labels and the max loads indicated in the programme section. Empty pockets. Make sure garments do not get caught between the door and/or the door filter.
2. Close door

- Press the button On/Off ⏻
- Select the programme according to the laundry type.
- Select the options, if necessary.
- To start the cycle, press the Start/Pause button ▷
- At the end of the drying cycle, a buzzer will beep. An indicator on the control panel signals the end of the cycle. Pull the load out immediately to prevent the formation of creases on laundry.
- Turn the machine off by pressing the button On/Off ⏻open the door and pull clothing out.
If the machine is not switched off manually, after about a quarter of an hour from the cycle end, the appliance turns off automatically to save energy.
If this last stage is not carried out immediately, some machines and/or some programmes/options are equipped with Crease Care system.
For some hours, after the end of drying, the drum rotates at regular intervals to prevent the formation of creases. In case of power failure, it is necessary to press the button Start/Pause ▷ to restart the cycle.
OPENING OF THE DOOR DURING THE CYCLE
During operation, it is possible to open the door.
After having closed it, press the button Start/Pause ▷ again to restart the dryer.
What to do if...
Before contacting the Service Centre, refer to the table below. Often the malfunctions are minor and can be solved in few minutes
| Problem Possible causes Solutions | ||
| The tumble dryer does not turn on | The plug is not inserted into the socket. Insert the plug into the socket. | |
| The plug is faulty. | Try to plug another appliance in the same socket. Do not use connecting electrical devices to the socket, as adapters or extensions. | |
| A power failure occurred. Await the reactivation of the power supply. | ||
| The tumble dryer does not start | The door is open. | For machines equipped with this function: await the end of the delay set or switch the machine off to reset it. Refer to the section Options. |
| The button Start/Pause was not pressed to start the program. | Press the button Start/Pause. | |
| The function Key Lock was enabled (in case of machines equipped with this option). | Refer to the option section and, if the Key Lock is present, disable it. Switching the machine off is not enough to disable this option. | |
| The drying times are very long | An appropriate maintenance was not carried out. | Refer to the section Cleaning and maintenance and perform the operations described. |
| The programme, the time and/or the drying level set are not suitable for the type and the amount of load inserted into the dryer. | Refer to the section programmes and options to find the programme and the options most suitable for the type of load. | |
| The garments are too wet. | Carry out a washing cycle with higher spin speed to remove as much water as possible. | |
| The dryer may be overloaded. | Refer to the programme section to check the max. load for each programme. | |
| Room temperature. | The drying time may be longer if the room temperature falls outside the 14-30°C range. | |
| The programme did not end | A power failure occurred might have occurred. | In case of power failure, it is necessary to press the button Start/Pause to restart the cycle. |
| Lights on or flashing | ||
| Water tank The water tank is full. | Emtpy the water tank. Refer to the section Cleaning and maintenance. | |
| Door filter and/or bottom filter | Failure of the air flow necessary for machine operation. | Clean the door filter and the bottom one and check whether air intake is free. Carrying out these operations improperly may cause damages. |
| Bottom filter The bottom filter requires cleaning. | Clean the bottom filter. Refer to section Cleaning and maintenance. | |
| DEMO The cycle lasts few minutes | The dryer is in DEMO mode. The DEMO indicator is on. | Disable the DEMO mode. The following actions must be carried out in sequence, without breaks. Switch the machine on and then switch it off again. Press the Start/Pause button until the buzzer is heard. Switch the machine on again. The “DEMO” indicator flashes and then turns off. |
| The presence of wrench symbol signals a malfunction. | The machine sensors detected a failure. | Switch the dryer off and unplug it. Open the door immediately and pull laundry out, to allow the heat to dissipate. Wait for about 15 minutes. Reconnect the dryer to the power supply, load the laundry and restart the drying cycle. If the problem still occurs, contact the After-Sales Service Centre and communicate the letters and digits flashing on the display. For instance: F3 and E2. |
Technical data
| IKEA UDD | ARP 8 | 220-24050 | A++ 194 | 1,78 234 B 1 | 0,5 64 | ||||||
| Brand Model | Rated capacity (Kg) | Voltage (V) Frequency (Hz) | Energy efficiency class | Standard cotton programme time at full load [Minutes] | Energy consumption electric dryer, full load [kWh/cycle] | Weighted Annual energy consumption, electric dryer - [kWh/annum] | Condensation efficiency class | Power consumption in | Noise level (dB)A | ||
| delay start (W) | standby mode (W) | ||||||||||
1 Veepaak
2 Öhu sissevõtt
3 Alumine filter
4 Uksefilter
Juhtpaneel
| Programmes Temp. Fonctions | ||||||||||
| Niveau de séchage | Départ différé | Séchage tempori- sé | Fin de cycle | Rapide | Frais Plus/ Désactivation 3 sec | Verrou 3 secondes | MARCHE- ARRÊT | DÉPART/ PAUSE | ||
| Coton Eco 90 | ● | ● | ● | ● | ● | ● | ● | ● | ||
| Coton 90 | ● | ● | ● | ● | ● | ● | ● | ● | ||
| Mixte 75 | ● | ● | ● | ● | ● | ● | ● | ● | ||
| Linge de Lit 87 | ● | ● | ● | ● | ● | ● | ● | ● | ||
| Duvet 90 | ● | ● | ● | ● | ● | ● | ||||
| Chemises 90 | ● | ● | ● | ● | ● | ● | ● | |||
| Jeans 87 | ● | ● | ● | ● | ● | ● | ● | ● | ||
| Repassage Facile | 90 | ● | ● | ● | ● | |||||
| Rafraîchir - | ● | ● | ● | ● | ||||||
| Rapide '30 | 90 | ● | ● | ● | ● | ● | ● | |||
| Sport | 75 | ● | ● | ● | ● | ● | ● | |||
| Soie | 60 | ● | ● | ● | ● | |||||
| Laine | 90 | ● | ● | ● | ● | |||||
| Délicat | 65 | ● | ● | ● | ● | ● | ● | ● | ||
| Synthétiques | 75 | ● | ● | ● | ● | ● | ● | ● | ● | |