
HRS 536 C5 VK - Lawn mower Honda - Free user manual and instructions
Find the device manual for free HRS 536 C5 VK Honda in PDF.

| Brand | Honda |
| Model | HRS 536 C5 VK |
| Product type | Self-propelled lawn mower |
| Engine | GCV160, 4-stroke, single-cylinder, 160 cm³ |
| Maximum engine speed | 2,850 rpm |
| Fuel | Unleaded gasoline (octane rating ≥ 91) |
| Fuel tank capacity | 0.93 L |
| Recommended engine oil | SAE 10W-30, API SJ or equivalent |
| Engine oil capacity | 0.50 L (full: 0.35-0.40 L) |
| Cutting width | 530 mm |
| Cutting height adjustment | 6 positions: 28, 44, 60, 75, 90, 102 mm |
| Weight (dry mass) | 31.2 kg |
| Dimensions (L x W x H) | 1,532 x 582 x 1,024 mm |
| Transmission system | Smart Drive variable speed (6.5 km/h max) |
| Functions | Mulching and side discharge |
| Spark plug | NGK BPR5ES (gap 0.7-0.8 mm) |
| Air filter | Dry type |
| Safety device | Rotor brake (engine stops if blade lever released) |
| Guaranteed sound power level | 98 dB(A) |
| Vibration | 2.3 m/s² (uncertainty 1.1 m/s²) |
| Repairability | Spare parts available at Honda dealer |
| Warranty | 2 years (3 months for professional use) |
Frequently Asked Questions - HRS 536 C5 VK Honda
User questions about HRS 536 C5 VK Honda
0 question about this device. Answer the ones you know or ask your own.
Ask a new question about this device
Download the instructions for your Lawn mower in PDF format for free! Find your manual HRS 536 C5 VK - Honda and take your electronic device back in hand. On this page are published all the documents necessary for the use of your device. HRS 536 C5 VK by Honda.
USER MANUAL HRS 536 C5 VK Honda
Thank you for purchasing a Honda lawnmower!
This manual covers the operation and maintenance of the Honda HRS536C5 VKEA lawnmower.
We want to help you get the best results from your new lawnmower and to operate it safely. This manual contains the information on how to do that; please read it carefully.
This manual should be considered a permanent part of the lawnmower and should remain with it if it is resold.
If you have a problem or questions concerning the lawnmower, contact your supplying dealer.
We recommend that you read the warranty policy to fully understand its coverage and your responsibilities of ownership.
Honda Power Equipment Mfg., Inc. reserves the right to make changes at any time without notice and without incurring any obligation.
No part of this publication may be reproduced without written permission.
SAFETY MESSAGES
Pay special attention to statements preceded by the following words:
DANGER
You WILL be KILLED or SERIOUSLY HURT if you don't follow instructions.
WARNING
You CAN be KILLED or SERIOUSLY HURT if you don't follow instructions.
CAUTION
You CAN be HURT if you don't follow instructions.
Each message tells you what the hazard is, what can happen, and what you can do to avoid or reduce injury.
DAMAGE PREVENTION MESSAGES
You will also see other important messages that are preceded by the following word:
NOTICE
Your lawnmower, other property, or the environment can be damaged if you don't follow instructions.
The purpose of these messages is to help prevent damage to your lawnmower, other property, or the environment.

00X39VG3 6561
HONDA
OWNER'S MANUAL
(Original instructions)
HRS536C5VKEA
PEDESTRIAN CONTROLLED
LAWNMOWER
natural_image
Red and silver LiMole lawn mower with black handle and wheels (no visible text or symbols)CONTENTS
INTRODUCTION 1
SAFETY MESSAGES .... 1
SAFETY INSTRUCTIONS 2
COMPONENT IDENTIFICATION 3
SET-UP 4
CONTROLS 4
Honda Warranty Conditions,
"EC Declaration of Conformity" CONTENT OUTLINE,
Major Honda Distributor Locations .... Last pages
© 2017 American Honda Motor Co., Inc.—All Rights Reserved
C5
HPE.2017.09
PRINTED IN U.S.A.
SAFETY INSTRUCTIONS
WARNING
To ensure safe operation –

- Honda lawnmowers are designed to give safe and dependable service if operated according to instructions. Read and understand the Owner's Manual before operating the mower. Failure to do so could result in personal injury or equipment damage.
- Read instructions carefully, become familiar with controls and proper use of equipment.
- Never allow children or people unfamiliar with these instructions to use the lawnmower. Local regulations may restrict the age of the operator.
- Never mow when:
- People, especially children, or pets are nearby.
- There is a risk of adverse weather such as lightning or a storm.
- Keep in mind that the operator or user is responsible for injuries, property damage, or hazards occurring to other people or their property.
- While mowing, always wear substantial footwear and long trousers. Do not operate the equipment when barefoot or wearing open sandals.
- Thoroughly inspect the area where the equipment is to be used, and remove all objects which may be thrown by the machine.
-
WARNING - Petrol is highly flammable:
-
Store fuel in containers specifically designed for this purpose.
- Refuel outdoors only and do not smoke while refueling.
- Add fuel before starting the engine. Never remove the cap of the fuel tank or add petrol while the engine is running or when the engine is hot.
- If petrol is spilled, do not attempt to start the engine, but move the machine away from the area of spillage, and avoid creating any source of ignition until the petrol vapors have dissipated.
- Install fuel caps securely.
- Replace faulty mufflers.
- Before using, always visually inspect to see that the cutting means, cutting means bolts, and cutting-means enclosure are not worn or damaged. Replace a worn or damaged cutting means and cutting-means bolts in sets to preserve balance.
- Check grass catchers frequently for wear or deterioration.
- Do not operate the engine in a confined space where dangerous carbon monoxide fumes can collect.
- Mow only in daylight or good artificial light.
- Avoid operating the equipment in wet grass, where feasible.
-
Mowing stability:
-
Always be sure of your footing on slopes.
- Mow across slopes, never up and down.
-
Walk, never run.
-
Exercise extreme caution when changing direction on slopes.
-
Do not mow excessively steep slopes.
-
Use extreme caution when pulling the lawnmower toward you.
- Stop the cutting means if the lawnmower has to be tilted for transporting, when crossing surfaces other than grass, and when transporting the lawnmower to and from the area to be mowed.
- Never operate the lawnmower with defective guards or shields, or without safety devices (for example, discharge guards and/or grass catchers in place).
- Do not attempt to make wheel height adjustments while the machine is running.
- Do not change the engine governor setting or over-speed the engine.
- Disengage the Smart Drive control before starting the machine.
- Start the engine carefully according to the instructions and with feet well away from the cutting means.
- Do not start the engine when standing in front of the discharge chute.
- Do not tilt the lawnmower when starting the engine.
- Do not put hands or feet near or under rotating parts. Keep clear of the discharge opening at all times.
- Never pick up or carry a lawnmower while the engine is running.
- Stop the engine and disconnect the spark plug wire:
– Before clearing a blockage or unclogging the lawnmower.
- Before checking, cleaning, or working on the lawnmower.
- After striking a foreign object. Inspect the lawnmower for damage and make repairs before restarting and operating the lawnmower.
- If lawnmower starts to vibrate abnormally, stop the engine immediately.
- Stop the engine:
-
Whenever you leave the lawnmower.
– Before refueling the lawnmower.
– Before removing the side discharge guard. -
Turn the fuel valve off at the conclusion of mowing.
- Keep all nuts, bolts, and screws tight to be sure the equipment is in safe working condition.
- Never store the equipment with petrol in the tank inside a building where fumes may reach an open flame or spark.
- Allow the engine to cool before storing in any enclosure.
- To reduce the fire hazard, keep the petrol storage area, engine, muffler, and battery compartment (if applicable) free of grass, leaves, or excessive grease.
- Replace worn or damaged parts for safety.
- If the fuel tank has to be drained, this should be done outdoors.
- Wear eye protection.
Disposal
To protect the environment, do not dispose of this product, battery, engine oil, etc. carelessly by leaving them in the waste. Observe the local laws and regulations or consult your authorized Honda dealer for disposal.
The labels shown here contain important safety information. Carefully read their meaning. These labels are considered permanent parts of your Honda mower. If a label comes off or becomes hard to read, contact your Honda dealer for a replacement.
Letter Meaning
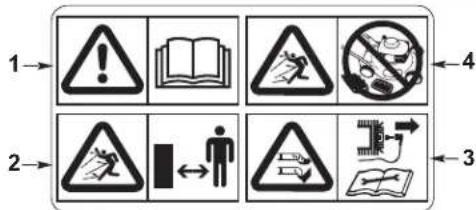
A
- Read the owner's manual before using the mower.
- Risk of projections: Keep third persons away from the area during use.
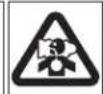
- Risk of cuts. Rotating cutting means: Do not put hands or feet inside the cutting-means enclosure. Disconnect the spark plug cap before performing any operation of maintenance or repairs.
- Do not operate without either discharge guard or grass catcher in place.
| B | 5 | 6 | 7 |
 |  |  |
| C | 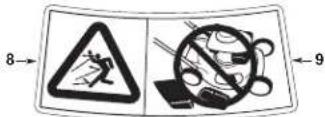 8. Risk of projections: Keep third persons away from the area during use.9. Do not operate without either discharge guard or grass catcher in place. 8. Risk of projections: Keep third persons away from the area during use.9. Do not operate without either discharge guard or grass catcher in place. |
PRODUCT IDENTIFICATION PLATE
Letter Meaning
| D | 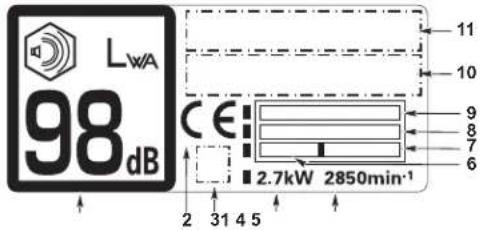 | |
 | 6. Year of manufacture7. Weight in kilograms8. Serial number9. Model10.Name and address of authorized representative11.Name and address of Manufacturer | |
| Name and address of manufacturer and authorized representative are written in the “EC Declaration of Conformity” CONTENT OUTLINE in this Owner’s Manual. | ||
- Year of manufacture
- Weight in kilograms
- Serial number
- Model
- Name and address of authorized representative
- Name and address of Manufacturer
COMPONENT IDENTIFICATION
![[1] [2] [3] A [LABEL] D [LABEL] [9] [10] (2) [8] [7] C [LABEL] [6] [5] [11] [15] [4] (2) [12] [13] B [LABEL] [4]](/content/2026/04/668927/images/166030a03bf12791330f13f8bb9999454826441822d99f699ac547be8848306f.jpg)
| 1 | Smart Drive control(Transmission control which drives the rear wheels) |
| 2 Handlebar 9 Recoil starter grip | |
| 3 | Cutting-means control (Starts and stops the cutting means) |
| 4 | Cutting height adjustment levers (4) |
| 5 Muffler | |
| 6 Discharge guard | |
| 7 Oil filler cap | |
| 8 Engine serial number |
| 10 Handlebar adjust knob (2) |
| 11 Fuel tank cap |
| 12 Fuel valve |
| Air cleaner |
| Carburetor |
| Spark plug cap |
Record the frame and engine serial numbers in the space below. You will need these numbers when ordering parts and when making technical or warranty inquires.
Frame serial number: ____ Engine serial number: ____
Date of purchase: ____ / ____ / ____
SET-UP
UNPACKING
Remove all the cardboard from around the handlebar.
HANDLEBAR SETUP
- With the handlebar adjust knobs [1] in the unlocked [3] position, raise the handlebar into the mowing position.
![[2] [1] [3] [4]](/content/2026/04/668927/images/3612b546a7779cee4e7fa4f85b7096d785c2702c3c4dc173b6a384a1792a152c.jpg)
-
Depress the blade control lever [2] while raising the handlebar.
-
Turn the handlebar adjust knobs 90 degrees into the lock position [4] allowing the pins to spring into the holes and lock into position.
ENGINE OIL
The mower is shipped WITHOUT OIL in the engine.
Add enough SAE 10W-30 API service category SJ or later oil to bring the oil level between the upper limit [2] and lower limit [3] marks on the dipstick [1] as shown.
Do not overfill the engine with oil. If the engine is overfilled, the excess oil may get transferred to the air cleaner housing and air filter.
![[1] [2] [3]](/content/2026/04/668927/images/d200e804df613d69d13861297ae442cbc7e2b628889cac3f53ba9002088941b9.jpg)
FUEL
Refer to page 6.
BEFORE USING YOUR LAWNMOWER
Before using the lawnmower, all mower operators must read the following chapters:
• SAFETY INSTRUCTIONS (page 2)
• CONTROLS (page 4)
• PRE-OPERATION CHECKS (page 5)
• OPERATION (page 7)
• MAINTENANCE SCHEDULE (page 10)
CONTROLS
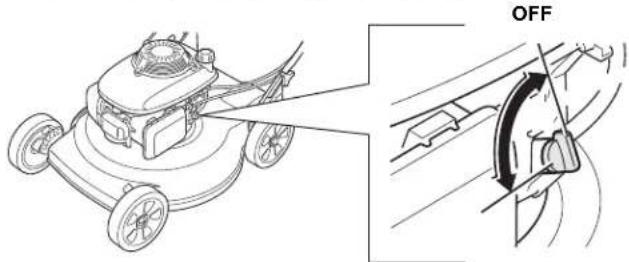
FUEL VALVE
The fuel valve [1] opens and closes the connection between the fuel tank and the carburetor.
![OFF ON [1]](/content/2026/04/668927/images/40f1c0ebf7340a11b0bc104f0eab9984a5dfdcbc1cf05be8e58048323d420ca8.jpg)
CUTTING-MEANS CONTROL
The cutting-means control [1] is connected to the engine flywheel brake and the ignition switch. The engine will not start unless this lever is pulled backwards.
![[1]](/content/2026/04/668927/images/e2872dffd3c60370df19b994313654bb917ca5ca5733662f1c65afa69371f4f1.jpg)
SMART DRIVE CONTROL
The Smart Drive control [1] can be adjusted up or down into any one of five positions.
- Slide the multi-position adjuster [2] to the left to unlock the control.
- Move the Smart Drive control up or down into the most comfortable position
![[1] [2]](/content/2026/04/668927/images/93ae3b68a50083ae537ce7162a4055a4497c99bbb32386868a51d0c033369c83.jpg)
- Release the multi-position adjuster and allow it to engage.
Do not attempt to adjust the position of the Smart Drive control while the mower is in motion.
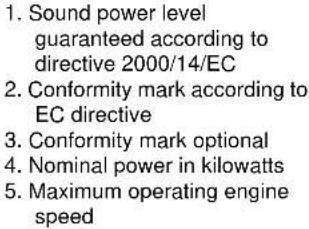
CUTTING HEIGHT ADJUSTMENT LEVERS
There are six adjustment settings. The cutting height figures are approximate. The actual height of cut grass will vary with lawn and soil conditions.
There is one adjustment lever [1] for each wheel.
![[1]](/content/2026/04/668927/images/bef6c621bff7b6a117170b01dc8bd79df48f44759797bf7a02aac31d9f16bf4c.jpg)
Be sure to wear protective clothing. Long pants and eye protection can lower your risk of injury from thrown objects. Wear footwear that protects your feet and won't let you slip if you mow on slopes or uneven ground.
CHECK YOUR LAWN
For your safety and for the safety of others, always inspect the area before mowing.
Objects
Anything that can be picked up by the cutting means and thrown is a potential hazard to you and others. Look for things like stones, sticks, bones, and wire. Remove them from the mowing area.
People and Pets
People and animals near the mowing area can move into your path or into a position where they could be struck by thrown objects. Clear the area of people, especially children, and pets. Their safety is your responsibility.
Lawn
Check the length and condition of the grass, so that you will know what cutting height and mowing speed to use.
Avoid mowing wet grass. Not only will wet grass clog your mower deck and collect in clumps on the lawn, it also gives poor traction, increasing your risk of losing your footing.
CHECK YOUR MOWER
Cutting Means
-
Move the fuel valve to the OFF position (page 4).
-
Disconnect the spark plug cap from the spark plug (page 11).
-
Tilt the mower to the right so the fuel cap is up [1]. This will help prevent fuel leakage, motor oil seeping into the air filter, and hard starting.
![[1]](/content/2026/04/668927/images/7af06d0c7504e8f52368beeb0fe452083090d5c29f7574c5b2e72695961ec14e.jpg)
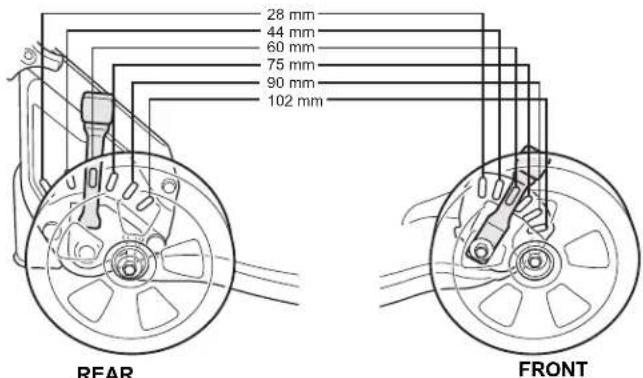
- Inspect the cutting means [2] for damage, cracks, and excessive wear, rust, or corrosion.
![[2]](/content/2026/04/668927/images/e5cf80dd7fef33307f11b56c8263d8fe66cee7fd5d94b725091b1846f85e870c.jpg)
WARNING
A worn, cracked, or damaged cutting means can break, and pieces of the damaged cutting means can become dangerous projectiles.
Thrown objects can cause serious injury.
Inspect the cutting means regularly, and do not operate the mower with a worn or damaged cutting means.
A dull cutting means can be sharpened, but a cutting means that is worn out, bent, cracked, or otherwise damaged must be replaced. A worn or damaged cutting means can break, causing cutting means pieces to be thrown from the mower.
When a cutting means needs sharpening or replacement, take the lawnmower to an authorized Honda dealer. Or, if you have a torque wrench, you can remove and install the cutting means yourself.
Check that the cutting means bolts [2] are tight (page 13).
Engine Oil Level
Check the engine oil level with the engine stopped and the mower on a level surface.
Use 4-stroke motor oil that meets or exceeds the requirements for API service category SJ or later. Always check the API SERVICE label on the oil container to be sure it includes the letters SJ or later.
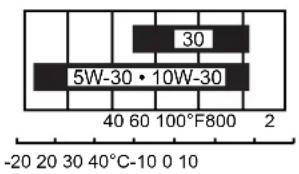
SAE 10W-30 is recommended for general use. Other viscosities shown in the chart may be used when the average temperature in your area is within the indicated range.
NOTICE
- Running the engine with a low oil level can cause engine damage.
-
Using nondetergent oil can shorten the engine's service life, and using 2-stroke oil can damage the engine.
-
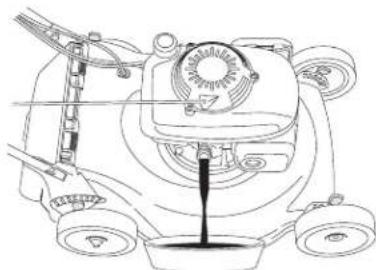
Remove the oil filler cap/dipstick [1], and wipe the dipstick clean.
- Insert the dipstick into the filler neck. Do not screw it down. Remove the dipstick and check the oil level.
- If the oil level is near the low level mark [3], add the recommended oil to bring the level up to the high limit mark [2]. Do not overfill.
- Install and tighten the filler cap/dipstick [1] securely.
Fuel
This engine is certified to operate on unleaded petrol with a pump octane rating of 86 or higher.
We recommend refueling after each use to minimize the air present in the fuel tank.
![[1] [2] [3]](/content/2026/04/668927/images/34b5785a57579850ebaf0a2037d17a9c4c95aaa3710a42117a5e8dead004a9b3.jpg)
Refuel in a well-ventilated area with the engine stopped. If the engine has been running, allow it to cool first. Never refuel the engine inside a building where petrol fumes may reach flames or sparks.
You may use regular unleaded petrol containing no more than 10% ethanol (E10) or 5% methanol by volume. In addition, methanol must contain cosolvents and corrosion inhibitors. Use of fuels with content of ethanol or methanol greater than shown above may cause starting and/or performance problems. It may also damage metal, rubber, and plastic parts of the fuel system. In addition, ethanol is hygroscopic, which means it attracts and retains water in the fuel system. Engine damage or performance problems that result from using a fuel with percentages of ethanol or methanol greater than shown above are not covered by warranty.
If your equipment will be used on an infrequent or intermittent basis, (more than 4 weeks before next use) please refer to the Fuel section of the STORAGE chapter (page 14) for additional information regarding fuel deterioration.
WARNING
Petrol is highly flammable and explosive.
You can be burned or seriously injured when handling fuel.
- Stop the engine and allow to cool
- Keep heat, sparks, and flame away.
- Handle fuel only outdoors.
- Wipe up spills immediately.
Never use stale or contaminated petrol or an oil/petrol mixture. Avoid getting dirt or water in the fuel tank.
NOTICE
Fuel can damage paint and plastic. Be careful not to spill fuel when filling your fuel tank. Damage caused by spilled fuel is not covered under warranty.
Remove the fuel tank cap [1] and check the fuel level. Refill the tank if the fuel level is low. Refuel carefully to avoid spilling fuel. Do not overfill; there should be no fuel in the filler neck [2].
![[1] [2]](/content/2026/04/668927/images/f87f58f5fe05a221b36fdab40936fc189cab9a41b2eb6d22cd17406291581e29.jpg)
After refueling, tighten the fuel tank cap securely.
Move the mower at least 3 meters away from the fueling source and site before starting the engine.
Fuel Storage Container
Store your petrol in a clean, plastic, sealed container approved for fuel storage. Close the vent (if equipped) when not in use, and store the container away from direct sunlight. If it will take more than 3 months to use the fuel in the container, we suggest adding a fuel stabilizer to the fuel when you fill the container.
Air Cleaner Inspection
Remove cover [1]. Make sure the filter [2] is clean and in good condition. A dirty air filter will restrict air flow to the carburetor, reducing engine performance. Refer to page 11 for air cleaner service.
![Diagram showing vehicle chassis components with labeled parts [1] and [2], including a battery pack and wheels.](/content/2026/04/668927/images/c03c9aba1b9916b5182bfff848423e71a914848253d3a60afb6aadb43e2cda32.jpg)
Mulching or Side Discharge
The mower can be used to mulch or side discharge grass clippings.
To mulch, make sure the side discharge chute [2] is not installed, and the discharge guard [1] on the discharge opening is fully closed.
To discharge the clippings, stop the engine, lift the discharge guard [1] up and install the side discharge chute [2] as shown.
![[1] [2]](/content/2026/04/668927/images/a709332a79f70a4792e1ddfd47e9b5a3cc53a02fdf47abdb157d627b39440168.jpg)
Cutting Height
Check the mower deck cutting height settings, and be sure that all four adjustment levers [1] are set to the same cutting height position.
To adjust cutting height, pull each adjustment lever [1] toward the wheel, and move it into another notch.
If you are not sure what cutting height to select, start with a high setting and check the appearance of the lawn after mowing a small area. Then readjust the cutting height if necessary.
![[1]](/content/2026/04/668927/images/d5dc3d9e399eaada153d3383d231f4aef1dbdda8f2c76d126fed73b671c65d35.jpg)
![[1]](/content/2026/04/668927/images/cdbdb2b1154a664c7d1cca30b2e454a809f7929e2afe55413bbc2073b85a6c06.jpg)
OPERATION
SAFE OPERATING PRECAUTIONS
Before operating the mower for the first time, please review SAFETY INSTRUCTIONS (page 2) and PRE-OPERATION CHECKS (page 5).
Even if you have operated other mowers, take the time to become familiar with how this mower works, and practice in a safe area until you build up your skills.
For your safety, avoid starting or operating the engine in an enclosed area such as a garage. Your mower's exhaust contains poisonous carbon monoxide gas that can collect rapidly in an enclosed area and cause illness or death.
FREQUENCY OF USE
If your equipment will be used on an infrequent or intermittent basis, (more than 4 weeks before next use) please refer to the Fuel section of the STORAGE chapter (page 14) for additional information regarding fuel deterioration.
STARTING THE ENGINE
The cutting means turns when you operate the starter. It is easiest to start the engine in a clear or mowed area where the cutting means can turn freely.
![[1]](/content/2026/04/668927/images/44d5d5299fcad536ed268e7535e08778752c9016969d84540c9831a64ffbe6d4.jpg)
-
Turn the fuel valve to the ON position (page 4).
-
Release the Smart Drive control. If the Smart Drive control is engaged, the mower will move forward when you operate the starter.
-
Pull back on the cutting-means control lever [1] and hold it against the handlebar.
-
Pull the starter grip lightly until you feel resistance, then pull briskly. Return the starter grip gently.
natural_image
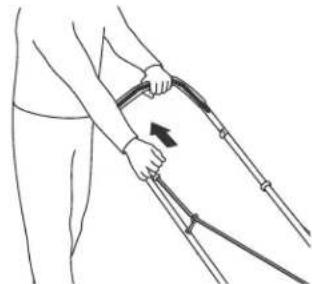
Line drawing of a person holding a walking stick with a belt, showing posture and movement (no text or symbols)Keep your hands and feet away from the cutting-means enclosure at all times when starting and running the engine.
Continue to hold the cutting-means control against the handlebar; the engine will stop if you release the control.
High Altitude Operation
At high altitude, the standard carburetor air-fuel mixture will be too rich. Performance will decrease, and fuel consumption will increase. A very rich mixture will also foul the spark plug and cause hard starting.
High altitude performance can be improved by specific modifications to the carburetor. If you always operate your mower at altitudes above 1,500 meters, have a Honda dealer perform this carburetor modification.
Even with carburetor modification, engine power will decrease about 3.5% for each 300 meter increase in altitude. The effect of altitude on power will be greater than this if no carburetor modification is made.
NOTICE
When the carburetor has been modified for high altitude operation, the air-fuel mixture will be too lean for low altitude use. Operation at altitudes below 1,500 meters with a modified carburetor may cause the engine to overheat and result in serious engine damage. For use
at low altitudes, have your authorized Honda dealer return the carburetor to original factory specifications.
OPERATING THE CONTROLS FOR MOWING
Cutting-Means Control
The cutting-means control lever [1] must be pulled back against the handlebar to start the engine. The cutting means starts to rotate when the lever is pulled back against the handlebar and the recoil starter grip is pulled.
![[1]](/content/2026/04/668927/images/3073a7a35e9a998900eecb747d3f0c62851a783bb02458b4b0de3760a37be892.jpg)
Continue to hold the cutting-means control against the handlebar. This will keep the engine and cutting means rotating smoothly and prevent premature wear to the flywheel brake system.
Release the cutting-means control lever to stop the engine and stop cutting means rotation whenever you need to leave the mower.
Smart Drive Control
With the engine running and the blades rotating, slowly push the Smart Drive control [1] to propel the mower forward.
Ground speed will increase as more pressure is applied to the Smart Drive control. After maximum ground speed is obtained, applying additional pressure will not further increase ground speed. Apply only enough pressure to achieve the desired speed.
To prevent thumb fatigue, hold the Smart Drive control as shown.
![CONTROL [1]](/content/2026/04/668927/images/ab8506cbdfc7e22d2ed911342bd2501cd3ac8ed7fce11864cefb93857821dce7.jpg)
Release the Smart Drive control to disengage the drive when mowing around trees and other obstacles. Push the mower around obstacles for better directional control.
Ground speed varies with terrain, grass height, slope, and grass bag weight. Moving the Smart Drive control allows you to maintain the desired ground speed under constantly changing mowing conditions.
Release the Smart Drive control to disengage (stop) the rear wheels.
STOPPING THE ENGINE
-
Release the Smart Drive control [1] and then the cutting-means control lever [2] to stop the engine.
-
When the mower is not in use, turn the fuel valve to the OFF position.
-
If your equipment will not be used for 3 to 4 weeks, we recommend running the engine's carburetor out of fuel. You can do this by leaving the fuel valve OFF, restarting the engine and running it out of fuel. See "Fuel" on page 14 for periods of inactivity that exceed 4 weeks.
![[1] [2]](/content/2026/04/668927/images/03f9f74b695667f3b500b83db310a7717c10352e6554731a2a7579ab58997606.jpg)
SAFE MOWING PRACTICES
For your safety, keep all four wheels on the ground, and be careful to avoid losing your footing and your control of the mower. Keep a firm grip on the handlebar, and walk, never run, with the mower. Be very careful when mowing uneven or rough ground.
If stuck, do not kick or shove the mower with your foot. Use the handlebar to control the mower.
WARNING
The cutting means is sharp and spins at high speed.
A spinning cutting means can cut you severely and can amputate fingers and toes.
- Wear protective footwear.
- Keep your hands and feet away from the mower deck while the engine is running.
- Stop the engine before performing any adjustment, inspection, or maintenance.
Stability
Mow across slopes, not up and down. Avoid steep slopes (more than 20^ ), and be careful when changing direction. Mowing on a slope when the grass is damp or wet could cause you to slip, fall, and lose control of the mower.
Obstacles
Use the side of the mower to cut close to large obstacles, such as fences or walls.
natural_image
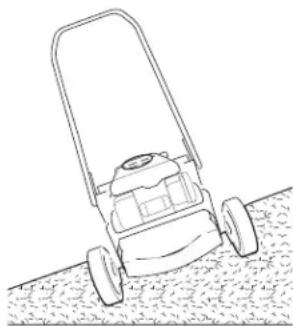
Line drawing of a lawn mower on grass (no text or symbols)Release the Smart Drive control to disengage the drive when mowing around trees and other obstacles. Push the mower around obstacles for better directional control. Be careful when mowing over obstacles embedded in the lawn, such as sprinkler heads, paving, edging, etc. Avoid anything that sticks up above the surface of the lawn.
If the cutting means hits something, or if the mower starts to vibrate, stop the engine immediately and check for damage. Striking objects may damage the cutting means, bend the crankshaft, and/or break the mower deck or other components. Vibration usually indicates serious trouble.
WARNING
A worn, cracked, or damaged cutting means can break, and pieces of the damaged cutting means can become dangerous projectiles.
Thrown objects can cause serious injury.
Inspect the cutting means regularly, and do not operate the mower with a worn or damaged cutting means.
The warranty does not cover parts damaged by collision.
Gravel and Loose Objects
Gravel, loose stones, and landscaping material can be picked up by the mower and thrown many feet with enough force to cause serious personal injury and/or property damage. The best way to prevent potential injury from thrown objects is to release the flywheel brake lever to stop the cutting means before reaching areas with gravel, loose stones, or landscaping material.
MOWING TIPS
When to Mow
Most grasses should be mowed when they have grown 12 \~ 25 mm above their recommended height.
More frequent mowing is required for mulching. For best results, you may need to mow the lawn twice a week during the growing season.
Cutting Height
Consult a local nursery or lawn and garden center for cutting height recommendations and advice about specific types of grasses and growing conditions in your area.

LONG ENOUGH
If you look closely, you'll see that most grass has stems and leaves. If you cut off the leaves, you'll scalp the lawn. Let the grass recover between mowings. Your mower will work better, and your lawn will look better.
TOO SHORT
If your grass gets too tall, cut it once at the highest cutting height setting, and then mow again in 2 or 3 days. Don't take off more than one third of total grass height in any one mowing, or brown patches may develop.
Cutting height adjustment levers are explained in the CONTROLS chapter (page 4).
Cutting Width
For an even lawn finish, overlap each mowing swath by a few centimeters. If the grass is very tall or thick, use more overlap and a narrower mowing swath.
Cutting Means Speed
The cutting means must spin very fast to cut properly.
If engine speed drops, it could mean the engine is being overloaded by the cutting means trying to cut too much grass. Mow a narrower swath, move the mower slower, or raise the cutting height.
Cutting Means Sharpness
A sharp cutting means cuts cleanly. A dull cutting means tears the grass, leaving shredded ends that turn brown. When your cutting means doesn't cut cleanly anymore, have it sharpened or replaced.
Dry Grass
If the ground is too dry, mowing will stir up a lot of dust. Besides being unpleasant to work in, too much dust will clog the carburetor air filter.
If dust is a problem, water your lawn the day before mowing. Mow when the grass is dry to your touch, but the soil is still moist.
Wet Grass
Wet grass is slippery and can make you lose your footing. Also, wet grass clippings will clog the mower deck and collect in clumps on the lawn. Always wait for wet grass to dry before mowing.
Fallen Leaves
If you want to mulch fallen leaves into your lawn, don't let the leaf cover get too deep before you begin. For best results, start mulching
while grass still shows through the leaf cover. In places where fallen leaves completely cover the grass, remove the leaves by raking.
Clogged Cutting-means Enclosure
Before clearing a clogged cutting-means enclosure, stop the engine and turn the fuel valve to the OFF position. With the spark plug cap disconnected, tilt the mower so the air cleaner side is up.
Clear a clogged cutting-means enclosure with a stick, not your hands.
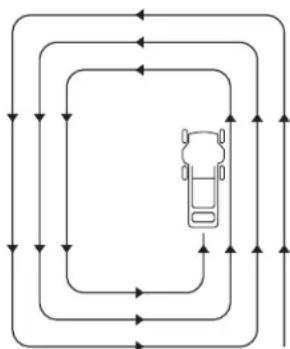
Mowing Patterns
Your Honda mower will work most efficiently if you use the following mowing pattern as much as possible. Mower deck and equipment design and the direction in which the cutting means rotates causes this mowing pattern to give the best results.
Mulching
Use a counterclockwise mowing pattern. If the lawn has an irregular shape, or many obstacles, divide it into sections where you can use counterclockwise mowing patterns.
Side Discharge Mowing
Where possible, use the same mowing pattern recommended for mulching. If the lawn has an irregular shape or many obstacles, divide it into sections where clippings will be discharged away from uncut areas. This will prevent clippings from piling up in the path of the mower.
flowchart
graph TD
    A["Top View Vehicle"] --> B{Traffic Flow}
    B --> C["Left Side"]
    B --> D["Right Side"]
    B --> E["Bottom Side"]
    C --> F["Left Side"]
    D --> G["Right Side"]
    E --> H["Bottom Side"]
    F --> I["Left Side"]
    G --> J["Right Side"]
    H --> K["Bottom Side"]
MULCHING AND SIDE DISCHARGE PATTERN
MAINTENANCE
THE IMPORTANCE OF MAINTENANCE
Good maintenance is essential for safe, economical, and trouble-free operation. It will also help reduce air pollution.
To help you properly care for your mower, the following pages include a maintenance schedule, routine inspection procedures, and simple maintenance procedures using basic hand tools. Other service tasks that are more difficult, or require special tools, are best handled by professionals and are normally performed by a Honda technician or other qualified mechanic.
The maintenance schedule applies to normal operating conditions. If you operate your mower under unusual conditions, consult an authorized Honda dealer for recommendations applicable to your individual needs and use.
Remember that your Honda dealer knows your mower best and is fully equipped to maintain and repair it.
To ensure the best quality and reliability, use only new, Honda Genuine parts or their equivalents for repair and replacement.
WARNING
Improper maintenance, or failure to correct a problem before operation, can cause a malfunction in which you can be seriously hurt or killed.
Always follow the inspection and maintenance recommendations and schedules in this owner's manual.
MAINTENANCE SAFETY
Some of the most important safety precautions follow. However, we cannot warn you of every conceivable hazard that can arise in performing maintenance. Only you can decide whether or not you should perform a given task.
WARNING
Failure to properly follow maintenance instructions and precautions can cause you to be seriously hurt or killed.
Always follow the procedures and precautions in this owner's manual.
Safety Precautions
- Make sure the engine is off before you begin any maintenance or repairs. This will eliminate several potential hazards:
– Carbon monoxide poisoning from engine exhaust.
Be sure there is adequate ventilation whenever you operate the engine.
– Burns from hot parts.
Let the engine and exhaust system cool before touching.
– Injury from moving parts.
Do not run the engine unless instructed to do so.
- Read the instructions before you begin, and make sure you have the tools and skills required.
- To reduce the possibility of fire or explosion, be careful when working around petrol. Use only a nonflammable solvent, not petrol, to clean parts. Keep cigarettes, sparks, and flames away from all fuel-related parts.
MAINTENANCE SCHEDULE
| Interval Item | |
| Before each use | Inspect the cutting means (page 13)Check the cutting-means bolt (page 13)Check the engine oil level (page 6)Check the air cleaner (page 7)Check cutting means stopping time (page 12) |
| First month or5 hours | Change the engine oil (page 11)Adjust the Smart Drive control ^2 |
| First 25 hours | Clean the air cleaner element ^1 (page 11)Adjust the Smart Drive control ^2 |
| Every 50 hours | Change the engine oil ^1 (page 11)Clean the air cleaner element (page 11)Adjust the Smart Drive control ^2 |
| Every 100 hours | Check-adjust the spark plug (page 11)Check-clean the spark arrester ^3 (page 12)Check cutting means stopping time (page 12)Check the flywheel brake pad ^2 Adjust the valve clearance ^2 Adjust the idle speed ^2 Clean the fuel tank ^2 Grease the pinion gears ^2 Adjust the Smart Drive control ^2 |
| Every 150 hours | Replace the air cleaner filter (page 11)Replace the spark plug (page 11)Inspect-grease rear wheel adjuster bushings ^2 Adjust the Smart Drive control ^2 |
| Every 2 years | Check the fuel line and replace if necessary ^2 |
- Service more frequently when used in dusty areas.
- These items should be serviced by an authorized Honda servicing dealer, unless you have the proper tools and are mechanically proficient. Refer to the Honda shop manual for service procedures.
- In Europe and countries where machinery directive 2006/42/EC is enforced, this cleaning should be done by your serving dealer.
Failure to follow this maintenance schedule could result in non-warrantable failures.
ENGINE MAINTENANCE
Engine Oil Change
Drain the oil while the engine is warm. Warm oil drains quickly and completely.
- Turn the fuel valve OFF. This will reduce the possibility of fuel leakage (page 4).
- Wipe the oil filler area clean, and then remove the oil filler cap/dipstick.
- Place a suitable container next to the mower to catch the used oil, and then tilt the mower on its right side. The used oil will drain through the filler neck. Allow the oil to drain completely.
Please dispose of used motor oil and the containers in a manner
natural_image
Line drawing of a lawn mower with visible blades and wheel (no text or symbols)that is compatible with the environment. We suggest you take it in a sealed container to your local recycling center or service station for reclamation. Do not throw it in the trash, pour it on the ground, or pour it down a drain.
- Fill with the recommended oil (page 6). Do not overfill. Measure the oil level as shown.
natural_image
Line drawing of a hand operating a mechanical device with gears and levers (no text or symbols)- After changing the engine oil and before starting the engine, check the oil level with the mower on a level surface:
a. Remove the filler cap/dipstick [1].
b. Wipe the dipstick clean.
c. Insert and remove the dipstick without screwing it into the filler neck. Check the oil level shown on the dipstick.
d. If the oil level is below the low level mark [3], add oil to reach the high limit mark [2] on the dipstick. Do not overfill. If the engine is overfilled, the excess oil may get transferred to the air cleaner housing and air cl
NOTICE
Running the engine with a low oil level can cause engine damage.
e. Screw in the filler cap/dipstick securely.
![[1] [2] [3]](/content/2026/04/668927/images/6429c166dbf36da6b86dd7a8443f6aed58dce9f21617b8a5e90dcd4633ea48c8.jpg)
Air Cleaner Service
A properly maintained air filter will help prevent dirt from entering your engine. Dirt entering the carburetor can be drawn into small passages in the carburetor and cause premature engine wear. These small passages can become blocked, causing starting or running problems. Always use an air filter specified for your engine to ensure it seals and performs as designed. You will need to clean the filter more frequently if you operate the engine in very dusty conditions.
NOTICE
Operating the engine without an air filter, or with a damaged filter, will allow dirt to enter the engine, causing rapid engine wear. This type of damage is not covered by the warranty.
- Press down on the air cleaner cover [1] tabs, and then remove the cover [2].
![[4] [1] [3] [2]](/content/2026/04/668927/images/83552976390a523369919b9fe806243329ed3c5dbe6151b13b9993a3ccf77955.jpg)
- Remove the filter [3] from the air cleaner housing [4].
- Inspect the filter, and replace it if it is damaged.
- Clean the filter by tapping the filter several times on a hard surface to remove dirt, or blow compressed air (not exceeding 207 kPa) through the filter from the inside. Never try to brush off dirt; brushing will force dirt into the fibers.
- Wipe dirt from the inside of the air cleaner housing and cover, using a moist rag. Be careful to prevent dirt from entering the air duct [4] that leads to the carburetor.
- Reinstall the filter and cover.
Spark Plug Service
Required spark plugs: NGK - BPR5ES
NOTICE
Incorrect spark plugs can cause engine damage.
For good performance, the spark plug [1] must be properly gapped and free of deposits.
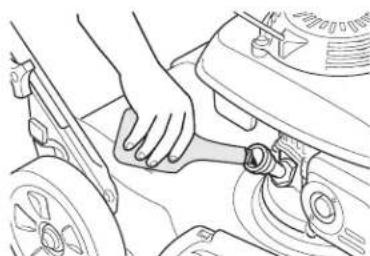
- Disconnect the spark plug cap [2], and remove any dirt from around the spark plug area.
![[1] [2]](/content/2026/04/668927/images/9775991a653359a9dca6798b35a20d78b4f1e9928b3f90bda6a1b0fe5bb8aecb.jpg)
-
Remove the spark plug with a spark plug wrench [3].
-
Inspect the spark plug. Replace it if the electrodes are worn or if the insulator is cracked or chipped.
-
Measure the spark plug electrode gap with a suitable gauge. The gap should be 0.7 \~ 0.8 mm. Correct the gap, if necessary, by carefully bending the side electrode.
-
Install the spark plug carefully, by hand, to avoid cross-threading.
-
After the spark plug seats, tighten with a spark plug wrench to compress the washer.
If reinstalling the old spark plug, tighten 1/8 to 1/4 turn after the spark plug seats.
![[3]](/content/2026/04/668927/images/2fe3355521c852465c4f7ae82bcdd8cc7988ff6b91af8b1ed646b5f6f22590de.jpg)
![0.7 ~ 0.8 mm [4]](/content/2026/04/668927/images/10930b2b93ea5228b8494e371cb39e975a52eaed40544a6c24b0c0674a995cb3.jpg)
If installing a new spark plug, tighten 1/2 turn after the spark plug seats to compress the washer [4].
NOTICE
A loose spark plug can overheat and damage the engine. Overtightening the spark plug can damage the threads in the cylinder head.
- Install the spark plug cap on the spark plug.
Spark Arrester Service
In Europe and countries where machinery directive 2006/42/EC is enforced, this cleaning should be done by your serving dealer.
The spark arrester must be serviced every 100 hours to keep it functioning as designed.
- Allow the engine to cool, and then remove the three bolts [1] from the muffler shield [2].
- Remove the muffler shield [2].
- Remove the screw [4].
- Remove the spark arrester [3] from the muffler [5].
- Check for carbon deposits on the spark arrester and the exhaust port. Brush carbon deposits away. Be careful to avoid damaging the spark arrester screen.
-
Install the spark arrester in the muffler.
-
Install the muffler components on the engine, and tighten the three bolts securely.
![[1] [2] [3] [4] [5]](/content/2026/04/668927/images/33f495ddd7a045118ac61077cf1542885218c4dcfd614282387bd14909e8ca88.jpg)
CHECK CUTTING MEANS STOPPING TIME
Start the engine outdoors.
Release the cutting-means control lever. Cutting means rotation should stop within the maximum time specified.
Max. stopping time: 3 seconds
If the flywheel brake does not operate properly, take the mower to an authorized Honda servicing dealer for repair.
CUTTING MEANS REMOVAL AND INSTALLATION
If you remove the cutting means for sharpening or replacement, you will need a torque wrench for installation. Wear heavy gloves to protect your hands.
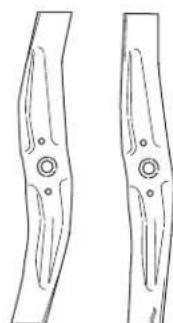
CUTTING MEANS SHARPENING: To avoid weakening the cutting means, or causing imbalance or poor cutting, the cutting means should be sharpened by trained staff at an authorized Honda dealer.
CUTTING MEANS REPLACEMENT: Use a Honda Genuine replacement cutting means or its equivalent.
Cutting Means Removal
- Turn the fuel valve OFF. Disconnect the spark plug cap, and then tilt the mower to the right side so that the air cleaner side is up. This will help to prevent fuel leakage and hard starting due to carburetor flooding.
![[4] [3] [1] [2] [3] [4] [2] [1]](/content/2026/04/668927/images/de973e4f46339c5906a2c2349d313ea097516bdb508bf90b8a6bf21be585c9fd.jpg)
-
Use a 14 mm (6 point) socket wrench and remove the two cutting means bolts [1] and special washers [2] from the cutting means holder [3]. Use a wooden block to prevent the cutting means from turning when removing the bolts.
-
Remove the cutting means [4].
Cutting Means Installation
-
Clean dirt and grass from around the cutting-means mounting area. Install the cutting means [4] using the two cutting-means bolts [1] and special washers [2]. Be sure to install the special washers with the concave side toward the cutting means and the convex side toward the head of the bol. The cutting-means bolts are specially designed for this application and must not be replaced with other bolts.
-
Tighten the cutting-means bolts with a torque wrench. Use a wooden block to prevent the cutting means from turning.
Cutting-means bolt torque: 49 \~ 59 N·m
If you do not have a torque wrench, have an authorized Honda dealer tighten the cutting-means bolts before you use the mower. If the cutting-means bolts are overtightened, they could break. If the cutting-means bolts are not tightened enough, they could loosen or come out. In either case, it would be possible for the cutting means to fly off while you are operating the mower.
TRANSPORTING
BEFORE LOADING
If the engine has been running, allow it to cool for at least 15 minutes before loading the mower on the transport vehicle. A hot engine and exhaust system can burn you and can ignite some materials.
Turn the fuel valve to the OFF position. This will prevent carburetor flooding and reduce the possibility of fuel leakage.
natural_image
Diagram of a lawn mower with a side view showing the blade and wheel assembly (no text or symbols)PIVOTING HANDLE
- Turn the handlebar adjust knobs [1] into the unlocked [2] position.
- Pivot the handlebar over mower. When pivoting the handlebar, be careful to avoid kinking or pinching the control cables.
![[1] [2]](/content/2026/04/668927/images/4f41c923b4d6f60c6d5a9eb25f19eccdc9e6a413c356a0734680cd02e52a173e.jpg)
LOADING AND UNLOADING
Position the mower so all four wheels are on the bed of the transport vehicle. Tie the mower down with rope or straps, and block the wheels. Keep the tie-down rope or straps away from the controls, adjustment levers, cables, and the carburetor.
NOTICE
To prevent losing control of or damaging the mower, do not use the drive system when going up or down a loading ramp. To prevent damaging the drive system, do not engage the clutch when the mower is rolling backwards.
- Turn the fuel valve to the OFF position.
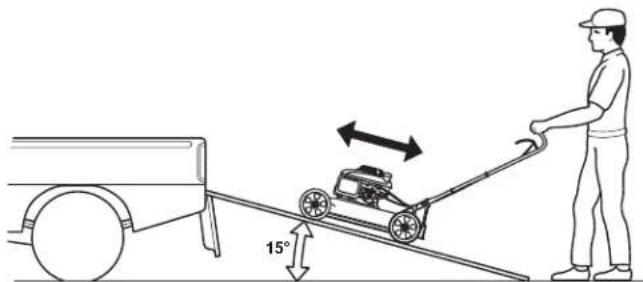
- Use a suitable loading ramp. Adjust the loading ramp so that it is inclined at an angle of less than 15^ . If a loading ramp is not available, two people should lift the mower on and off the transport vehicle while keeping the mower level.
STORAGE
Proper storage is essential for keeping your lawnmower troublefree and looking good. The following steps will help protect the mower from rust and corrosion, and make the engine easier to start when you use the lawnmower again.
Cleaning
Engine
Wash the engine by hand, and be careful to prevent water from entering the air cleaner.
NOTICE
Using a garden hose or pressure washing equipment can force water into the air cleaner. Water in the air cleaner will soak the paper filter and can enter the carburetor or engine cylinder, causing damage. Water contacting a hot engine can cause damage. If the engine has been running, allow it to cool for at least half an hour before washing.
Cutting-Means Enclosure
Before washing the underside of the cutting-means enclosure, be sure the fuel valve is in the OFF position. Disconnect the spark plug cap. Rest the mower on its right side so the fuel filler cap is up. This will help prevent fuel leakage and hard starting due to carburetor flooding. Wear heavy gloves to protect your hands from the cutting means.
Wash the lawnmower, including the underside of the cutting-means enclosure.
If using a garden hose or pressure washing equipment to clean the cutting-means enclosure, be careful to avoid getting water into controls and cables, or anywhere near the engine air cleaner or muffler opening.
Drying
- After washing the lawnmower, wipe dry all accessible surfaces.
- With the mower in an upright position, start the engine outdoors, and let it run until it reaches normal operating temperature to evaporate any water remaining on the engine.
- Stop the engine and allow it to cool.
- After the lawnmower is clean and dry, touch up any damaged paint and coat other areas that may rust with a light film of oil.
FUEL
NOTICE
Depending on the region where you operate your equipment, fuel formulations may deteriorate and oxidize rapidly. Fuel deterioration and oxidation can occur in as little as 30 days and may cause damage to the carburetor and/or fuel system. Please check with your servicing dealer for local storage recommendations.
Petrol will oxidize and deteriorate in storage. Old petrol will cause hard starting, and it leaves gum deposits that can clog the small passages in the fuel system. If the petrol in your mower deteriorates during storage, you may need to have the carburetor and other fuel system components, serviced or replaced.
The length of time that petrol can be left in your fuel tank and carburetor without causing functional problems will vary with such factors as petrol blend, your storage temperatures, and whether the fuel tank is partially or completely filled. The air in a partially filled fuel tank promotes fuel deterioration. Very warm storage temperatures accelerate fuel deterioration. Fuel deterioration problems may occur within a few months, or even less if the petrol was not fresh when you filled the fuel tank. If you keep a container of petrol for refueling, be sure that it contains only fresh petrol.
If it will take more than 3 months to use the fuel in your storage container, we suggest adding a fuel stabilizer to the fuel when you fill the container.
Short Term Storage (30-90 days)
If your equipment will not be used for 30 to 90 days, we recommend the following to prevent fuel-related problems:
- Add fuel stabilizer following the manufacturer's instructions.
When adding a fuel stabilizer, fill the fuel tank with fresh petrol. If only partially filled, air in the tank will promote fuel deterioration during storage.
Note:
– All stabilizers have a shelf life and their performance will deteriorate over time.
– Fuel stabilizers will not reconstitute stale fuel.
- After adding a fuel stabilizer, run the engine outdoors for 10 minutes to be sure that treated petrol has replaced the untreated petrol in the carburetor.
- Stop the engine and turn the fuel valve to the OFF position.
- Start the engine and continue to run the engine until it stops from the lack of fuel in the carburetor fuel bowl. Running time should be less than 3 minutes.
Long Term or Seasonal Storage (greater than 90 days)
Start the engine and allow it to run long enough to empty all the petrol from the entire fuel system (including the fuel tank). Do not allow petrol to remain in your engine for more than 90 days of inactivity.
The DISTRIBUTOR'S LIMITED WARRANTY does not cover fuel system damage or engine performance problems resulting from neglected storage preparation.
ENGINE CYLINDER
If the mower is to be stored for more than 3 months, remove the spark plug (page 11). Pour 5 \~ 10 cm ^3 of clean engine oil into the cylinder. Pull the starter rope several times to distribute the oil in the cylinder. Reinstall the spark plug.
Pull the starter rope slowly until resistance is felt, then return the starter grip gently. This will close the valves so moisture cannot enter the engine cylinder.
ENGINE OIL
Change the engine oil (page 11).
PLACING IN STORAGE
If your mower will be stored with petrol in the fuel tank and carburetor, it is important to reduce the hazard of petrol vapor ignition. Select a well-ventilated storage area away from any appliance that operates with a flame, such as a furnace, water heater, or clothes dryer. Also avoid any area with a spark-producing electric motor, or where power tools are operated.
If possible, avoid storage areas with high humidity, because that promotes rust and corrosion.
Place the mower with its wheels on a level surface. Tilting can cause fuel or oil leakage.
The handlebar can be folded for compact storage (page 13).
With the engine and exhaust system cool, cover the mower to keep out dust. A hot engine and exhaust system can ignite or melt some materials. Do not use sheet plastic as a dust cover. A nonporous cover will trap moisture around the mower, promoting rust and corrosion.
REMOVING FROM STORAGE
Check your mower as described in PRE-OPERATION CHECKS (page 5).
If the cylinder was coated with oil during storage preparation, the engine will smoke briefly at startup. This is normal.
TROUBLESHOOTING
ENGINE WILL NOT START
| Possible Cause Correction | |
| Fuel valve OFF Turn the fuel valve | ON (page 4). |
| Out of fuel Refuel (page 6). | |
| Bad fuel; mower stored without treating the petrol, or refueled with bad petrol | Refuel with fresh petrol (page 6). |
| Spark plug faulty, fouled, or improperly gapped | Gap or replace the spark plug (page 11). |
| Spark plug wet with fuel (flooded engine) | Dry and reinstall the spark plug. |
| Fuel filter clogged, carburetor malfunction, ignition malfunction, valves stuck, etc. | Take the mower to an authorized Honda servicing dealer or refer to the shop manual for repair. |
LOSS OF POWER
| Possible Cause Correction | |
| Grass is too tall to cut Raise the cutting height (page 7), cut a narrower swath, or cut more frequently. | |
| Cutting-means enclosure is clogged | Clean out the cutting-means enclosure (page 9). |
| Air cleaner is clogged Clean or replace the air cleaner (page 11). | |
| Bad fuel; mower stored without treating the petrol, or refueled with bad petrol | Refuel with fresh petrol (page 6). |
| Fuel filter clogged, carburetor malfunction, ignition malfunction, valves stuck, etc. | Take the mower to an authorized Honda servicing dealer or refer to the shop manual for repair. |
VIBRATION
| Possible Cause Correction | |
| Grass and debris lodged under the cutting-means enclosure | Clean out the cutting-means enclosure (page 9). |
| Cutting means loose, bent, damaged, or unbalanced by improper sharpening | Tighten loose cutting-means bolts (page 13).If the cutting means is found to be bent or damaged, take the lawnmower to an authorized Honda servicing dealer for inspection. |
| Mechanical damage, such as a bent crankshaft | Take the mower to an authorized Honda servicing dealer or refer to the shop manual for repair. |
MOWING PROBLEMS
| Possible Cause Correction | |
| Mower is moving too fast for lawn conditions | Release the Smart Drive control and push the mower slower. |
| Cutting height adjustment levers set at different positions | Set all levers at the same cutting height position (page 4). |
| Mower deck is clogged Clean out the mower deck (page 9). | |
| Cutting means dull, worn, or damaged | Sharpen or replace the cutting means if necessary (page 13). |
| Wrong cutting means installed Install the correct cutting means (page 13). | |
PARTS
| Item Part Number | |
| Air Cleaner | 17211-Z8B-901 |
| Spark Plug | 98079-55846 |
| Cutting Means | 72511-VG3-000 |
| Cutting Means Bolt (2) | 90105-VA3-J01 |
| Bolt Washer (2) | 90502-VG3-000 |
SPECIFICATIONS
| MODEL HRS536C5 | |
| TYPE VKEA | |
| DESCRIPTION CODE MZBZ | |
GENERAL
| Length 1,532 mm | |
| Handlebar height 1,024 mm | |
| Dry mass | 31.2 kg |
| Width | 582 |
| Cutting width 530 mm | |
| Cut height adjustments (6) 28, 44, 60, 75, 90, 102 mm | |
| Sound pressure level at operator's ears (According to EN ISO 5395-1:2013) | 81 dB(A) |
| Uncertainty | 1 dB(A) |
| Sound power level measured (According to 2000/14/EC directive) | 93 dB(A) |
| Uncertainty | 0.1 dB(A) |
| Sound power level guaranteed (According to 2000/14/EC directive) | 98 dB(A) |
| Vibration transmitted (According to EN ISO 5395-1:2013) | 2.3 m/s^2 |
| Uncertainty | 1.1 m/s^2 |
ENGINE
| Model GCV160 | |
| Type 4-stroke, single cylinder, vertical shaft, OHC | |
| Displacement 160 cc | |
| Bore and stroke 64 x 50 mm | |
| Cooling Forced air | |
| Lubrication | Splash and spray |
| Compression ratio | 8,5:1 |
| Maximum operating engine speed | 2,850^+0_-100 min ^-1 |
| Ignition system Transistorized magneto | |
| Spark plug | NGK: BPR5ES |
| Spark plug gap 0.7 ~ 0.8 mm | |
| Air cleaner | Dry element type |
| Recommended fuel | Unleaded petrol with a research octane rating of 91 or higher |
| Fuel tank capacity | 0.93 L |
| Recommended oil | SAE 10W-30, API SJ or later |
| Engine oil capacity | 0.50 L* Refill amount: 0.35 ~ 0.40 L |
* Actual amount will vary due to residual oil in the engine. Always use the dipstick to confirm the actual level (see page 6).
DRIVE
| Type | Variable speed |
| Mower speed (engine @ 2,850 min ^-1 ) | 6.5 km/h |
mm
INTRODUCTION
Madame, Monsieur,
natural_image
Red and silver M-100 lawn mower with black handle and wheels (no visible text or symbols)TABLE DES MATIERES
INTRODUCTION....1
MESSAGES DE SECURITE....1
CONSIGNES DE SECURITE 2
IDENTIFICATION DES COMPOSANTS....3
INSTALLATION....4
COMMANDES 4
VERIFICATIONS AVANT UTILISATION 5
FONCTIONNEMENT 7
ENTRETIEN....10
TRANSPORT....13
RANGEMENT 14
DEPISTAGE DES PANNES 15
SPÉCIFICATIONS 16
Conditions D'application De La Garantie Honda,
"CE-Déclaration de conformité" DESCRIPTION DE
TABLE DES MATIERES,
COMMANDES
SOUPAPE DE COMBUSTIBLE
natural_image
Diagram of a mechanical component with curved arrows indicating motion or force direction (no text or symbols)TONDRE EN TOUTE SECURITE
natural_image
Line drawing of a lawn mower on grass, no text or symbols presentObstacles
natural_image
Line drawing of a grass lawn mower with bucket and wheels (no text or symbols)natural_image
Line drawing of a hand using a tool to adjust or install a vehicle wheel (no text or symbols visible)a. Retirez le bouchon/jauge [1].
AVIS
natural_image
Red and silver lawn mower with attached propeller, no visible text or symbolsINDICE
INTRODUCCIÓN 1
MENSAJES DE SEGURIDAD 1
MANDOS
VÁLVULA DE COMBUSTIBLE
natural_image
Line drawing of a lawn mower with a hand adjusting the blade (no text or symbols)![[1] [2] [3]](/content/2026/04/668927/images/fbfde1cf56cc9144c20d2f442b78111f55d9c64833c590438fbe4faa6a468a1e.jpg)
natural_image
Line drawing of a lawn mower on a gravel surface (no text or symbols)Obstáculos
natural_image
Line drawing of a grass lawn mower with visible blades and wheels (no text or symbols)natural_image
Line drawing of a hand using a wrench to adjust or install a vehicle component (no text or symbols visible)![Technical diagram showing a hand operating a vehicle's steering wheel, with labeled parts [1], [2], and [3] indicating different components.](/content/2026/04/668927/images/10e89420b4e8804b5fccc8bb54779b3720d5e19cfbd525bff9dafc0ab6aa9024.jpg)
AVISO
natural_image
Illustration of a person using a lawn mower to lift a cart, with a 15° angle indicator (no text or symbols present)ALMACENAMIENTO
natural_image
Exterior view of a red and silver lawn mower with a blue hood (no text or symbols visible)INHALTSVERZEICHNIS
EINLEITUNG 1
![[15] [4] (2) [12] [13] [14] [13] B [SICHERHEITSSCHILD]](/content/2026/04/668927/images/40bfe2df9c019086e3d3f8406071849535997baa70d2e0409d0ae283702151ec.jpg)
BENZIN
Siehe Seite 6.
VOR DEM BETRIEB
Benzin
natural_image
Illustration of a hand holding a tool with a bracket, labeled [1] (no text or symbols on the diagram itself)natural_image
Line drawing of a person performing a knee press exercise with a belt and wrist (no text or symbols)natural_image
Line drawing of a lawn mower on a gravel surface (no text or symbols)Hindernisse
natural_image
Line drawing of a mechanical assembly with no visible text or symbolsnatural_image
Line drawing of a hand holding a tool on a vehicle wheel (no text or symbols)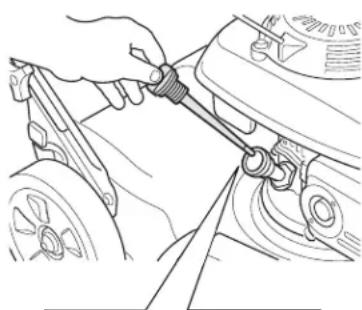
natural_image
Line drawing of a hand using a tool to adjust or install a mechanical component (no text or symbols visible)![[1] [2] [3]](/content/2026/04/668927/images/3421a06c56eb37ba83cdff240b09ed5032326116bf3c20f8c096a8ffe664b243.jpg)
natural_image
Diagram of a lawn mower with a tool and directional arrow indicating motion (no text or symbols)AUF- UND ABLADEN
LAGERUNG
natural_image
Red and silver lawn mower with a blue hood, mounted on a gray body (no visible text or symbols)INDICE
INTRODUZIONE....1
COMANDI
VALVOLA DEL CARBURANTE
LEVA DEL FRENO DEL VOLANO
Carburante
[2]
natural_image
Diagram of hands installing a component on a vehicle (no text or symbols visible)[2]
Altezza di tosatura
natural_image
Illustration of a hand holding a tool with a pointed tip, no text or symbols present[1]
natural_image
Line drawing of a person performing a walking exercise with a belt and rope (no text or symbols)natural_image
Line drawing of a lawn mower on grass (no text or symbols)natural_image
Line drawing of a vintage-style mechanical device with gears and a central shaft (no text or symbols)natural_image
Line drawing of a hand using a tool to adjust or install a vehicle component (no text or symbols visible)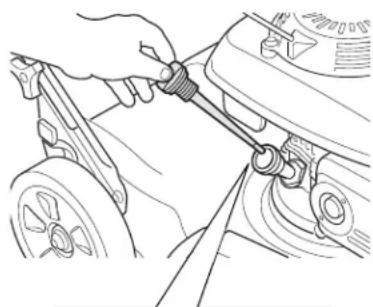
natural_image
Line drawing of a hand adjusting a mechanical component (no text or symbols visible)![[1] [2] [3]](/content/2026/04/668927/images/d3b46e48392c2fe6082c639590000c487f11326c9eb6fd2b851db5757a3e1820.jpg)
NOTA
IMMAGAZZINAGGIO
natural_image
Exterior view of a red and silver lawn mower with a blue hood (no text or symbols visible)INHOUD
INLEIDING 1
WAARSCHUWINGEN BETREFFENDE DE VEILIGHEID ..... 1
VEILIGHEIDSVOORSCHRIFTEN 2
OVERZICHT VAN ONDERDELEN 3
IN ELKAAR ZETTEN 4
BEDIENING 4
VOORDAT U GAAT MAAIEN 5
DE MAAIER GEBRUIKEN 7
TRANSPORTEREN 13
BERGING....14
ONDERHOUD 10
STORINGZOEKEN 15
SPECIFICATIES 16
WAARSCHUWINGSSTICKER
VLIEGWIELREMHENDEL
VOORDAT U GAAT MAAIEN
BENT U KLAAR OM TE MAAIEN?
natural_image
Four identical line drawings of a leaf with circular features, arranged horizontally (no text or symbols)NORMAAL
natural_image
Two abstract line drawings of elongated, curved shapes with circular indentations (no text or symbols)VERBOGEN

NORMAAL
Mulch- of zijafvoer
natural_image
Line drawing of a lawn mower on grass (no text or symbols)natural_image
Line drawing of a lawn mower with visible blades and wheel (no text or symbols)natural_image
Line drawing of a hand operating a vehicle wheel assembly (no text or symbols)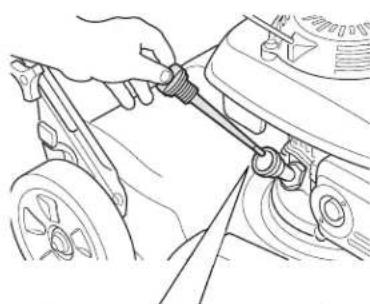
natural_image
Line drawing of a hand adjusting a mechanical component with tools (no text or symbols)![[1] [2] [3]](/content/2026/04/668927/images/999a0758820bee290bc5efbf3e5a7e3edc229e34e845c86033f7932d5de8d62d.jpg)
OPMERKING
BERGING
Honda Warranty Conditions
Thank you for purchasing your Honda lawnmower.
Honda warrants your new mower to be free of defects in materials or workmanship for a period of 2 years from the date of purchase (3 months for commercial use). This warranty is in addition to your statutory rights.
However, in the unlikely event that you encounter a problem with your mower, please contact your original retailer. Should your machine require repair under warranty, you will need to take it to an authorised Honda dealer with either the warranty card or your proof of purchase.
There are, of course, some Terms and Conditions that apply to the Honda warranty. Listed here are items that are not covered:
-
Any damage resulting from neglect of the periodic maintenance specified by Honda.
-
Any damage resulting from repair or maintenance performed by non-authorized Honda service points.
-
Any damage resulting from operating methods other than those indicated in the owner's manual of the product.
-
Any damage resulting from the use of non-genuine Honda parts, other than recommended lubricants and fluids, and accessories other than those approved by Honda.
-
Any damage or deterioration due to natural wear and tear (natural fading of painted or plated surfaces, sheet peeling and other natural deterioration).
-
Consumable parts: Honda does not warrant parts deterioration due to natural wear and tear. The parts listed below are not covered by warranty (unless they are needed as a part of another warranty repair):
- Spark plug, fuel filter, air cleaner element, brake pad, clutch disc, tyre, wheel, wheel bearing, recoil starter rope, cable, belt, cutter blade.
- Lubricant: oil and grease.
-
Cleaning, adjustment, and normal periodic maintenance work (carburetor cleaning, engine oil draining, blade sharpening, belt and cables adjustment).
-
Expenses incidental to the warranty claim, including:
- Compensation for loss of time, commercial loss or rental costs for a substitute product.
- Costs incurred for transportation to and from the dealership.
- Any damage resulting from exposure of the product to soot and smoke, chemical agents, bird droppings, sea water, sea breeze, salt or other environmental phenomena.
Conditions D'application De La Garantie Honda
EC Declaration of Conformity
1. The undersigned, Peter Neckebroeck, on behalf of the authorized representative, herewith declares that the machinery described below fulfils all the relevant provisions of:
- Directive 2006/42/EC on machinery
- Directive 2014/30/EU on electromagnetic compatibility
- Directive 2000/14/EC – 2005/88/EC on outdoor noise
2. Description of the machinery
a) Product: Lawnmower
b) Function: cutting of grass
c) Model d) Type e) Serial number
HRS536C5 MZBZ 6550060 - 9999999
HRX537C4 MAGA 2580738-9999999
3. Manufacturer 4. Authorized representative and able to
Honda Power Equipment Mfg., Inc.
PO Box 37 Honda Motor Europe Ltd.
Honda Drive, NC Hwy 119 Cain Road, Bracknell, RG12 1HL
Sweepsonville, NC 27359 USA (United Kingdom)
5. References to harmonized standards 6. Other standards or specifications
EN ISO 14982:2009
EN ISO 5395-1:2013
EN ISO 5395-2:2013/A1:2016
7. Outdoor Noise Directive
a) Measured sound power dB(A): 94 (MZBZ), 97 (MAGA)
b) Guaranteed sound power dB(A): 98 (MZBZ, MAGA)
c) Noise parameter (L, min ^-1 ): 53cm, 2850
d) Conformity assessment procedure: Annex VI
e) Notified body: SNCH
2a, Kalchesbruck
L - 1852 Luxembourg
8. Done at: Aalst, BELGIUM
9. Date: 11 July 2017

Peter Neckebroeck
Manager of the Homologation Department
| Français. (French)Déclaration CE de Conformité1. Le sous signé, Peter Neckebroeck, de la part du représentant autorisé, ciéclare que la machine décrit ci-dessous répond à toutes les dispositions applicables de:• Directive Machine 2006/42/CE• Directive 2014/30/UE sur la compatibilité électromagnétique• Directive 2000/14/CE - 2005/88/CE des émissions sonores dans l'environnement des matériels destinés à être utilisé à l'extérieur des batiments2. Description de la machinea) Produit : Tondeuse à gazonb) Fonction : couper de l'herbe (tondre)d) Modèle d) Typee) Numéro de série3. Constructeur4. Représentant autorisé et en charge des éditions de documentation techniques5. Référence aux normes harmonisées6. Autres normes et specifications7. Directive des émissions sonores dans l'environnement des matériels destinés à être utilisé à l'extérieur des batimentsa) Puissance accoustique mesuréeb) Puissance accoustique garantie c) Paramètre du bruttd) Procédure d'évaluation de conformitée) Organisme notifié9. Fait à 9. Date | Italiano (Italian)Dichiarazione CE di Conformità1. Il soltoscrito, Peter Neckebroeck, in qualità di rappresentante autorizzato. dichiara qui di seguito che la macchina sotto descrita soddisfa tutte le disposizioni pertinenti delle:* Direttiva macchine 2006/42/CE• Direttiva sulla compatilità eletromagnetica 2014/30/UE• Direttiva sulla emissione acustica delle macchine e altrezzature destinate a funzionare all'aperto 2000/14/CE - 2005/88/CE2. Descrizione della macchinaa) Prodotto : Tosaerab) Funzione : Tapilo di erba c) Modello d) Tipoe) Numero di serie 3. Costruttore4. Rappresentante autorizzato e competente per la compilazione della documentazione tecnica5. Riferimento agli standard armonizzati6. Affil standard o specifiche7. Direttiva sulla emissione acusica delle macchine e attrezzature destinate a funzionare all'aperto:a) Livello di potenza sonora misuratob) Livello di potenza sonora garantitoc) Parametri emissione acusicade) Procedura di valutazione della conformitàe) Organismo notificato8. Falto a 9. Data | Deutsch (German)EG-Konformitätserklärung1. Der Unterzeichner, Peter Neckebroeck erklärt hiermit im Namen der Bevollmächtigten, dass das hierunter genannte Maschine allen einschligigen Bestimmungen der * entspricht:* Maschinenrichtlinie 2006/42/EG* Richtlinie der Elektrammetischen Kombatabilität 2014/30/EU* Gerauschrichtlinie im Freien 2000/14EG - 2005/88/EG2. Beschreibung der Maschinea) Produkt :Rasenmäherb) Funktion : Gras schneidenc) Mocell d) Type) Sonionnummer3. Herssteller4. Bevollmächtigter und in der Position, die technische Dokumentation zu erstellen5. Verwels auf harmonisierte Nomen6. Andere Nomen oder Spezifikationen7. Gerauschrichtlinie im Freena a) gemessene Laustärkeb) Schalleistungspegelc) Gerauschvorgabe d) Konformitätsbewertlungs Ablaufe) Banannte Stelle8. Ort 9. Datum |
| Nederlands (Dutch)EG-verklaring van oversenstemming1. Ondergetekende, Peter Neckebroeck, In naam van de gemachtigde van de fabrikant, verklart hiermee dat net hieronder beschreven machine voldoet aan alle toepasselijke bepalingen van :• Richtijn 2006/42/EG betreffende machines• Richtijn 2014/30/EU betreffende elektromagnetische overeenstemming• Richtijn 2000/14/EG - 2005/88/EG betreffende geluidsemissie (openlucht)2. Beschrijving van de machinea) Product : Grasmaarerb) Fundie : gra maalenc) Model d) Typese) Serienummer3. Fabrikant4. Gemachtigde van de fabrikant en in staat om de lechnische documentatie samen to stellen5. Refereert naar geharmoniseerde normenBZ. Andere normen of specificität MAGA) Geluidsemissierichtlijn (openlucht)a) Gamelen geluidsvermögensniveau b) Gewaarborg geluidsvermögensniveau c) Geluidparameter d) Conformiteitsbeoordeingsproceduree) Aangemeide instantie8. Plaats 9. Datum | Dansk (Danish)EF OVERENSTEMMELSEERKLUERING1. UNDERTEGNEDE, Peter Neckebroeck, PÀ VEGNE AF DEN AUTORISEREDE REPRÉSAENTER, ERKLAERER HERMED AT MASKINEN, SOM ER BESKREVET NEDENFOR, OPFYLDER ALLE RELEVANTE BESTEMMELSER IFDLGE:• MASKINDIRECTIV 2006/42/EF• EMC-DIREKTIV 2014/30/EU• DIREKTIV OM STÖJEMISSION 2000/14/EF - 2005/86/EF2. BESKRIVELSE AF PRODUKTETA) Produkt : Planeklipporb) ANVENDELSE : Graskippingc) Model d) TYPEe) SERIENUMMER3. PRODUCENT4. AUTORISERET REPRÉSENTANT OG I STAND TIL AT UDARBEJDE DEN TEKNISKE DOKUMENTATION5. REFERENCE TIL HARMONISEREDE STANDARDER6. ANDRE STANDARDER ELLERSPEFFIFICATIONER7. DIREKTIV OM STÖJEMISSION FRAMASKINER TIL UDENDÖRS BRUGa) MÄLT LYDEFFEKTNIVEAUb) GARANETERET LYDEFFE KTNIVEAUC) STÖJPARAMETERd) PROCEDURE FOR OVERENSTEMMELSESVURDERINGe) BEMYNDIGET ORGAN8. STED 9. DATO | ΕΛληνικά (Greek)ΕΚ-Δήωση συμβορφωσης1. Ο κάτωλι υπογεγραμμένος, Peter Neckebroeck, ex μέρου τουξευσοδοτημένου αντηρροσότου με το παρών δηλωνων ότο τα παρακτών περηγραφόνονο όχημα πληροβέλες τικ σχετικές προδικραφάες του:* Οδηγία 2006/42/ΕΚ για μηχαντε* Οδηγία 2014/30/ΕΕ για την ηλεκτρομαννητική συμβατόρτα* Οδηγία 2000/14/ΕΚ - 2005/88/ΕΚ για το επίπεθεοφοβύου σε εξωμετρικούς χώρους,2. Περηγρατή μηχαντιματοςa) προϊόν ,Χλοσκοτικόa,b) Αλυσμργία : για κόμμα γραπαδιομc) Μοντέλιο d) Τυποςa) Αριμθμο ,σχαράς παρανωγης3. Κατασκυσστης4. Εξουσαδομμένος αντηρόσωτης και είναι σε έση νακαστοίτα τον τοχικικό φυκλο5. Αναφορά σε αφαρονοισμένα προστυτα6. Λυπτα πρόσυμη ή προδικραφιμές7. Οδηγία επτάδου θορύβου εξωτερικών χώρωνa) Ματρηβελο έχητική έντασηb) Εξγνυσινήν έχητική έντασηc) Ηυγηκή παράστροςd) Διαξικασία πατοποίησηςe) Οργονυμόστηστοποίησηςg. Η διακή ένγιε 9. Ημερομηνία |
| Svenska (Swedish)EG-forskrikan om diversstämmeelse1. Undertdecknad, Peter Neckebroeck, på uppdrag av auktoriserad representant, declarerar härmed alt maskinen beskriven nedan ftullößer alla relevanta bestämmeister enl :• Direktiv 2006/42/EG gällande maskiner• Direktiv 2014/30/EÜ gällande elektronemäfisk kompatibilitet• Direktiv 2000/14/ΕΕ - 2005/88/ΕΕ gällande buller utomhus2. Maskinbeskrivninga) Produkt : Gräsklippareb) Funzione : Gräskiplinngc) Modoll d) Type) Seriennummer3. Tillverkare4. Auktoriserad representant och sika kunna sammanställä teknik dokumentationen5. referents til överensstämmande standarder6. Andra standarder eller specifikationer7. Direktiv för buller utomhusa) Ucpmitt ljudnivab) Garantered ljudnivac) Buller parameterd) Förfarande för bedömninge) Anmälda organ8. Utfärdat vid 9. Datum | Español (Spanish)Declaración de Conformidad CE1. El abajo firmante, Peter Neckebroeck, en representación del representante autorizado, adjunto declara que la máquina abajo descrita, cumple las clausulas relevantes de:* Direktiva 2006/42/CE de maquinaria• Direktiva 2014/30/UE de compatibilidad electromagnética• Direktiva 2000/14/CE - 2005/88/CE de ruído exterior2. Descriptión de la máquinaa) Produkt : Cortadora de céspedb) Función : Corbar el céspedc) Modelo d) Typoe) Número de serie3. Fabricante4. Representante autorizado que puede compliar el expediente técnico5. Referencia de los estándar harmonizados6. Otros estándar o especificaciones7. Directiva sobre ruído exteriora) Potencia sonora Medidab) Potencia sonora Garantizadac) Parámetros ruidod) Procedimento evaluación conformidade) Organismo notificado8. Realizado en 9. Fecha | Româná (Romanian)CE-Declarallte de Conformitate1. Subsemnatul akturonor autorizat, declar prin prezenta faplul ca echipamentul descrit mai jos indeplineste toate conditille necesarie din:* Direktiva 2006/42/CE privind echipamentul• Direktiva 2014/30/UE privind compatibilitatea electromagnética• Direktiva 2000/14/CE - 2005/88/CE privind poluarea fonica in spaliu deschis2. Descteries echipamentula) Produsul : Marsina de tums iarbaa) Domeniu du utilizzare - tunderea ierbili c) Modell d) Tipoe) Serleprodus3. Producer4. Reprezentant autoritz si abilitat să realizeze documentalje tehniciä5. Referinta la standardele armonizate6. Alle standarde sau norme7. Directiva privind poluarea fonica in spaliu inchisa) Puterea acustica masuralaa) Pulere acustica maxim garantiač) Indice poluarea fonica4. Prodsourda evaluare a conformalitii e) Notificari8. Emisla 9. Data |
(MZBž
| Lietuviu kalba (Lithuanian)EB atlikdies deklaracija1. Igaliotoja atstovo vardu pasirāęs peterNeckebroeck pavirtina. kad žemiau aprašylamasina attinka visas tšvardintų direktyvųnuoslatas:* Mechanizmu direktyva 2006/42/EB* Elektromagnetične suderinamumo direktyva2014/30/ES* Triukšmo lauke direktyva 2000/14/EB .2005/88/EB2. Prėtaiso aprašymasa)Gaminya : Zoliapovėb) Funkcija : Zolės pjovimasc) Modelisd) Tipase) Serijos numeris3. Gamintojas4. Igaliotlasis atstovas ir galinitis sudaryti techniņedokumentaciją5. Nuorocosa i sudertintus standartius6. Kiti standartai ir specifikacija7. Triukšmo lauke direktyvaa) Išmatuotas gasro galingumo lygisb) Garantuojamas garso galingumo lygisc) Triukšmo parametrasc) Tipase) Registrulota jstaiga8. Vieta9. Data | Bългароки (Bulgarlan)EO декларация за съответствие1. Долупадписаният Peter Neckebroeck, отимето на упътномощення представител, снастоящота декларирам, че машините,отписани подогу, отповарят на всичкисъответни разпоредби на:* Директива 2006/42/ΕΟ относно машините* Директива 2014/30/ΕΟ относноелектромагнитната съыместимост* Директива 2000/14/ΕΟ - 2005/88/ΕΟ относнюшумовите имисли на съоръжения,предназначени за употреба извън сградите2. Описание на машинитеa) Продукт : Kosacka b) Функция : косине на трева c) Моделc) Типe) Сериян номер3. Производител4. Упътномощен представител и стоторник засъставане на техническа документация5. Съответствие с хармонизирами стандарти6. Други стандарти или спецификации7. Директива относно шумовите ежикки насъоръжения, предназначени за употреба извънсградитеa) Измерена звукова мощностb) Гарантирана звукова мощностc) Параметельствушd) Продедурата за оценка на съответстаннетoe) Нспективиран орган8. Мосто на изголване9. Дата на изголване | Norsk (Norwegian)EF. Samevarserklæring1.Undertegnede Peter Neckebroeck på vegne avautorisert representant herved erklarer atmaskiner beskrevet nedenfor innfhir relevantinformasjon fra følgende forskrifter:* Maskindeikdivet 2006/42/EF* Direktiv EMC. 2014/30/EUElektromagnetsk kompabilitet* Direktiv om støy utlendørs 2000/14/EF .2005/88/EF2. Beskrivelse av produkta) Produkt : Gressklipperb) Funksjon : Klippe gressc) Modelld) Typese) Sariennummer3. Produsent4. Autorisert representant og i stand til å utarbeideden tekniske dokumentasjøhen5. Referanse til harmoniserte standarder6. ∅vrige standarder eller spesifikasjoner7. Utlenders direkliv får støya) Målt støyb) Maks støyc) Konstant støyd) Verdi vunderings prosedyree) Ojeldene Køreløykroppistamme/skrog8. Sted9. Dato |
| Türk (Turkish)AT Uyguntuk Beyani1. Asagida imzası bulunan Peter Neckebroeck,yektili temsilco adina, bu yazyla birikte asagičakilmakine ile ilgili lčim hükümlükličklerin yerinegetirioloğini beyan etmektedir:* Makina Emniyet Yönetmeligi 2006/42/AT* Eletromanyestik Uyumutluk Yönetmeligi1 2014/30/AB* Ajć Alanda Kullanian Techizat TarafindanOluşturanlan Çevredeki Günültü Emissyonu İlo ilgiliYönetmelik 2000/14/AT/2005/88/AT2. Makinanun tarifia) Ürün : Çim biome makinesib) İşlevi : Çimierin kesilmesic) Codeld) Tipie) Seri numarası3. Imalatiča) Teknik dosayan hazirlamakda yetkili olanToplukta yerleğik yetkili temsilci5. Uyumlaştırılmış standartlara alif6. Diğer standartlar veya spesifikasyonlar7. Ajć alan gürlüti Yönetmeligla) Ölçülen ses gücüb) Garanti edilen ses gücüc) Gürülü parametresic) Uyguntluk deterlerindmee prosedurüe) Onaylanmış kurulus8. Beyanın yeri :9. Beyanın tarihi : | Islenskala(Scotland)EB-Sanriamnsytiryšing1. Undinitačur Peter Neckebroeck stačfestir hérmeđo tvyr nõndo loggra adila ad uppsingar umvélbūnač hér ad neban eru tasmandi hvađ varallaiheyrandi mälslokka, svo sem* Leibtbeininger fyir vitbūnač 2006/42/EB* Leibtbeininger fyir rafsegulavič 2014/30/EU* Leibtbeininger um håvađatemangun 2000/14/EB.2005/88/EB2. Lysing ve vitbūnači) Okutaski : Slăttuvėlib) Virkini : Gras slogljč) Gerðd) Tegunde) Serial númer3. Framleiðandi4. Lögildil arðilar og fær um ad taka samatekniskičlin5. Tilvisun um heildar stadaio6. Aðnr stačlar eða sěrstóður7. Leibtbeininger um håvađatemunguna) Masidur havába styrkurb) Staštestur haváda styrkurc) Havába breytléikii Stačfasting a ģaadastóčiume) Merkingar8. Gert hija9. Dagsetning | Hrvatski(Croatian)EK Izjava o sukladnosti1. Popisani, Peter Neckebroeck, u imeovlaštenog predstavnika, cvrme zjavljuje dadstrojevi navedeni u nastavku ispunjavaju svevažede odredbe:* Propisa za strojeve 2006/42/EX* Propisa o elektromagnetskoj kompatibilincsti1 2014/30/EU* Propisa o buci na otvcrenome 2000/14/ΕK-2005/88/EK2. Opis strojevaa) Proizvod : Kosilica za travub) Funcionalnost : rezanje travec) Modeld) Tipie) Serijeski broj3. Proizvođač4. Ovlašteni predstavnik i osoba za sastavljanjetehnicke dokumentacije5. Reference na uskladene norme6. Ostale norme i spesifikacije7. Propis o buci na otvcrenomea) izmjerenja jačina zvukab) Zajamčena jačina zvukac) Parameter buked) Postupak za ociju sukladrostilee) Obavljestešeno tijelo8. U9. Datum |
| Português (Portuguese)Declaração CE de Conformidade1. O abaixo assinado, Peter Neckebroeck,declara deste modo, em nome do mandalário,que a máquina abaixo descrito cumpre todas asestipulações relevantes da:• Direciva 2006/42/CE relativa às máquinas• Direciva 2014/30/UE relativa à compatibilidadeelectromagnética• Direciva 2000/14/CE - 2005/88/CE relativa àsemissões sonoras para o meio ambiente dosequipamentos para utilização no exterior2. Descrição da máquinaa) Produto : Corta relva b) Função : corte de relva c) Modelo d) Tipo e) Número de série 3. Fabricante 4. Mandatárlo com capacidade para compilardocumentação técnica 5. Referência a normas harmonizadas 6. Obras normas ou especificações 7. Directiva relativa às emissões sonoras para omelo ambiente dos equipamentos para utilizacióneo exterior a) Potência sonora medida b) Potância sonora garantida c) Parametro de ruíso d) Procedimento de avaliação da conformidade e) Organismo notificado 8. Feito em 9. Data | Polski (Polish) Deklaracja zgodności WE1. Nizej prodpisany, Peter Neckebroeck, w imieniuupoważionego przedstawiciela, niniejszymdeklaruje, že urządzenie opisane poniżei spemawszyskie odpowiednie ocelanowienia:* Dyrektywa Maszynowa 2006/42/WE* Dyrektywy Kompatybilności Elektromagnelytcznej 2014/30/UE* Dyrektywa Halasova 2000/14/WE - 2005/88/WE2. Opis urządzeniaa) Produkt : Kosiarka b) Funkoja : ścinanie trawy c) Model d) Type) Numery seryjne 3. Producent 4. Upownszniony Przedstawiciel oraz osobaupoważniona do przygotowania dokumentacijtechnicznej 5. Zastosowane normy zhamonizowane 6. Pozostale normy i przepisy 7. Dyrektywa Halasova a) Zmierzony poziom mocy akustycznej b) Gwarantowany poziom mocy akustycznej c) Wartość halasu d) Procedura oceny zgodnoście 8. Jednostka notyfikowana 9. Miejace 9. Data | Suomi / Suomen kileli (Finnish) EY-VAATIMUSTENMUKAISUUSVAKUUTUS1. Allekrijotjanut, Peter Neckebroeck valtulettuvalmistajan eduslaja, vakuitaa täten etä allamainittu kone/tuote täyttää kakki seurasvamlärärkysis:* Konecirektivi 2006/42/EY* Direktivi 2014/30/EU sähkörmagnositlinyenhteensopivuus* Direktivi 2000/14/EY - 2005/88/EY ympäristönmelu2. TUOTTEEN KUVAUSA) Tucé : Ruchonleikkurtb) Toiminio : ruchon leikkausc) Malli d) TYPPIe) SARJANUMERO 3. VALMISTAJA 4. Valmistajan edustaja ja teknisten dokumettienlastia 5. VIITTAUS YHTEISIIN STANDARDERIHIN 6. MUU STANDARDI TAI TEKNISET TIEDOT 7. Ympäristön meludirektivi a) Mitattu melutascb) Todenmukalien melutasoc) Melu parametrit d) Ydhenimukasauden arviohinn menetelmäe) Tiedonantoselin 8. TEHTY 9. PÄIVÄMÄÄRÄ |
| Magyar (Hungarian)EK-megfeleidőságı nylatkozata1. Aliúrólt Peter Neckebroeck, a gyárló cégtrönyëves képviselőjeként nylatkozgom, hogy azällabunk gyártót gêo megfelei az ősszes, alábbfelsorolt direktivának c) 2006/42/EK Direktivának berendezésekre 3) 2014/30/EU Direktivának elektromagnénessemegfeleidőségre 4) 2000/14/EC - 2005/88/EK Direktivának kultérizajszintre 2. A gép leirásaa a) Termék : Fünyiró b) Funkoć : fő levágása c)Model d) Tipuse Sorozatszám 3. Gyártó 4. Meghalatmazolt képviselője és képesősszeallitani a mószaki dokumentációt 5. Hivatközással a szabványokra 6. Más elóirások, megogyzések 7. Kultén zajszint Direktiva a) Mért hangeró b) Szavaltot hangeró c) Zajszint paraméter d) Megfeleidőségi becsítési eljárás e) Kijelolt szervezet 8. Keitezés helye 9. Keitezés ideje | Cestina (Czech) ES – Pronašení o skodě 1. Podeosaný Peter Neckebroeck, jakoutoritzovaná osoba zde potvrzuje, že strojpopsaný niže spiliuje požadavky přístušenýchopaftení:* Směrnico 2006/42/ES pro strojni zařízení* Směrnico 2014/30/EU stanovující technicképožadavky na výrobky z hlediskalelektromagnetičke kompatibility* Směrnico 2000/14/ES - 2005/88/ES stanovujícítechnické požadavky na výrobky z hlediska emislhluku zařízení pro venkovní použití2. Popis zařízenía) Výrobex : Sekačka na trávu b) Funkoe : Sekání trávy c) Model d) Type) Výrotoni číslo 3. Výrobce 4. Zplnomocněny zástupoe a osoba všeřenánkomplestač technické dokumentace 5. Odkazy na harmonizované normy 6. Ostatní použitě normy a specifikace 7. Směrnice pro hluk pro venkovní použitía) Naměření: akustický výkon b) Garantovaný akustický výkon c) Parametrhluku d) Způsob posouzení shody e) Notifikovaná osoba 9. Podepsáno v 9.Datum | Latviešu (Latvian) EK atblistbas deklardicja1. Peter Neckebroeck ar savu paraisku zam širdokumenta, autorizeta pársátva várda, pazipo, kazernák aprakstilke matína, albitist visám zernáknorácito direktivu sadajam:* Direktiva 2006/42/EK par masňnám* Direktiva 2014/30/ES attiedtá uzelektromagnetiško savietojamítou* Direktiva 2000/14/EK - 2005/88/EK par trokšgameisiju vidě 2. Iekártas apraksta a) Produkts : Zilous plňwýjs b) Funkoja : záies plňausanc) Modelis d) Tipee) Sérijas numurs 3. Ražotájs 4. Autorizétais párstávis, kas spěj sastádittehnisko dokumentáciu 5. Attauce uz sasakojotajem standariem 6. Čitl noteklikie standartli val specifikácijas 7. Árájo trokšągu Direktivaa) izměřitá trokšąja lielums b) Pielaujamais trokšąja lielums c) Trokšąja parametrid) Abístibás věrlejúma procedúreae) Informéta lestáce 8. Vieta 9. Datums |
| Slovenčina (Slovak)ES vyhláslenie o zhode1. Dolupodpisany, Peter Neckebroeck, akoautorzovaný zástupca výrobcu, týmto vyhlásuje,že uvedený strocové je v zhode s nasledovnymísmernamicí:* Smernica 2006/42/ES (Strojné zarladenia)* Smernica 2014/30/EU (Elektromagniekčkapontabilitta)* Smernica 2000/14/ES - 2005/88/ES (Emisiehluku) 2. Popis strojaa) Produkt : Kosacka na trávu b) Funkoía : Kosenie trávy c) Model d) Type) Výročné číslo 3. Výrobca4. Autorzovaný zástupca schopný zostaviťtechnický dokumentáciu 5. Referencia k harmonizovaným štandardom 6. Daftáie štandardy alebo specifikácie 7. Smerna pre emisie hluku vo vońcmpriestranstvea) Nameraná hladina akustického výkonu b) Zaručená hladina akustického výkonu c) Rozmornd Procedura pseudozvania zhodye) Notifikovaná osoba 8. Miesto 9. Datum | Eesti (Estonian) EU vastavusceklaratsicon1. Káeslovaga kinnilab allakrijutanu, PeterNeckebroeck, voltatud esindaja nimei, et alpoolkrjelkatud masína vastab kölklódele alljárgnevatedirektivce sátetele:* Masinate direktiv 2006/42/EÚ* Elektromagnetišse ühlídvusce direktiv2014/30/EL* Välismírua direktiv 2000/14/EU - 2005/88/EU 2. Seadmatele kijelidus a) Toode : Muruniiduk b) Funksisoon : muru niltnine c) Mudel d) Túüp e) Seerlanumber 3. Tocja 4. Voltatud esindaja, kes on pádev tätima tehnilistdokumentalsiconi 5. Viide ohlluslad standarditele 6. Mud standardid ja spetsifikatsioonid 7. Välismírua direktiv a) Möbčestud heliivčimsuse tase b) Lubatud heliivčimsuse tase c) Můra paramester d) Vastavushinamiamisenetlus e) Teavilatud asutus 8. Koht 9. Kuupáev | Slovensčina (Slovenian) ES izjava o skladnosti1. Spoda podcapsani, Peter Neckebroeck, ki jepooblačena oseba in v menu proizvajicaijedjavla, da spodaj opisana stroj ustreza vsemnavedenim direktivam:* Direktiva 2006/42/ES o strojh* Direktiva 2014/30/EU o elektromagnetizaružitljosti* Direktiva 2000/14/ES - 2005/88/ES o hrupnostia) Opis napravaa) Proizvod : Vrtna kosilnicab) Funkoja : košenje travec) Modeld) Tipe) Serijska šlevilka3. Proizvajalec4. Pooblačeni predslavnik ki lahko predložičtehníčno dokumentacijo 5. Upoštevani harmonizirani standardi 6. Ostali standardi ali specifikacj 7. Direktiva o hrupnosta) Izmerjena zvočna močb) Garantirana zvočna močc) Parameterd) Postopek e Postopek opravli 8. Kraj 9. Datum |
Honda Austria Branch of Honda
Motor Europe Ltd
Hondastraße 1
2351 Wiener Neudorf
Power Products Trading
162, Yiannos Kranidiotis Avenue
2235 Latsia, Nicosia
Tel. : + 357 22 715 300
M50 Business Part, Ballymount
Dublin 12
Tel. : +353 1 4381900
Fax : +353 1 4607851
http://www.hondaireland.ie
E-mail: Service@hondaireland.ie
MALTA
The Associated Motors Company
Ltd.
New Street in San Gwakkin Road
Aries Power Equipment Sp. z o.o.
ul. Wroclawska 25
01-493 Warszawa
Tel. : +48 (22) 861 43 01
Fax : +48 (22) 861 43 02
http://www.grow.com.pt
mail: abel.leiriao@grow.com.pt
REPUBLIC OF BELARUS
Scanlink Ltd.
Kozlova Drive, 9
220037 Minsk
Tel. : +375 172 999090
Fax : +375 172 999900
http://www.hondapower.by
ROMANIA
Hit Power Motor Srl
str. Vasile Stroescu nr. 12, Camera 6,
Sector 2. 021374 Bucuresti
Tel. : +40 21 637 04 58
Fax: +40 21 637 04 78
http://www.honda.ro
E-mail: hit_power@honda.ro
SERBIA & MONTENEGRO
ITH Trading Co Doo
Majke Jevroscme 26
1100 Beograd
Serbia
email:sstevanovic@ithtrading.co.rs
SLOVAK REPUBLIC
Honda Motor Europe Ltd Slovensko,
organizačná zložka
Prievozská 6 821 09 Bratislava
Tel.: +421 2 32131111
Fax: +421 2 32131112
http://www.honda.sk
SLOVENIA
AS Domzale Moto Center D.O.O.
Blatnica 3A
1236 Trzin
Tel.: +386 1 562 22 62
Fax: +386 1 562 37 05
http://www.honda-as
Greens Power Products, S.L.
Poligono Industrial Congost –
- SAFETY MESSAGES
- DAMAGE PREVENTION MESSAGES
- HONDA
- OWNER'S MANUAL
- PEDESTRIAN CONTROLLED
- LAWNMOWER
- CONTENTS
- SAFETY INSTRUCTIONS
- WARNING
- To ensure safe operation –
- Disposal
- PRODUCT IDENTIFICATION PLATE
- COMPONENT IDENTIFICATION
- SET-UP
- UNPACKING
- HANDLEBAR SETUP
- ENGINE OIL
- FUEL
- BEFORE USING YOUR LAWNMOWER
- CONTROLS
- FUEL VALVE
- CUTTING-MEANS CONTROL
- SMART DRIVE CONTROL
- CUTTING HEIGHT ADJUSTMENT LEVERS
- CHECK YOUR LAWN
- Objects
- People and Pets
- Lawn
- CHECK YOUR MOWER
- Cutting Means
- Engine Oil Level
- NOTICE
- Fuel Storage Container
- Air Cleaner Inspection
- Mulching or Side Discharge
- Cutting Height
- OPERATION
- SAFE OPERATING PRECAUTIONS
- FREQUENCY OF USE
- STARTING THE ENGINE
- High Altitude Operation
- OPERATING THE CONTROLS FOR MOWING
- STOPPING THE ENGINE
- SAFE MOWING PRACTICES
- Stability
- Obstacles
- Gravel and Loose Objects
- MOWING TIPS
- When to Mow
- Cutting Width
- Cutting Means Speed
- Cutting Means Sharpness
- Dry Grass
- Wet Grass
- Fallen Leaves
- Clogged Cutting-means Enclosure
- Mowing Patterns
- Mulching
- Side Discharge Mowing
- MAINTENANCE
- THE IMPORTANCE OF MAINTENANCE
- MAINTENANCE SAFETY
- Safety Precautions
- ENGINE MAINTENANCE
- Engine Oil Change
- Air Cleaner Service
- Spark Plug Service
- Spark Arrester Service
- CHECK CUTTING MEANS STOPPING TIME
- Max. stopping time: 3 seconds
- CUTTING MEANS REMOVAL AND INSTALLATION
- Cutting Means Removal
- Cutting Means Installation
- Cutting-means bolt torque: 49 \~ 59 N·m
- TRANSPORTING
- BEFORE LOADING
- PIVOTING HANDLE
- LOADING AND UNLOADING
- STORAGE
- Cleaning
- Engine
- Cutting-Means Enclosure
- Drying
- Short Term Storage (30-90 days)
- Long Term or Seasonal Storage (greater than 90 days)
- ENGINE CYLINDER
- PLACING IN STORAGE
- REMOVING FROM STORAGE
- TROUBLESHOOTING
- INTRODUCTION
- TABLE DES MATIERES
- COMMANDES
- SOUPAPE DE COMBUSTIBLE
- TONDRE EN TOUTE SECURITE
- AVIS
- INDICE
- MANDOS
- VÁLVULA DE COMBUSTIBLE
- Obstáculos
- AVISO
- ALMACENAMIENTO
- INHALTSVERZEICHNIS
- BENZIN
- VOR DEM BETRIEB
- Hindernisse
- AUF- UND ABLADEN
- LAGERUNG
- COMANDI
- VALVOLA DEL CARBURANTE
- LEVA DEL FRENO DEL VOLANO
- Carburante
- Altezza di tosatura
- NOTA
- IMMAGAZZINAGGIO
- INHOUD
- WAARSCHUWINGSSTICKER
- VLIEGWIELREMHENDEL
- VOORDAT U GAAT MAAIEN
- BENT U KLAAR OM TE MAAIEN?
- Mulch- of zijafvoer
- OPMERKING
- BERGING
- Honda Warranty Conditions
- There are, of course, some Terms and Conditions that apply to the Honda warranty. Listed here are items that are not covered:
- Conditions D'application De La Garantie Honda
- Honda Austria Branch of Honda
- Motor Europe Ltd
- Power Products Trading
- MALTA
- The Associated Motors Company
- Ltd.
- Aries Power Equipment Sp. z o.o.
- REPUBLIC OF BELARUS
- Scanlink Ltd.
- ROMANIA
- Hit Power Motor Srl
- SERBIA & MONTENEGRO
- ITH Trading Co Doo
- SLOVAK REPUBLIC
- Honda Motor Europe Ltd Slovensko,
- organizačná zložka
- SLOVENIA
- AS Domzale Moto Center D.O.O.
- Greens Power Products, S.L.
Brand : Honda
Model : HRS 536 C5 VK
Category : Lawn mower