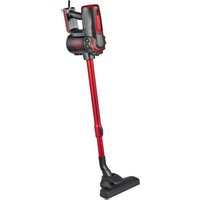
PC-BS 3038 - Vacuum Cleaner ProfiCare - Free user manual and instructions
Find the device manual for free PC-BS 3038 ProfiCare in PDF.


| Product type | Vacuum cleaner for floors |
| Brand | ProfiCare |
| Model | PC-BS 3038 |
| Power supply | 220-240 V~, 50-60 Hz |
| Power consumption | 600 W |
| Net weight | approx. 2.3 kg |
| Protection class | II |
| Collection system | Bagless, transparent dust collector |
| Filters | HEPA filter, coarse filter, exhaust filter (non-woven) |
| Suction power | 2 levels (I = low, II = high) |
| Included accessories | Floor nozzle, hard floor brush, crevice nozzle, crevice brush, wall mount, plugs and screws |
| Telescopic tube | Yes, adjustable |
| Floor types | Hard floors and carpets |
| Filter cleaning | Under running water, air dry |
| Collector maintenance | Empty after use, wet cleaning |
| Safety | Do not vacuum liquids, hot ashes, sharp objects; do not use without filter |
| Wall storage | Wall mount included |
| Cord length | Not specified in the manual |
Frequently Asked Questions - PC-BS 3038 ProfiCare
User questions about PC-BS 3038 ProfiCare
0 question about this device. Answer the ones you know or ask your own.
Ask a new question about this device
Download the instructions for your Vacuum Cleaner in PDF format for free! Find your manual PC-BS 3038 - ProfiCare and take your electronic device back in hand. On this page are published all the documents necessary for the use of your device. PC-BS 3038 by ProfiCare.
USER MANUAL PC-BS 3038 ProfiCare
natural_image
Red and black handheld vacuum cleaner with attached clasp (no visible text or symbols)Bedienungsanleitung
2× Dübel
2× Schraube
natural_image
Line drawing of a manual electric shaver with rotating arm (no text or symbols)Das Filtersystem
natural_image
Illustration of a hand inserting into a cylindrical device into a base (no text or symbols)natural_image
Diagram of a mechanical assembly with a tool and textured surface (no text or symbols)natural_image
Illustration of a hand using a tool to clean or store floor tiles on a grid-patterned surface (no text or symbols)natural_image
Illustration of a manual electric shaver with a rotating button (no text or symbols)Het filtersysteem
natural_image
Illustration of a hand inserting into a cylindrical device into a base (no text or symbols)- HEPA filter
- Grof filter
natural_image
Illustration of a manual electric shaver with rotating arm (no text or symbols)natural_image
Illustration of a hand inserting into a cylindrical device into a base (no text or symbols)natural_image
Diagram of a mechanical or structural component with no visible text or symbolsnatural_image
Illustration of a hand using a tool to clean or store floor tiles on a grid-patterned surface (no text or symbols)natural_image
Line drawing of a handheld electric shaver with a rotating wheel (no text or symbols)Sistema de filtro
natural_image
Illustration of a hand inserting into a cylindrical device into a base (no text or symbols)natural_image
Illustration of a hand using a tool to clean or store floor tiles on a grid-patterned surface (no text or symbols)natural_image
Illustration of a hand inserting into a cylindrical device into a multi-layered housing (no text or symbols)Thank you for selecting our product. We hope that you will enjoy use of the appliance.
Symbols in these Instruction Manual
Important information for your safety is specially marked. It is essential to comply with these instructions in order to avoid accidents and prevent damage to the appliance:

WARNING:
This warns you of dangers to your health and indicates possible injury risks.

CAUTION:
This refers to possible hazards to the appliance or other objects.

NOTE:
This highlights tips and information.
Contents
Overview of the Components....3
General Notes......30
Special Safety Instructions for this Appliance....30
Overview of the Components / Delivery Scope ....31
Unpacking the Device 31
Start-Up 31
Telescopic suction pipe 31
Nozzle Attachments 32
Electrical Connection 32
Switching the Appliance On/Off 32
Assembly the Wall Holder....32
Using the Appliance 32
End of Operation 32
Maintenance 32
Emptying the Dust Collector 32
The Filter System....33
Cleaning 33
Troubleshooting....34
Technical Data....34
Notice of Directive Conformity....34
Disposal 34
Meaning of the "Dustbin" Symbol 34
General Notes
Read the operating instructions carefully before putting the appliance into operation and keep the instructions including the warranty, the receipt and, if possible, the box with the internal packing. If you give this appliance to other people, please also pass on the operating instructions.
- The appliance is designed exclusively for private use and for the envisaged purpose. This appliance is not fit for commercial use.
- Do not use it outdoors. Keep it away from sources of heat, direct sunlight, humidity (never dip it into any liquid) and sharp edges. Do not use the appliance with wet hands. If the appliance is humid or wet, unplug it immediately.
- When cleaning or putting it away, switch off the appliance and always pull out the plug from the socket (pull the plug itself, not the lead) if the appliance is not being used and remove the attached accessories.
- Do not operate the appliance without supervision. If you leave the room you should always turn the appliance off. Remove the plug from the socket.
- The appliance and the mains lead have to be checked regularly for signs of damage. If damage is found the appliance must not be used.
- Use only original spare parts.
- In order to ensure your children's safety, please keep all packaging (plastic bags, boxes, polystyrene etc.) out of their reach.

WARNING:
Do not allow small children to play with the foil. There is a danger of suffocation!
Special Safety Instructions for this Appliance
- Do not try to repair the appliance on your own. Always contact an authorized technician. If the supply cord is damaged, it must be replaced by the manufacturer, its service agent or similarly qualified persons in order to avoid a hazard.
- This appliance can be used by children aged from 8 years and above and persons with reduced physical, sensory or mental capabilities or lack of experience and knowledge if they have been
given supervision or instruction concerning use of the appliance in a safe way and understand the hazards involved.
• Children shall not play with the appliance.
- Cleaning and user maintenance shall not be made by children without supervision.
- Do not suck up liquids!
- Do not suck up hot ashes or pointed or sharp objects!
- Do not use the device in damp rooms!
- Never use without the filter. Check that the filter is inserted correctly!
- Hair, clothing and body parts away from the vacuum nozzle during use!
- Keep the vacuum cleaner away from sources of heat like radiators, ovens, etc.!
Overview of the Components / Delivery Scope
1 Filtering unit unlock / lock button
2 Engine unit
3 On / off switch (O/I/II)
4 Cover for exhaust filter
5 Carrying handle
6 Power cord
7 Hook for wall holder
8 Dust collector base plate
9 Dust collector with HEPA filter
10 Button to open dust container
11 Lever for extending and retracting the brushes
12 Floor nozzle
13 Slide for telescopic suction pipe
14 Telescopic suction pipe
15 Connector for suction tube or nozzle attachments
16 Dust container cover
17 Brush nozzle
18 Crevice nozzle
19 Hard floor brush
20 Wall holder
Accessories not shown
2 × Dowel
2× Screw
Unpacking the Device
- Remove the device from its packaging.
- Check the delivery scope for completeness.
- Check the device for any transport damage, in order to prevent hazards.

NOTE:
In case of any transport damage, contact your dealer immediately. Do not use a damaged device!
Start-Up
Telescopic suction pipe
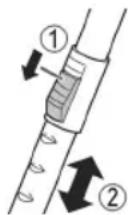
- With a light twist, place the telescopic suction tube on the appliance connector.
- Loosen the locking mechanism by sliding and holding the button (13) in the direction of the arrow marking.
- Extract one tube from the other to the desired length.
- Release the button in order to lock the connection.
- Assemble the floor nozzle and / or the accessories.
Nozzle Attachments
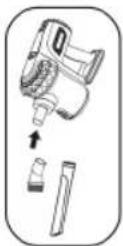
- You can attach the nozzle attachments both directly to the connector on the appliance as well as to the already mounted suction tube.
• To detach the nozzle attachments, pull them off while turning them slightly.
Floor Nozzle (12)
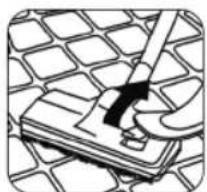
The floor nozzle is fitted with rollers for easier guiding. You can clean smooth surfaces and carpets with the floor nozzle.
- Adjust the brushes outwards or inwards using the lever (11).
Best use of the appliance depends on the texture of the floor covering. We recommend the following use:
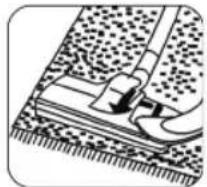
- Use without brushes:
For vacuuming floor coverings with a deep pile
natural_image
Illustration of a hand using a tool to clean or store floor tiles on a grid-patterned surface (no text or symbols)- Use with brushes:
For vacuuming smooth floors and carpets with a shallow pile
Hard Floor Brush
For gentle cleaning of hard surfaces such as parquet, laminate, tiles, etc.
Crevice Nozzle
For vacuuming dirt from corners, joints and small gaps.
Brush Nozzle
For removing dirt gently from slits in upholstery and mattresses. Also suitable for removing dust from sensitive surfaces such as furniture or curtains.
Electrical Connection
- Before connecting the plug to the wall socket, check whether the mains voltage is correct. Refer to the information on the rating plate of the device.
- Connect the device to a certified wall socket only.
Switching the Appliance On/Off
Turn the appliance on by using the on / off switch.
$$ \mathbf {O} = \text { Off } $$
I = Low suction power
II = High suction power
Assembly the Wall Holder
WARNING:
Make sure beforehand whether there are cables in the wall which could be damaged!
- Measure the height for the wall holder. Hold the vacuum cleaner against the wall when it is assembled with the telescopic suction pipe and the floor nozzle.
- Hold the wall holder against the wall with the two drill holes at the top and the bottom of the holder. Mark 2 drill holes.
- Drill the holes and insert the dowels into the wall.
- Insert the screws through the holes of the wall holder. Turn the screws with the wall holder into the dowels.
- Tighten the screws by hand.
Using the Appliance
- Unwind the power cord completely.
- Insert the mains plug into a correctly installed power socket.
- Switch on the appliance with the on / off switch. Select a desired speed setting (I or II).
- Adjust the floor nozzle with the lever depending on the floor covering.
- Vacuum at a steady speed. There is no need to exert pressure.
i NOTE:
Pay attention to the range that can be covered with the cable length!
End of Operation
- Turn the vacuum cleaner off by the on / off switch and remove the plug from the socket.
- Let the device cool down completely.
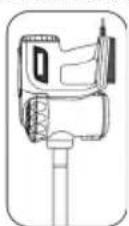
- If you have already installed the wall holder, hang up the vacuum cleaner.
- You can wind the power cord loosely around the handle and the dust collector.
Maintenance
Emptying the Dust Collector
- Disconnect the mains plug from the wall socket.
- If necessary, remove the suction tube or the nozzle attachment from the appliance.
-
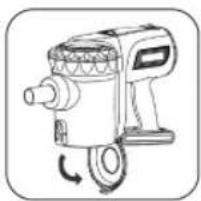
Hold the appliance with the bottom plate of the dust collector over a dustbin.
-
Empty the contents of the dust collector. Press the (10) button to open the bottom panel.
- Then close the base plate again. The lock on the dust collector must engage.
natural_image
Line drawing of a manual electric shaver with rotating arm (no text or symbols)The Filter System
Your appliance features 3 filters. The common dust bag system has been replaced by a transparent dust collector.
The higher flow speed of the collector allows for heavy dirt and smallest floating particles to be separated from the "sucked-in air".
It is thus not necessary to buy dust bags.
The filters must be cleaned periodically.

CAUTION:
- Never wash the filter in the washing machine.
- Do not use a hairdryer for drying.
- Put the appliance back into operation when all filters are completely dry and correctly assembled.
The Filter Unit

natural_image
Illustration of a hand inserting into a cylindrical device into a base (no text or symbols)The filter unit is composed of:
- HEPA filter
- Coarse filter
Proceed as follows to clean the filter unit:
- Empty the dust container as described above. (Steps 1-5)
-
Separate the filter unit from the engine unit. To do this, press the filter unit unlock button (1).
-
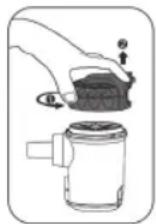
Disassembly of the filter unit
3.1 Open the dust container cover by turning it slightly counter-clockwise and remove it.
3.2 Remove the filter unit by pulling it out using the HEPA filter handle. Separate the HEPA filter from the coarse filter.
- You can brush out the HEPA filter. In case of heavy staining, clean the filters under running water.
- Let the filters air-dry completely before refitting them!
- Wipe the dust collector with a damp cloth and then wipe it dry.

NOTE:
A discoloration / matting of the dust collector through use is normal and does not constitute a defect.
7. Assembly of the filter unit
7.1 Place the coarse filter in the dust container. The symbol must be aligned in the direction of the nozzle inserts connection. Pay attention to the notches in the dust container and coarse filter.
7.2 Place the HEPA filter on the coarse filter.

CAUTION:
If the filters are not tightened, dirt will enter the engine. This can damage the motor.
7.3 The marking ▪ is situated on the dust filter cover. Position the cover so that the marking ▪ is above the symbol □ on the transparent dust container. Turn the cover in the direction □ to lock it.
- Reattach the dust container to the engine housing. Insert the dust container notch first at the bottom of the engine housing. Then snap the filter unit in audibly at the top.
Outlet Filter
The appliance is also equipped with an outlet filter. The cover of the filter is located on the back of the appliance.
- Turn the cover counter-clockwise. Lock symbols are pictured on the cover additionally.
- Remove the non-woven filter and wash it.
- Let the non-woven filter dry completely in the air, before reinserting it into the appliance.
- Close the exhaust filter with the cover. Turn it clockwise until it is attached to the appliance.
Cleaning

WARNING:
- Before cleaning remove the mains lead from the socket.
- Under no circumstances should you immerse the device in water for cleaning purposes. Otherwise this might result in an electric shock or fire.

CAUTION:
- Do not use a wire brush or any abrasive items.
-
Do not use any acidic or abrasive detergents.
-
Clean the housing with a soft, dry cloth without additives.
- For cleaning of the filters, read the chapter "Maintenance".
Troubleshooting
| Problem Possible Cause Remedy | ||
| The device does not work. | The appliance is not connected to mains power. | Check the connection to the mains. |
| Check the position of the switch. | ||
| Weak suction power. | The dust collector is full. | Empty the dust collector. |
| The filters are dirty. | Clean the filters as described under “Maintenance”. | |
| △ CAUTION: Restart operation only with dry filters. | ||
| There is a foreign body in the suction tube or the nozzle. | Check the accessories for foreign bodies. | |
Technical Data
Model: PC-BS 3038 Power supply: 220 - 240 V\~, 50 - 60 Hz Power consumption: 600 W Protection class: II Net weight: approx. 2.30 kg
The right to make technical and design modifications in the course of continuous product development remains reserved.
Notice of Directive Conformity
The device meets the European standards and directives in the current version at delivery:
• Low Voltage Directive (LVD) 2014 / 35 / EU
• Electromagnetic Compatibility (EMC) Legislation Directive 2014 / 30 / EU
• RoHS-directive 2011 / 65 / EU
• Ecodesign-directive (ErP) 2009 / 125 / EC
- Ecodesign requirements for vacuum cleaners COMMISSION REGULATION (EU) No 666 / 2013
Disposal
Meaning of the "Dustbin" Symbol
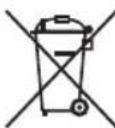
Protect our environment: do not dispose of electrical equipment in the domestic waste. Please return any electrical equipment that you will no longer use to the collection points provided for their disposal.
This helps avoid the potential effects of incorrect disposal on the environment and human health.
This will contribute to the recycling and other forms of re-utilisation of electrical and electronic equipment.
Information concerning where the equipment can be disposed of can be obtained from your local authority.
Instrukcje obsługi
natural_image
Diagram of a mechanical or electrical component with no visible text or symbolsnatural_image
Illustration of a hand using a tool to clean or store floor tiles on a grid-patterned surface (no text or symbols)natural_image
Line drawing of a manual electric drill press with rotating arm (no text or symbols)System filtrów
natural_image
Illustration of a hand inserting into a cylindrical device into a multi-layered container (no text or symbols)CTC Clatronic Sp. z o.o
Ul. Brzeska 1
45-960 Opole
Usuwanie
natural_image
Illustration of a cleaning or repair procedure with a tool and mesh material (no text or symbols)natural_image
Illustration of a hand using a tool to clean or store floor tiles on a grid-patterned surface (no text or symbols)natural_image
Illustration of a hand inserting into a cylindrical device into a multi-tiered housing (no text or symbols)natural_image
Illustration of a hand inserting into a cylindrical device into a base (no text or symbols)natural_image
Line drawing of a manual electric shaver with a rotating button (no text or symbols)نظام الفلتر
natural_image
Illustration of a hand inserting into a cylindrical device into a base (no text or symbols)natural_image
Illustration of a hand using a tool to clean or repair a grid-patterned surface (no text or symbols)فرشاة للأسطح الخشنة
- Bedienungsanleitung
- Das Filtersystem
- Het filtersysteem
- Sistema de filtro
- Symbols in these Instruction Manual
- WARNING:
- CAUTION:
- NOTE:
- Contents
- General Notes
- Special Safety Instructions for this Appliance
- Overview of the Components / Delivery Scope
- Accessories not shown
- Unpacking the Device
- Start-Up
- Telescopic suction pipe
- Nozzle Attachments
- Floor Nozzle (12)
- Hard Floor Brush
- Crevice Nozzle
- Brush Nozzle
- Electrical Connection
- Switching the Appliance On/Off
- Assembly the Wall Holder
- Using the Appliance
- i NOTE:
- End of Operation
- Maintenance
- Emptying the Dust Collector
- The Filter System
- Assembly of the filter unit
- Outlet Filter
- Cleaning
- Technical Data
- Notice of Directive Conformity
- Disposal
- Meaning of the "Dustbin" Symbol
- Instrukcje obsługi
- System filtrów
- Usuwanie
- نظام الفلتر
Brand : ProfiCare
Model : PC-BS 3038
Category : Vacuum Cleaner