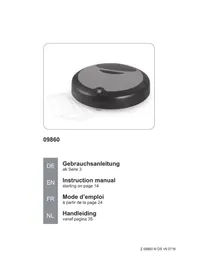
09860 - Robot vacuum Cleanmaxx - Free user manual and instructions
Find the device manual for free 09860 Cleanmaxx in PDF.


| Product type | Robot vacuum cleaner |
| Brand | Cleanmaxx |
| Model | 09860 (ref. Z 09860) |
| Dimensions | Diameter 33 cm, height 10 cm |
| Weight | Not specified (estimated ~2 kg) |
| Power supply | AC adapter 100-240 V~, 50/60 Hz, output 9 V DC, 500 mA |
| Battery | Li-Ion 7.4 V, 1800 mAh |
| Charging time | 4 to 9 hours (first charge ~8-9 h) |
| Runtime | Up to 60 minutes |
| Sensors | Obstacle sensors and drop detection (stairs) |
| Dustbin | With removable and washable filter |
| Included accessories | 3 dust cloths, AC adapter, rechargeable batteries |
| Cleaning functions | Vacuuming + dust cloth for hard floors |
| Floor types | Hard floors and carpets (avoid long fibers) |
| Cleaning and maintenance | Dustbin washable with water, filter to clean, cloth hand washable (30°C max) |
| Safety | Automatic shut-off if blocked, anti-drop sensors, protection class II |
| Protection ratings | IP20 (indoor dry use) |
| After-sales service | DS Produkte GmbH, Germany, phone +49 38851 314650 |
| Warranty | Legal warranty (excluding normal wear, improper use) |
Frequently Asked Questions - 09860 Cleanmaxx
User questions about 09860 Cleanmaxx
0 question about this device. Answer the ones you know or ask your own.
Ask a new question about this device
Download the instructions for your Robot vacuum in PDF format for free! Find your manual 09860 - Cleanmaxx and take your electronic device back in hand. On this page are published all the documents necessary for the use of your device. 09860 by Cleanmaxx.
USER MANUAL 09860 Cleanmaxx
natural_image
Black circular robotic vacuum cleaner with a lid and ventilation slots, next to three white square cards (no text or symbols visible)09860
| DE | Gebrauchsanleitungab Seite 3 |
| EN | Instruction manualstarting on page 14 |
| FR | Mode d’emploià partir de la page 24 |
| NL | Handleidingvanaf pagina 35 |
Inhalt
www.service-shopping.de
natural_image
Close-up of a mechanical component with two arrows pointing to features (no text or symbols visible)natural_image
Simple diagram showing a downward arrow pointing to a battery icon (no text or symbols)Safety Instructions 15
Items Supplied 17
Device Overview 18
Basic Functions 19
Before Initial Use 19
Use 21
Cleaning, Maintenance Work and Storage ____ 21
Care 22
Troubleshooting 22
Technical Data 23
Disposal 23
Explanation of Symbols

Safety instructions:
Please read these carefully and comply with them in order to prevent personal injury and damage to property.
Supplementary information



Read the instruction before use!
Protection class II

May only be used indoors!

Energy efficiency class V
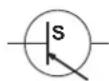
Switching power supply

Safe electrical isolation (transformer)
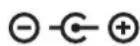
Polarity of the barrel plug (mains adapter)
Dear Customer,
We are delighted that you have chosen this robot vacuum cleaner.
Before using the device for the first time, please read the instructions through carefully and keep them for future reference. If the device is given to someone else, these instructions should also be handed over with it.
The manufacturer and importer do not accept any liability if the information in these instructions is not complied with.
If you have any questions about the device and about spare parts/accessories, contact the customer service department via our website:
www.service-shopping.de
Intended Use
- This device is designed for vacuum cleaning normal household dust on carpets and hard floors. It is intended only for private indoor use and is not suitable for commercial applications.
- The device is not suitable for plush or shag carpeting.
- On no account should the device be used to suck up the following:
–Liquids or wet substances
-Glowing ash, cigarette ends, matches, etc.
- Chemical substances (e.g. acids, cleaning products)
– Inflammable or explosive substances
- Very fine dust (e.g. concrete dust) or toner
-Pointed, hard objects such as large pieces of broken glass
- Use the device only as described in the instructions. Any other use is deemed to be improper.
- The following are excluded from the warranty: all defects caused by improper handling, damage or unauthorised attempts at repair. This also applies to normal wear and tear.
Safety Instructions
This device may be used by children aged 8 and over and by people with reduced physical, sensory or mental abilities or a lack of experience and/or knowledge if they are supervised or have received instruction on how to use the device safely and have understood the dangers resulting from failure to comply with the relevant safety precautions. Cleaning and user maintenance may not be carried out by children.
■ Children younger than 8 years of age and animals must be kept away from the device and the connecting cable.
Children must be supervised to guarantee that they do not play with and/or injure themselves on the device. Children must not sit or ride on the device.
- The device must always be disconnected from the mains power when it is left unattended and before assembling, disassembling or cleaning the device.
- Never immerse the device, mains cable or plug in water or other liquids and ensure that they cannot fall into water or become wet.
If the device, the connecting cable or the plug of the device is damaged, it must be replaced by the manufacturer or customer
service department or a similarly qualified person (e.g. specialist workshop) in order to avoid any hazards.

Dangers of Injury
- Keep the device and packaging material away from children and animals. There is a risk of injury and suffocation!

Danger of Electric Shock and Fire
- Do not use the device if highly flammable gases are present in the air.
- Do not touch the device with wet hands. Do not operate it outdoors or in rooms with high humidity.
- Never pick up liquids with the device. Do not pour liquids into the dust container.
■ Store the device only in dry indoor rooms.
In the event of damage/faults (e.g. unusual noises, odour or smoke development), switch the device off immediately.
- Never carry or pull the mains adapter by the cable; always treat the cable with care. Avoid pinching the cable in doors or pulling it over sharp edges or corners. Keep the cable away from hot surfaces.
- Connect the mains adapter only to a plug socket whose mains voltage corresponds to the data on the rating plate. The plug socket must still be accessible after the connection has been made.
In the interest of your own safety, you should check the device for damage each time before you use it. Only use it if it is not damaged in any way!
■ Switch the device off and pull the mains plug out of the plug socket
-in the event of a thunderstorm,
-if there are faults with the mains adapter / charging station,
-if liquids or foreign bodies have found their way into the device.
■ Always pull the plug, never the cable, to remove the mains plug from the plug socket. Touch the mains plug only with dry hands.

Danger from Rechargeable Batteries
- Rechargeable batteries can be deadly if swallowed. Seek medical attention immediately if a battery has been swallowed.
Before inserting the battery pack, check whether the contacts are clean and clean them if necessary.
■ Use only the battery type specified in the technical data.
If the battery has leaked, do not allow your skin, eyes and mucous membranes to come into contact with the battery acid. If you touch battery acid, rinse the affected sites with abundant fresh water immediately and contact a doctor as soon as possible. - Remove a leaking battery from the device immediately. Clean the contacts before inserting a new battery.
- The battery must not be taken apart, thrown into a fire, immersed in liquids or short-circuited.
Avoiding Damage to Material, Property and the Device
- The dust container must be completely dried after washing before it may be reinserted.
- The device should be used only when it is fully assembled. The dust container and filters must be inserted.
■ Connected cables must not present a trip hazard. - Do not insert anything into the openings / nozzle of the device and make sure that they do not become clogged.
■ Use only original manufacturer's accessories.
Before starting up the device, you must make sure that the floor is free of any objects that could get caught in the nozzle or prevent the device from cleaning. Ensure that the device cannot get caught in cables or curtains. It could, for example, get caught in the cable of a table lamp and pull it off the table. - Keep the device in a dry place at temperatures of between 0 and 40°C.
■ Never place objects on the device.
■ Never cover the ventilation openings. - Protect the device from heat, naked flames, direct sunlight, moisture, and collisions. Do not drop the device.
- Do not try to lubricate the rollers with lubricant or oil. This would cause dust and dirt to increasingly adhere to the rollers.
Items Supplied
- Robot vacuum cleaner
- Mains plug
- Rechargeable battery
- 3 x dust cloths
Device Overview
Top
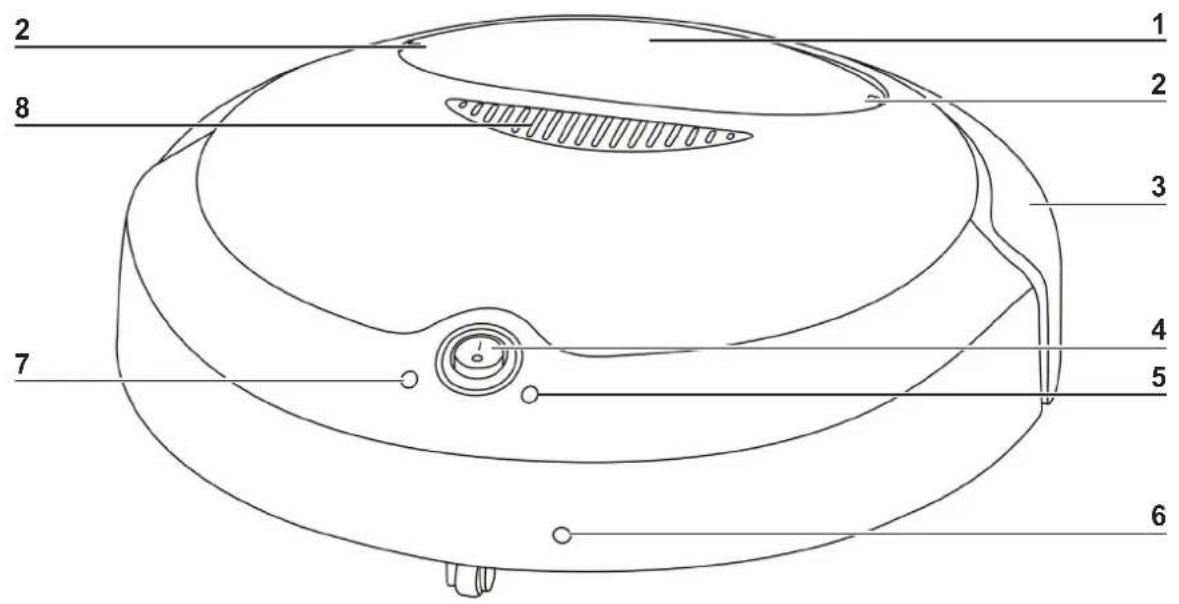
1 Dust container with filters (under the cover inside the device)
2 Release button of the dust container
3 Bumper
4 On/Off switch
5 Operation control lamp
6 Mains plug connector
7 Charging control lamp
8 Ventilation
Not shown: stopper
Bottom
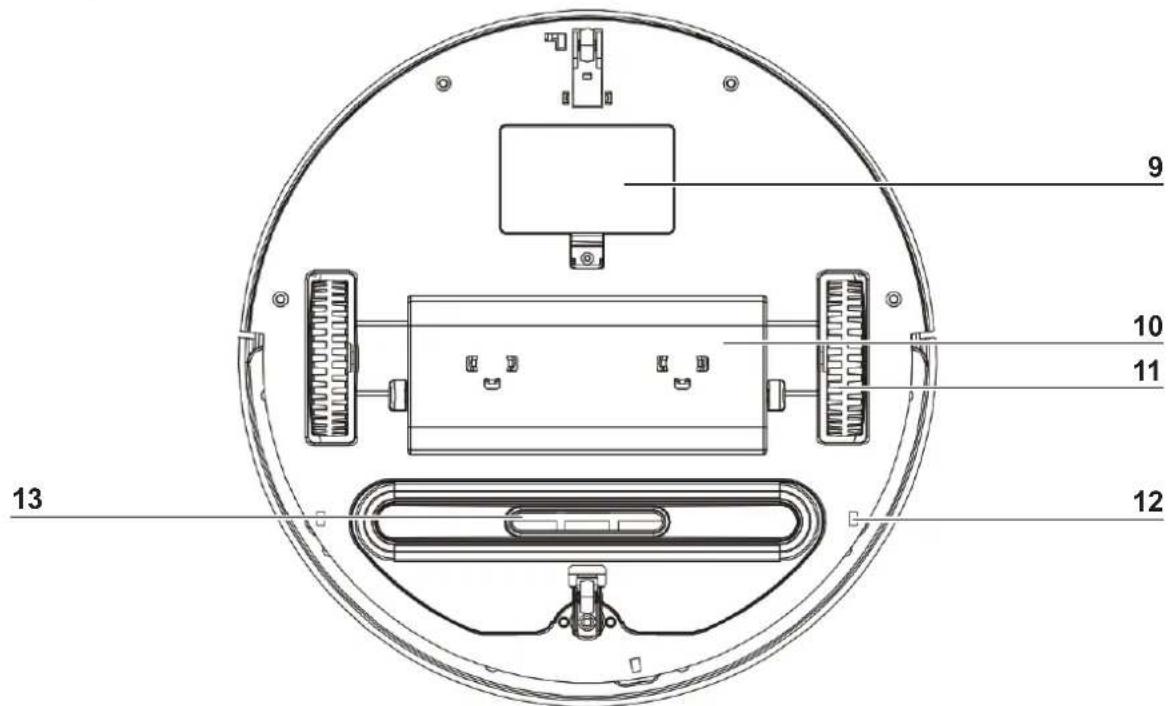
9 Rechargeable battery compartment
10 Attachment for the dust cloth
11 Driving wheels
12 Sensors
13 Nozzle
Basic Functions
- This robot vacuum cleaner sucks up loose dirt through the nozzle. To clean more efficiently, it has a floor cloth.
- Thanks to its sensors, the device can recognise a wall or other obstacles and change its direction of travel.
- The sensors on the bottom of the device recognise steps or other depressions so that the device cannot fall down.
natural_image
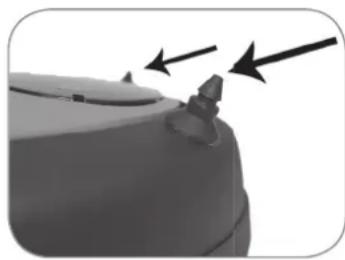
Close-up of a mechanical component with two arrows pointing to features (no text or symbols visible)- This robot vacuum cleaner has two stopper on the front of the bumpers. These prevent that the robot vacuum cleaner can get under cabinets or shelves, under which he could get stuck.
Before Initial Use
Before you can use the device, you must:
- unpack the items supplied and remove all transport and packaging elements,
- insert and charge up the rechargeable battery of the device.
Unpacking the Items Supplied

CAUTION!
- Do not leave the mains adapter connected for a prolonged period of time. Disconnect it from the mains once charging is complete.
- Keep the mains adapter, the cable and the device away from radiators or other heat sources as well as from direct sunlight.
- Keep children and animals away from the packaging material. There is a danger of suffocation!
- Unpack all parts and check the items supplied to make sure they are complete (see the "Items Supplied" chapter); also check for transport damage. If you find any damage to the components, do not use them (!), but contact the customer service department.
- Remove all possible transport restraints and protective fi lms.
Removing / Inserting Battery

CAUTION!
- The device must not be connected to the mains power while the battery is being removed / inserted.
- You should never open the battery pack!
To insert or remove the rechargeable battery, please proceed as follows:
natural_image
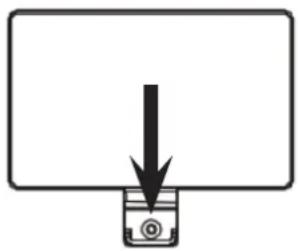
Simple diagram showing a downward arrow pointing to a container with an @ symbol, no text or labels present.- Undo the screw, reach into the indentation and flip up the battery compartment cover.
- Inserting: Attach the connectors and insert the battery pack into the battery compartment. Close the battery compartment cover and tighten the two screws.
- Removing: Pull up the battery pack and release the plug connection by pressing on the locking lug.
Charging Up the Battery

- Do not charge up the rechargeable battery (9) of the device in damp locations and make sure that the room temperature is between 15^ and 35^ .
- Completely discharge the rechargeable battery every few months and then charge it up again. To discharge the battery, use the device with the charging station disconnected from the mains without any cables until it comes to a standstill. Then charge up the battery.
- Before you first use the device, or if it has not been used for a long time, it takes approx. 8 to 9 hours, later approx. 4 to 6 hours, for an empty battery to be fully charged up. The battery only reaches its full performance capacity after it has been fully discharged and recharged two to three times..
-
The device cannot be switched on while it is still connected to the mains power.
-
Connect the mains adapter cable directly to the device.
- Insert the mains plug of the mains adapter into an easily accessible socket.
-
Disconnect the device from the mains after around 4-6 hours.
-
The charging process then begins. The charging control lamp (7) lights up in red. When the charging control lamp lights up in green, the battery is fully charged and the device is ready for use.
Using the Dust Cloth

-
To clean hard floors, use the dust cloth to remove both crumbs and dust from the floor at the same time.
-To clean carpets, remove the attachment for the dust cloth. -
The attachment for the dust cloth is already prefitted when the device is supplied. All you need to do is attach the dust cloth using the Velcro fastener.
- If you do not want to use the dust cloth, remove it from the attachment.
- Also remove the attachment for the dust cloth (10) by simply pulling it off.
- If you then want to secure the attachment on again, first place a locking lug into the notch which is provided and then slide the second locking lug into the other notch with a little pressure.
Use
Preparing the Room

CAUTION!
If you are using the device in a room for the first time, keep an eye on it in case you need to remove any obstacles so that the device can effectively clean the entire room.
- Remove any objects from the floor that may get caught in the nozzle (13) or prevent the device from cleaning. In particular, do not leave plastic bags on the floor.
- Make sure that no cables, cords, or fringes, for example from curtains or tablecloths, are in the path of the device.
- Remove all objects that could be tipped over (e.g. vases, small lamps, decorations).
- The distance between two objects (e.g. wall and shelf) must be at least 40 cm so that the device can get through.
- The device can get stuck under furniture which it can just about get under. Block its path, for example, with flower pots that are heavy enough not to get knocked over.
Starting the Device
- Make sure that the dust container (1) is empty, the device is free of any contamination (see the "Cleaning, Maintenance Work and Storage" chapter) and the battery is charged up.
- If necessary, fix a dust cloth to the attachment for the dust cloth (10) if you want to use the device on hard floors, or remove the attachment for the dust cloth (see the "Using the Dust Cloth" section) if you want to use the device on a carpet.
- Place the robot vacuum cleaner on the floor.
- To switch on the robot vacuum cleaner, move the On/Off switch (4) to position I.
- To switch off the robot vacuum cleaner, move the On/Off switch to position 0.
- After each use, empty the dust container and remove any contamination (see the "Cleaning, Maintenance Work and Storage" chapter).
Cleaning, Maintenance Work and Storage

CAUTION!
During cleaning and maintenance work, the device must not be connected to the mains power and must be switched off!
- Only the dust container may be rinsed out. The device must not be immersed in water or any other liquids. Make sure that all parts are completely dry before you insert the dust container back into the device!
- Do not use any caustic or abrasive cleaning agents for cleaning. These can damage the surface.
- Before and after every use, make sure that
-the nozzle and ventilation openings are clear,
–the sensors on the bottom of the device are clear of dust etc.,
—the dust cloth has been cleaned or replaced,
-no hairs, threads, or similar things are wrapped around the wheels.
- If necessary, just wipe down the housing with a damp cloth.
- Pull the dust cloth off the dust cloth holder and wash it using warm water and mild soap.
- Remove the dust container:
- press the release buttons (2) on the device at the same time,
-pull out the dust container.
- Open the dust container by flipping the locking lug forwards and pushing it up.
- Empty the dust container over a rubbish bin.
- Also clean the dust filter over a rubbish bin after each use. This is located inside the dust container.
-
Clean the dust container if necessary with clear, warm water. Then allow it to dry completely before you insert it back into the device. When you insert the dust container, make sure that it fits correctly in the dust container compartment.
-
Reinsert the dust filter. When you insert the filter, make sure that it fits correctly!
-
Attach a clean and dry dust cloth to the dust cloth holder.
- You should store the device and accessories in a dry, cool place which is protected from sunlight and is out of the reach of children and animals.
Care
Material dust cloth: 100 % polyester

hand wash up to max. 30 °C

do not dry in the dryer

do not bleach

do not iron

do not dry clean
- Only wash with a mild detergent.
- Do not use any softener.
Troubleshooting
If the device stops working properly, first check whether you are able to correct the problem yourself.

Do not attempt to repair a defective electrical device yourself!
| Problem Possible cause / solution | |
| The device does not work. | • Is the battery charged up?• Is the On/Off switch in position I? |
| The battery of the device is not charging. | • Check whether the mains adapter is correctly connected to the plug socket.• Is the mains adapter defective?• Is the socket defective? Try another socket.• Check the fuse of your mains connection. |
| Low suction force. | • Is the nozzle blocked, the dust container full, or the fi lter dirty? |
| The device stops, but remains switched on. | • Check whether the wheels are blocked.• Is the nozzle blocked, the dust container full, or the fi lter dirty? |
| The device rotates around its own axis. | • Is a wheel blocked? |
Technical Data
Device
Model number: HZ-01
Article number: Z 09860
Diameter: 33 cm
Height: 10 cm
Battery: 7.4 V; Li ion
Battery capacity: 1800 mAH
Battery charge duration: 4 – 9 hours
Operating duration: max. 60 minutes
Mains adapter
Model number: DZ006HL090050V
Voltage supply
(Calls to German landlines are subject to charges. The cost varies depending on the service provider.)

Disposal
The packaging material is recyclable. Please dispose of it in an environmentally friendly manner and take it to a recycling centre.
Dispose of the device in an environmentally friendly manner. It should not be disposed of in the normal domestic waste. Dispose of it at a recycling centre for used electrical and electronic devices.
You can obtain more information from your local authorities.
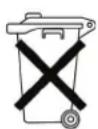
Non-rechargeable and rechargeable batteries should be removed prior to disposal of the device and disposed of separately from the device. To protect the environment, non-rechargeable and rechargeable batteries may not be disposed of with normal household waste, but must be taken to suitable collection points. Also note the relevant statutory regulations governing the disposal of batteries.
Contenu
natural_image
Close-up of a mechanical component with two arrows pointing to a detail (no text or symbols visible)natural_image
Simple diagram showing a downward arrow pointing to a container with an @ symbol, no text or labels present.www.service-shopping.de
Doelmatig gebruik
natural_image
Close-up of a mechanical component with two arrows pointing to features (no text or symbols visible)natural_image
Simple diagram showing a downward arrow pointing to a battery icon (no text or symbols)


- Inhalt
- Explanation of Symbols
- Intended Use
- Safety Instructions
- Dangers of Injury
- Danger of Electric Shock and Fire
- Danger from Rechargeable Batteries
- Avoiding Damage to Material, Property and the Device
- Items Supplied
- Device Overview
- Basic Functions
- Before Initial Use
- Unpacking the Items Supplied
- CAUTION!
- Removing / Inserting Battery
- Charging Up the Battery
- Using the Dust Cloth
- Use
- Preparing the Room
- Starting the Device
- Cleaning, Maintenance Work and Storage
- Care
- Troubleshooting
- Technical Data
- Device
- Mains adapter
- Disposal
- Contenu
- Doelmatig gebruik
Brand : Cleanmaxx
Model : 09860
Category : Robot vacuum