
PIXMA GM4040 - Printer CANON - Free user manual and instructions
Find the device manual for free PIXMA GM4040 CANON in PDF.

| Product type | Monochrome inkjet multi-function printer (print, copy, scan) |
| Dimensions (W x D x H) | 403 x 367 x 177 mm |
| Weight | 6.5 kg |
| Power supply | AC 100-240 V, 50/60 Hz |
| Power consumption (printing) | Approximately 14 W |
| Main tray capacity | 250 sheets (cassette) |
| Rear tray capacity | 100 sheets |
| Supported paper types | Plain paper, envelopes, photo paper (A4, Letter size) |
| Printing technology | Thermal inkjet |
| Print resolution | Up to 4800 x 1200 dpi |
| Connectivity | Wi-Fi, USB 2.0, Canon PRINT app |
| Ink type | Black pigment ink bottles (monochrome) |
| Maintenance and cleaning | Automatic print head cleaning, manual alignment via control panel |
| Safety | Do not tilt the printer during transport; handle ink with care |
| Spare parts and repairability | Replaceable print head, refillable ink bottles |
| General information | Brand: Canon, Model: PIXMA GM4040, Year: 2019 (estimated) |
Frequently Asked Questions - PIXMA GM4040 CANON
User questions about PIXMA GM4040 CANON
0 question about this device. Answer the ones you know or ask your own.
Ask a new question about this device
Download the instructions for your Printer in PDF format for free! Find your manual PIXMA GM4040 - CANON and take your electronic device back in hand. On this page are published all the documents necessary for the use of your device. PIXMA GM4040 by CANON.
USER MANUAL PIXMA GM4040 CANON
Read Safety and Important Information (addendum) first.
natural_image
Icon showing a printer with a paper airplane and a document, symbolizing file transfer or sync (no text present)Installing the Printer......page 1
natural_image
Two white icons: a laptop and a smartphone, on a solid red background (no text or symbols)Connecting to a Computer, Smartphone or Tablet......page 4

Instructional Videos
Vídeos instructivos
Setting Up the Printer
Online Setup
https://ij.start.canon

1. Box Contents
- Print head
Ink bottle
Power cord
- Setup CD-ROM for Windows
● Safety and Important Information
● Getting Started (this manual)
2. Removing Packing Materials

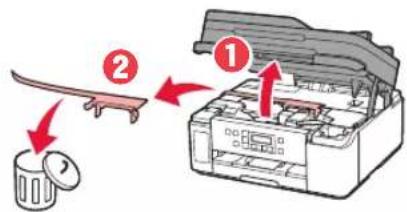
1 Remove and dispose of any packing materials and orange tape.
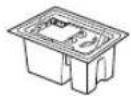
2 Open the scanning unit / cover, remove and dispose of the orange tape and protective material inside.
3. Installing the Print Head

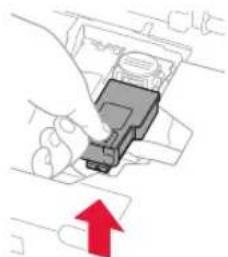
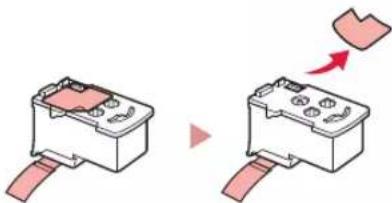
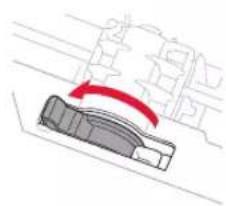
1 Open the print head locking cover on the right.
natural_image
Hand holding a connector with a red upward arrow indicating action (no text or symbols present)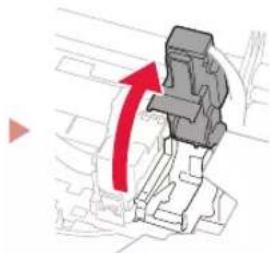
natural_image
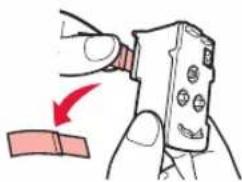
Mechanical component diagram showing a red arrow indicating rotational motion (no text or symbols)2 Take out the print head from the package and remove the label.
natural_image
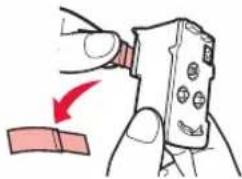
Two diagrams showing a battery box being inserted into a socket, with one arrow indicating the insertion direction (no text or symbols present)3 Remove the protective tape.
natural_image
Illustration of a hand holding a handheld device with a red arrow indicating motion (no text or symbols)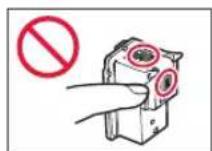

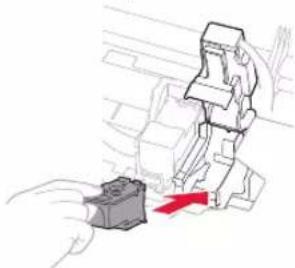
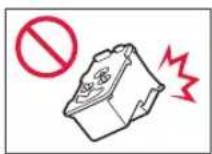
4 Insert the print head into the print head holder.
natural_image
Illustration of a robotic arm interacting with a mechanical component, showing motion and force direction (no text or symbols)5 Close the print head locking cover and press down until it clicks.
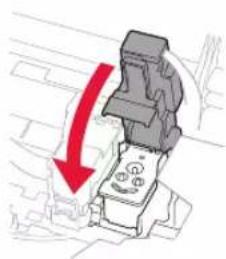
natural_image
Illustration of a mechanical component with a red downward arrow indicating compression or disassembly (no text or symbols)
natural_image
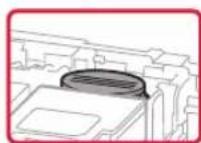
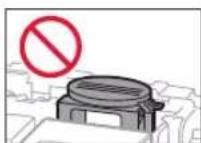
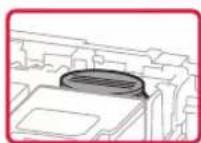
Diagram of a mechanical component with red arrows indicating motion or force direction (no text or symbols)6 Press down the joint button completely until it clicks.

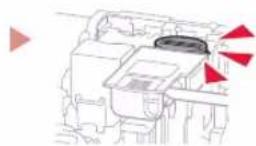
Check!
Setting Up the Printer
4. Pouring Ink


Important
This product requires careful handling of ink. Ink may splatter when the ink tanks are filled with ink. If ink gets on your clothes or belongings, it may not come off.
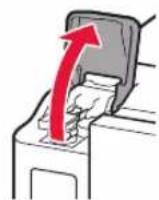
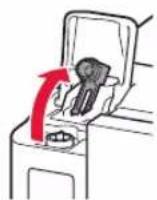
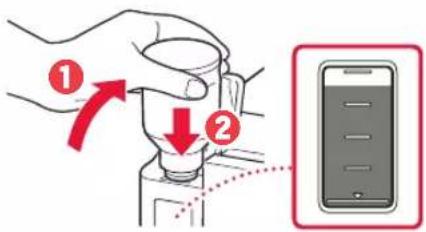
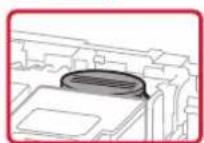
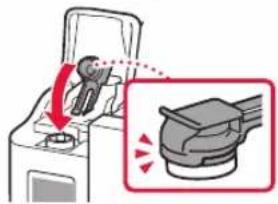
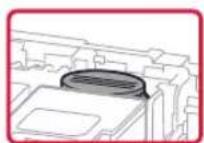
1 Open the ink tank cover and the tank cap.

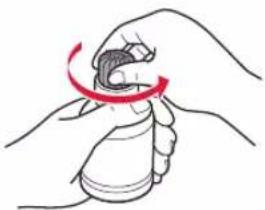
2 Hold the ink bottle upright and gently twist the bottle cap to remove.
natural_image
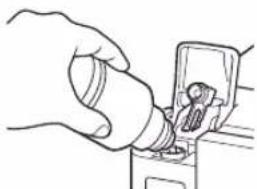
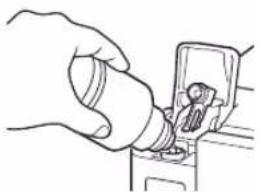
Illustration of a hand holding a bottle with a red curved arrow indicating rotation (no text or symbols)3 Align the nozzle of the ink bottle with the inlet.
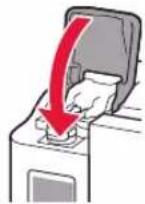
natural_image
Line drawing of a hand inserting a small component into a device (no text or symbols)4 Slowly stand the ink bottle upside down and push down to pour the ink.
- If the ink does not pour, gently remove the ink bottle and try again.
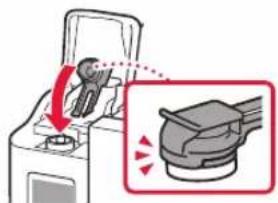
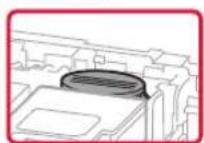
5 Gently remove the ink bottle from the inlet.
- Be careful not to spill the ink.

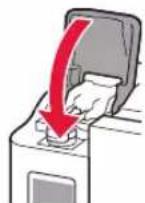
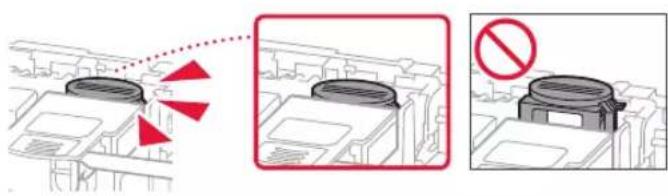
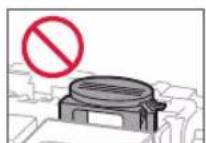
6 Replace the tank cap securely, and then close the ink tank cover.
natural_image
Illustration of a person using a device to interact with a device, showing motion arrows (no text or symbols)
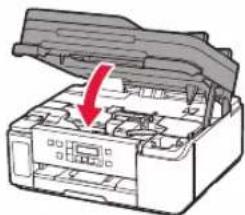
7 Close the scanning unit / cover.
natural_image
Diagram of an open electronic device with a red arrow indicating a component (no text or symbols present)
Caution
Watch your fingers.
5. Turning on the Printer

1 Connect the power cord.
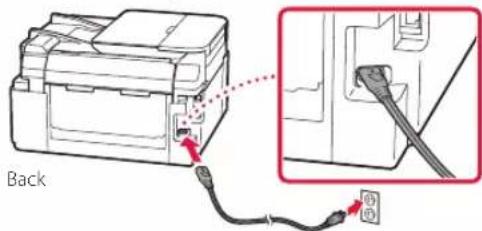

Important
At this time, do not connect any other cables.
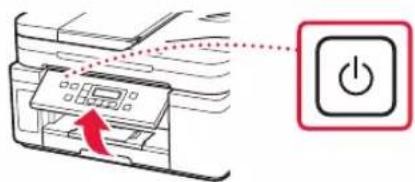
2 Open the operation panel and press the ON button.
3 When the following screen appears, use the ◀ and ▶ buttons to select a language, and then press the OK button.

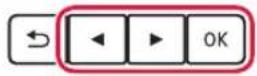
Important
If an error appears on the screen, see "If an error message (support code) appears on the screen" on page 3 and follow the instructions.
6. Loading Paper

1 When the following screen appears, use the ◀ and ▶ buttons to select Yes, and then press the OK button.


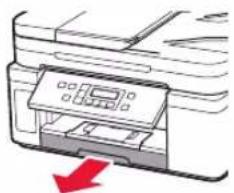
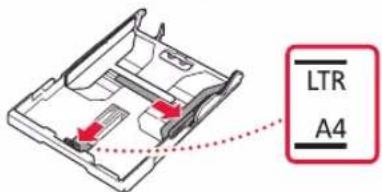
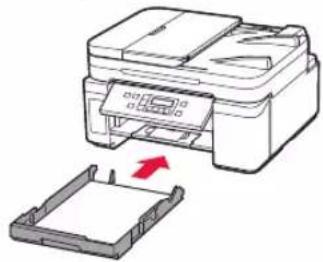
2 Remove the cassette from the printer.
natural_image
Diagram of a printer with a red arrow indicating compression or disassembly (no text or symbols present)3 Slide apart the paper guides.
- Slide the right paper guide to the right edge. Align the front paper guide with the Letter or A4 mark.
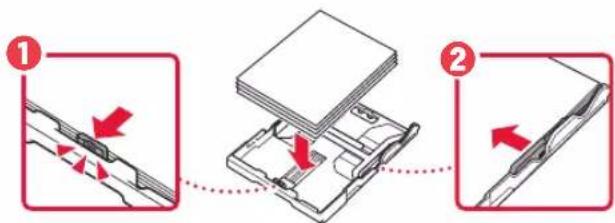
4 Load paper.
- Load 2 or more sheets of Letter or A4 sized plain paper with the print side facing down.
- Place the paper against the front paper guide, and align the right paper guide to the width of the paper.
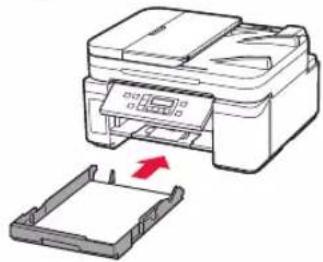
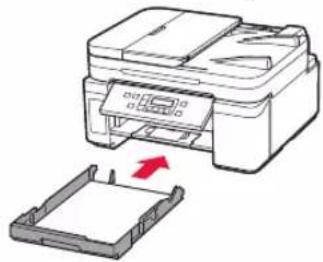
5 Replace the cassette.
natural_image
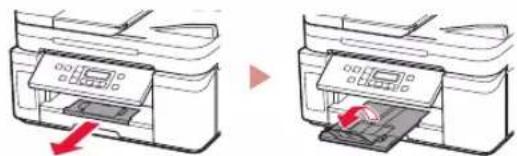
Diagram of a printer printing into a plastic tray (no text or symbols present)6 Pull out the paper output tray.
natural_image
Two line drawings of a printer with a paper feed, showing the left and right views (no text or symbols)7 Follow the on-screen instructions, and then press the OK button.
- Check that Ready to connect appears on the printer's screen.
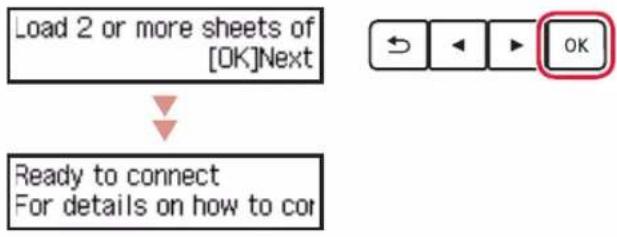
flowchart
graph TD
    A["Load 2 or more sheets of [OK"]Next] --> B["Ready to connect For details on how to cor"]
    C["OK"] --> A

If an error message (support code) appears on the screen

Check the support code, and then follow the instructions if the displayed code is written below.
1890
The protective materials are not removed.
→ "2. Removing Packing Materials" on page 1
1470
The print heads are not installed correctly.
→"3. Installing the Print Head" on page 1
1471
No print heads are installed.
→"3. Installing the Print Head" on page 1
1642
There may be insufficient ink.
→ "4. Pouring Ink" on page 2
For all other cases, refer to the Online Manual.
What device are you connecting?

Computer Smartphone

Computer and smartphone

To use your printer without connecting to any other devices. 7-c
7-a
Connecting to a Computer
If you are using multiple computers, perform these steps on each computer.

1 Access the Canon website from a computer.
https://ij.start.canon

2 Select Set Up.
3 Enter your printer's model name and click Go.
4 Click Start.
5 Click If you have already prepared your printer, go to Connect.
Note
The following steps are for Windows (except Windows 10 in S mode).
6 Click Download.
7 Run the downloaded file.
8 Click Start Setup.
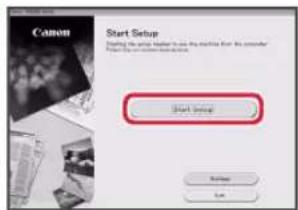
9 Follow the on-screen instructions.
• These operations may take some time.
- To connect to a smartphone as well, see "7-b. Connecting to a Smartphone" on page 5.
Using the Setup CD-ROM for Windows
Double click EasySetup.exe in the CD-ROM, and then continue from step 3. If you do not have an internet connection, open the win folder in the CD-ROM and double click SETUP.exe. This will install the printer driver.
7-b
Connecting to a Smartphone
If you are using multiple smartphones, perform these steps on each smartphone.

Prepare the following before starting.
① Enable the Wi-Fi setting on your smartphone.
② Connect your smartphone to the wireless router (if you have a wireless router).
Refer to your smartphone and wireless router manuals for more details.
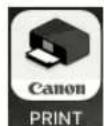
1 Install the "Canon PRINT Inkjet/SELPHY" app on your smartphone.
- Scan the QR code shown on the right to access the Canon website, and then download the app.

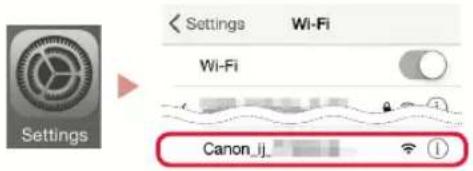
2 Open your smartphone's Wi-Fi settings. Tap the network name (SSID) that starts with "Canon_ij_".
If "Canon_ij_" does not appear, proceed to step 3.
(Example of iOS screen)
3 Open the installed app.
4 Follow the on-screen instructions in the app to add your printer.
Once you have added your printer, you can print from your smartphone.
7-c
Do Not Connect To A Device
1 Press the Stop button.
2 Select Do not connect, and then press the OK button.
3 Select Yes, and then press the OK button.
Loading Paper into the Rear Tray
1 Open the rear tray cover and extend the paper support.
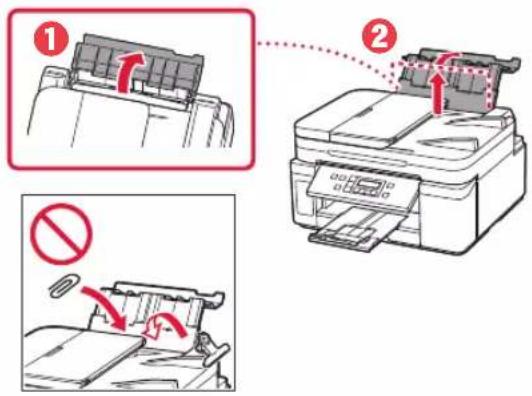
2 Open the feed slot cover and slide the right-hand side paper guide to the far right.
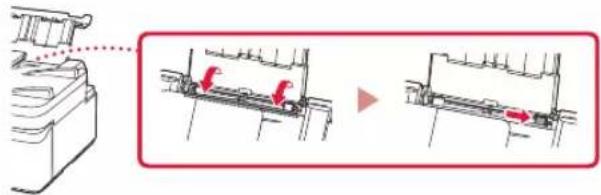
3 Load several sheets of paper with the print side facing up.

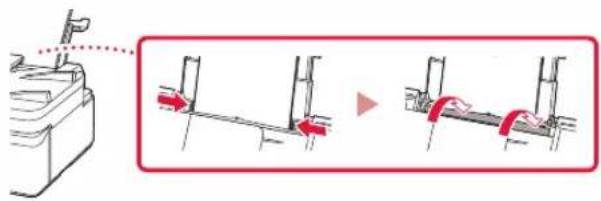
4 Align the paper guide to the paper, and then close the feed slot cover.
- Follow the on-screen instructions to set information for the loaded paper.
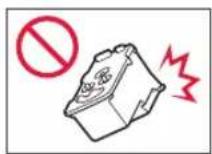
Transporting Your Printer
When relocating the printer, make sure of the following. Refer to the Online Manual for details.
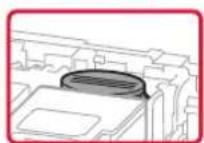
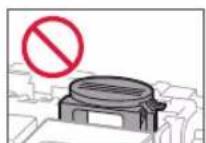
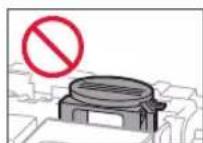
Check that the joint button is pressed down completely to avoid ink leaks.
Check that the position of the ink valve lever is closed.
natural_image
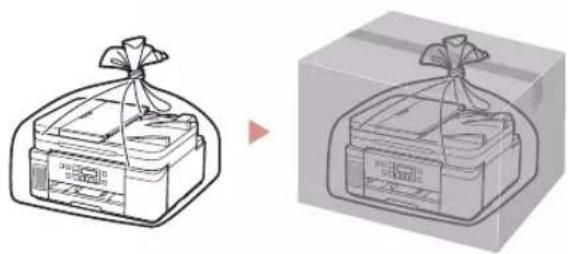
Diagram of a mechanical component with a red curved arrow indicating motion (no text or symbols)Pack the printer in a plastic bag in case ink leaks.
- Pack the printer in a sturdy box so that it is placed with its bottom facing down, using sufficient protective material to ensure safe transport.
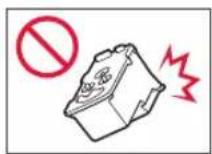
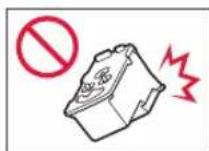
• Do not tilt the printer. Ink may leak. - Please handle with care and ensure the box remains flat and NOT turned upside down or on its side, as the printer may be damaged and ink in the printer may leak.
- When a shipping agent is handling transport of the printer, have its box marked "THIS SIDE UP" to keep the printer with its bottom facing down. Mark also with "FRAGILE" or "HANDLE WITH CARE".
natural_image
Illustration of two gift boxes with wrapped items, one open and one closed, both without any text or symbols.natural_image
Diagram showing two mechanical assembly states with red arrows indicating direction of movement (no text or symbols present)natural_image
Two-step diagram showing a device with ports and a red arrow indicating direction (no text or symbols)3 Retire la cinta protectora.
natural_image
Illustration of a hand holding a device with a red arrow pointing to it, no text or symbols present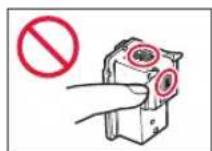
natural_image
Illustration of a robotic arm interacting with a small mechanical component, no text or symbols presentnatural_image
Mechanical assembly diagram showing a component being lowered into a housing (no text or symbols present)¡Comprobar!
natural_image
Illustration of a hand holding a small object with a red curved arrow indicating motion (no text or symbols)natural_image
Line drawing of a hand inserting a small component into a device (no text or symbols)natural_image
Diagram of an open industrial machine with a red arrow indicating a component (no text or symbols present)Precaución
natural_image
Diagram of a printer with a red arrow indicating compression or disassembly (no text or symbols present)5 Reemplace el cassette.
natural_image
Diagram of a printer with a paper tray and a red arrow indicating compression or disassembly (no text or symbols present)natural_image
Two line drawings of a printer with a paper feed, showing the process from left to right (no text or symbols present)flowchart
graph TD
    A["Load 2 or more sheets of [OK"]Next] --> B["Ready to connect For details on how to cor"]
    C["OK"] --> A
natural_image
Diagram of a vehicle's wheel rim with red motion arrow indicating clockwise motion (no text or symbols)natural_image
Illustration of two gift boxes with wrapped bags, one showing a ribbon and the other a tray (no text or symbols)Configurando a impressora
natural_image
Mechanical assembly diagram showing a hand holding a component and a right-hand view of a mechanical component with red arrows indicating motion (no text or symbols)natural_image
Diagram showing two mechanical components with arrows indicating motion, no text or symbols presentnatural_image
Illustration of a hand holding a handheld device with a red arrow indicating motion (no text or symbols)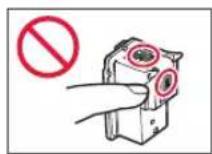
natural_image
Illustration of a robot interacting with a small mechanical component, no text or symbols presentnatural_image
Technical diagram showing mechanical assembly with red arrows indicating direction (no text or symbols)Verificar!

Configurando a impressora
4. Colocando tinta

Importante
natural_image
Illustration of a hand holding a bottle with a red curved arrow indicating rotation (no text or symbols)3 Alinhe o bocal da garrafa de tinta com a entrada.
natural_image
Line drawing of a hand inserting a small component into a device (no text or symbols)5 Remova lentamente a garrafa de tinta da entrada.
6 Substitua a tampa do cartucho com segurança e feche a tampa do cartucho de tinta.
natural_image
Illustration of a person using a tool to lift a car, with a magnified inset showing the engine compartment (no text or symbols)▶
natural_image
Diagram of a printer's internal structure with a red arrow indicating the open lid (no text or symbols present)
Cuidado
natural_image
Diagram of a printer with a red arrow indicating compression or disassembly (no text or symbols present)3 Deslize as guias do papel.
5 Substitua o cassete.

natural_image
Diagram of a printer with a paper tray and a red arrow indicating compression or disassembly (no text or symbols present)6 Puxe para fora a bandeja de saída do papel.

natural_image
Two line drawings of a printer with a paper feed, showing the left and right views (no text or symbols)flowchart
graph TD
    A["Load 2 or more sheets of [OK"]Next] --> B["Ready to connect For details on how to cor"]
    C["OK"] --> A
natural_image
Simple line drawing of a smartphone with no text or symbolsnatural_image
Diagram of a vehicle's wheel and dashboard with red motion arrow (no text or symbols)natural_image
Illustration of two gift boxes with wrapped items, one showing a ribbon and the other a ribbon (no text or symbols)Configuration de l'imprimante
natural_image
Mechanical assembly diagram showing a hand holding a component and a right-hand view of a mechanical component with red arrows indicating motion (no text or symbols)natural_image
Two diagrams showing a battery component being inserted into a socket, with no text or symbols present.natural_image
Illustration of a hand holding a handheld device with a red arrow indicating motion (no text or symbols)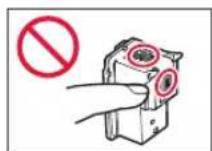

natural_image
Diagram of a robotic arm interacting with a small mechanical component, no text or symbols presentnatural_image
Mechanical assembly diagram showing a component being lowered into a housing (no text or symbols present)Vérifiez!
Configuration de l'imprimante
natural_image
Illustration of a hand holding a small object with a red curved arrow indicating motion (no text or symbols)natural_image
Line drawing of a hand pouring liquid into a container with a tool (no text or symbols)natural_image
Diagram of a printer case with an open lid and a red arrow indicating the opening (no text or symbols present)
Attention
natural_image
Diagram of a printer with a red arrow indicating compression or disassembly (no text or symbols present)natural_image
Diagram showing a printer being inserted into a plastic tray, with a red arrow indicating the process (no text or symbols present)natural_image
Two-step illustration of a printer printer being inserted, showing the process from opening to exiting (no text or symbols present)natural_image
Diagram of a vehicle's wheel and dashboard with red motion arrow (no text or symbols)natural_image
Illustration of two gift boxes with wrapped bags, one open and one closed, both without any text or symbols.Настройка принтера
Онлайн-настройка
https://ij.start.canon

natural_image
Mechanical assembly diagram showing a hand holding a component with red arrows indicating direction (no text or symbols)natural_image
Two diagrams showing a battery pack before and after an operation, with no text or symbols present.natural_image
Illustration of a hand holding a handheld device with a red arrow indicating motion (no text or symbols)

natural_image
Illustration of a robotic arm interacting with a small mechanical component, no text or symbols presentnatural_image
Diagram showing mechanical assembly with red arrows indicating motion or force direction (no text or symbols)natural_image
Mechanical assembly diagram showing a component being lowered into a housing (no text or labels)Проверка!

Настройка принтера
4. Заливка чернил

Внимание!
natural_image
Illustration of a hand performing a circular motion exercise with red curved arrows (no text or symbols)natural_image
Line drawing of a hand pouring liquid into a container with a tool (no text or symbols)natural_image
Illustration of a person using a device to interact with a machine, showing a magnified view of the device (no text or symbols present)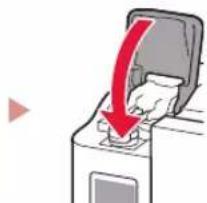
natural_image
Illustration of a hand inserting a device into a machine with a red downward arrow (no text or symbols)natural_image
Diagram of a printer case with a red arrow indicating the open lid (no text or symbols present)natural_image
Diagram of a printer with a red arrow indicating compression or disassembly (no text or symbols present)5 Установите кассету на место.
natural_image
Illustration of a printer with a paper tray and a red arrow indicating compression or disassembly (no text or symbols present)natural_image
Two line drawings of a printer with a paper feed, showing the process from left to right (no text or symbols present)flowchart
graph TD
    A["Load 2 or more sheets of [OK"]Next] --> B["Ready to connect For details on how to cor"]
    C["OK"] --> A

natural_image
Simple line drawing of a smartphone with no text or symbolsnatural_image
Diagram of a vehicle's wheel rim with red motion arrow indicating clockwise motion (no text or symbols)natural_image
Illustration of two gift boxes with wrapped bags, one open and one closed, both without any text or symbols.natural_image
Mechanical assembly diagram showing a hand holding a component with red arrows indicating motion (no text or symbols)natural_image
Two diagrams showing a battery box being inserted into a socket, with an arrow indicating the insertion direction (no text or symbols present)natural_image
Illustration of a hand holding a handheld device with a red arrow indicating motion (no text or symbols)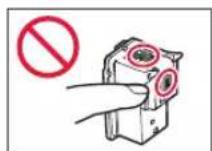
natural_image
Illustration of a robotic arm interacting with a small mechanical component, no text or symbols presentnatural_image
Diagram showing two mechanical components with red arrows indicating motion or force direction (no text or symbols)natural_image
Mechanical assembly diagram showing a component with red arrows indicating direction (no text or symbols)Перевірити!

natural_image
Illustration of a hand performing a circular motion exercise with red curved arrows (no text or symbols)natural_image
Line drawing of a hand pouring liquid into a container with a tool (no text or symbols)natural_image
Illustration of a person using a device to interact with a device, showing a magnified view of the device (no text or symbols present)
natural_image
Illustration of a hand inserting a device into a machine with a red downward arrow (no text or symbols)natural_image
Diagram of an open battery pack with a red arrow indicating the outlet (no text or symbols present)natural_image
Diagram of a printer with a red arrow indicating compression or disassembly (no text or symbols present)natural_image
Diagram of a printer with a paper tray and a red arrow indicating compression or disassembly (no text or symbols present)natural_image
Two line drawings of a printer with a paper feed, showing the process from left to right (no text or symbols present)flowchart
graph TD
    A["Load 2 or more sheets of [OK"]Next] --> B["Ready to connect For details on how to cor"]
    C["OK"] --> A

natural_image
Simple line drawing of a smartphone with no text or symbolsnatural_image
Diagram of a vehicle's wheel rim with red motion arrow indicating clockwise motion (no text or symbols)natural_image
Illustration of two gift boxes with wrapped bags, one showing a ribbon and the other a ribbon (no text or symbols)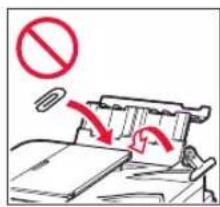
natural_image
Illustration of two gift bags with wrapped items, one open and one closed, both drawn in line art style (no text or symbols)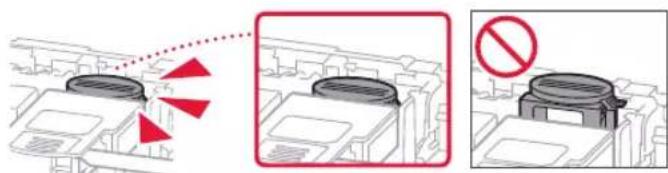
natural_image
Diagram of a mechanical component with a red curved arrow indicating motion (no text or symbols)
الاتصال بهاتف ذكي
natural_image
Simple line drawing of a smartphone inside a rounded rectangle (no text or symbols)natural_image
Diagram of a printer with a red arrow indicating compression or disassembly (no text or symbols present)natural_image
Illustration of a hand inserting a device into a machine with a red arrow indicating the process (no text or symbols present)
natural_image
Illustration of a person using a device to interact with a mechanical device (no text or symbols visible)natural_image
Diagram of a device with an open lid and a red arrow indicating a location or operation (no text or symbols present)
5. تشغيل الطبعة

4. صب الحبر
هام
natural_image
Illustration of a hand holding a bottle with a red curved arrow indicating motion (no text or symbols)natural_image
Line drawing of a hand inserting a small component into a socket (no text or symbols)4
natural_image
Illustration of a hand holding a remote control with a red arrow indicating direction (no text or symbols)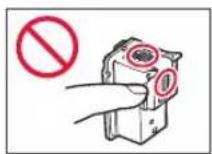
natural_image
Diagram showing a mechanical component being adjusted to a device, with no visible text or symbols.natural_image
Diagram of a mechanical component with red arrows indicating direction, no text or symbols present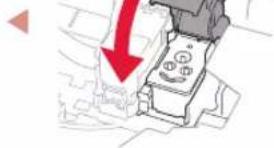
natural_image
Illustration of a mechanical device with a red downward arrow indicating motion or force (no text or symbols)natural_image
Diagram showing a mechanical assembly with a red arrow indicating downward motion (no text or symbols present)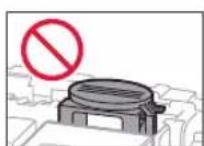
تحق!
1. محتويات العليا
زجاجة الحبر
specialist الطاقة

natural_image
Diagram showing a mechanical component being inserted into a device, with red arrows indicating direction (no text or symbols present)natural_image
Two-step diagram showing a device with internal components before and after assembly, no text or symbols present.
natural_image
Red icon showing a globe with a question mark on a laptop, symbolizing global inquiry or search (no text present)Access Online Manual Acesse o Manual On-line Доступ к документу Онлайн-руководство
- Setting Up the Printer
- Online Setup
- Box Contents
- Removing Packing Materials
- Installing the Print Head
- Pouring Ink
- Important
- Turning on the Printer
- Loading Paper
- What device are you connecting?
- 7-a
- Connecting to a Computer
- 7-b
- Connecting to a Smartphone
- 7-c
- Do Not Connect To A Device
- Loading Paper into the Rear Tray
- Transporting Your Printer
- Configurando a impressora
- Colocando tinta
- Importante
- Configuration de l'imprimante
- Настройка принтера
- Онлайн-настройка
- Заливка чернил
- Внимание!
- الاتصال بهاتف ذكي
- تشغيل الطبعة
- صب الحبر
- محتويات العليا
Brand : CANON
Model : PIXMA GM4040
Category : Printer