Viera TC-L32C12 - TV PANASONIC - Free user manual and instructions
Find the device manual for free Viera TC-L32C12 PANASONIC in PDF.

User questions about Viera TC-L32C12 PANASONIC
0 question about this device. Answer the ones you know or ask your own.
Ask a new question about this device
Download the instructions for your TV in PDF format for free! Find your manual Viera TC-L32C12 - PANASONIC and take your electronic device back in hand. On this page are published all the documents necessary for the use of your device. Viera TC-L32C12 by PANASONIC.
USER MANUAL Viera TC-L32C12 PANASONIC
Operating Instructions
32" Class 720p LCD HDTV
(31.5 inches measured diagonally)
natural_image
Black Panasonic TV monitor with a stand and curved screen (no visible text or symbols on the screen)Quick Start Guide
(See page 8-16)
or visit us at www.panasonic.com/contactinfo
■ For assistance (Canada), please call: 1-866-330-0014
or visit us at www.vieraconcierge.ca
Please read these instructions before operating your set and retain them for future reference.
The images shown in this manual are for illustrative purposes only.
Español
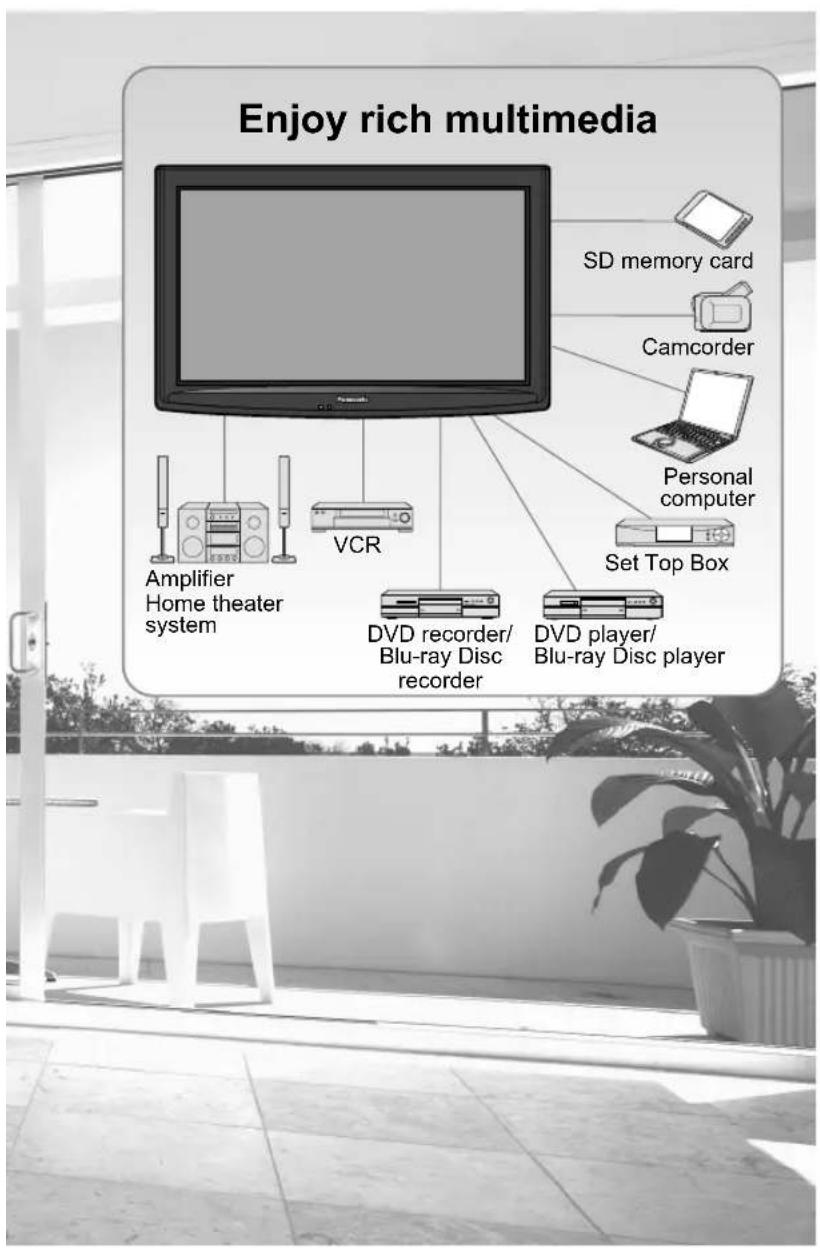
Turn your own living room into a movie theater!
Experience an amazing level of multimedia excitement
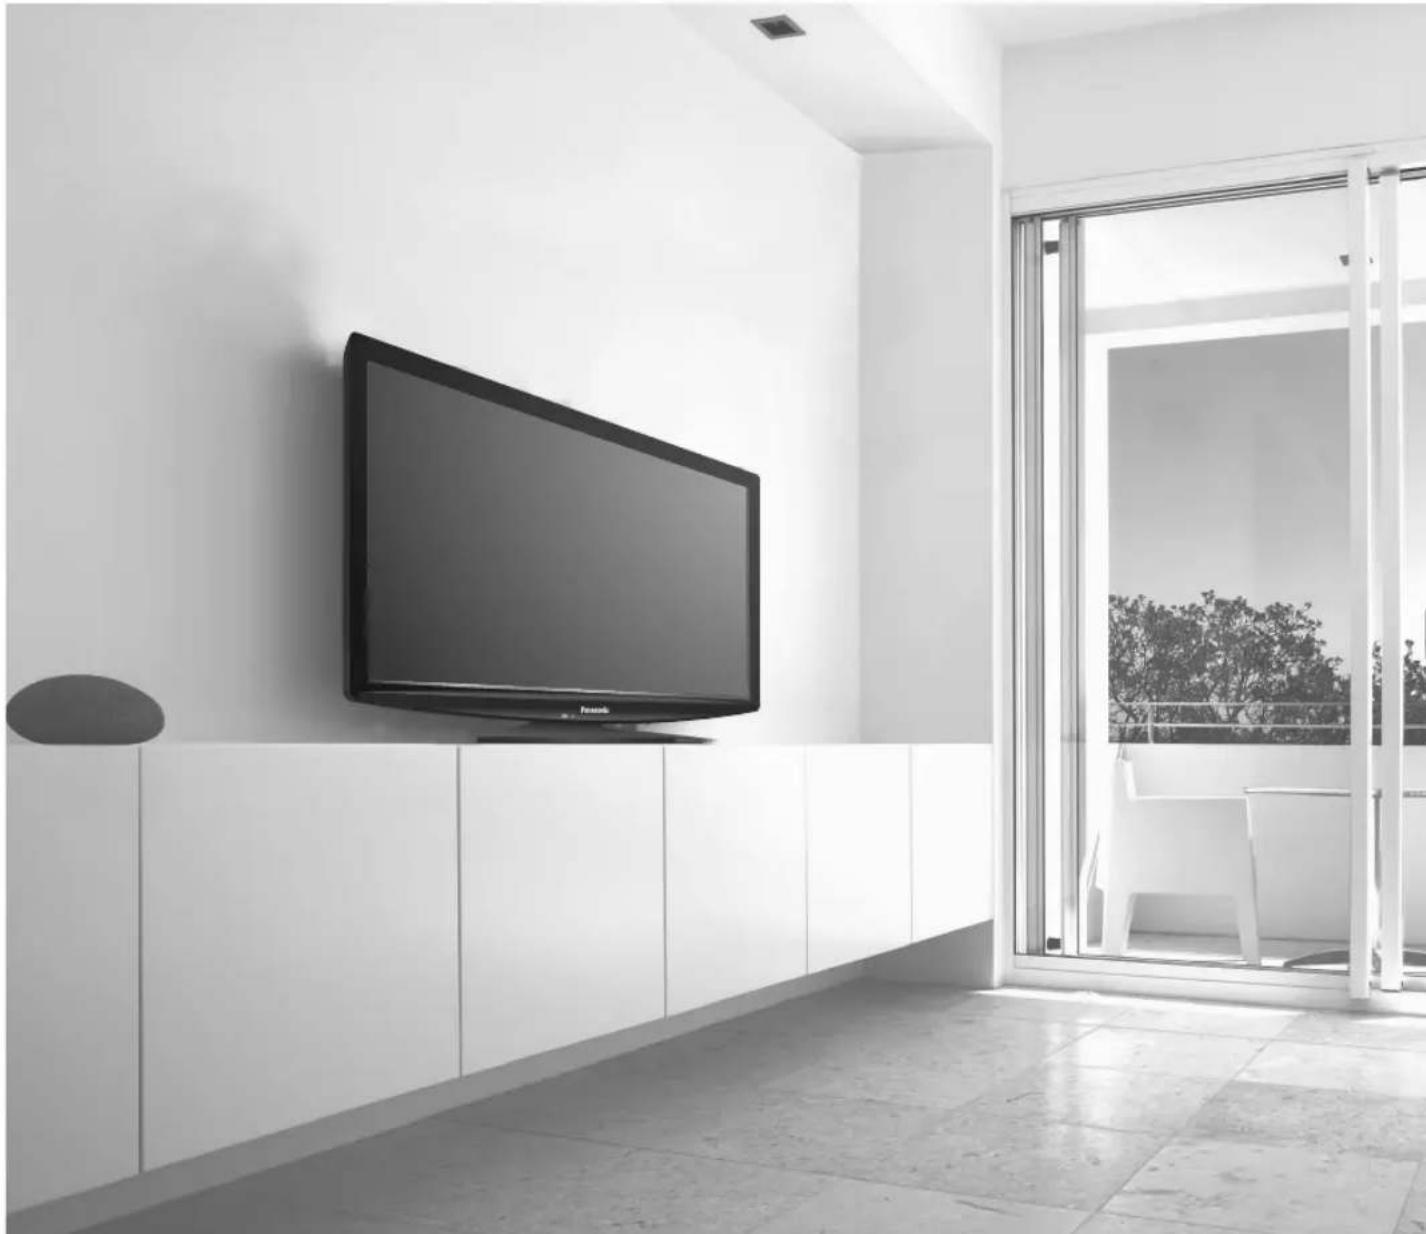
natural_image
Modern interior with a large flat-screen TV on a white wall, overlooking a window and outdoor balcony (no text or symbols visible) HIGH-DEFINITION MULTIMEDIA INTERFACEHDMI, the HDMI logo and High-Definition Multimedia Interface are trademarks or registered trademarks of HDMI Licensing LLC. HIGH-DEFINITION MULTIMEDIA INTERFACEHDMI, the HDMI logo and High-Definition Multimedia Interface are trademarks or registered trademarks of HDMI Licensing LLC. |  VIERA LinkTM is a trademark of Panasonic Corporation. VIERA LinkTM is a trademark of Panasonic Corporation. |  SDHC Logo is a trademark. SDHC Logo is a trademark. |
| HDAVI ControlTM is a trademark of Panasonic Corporation. | Manufactured under license from Dolby Laboratories.DOLBY and the double-D symbol are trademarks of Dolby Laboratories. |  |
text_image
Enjoy rich multimedia SD memory card Camcorder Personal computer Amplifier Home theater system VCR Set Top Box DVD recorder/ Blu-ray Disc recorder DVD player/ Blu-ray Disc player
This product qualifies for ENERGY STAR in the "Home" setting and this is the setting in which energy savings will be achieved. Any modifications to the "Home" setting or other factory default settings could result in greater energy consumption beyond levels that meet ENERGY STAR qualifications.

Contents
Please read before using the unit
Safety Precautions 4
Quick Start Guide
● Accessories/Optional Accessory …… 8
● Basic Connection …… 10
● Identifying Controls 14
● First Time Setup.... 15
Enjoy your TV!
Basic Features
● Watching TV 17
Using VIERA TOOLS 19
Viewing from SD Card 20
● Watching Videos and DVDs 22
- Displaying PC Screen on TV 24
Advanced Features
How to Use Menu Functions (picture, sound quality, etc.) 26
- VIERA Link™ "HDAVI Control™" 30
Lock 36
- Editing and Setting Channels 38
- Closed Caption 40
Input Labels 41
Using Timer 42
Recommended AV Connections 43
FAQs, etc.
● Ratings List for Lock 44
● Technical Information 45
Care and Cleaning 49
- FAQ 50
Specifications 52
Limited Warranty
(for U.S.A. and Puerto Rico only).... 53
- Customer Services Directory (for U. S. A. and Puerto Rico)....54
● Limited Warranty (for Canada) 55

Safety Precautions

CAUTION
RISK OF ELECTRIC SHOCK
DO NOT OPEN

WARNING: To reduce the risk of electric shock, do not remove cover or back. No user-serviceable parts inside. Refer servicing to qualified service personnel.


The lightning flash with arrowhead within a triangle is intended to tell the user that parts inside the product are a risk of electric shock to persons.
The exclamation point within a triangle is intended to tell the user that important operating and servicing instructions are in the papers with the appliance.
Note to CATV System Installer
This reminder is provided to direct the CATV system installer's attention to Article 820-40 of the NEC that provides guidelines for proper grounding and, in particular, specifies that the cable ground shall be connected to the grounding system of the building, as close to the point of cable entry as practical.
Secure Ventilation
Slots and openings in the cabinet and the back or bottom are provided for ventilation, and to ensure reliable operation of the LCD TV and to protect it from overheating. These openings must not be blocked or covered. There should be at least 10 cm of space from these openings. The openings should never be blocked by placing the LCD TV on a bed, sofa, rug or other similar surface. This LCD TV should not be placed in a built-in installation such as a bookcase unless proper ventilation is provided.
Important Safety Instructions
1) Read these instructions.
2) Keep these instructions.
3) Heed all warnings.
4) Follow all instructions.
5) Do not use this apparatus near water.
6) Clean only with dry cloth.
7) Do not block any ventilation openings. Install in accordance with the manufacturer's instructions.
8) Do not install near any heat sources such as radiators, heat registers, stoves or other apparatus (including amplifiers) that produce heat.
9) Do not defeat the safety purpose of the polarized or grounding-type plug. A polarized plug has two blades with one wider than the other. A grounding type plug has two blades and a third grounding prong. The wide blade or the third prong are provided for your safety. If the provided plug does not fit into your outlet, consult an electrician for replacement of the obsolete outlet.
10) Protect the power cord from being walked on or pinched particularly at plugs, convenience receptacles, and the point where they exit from the apparatus.
11) Only use attachments / accessories specified by the manufacturer.
12) Use only with the cart, stand, tripod, bracket or table specified by the manufacturer, or sold with the apparatus. When a cart is used, use caution when moving the cart / apparatus combination to avoid injury from tip-over.
13) Unplug this apparatus during lightning storms or when unused for long periods of time.
14) Refer all servicing to qualified service personnel. Servicing is required when the apparatus has been damaged in any way, such as power-supply cord or plug is damaged, liquid has been spilled or objects have fallen into the apparatus, the apparatus has been exposed to rain or moisture, does not operate normally, or has been dropped.
15) Operate only from the type of power source indicated on the marking label. If you are not sure of the type of power supplied to your home consult your television dealer or local power company.
16) Follow all warnings and instructions marked on the LCD TV.
17) Never push objects of any kind into this LCD TV through cabinet slots as they may touch dangerous voltage points or short out parts that could result in a fire or electric shock. Never spill liquid of any kind on the LCD TV.
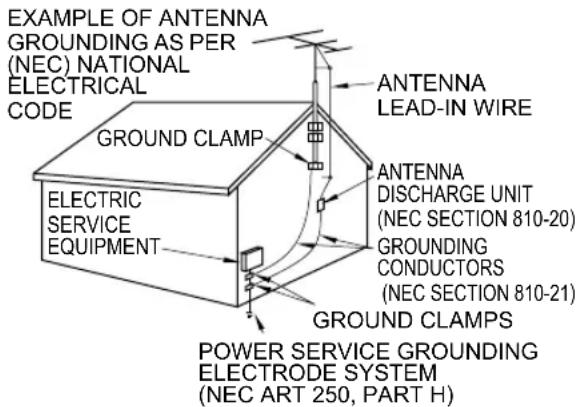
18) If an outside antenna is connected to the tele vision equipment, be sure the antenna system is grounded so as to provide some protection against voltage surges and built up static charges. In the U.S. Section 810-21 of the National Electrical Code provides information with respect to proper grounding of the mast and supporting structure, grounding of the lead-in wire to an antenna discharge unit, size of grounding conductors, location of antenna discharge unit, connection to grounding electrodes, and require ments for the grounding electrode.

text_image
EXAMPLE OF ANTENNA GROUNDING AS PER (NEC) NATIONAL ELECTRICAL CODE GROUND CLAMP ELECTRIC SERVICE EQUIPMENT ANTENNA LEAD-IN WIRE ANTENNA DISCHARGE UNIT (NEC SECTION 810-20) GROUNDING CONDUCTORS (NEC SECTION 810-21) GROUND CLAMPS POWER SERVICE GROUNDING ELECTRODE SYSTEM (NEC ART 250, PART H)19) An outside antenna system should not be located in the vicinity of overhead power lines, other electric light, power circuits, or where it can fall into such power lines or circuits. When installing an outside antenna system, extreme care should be taken to keep from touching such power lines or circuits as contact with them might be fatal.
20) Unplug this LCD TV from the wall outlet and refer servicing to qualified service personnel under the following conditions:
a. When the power cord or plug is damaged or frayed.
b. If liquid has been spilled into the LCD TV.
c. If the LCD TV has been exposed to rain or water.
d. If the LCD TV does not operate normally by following the operating instructions.
Adjust only those controls that are covered by the operating instructions as improper adjustment of other controls may result in damage and will often require extensive work by a qualified technician to restore the LCD TV to normal operation.
e. If the LCD TV has been dropped or the cabinet has been damaged.
f. When the LCD TV exhibits a distinct change in performance - this indicates a need for service.
21) When replacement parts are required, be sure the service technician uses replacement parts specified by the manufacturer that have the same characteristics as the original parts. Unauthorized substitutions may result in fire, electric shock, or other hazards.
22) WARNING: TO REDUCE THE RISK OF FIRE OR ELECTRIC SHOCK, DO NOT EXPOSE THIS APPARATUS TO RAIN, MOISTURE, DRIPPING OR SPLASHING.
DO NOT PLACE LIQUID CONTAINERS (FLOWER VASES, CUPS, COSMETICS, ETC.) ABOVE THE SET (INCLUDING ON SHELVES ABOVE, ETC.).
23) WARNING: SMALL PARTS CAN PRESENT CHOKING HAZARD IF ACCIDENTALLY SWALLOWED. KEEP SMALL PARTS AWAY FROM YOUNG CHILDREN.
DISCARD UNNEEDED SMALL PARTS AND OTHER OBJECTS, INCLUDING PACKAGING MATERIALS AND PLASTIC BAGS/SHEETS TO PREVENT THEM FROM BEING PLAYED WITH BY YOUNG CHILDREN, CREATING THE POTENTIAL RISK OF SUFFOCATION.
24) CAUTION: TO PREVENT ELECTRIC SHOCK, DO NOT USE THIS PLUG WITH A RECEPTACLE OR OTHER OUTLET UNLESS THE BLADES CAN BE FULLY INSERTED TO PREVENT BLADE EX PO SURE.
25) CAUTION: USE WITH OTHER STAND MAY RESULT IN INSTABILITY POSSIBLY CAUSING INJURY.
26) CAUTION: DANGER OF EXPLOSION IF BATTERY IS INCORRECTLY REPLACED. REPLACE ONLY WITH THE SAME OR EQUIVALENT TYPE.
27) CAUTION: This LCD TV is for use only with the following optional accessory. Use with any other type of optional accessories may cause instability which could result in the possibility of injury.
(All of the following accessories are manufactured by Panasonic Corporation)
• Wall-hanging bracket: TY-WK3L2RW
Always be sure to ask a qualified technician to carry out set-up.
NOTE: This equipment is designed to operate in North America and other countries where the broadcasting system and AC house current are exactly the same as in North America.
Safety Precautions (Continued)

WARNING
CEA CHILD SAFETY NOTICES: Flat panel displays are not always supported on the proper stands or installed according to the manufacturer's recommendations. Flat panel displays that are inappropriately situated on dressers, bookcases, shelves, desks, speakers, chests or carts may fall over and may cause personal injury or even death.
The consumer electronics industry (of which Panasonic is a member) is committed to making home entertainment enjoyable and safe. To prevent personal injury or death, be sure to follow the following safety guidelines:
TUNE INTO SAFETY:
- One size does NOT fit all. Follow the manufacturer's recommendations for the safe installation and use of your flat panel display.
- Carefully read and understand all enclosed instructions for proper use of this product.
- Don't allow children to climb on or play with furniture and television sets.
- Don't place flat panel displays on furniture that can easily be used as steps, such as a chest of drawers.
- Remember that children can become excited while watching a program, especially on "larger than life" flat panel displays. Care should be taken to install the display where it cannot be pushed, pulled over, or knocked down.
- Care should be taken to route all cords and cables connected to the flat panel display so that they cannot be pulled or grabbed by curious children.
WALL MOUNTING: IF YOU DECIDE TO WALL MOUNT YOUR FLAT PANEL DISPLAY, ALWAYS:
- Use a mount that has been recommended by the display manufacturer and/or listed by an independent laboratory (such as UL, CSA, ETL).
- Follow all instructions supplied by the display and wall mount manufacturers.
- If you have any doubts about your ability to safely install your flat panel display, contact your retailer about professional installation.
- Make sure the wall where you are mounting the display is appropriate. Some wall mounts are not designed to be mounted to walls with steel studs or old cinder block construction. If you are unsure, contact a professional installer.
• A minimum of two people are required for installation. Flat panel displays can be heavy.
FCC STATEMENT
This equipment has been tested and found to comply with the limits for a Class B digital device, pursuant to Part 15 of the FCC Rules. These limits are designed to provide reasonable protection against harmful interference in a residential installation. This equipment generates, uses and can radiate radio frequency energy and, if not installed and used in accordance with the instructions, may cause harmful interference to radio communications. However, there is no guarantee that interference will not occur in a particular installation. If this equipment does cause harmful interference to radio or television reception, which can be determined by turning the equipment off and on, the user is encouraged to try to correct the interference by one or more of the following measures:
- Reorient or relocate the receiving antenna.
- Increase the separation between the equipment and receiver.
- Connect the equipment into an outlet on a circuit different from that to which the receiver is connected.
- Consult the dealer or an experienced radio/TV technician for help.
This device complies with Part 15 of the FCC Rules. Operation is subject to the following two conditions: (1) This device may not cause harmful interference, and (2) this device must accept any interference received, including interference that may cause undesired operation.
FCC Caution:
To assure continued compliance, follow the attached installation instructions and use only shielded interface cables when connecting to computer or peripheral devices. Any changes or modifications not expressly approved by Panasonic Corp. of North America could void the user's authority to operate this device.
FCC Declaration of Conformity Model No. TC-L32C12
Responsible Party: Panasonic Corporation of North America One Panasonic Way, Secaucus, NJ 07094 Contact Source: Panasonic Consumer Electronics Company 1-877-95-VIERA (958-4372) email: consumerproducts@panasonic.com
Accessories/Optional Accessory
Accessories

Check you have all the items shown.
Accessories
□ Remote Control Transmitter • N2QAYB000321
□ Batteries for the Remote Control Transmitter (2)
• AA Battery
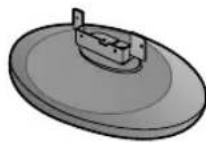
□ Cleaning cloth Pedestal

TBL2AX00261
Accessories
Assembly screws (4)

M4 × 10
□ Operating Instructions
□ Quick Setup Guide
□ Product Registration Card (U.S.A)
□ Customer Care Plan Card (U.S.A)
Optional Accessory
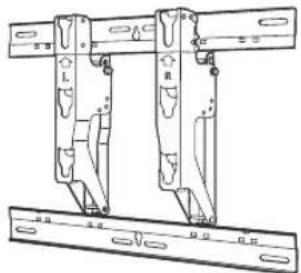
natural_image
Technical line drawing of a mechanical assembly with two vertical components and a ruler (no text or symbols)Wall-hanging bracket
- TY-WK3L2RW
Please contact your nearest Panasonic dealer to purchase the recommended wall-hanging bracket. For additional details, please refer to the wall-hanging bracket installation manual.
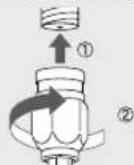
Installing the remote's batteries

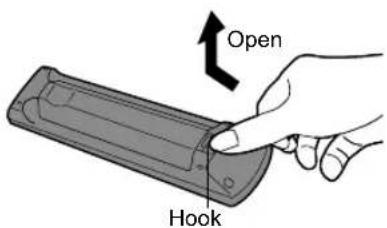
text_image
Open Hook

text_image
CloseNote the correct polarity (+ or -).
Caution
- Incorrect installation may cause battery leakage and corrosion, resulting in damage to the remote control.
- Do not mix old and new batteries.
- Do not mix different battery types (such as alkaline and manganese batteries).
- Do not use rechargeable (Ni-Cd) batteries.
- Do not burn or break batteries.
Attaching the pedestal to TV
Fix securely with assembly screws
- Tighten screws firmly.
A. (Total 4 screws)
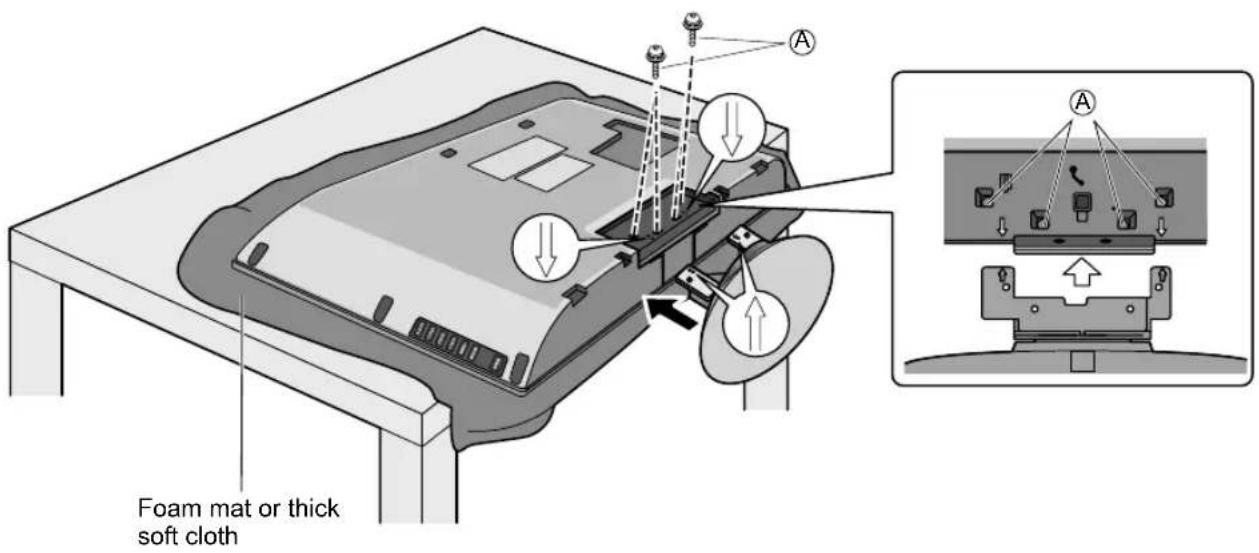
text_image
Foam mat or thick soft clothWARNING
● Always be sure to ask a qualified technician to carry out set-up. Incorrect fitting may cause equipment to fall, resulting in injury and product damage.
Do not disassemble or modify the pedestal.
- Otherwise the TV may fall over and become damaged, and personal injury may result.
Caution
Do not use any other TV and displays.
● Otherwise the TV may fall over and become damaged, and personal injury may result.
Do not use the pedestal if it becomes warped or physically damaged.
- If you use the pedestal when it is physically damaged, personal injury may result. Contact your nearest Panasonic Dealer immediately.
During set-up, make sure that all screws are securely tightened.
- If sufficient care is not taken to ensure screws are properly tightened during assembly, the pedestal will not be strong enough to support the TV, and it might fall over and become damaged, and personal injury may result.
Reference of connection
Antenna terminal Pin terminals HDMI terminal
- Firmly tighten by hand.

text_image
greenbluered green- Match colors of plugs and terminals. - Insert firmly.
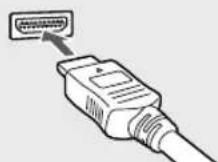
- Insert firmly.
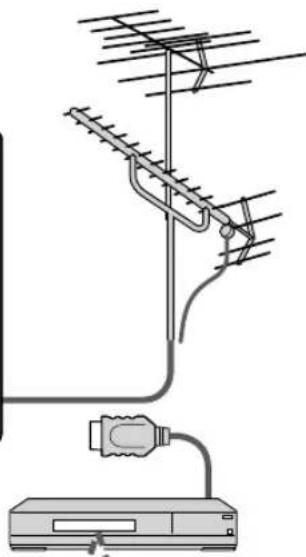
Basic Connection
Example 1 Connecting Antenna (To watch TV)
TV
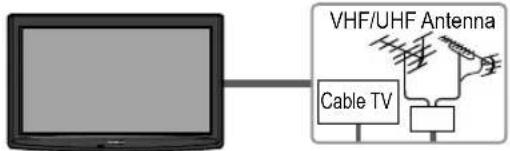
text_image
VHF/UHF Antenna Cable TVVHF/UHF Antenna
• NTSC (National Television System Committee): Conventional broadcasting
- ATSC (Advanced Television Systems Committee):
Digital TV Standards include digital high-definition television (HDTV), standard-definition television (SDTV), data broadcasting, multi-channel surround-sound audio and interactive television.
To connect the antenna terminal and Cable Box
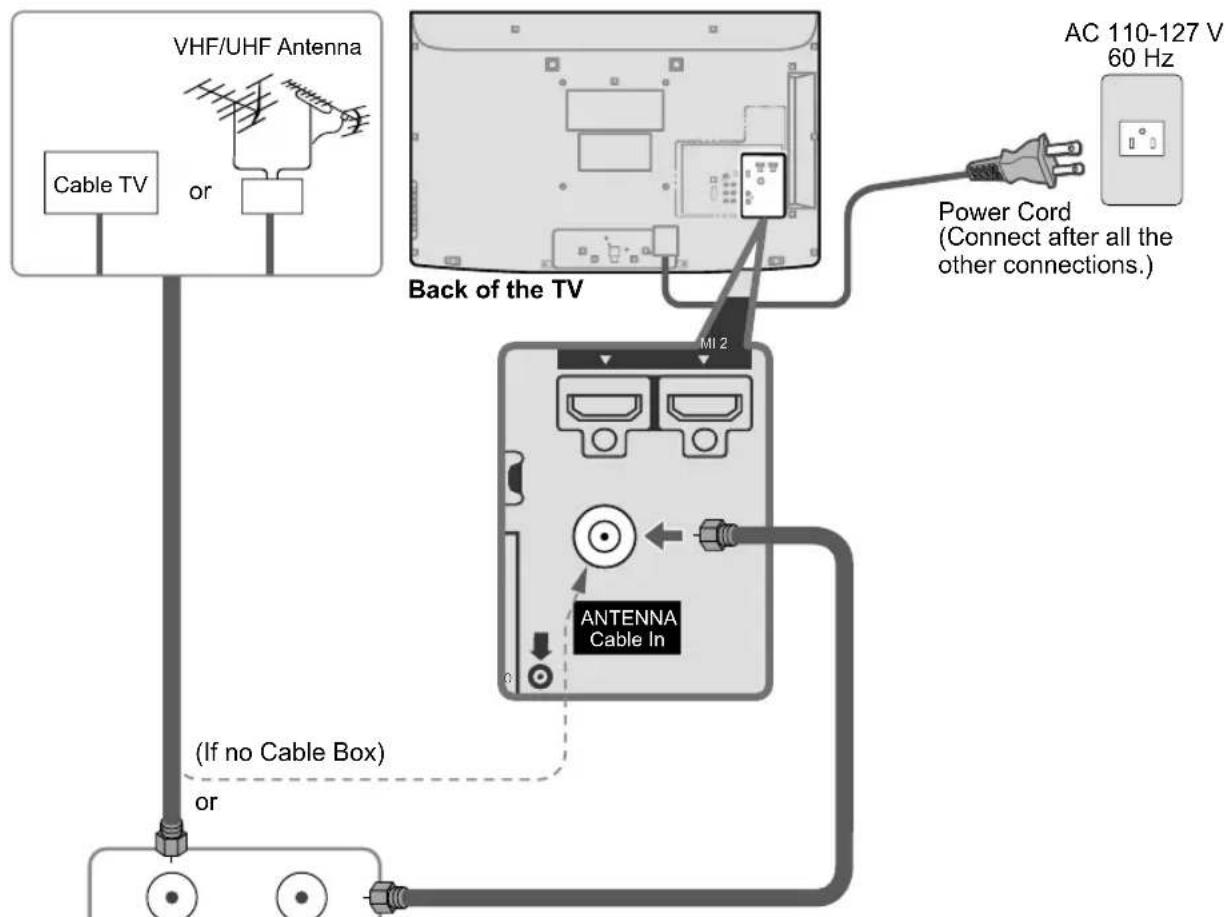
text_image
VHF/UHF Antenna Cable TV or Back of the TV AC 110-127 V 60 Hz Power Cord (Connect after all the other connections.) MI 2 ANTENNA Cable In (If no Cable Box) orCable Box/Cable
- You need to subscribe to a cable TV service to enjoy viewing their programming.
- If using a Cable Box, set the TV channel to CH3 or CH4 for regular cable.
- You can enjoy high-definition programming by subscribing to a high-definition cable service.
The connection for high-definition can be done with the use of HDMI or Component Video cable. (p. 13)
• To view high-definition programming select the correct video input. (p. 22)
Note
- Not all cables and external equipment shown in this book are supplied with the TV.
For more details on the external equipment's connections, please refer to the operating manuals for the equipment. - For additional assistance, visit us at: www.panasonic.com
www.panasonic.ca
Example 2
Connecting DVD recorder (VCR) (To record/playback)
TV
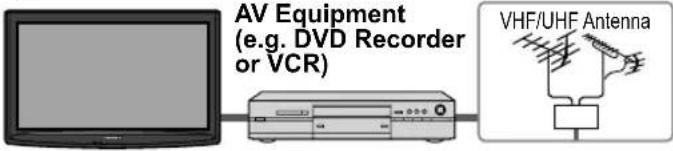
text_image
AV Equipment (e.g. DVD Recorder or VCR) VHF/UHF AntennaDVD Recorder
If the source has a higher resolution signal (480p/720p/1080i), connection can be made with the use of a Component Video or HDMI cable.
VCR
Connection can be made with the use of an RF cable and Composite Video/S Video cable. (p. 13)
To connect the antenna terminal and DVD recorder or VCR
flowchart
graph TD
    A["VHF/UHF Antenna"] --> B["Back of the TV"]
    B --> C["AC 110-127 V 60 Hz"]
    C --> D["Power Cord"]
    D --> E["HDMI HDMI 1 HDMI 2"]
    E --> F["Antenna Cable In"]
    F --> G["PC"]
    F --> H["VIDEO IN 1"]
    F --> I["VIDEO IN 1"]
    F --> J["VIDEO IN 1"]
    F --> K["VIDEO IN 1"]
    F --> L["VIDEO IN 1"]
    F --> M["VIDEO IN 1"]
    F --> N["VIDEO IN 1"]
    F --> O["VIDEO IN 1"]
    F --> P["VIDEO IN 1"]
    F --> Q["VIDEO IN 1"]
    F --> R["VIDEO IN 1"]
    F --> S["VIDEO IN 1"]
    F --> T["VIDEO IN 1"]
    F --> U["VIDEO IN 1"]
    F --> V["VIDEO IN 1"]
    F --> W["VIDEO IN 1"]
    F --> X["VIDEO IN 1"]
    F --> Y["VIDEO IN 1"]
    F --> Z["VIDEO IN 1"]
    F --> AA["VIDEO IN 1"]
    F --> AB["VIDEO IN 1"]
    F --> AC["VIDEO IN 1"]
    F --> AD["VIDEO IN 1"]
    F --> AE["VIDEO IN 1"]
    F --> AF["VIDEO IN 1"]
    F --> AG["VIDEO IN 1"]
    F --> AH["VIDEO IN 1"]
    F --> AI["VIDEO IN 1"]
    F --> AJ["VIDEO IN 1"]
    F --> AK["VIDEO IN 1"]
    F --> AL["VIDEO IN 1"]
    F --> AM["VIDEO IN 1"]
    F --> AN["VIDEO IN 1"]
    F --> AO["VIDEO IN 1"]
    F --> AP["VIDEO IN 1"]
    F --> AQ["VIDEO IN 1"]
    F --> AR["VIDEO IN 1"]
    F --> AS["VIDEO IN 1"]
    F --> AT["VIDEO IN 1"]
    F --> AU["VIDEO IN 1"]
    F --> AV["VIDEO IN 1"]
    F --> AW["VIDEO IN 1"]
    F --> AX["VIDEO IN 1"]
    F --> AY["VIDEO IN 1"]
    F --> AZ["VIDEO IN 1"]
    F --> BA["VIDEO IN 1"]
    F --> BB["VIDEO IN 1"]
    F --> BC["VIDEO IN 1"]
    F --> BD["VIDEO IN 1"]
    F --> BE["VIDEO IN 1"]
    F --> BF["VIDEO IN 1"]
    F --> BG["VIDEO IN 1"]
    F --> BH["VIDEO IN 1"]
    F --> BI["VIDEO IN 1"]
    F --> BJ["VIDEO IN 1"]
    F --> BK["VIDEO IN 1"]
    F --> BL["VIDEO IN 1"]
    F --> BM["VIDEO IN 1"]
    F --> BN["VIDEO IN 1"]
    F --> BO["VIDEO IN 1"]
    F --> BP["VIDEO IN 1"]
    F --> BQ["VIDEO IN 1"]
    F --> BR["VIDEO IN 1"]
    F --> BS["VIDEO IN 1"]
    F --> BT["VIDEO IN 1"]
    F --> BU["VIDEO IN 1"]
    F --> BV["VIDEO IN 1"]
    F --> BW["VIDEO IN 1"]
Basic Connection (Continued)
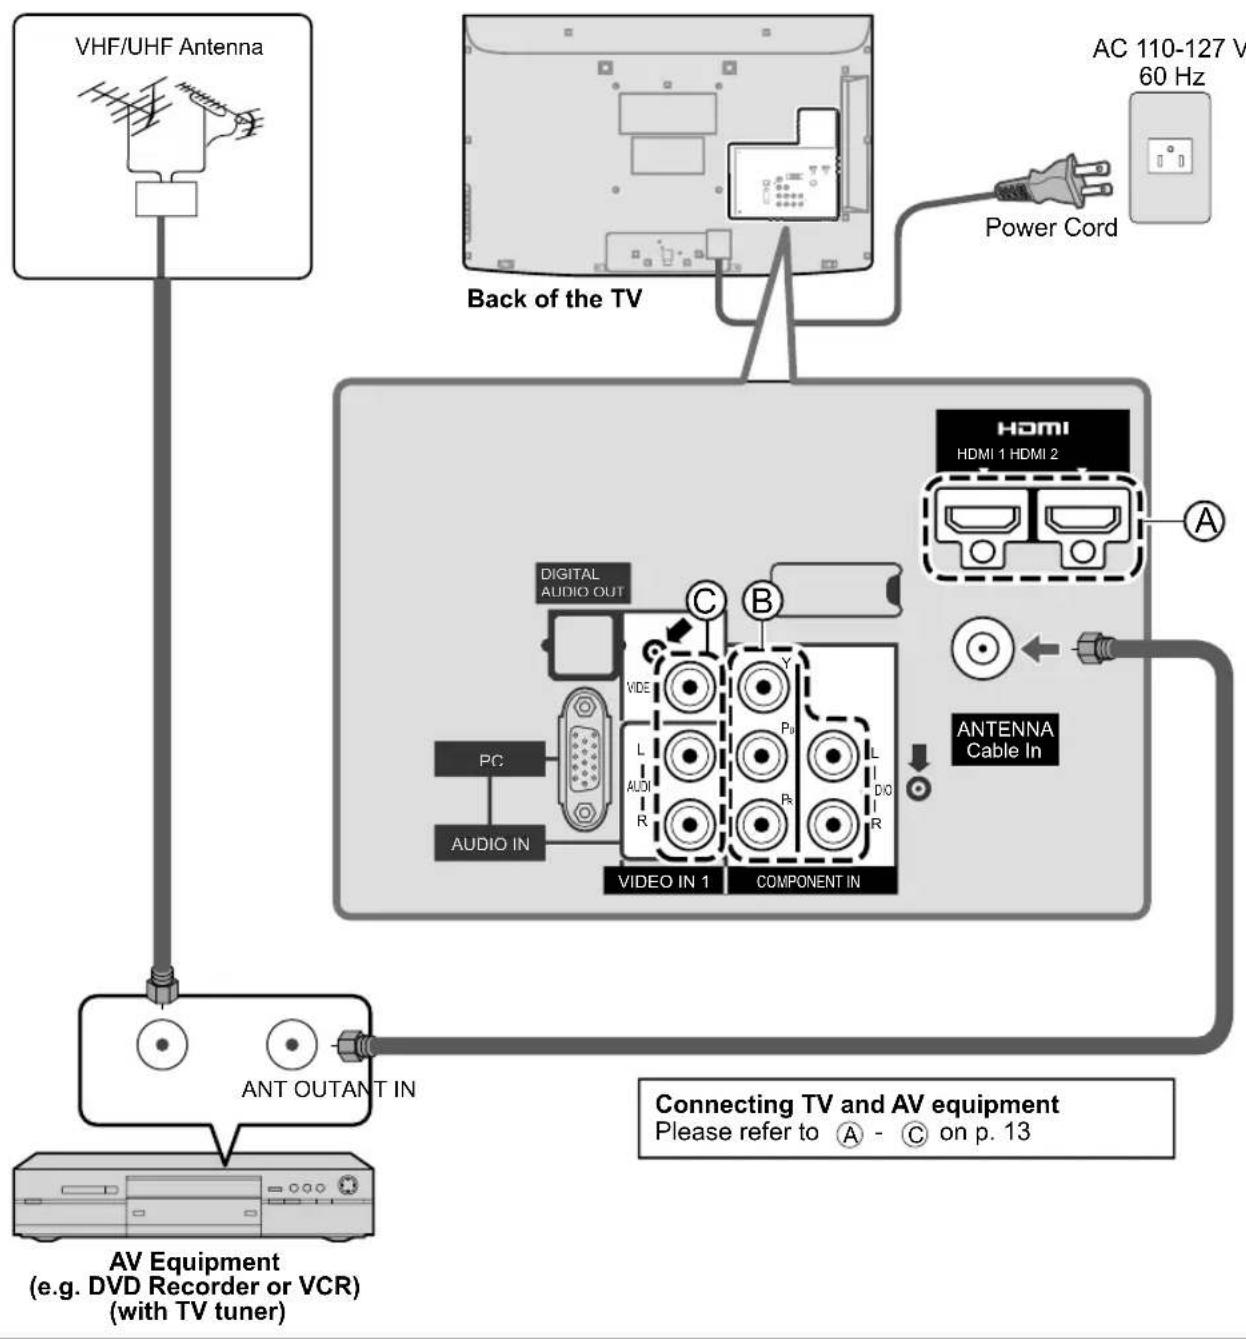
Example 3 Connecting DVD recorder (VCR) and satellite receiver
TV

flowchart
graph LR
    A["TV"] --> B["Receiver"]
    B --> C["VHF/UHF Antenna"]
    D["DVD Recorder or VCR"] --> B
    E["Satellite"] --> B
You can enjoy high-definition programming by subscribing to high-definition satellite service. Connection can be done with the use of HDMI or Component Video cable. (p. 13)
To connect the antenna terminal and Satellite Receiver and DVD recorder or VCR
flowchart
graph TD
    A["Satellite Receiver"] --> B["Ant IN"]
    A --> C["Ant OUTANT IN"]
    D["VHF/UHF Antenna"] --> E["Back of the TV"]
    E --> F["AC 110-127 V 60 Hz"]
    F --> G["Power Cord"]
    G --> H["Video In 1"]
    H --> I["Component In"]
    I --> J["Digital Audio Out"]
    I --> K["PC"]
    I --> L["AUDIO IN"]
    I --> M["L"]
    I --> N["AUDR"]
    I --> O["R"]
    I --> P["P"]
    I --> Q["L"]
    I --> R["DIO"]
    I --> S["DIO"]
    I --> T["ANTENNA Cable In"]
    T --> U["Connecting TV and AV equipment"]
    U --> V["Please refer to A - C on p. 13."]
Note
- For details of external equipment connections, please refer to the operating manuals for the equipment.
AV cable connections
High-Definition
Ⓐ To use HDMI terminals

flowchart
graph LR
    A["HDMI 1-HDMI2"] --> B["Switch"]
    B --> C["HDMI AV OUT"]
    C --> D["AV Equipment"]
    style A fill:#f9f,stroke:#333
    style D fill:#ccf,stroke:#333
- Connecting to the HDMI terminals will enable you to enjoy high-definition digital images and high-quality sound.
- For "VIERA Link™ connections", please refer to p. 31.
⑧ To use COMPONENT terminals
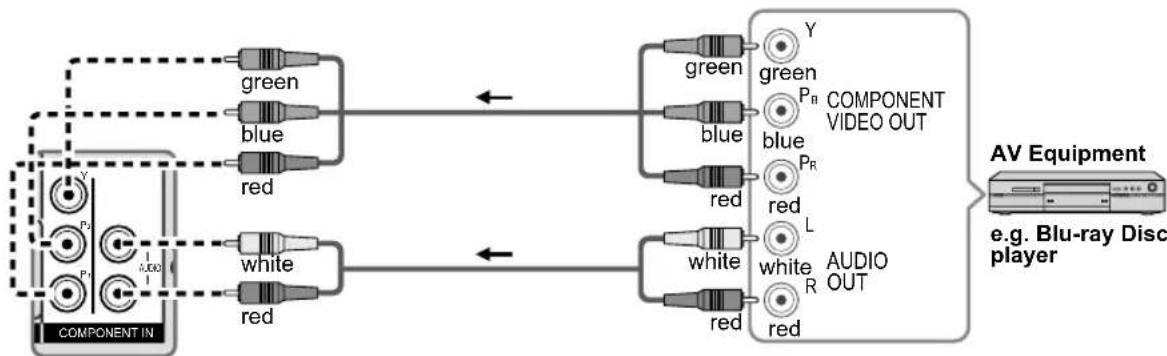
flowchart
graph LR
    A["COMPONENT IN"] --> B["green"]
    A --> C["blue"]
    A --> D["red"]
    A --> E["white"]
    A --> F["red"]
    B --> G["COMPONENT VIDEO OUT"]
    C --> G
    D --> G
    E --> G
    F --> G
    G --> H["AV Equipment"]
    H --> I["e.g. Blu-ray Disc player"]
- Recorders may also be connected to COMPOSITE or S VIDEO terminals. (see below)
Standard-Definition
© To use COMPOSITE terminals
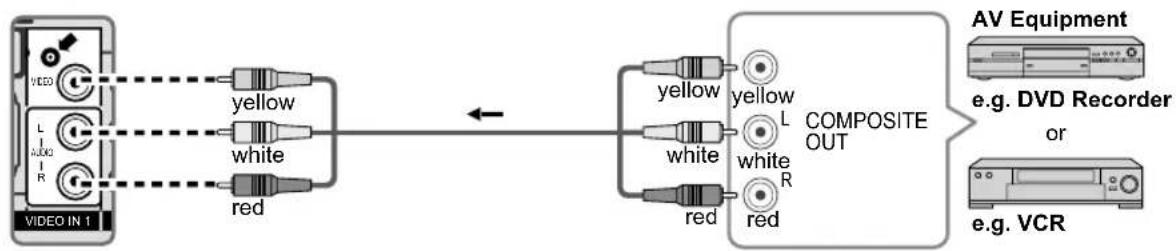
flowchart
graph LR
    A["VIDEO IN 1"] --> B["yellow"]
    A --> C["white"]
    A --> D["red"]
    B --> E["Composite OUT"]
    C --> E
    D --> E
    E --> F["AV Equipment"]
    E --> G["e.g. DVD Recorder or"]
    E --> H["e.g. VCR"]
Note
- Some programs contain a copyright protection signal to prevent recording.
- When the copyright protection program is displayed, do not connect the other TV monitor through a VCR. Video signals fed through VCRs may be affected by copyright protection systems and the picture will be distorted on the other TV monitor.
- For more details on the external equipment's connections, please refer to the operating manuals of this equipment.
Identifying Controls
TV controls/indicators
Front of the TV
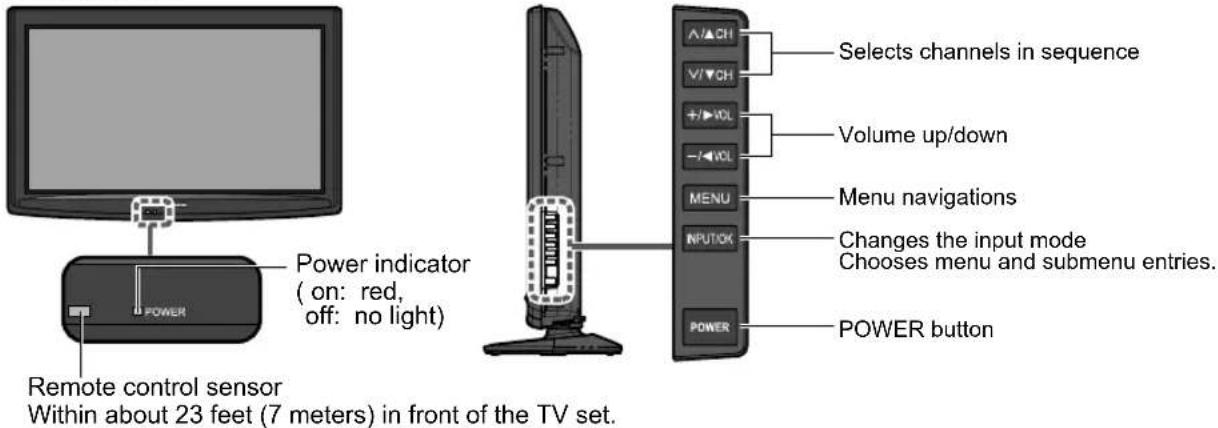
text_image
Power indicator (on: red, off: no light) Remote control sensor Within about 23 feet (7 meters) in front of the TV set. Selects channels in sequence Volume up/down Menu navigations Changes the input mode Chooses menu and submenu entries. POWER buttonNote
- The TV consumes a limited amount of power as long as the power cord is inserted into the wall outlet.
- Do not place any objects between the TV remote control sensor and remote control.
Remote control
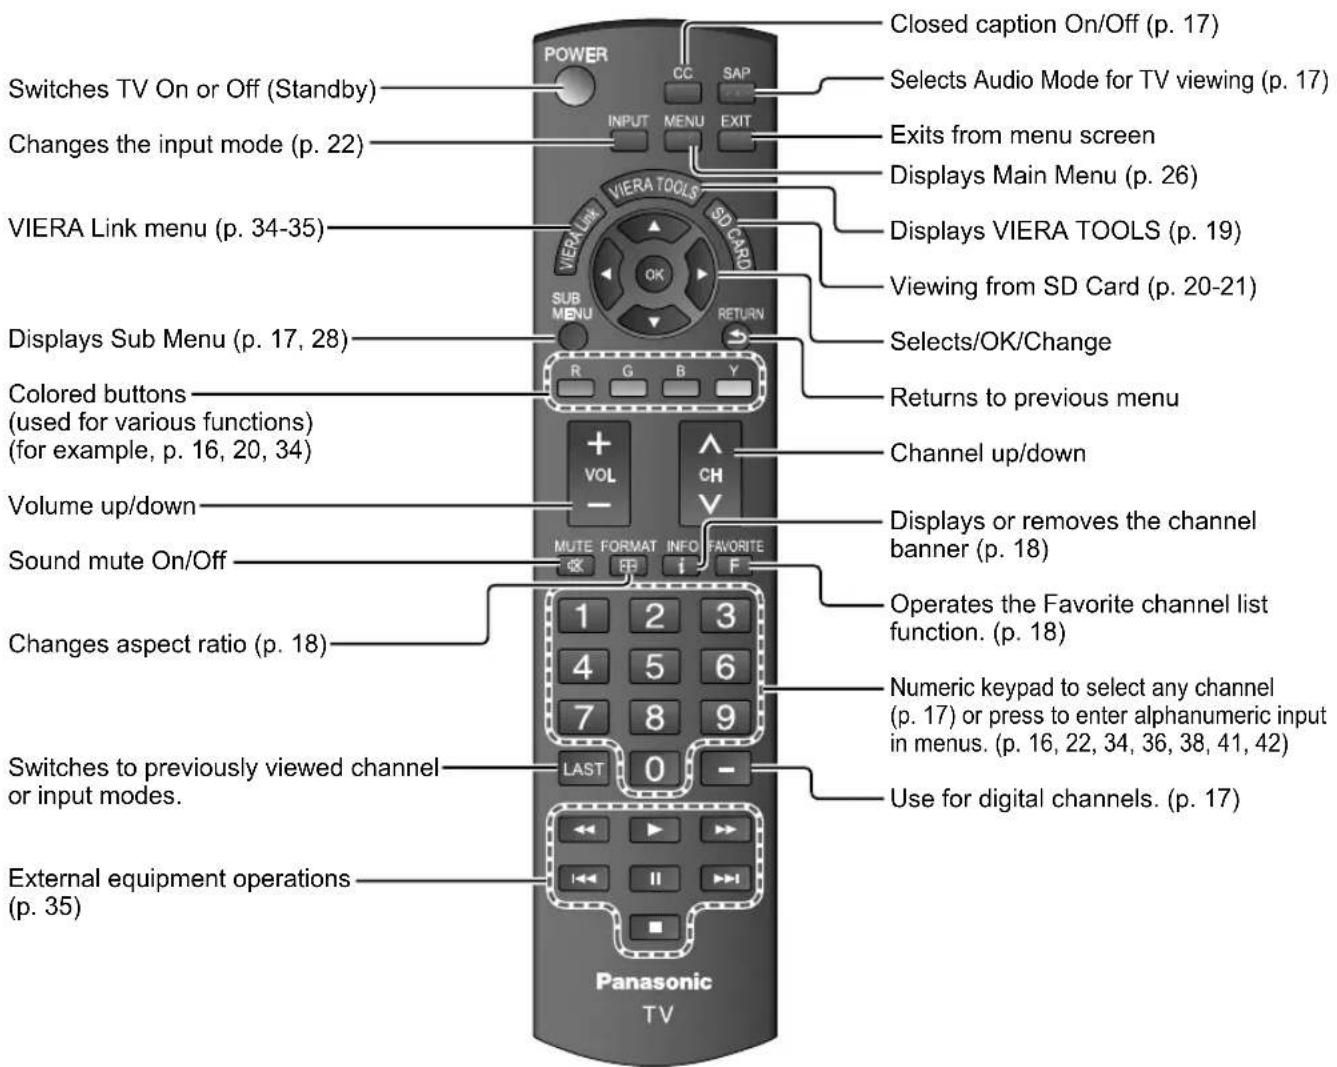
text_image
Switches TV On or Off (Standby) Changes the input mode (p. 22) VIERA Link menu (p. 34-35) Displays Sub Menu (p. 17, 28) Colored buttons (used for various functions) (for example, p. 16, 20, 34) Volume up/down Sound mute On/Off Changes aspect ratio (p. 18) Switches to previously viewed channel or input modes. External equipment operations (p. 35) POWER CC SAP INPUT MENU EXIT VIERA LINK VIERA TOOLS SD CARD SUB MENU RETURN R G B Y VOL CH MUTE FORMAT INFO FAVORITE F Panasonic TV Closed caption On/Off (p. 17) Selects Audio Mode for TV viewing (p. 17) Exits from menu screen Displays Main Menu (p. 26) Displays VIERA TOOLS (p. 19) Viewing from SD Card (p. 20-21) Selects/OK/Change Returns to previous menu Channel up/down Displays or removes the channel banner (p. 18) Operates the Favorite channel list function. (p. 18) Numeric keypad to select any channel (p. 17) or press to enter alphanumeric input in menus. (p. 16, 22, 34, 36, 38, 41, 42) Use for digital channels. (p. 17)First Time Setup
"First time setup" is displayed only when the TV is turned on for the first time after the power cord is inserted into a wall outlet and when "Auto power on" (p. 28-29) is set to "No".
natural_image
Illustration of a flat-screen TV with a logo and cable cord (no readable text or symbols)
Turn the TV On with the POWER button

text_image
POWER or POWER (Remote)(TV)
text_image
POWER EXIT OK RETURN Panasonic TV* This setting will be skipped next time if you select "Home".
① Select your language


② Be sure to select "Home"

- Please confirm your selection (Home) before pressing OK button.
■ If you select "Store" by mistake in ? confirmation screen will be displayed.


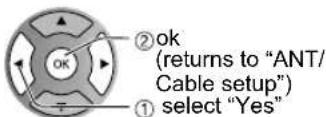
- Select "No" and return to previous screen ②
- If you select "Yes", Screen enters store demonstration mode.
To display the "Please select your viewing environment" screen again as shown above and select "Home", do one of the following:
- Press and hold down the side POWER button.
- Unplug the TV and plug it again.

Adjust the clock
text_image
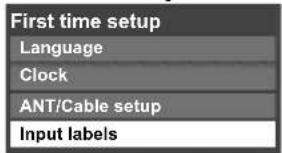
First time setup Language Clock ANT/Cable setup Input labels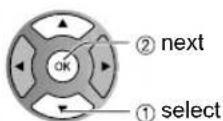

text_image
Clock Year 2009 Month 1 Day 7 Hour 10 AM Minute 10
Year: Select the year
Month: Select the month
Day: Select the day
Hour: Adjust the hour
Minute: Adjust the minute
■ Press to exit from a menu screen

■ Press to return to the previous screen

First Time Setup (Continued)
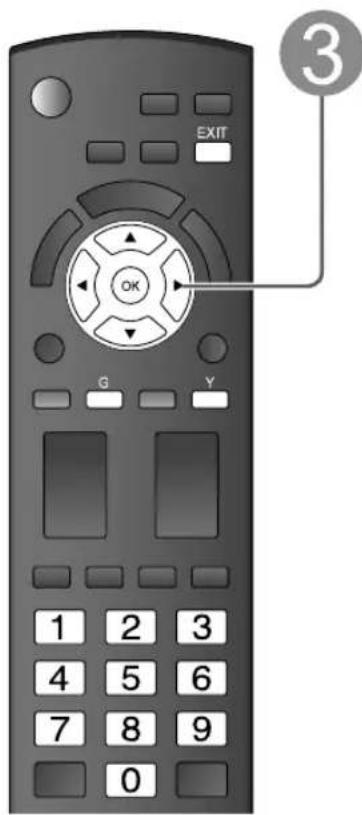
text_image
EXIT OK G Y 1 2 3 4 5 6 7 8 9 0 ③■ Press to exit from
a menu screen

Note
- To change setting (Language/Clock/ANT/Cable setup/Input labels) later, go to Menu screen (p. 28)
- About broadcasting systems
Analog (NTSC):
Conventional broadcasting
Digital (ATSC):
New
programming that allows you to view more channels featuring high-quality video and sound

Auto channel setup
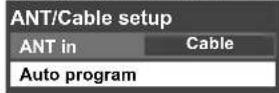
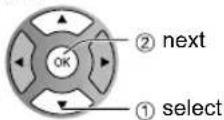
① Select "ANT/Cable setup"
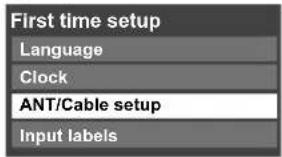
text_image
First time setup Language Clock ANT/Cable setup Input labels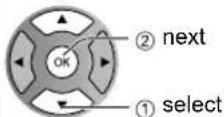
② Select "ANT in"
ANT in
Cable: Cable TV
Antenna: Antenna
Not used: Skip TV tuning go to 4
Select "Not used" when no wire is connected to the "Antenna/Cable" terminal.
- Typical when Cable/Satellite box is connected to a TV input.
- Prevents accidental tuning to an unavailable signal.
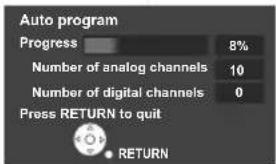
③ Select "Auto program"
④ Select scanning mode (ALL channels/Analog only/Digital only)

text_image
Auto program Progress 8% Number of analog channels 10 Number of digital channels 0 Press RETURN to quit RETURNStart scanning the channels
● Available channels (analog/digital) are automatically set.
All channels: Scans digital and analog channels
Analog only: Scans Analog channels only
Digital only: Scans Digital channels only
⑤ Confirm registered channels

- If OK is not pressed after selecting "Apply", the channels will not be saved. The channel will be saved when no operation is performed for 60 seconds and the "Manual program" menu will also exit automatically.
- If you perform scanning more than twice, previously saved channels are erased.
Set the Input labels
text_image
First time setup Language Clock ANT/Cable setup Input labels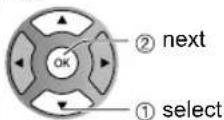
Label: [BLANK] SKIP/VCR/DVD/ CABLE/SATELLITE/DVR/GAME/ AUX/RECEIVER/COMPUTER/ Blu-ray/CAMERA/DVD REC/ HOME THTR/MONITOR/MEDIA CTR/MEDIA EXT/OTHER
text_image
Input labels Component HDMI 1 HDMI 2 Video 1 Video 2 PC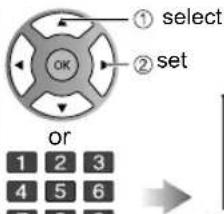
text_image
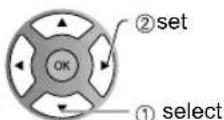
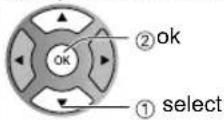
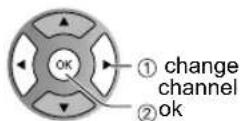
① select ② set OR or 1 2 3 4 5 6 7 8 9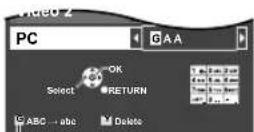
0
Switches Input mode alphabet to numeric
Watching TV
Connect the TV to a cable box/cable, set-top-box, satellite box or antenna cable (p. 10-13)
To watch TV and other functions
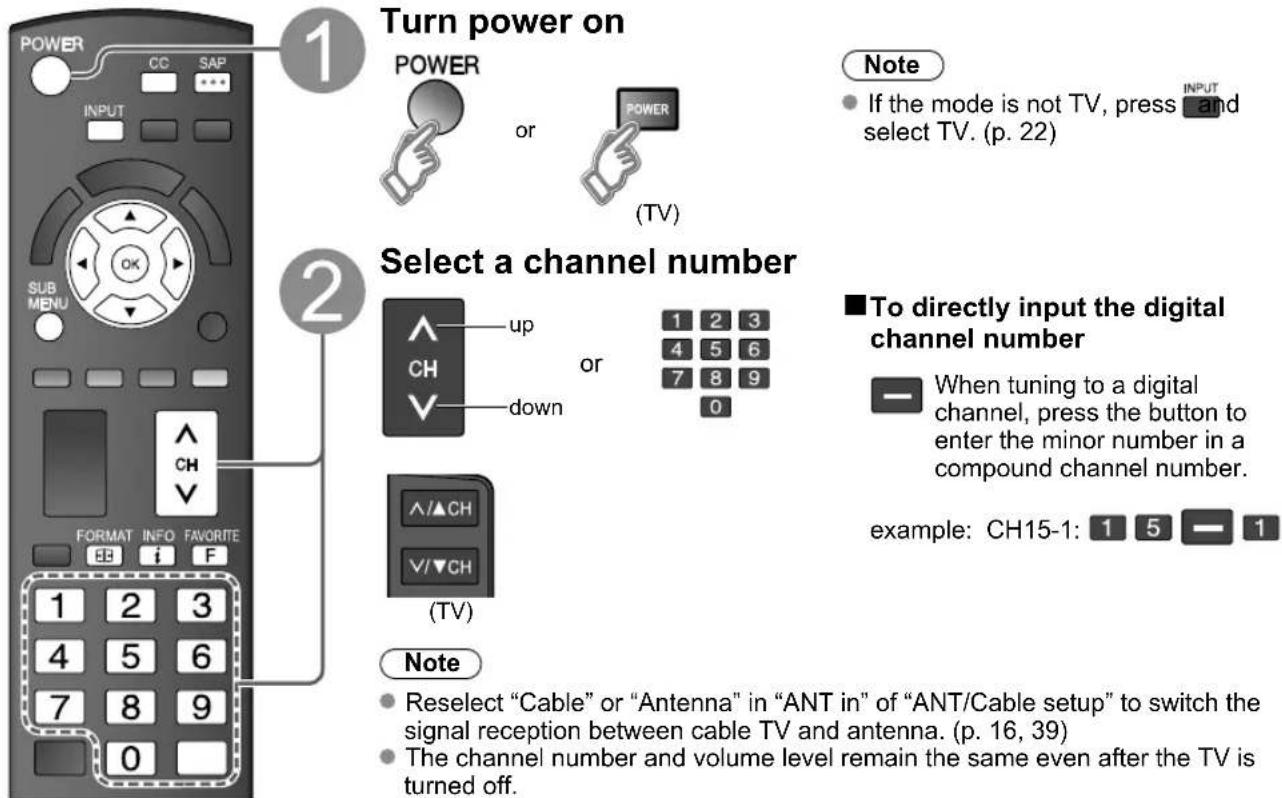
text_image
1 Turn power on POWER or POWER (TV) Note • If the mode is not TV, press and select TV. (p. 22) 2 Select a channel number up CH down 1 2 3 4 5 6 7 8 9 0 ■ To directly input the digital channel number When tuning to a digital channel, press the button to enter the minor number in a compound channel number. example: CH15-1: 1 5 — 1 Note • Reselect "Cable" or "Antenna" in "ANT in" of "ANT/Cable setup" to switch the signal reception between cable TV and antenna. (p. 16, 39) • The channel number and volume level remain the same even after the TV is turned off.| Listen with SAP (Secondary Audio Program) | ■Select Audio Mode for watching TV SAP ●Digital mode Press SAP to select the next audio track (if available) when receiving a digital channel. Audio track 1 of 2 (English) ●Analog mode Press SAP to select the desired audio mode. •Each press of SAP will change the audio mode. (Stereo/SAP/Mono) |
| Closed caption | ■Switches Closed caption mode On or Off CC Closed caption On ↔ Closed caption Off |
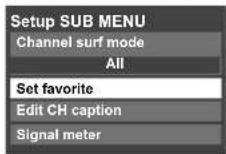
| Display the SUB MENU | ■Press SUB MENU to show sub menu screen. (p. 28) This menu consists of shortcuts to convenient functions. SUB MENU Setup SUB MENU Channel surf mode All Set favorite Edit CH caption Signal meter |
Watching TV (Continued)
■ Other Useful Functions (Operate after )
| Information Recall | ■ Displays or removes the channel banner. INFO Channel Clock i 15-2 12:30 THE NEWS ABC-HD CC SAP TV-G 1080i Standard 4:3 30 Station identifier S&P indication Signal resolution Picture mode Sleep timer remaining time Closed caption Rating Level Aspect ratio | ||||
| Change aspect ratio | ■ Press FORMAT to cycle through the aspect modes. (p. 45) FORMAT 4:3 3 • 480i, 480p: FULL/JUST/4:3/ZOOM • 1080i, 720p: FULL/H-FILL/JUST/4:3/ZOOM | ||||
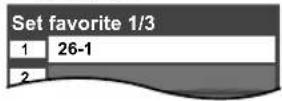
| Call up a favorite channel | FAVORITE F | ■FAVORITE Channel numbers registered in Favorite are displayed on the favorite tune screen. Select the desired broadcast station with the cursor or use number buttons. (see below) | |||
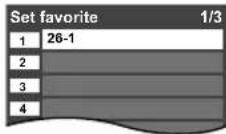
Favorite Feature
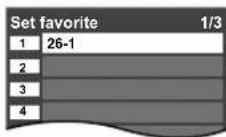
■ Set Favorite Feature
1 Display the SUB MENU.

2 Select "Set favorite"
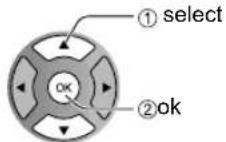
3 Set the displayed channel
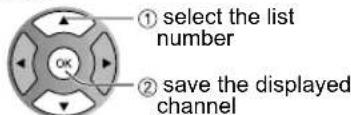
text_image
① select the list number ② save the displayed channel
Delete a favorite channel
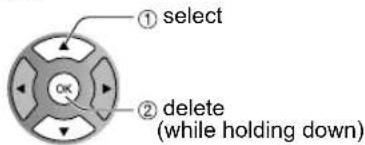
text_image
① select ② delete (while holding down)■Use Favorite Feature
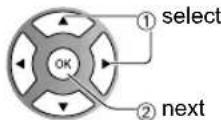
1 Display "Favorite channels"

2 Select the channel
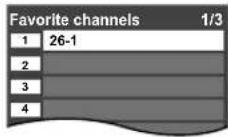
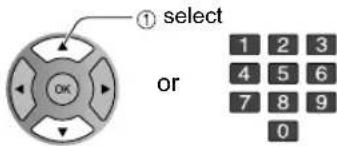
text_image
① select OR 1 2 3 4 5 6 7 8 9 03 Set Favorite channel

■To change the page


Press repeatedly to change between pages(1/3, 2/3, 3/3 or exit)
Changes the page forward/backward
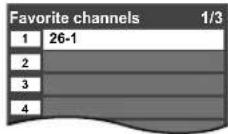
Using VIERA TOOLS
VIERA TOOLS are the easy way to access high use menu items. They are displayed as shortcut icons on the TV screen.
Unlike a conventional menu, you can enjoy using, playing or setting a function quickly.
text_image
Display VIERA TOOLS VIERA TOOLS Select the item ① select ② next Panasonic ① VIERA Link Displayed "VIERA Link control" menu (p. 34-35) Slideshow Start Slideshow (p. 20-21) Sleep Set "Sleep" (Off timer) (p. 42) Eco Displayed "ECO/energy saving" (p. 28)■ Press to exit from
a menu screen
EXIT

■ Press to return
to the previous screen
RETURN

Viewing from an SD Card
You can view photos taken with a digital camera or digital video camera and saved on an SD card. (Media other than SD Cards may not be reproduced properly.)
Photo viewer
Insert the SD card
* This setting will be skipped next time unless you select "Set later". Set "SD card setting" and select "Play SD card now"
- "SD card setting" will be displayed automatically each time an SD card is inserted for the first time.
Slideshow: A Slideshow will start automatically next time. Thumbnail: The Photo viewer menu will be displayed automatically next time. Set later: "SD card setting" menu will be displayed repeatedly.
Off: The data can be played manually.
■ Manual operation ("Play SD card automatically" is "Off")
Display "Photo viewer" Start Slideshow
Note
- Depending on the JPEG format, "Information" contents may not be displayed correctly. Refer to p. 46 (Data format for SD card browsing) for details.
• To display/hide Navigation area
- Return to Thumbnail view
VIERA IMAGE VIEWER
The VIERA Image Viewer is a function that lets you easily view still and motion images on a VIERA television by simply inserting an SD card into the VIERA SD card slot.
| SD Card | ● Insert the card Remove the card Compliant card type (maximum capacity): SDHC Card (16 GB), SD Card (2 GB), miniSD Card (1 GB) (requiring miniSD Card adapter)● For cautions and details on SD Cards (p. 46) | ||
| Sort | ■To sort by Folder, month or dateIn 21 Select sort type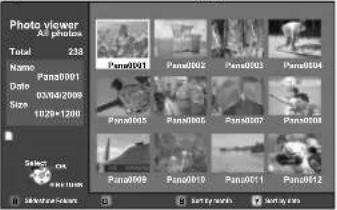  2 Select the directory. 2 Select the directory.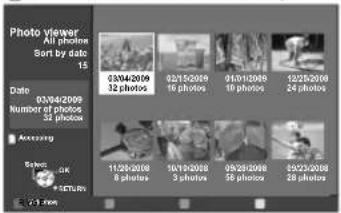 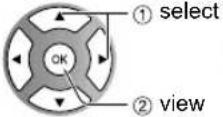 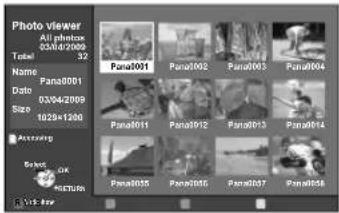 RETURNReturn to previous screen RETURNReturn to previous screen | ||
| Photo settings |     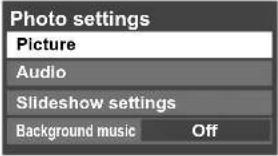   [Background music Off] [Background music Off] Select the Background music from 3 types. Each Background music plays for 90 seconds. (Off/Music 1/Music 2/Music 3) Select the Background music from 3 types. Each Background music plays for 90 seconds. (Off/Music 1/Music 2/Music 3) | ||
     [xtxx] [xtxx] | |||
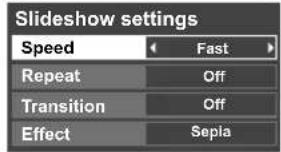
| Speed | You can set how many seconds each image is displayed in Slideshow mode. (Very fast/Fast/Medium/Slow/Very slow) | ||
| Repeat | Turn the slideshow Repeat function on or off (On/Off). | ||
| Transition | Select transition effect (Off/Wipe ↓/Wipe ↑/Wipe →/Wipe ←/Comb ↑↓/Comb →←/Dissolve/Checker wipe/Random) | ||
| Effect | Select conversion effect (Off/Sepia/Gray scale) | ||
| Speed | You can set how many seconds each image is displayed in Slideshow mode. (Very fast/Fast/Medium/Slow/Very slow) |
| Repeat | Turn the slideshow Repeat function on or off (On/Off). |
| Transition | Select transition effect (Off/Wipe ↓/Wipe ↑/Wipe →/Wipe ←/Comb ↑↓/Comb →←/Dissolve/Checker wipe/Random) |
| Effect | Select conversion effect (Off/Sepia/Gray scale) |
Watching Videos and DVDs
If you have applicable equipment connected to the TV, you can watch videos and DVDs on the TV's screen.
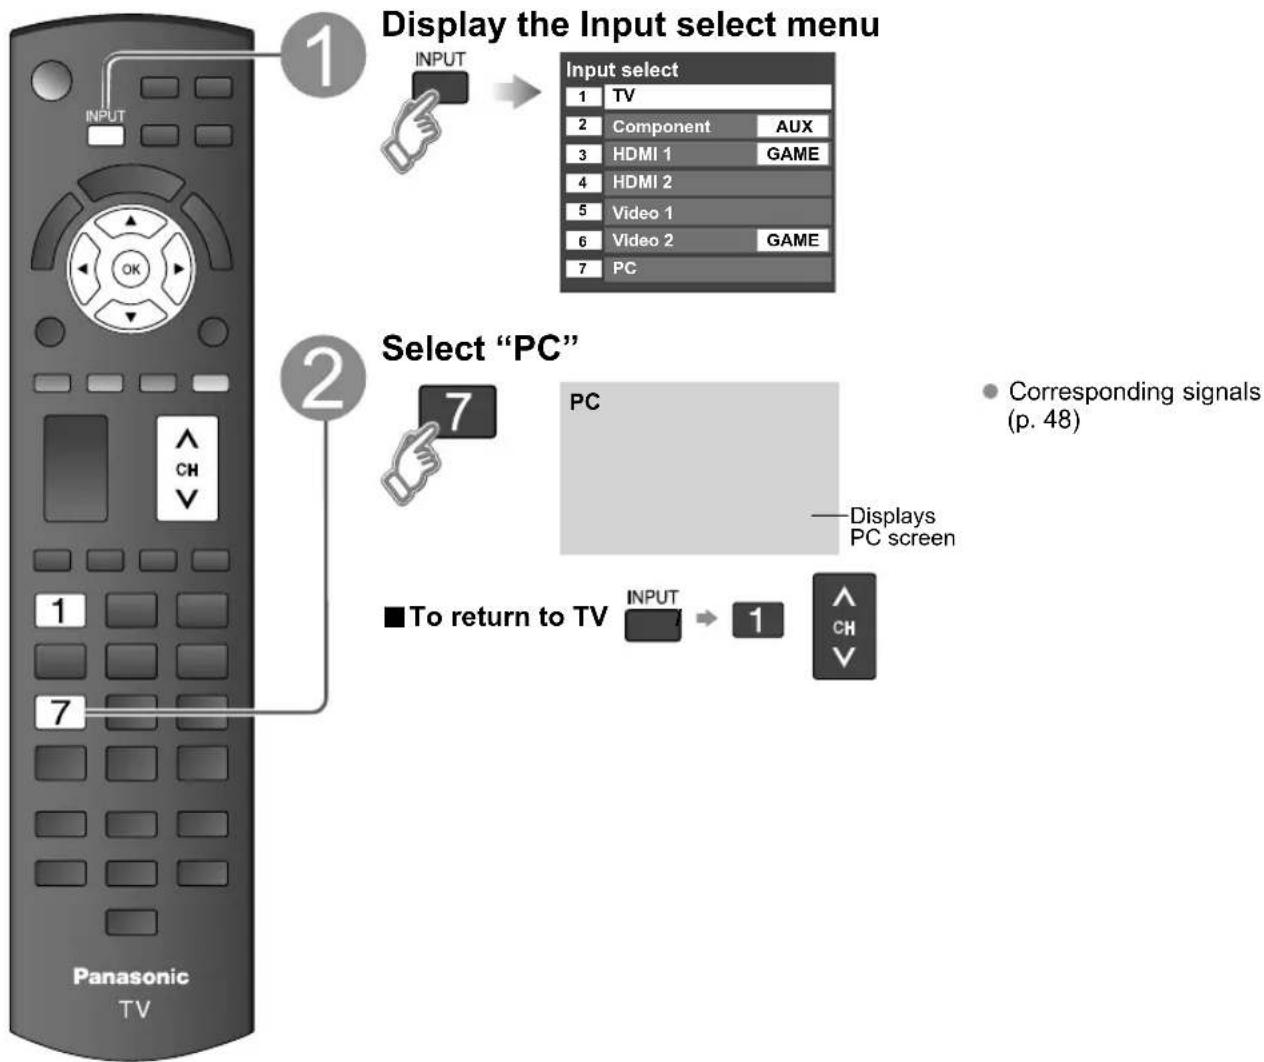
Input Select
You can select the external equipment to access.

flowchart
graph TD
    A["1: With the connected equipment turned On"] --> B["2: Select the input mode"]
    B --> C["3: Operate the connected equipment using the remote control supplied with the equipment"]
    C --> D["4: Press corresponding NUMBER button on the remote control to select the input of your choice."]
    D --> E["5: Select the input of your choice, then press OK."]
    E --> F["6: During the selection, if no action is taken for several seconds, the "Input select" menu disappears."]
    F --> G["7: The terminal and label of the connected equipment are displayed. To label each of the inputs, please refer to p. 41."]
    G --> H["8: The terminal and label of the connected equipment are displayed. To label each of the inputs, please refer to p. 41."]
    H --> I["9: The terminal and label of the connected equipment are displayed. To label each of the inputs, please refer to p. 41."]
    I --> J["10: The terminal and label of the connected equipment are displayed. To label each of the inputs, please refer to p. 41."]
    J --> K["11: The terminal and label of the connected equipment are displayed. To label each of the inputs, please refer to p. 41."]
    K --> L["12: The terminal and label of the connected equipment are displayed. To label each of the inputs, please refer to p. 41."]
    L --> M["13: The terminal and label of the connected equipment are displayed. To label each of the inputs, please refer to p. 41."]
    M --> N["14: The terminal and label of the connected equipment are displayed. To label each of the inputs, please refer to p. 41."]
    N --> O["15: The terminal and label of the connected equipment are displayed. To label each of the inputs, please refer to p. 41."]
    O --> P["16: The terminal and label of the connected equipment are displayed. To label each of the inputs, please refer to p. 41."]
    P --> Q["17: The terminal and label of the connected equipment are displayed. To label each of the inputs, please refer to p. 41."]
    Q --> R["18: The terminal and label of the connected equipment are displayed. To label each of the inputs, please refer to p. 41."]
    R --> S["19: The terminal and label of the connected equipment are displayed. To label each of the inputs, please refer to p. 41."]
    S --> T["20: The terminal and label of the connected equipment are displayed. To label each of the inputs, please refer to p. 41."]
    T --> U["21: The terminal and label of the connected equipment are displayed. To label each of the inputs, please refer to p. 41."]
    U --> V["22: The terminal and label of the connected equipment are displayed. To label each of the inputs, please refer to p. 41."]
    V --> W["23: The terminal and label of the connected equipment are displayed. To label each of the inputs, please refer to p. 41."]
    W --> X["24: The terminal and label of the connected equipment are displayed. To label each of the inputs, please refer to p. 41."]
    X --> Y["25: The terminal and label of the connected equipment are displayed. To label each of the inputs, please refer to p. 41."]
    Y --> Z["26: The terminal and label of the connected equipment are displayed. To label each of the inputs, please refer to p. 41."]
    Z --> AA["27: The terminal and label of the connected equipment are displayed. To label each of the inputs, please refer to p. 41."]
    AA --> AB["28: The terminal and label of the connected equipment are displayed. To label each of the inputs, please refer to p. 41."]
    AB --> AC["29: The terminal and label of the connected equipment are displayed. To label each of the inputs, please refer to p. 41."]
    AC --> AD["30: The terminal and label of the connected equipment are displayed. To label each of the inputs, please refer to p. 41."]
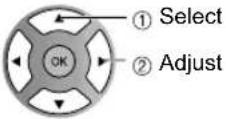
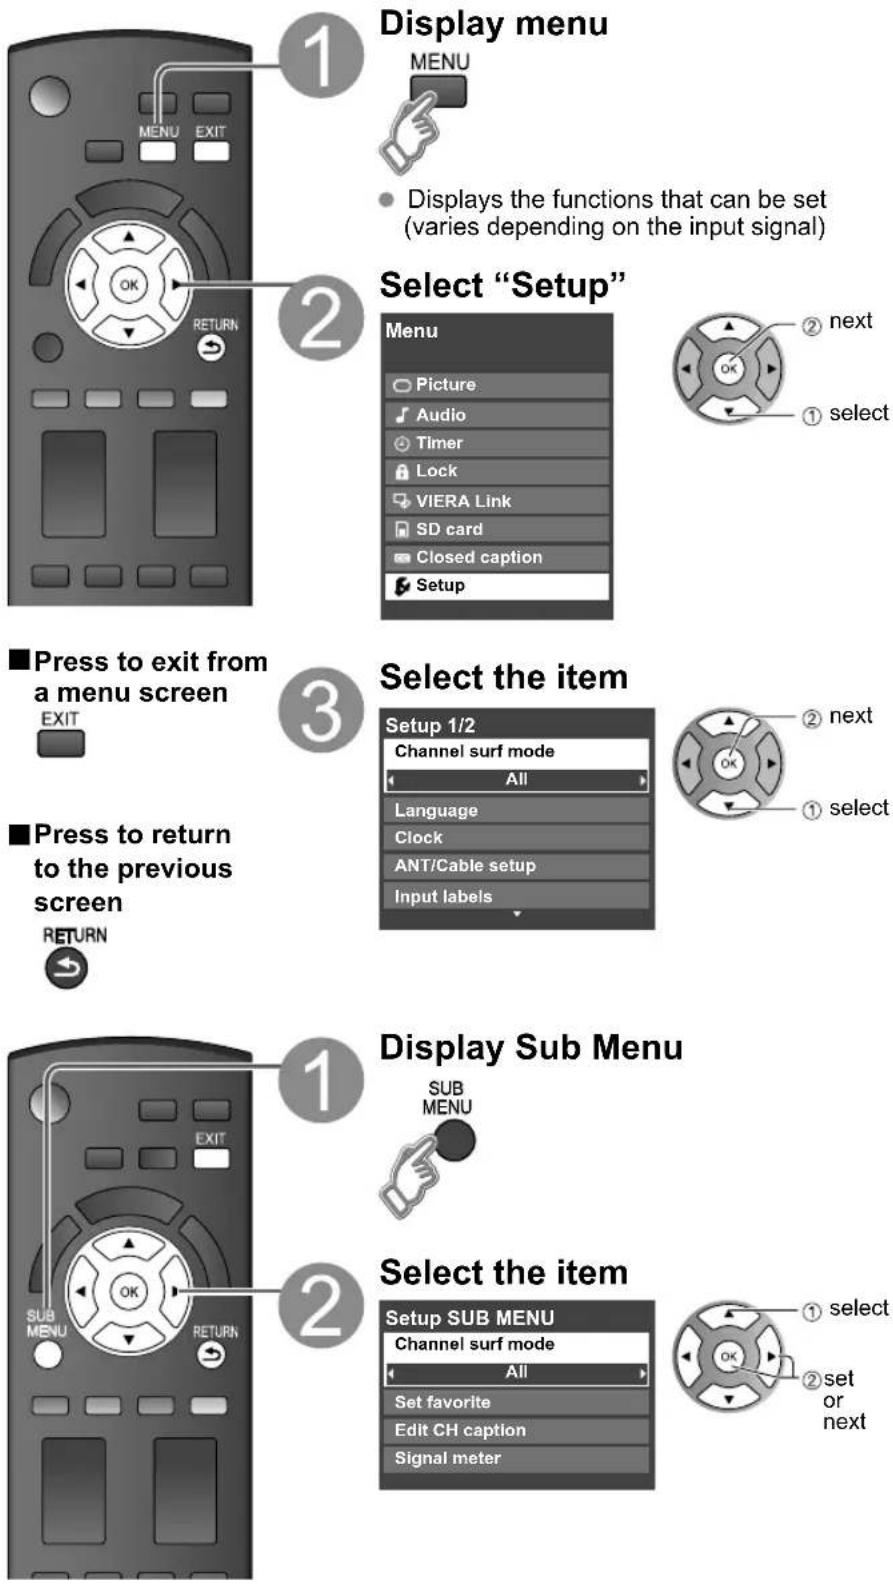
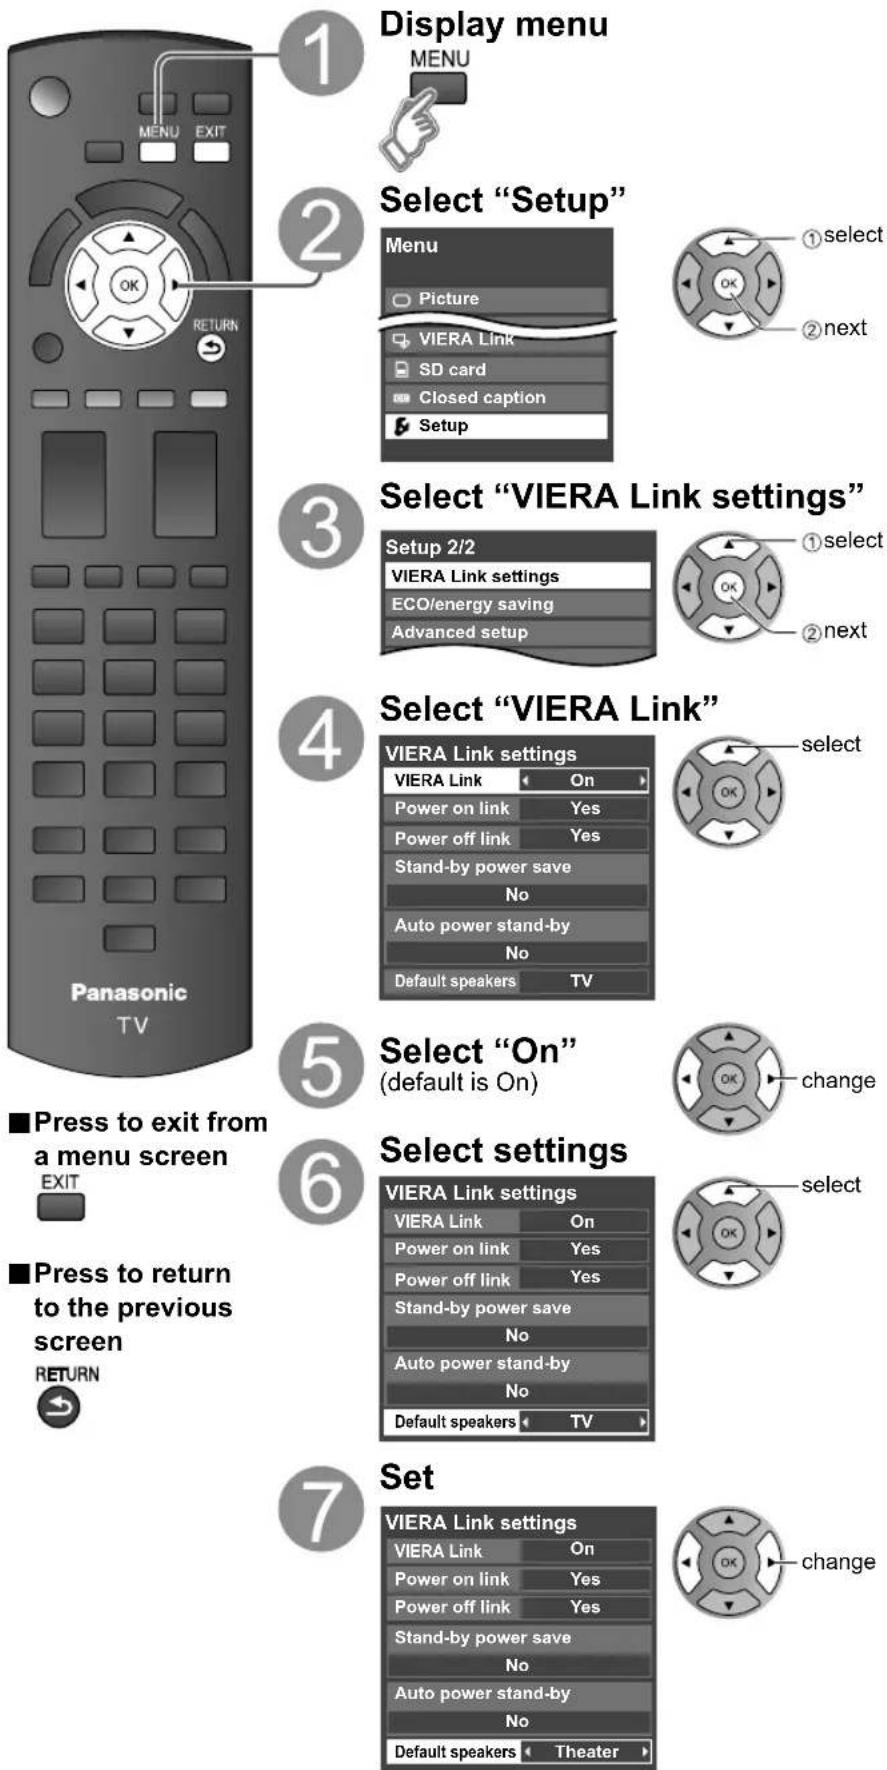
VIERA Link™ Setting
If you connect equipment that has the "HDAVI Control" function to a TV using an HDMI cable, you will find it easier to use. Please refer to p. 30-35. Before using these functions, you need to set "VIERA Link" setting to "On" as shown below.
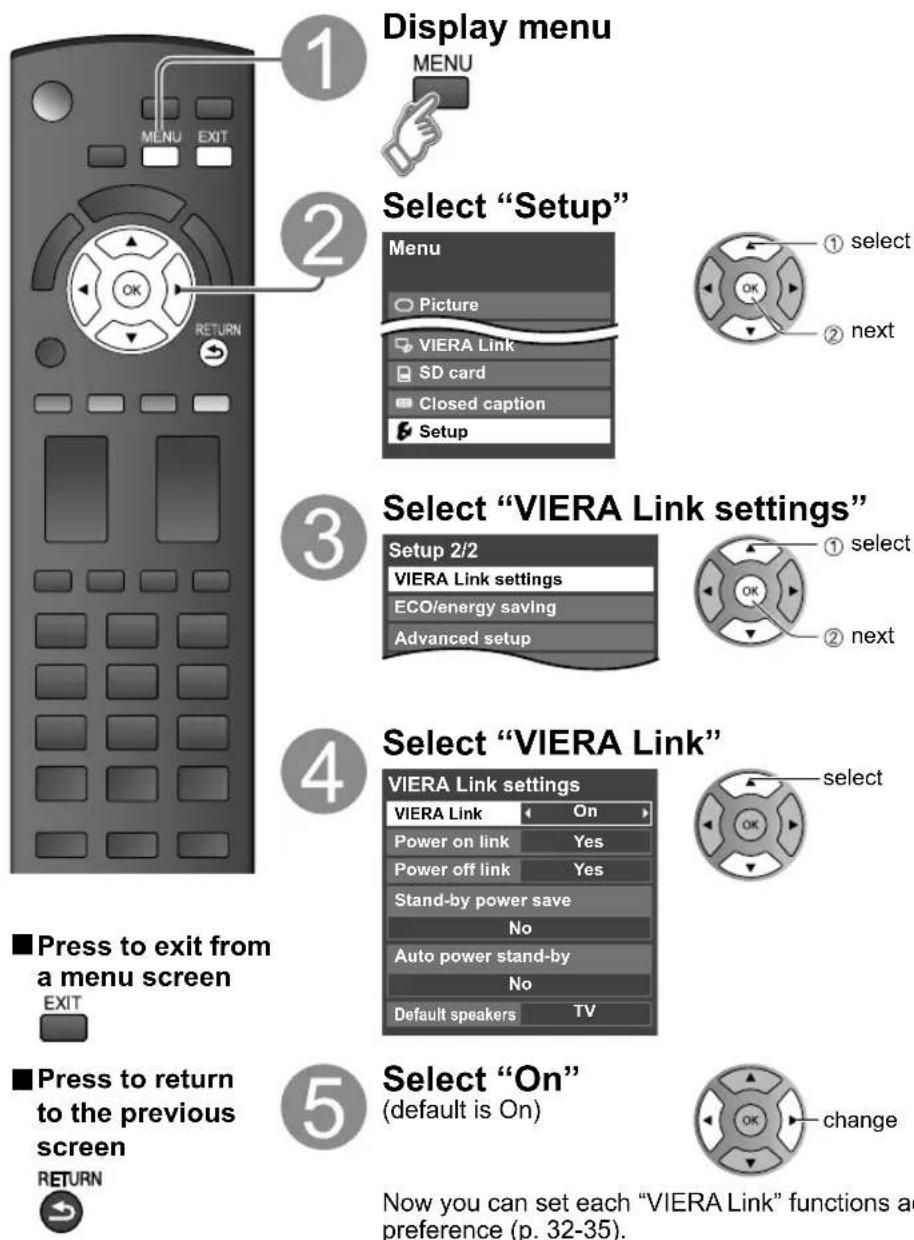
1
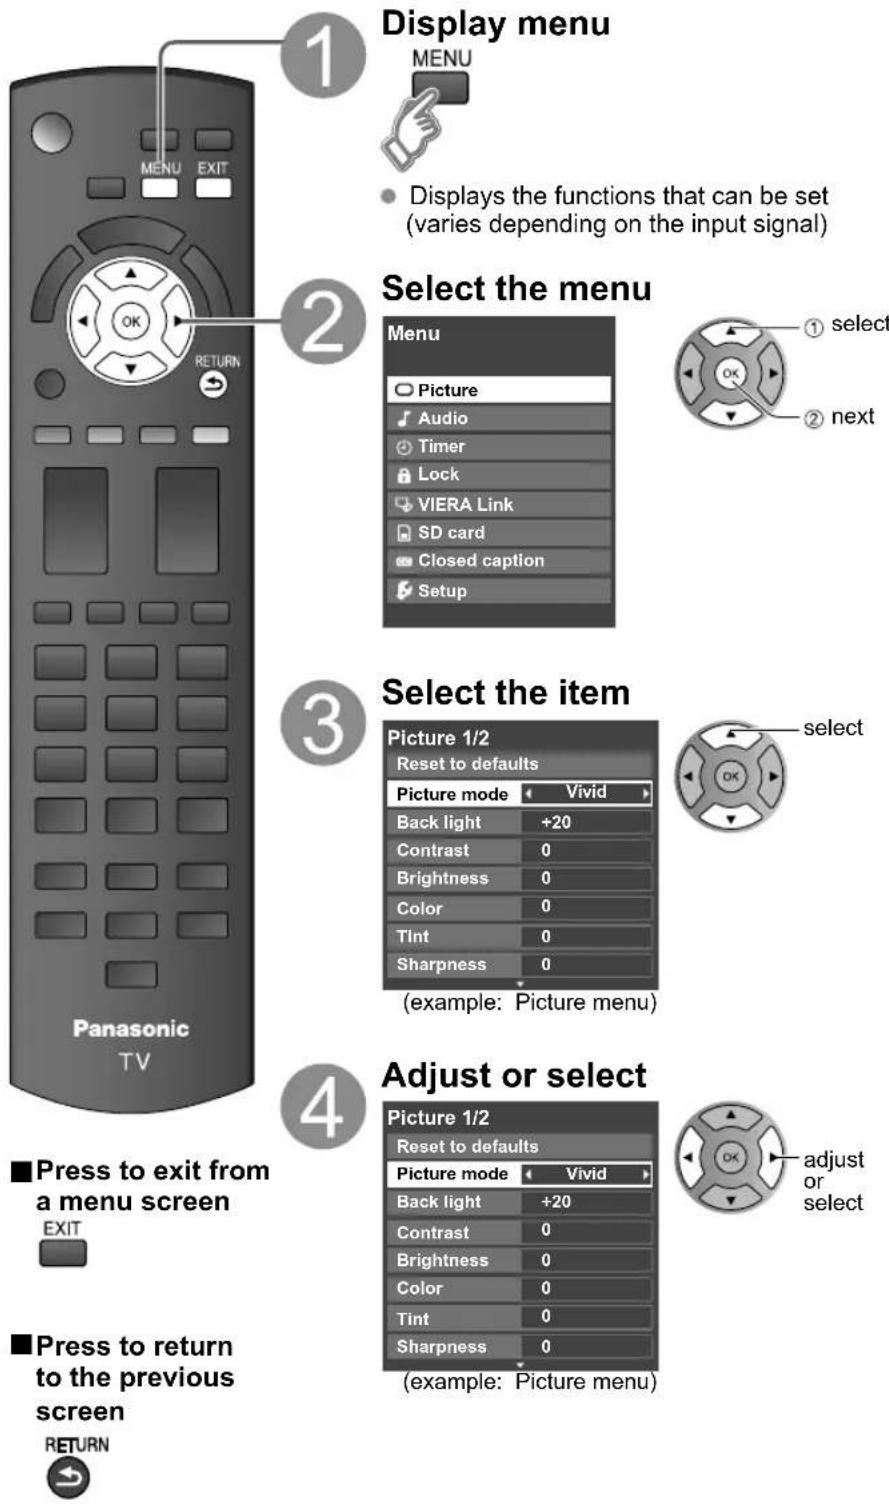
Display menu
2
Select "Setup"
3
Select "VIERA Link settings"
4
Select "VIERA Link"
5
Select "On" (default is On)
Now you can set each "VIERA Link" functions according to your preference (p. 32-35).
Note
- If no HDMI equipment is connected or standard HDMI equipment (non- "VIERA Link") is used, set it to "Off".
- For more details on the external equipment's connections, please refer to the operating manuals for the equipment.
Displaying PC Screen on TV
The screen of the PC connected to the unit can be displayed on the TV.
You can also listen to PC sound with the audio cable connected. To connect PC (p. 43)
flowchart
graph TD
    A["1"] --> B["1"] --> C["2"]
    C --> D["2"] --> E["3"] --> F["4"] --> G["5"] --> H["6"] --> I["7"] --> J["8"] --> K["9"] --> L["10"] --> M["11"] --> N["12"] --> O["13"] --> P["14"] --> Q["15"] --> R["16"] --> S["17"] --> T["18"] --> U["19"] --> V["20"] --> W["21"] --> X["22"] --> Y["23"] --> Z["24"] --> AA["25"] --> AB["26"] --> AC["27"] --> AD["28"] --> AE["29"] --> AF["30"] --> AG["31"] --> AH["32"] --> AI["33"] --> AJ["34"] --> AK["35"] --> AL["36"] --> AM["37"] --> AN["38"] --> AO["39"] --> AP["40"] --> AQ["41"] --> AR["42"] --> AS["43"] --> AT["44"] --> AU["45"] --> AV["46"] --> AW["47"] --> AX["48"] --> AY["1"]
    A -->|1| B
    B -->|2| C
    C -->|3| D
    D -->|4| E
    E -->|5| F
    F -->|6| G
    G -->|7| H
    H -->|8| I
    I -->|9| J
    J -->|10| K
    K -->|11| L
    L -->|12| M
    M -->|13| N
    N -->|14| O
    O -->|15| P
    P -->|16| Q
    Q -->|17| R
    R -->|18| S
    S -->|19| T
    T -->|20| U
    U -->|21| V
    V -->|22| W
    W -->|23| X
    X -->|24| Y
    Y -->|25| Z
    Z -->|26| AA
    AA -->|27| AB
    AB -->|28| AC
    AC -->|29| AD
    AD -->|30| AE
    AE -->|31| AF
    AF -->|32| AG
    AG -->|33| AH
    AH -->|34| AI
    AI -->|35| AJ
    AJ -->|36| AK
    AK -->|37| AL
    AL -->|38| AM
    AM -->|39| AN
    AN -->|40| AO
    AO -->|41| AP
    AP -->|42| AQ
    AQ -->|43| AR
    AR -->|44| AS
    AS -->|45| AT
    AT -->|46| AU
    AU -->|47| AV
    AV -->|48| AW
■ PC menu setting (change as desired)
- Making settings → "How to Use Menu Functions"

| Menu | Item Adjustments/Configurations (options) | |||
| Picture | PC adjustments | Reset to defaults | Resets PC adjust | |
| Sync | H & V: The H and V sync signals are input from the HD/VD connector. (p. 48)On green: Uses a synchronized signal on the Video G signal, which is input from the G connector. (p. 48) | |||
| Dot clock | Alleviates the problem if a picture appears to be vertically-striped, flickers partially or is blurred. | |||
| H-position | Adjusts the horizontal position. |  | ||
| V-position | Adjusts the vertical position. |  | ||
| Clock phase | Alleviates the problem if the whole picture appears to flicker or is blurred.First adjust the Dot Clock to get the best possible picture, then adjust the Clock Phase so that a clear picture appears.NoteIt may not be possible to display a clear picture due to poor input signals. | |||
| Input resolution | Switches to wide display.Input signal switched from 640×480 to 800×480Input signal switched from 1024×768 to 1280×768 or 1366×768 | |||
| H-frequency V-frequency | Displays the H (Horizontal)/V (Vertical) frequencies.Display rangeHorizontal: 15 - 110 kHzVertical: 48 - 120 Hz | |||
• Audio menu (p. 26)
How to Use Menu Functions
other functions so that you can enjoy watching TV best suited for you.
text_image
Display menu MENU Displays the functions that can be set (varies depending on the input signal) Select the menu Menu Picture Audio Timer Lock VIERA Link SD card Closed caption Setup ① select ② next 3 Select the item Picture 1/2 Reset to defaults Picture mode Vivid Back light +20 Contrast 0 Brightness 0 Color 0 Tint 0 Sharpness 0 (example: Picture menu) select 4 Adjust or select Picture 1/2 Reset to defaults Picture mode Vivid Back light +20 Contrast 0 Brightness 0 Color 0 Tint 0 Sharpness 0 (example: Picture menu) adjust or select Press to exit from a menu screen EXIT Press to return to the previous screen RETURN■Menu listVarious menus allow you to m
| Menu | Item | ||
| Picture | Reset to defaults | ||
| Picture mode | |||
| Back light | |||
| Contrast, Brightness, Color, Tint, Sharpness | |||
| Color temp. | |||
| Color mgmt. | |||
| A.I. picture | |||
| Video NR | |||
| Zoom adjustments | |||
| PC adjustments | |||
| Advanced picture | Color matrix | ||
| MPEG NR | |||
| Black level | |||
| H size | |||
| Audio | Reset to defaults | ||
| Bass | |||
| Treble | |||
| Balance | |||
| Advanced audio | A.I. sound | ||
| Surround | |||
| Volume leveler | |||
| TV speakers | |||
| HDMI 1 in HDMI 2 in | |||
| Timer | Sleep, Timer 1-5 | ||
| Lock | |||
| VIERA Link | Record now Stop recording VIERA Link control Speaker output | ||
| SD card | SD card | ||
| Closed caption | Closed caption | ||
| Adjustments/Configurations (alternatives) | ||
| Resets all picture adjustments to factory default settings except for “Advanced picture”. | Reset to defaults | |
| Basic picture mode (Vivid/Standard/Cinema/Custom) (p. 47) | Picture mode Vivid | |
| Adjusts luminance of the back light. | Back light +20 | |
| Adjusts color, brightness, etc. for each picture mode to suit your taste | Contrast +20 | Tint 0 |
| Display range | Brightness 0 | Sharpness 0 |
| Contrast/Brightness/Color/Sharpness: 0 - 100 | Color 0 | |
| Tint: -50 - +50 | ||
| Selects a choice of Cool(blue), Normal, or Warm(red) color. (Cool/Normal/Warm) | Color temp. Cool | |
| On: Enhances green and blue color reproduction, especially outdoor scenes. (On/Off) | Color mgmt. On | |
| Controls dark areas without affecting the black level or brightness in the overall picture (On/Off) | A.I. picture On | |
| Reduces noise, commonly called snow. Leave it off when receiving a strong signal. (Off/On) | Video NR Off | |
| Adjusts vertical alignment and size when aspect setting is “ZOOM” (p. 45) | Zoom adjustments | |
| Sets PC display (p. 24) | PC adjustments | |
| Selects image resolution of component-connected devices (HD/SD) | Color matrix SD | |
| SD: Standard Definition HD: High Definition Only 480p signal accepted; regular TV (NTSC) is not available. | ||
| Reduces noise of specific digital signals of DVD, STB, etc. (On/Off) | MPEG NR Off | |
| Selects Dark or Light. Valid only for external input signals. (Dark/Light) | Black level Light | |
| Adjust horizontal display range to reduce noise of both side edges of an image. (Size 1/Size 2) Size 2: Adjust image size according to aspect mode for reducing noise. (p. 48) | H size Size 1 | |
| Resets Bass, Treble and Balance adjustments to factory default settings. | Reset to defaults | |
| Increases or decreases the bass response. | Bass 0 | |
| Increases or decreases the treble response. | Treble 0 | |
| Emphasizes the left / right speaker volume. | Balance 0 | |
| Equalizes overall volume levels across all channels and external inputs. (On/Off) | A.I. sound On | |
| Enhances audio response when listening to stereo. (On/Off) | Surround Off | |
| Minimizes volume disparity after switching to external inputs. | Volume leveler 0 | |
| Switch to “Off” when using external speakers (On/Off) | TV speakers On | |
| “A.I. sound”, “Surround” and “Volume leveler” do not work if “Off” is selected. | ||
| The default setting is “Digital” for HDMI connection. (Digital input signal) Select audio input terminal when DVI cable is connected. (Analog audio input signal) (Digital/Component/Video 1/Video 2) | HDMI1 in Digital | |
| HDMI2 in Digital | ||
| The TV can automatically turn On/Off at the designated date and time (p. 42) | ||
| Locks the channels and programs (p. 36) | ||
| [Record now/Stop recording] Records programs on the recorder immediately with the TV’s remote control (p. 34-35). [VIERA Link control] Selects equipment to access and operate. (Recorder/Home theater/Player/Camcorder/LUMIX) (p. 34-35) [Speaker output] Selects an audio output. (Home theater/TV) (p. 34-35) VIERA Link menu is accessible directly by pressing the VIERA Link button on the remote control. ➔ (p. 34) | ||
| Displays SD card data (p. 20-21) | SD card | |
| Displays subtitles (Closed caption) (p. 40) | Closed caption | |
- In AV mode, the Audio menu and Setup menu give fewer options.
How to Use Menu Functions
Various menus allow you to make settings for the picture, sound, and other functions so that you can enjoy watching TV best suited for you.
- Displays the functions that can be set (varies depending on the input signal)
■Menu list
| Menu | Item | ||
| Setup | Channel surf mode | ||
| Language | |||
| Clock | |||
| ANT/Cable setup | |||
| Input labels | |||
| VIERA Link settings | VIERA Link | ||
| Power on link | |||
| Power off link | |||
| Stand-by power save | |||
| Auto power stand-by | |||
| Default speakers | |||
| ECO/energy saving | Power save | ||
| No signal for 10 minutes | |||
| No activity for 3 hours | |||
| Advanced setup | Auto power on | ||
| Play SD card automatically | |||
| About | |||
| Reset to defaults | |||
■Sub menu list
| Menu | tem | |
| Setup | Channel surf mode | |
| Set favorite | ||
| Edit CH caption | ||
| Signal meter |
(Continued)
| Adjustments/Configurations (alternatives) | |
| Sets the mode to select the channel with Channel up/down button(All/Favorite/Digital only/Analog only)Favorite: Only channels registered as FAVORITE (p. 18) | Channel surf modeAll |
| Selects the screen menu language (p. 15) | Language |
| Adjusts the clock (p. 15) | Clock |
| Sets channels (p. 39) | ANT/Cable setup |
| Selects the terminal and label of the external equipment (p. 41) | Input labels |
| Controls equipment connected to HDMI terminals (p. 32) (On/Off)"Power off link", "Power on link", "Stand-by power save", "Auto power stand-by" and "Default speakers" cannot be selected if "Off" is set. | VIERA Link On |
| Sets "Power on link" of HDMI connection equipment (p. 32) (Yes/No) | Power on link Yes |
| Sets "Power off link" of HDMI connection equipment (p. 32) (Yes/No) | Power off link Yes |
| Set "Stand-by power save" of HDMI connection equipment. (p. 32) (No/Yes) | Stand-by power saveNo |
| Set "Auto power stand-by" of HDMI connection equipment. (p. 32)(No/Yes (with reminder)/Yes (no reminder) | Auto power stand-byNo |
| Selects the default speakers (p. 32) (TV/Theater) | Default speakers TV |
| Reduces screen brightness to lower power consumption. Eye-friendly for viewing in a dark room.(Standard/Saving) | Power save Standard |
| To conserve energy, the TV automatically turns off when NO SIGNAL and NO OPERATION is performed for more than 10 minutes. (Enable/Disable)NoteNot in use when setting "Auto power on", "On/Off Timer", "Lock", "SD mode" or Digital channel.No signal for 10 minutes was activated will be displayed for about 10 seconds when the TV is turned on for the first time after turning the power off by "No signal for 10 minutes".The on-screen display will flash 3, 2 and 1 to indicate the last three (3) remaining minutes prior to the shut-off. | No signal for 10 minutesEnable |
| To conserve energy, the TV automatically turns off when no operation of remote or side panel key continues for more than 3 hours. (Enable/Disable)NoteNot in use when setting "Auto power on", "On/Off Timer or PC input display."No activity for 3 hours was activated will be displayed for about 10 seconds when the TV is turned on for the first time after turning the power off by "No activity for 3 hours".The on-screen display will flash 3, 2 and 1 to indicate the last three (3) remaining minutes prior to the shut-off. | No activity for 3 hoursDisable |
| Turns TV On automatically when the cable box or a connected device is turned On. (No/Yes)TV power cord must be plugged into this device. TV comes on every time the power is restored.The "Sleep" timer, "On / Off timer", and "First time setup" will not function if "Auto power on" is set. (p. 42) | Auto power on No |
| Set "Thumbnail" or "Slideshow" to play back SD cards automatically. (Slideshow/Thumbnail/Set later/Off) | Play SD card automaticallySet later |
| Displays TV version and software license. | About |
| Performing Reset will clear all items set with Setup, such as channel settings. (p. 38) | Reset to defaults |
| Adjustments/Configurations (alternatives) |
| Sets the mode to select the channel with Channel up/down button (All/Favorite/Digital only/Analog only) |
| Sets favorite channels. (p. 18) |
| Changes the station identifier. (p. 39) |
| Checks the signal strength if interference or freezing occurs on a digital image. (p. 39) |
VIERA Link™ “HDAVI Control™”\*
Simultaneously control all Panasonic "HDAVI Control" equipped components using one button on the TV remote.
Enjoy additional HDMI Inter-Operability with Panasonic products which have the "HDAVI Control" function.
This TV supports "HDAVI Control 4" function.
Connections to the equipment (DVD recorder DIGA, HD Camcorder, Player theatre, RAM theater, Amplifier, etc.) with HDMI cables allow you to interface with them automatically.
Equipment with the "HDAVI Control" function enables the following operations:
| Version Operations | |
| HDAVI Control or later | Automatic Input Switching (p. 33)Power on link (p. 33)Power off link (p. 33)Default speakers (p. 33)One-touch theater playback (p. 33)Speaker control (p. 35) |
| HDAVI Control 2 or later | VIERA Link control only with the TV's remote control(P. 35)Auto power stand-by (for available equipment only) (p. 33)Direct TV recording (p. 35) |
| HDAVI Control 3 or later | Providing the setting information (p. 33)Automatic lip-sync function (p. 33) |
| HDAVI Control 4 | Stand-by power save (with quick start mode) (p. 33) |
For the first time/When adding new equipment, reconnecting equipment or changing the setup after the connection, turn the equipment on and then switch the TV on. Set the input mode to HDMI1 or HDMI2 (p. 22), and make sure that the image is displayed correctly.
VIERA Link "HDAVI Control", based on the control functions provided by HDMI which is an industry standard known as HDMI CEC (Consumer Electronics Control), is a unique function that we have developed and added. As such, its operation with other manufacturers' equipment that supports HDMI CEC cannot be guaranteed.
Please refer to the individual manuals for other manufacturers' equipment supporting the VIERA Link function.
■ HDMI cable
This function needs an HDMI compliant (fully wired) cable. Non-HDMI-compliant cables cannot be utilized.
It is recommended that you use Panasonic's HDMI cable. Recommended part number:
RP-CDHF15 (4.9 ft/1.5 m), RP-CDHG15 (4.9 ft/1.5 m), RP-CDHF30 (9.8 ft/3.0 m),
RP-CDHG30 (9.8 ft/3.0 m), RP-CDHG50 (16.4 ft/5.0 m)
* For more details on the external equipment's connections, please refer to the operating manuals for the equipment.
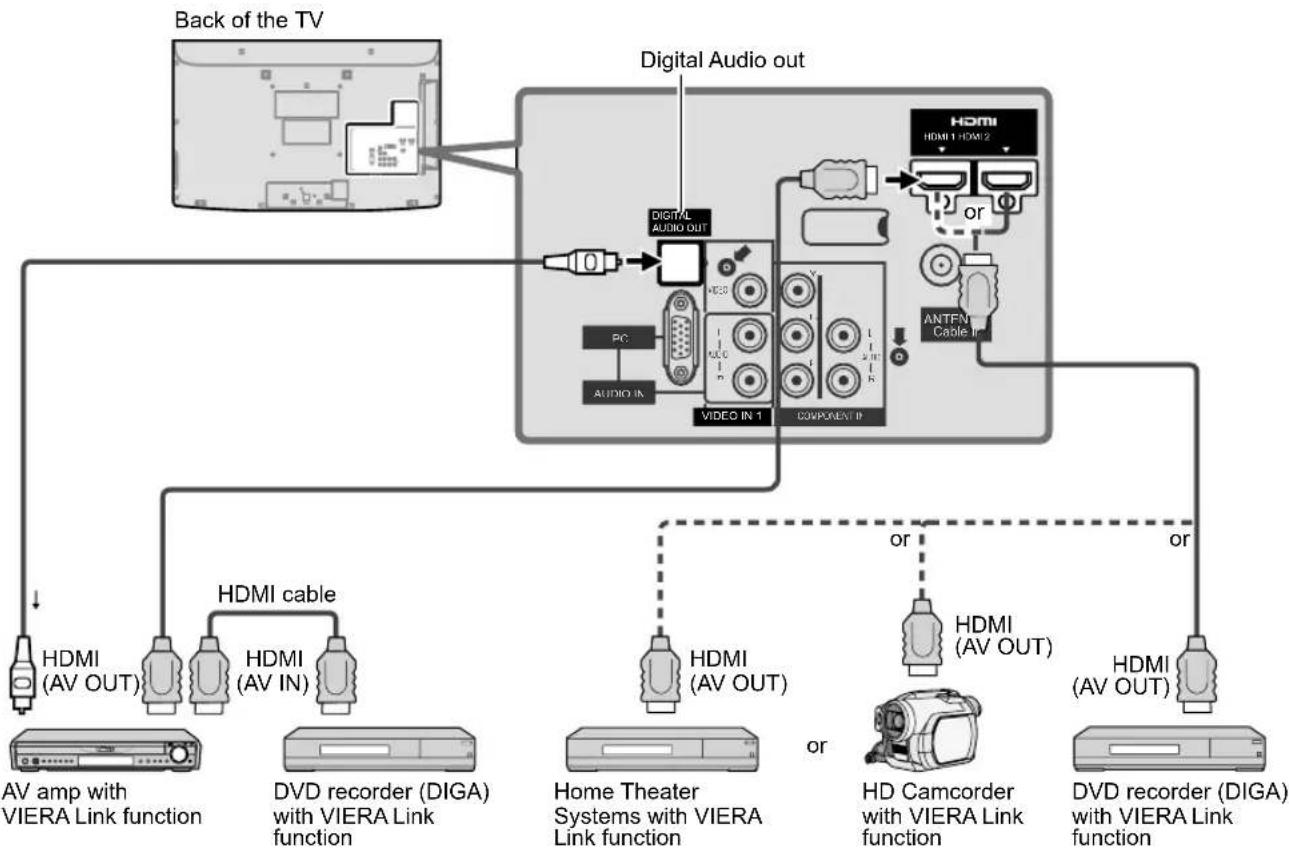
VIERA Link™ Connections
Follow the connection diagrams below for HDAVI control of a single piece of AV equipment such as a DVD recorder (DIGA), RAM theater, or Player theater system.
Refer to page 32-35 for Setup Menu settings and additional control information.
- Optional HDMI and/or optical cables are not included.
If connection (or setting) of equipment compatible with HDAVI control is changed, switch the power of this unit Off and On again while the power of all equipment is On (so that the unit can correctly recognize the connected equipment) and check that the DVD recorder (DIGA), RAM theater, and Player theater playback operate.
Note
• HDMI 1 is recommended.
When connecting to HDMI 2, set the input mode to HDMI 2 (p. 22) initially before connecting to HDMI 2. After connection, confirm the HDMI control functions (p. 32-35).
■ Connecting this unit to the DVD recorder (DIGA), RAM theater, or Player theater
- For DVD recorder (DIGA): Connect with HDMI cable
- For RAM theater and Player theater:
Connect with the HDMI and audio cables.
If audio cable is not connected, you cannot listen to the TV program through the theater system.
■ Connecting this unit to a DVD recorder (DIGA) and AV amp
When using a "VIÉRA Link" audio-video amplifier and a compatible DVD recorder (DIGA) use a daisy chain connection as shown below.
flowchart
graph TD
    A["Back of the TV"] --> B["Digital Audio out"]
    B --> C["PC"]
    C --> D["VIDEO IN 1"]
    D --> E["COMPONENT IP"]
    E --> F["HDMI (AV OUT)"]
    E --> G["HDMI (AV OUT)"]
    E --> H["HDMI (AV IN)"]
    E --> I["HDMI cable"]
    I --> J["AV amp with VIERA Link function"]
    I --> K["DVD recorder (DIGA) with VIERA Link function"]
    E --> L["Home Theater Systems with VIERA Link function"]
    E --> M["HD Camcorder with VIERA Link function"]
    E --> N["HDMI (AV OUT)"]
    E --> O["HDMI (AV OUT)"]
    E --> P["HDMI (AV OUT)"]
    B --> Q["AntEN Cable In"]
    Q --> R["2 or 3"]
    R --> S["HDMI HDMI 1 HDMI 2"]
    style A fill:#f9f,stroke:#333
    style B fill:#ccf,stroke:#333
    style C fill:#cff,stroke:#333
    style D fill:#ffc,stroke:#333
    style E fill:#cfc,stroke:#333
    style F fill:#fcc,stroke:#333
    style G fill:#fcc,stroke:#333
    style H fill:#fcc,stroke:#333
    style I fill:#fcc,stroke:#333
    style J fill:#fcc,stroke:#333
    style K fill:#fcc,stroke:#333
    style L fill:#fcc,stroke:#333
    style M fill:#fcc,stroke:#333
    style N fill:#fcc,stroke:#333
    style O fill:#fcc,stroke:#333
• One AV amp and one DVD recorder (DIGA) can be operated with this unit.
- Be sure to connect the AV amp between this unit and the DVD recorder (DIGA).
■ Setting of this unit after connection
After making connections as shown above, set "VIERA Link" (under "VIERA Link settings") to "On" using the Setup menu. (p. 23, 32-35).
Note
- Individual HDMI equipment may require additional menu settings specific to each model. Please refer to their respective operating instruction manuals.
- When audio from other equipment connected to this unit via HDMI is output using "DIGITAL AUDIO OUT" of this unit, the system switches to 2CH audio.
(When connecting to an AV amp via HDMI, you can enjoy higher sound quality.)
- For details about HDMI cable for connecting Panasonic HD camcorder, read the manual for the equipment.
VIERA Link™ “HDAVI Control™”\*
(Continued)
At the start of the DIGA, Player theater, or RAM theater playback, the TV's input automatically switches to the input based on the playback equipment.
- For the RAM theater, the speakers automatically switch to the theater system.
If using the DIGA operation, the TV's input automatically switches to the DIGA and DIGA menu is displayed.
When “Yes” is selected (p. 29), TV is turned on automatically and switches to the appropriate HDMI input whenever VIERA Link compatible equipment is initially turned on and Play mode is selected.
When “Yes” is selected (p. 29) and the TV is turned off, all connected VIERA Link compatible equipment is also automatically turned off.
- DIGA (Panasonic DVD Recorder) will not turn off if it is still in rec mode.
Caution: The TV remains on even if the VIERA Link compatible equipment is turned off.
Condition
Power off link: Yes, Stand-by power save: Yes
The equipment has "HDAVI Control 4 (with quick start mode)" connected with HDMI cable.
When TV is turned off, all connected VIERA Link compatible equipment is moved to ECO standby mode* automatically under above conditions.
* Minimum power consumption of standby condition for the equipment.
Condition
Auto power stand-by: Yes,
The equipment has “HDAVI Control 2 or later” (for available equipment only) connected with HDMI cable. [Examples of timing for operation]
- When the input is switched from HDMI.
- When the "Speaker output" is changed from "Home theater" to "TV".
The connected VIERA Link compatible equipment will be turned off automatically when not in use.
“TV” is the default setting. To set the Home Theater system as default speakers, change the default speakers setting from “TV” to “Theater”. Sound will be output from the Home Theater whenever the TV is powered on.
If the "ONE TOUCH PLAY" key is pressed on the remote control for Panasonic Home Theater system, the following sequence of operations is performed automatically.
① Home Theater power switches On, and playback begins.
② TV power switches On, and the playback screen is displayed.
③ Audio is muted on the TV and switches to the theater system.
The following information about the TV settings can be transmitted to each piece of equipment (Recorder/Home theater/Player) that has "HDAVI Control 3 or later" function connected to a TV with HDMI cable.
| Transmittable data | Recorder Home theater Player | ||
| 1 On Screen Display Language setting (English/Espanol/Français) | ○ | ○ | ○ |
| 2 Panel Aspect Ratio (16:9 fixed) | ○ | ○ | ○ |
| 3 Closed caption information (Mode/CC type/Digital setting) | ○ | --- --- | |
| 4 Channel information (Input signal/Channel list/Caption information) | ○ | --- --- | |
Note
- There is a possibility that all the GUI language information might be set from equipment that has HDMI CEC function connected to TV with HDMI cable. Depending on operating conditions or the specification for each piece of equipment the setting may or may not be applied.
For more details on the external equipment's operation, please refer to the operating manuals for the equipment.
[For Recorder]
- You cannot operate other functions while transmitting TV's information above except Power On/Off key operation. When you turn off this unit, the transmission will be interrupted (only when you are transmitting ④ Channel information).
Minimizes lip-sync delays between the picture and audio when you connect to a Panasonic theater system or Amplifier.
VIERA Link™ “HDAVI Control™”
You can enjoy more convenient operation with the "HDAVI Control" function in the "VIERA Link" menu.
For more details on the "HDAVI Control" function, refer to p. 30

flowchart
graph TD
    A["1 Display VIERA Link menu"] --> B["2 Select the item"]
    B --> C["3 Select"]
    C --> D["4 Set"]
(Continued)
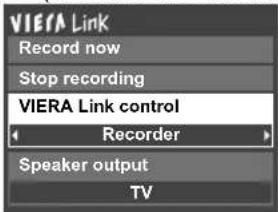
You can select Home theater or TV speakers for audio output. Control theater speakers with the TV's remote control. This function is available only when Panasonic Amplifier or Player theater is connected.
① Select "Speaker output"
② Select "Home theater" or "TV"
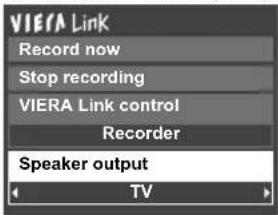
text_image
VIERA Link Record now Stop recording VIERA Link control Recorder Speaker output TV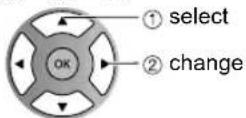
■Home theater: Adjustment for equipment

flowchart
graph LR
    A["Volume up / down"] --> B["+ VOL -"]
    C["Mute"] --> D["MUTE"]
The sound of the TV is muted.
- When the equipment is turned off, the TV speakers take over. Selecting "Home theater" turns the equipment on automatically if it is in standby mode.
■TV: The TV speakers are on.
In the VIERA Link menu, you can select HDMI connected equipment and access it quickly. Continue using your TV's remote control to operate the equipment, pointing it at the TV.
① Select "VIERA Link control"
② Select the equipment you want to access.
(Recorder/Home theater/Player/Camcorder/LUMIX)
text_image
VIERA Link Record now Stop recording VIERA Link control Recorder Speaker output TV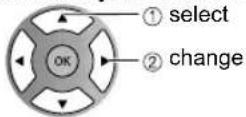
You can select available items only.
- If there is more than one equipment item, a number after the name indicates the number of items. (e.g. Recorder 1/Recorder 2/Recorder 3) - The number of equipment items that can be connected is three for recorders, and a total of three for Home theater/Player/Camcorder/LUMIX.
Note
- There is a limit to the number of HDMI connectors.
③ Operate the equipment with the TV's remote control, pointing it at the TV.
- To operate the equipment, read the manual of the equipment.
■Available TV's remote control buttons
Whether an operation is available differs depending on the connected equipment.
| Move the cursor/Select Play | |||
| Set/Access Stop | |||
| Return to previous menu Reverse/Forward | |||
| Display the functions menu on the equipment | Skip Reverse/Forward | ||
| Available when the purpose of the keys is displayed on screen | Pause | ||
| Exit Closed caption | |||
| Channel Up/Down SAP (Select Audio Mode) | |||
| 0-9 | Select digital subchannel |
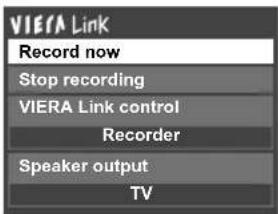
Records the current program on the recorder immediately.
① Select "Record now"
text_image
VIERA Link Record now Stop recording VIERA Link control Recorder Speaker output TV
② Select "Stop recording", when you want to stop recording
text_image
VIERA Link Record now Stop recording VIERA Link control Recorder Speaker output TV
- For optimal recording, the settings of the recorder might be required. For details, read the manual of the recorder.
- Recording will not stop automatically when the program is finished.
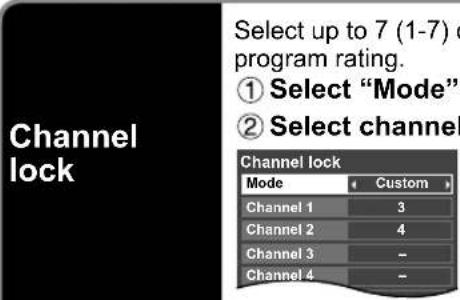
Lock
You can lock specified channels or shows to prevent children from watching objectionable content.
You will be asked to enter your password each time you display the Lock menu.
A 4-digit code must be entered to view a blocked program or change rating settings.
- If it is your first time entering the password, enter the password twice in order to register it.
Off: Unlocks all the lock settings of "Channel", "Game" and "Program".
All: Locks all the inputs regardless of the lock settings of "Channel", "Game" and "Program".
Custom: Locks specified inputs of "Channel", "Game" and "Program".
Caution
Make a note of your password in case you forget it. (If you have forgotten your password, consult your local dealer.)
Note
- When you select a locked channel, a message will be displayed that allows you to view the channel if you input your password.
- "Channel", "Game" and "Program" are not accessible unless "Custom" is selected in "Mode".
Set
■ To select the channel or the rating of the program to be locked
 | channels to be blocked. These channels will be blocked regardless of the and set to "Custom" to lock.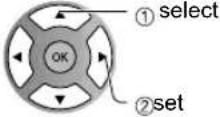 To lock/unlock all channels:Select "Mode" and set to "All" or "Off".All: Locks all channelsOff: Unlocks all channels To lock/unlock all channels:Select "Mode" and set to "All" or "Off".All: Locks all channelsOff: Unlocks all channels | ||
| Game lock | Locks Channel 3, Channel 4 and external inputs.Select "Game" in 5 and set to "On". | 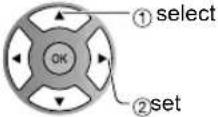 On: LocksOff: Unlocks On: LocksOff: Unlocks | |
| Program lock | ■To set a rating level"V-chip" technology enables restricted shows to be locked according to TV ratings.1 Select "Mode" and set to "On".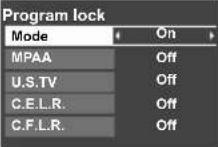 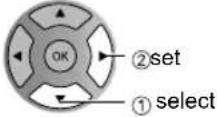 2 Select the rating category you wish to follow 2 Select the rating category you wish to follow  MPAA: U.S movie ratingsU.S.TV: U.S TV program ratingsC.E.L.R.: Canadian English ratingsC.F.L.R.: Canadian French ratings MPAA: U.S movie ratingsU.S.TV: U.S TV program ratingsC.E.L.R.: Canadian English ratingsC.F.L.R.: Canadian French ratings | 3 Select the rating to be lockedselectExample of "MPAA" (U.S movie ratings)NR No ratingG General Audience: All ages admittedPG Parental Guidance SuggestedPG-13 Parents Strongly Cautioned: Inappropriate for children under 13R Restricted: Under 17 requires accompanying parent or adult guardianNC-17 No one 17 and under admittedX Adults onlyTo get more information (p. 44) | |
| Change password | ■To change the passwordIn , select "Change password" and press OKInput the new 4-digit password twice |   | |
Note
- This television is designed to support the “Downloadable U.S. Region Rating System” when available. (Available only in U.S.A.)
• The Off rating is independent of other ratings. - When placing a lock on a specific-age-based-rating level, the Off rating and any other more restrictive ratings will also be blocked.
Editing and Setting Channels
The current channel settings can be changed according to your needs and reception conditions.
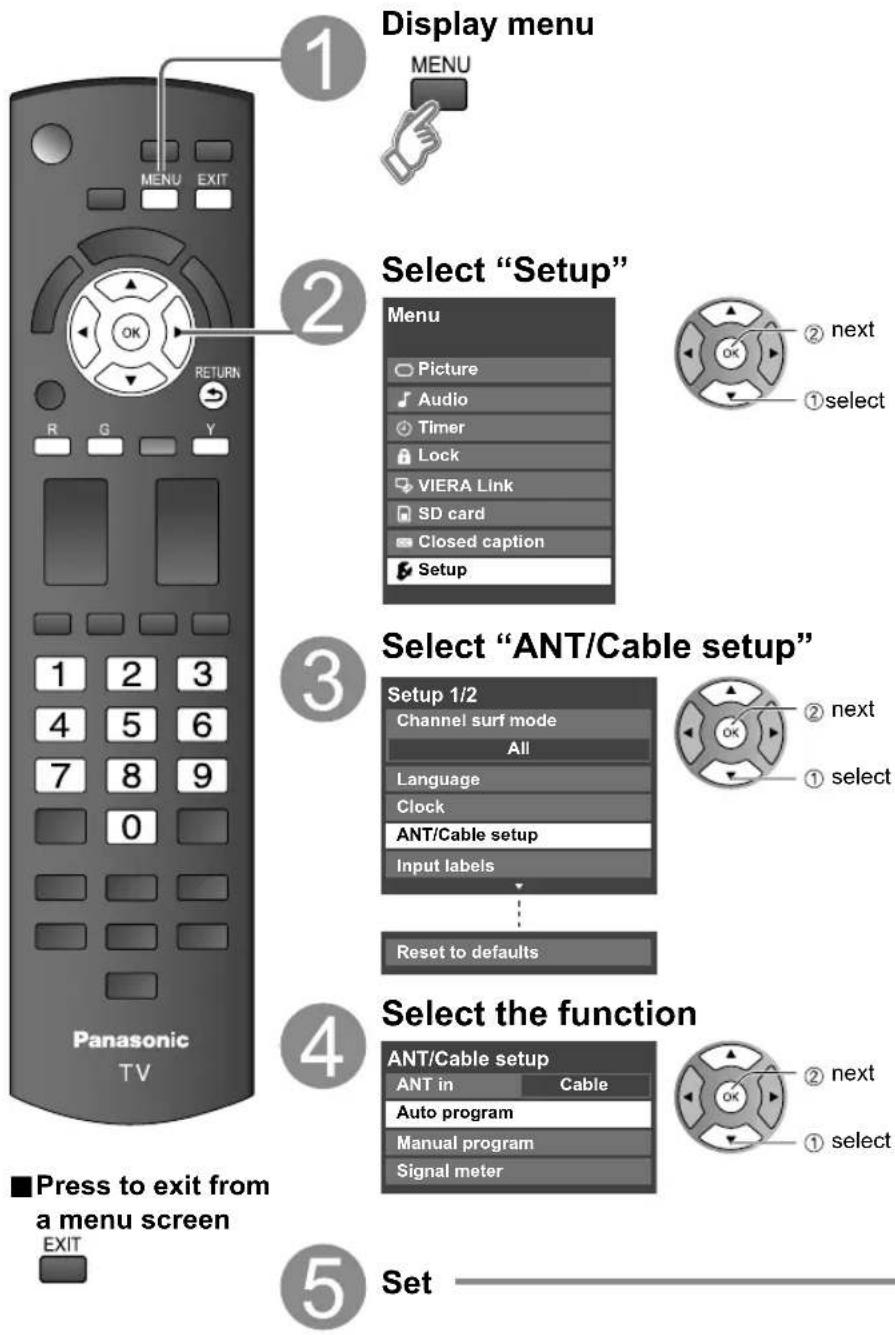
flowchart
graph TD
    A["1 Display menu"] --> B["2 Select "Setup""]
    B --> C["3 Select "ANT/Cable setup""]
    C --> D["4 Select the function"]
    D --> E["5 Set"]
■To reset the settings of setup menu
① Select "Reset to defaults" in Setup menu (3) and press OK
② Input your 4-digit password with number buttons
③ Select "YES" on the confirmation screen and press OK
Auto program Set automatically
Manual program
Set manually
Signal meter
Check signal strength
Automatically searches and adds available channels to the memory.
① Select "ANT in"
Select Cable or Antenna
Or select "Not used". (p. 16)
② Select "Auto program"
| ANT/Cable setup | |
| ANT in | Cable |
| Auto program | |
| Manual program | |
| Signal meter | |
③ Select a scanning mode (p. 16)

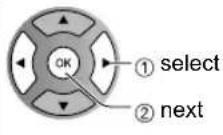
text_image
① select ② okSettings are made automatically
- After the scanning is completed, select "Apply". (see below 5)
- All previously saved channels are erased.
Use this procedure when changing the channel setup or changing the channel display.
Also, use this to add or skip channels from the channel list manually.
You can select a channel tuning mode (Digital only/Analog only) in "Channel surf mode"(p. 28)
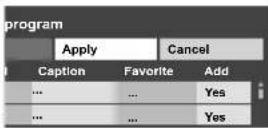
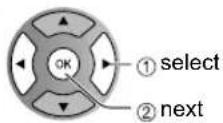
① Select "Edit"

② Select the item to be edited

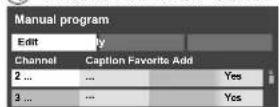
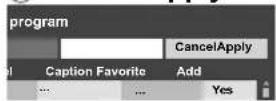
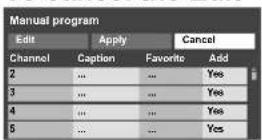
text_image
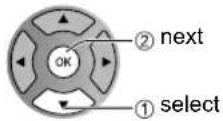
Manual program Edit Apply Cancel Channel Caption Favorite Add 2 Yes 3 Yes 4 Yes Yes Favorite Caption Add
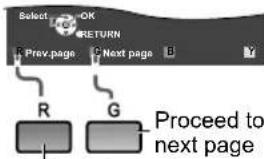
text_image
Select OK RETURN Prev.page Next page B R G Proceed to next pageGo back to previous page
- Caption:
Changes the station identifier - Favorite: Registers channel to Favorite List
- Add: Adds or skips channels
③ Edit
Caption
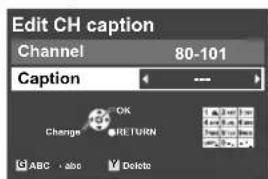
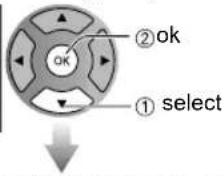
text_image
Edit CH caption Channel 80-101 Caption --- Change OK RETURN ABC abc Delete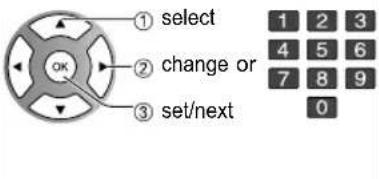
text_image
① select ② change or ③ set/next 1 2 3 4 5 6 7 8 9 0Caption
Select or edit the station identifier. (maximum 7 characters available)
- Favorite
Set favorite Select the number
- Add Press OK to select "Yes (add)" or "No (skip)"
④ Move cursor to channel number

⑤ Select "Apply"

To cancel the Edit

Check the signal strength if an interference is found or freezing occurs on a digital image.
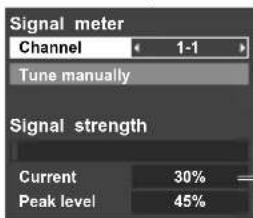
text_image
Signal meter Channel 1-1 Tune manually Signal strength Current 30% Peak level 45%
- If the signal is weak, check the antenna. If no problem is found, consult your local dealer.
Note
- Not available if "Cable" is selected in "ANT in" (see above).
● Available only for digital antenna channels.
Closed Caption
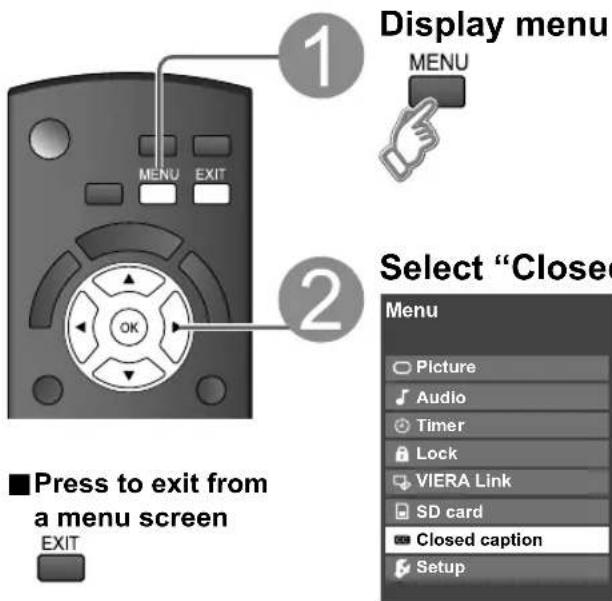
text_image
Display menu MENU MENU EXIT OK ■Press to exit from a menu screen EXIT Select "Close" Menu Picture Audio Timer Lock VIERA Link SD card Closed caption Setup
text_image
Closed caption Display Closed captionThe television includes a built-in decoder that is capable of providing a text display of the audio. The program being viewed must be transmitting Closed caption (CC) information. (p. 45)
■ Select the item and set
text_image
Closed caption Reset to defaults Mode On Analog CC1 Digital Primary Digital setting ① select ② set- The settings in "Analog" or "Digital" depend on the broadcaster.
Mode Select "On" (when not using, select "Off").
Analog (Choose the Closed caption service of Analog broadcasting.)
CC1-4: Information related to pictures (Appears at bottom of screen)
T1-4: Textual information (Appears over entire screen)
Digital (The Digital Closed caption menu lets you configure the way you choose to view the digital captioning.)
Select the setting.
- "Primary", "Second.", "Service 3", "Service 4", "Service 5", "Service 6"
■ To make more in-depth display settings in digital programs
① Select "Digital setting" and press OK
② Select the item and set
text_image
Digital setting Size Automatic Font Automatic Style Automatic Foreground Automatic Fore. opacity Automatic Background Automatic Back. opacity Automatic Outline Automatic- Size: Text size
- Font: Text font
Style: Text style (Raised, Depressed, etc.)
• Foreground: Color of text - Fore. opacity: Opacity of text
Background: Color of text box - Back. opacity: Opacity of text box
- Outline: Outline color of text (Identify the setting options on the screen.)
■ To reset the settings
Select "Reset to defaults" and press OK
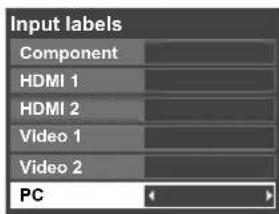
Input Labels
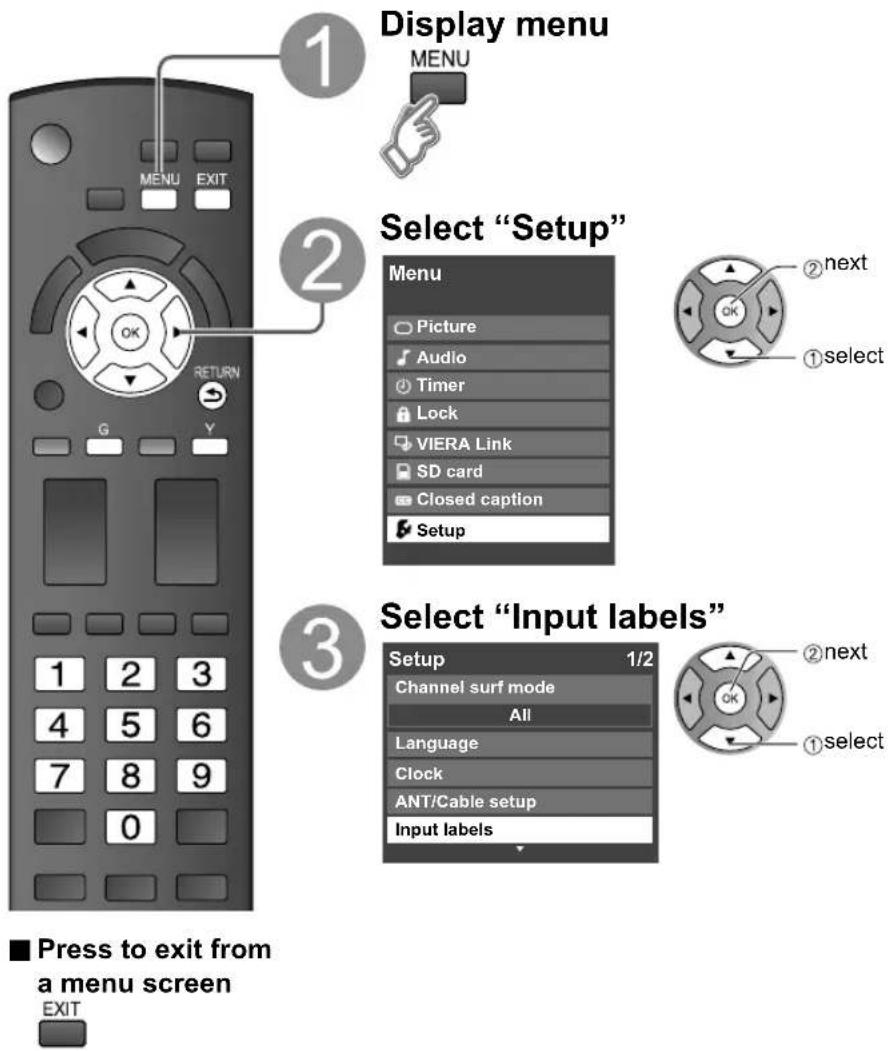
text_image
1 Display menu MENU 2 Select "Setup" Menu Picture Audio Timer Lock VIERA Link SD card Closed caption Setup 3 Select "Input labels" Setup 1/2 Channel surf mode All Language Clock ANT/Cable setup Input labels ■ Press to exit from a menu screen EXIT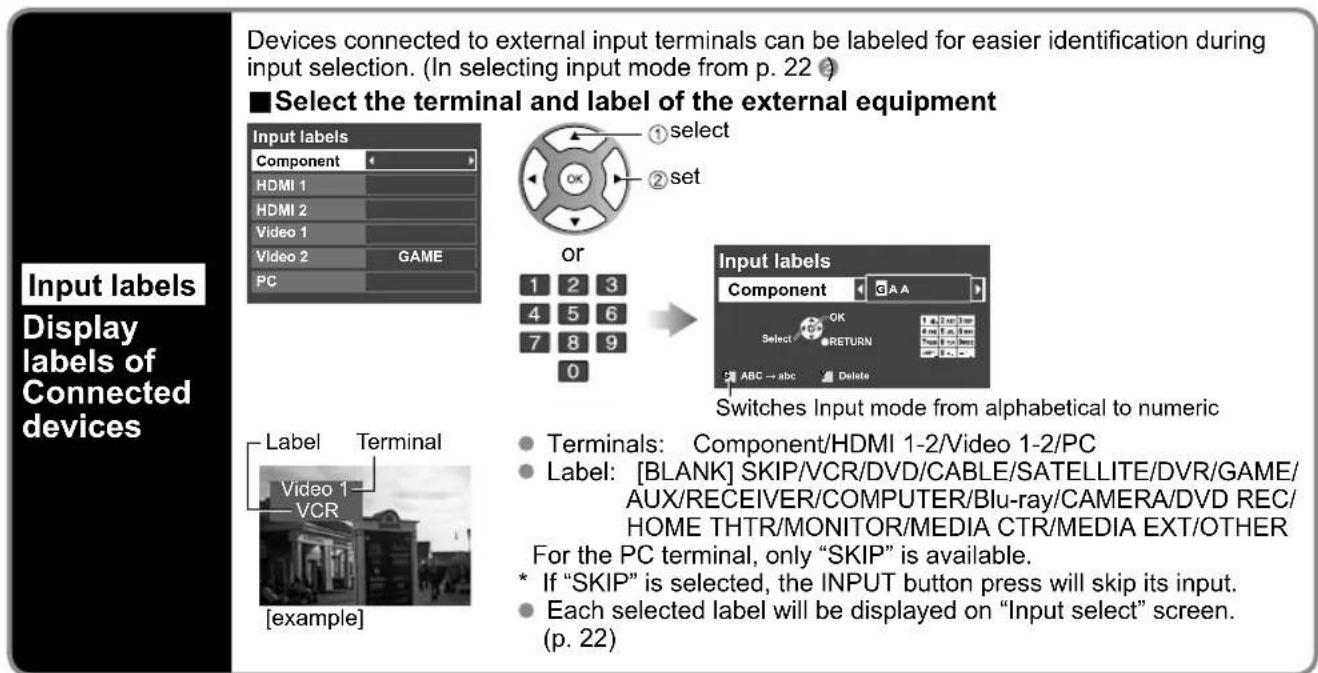
text_image
Devices connected to external input terminals can be labeled for easier identification during input selection. (In selecting input mode from p. 22) ■ Select the terminal and label of the external equipment Input labels Component HDMI 1 HDMI 2 Video 1 Video 2 GAME PC or 1 2 3 4 5 6 7 8 9 0 Input labels Component GAA Select OK RETURN ABC → abc Delete Switches Input mode from alphabetical to numeric Label Terminal Video 1 VCR [example] Terminals: Component/HDMI 1-2/Video 1-2/PC Label: [BLANK] SKIP/VCR/DVD/CABLE/SATELLITE/DVR/GAME/ AUX/RECEIVER/COMPUTER/Blu-ray/CAMERA/DVD REC/ HOME THTR/MONITOR/MEDIA CTR/MEDIA EXT/OTHER For the PC terminal, only "SKIP" is available. * If "SKIP" is selected, the INPUT button press will skip its input. • Each selected label will be displayed on "Input select" screen. (p. 22)Using Timer
The TV can automatically turn On/Off at the designated date and time.
● The Clock must be set before On time/Off time settings. (p. 15)
- The "Sleep" timer and "On / Off timer" will not work if the "Auto power on" (p. 28) is set.
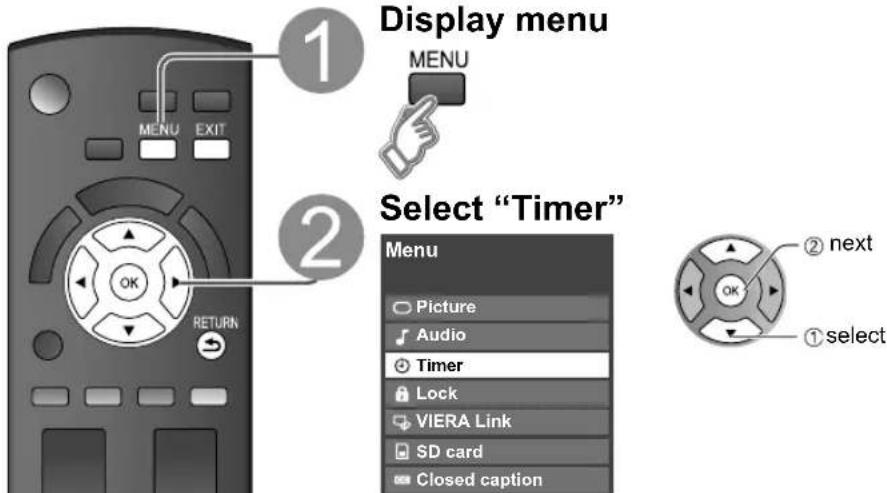
text_image
1 Display menu MENU 2 Select "Timer" Menu Picture Audio Timer Lock VIERA Link SD card Closed caption ① select ② next OK3 Select the timer to set Timer Sleep

text_image
1 2 3 4 5 6 7 8 9 LAST 0 - Timer 1 Timer 2 Timer 3 Timer 4 Timer 5 ② next Sleep Turns Off automatically Timer 1 Turns On/Off automatically { (5 timers can be set.) Timer 5■Press to exit from a menu screen 4 Set the timer ■To set "Sleep" Set to shut the unit

text_image
EXIT ■Press to return to the previous Sleep Sleep (minutes) 60 ● 0/30/60/90 (minutes) OK setscreen
RETURN
■ To set "Timer 1-5" (On/Off Timer)
Select the item and set
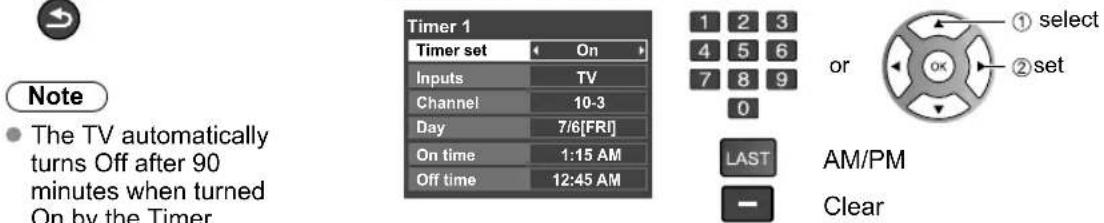
text_image
Timer 1 Timer set On Inputs TV Channel 10-3 Day 7/6[FRI] On time 1:15 AM Off time 12:45 AM 1 2 3 4 5 6 7 8 9 0 LAST AM/PM Clear Note • The TV automatically turns Off after 90 minutes when turned On by the Timer. or ① select ② set
text_image
This operation will be cancelled if the Off time is selected or if a key is pressed. Timer set Timer setting (On/Off) Inputs Select the inputs Channel Select the channel Day Select the day [SUN/MON/TUE/WED/THU/FRI/SAT (displays the nearest future date) MON-FRI/SAT-SUN/DAILY/Every SUN/Every MON/ Every TUE/Every WED/Every THU/Every FRI/ Every SAT] On time The time to turn On Off time The time to turn OffRecommended AV Connections
These diagrams show our recommendations on how to connect the TV unit to your various equipment. For other connections, consult the instructions for each piece of equipment and its specifications.
For additional assistance, please visit our website at: www.panasonic.com
www.panasonic.ca
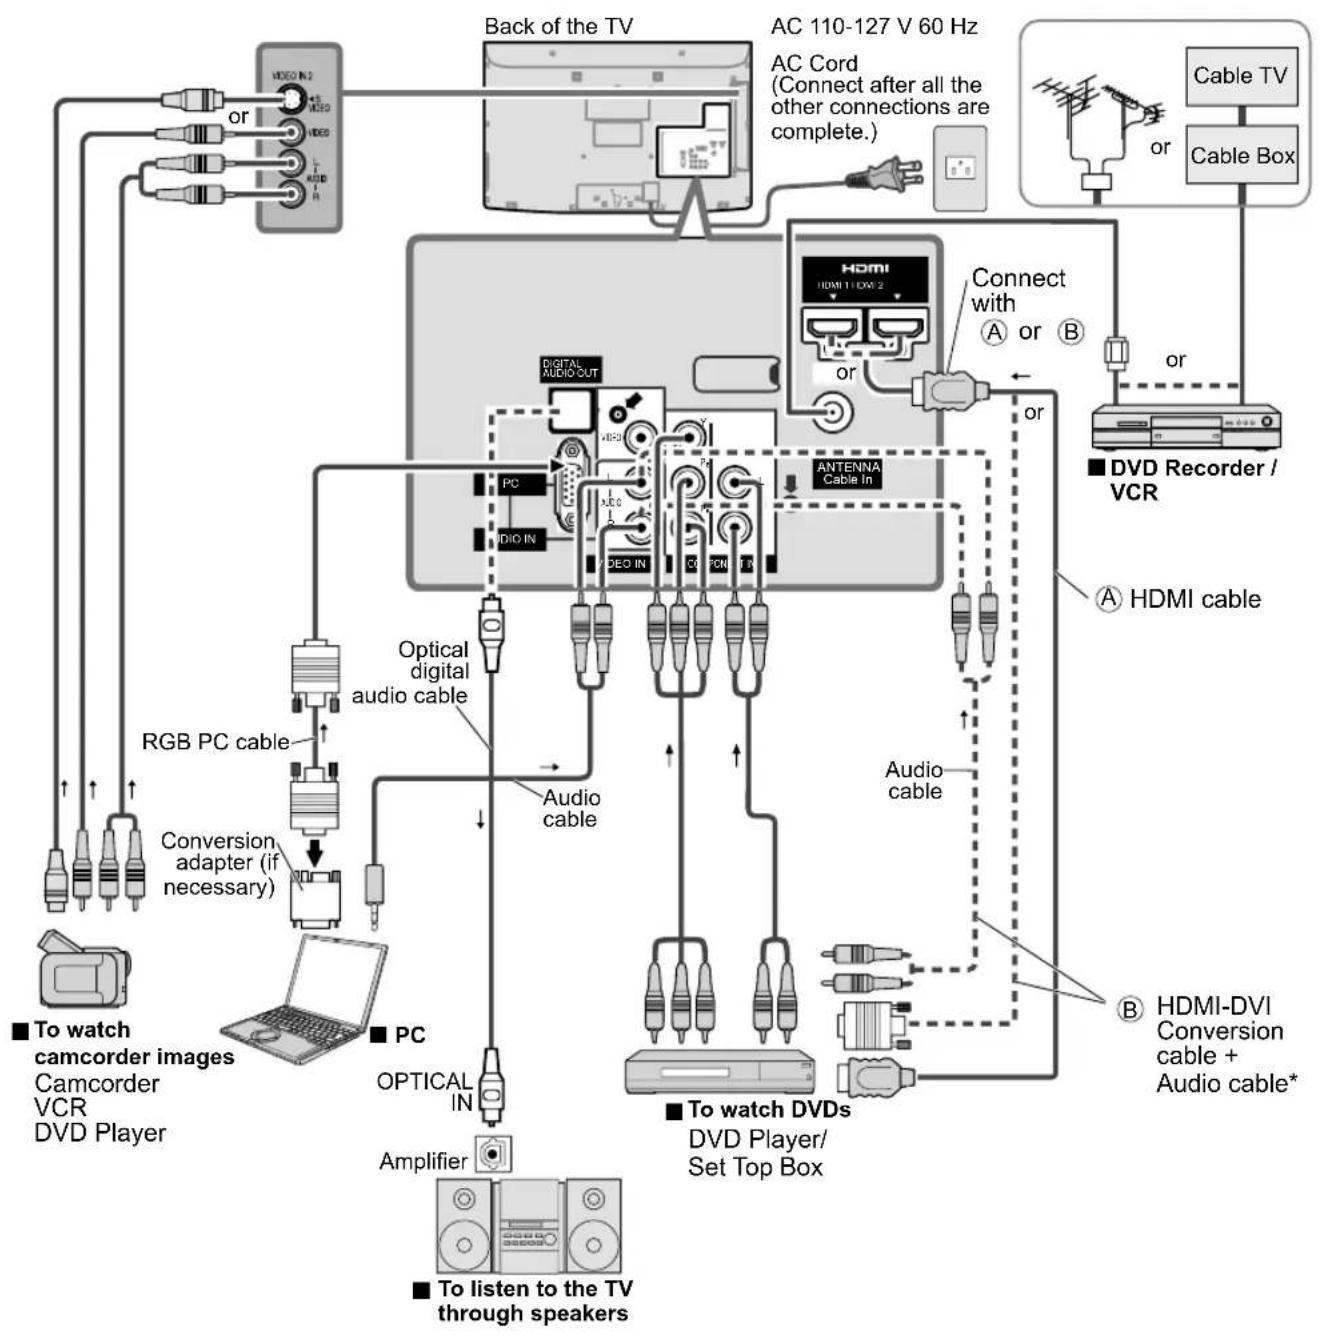
flowchart
graph TD
    A["Back of the TV"] --> B["AC 110-127 V 60 Hz"]
    B --> C["Cable TV"]
    B --> D["Cable Box"]
    B --> E["PC"]
    E --> F["Optical digital audio cable"]
    F --> G["RGB PC cable"]
    G --> H["Conversion adapter (if necessary)"]
    H --> I["To watch camcorder images Camcorder VCR DVD Player"]
    E --> J["PC"]
    J --> K["OPTICAL IN"]
    K --> L["Amplifier"]
    L --> M["To listen to the TV through speakers"]
    N["HDMI"] --> O["Connect with A or B"]
    O --> P["Antenna Cable In"]
    P --> Q["Audio cable"]
    Q --> R["DVD Recorder / VCR"]
    R --> S["HDMI cable"]
    T["To watch DVDs"] --> U["DVD Player/Set Top Box"]
    U --> V["HDMI-DVI Conversion cable + Audio cable*"]
    W["Back of the TV"] --> X["AC Cord (Connect after all the other connections are complete.)"]
    X --> Y["Cable TV"]
    X --> Z["Cable Box"]
* Please see p. 26-27 for setup when using an external analog audio cable with an HDMI to DVI cable.
Ratings List for Lock
"V-chip" technology enables you to lock channels or shows according to standard ratings set by the entertainment industry. (p. 37)
■U.S. MOVIE RATINGS (MPAA)
| NR | NO RATING (NOT RATED) AND NA (NOT APPLICABLE) PROGRAMS. Movie which has not been rated or where rating does not apply. |
| G GENERAL AUDIENCES. All ages admitted. | |
| PG PARENTAL GUIDANCE SUGGESTED. Some material may not be suitable for children. | |
| PG-13 PARENTS STRONGLY CAUTIONED. Some material may be inappropriate for children under 13. | |
| R RESTRICTED. Under 17 requires accompanying parent or adult guardian. | |
| NC-17 NO ONE 17 AND UNDER ADMITTED. | |
| X ADULTS ONLY. | |
■U.S. TV PROGRAMS RATINGS (U. S. TV)
| Age-based Group | Age-based Ratings | Possible Content Selections | Description |
| NR(Not Rated) | TV-NR | ViewableBlocked | Not Rated. |
| Youth | TV-Y | ViewableBlocked | All children. The themes and elements in this program are specifically designed for a very young audience, including children from ages 2-6. |
| TV-Y7 | FV BlockedViewableBlocked | Directed to older children. Themes and elements in this program may include mild physical or comedic violence, or may frighten children under the age of 7. | |
| Guidance | TV-G | ViewableBlocked | General audience. It contains little or no violence, no strong language, and little or no sexual dialogue or situations. |
| TV-PG | D,L,S,V (all selected)Any combination of D, L, S, V | Parental guidance suggested. The program may contain infrequent coarse language, limited violence, some suggestive sexual dialogue and situations. | |
| TV-14 | D,L,S,V (all selected)Any combination of D, L, S, V | Parents strongly cautioned. This program may contain sophisticated themes, sexual content, strong language and more intense violence. | |
| TV-MA | L,S,V (all selected)Any combination of L, S, V | Mature audiences only. This program may contain mature themes, profane language, graphic violence, and explicit sexual content. |
FV: Fantasy/Cartoon Violence. V: Violence S: Sex L: Offensive Language D: Dialogue with sexual content.
■CANADIAN ENGLISH RATINGS (C. E. L. R.)
| E | Exempt - Exempt programming includes: news, sports, documentaries and other information programming, talk shows, music videos, and variety programming. |
| C Programming intended for children under age 8. No offensive language, nudity or sexual content. | |
| C8+ | Programming generally considered acceptable for children 8 years and over. No profanity, nudity or sexual content. |
| G General programming, suitable for all audiences. | |
| PG Parental Guidance suggested. Some material may not be suitable for children. | |
| 14+ | Programming contains themes or content which may not be suitable for viewers under the age of 14. Parents are strongly cautioned to exercise discretion in permitting viewing by pre-teens and early teens. |
| 18+ 18+ years old. Programming restricted to adults. Contains constant violence or scenes of extreme violence. | |
■CANADIAN FRENCH RATINGS (C. F. L. R.)
| E Exempt - Exempt programming. | |
| G | General - Programming intended for audience of all ages. Contains no violence, or the violence content is minimal or is depicted appropriately. |
| 8 ans+ | 8+ General - Not recommended for young children. Programming intended for a broad audience but contains light or occasional violence. Adult supervision recommended. |
| 13 ans+ | Programming may not be suitable for children under the age of 13 - Contains either a few violent scenes or one or more sufficiently violent scenes to affect them. Adult supervision strongly suggested. |
| 16 ans+ | Programming may not be suitable for children under the age of 16 - Contains frequent scenes of violence or intense violence. |
| 18 ans+ | Programming restricted to adults. Contains constant violence or scenes of extreme violence. |
Caution
- The V-Chip system that is used in this set is capable of blocking "NR" programs (non rated, not applicable and none) as per FCC Rules Section15.120(e)(2). If the option of blocking "NR" programs is chosen "unexpected and possibly confusing results may occur, and you may not receive emergency bulletins or any of the following types of programming:"
• Emergency Bulletins (Such as EAS messages, weather warnings and others) - Locally originated programming • News • Political • Public Service Announcements • Religious • Sports • Weather
Technical Information
Closed caption (CC)
- For viewing the CC of digital broadcasting, set the aspect to FULL (If viewing with H-FILL, JUST, ZOOM or 4:3; characters might be cut off).
- The CC can be displayed on the TV if the receiver (such as a set-top box or satellite receiver) has the CC set On using the Component or HDMI connection to the TV.
- If the CC is set to On on both the receiver and TV when the signal is 480i (except for the HDMI connection), the CC may overlap on the TV.
- If a digital program is being output in analog format, the CC data will also be output in analog format.
- If the recorder or output monitor is connected to the TV, the CC needs to be set up on the recorder or output monitor.
Aspect Ratio (FORMAT)
Press the FORMAT button to cycle through the aspect modes. This lets you choose the aspect depending on the format of the received signal and your preference. (p. 18) (e.g.: in case of 4:3 image)
FULL JUST

text_image
4 3 FULL 16 9Enlarges the 4:3 image horizontally to the screen's side edges. (Recommended for anamorphic picture)
●
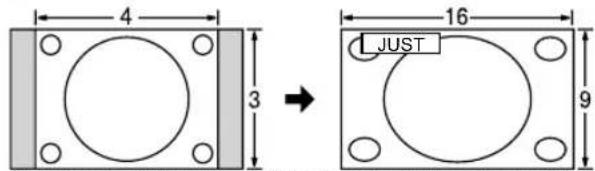
text_image
4 3 16 9 JUSTStretches to justify the 4:3 image to the four corners of the screen. (Recommended for normal TV broadcast)
H-FILL 4:3
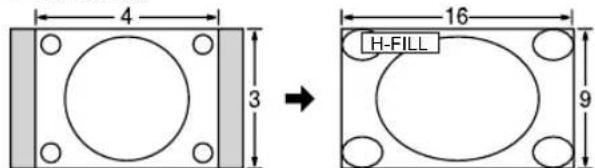
text_image
4 3 16 H-FILL 9Enlarges the 4:3 image horizontally to the screen's side edges. The side edges of the image are cut off.
●

text_image
4:3 4 3 Side barStandard (Note that "Image retention" of the side bar may occur from displaying it for a long time.)
• ZOOM
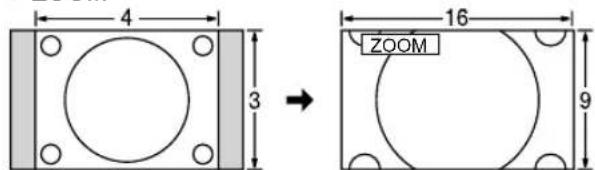
text_image
4 3 16 9 ZOOMEnlarges the 4:3 image to the entire screen. (Recommended for Letter Box)
Note
- 480i (4:3), 480i (16:9), 480p (4:3), 480p (16:9): FULL, JUST, 4:3 or ZOOM
1080i / 720p: FULL, H-FILL, JUST, 4:3 or ZOOM
- Zoom adjustments
Vertical image position and size can be adjusted in "ZOOM".
Select "Zoom adjustments" on the "Picture" menu. (p. 26-27)
② V-position: Vertical position adjustment V-size: Vertical size adjustment


• To reset the aspect ratio

Technical Information (Continued)
Data format for SD Card browsing
Photo: Still images recorded with digital still cameras compatible with JPEG files of DCF* and EXIF** standards
Data format: Baseline JPEG (Sub-sampling: 4:4:4, 4:2:2 or 4:2:0)
Max. number of files: 9,999
Image resolution: 160 x 120 to 10,000,000
* DCF (Design rule for camera file system): A Japan Electronics and Information Technology Industries Association's standard
** EXIF (Exchangeable Image File Format)
Caution
- A JPEG image modified with a PC may not be displayed.
- Partly degraded files might be displayed at a reduced resolution.
Note
- Folder structure viewed in PC

text_image
DCIM Created automatically 100_P ANA 3-digit folder number + 5-digit arbitrary characters P1000001.JPG P1000002.JPG P1000003.JPG P1000004.JPG 4-digit arbitrary characters + 4-digit file number ● Usable characters: 1-byte "a to z", "A to Z", "0 to 9," and "_"The folder and file names may be different depending on the digital camera used.
- For the suitable SD Memory Cards, please confirm the latest information on the following website.
http://panasonic.jp/support/global/cs (This site is in English only)
Cautions in handling SD Card:
- Do not remove the card while the unit is accessing data (this can damage card or unit).
- Do not touch the terminals on the back of the card.
- Do not subject the card to high pressure or impact.
- Insert the card in the correct direction (otherwise, card may be damaged).
Electrical interference, static electricity or erroneous operation may damage the data or card. - Back up the recorded data at regular intervals in case of deteriorated or damaged data or erratic operation of the unit.
(Panasonic is not liable for any deterioration or damage of recorded data.)
SD Card warning messages
Message Meaning
SD card slot is empty.
No photos
Cannot read file
• The card is not inserted.
- The card has no data or this type of data is not supported.
● The file is broken or unreadable.
- The TV does not support the format.
VIERA Link™ "HDAVI Control™"
HDMI connections to some Panasonic equipment allow you to interface automatically. (p. 30)
- This function may not work normally depending on the equipment condition.
The equipment can be operated by other remote controls with this function on even if TV is in Standby mode. - Image or sound may not be available for the first few seconds when the playback starts.
- Image or sound may not be available for the first few seconds when Input mode is switched.
• Volume function will be displayed when adjusting the volume of the equipment. - If you connect the same kind of equipment at once (for example: one DIGA to HDMI 1 / another DIGA to HDMI 2), VIERA Link™ is available for the terminal with the smaller number.
- If you connect equipment that has "HDAVI Control 2 or later" function to the TV with HDMI cable, the sound from DIGITAL AUDIO OUT terminal can be output as multi channel surround.
- “HDAVI Control 4” is the newest standard (current as of December, 2008) for the HDAVI Control compatible equipment. This standard is compatible with the conventional HDAVI equipment.
HDMI connection
HDMI (high-definition multimedia interface) allows you to enjoy high-definition digital images and high-quality sound by connecting the TV unit and the devices.
HDMI-compatible equipment (*1) with an HDMI or DVI output terminal, such as a set-top box or a DVD player, can be connected to the HDMI connector using an HDMI compliant (fully wired) cable.
HDMI is the world's first complete digital consumer AV interface complying with a non-compression standard.
- If the external equipment has only a DVI output, connect to the HDMI terminal via a DVI to HDMI adapter cable (*2).
- When the DVI to HDMI adapter cable is used, connect the audio cable to the audio input terminal.
- Audio settings can be made on the "HDMI 1 in" or "HDMI 2 in" menu screen. (p. 26)
Applicable audio signal sampling frequencies (L.PCM): 48 kHz, 44.1 kHz, 32 kHz
(*1): The HDMI logo is displayed on an HDMI-compliant device.
(*2): Enquire at your local digital equipment retailer shop.
Caution
- Use with a PC is not assumed.
All signals are reformatted before being displayed on the screen. - If the connected device has an aspect adjustment function, set the aspect ratio to "16:9".
- These HDMI connectors are "type A".
● These HDMI connectors are compatible with HDCP (High-Bandwidth Digital Content Protection) copyright protection. - A device having no digital output terminal may be connected to the input terminal of either "COMPONENT", "S VIDEO", or "VIDEO" to receive analog signals.
The HDMI input terminal can be used with only the following image signals: 480i, 480p, 720p, 1080i.
Match the output setting of the digital device. - For details of the applicable HDMI signals, see p. 48.
DIGITAL AUDIO OUT terminals
You can enjoy your home theater by connecting a Dolby Digital (5.1 channel at ATSC only) decoder and "Multi Channel (ATSC only)" amplifier to the DIGITAL AUDIO OUT terminals.
Caution
● Depending on your DVD player and DVD-Audio software the copyright protection function may operate and disable optical output.
- When an ATSC channel is selected, the output from the DIGITAL AUDIO OUT jack will be Dolby Digital. When an NTSC channel is selected, the output will be PCM.
Picture mode
● Vivid: Provides enhanced picture contrast and sharpness for viewing in a well-lit room.
- Standard: Recommended for normal viewing conditions with subdued room lighting.
Cinema: For watching movies in a darkened room. It provides a soft, film-like picture.
- Custom (Photo): Customizes each item according to your taste.
Photo is displayed in JPEG menu.
Technical Information (Continued)
H size
- Aspect Ratio: 4:3
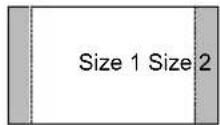
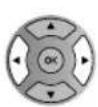
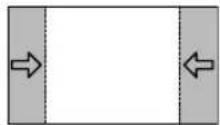
- The width will be decreased on both sides to reduce noise.
- Aspect Ratio: FULL/JUST(H-FILL/ZOOM)
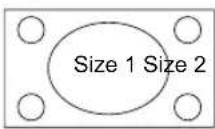
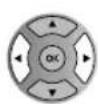
- The width will be increased on both sides to reduce noise.
See pages 26-27 for more information
Input signal that can be displayed
* Mark: Applicable input signal for Component (Y, PB, PR), HDMI and PC
| horizontal frequency (kHz) | vertical frequency (Hz) | COMPONENT HDMI PC | |||
| 525 (480) / 60i 15.73 59.94 | * | * | |||
| 525 (480) /60p 31.47 59.94 | * | * | |||
| 750 (720) /60p 45.00 59.94 | * | * | |||
| 1,125 (1,080) /60i 33.75 59.94 | * | * | |||
| 640 × 400 @70 31.47 70.08 | * | ||||
| 640 × 480 @60 31.47 59.94 | * | ||||
| Macintosh13" (640 × 480) 35 | 00 66.67 | * | |||
| 640 × 480 @75 37.50 75.00 | * | ||||
| 852 × 480 @60 31.47 59.94 | * | ||||
| 800 × 600 @60 37.88 60.32 | * | ||||
| 800 × 600 @75 46.88 75.00 | * | ||||
| 800 × 600 @85 53.67 85.08 | * | ||||
| Macintosh16" (832 × 624) 49 | 73 74.55 | * | |||
| 1,024 × 768 @60 48.36 60.00 | * | ||||
| 1,024 × 768 @70 56.48 70.07 | * | ||||
| 1,024 × 768 @75 60.02 75.03 | * | ||||
| 1,024 × 768 @85 68.68 85.00 | * | ||||
| Macintosh 21" (1,152 × 870) | 68.68 75.06 | * | |||
| 1,280 × 768 @60 47.70 60.00 | * | ||||
| 1,280 × 1,024 @60 | 63.98 60.02 | * | |||
| 1,366 × 768 @60 | 48.36 60.00 | * | |||
Note
● Signals other than above may not be displayed properly.
● The above signals are reformatted for optimal viewing on your display.
PC Input Terminals Connection
Computer signals which can be input are those with a horizontal scanning frequency of 15 to 110kHz and vertical scanning frequency of 48 to 120Hz . (However, the image will not be displayed properly if the signals exceed 1,200 lines.)
- Some PC models cannot be connected to the set.
There is no need to use an adapter for computers with IBM PC/AT compatible D-sub 15P terminal.
The maximum resolution: 1,280 × 1,024
If the display resolution exceeds these maximums, it may not be possible to show fine detail with sufficient clarity.
• Signal Names for D-sub 15P Connector
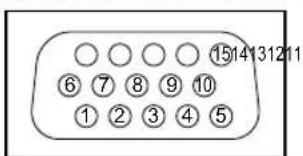
text_image
1514131211 ⑥⑦⑧⑨⑩ ①②③④⑤Pin Layout for PC Input Terminal
| Pin No. | Signal Name | Pin No. | Signal Name | Pin No. | Signal Name |
| 1 | R | 6 | GND (Ground) | 11 | NC (not connected) |
| 2 | G | 7 | GND (Ground) | 12 | NC |
| 3 | B | 8 | GND (Ground) | 13 | HD/SYNC |
| 4 | NC (not connected) | 9 | NC (not connected) | 14 | VD |
| 5 | GND (Ground) | 10 | GND (Ground) | 15 | NC |
Care and Cleaning
First, unplug the Power cord plug from the wall outlet.
Display panel
The front of the display panel has been specially treated. Wipe the panel surface gently using only a cleaning cloth or a soft, lint-free cloth.
- If the surface is particularly dirty, soak a soft, lint-free cloth in diluted mild liquid dish soap (1 part mild liquid dish soap diluted by 100 times the amount of water) and then wring the cloth to remove excess liquid. Use this cloth to wipe the surface of the display panel, then wipe it evenly with a dry cloth of the same type until the surface is dry.
- Do not scratch or hit the surface of the panel with fingernails or other hard objects. Furthermore, avoid contact with volatile substances such as insect sprays, solvents, and thinner; otherwise, the quality of the surface may be adversely affected.
Cabinet
If the cabinet becomes dirty, wipe it with a soft, dry cloth.
- If the cabinet is particularly dirty, soak the cloth in a weak mild liquid dish soap and then wring the cloth dry. Use this cloth to wipe the cabinet and then wipe it dry with a dry cloth.
- Do not allow any mild liquid dish soap to come into direct contact with the surface of the LCD TV. If water droplets get inside the unit, operating problems may result.
- Avoid contact with volatile substances such as insect sprays, solvents, and thinner; otherwise, the quality of the cabinet surface may be adversely affected or the coating may peel off. Furthermore, do not leave it for long periods in contact with articles made from rubber or PVC.
Pedestal
- Cleaning
Wipe the surfaces with a soft, dry cloth. If the unit is particularly dirty, clean it using a cloth soaked with water to which a small amount of mild liquid dish soap has been added and then wipe with a dry cloth.
Do not use products such as solvents, thinner, or household wax for cleaning, as they can damage the surface coating. (If using a chemically-treated cloth, follow the instructions supplied with the cloth.)
- Do not attach sticky tape or labels, as they can make the surface of the pedestal dirty. Do not allow long-term contact with rubber, vinyl products, or the like. (Doing so will cause deterioration.)
Power cord plug
Wipe the plug with a dry cloth at regular intervals. (Moisture and dust can lead to fire or electrical shock.)
FAQ
Before requesting service or assistance, please follow these simple guides to resolve the problem.
If the problem still persists, please contact your local Panasonic dealer or Panasonic Service Center for assistance.
For details (p. 54, 55)
For additional assistance, please contact us via the website at:
www.panasonic.com/contactinfo
www.panasonic.ca
White spots or shadow images (noise)

natural_image
Abstract black-and-white graphic with irregular shapes on a dotted background (no text or symbols)
natural_image
Illustration of three penguins standing together (no text or symbols)- Check the position, direction, and connection of the antenna.
Interference or frozen digital channels (intermittent sound)
natural_image
Low-resolution grayscale image with no discernible text, symbols, or identifiable objects.- Change the direction of antenna for digital channels.
- Check "Signal meter" (p. 39). If the signal is weak, check the antenna and consult your local dealer.
The LCD panel moves slightly when it is pushed with a fi nger. A clattering sound might be heard
This is not a malfunction.
- There is some looseness around the panel to prevent the damage to the panel.
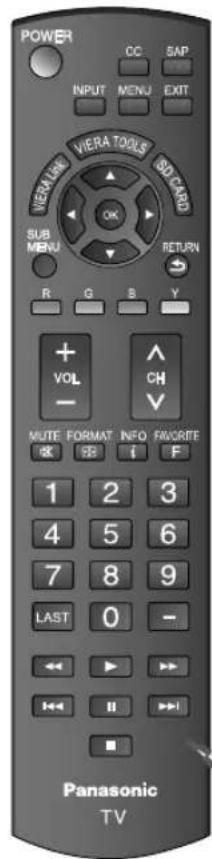
text_image
POWER CC S&P INPUT MENU EXIT VIERLINK VIERA TOOLS SD CARD OK SUB MENU RETURN R G B Y + VOL - CH MUTE FORMAT INFO FAVORITE &F ↓ F 1 2 3 4 5 6 7 8 9 LAST 0 - ← → ← → II → Panasonic TV
natural_image
Illustration of a flat-screen television with no visible text or symbols on the screen or body.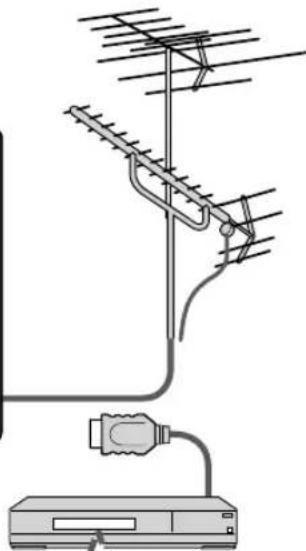
natural_image
Diagram of a mounted antenna array connected to a power outlet (no text or symbols present)Pictures from external equipment are distorted when the unit is connected via HDMI
- Is the HDMI cable connected properly? (p. 31, 43)
- Turn Off the TV unit and equipment, then turn them On again.
- Check an input signal from the equipment. (p. 48)
- Use equipment compliant with EIA/CEA-861/861B.
When the channel is changed on an STB that is connected with HDMI, "HDMI" may be displayed on the top left of the screen
• This is not a malfunction.
Recording does not start immediately
- Check the settings of the recorder. For details, read the manual of the recorder.
The remote control does not work
Are the batteries installed correctly? (p. 8)
Are the batteries new?
If there is a problem with your TV, please refer to the table below to determine the symptoms, then carry out the suggested check. If this does not solve the problem, please contact your local Panasonic dealer, quoting the model number and serial number (both found on the rear of the TV).
Problem Actions
Screen Sound Other
Some spots remain bright or dark
Chaotic image, noisy
No image can be displayed
Only spots are displayed instead of images
Neither image nor sound is produced
Black Box appears
No sound is produced
Sound is unusual
Unknown sound heard
1- Sounds from TV cabinet
2- Tick/Click sound
3- Buzzing sound
The main unit is hot.
- The LCD panel is made up of a few million pixels and is produced with advanced technology through an intricate process. Sometimes a few pixels may be bright or dark. These pixels do not indicate a defective panel and will have no impact on the performance of the TV.
- Check nearby electrical products (car or motorcycle ignition systems, fluorescent lamp, etc.)
- Check Picture menu (p. 26)
- Check the cable connections.
- Check that the correct input has been selected.
- Check the channel settings. (p. 38)
- Check the antenna cables.
- Is the power cord plugged into the outlet?
• Is the TV unit turned On?
- Check Picture menu (p. 26) and volume.
- Check the AV cable connections. (p. 10-13)
- Check that the correct input has been selected. (p. 22)
- Change settings of Closed caption (CC). (p. 40)
Are the speakers' cables connected correctly? (p. 43)
- Is "Sound Mute" active? (p. 14)
- Is the volume set to the minimum?
- Is "TV speakers" set to "Off"? (p. 26)
- Change "SAP" settings. (p. 17)
- Check "HDMI 1 in" or "HDMI 2 in" settings. (p. 26)
- Set "SAP" setting to "Stereo" or "Mono".
- Check the HDMI device connected to the unit.
- Set the audio setting of the HDMI device to "Linear PCM".
- If digital sound connection has a problem, select analog sound connection.
1- Changes in the temperature and humidity of the room may cause the TV's cabinet to expand or contract and produce metallic sounds. This is not a sign of faulty operation or a malfunction.
2- When the TV is powered on, an electrical component in the TV activates producing a tick/click sound. This is not a sign of faulty operation or a malfunction.
3- Electrical circuits are active while the TV set is on. This is not a sign of faulty operation or a malfunction.
- The main unit radiates heat and some of the parts may become hot. This is not a problem for performance or quality.
Set up in a location with good ventilation.
Do not cover the ventilation holes of the TV with a tablecloth, etc., and do not place on top of other equipment.
Specifications
| TC-L32C12 | ||
| Power Source AC 110-127 V, 60 Hz | ||
| Power Consumption | Maximum Standby condition | 120 W0.7 W |
| Display panel | Aspect Ratio 16:9 | |
| Visible screen size (W × H × Diagonal) | 32" class (31.5 inches measured diagonally) | |
| 27.5 " × 15.4 " × 31.5 " (698 mm × 392 mm × 800 mm) | ||
| (No. of pixels) | 1,049,088 (1,366 (W) × 768 (H)) [4,098 × 768 dots] | |
| Sound | Speaker 1-way 2 speakers | slim under SP System |
| Audio Output 20 W [10 W + 10 W] (10 % THD) | ||
| PC signals | VGA, SVGA, XGA, WXGA, SXGAHorizontal scanning frequency 31 - 69 kHzVertical scanning frequency 59 - 86 Hz | |
| Channel Capability-ATSC/NTSC (Digital/Analog) | VHF/ UHF: 2 - 69, CATV: 1 - 135 | |
| Operating Conditions | Temperature: 32 °F – 95 °F (0 °C – 35°C)Humidity: 20 % – 80 % RH (non-condensing) | |
| Connection Terminals | VIDEO IN 1 | VIDEO: RCA PIN Type × 1 1.0 V[p-p] (75 Ω)AUDIO L - R: RCA PIN Type × 2 0.5 V [rms] |
| VIDEO IN 2 | VIDEO: RCA PIN Type × 1 1.0 V [p-p] (75 Ω)S VIDEO: Mini DIN 4-pin Y: 1.0 V[p-p] (75 Ω) C: 0.286 V [p-p] (75 Ω)AUDIO L - R: RCA PIN Type × 2 0.5 V [rms] | |
| COMPONENT IN | Y: 1.0 V [p-p] (including synchronization)PB, PR: ±0.35 V [p-p]AUDIO L-R: RCA PIN Type × 2 0.5 V [rms] | |
| HDMI 1-2 | TYPE A Connector × 2This TV supports “HDAVI Control 4” function. | |
| PC | D-SUB 15PIN: R,G,B / 0.7 V [p-p] (75 Ω)HD, VD / 1.0 - 5.0 V [p-p] (high impedance) | |
| Card slot | SD CARD slot × 1 | |
| DIGITAL AUDIO OUT | PCM / Dolby Digital, Fiber Optic | |
| FEATURES | CLOSED CAPTION, V-ChipHDMI (HDAVI Control 4)Vesa compatible, Photo viewer | |
| Dimensions(W × H × D) | Including TV stand | 31.5 " × 21.7 " × 8.6"(798 mm × 551 mm × 217 mm) |
| TV Set only | 31.5 " × 20.2 " × 3.3"(798 mm × 511 mm × 83 mm) | |
| Mass | Including TV stand | 28.9 lb. (13.1 kg) NET |
| TV Set only | 25.1 lb. (11.4 kg) NET | |
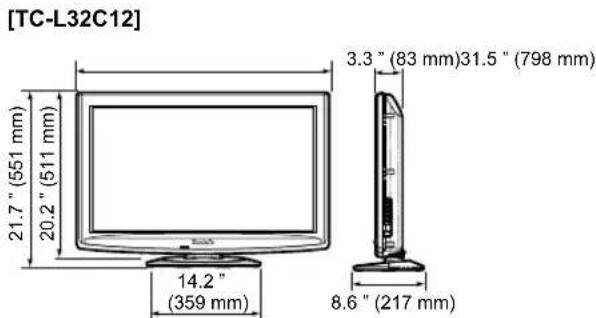
text_image
[TC-L32C12] 21.7" (551 mm) 20.2" (511 mm) 14.2" (359 mm) 3.3" (83 mm)31.5" (798 mm) 8.6" (217 mm)Note
- Design and Specifications are subject to change without notice. Mass and Dimensions shown are approximate.
Limited Warranty (for U.S.A. and Puerto Rico only)
PANASONIC CONSUMER ELECTRONICS COMPANY,
DIVISION OF:
PANASONIC CORPORATION OF NORTH AMERICA
One Panasonic Way
Secaucus, New Jersey 07094
Panasonic LCD Televisions Limited Warranty
Limited Warranty Coverage
If your product does not work properly because of a defect in materials or workmanship, Panasonic Consumer Electronics Company (referred to as “the warrantor”) will, for the length of the period indicated on the chart below, which starts with the date of original purchase (“warranty period”), at its option either (a) repair your product with new or refurbished parts, or (b) replace it with a new or a refurbished product. The decision to repair or replace will be made by the warrantor.
| LCD TV CATEGORIES PARTS LABOR SERVICE | |||
| Up to 37' (diagonal) | 1 (ONE) YEAR 1 (ONE) YEAR | Carry-In | |
| 42" (diagonal) and larger On-Site | |||
During the “Labor” warranty period there will be no charge for labor. During the “Parts” warranty period, there will be no charge for parts.
You must carry-in your product or arrange for on-site service during the Limited warranty period. If non-rechargeable batteries are included, they are not warranted. This warranty only applies to products purchased and serviced in the United States or Puerto Rico. This warranty is extended only to the original purchaser of a new product which was not sold "as is". A purchase receipt or other proof of the original purchase date is required for warranty service.
On-Site or Carry-in Service
For On-Site or Carry-In Service in the United States and Puerto Rico call 1-877-95-VIERA (1-877-958-4372)
On-site service where applicable requires clear, complete and easy access to the product by the authorized servicer and does not include removal or re-installation of an installed product. It is possible that certain on-site repairs will not be completed on-site, but will require that the product or parts of the product, at the servicer's discretion be removed for shop diagnosis and/or repair and then returned.
Limited Warranty Limits And Exclusions
This warranty ONLY COVERS failures due to defects in materials or workmanship, and DOES NOT COVER normal wear and tear or cosmetic damage, nor does it cover markings or retained images on the LCD panel resulting from viewing fixed images (including, among other things, non-expanded standard 4:3 pictures on wide screen TV's, or onscreen data in a stationary and fixed location). The warranty ALSO DOES NOT COVER damages which occurred in shipment, or failures which are caused by products not supplied by the warrantor, or failures which result from accidents, misuse, abuse, neglect, bug infestation, mishandling, misapplication, alteration, faulty installation, set-up adjustments, misadjustment of consumer controls, improper maintenance, power line surge, lightning damage, modification, or commercial use (such as in a hotel, office, restaurant, or other business), rental use of the product, service by anyone other than a Factory Service Center or other Authorized Servicer, or damage that is attributable to acts of God.
THERE ARE NO EXPRESS WARRANTIES EXCEPT AS LISTED UNDER “LIMITED WARRANTY COVERAGE”. THE WARRANTOR IS NOT LIABLE FOR INCIDENTAL OR CONSEQUENTIAL DAMAGES RESULTING FROM THE USE OF THIS PRODUCT, OR ARISING OUT OF ANY BREACH OF THIS WARRANTY. (As examples, this excludes damages for lost time, cost of having someone remove or re-install an installed unit if applicable, or travel to and from the servicer. The items listed are not exclusive, but are for illustration only.) ALL EXPRESS AND IMPLIED WARRANTIES, INCLUDING THE WARRANTY OF MERCHANTABILITY, ARE LIMITED TO THE PERIOD OF THE LIMITED WARRANTY.
Some states do not allow the exclusion or limitation of incidental or consequential damages, or limitations on how long an implied warranty lasts, so the exclusions may not apply to you.
This warranty gives you specific legal rights and you may also have others rights which vary from state to state. If a problem with this product develops during or after the warranty period, you may contact your dealer or Service Center. If the problem is not handled to your satisfaction, then write to the warrantor's Consumer Affairs Department at the addresses listed for the warrantor.
PARTS AND SERVICE (INCLUDING COST OF AN ON-SITE SERVICE CALL, WHERE APPLICABLE) WHICH ARE NOT COVERED BY THIS LIMITED WARRANTY ARE YOUR RESPONSIBILITY.
Customer Services Directory (for U.S.A. and Puerto Rico)
Customer Services Directory (United States and Puerto Rico)
Obtain Product Information and Operating Assistance; locate your nearest Dealer or Service Center; purchase Parts and Accessories; or make Customer Service and Literature requests by visiting our Web Site at:
http://www.panasonic.com/help
or, contact us via the web at:
http://www.panasonic.com/contactinfo
You may also contact us directly at:
1-877-95-VIERA (958-4372)
Monday-Friday 9 am-9 pm; Saturday-Sunday 10 am-7 pm, EST.
■For hearing or speech impaired TTY users, TTY: 1-877-833-8855
Accessory Purchases (United States and Puerto Rico)
Purchase Parts, Accessories and Instruction Books on line for all Panasonic Products by visiting our Web Site at:
http://www.pstc.panasonic.com
or, send your request by E-mail to:
npcparts@us.panasonic.com
You may also contact us directly at:
1-800-332-5368 (Phone) 1-800-237-9080 (Fax Only) (Monday - Friday 9 am to 9 pm, EST.)
Panasonic Service and Technology Company
20421 84th Avenue South,
Kent, WA 98032
(We Accept Visa, MasterCard, Discover Card, American Express, and Personal Checks)
■For hearing or speech impaired TTY users, TTY: 1-866-605-1277
Limited Warranty (for Canada)
Panasonic Canada Inc.
PANASONIC PRODUCT - LIMITED WARRANTY
Panasonic Canada Inc. warrants this product to be free from defects in material and workmanship and agrees to remedy any such defect for a period as stated below from the date of original purchase.
| Plasma TV / Monitor In-h | home service One (1) year, parts (including Plasma Panel) and labour. |
| LCD TV (42 in & over) In-h | home service One (1) year, parts (including LCD Panel) and labour. |
In-home Service will be carried out only to locations accessible by roads and within 50 km of an authorized Panasonic service facility.
LIMITATIONS AND EXCLUSIONS
This warranty does not apply to products purchased outside Canada or to any product which has been improperly installed, subjected to usage for which the product was not designed, misused or abused, damaged during shipping, or which has been altered or repaired in any way that affects the reliability or detracts from the performance, nor does it cover any product which is used commercially. Dry cell batteries are also excluded from coverage under this warranty.
This warranty is extended to the original end user purchaser only. A purchase receipt or other proof of date of original purchase is required before warranty service is performed.
THIS EXPRESS, LIMITED WARRANTY IS IN LIEU OF ALL OTHER WARRANTIES, EXPRESS OR IMPLIED, INCLUDING ANY IMPLIED WARRANTIES OF MERCHANTABILITY AND FITNESS FOR A PARTICULAR PURPOSE. IN NO EVENT WILL PANASONIC CANADA INC. BE LIABLE FOR ANY SPECIAL, INDIRECT OR CONSEQUENTIAL DAMAGES.
In certain instances, some jurisdictions do not allow the exclusion or limitation of incidental or consequential damages, or the exclusion of implied warranties, so the above limitations and exclusions may not be applicable.
In-home service requires clear, complete and easy access to the product by the Authorized Servicentre and does not include removal or re-installation of an installed product. If removal is required to service the product, it will be at the discretion of the Servicentre and in no event will Panasonic Canada Inc. or the Servicentre be liable for any special, indirect or consequential damages.
WARRANTY SERVICE
For product operation and information assistance, please contact:
Our Customer Care Centre: 1-800 #: 1-866-330-0014
Email link: www.vieraconcierge.ca
FOR PRODUCT REPAIRS, please contact Viera Customer Care Agent using the above contact info.
IF YOU SHIP THE PRODUCT TO A SERVICENTRE
Carefully pack and send prepaid, adequately insured and preferably in the original carton. Include details of the defect claimed, and proof of date of original purchase.
Note
This product has a fluorescent lamp that contains mercury. Disposal may be regulated in your community due to environmental considerations. For disposal or recycling information, please contact your local authorities, or the Electronic Industries Alliance: http://www.eiae.org.
The model number and serial number of this product can be found on its back cover. You should note this serial number in the space provided below and retain this book, plus your purchase receipt, as a permanent record of your purchase to aid in identification in the event of theft or loss, and for Warranty Service purposes.
Model
Number
Serial
Number
natural_image
Modern interior with white walls, a flat-screen TV on the wall, and a large window overlooking a balcony (no text or symbols visible)Responsible: Panasonic Corporation of North America
One Panasonic Way, Secaucus, NJ 07094
natural_image
Technical line drawing of a mechanical assembly with two vertical components and a ruler for scale (no text or symbols)natural_image
Black-and-white photo of a football player in action, wearing jersey with number 12 and helmet, no visible text or symbols.VIERA Link "HDAVI Control™"
natural_image
Abstract black-and-white illustration of a stylized animal or creature on a dotted background (no text or symbols)
natural_image
Illustration of three penguins standing together (no text or symbols)natural_image
Low-resolution grayscale image with no discernible text, symbols, or identifiable objects.natural_image
Illustration of a flat-screen television with no visible text or symbols on the screen or background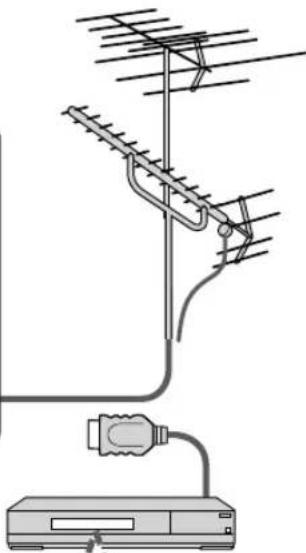
natural_image
Diagram of an antenna mounted on a power supply unit (no text or symbols present)natural_image
Black Panasonic TV monitor with a stand and circular base (no visible text or symbols on the screen)natural_image
Modern interior with white walls, a large flat-screen TV on the wall, and a window overlooking a balcony (no text or symbols visible)Responsible: Panasonic Corporation of North America
One Panasonic Way, Secaucus, NJ 07094
Contact: Panasonic Consumer Electronics Company
1-877-95-VIERA (958-4372)
Courriel: consumerproducts@panasonic.com
natural_image
Technical line drawing of two mechanical components with mounting brackets and a ruler, no text or symbols presentSupport de montage mural • TY-WK3L2RW
ATSC (Advanced Television Systems Committee):
Réglage initial (Suite)
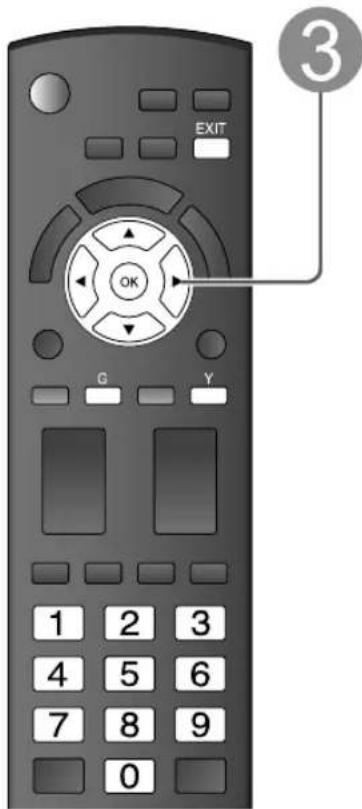
text_image
EXIT 3 OK G Y 1 2 3 4 5 6 7 8 9 0Identification: [ESPACE] OMETTRE/
MAGNÉTO/DVD/CÂBLE/ SATELLITE/DVR/JEU/AUX/ RÉCEPTEUR/ORDINATEUR/ Blu-ray/AP.PHOTO/ENR. DVD/CINÉMA M./MONITEUR/ CENTRE M/PASSER.M/AUTR
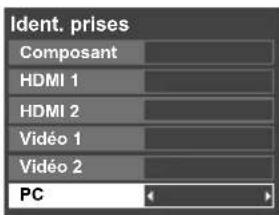
0/30/60/90 (minutes)
sélection
flowchart
graph TD
    A["110-127 V c.a., 60 Hz Cordon d'alimentation (Ne branchez le cordon qu'après avoir fait tous les autres raccordements.)"] --> B["Chromosome 1"]
    B --> C["Chromosome 2"]
    C --> D["Cable"]
    D --> E["Analog Cable"]
    E --> F["Analog Cable In"]
    F --> G["Cable Audio"]
    G --> H["Cable Cable"]
    H --> I["Cable Audio"]
    I --> J["Cable Cable In"]
    J --> K["Cable Audio"]
    K --> L["Cable Cable In"]
    L --> M["Cable Audio"]
    M --> N["Cable Cable In"]
    N --> O["Cable Audio"]
    O --> P["Cable Cable In"]
    P --> Q["Cable Audio"]
    Q --> R["Cable Cable In"]
    R --> S["Cable Audio"]
    S --> T["Cable Cable In"]
    T --> U["Cable Audio"]
    U --> V["Cable Cable In"]
    V --> W["Cable Audio"]
    W --> X["Cable Cable In"]
    X --> Y["Cable Audio"]
    Y --> Z["Cable Cable In"]
    Z --> AA["Cable Audio"]
    AA --> AB["Cable Cable In"]
    AB --> AC["Cable Audio"]
    AC --> AD["Cable Cable In"]
    AD --> AE["Cable Audio"]
    AE --> AF["Cable Cable In"]
    AF --> AG["Cable Audio"]
    AG --> AH["Cable Cable In"]
    AH --> AI["Cable Audio"]
    AI --> AJ["Cable Cable In"]
    AJ --> AK["Cable Audio"]
    AK --> AL["Cable Cable In"]
    AL --> AM["Cable Audio"]
    AM --> AN["Cable Cable In"]
    AN --> AO["Cable Audio"]
    AO --> AP["Cable Cable In"]
    AP --> AQ["Cable Audio"]
    AQ --> AR["Cable Cable In"]
natural_image
Black and white photo of a football player in action, wearing helmet and gear (no visible text or symbols)

** EXIF (Exchangeable Image File Format)
Mises en garde
Informations techniques (Suite)
Format H
text_image
Format 1 Format 2natural_image
Abstract black-and-white illustration of a stylized bird or creature on a dotted background (no text or symbols)
natural_image
Illustration of three penguins standing together (no text or symbols)natural_image
Blurred grayscale image with no discernible text, symbols, or identifiable objectsnatural_image
Illustration of a flat-screen television displaying (no text or symbols visible)