G90BKAL - Basket TAURUS - Free user manual and instructions
Find the device manual for free G90BKAL TAURUS in PDF.

| Brand | TAURUS |
| Model | G90BKAL |
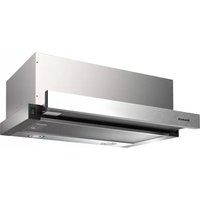
| Product type | Extractor hood |
| Energy efficiency class | A |
| Annual energy consumption | 37.63 kWh/year |
| Maximum air flow | 616.31 m³/h |
| Maximum air pressure | 378.43 Pa |
| Maximum noise level | 67.5 dB(A) |
| Lighting power | 3 W |
| Average illumination on cooking surface | 142.8 lux |
| Grease filtration efficiency | 83.2 % |
| Filters | Aluminum filter (washable) + Activated carbon filter (optional) |
| Power supply | 220-240 V ~50 Hz, 10 A |
| Number of speeds | 3 |
| Timer | Yes, programmable from 5 to 60 minutes |
| Lighting | LED |
| Installation modes | Extraction and recirculation |
| Minimum distance between hob and hood | 65-75 cm |
| Air outlet diameter | 150 mm |
| Warranty | In accordance with applicable legislation |
Frequently Asked Questions - G90BKAL TAURUS
User questions about G90BKAL TAURUS
0 question about this device. Answer the ones you know or ask your own.
Ask a new question about this device
Download the instructions for your Basket in PDF format for free! Find your manual G90BKAL - TAURUS and take your electronic device back in hand. On this page are published all the documents necessary for the use of your device. G90BKAL by TAURUS.
USER MANUAL G90BKAL TAURUS
Fig.2
natural_image
Two-step diagram showing hand positioning of a rectangular object with an arrow indicating rotation (no text or symbols)natural_image
Pure mechanical diagram showing two vertical supports with downward arrows indicating force or movement (no text or symbols)natural_image
Two diagrams showing hand positioning of a circular object on a flat surface, with arrows indicating direction (no text or symbols)natural_image
Diagram of a hand pressing down on a cylindrical object with a downward arrow, no text or symbols presentnatural_image
Two identical line drawings of a container with steam rising from top, no text or symbols presentnatural_image
Diagram showing a brick wall with two screws and two 2x2 bolts, no text or symbols presentnatural_image
Pure technical line drawing of a mechanical component with no text or symbolsSE
natural_image
Illustration of hands stacking a cardboard box with an upward arrow (no text or symbols)natural_image
Technical illustration of a wall-mounted screw with two 2x2 screws, shown in line and close-up views (no text or symbols)• 12. Cuelgue la chimenea superior al colgador de chimenea grande.

natural_image
Diagram showing a brick wall-mounted fixture with directional arrows and a circular safety symbol (no text or labels)natural_image
Pure electrical circuit lines without any symbolsnatural_image
Technical line drawing of a mechanical device with a close button and rotating arrow (no text or symbols)natural_image
Line drawing of a multi-level office or kitchen structure with furniture and airflow indicators (no text or symbols)natural_image
Simple line drawing of a kitchen cabinet with airflow indicators above (no text or symbols)MODO DE EMPLEO
NOTAS PREVIAS AL USO:
Many thanks for choosing to purchase a TAURUS brand product.
Thanks to its technology, design and operation and the fact that it exceeds the strictest quality standards, a fully satisfactory use and long product life can be assured.
Read these instructions carefully before switching on the appliance and keep them for future reference. Failure to follow and observe these instructions could lead to an accident.
SAFETY ADVICE AND WARNINGS
- This appliance can be used by children aged from 8 years and above and persons with reduced physical, sensory or mental capabilities or lack of experience and knowledge if they have been given supervision or instruction concerning use of the appliance in a safe way and understand the hazards involved.
- Children shall not play with the appliance.
- Cleaning and user maintenance shall not be made by children without supervision.
· Do not flambé food under the appliance. - If other gas or fuel appliances can be used at the same time in the room where the appliance is to be used, that room must be well ventilated.
- It is advisable to clean the appliance regularly, as accumulated grease, especially in the filters, reduces the product's performance and increases the risk of fire.
-
CAUTION There is a risk of fire if the appliance's cleaning is not done according to these instructions.
-
If the supply cord is damaged, it must be replaced by the manufacturer, its service agent or similar qualified person in order to avoid a hazard.
- This appliance is for household use only, not professional, industrial use.
- CAUTION Accessible parts may become hot when used with cooking appliances.
- Ensure that the voltage indicated on the rating label matches the mains voltage before plugging in the appliance.
- Connect the appliance to a base with an earth socket withstanding a minimum of 10 amperes.
- The appliance's plug must fit into the mains socket properly. Do not alter the plug. Do not or use plug adaptors.
- Do not force the power cord. Never use the power cord to lift up, carry or unplug the appliance.
Check the state of the power cord. Damaged or tangled cables increase the risk of electric shock. - Do not touch the plug with wet hands.
Do not use the appliance if the cable or plug is damaged. - If any of the appliance casings breaks, immediately disconnect the appliance from the mains to prevent the possibility of an electric shock.
- Do not use the appliance if it has fallen on the floor, if there are visible signs of damage or if it has a leak.
- Do not use the appliance outdoors.
USE AND CARE:
- Do not use the appliance if its accessories are not properly fitted.
- Do not use the appliance if the on/off switch does not work.
e Unplug the appliance from the mains when not in use and before undertaking any cleaning task.
SERVICE:
- Make sure that the appliance is serviced only by specialist personnel, and that only original spare parts or accessories are used to replace existing parts/accessories.
- Any misuse or failure to follow the instructions for use renders the guarantee and the manufacturer's liability null and void.
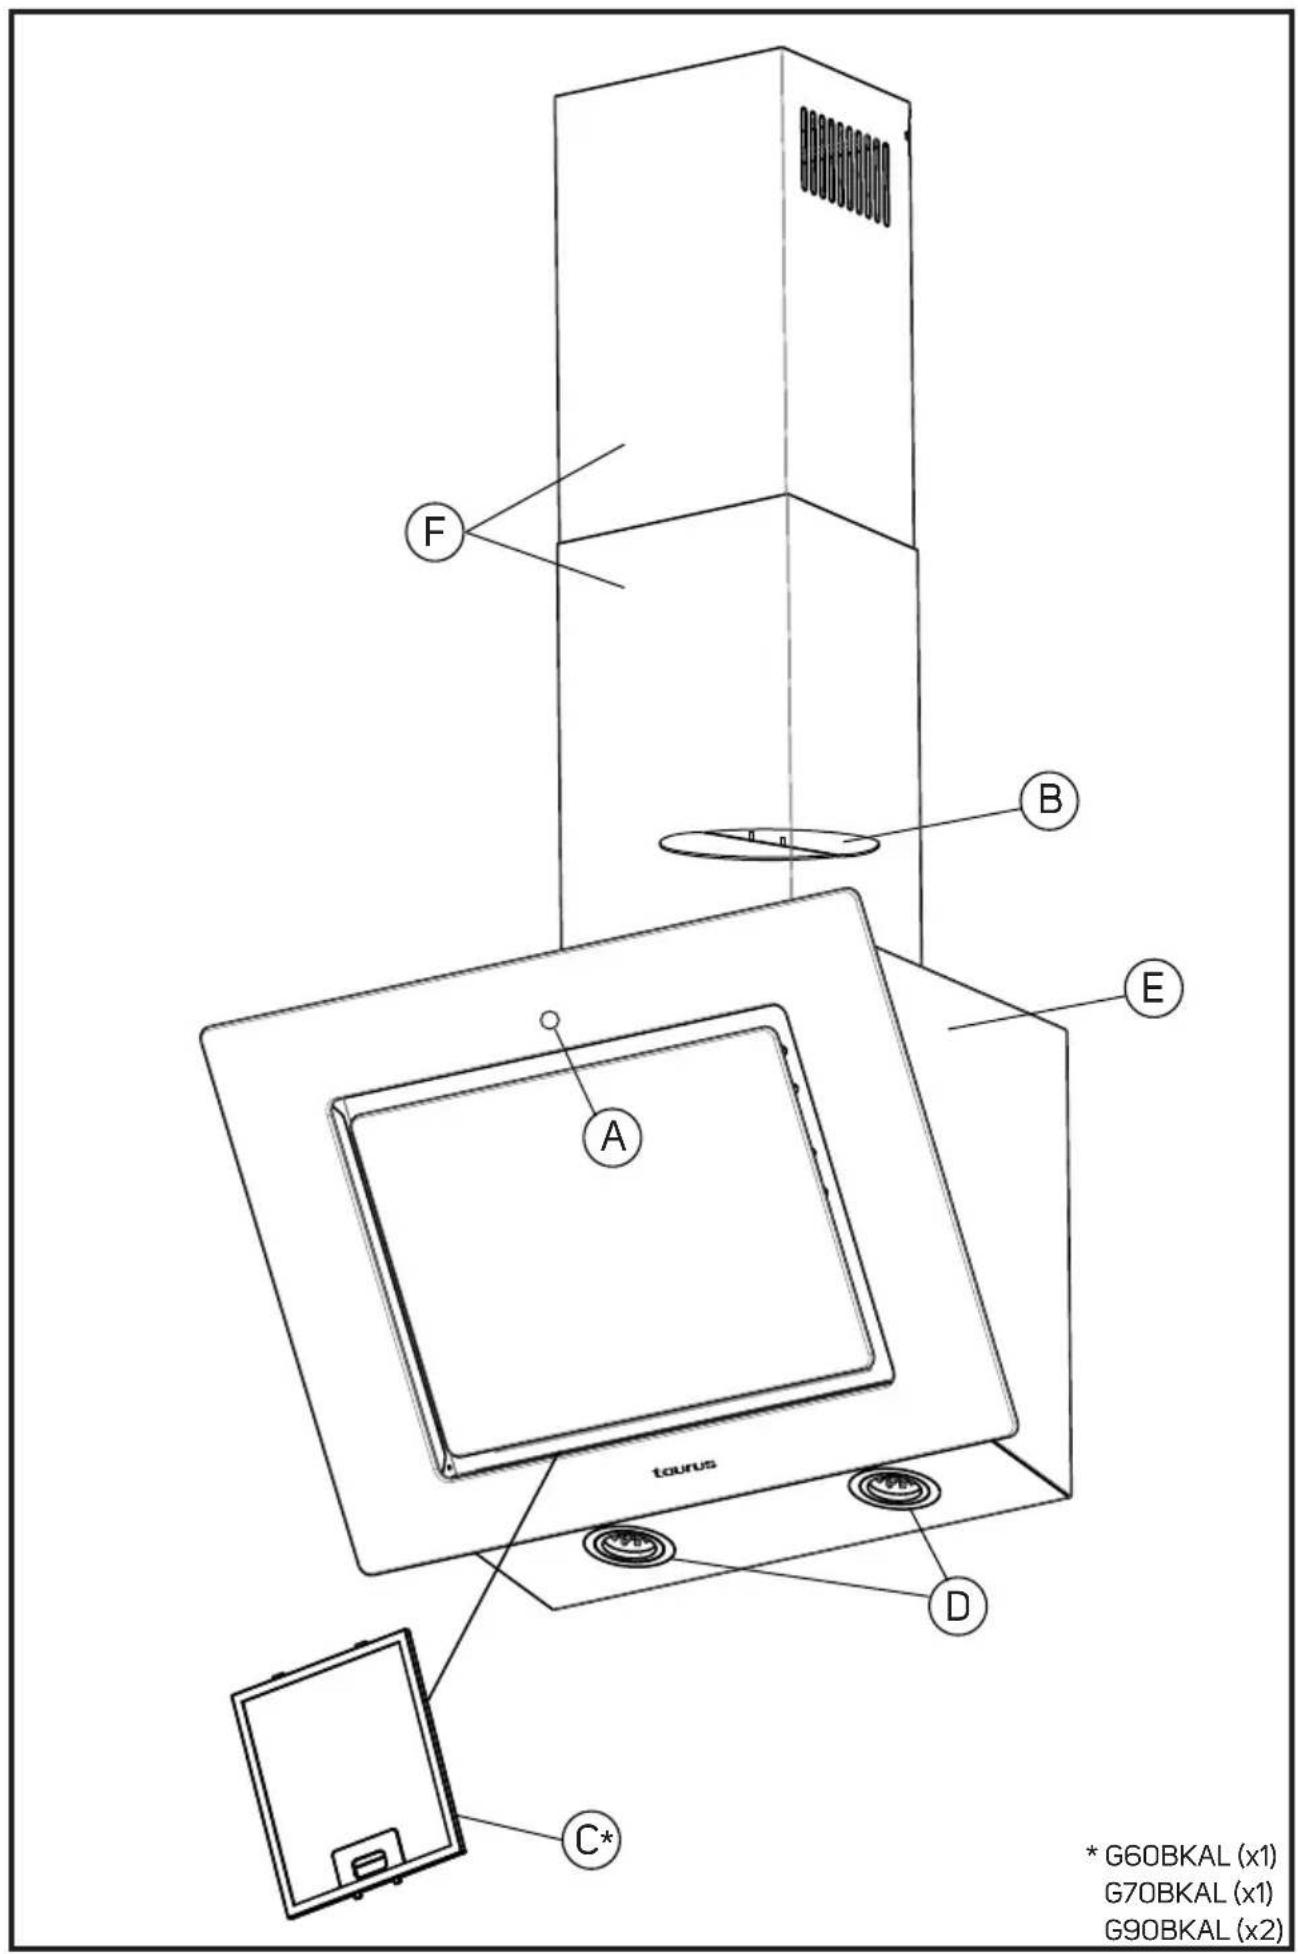
DESCRIPTION
A Switches
B One-way valve
C Aluminium filter/s
D Lights
E Body
F Chimney
INSTALLATION
- Be sure to remove all packaging material from inside the appliance.
- Make sure the air vented is not sent through the ducts used to vent fumes from other gas or fuel appliances.
- Specific air venting regulations applicable must be complied with when installing the appliance.
- Respect the legal provisions concerning safety distances from other elements such as pipes, electrical connections, etc.
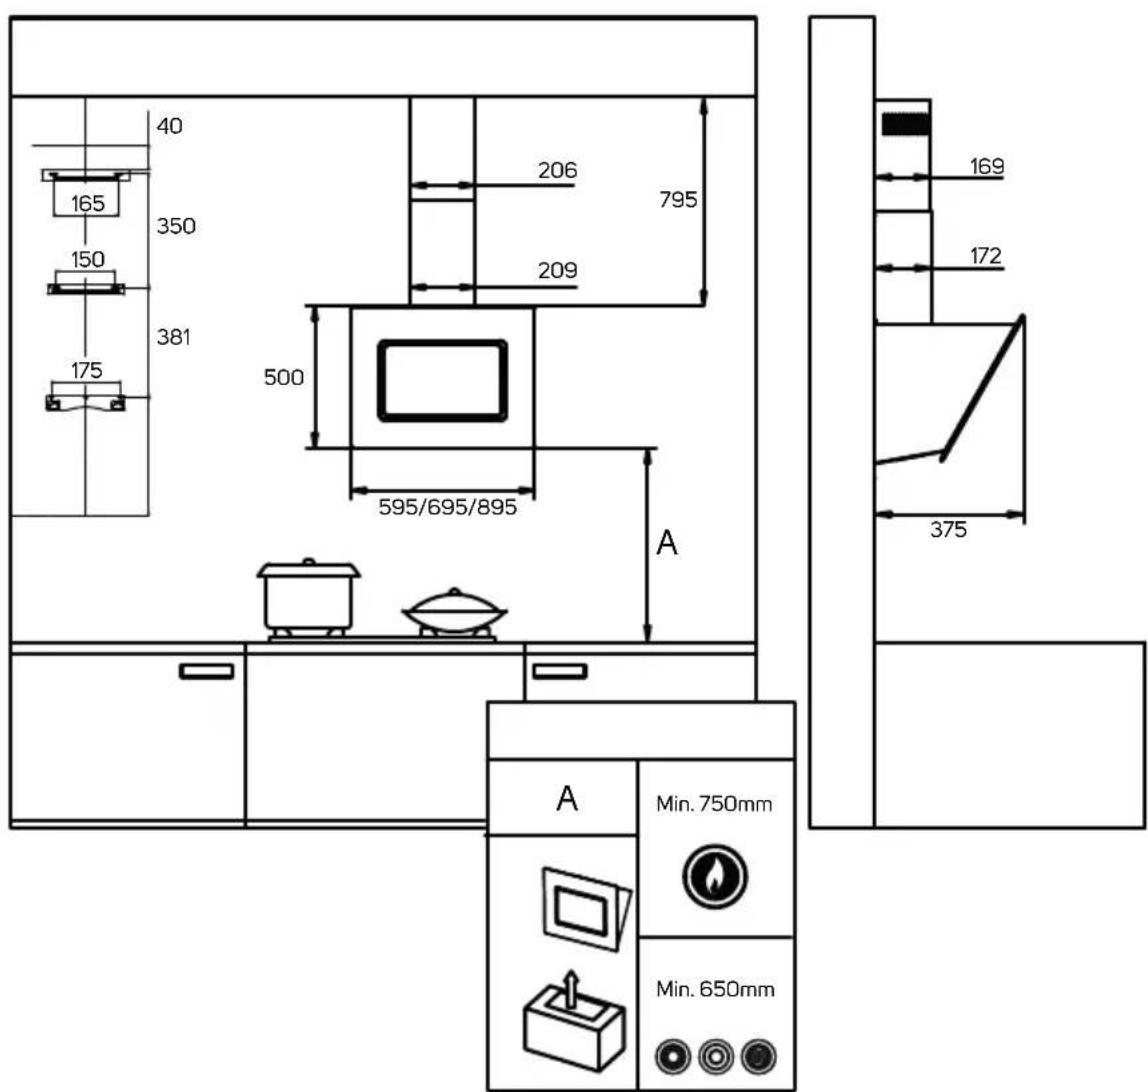
- The minimum distance between the support surface of the cooking elements and the lower part of the appliance is 65-75cm. (This distance can be greater if specified in the cooking elements' installation instructions).
- Do not cover or obstruct any of the openings of the appliance.
- The plug must be easily accessible so it can be disconnected in an emergency.
- Do not add new sections to the extraction tube provided, as it could cause the appliance to malfunction.
- Make sure you have the necessary elements for the installation before you start:
- Impact drill
- 8 mm drill bit
- Philips screwdriver
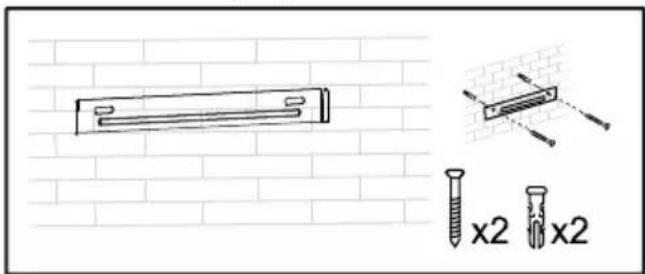
ELEMENTS CONTAINED IN THE BOX FOR INSTALLATION (FIG.1):
-
4X30 mm screws (9 pcs.)
-
3X10 mm screws (2 pcs.)
-
Screw plug (9 pcs.)
-
Wall bracket
-
Chimney hangers (2 pcs.) (small and large)
-
Lower chimney
-
Upper chimney
-
One-way valves (2 pcs.)
-
Exhaust pipe
ASSEMBLAGE
- If you have an outlet to the outside, your hood can be connected as shown in the image below by means of an exhaust pipe (with an internal diameter of 150 mm).

- NOTE: Before installation, turn the unit off and unplug it from the power outlet.
- Before installation, you must remove the grease filters as shown below, you must press the lock and pull down:

natural_image
Two-step diagram showing hand positioning and folding of a rectangular object, no text or symbols presentINSTALLATION FOR EXTERIOR VENTILATION:
-
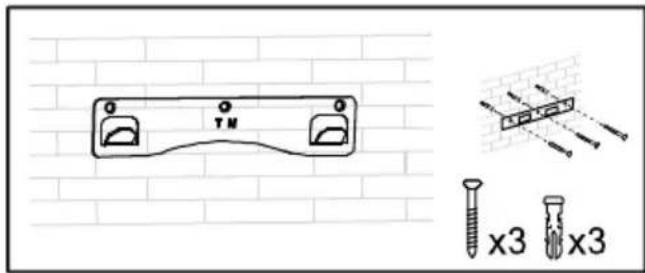
- Place the wall bracket on the wall and mark the 3 points where the screws should be fixed. (As a reference, take the measurements of Fig.2).
-
- Drill 3 holes of 8 mm and insert 3 screw plugs there.
-
- Replace the wall bracket and fix it to the wall with the 4X30 mm screws.
NE
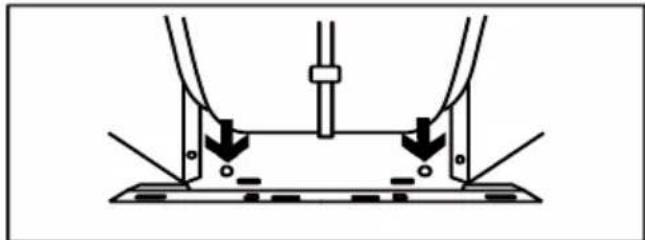
- Hang the body of the extractor hood and with the filters removed you will see two more fixing points. You must mark these two points, remove it and repeat what has been done previously (drill and place studs). We hang again the extractor hood and fix two more 4X30 mm screws.
natural_image
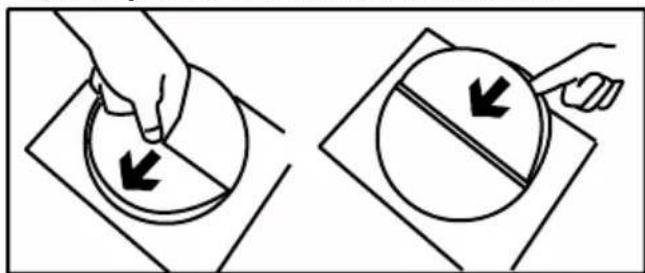
Pure mechanical diagram showing two vertical supports with downward arrows indicating force or movement (no text or symbols)- Now that the hood is hung, you must fix the one-way valve to the air outlet as follows:
natural_image
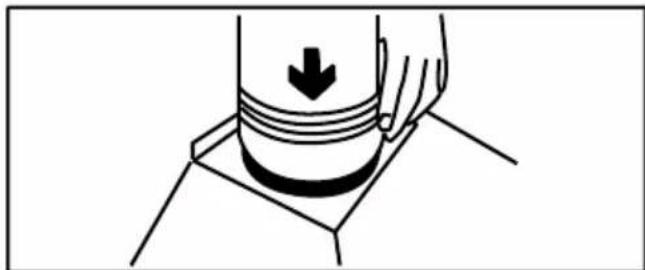
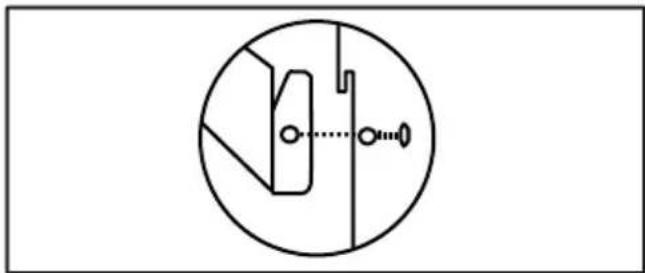
Two-step diagram showing hand pressing a circular object on a flat surface, with arrows indicating direction (no text or symbols)- Connect the exhaust pipe to the air outlet of the extractor hood as follows:
natural_image
Diagram of a hand pressing down on a cylindrical object with an arrow indicating downward motion (no text or symbols present)NOTE: It is recommended to use American tape to fix and better seal the exhaust pipe around the air outlet.
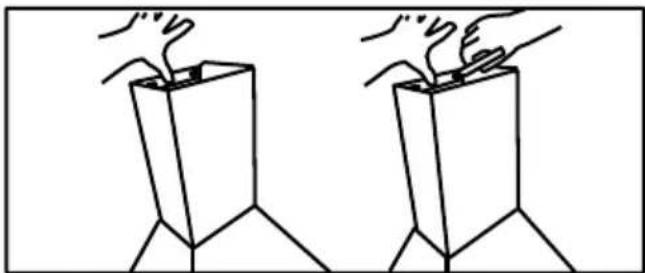
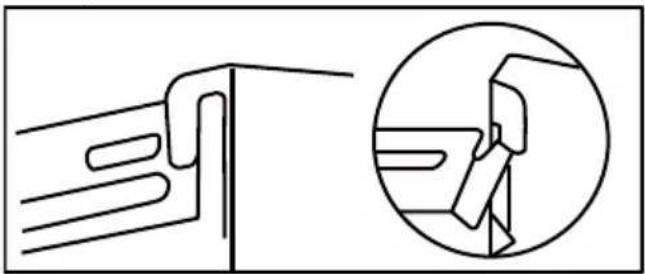
7. Place the lower chimney on the hanged hood with the small chimney hanger placed on the back, mark two points on the wall in the position of the chimney hanger holes.
natural_image
Line drawing of two identical 3D geometric shapes with hands holding small objects, no text or symbols present- 8. Remove the lower chimney and drill two 8 mm holes and fix the small chimney hanger with two screw plugs and two screws.
natural_image
Diagram showing a brick wall with two screws and a close-up of a screw with two 2x2 bolts (no text or symbols)- Place the upper chimney in the lower chimney and place them over the hood and hang the lower chimney on the small chimney hanger.
natural_image
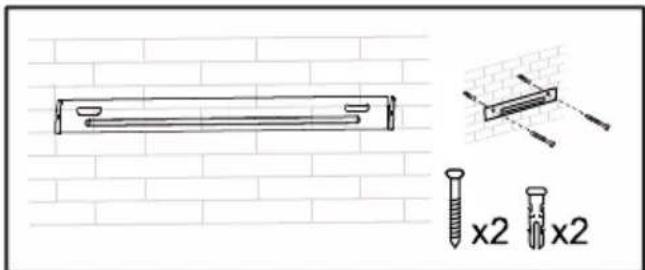
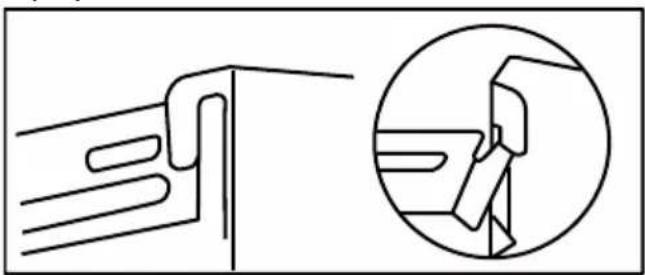
Pure technical line drawing of a mechanical component with an inset circular detail (no text or symbols)- Pull the upper chimney up until it reaches the required height and mark the points of the large chimney hanger on the wall.

natural_image
Illustration of a hand placing a cardboard box onto a stand, with an upward arrow indicating motion (no text or symbols)- 11. Drill two 8 mm holes and secure the large chimney hanger with two screw plugs and two screws.
natural_image
Technical line drawing of a wall-mounted screw with two 2x2 bolts, shown against a brick wall background (no text or symbols)NE
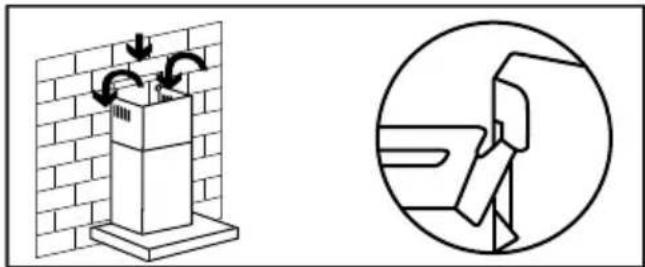
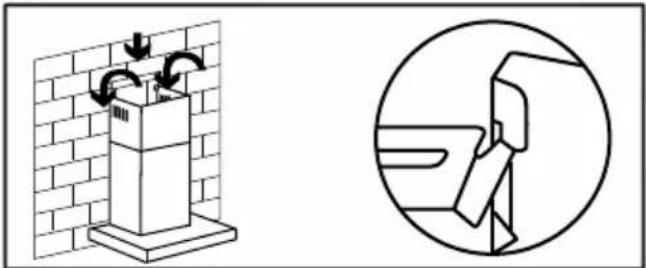
- Hang the upper chimney to the large chimney hanger.
natural_image
Diagram showing a brick wall-mounted fixture with directional arrows and a circular diagram of a mechanical component (no text or symbols)NOTE: You can also fix the upper chimney with two small screws (3X10) as follows:
natural_image
Pure electrical circuit lines without any symbolsNOTE: If you don't have an outlet to the outside, the exhaust pipe is not necessary and the installation is the same as before skipping the part of the pipe (recirculation mode).
- You will need two carbon filters to trap odours, they are not included.
- To install the carbon filters, remove the grease filters as explained above, plug the filters into the unit and turn them clockwise on both sides of the motor, as shown below:

- Make sure the filter is securely locked.
- NOTE: When the carbon filter is connected, the suction will be lower.
MODES
- The device has 2 installation modes: Recirculation mode and extraction mode.
EXTRACTION MODE:
- The extraction mode expels the air to the outside. This mode guarantees high performance, high capacity and low noise level.
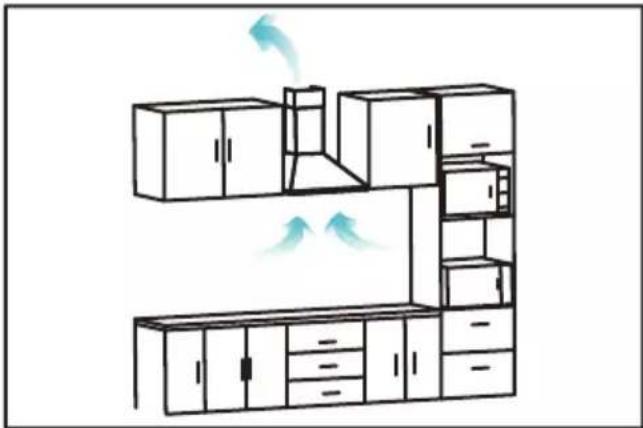
natural_image
Line drawing of a multi-level kitchen or office layout with furniture and airflow indicators (no text or symbols)RECIRCULATION MODE:
- The recirculation mode removes odours by means of a carbon filter and reintroduces the air into the kitchen. This mode is suitable for rooms without extraction ducts, saves air and prevents thermal losses to the outside.
- For this mode, you need to obtain the carbon filters and install them as explained in the installation part, they are not included.
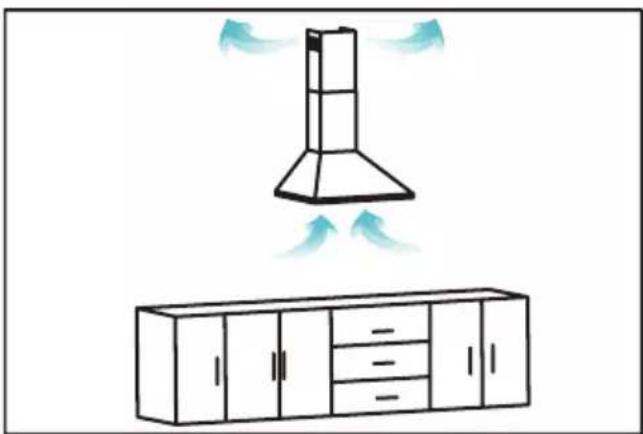
natural_image
Simple line drawing of a kitchen cabinet with a chimney and airflow arrows, no text or symbols present.INSTRUCTIONS FOR USE
BEFORE USE:
- Remove the appliance's protective film.
- Make sure that all products' packaging has been removed.
- Ensure that the selected tension on the voltage selector coincides with the tension of the mains.
USE:
- Connect the appliance to the mains.

- Press this key to turn the engine on and off.

FILTER CLEANING INDICATOR
- The first time you turn on the appliance, or after 14 hours of working time, the filter cleaning indicator will turn on.

DECREASE KEY
- In normal use press to decrease the engine power level.
- In timer mode it can be used to reduce the programmed time, every time you press it you will lower 1 minute, press and hold to decrease the time quickly.
- If you are adjusting the clock time, each time you press it will lower 1 minute, press and hold to decrease the time quickly.

INCREASE KEY
- In normal use press to increase the engine power level.
- In timer mode it can be used to increase the programmed time, each time you press it will increase 1 minute, press and hold to increase the time quickly.
- If you are adjusting the clock time, each time you press will increase 1 minute, press and hold to increase the time quickly.

TIMER MODE
- Press this button to activate the timer, they will add 5 minutes (it can be programmed between 5 and 60 minutes). If no button is pressed within 10 seconds, the settings will be saved.
- To set the clock press and hold this button for 3 seconds, the three keys necessary to set the clock will be activated. Once the clock is set, if no button is pressed within 10 seconds, the setting will be saved.

LIGHT BUTTON
- Press to turn the light on or off.
- If you hold down the time you will see the engine running time, stop pressing and this time will disappear in 10 seconds or press again to hide the information. When the engine has worked 14 hours, it will be indicated that the filters must be cleaned, to remove the indication, this button must be kept pressed.
PRACTICAL TIPS:
- It is recommended to keep the filters clean, grease and dirt in the filters decreases the efficiency of the engine and increases its energy consumption.
- Adjust the extraction speed according to the amount of smoke, working at high speeds with little smoke consumes more energy.
CLEANING
- Disconnect the appliance from the mains and allow it to cool before undertaking any cleaning task.
- Clean the equipment with a damp cloth with a few drops of washing-up liquid and then dry.
- Do not use solvents, or products with an acid or base pH such as bleach, or abrasive products, for cleaning the appliance.
- Do not let water or any other liquid get into the air vents to avoid damage to the inner parts of the appliance.
- Never submerge the appliance in water or any other liquid or place it under running water.
- If the appliance is not maintained in good cleaning condition, its surface can degrade and inexorably affect the life of the appliance and lead to a dangerous situation.
- Then dry all parts before its assembly and storage.
CLEANING THE ALUMINUM FILTERS
- The filters can be cleaned by hand or with the dishwasher. It is advisable to clean them monthly.
- NOTE: Cleaning the filters in the dishwasher may change colour slightly.
HAND CLEANING:
- Remove the filter as shown in the installation section.
- Brush with a soft brush in a solution of warm water and a small amount of liquid soap.
- Do not use liquid soap alone as it can damage the filter.
- After cleaning, let the water drain and dry well.
DISHWASHER CLEANING:
- To clean the dishwasher, you must select a program at 60°C, place the filter vertically and in the lower basket.
- Some cleaning products may discolour the filter permanently, although this will not affect its performance.
CHANGING THE BULB/S LED
- You must purchase the specific spare part for your model.
-
Steps to follow:
-
Disconnect the hood from the mains.
- Press the LED to push towards the inside.
- Disconnect the connector.
- Introduce the new LED and push to place it in its place.
- Reconnect the connector.
CHANGING THE FILTERS:
- For activated carbon filters (if applicable), it is advisable to replace them at least once a year or every 48 hours of operation.
- In the case of permanent mesh filters, they do not need to be replaced.
SUPPLIES
- Supplies can be acquired from distributors and authorised establishments (such as filters, bulbs...) for your appliance model.
- Always use original supplies, designed specifically for your appliance model.
ANOMALIES AND REPAIR
- In the event of a fault, call the customer service telephone number indicated on the guarantee sheet (that you will find at the end of this manual). Do not attempt to disassemble or repair the device yourself as there may be danger.
FOR EU PRODUCT VERSIONS AND/OR IN CASE THAT IT IS REQUESTED IN YOUR COUNTRY:
ECOLOGY AND RECYCLABILITY OF THE PRODUCT
- The materials of which the packaging of this appliance consists are included in a collection, classification and recycling system. Should you wish to dispose of them, use the appropriate public recycling bins for each type of material.
- The product does not contain concentrations of substances that could be considered harmful to the environment.
This symbol means that in case you wish to dispose of the product once its working life has ended; take it to an authorised waste agent for the selective collection of Waste from Electric and
Electronic Equipment (WEEE).
This appliance complies with Directive 2014/35/EU on Low Voltage, Directive 2014/30/EU on Electromagnetic Compatibility, Directive 2011/65/EU on the restrictions of the use of certain hazardous substances in electrical and electronic equipment and Directive 2009/125/EC on the eco-design requirements for energy-related products.
The following information is regarding to energy labelling and eco-design:
| Data sheet | |
| Trade mark: | TAURUS |
| Model: | G60BKAL G70BKAL G90BKAL |
| Annual Energy Consumption (AEC _hood ) (kW/a) | 37,63 |
| Energy Efficiency class: | A |
| Fluid Dynamic Efficiency (FDE _hood ) | 29,57 |
| Fluid Dynamic Efficiency class | A |
| Lighting Efficiency (LE _hood ) (lux/W) | 47,60 |
| Lighting Efficiency class | A |
| Grease Filtering Efficiency (GFE _hood ) (%) | 83,20 |
| Grease Filtering Efficiency class | C |
| Air flow at minimum (normal use) (m3/h) | 394,33 |
| Air flow at maximum (normal use, intensive excluded) (m3/h) | 523,37 |
| Noise at maximum (normal use, intensive excluded) (dB(A)) | 67.5 |
| Measured power consumption in standby mode (Ps) (W) | 0,01 |
| Measured power consumption in off mode (Po) (W) | 0 |
| Time increase factor (f) | 0,94 |
| Energy Efficiency Index (EEI _hood ) | 50.82 |
| Measured air flow rate at best efficiency point (Q _BEP ) (m3/h) | 616.31 |
| Measured air pressure at best efficiency point (R _BEP ) (Pa) | 378.43 |
| Maximum air flow (Q _max ) (m3/h) | 616.31 |
| Measured electric power input at best efficiency point (W _BEP ) (W) | 103.82 |
| Nominal power of the lighting system (WL) (W) | 3 |
| Average illumination of the lighting system on the cooking surface (Emiddle) (lux) | 142.8 |
| Sound power emission (LWA) (dB(A)) | 67.5 |
To establish compliance with the eco-design requirements and for calculation of energy labelling parameters the appliance the European standard EN 61591, EN 60704-3, EN 60704-13 and EN 50564 are used as reference.
Cher Client,
natural_image
Two-step diagram showing hand positioning of a rectangular object with an arrow indicating rotation (no text or symbols)INSTALLATION POUR LA VENTILATION EXTERIEURE :
natural_image
Diagram showing a brick wall with a small electrical component and a wireframe view of a wall structure (no text or symbols)natural_image
Pure mechanical diagram showing two vertical supports with downward arrows indicating force or movement, no text or symbols present.natural_image
Two-step diagram showing hand positioning of a circular object on a flat surface, with arrows indicating direction (no text or symbols)natural_image
Diagram of a hand pressing down on a cylindrical object with a downward arrow, no text or symbols presentnatural_image
Line drawing of two identical 3D geometric shapes with hands holding small objects, no text or symbols presentnatural_image
Technical illustration of a brick wall with two screw fasteners and a separate close-up of a rectangular component (no text or symbols)natural_image
Pure technical line drawing of a mechanical component and a circular inset showing a person walking (no text or symbols)natural_image
Illustration of a hand placing a cardboard box onto a stand, with an upward arrow indicating motion (no text or symbols)natural_image
Technical illustration of a brick wall with two screw holes and a close-up view of the same screw (no text or symbols)natural_image
Technical diagram showing a brick chimney with directional arrows and a circular inset view of a mechanical component (no text or symbols)natural_image
Pure electrical circuit lines without any symbolsnatural_image
Technical line drawing of a mechanical device with a close button and rotating arrow (no text or symbols)natural_image
Line drawing of a multi-level kitchen or office space layout with no text, numbers, or symbolsMODE DE RECIRCULATION
natural_image
Simple line drawing of a kitchen cabinet with a chimney and airflow indicators above (no text or symbols)MODE D'EMPLOI
CONSIGNES PREALABLES :
REMPLACEMENT DES AMPOULES LED
natural_image
Two-step diagram showing hand positioning and folding of a rectangular object, no text or symbols presentnatural_image
Pure mechanical diagram showing two vertical supports with downward arrows indicating force or movement (no text or symbols)natural_image
Two diagrams showing hand positioning of a circular object on a flat surface, with arrows indicating direction (no text or symbols)natural_image
Diagram of a hand pressing down on a cylindrical object with a downward arrow, no text or symbols presentnatural_image
Two identical line drawings of a container with steam rising from top, placed on a stand (no text or symbols)natural_image
Diagram showing brick wall and two screw fasteners with cross-sectional view (no text or symbols)- Coloque a chaminé superior na chaminé inferior, coloque-as sobre o corpo do exaustor e coloque a chaminé inferior no suporte pequeno da chaminé.
natural_image
Pure technical line drawing of a mechanical component with an inset circular detail showing a gear mechanism (no text or symbols)natural_image
Illustration of a hand stacking a box with an upward arrow, no text or symbols presentPT
natural_image
Technical line drawing of a wall-mounted screw and two screws (x2) on a brick wall, no text or symbols present.- Coloque a chaminé superior no suporte grande da chaminé.
natural_image
Diagram showing a brick chimney with directional arrows and a circular diagram of a mechanical component (no text or symbols)natural_image
Pure electrical circuit lines without any symbolsnatural_image
Technical line drawing of a mechanical component with no visible text or symbolsnatural_image
Line drawing of a multi-level office or kitchen structure with airflow indicators (no text or symbols)natural_image
Simple line drawing of a kitchen air conditioner unit with airflow arrows (no text or symbols)MODO DE UTILIZAÇÃO
natural_image
Two-step diagram showing hand positioning and folding of a rectangular object with arrows indicating rotation (no text or symbols)natural_image
Pure mechanical diagram showing two vertical supports with downward arrows indicating force or movement (no text or symbols)natural_image
Two-step diagram showing hand pressing a circular object on a flat surface, with arrows indicating direction (no text or symbols)natural_image
Diagram of a hand pressing down on a cylindrical object with an arrow indicating downward motion (no text or symbols present)natural_image
Two hand-drawn diagrams showing a container being placed on top, with no text or symbols present.natural_image
Technical illustration of a brick wall with two screws and a close-up view of the screw (no text or symbols)natural_image
Pure technical line drawing of a mechanical component and a circular inset view (no text or symbols)CA
natural_image
Illustration of a hand placing a cardboard box onto a stand, with an upward arrow indicating motion (no text or symbols)natural_image
Technical illustration of a wall-mounted screw and two screws (x2) on a brick wall, no text or symbols present.natural_image
Diagram showing a brick wall-mounted fixture with directional arrows and a circular diagram of a mechanical component (no text or symbols)natural_image
Pure mechanical diagram showing a gear and shaft assembly without any text or symbolsnatural_image
Technical line drawing of a mechanical component with a close button and rotation arrow (no text or symbols)natural_image
Line drawing of a multi-level kitchen or office space layout with appliances and fixtures (no text or symbols)natural_image
Simple line drawing of a kitchen air conditioner unit with airflow arrows (no text or symbols)INSTRUCCIONS D'ÚS
NOTES PRÈVIES A L'ÚS:
natural_image
Two-step diagram showing hand positioning and folding of a rectangular object, no text or symbols presentИНСТАЛИРАНЕ ЗА ВЪНШНА ВЕНТИЛАЦИЯ:
natural_image
Pure mechanical diagram showing two vertical supports with downward arrows indicating force or movement (no text or symbols)natural_image
Two-step diagram showing hand turning a circular object with directional arrows, no text or symbols presentnatural_image
Diagram of a hand pressing down on a cylindrical object with a downward arrow, no text or symbols presentnatural_image
Two identical line drawings of a container with steam rising from top, no text or symbols presentBG
natural_image
Diagram showing a brick wall with two screw holes and a close-up of the same screw (no text or symbols)natural_image
Pure technical line drawing of a mechanical component with an inset circular detail (no text or symbols)natural_image
Illustration of a hand stacking a cardboard box with an upward arrow (no text or symbols)natural_image
Technical line drawings of a wall-mounted tool and two screw fasteners (x2), shown against a brick wall background (no text or symbols)natural_image
Diagram showing a brick chimney with directional arrows and a circular diagram of a mechanical component (no text or symbols)natural_image
Pure mechanical diagram showing a circular component with internal components and alignment lines (no text or symbols)natural_image
Technical line drawing of a mechanical device with a close button and rotating arrow (no text or symbols)natural_image
Line drawing of a multi-level cabinet or rack system with airflow arrows indicating movement (no text or symbols)МЕТОД НА РЕЦИРКУЛАЦИЯТА
natural_image
Simple line drawing of a kitchen cabinet with a chimney and airflow indicators above (no text or symbols)НАЧИН НА УПОТРЕБА
ЗАБЕЛЕЖКИ ПРЕДИ УПОТРЕБА:
This product enjoys the recognition and protection of the legal guarantee in accordance with current legislation. To enforce your rights or interests you must go to any of our official technical assistance services.
You can find the closest one by accessing the following web link: http://taurus-home.com/
You can also request related information by contacting us.
You can download this instruction manual and its updates at http://taurus-home.com/
Français
GARANTIE ET ASSISTANCE TECHNIQUE
COUNTRY ADDRESS PHONE
| Algeria Zone d'Activite, N° 62, Constantine 213770777756 | ||
| Argentina Av. del Libertador 1298,(B1638BEY), Vicente López (Pcia. Buenos Aires) | 541153685223 | |
| Belgium Mariëndonkstraat 5, 5154 EG, Elshout 31620401500 | ||
| Benin 359 Av. Steinmetz, 1930, Cotonou 0299-21313798 | ||
| Bulgaria | 265,Okolovrasten Pat, Mladost 4, 1766, Sofia | 35929211120 / 35929211193 |
| Burkina Faso Avenue Bassawarga, 01 BP915, Ouagadougou 226 25301038 | ||
| Congo (Republic of) 98 Blvd General Charles de Gaulle, Pointe Noire 242066776656 | ||
| Cyprus | 20, Bethlehem Str. / P.O.Box 20430, 2033, Strovolos | 35722711300 |
| Czech Republic | Milady Horakove 357/4, 568 02, Svitavy | 420 461 540 130 |
| Democratic Republic of the Congo | AV. Pont Canale N° 3440, Kinshasa | 00243-991223232 |
| Equatorial Guinea | SN Av Patricio Lumumba y C/ Jesus B, Bata | 00240 333 082958 / 00240 333 082453 |
| Equatorial Guinea | Calle de las Naciones Unidas, PO box 762, Malabo | 240333082958 / 240333082453 |
| España Avda Barcelona, S/N, 25790 Oliana (Lleida) atencioncliente@taurus.es | 902 118 050 | |
| Ethiopia Lideta Sub City Kebele 10 H.NO 124, Addis Ababa | +251 11 5518300 | |
| France | Za les bas musats 18, 89100, Malay-le-Grand | 03 86 83 90 90 |
| Gabon | BP 574, Port-Gentil Centre-ville | 24101552689 / 24101560698 |
| Ghana | Ederick Place, Accra-Ghana | 302682448 / 302682404 |
| Gibraltar 11 Horse Barrack Lane, 54000, Gibraltar 00350 200 75397 / 00350 200 | ||
| 41023 | ||
| Greece Sapfous 7-9, 10553, Athens +30 21 0373 7000 | ||
| Guinea BP 206, GN, Conakry (224) 622204545 | ||
| Hong Kong Unit H,13/F., World Tech Centre, Hong kong (852) 2448 0116 / 9197 3519 | ||
| Hungary Késmárk utca 11-13, 1158, Budapest +36 1 370 4519 | ||
| India C-175, Sector-63, Noida, Gautam Budh Nagar - 201301, Delhi | (+91) 120 4016200 | |
| Ivory Coast 01 Rue Des Carrossiers-Zone 3, B.P 3747, Abidjan 01 (RCI) | 22521251820 / 225 21 353494 | |
| Jordan 28 Basman St Down town, Amman +962 6 46 222 68 | ||
| Kuwait | P.O. BOX 3379 hawally, 32034, Hawally | +965 2200 1010 |
| Lebanon Damascus Highway; Sciale Building, Jamhour | 9615922963 | |
| Luxembourg | Mariëndonkstraat 5, 5154 EG, Elshout 31620401500 | |
| Mali | BP E2900, Dravela Bolibana | 223227216 / 223227259 |
| Marruecos | Avenue 2 Mars, Résidence Nassrallah, Appt n° 2 1er, Casablanca | (+212) 522 86 30 95 |
| Mauritania | 134 Avenue Gamal Abdener Ilot D, Nouakchott | 2225254469 / 2225251258 |
| Mexico Rosas Moreno N° 4-203 Colonia de San Rafael C.P. 06470 – Delegación Cuauhtémoc, Ciudad de México | (+52) 55 55468162 | |
| Montenegro | Rastovac bb, 81400, Niksic | +382 40 217 055 |
| Netherlands | Mariëndonkstraat 5, 5154 EG, Elshout 31620401500 | |
| Nigeria 8, Isaac; John Str,G.R.A Ikeja Lagos | 23408023360099 | |
| Paraguay | Denis Roa 155 c/ Guido Spano, Asunción | 21665100 |
| Peru | Calle los Negocios 428, Surquillo, Lima | (511) 421 6047 |
| Portugal Avenida Rainha D. Amélia, n°12-B, 1600-677, Lisboa | +351 210966324 | |
| Romania | Dudesti Pantelimon 23, 410554, Bucharest | 031.805.49.58 |
| Serbia | Rastovac bb, 81400, Niksic | +382 40 217 055 |
| Slovakia Milady Horakove 357/4, 568 02, Svitavy | 420 461 540 130 | |
| Southafrica | Unit 25 & 26, San Croy Office Park, Die Agora Road, Croydon, Kempton Park, 1619, Johannesburg | (+27) 011 392 5652 |
| Tunisia | 2, Rue de Turquie, Tunis | 21671333066 |
| Ukraine | Block 6, Ap Housing Estate Topol-2, B, 49000, Dnepropetrovsk | 380563704161 / 380563704161 |
| United Arab Emirates | P.O.BOX 8543, Dubai | 14506246200 |
| Uruguay | Luis Alberto de Herrera 3468, 11600, Montevideo | 598 2209 28 00 |
| Vietnam Lot 7 Ind. Zone for, Ha Noi | 84437658111 / 84437658110 | |