RF-HC-550 - Camera Renkforce - Free user manual and instructions
Find the device manual for free RF-HC-550 Renkforce in PDF.


| Product type | Wildlife observation camera |
| Brand | Renkforce |
| Model | RF-HC-550 |
| Image sensor | CMOS 48 MP |
| Max. photo resolution | 48 MP (8000 x 6000 pixels) |
| Max. video resolution | 3840 x 2160 (4K) |
| Display | 2.0" TFT |
| Night vision | 40 IR LEDs, range 15 m |
| PIR detection distance | 18.3 m (60 ft) |
| PIR detection angle | 120° (3 lenses) |
| Trigger time | 0.2 s |
| Power supply | 4 or 8 AA alkaline batteries (not rechargeable) or 6 V DC adapter |
| Standby battery life | 4 to 6 months (with 8 AA batteries) |
| Memory card type | SD/SDHC up to 128 GB (class 10 or higher) |
| Connectors | USB 2.0, DC-in jack |
| Protection rating | IP54 |
| Operating temperature | -20 °C to 60 °C |
| Available languages | French, English, German, etc. |
| Time lapse mode | Yes |
| Password protection | Yes (4-digit code) |
| Timestamp | Yes (time, date or off) |
| Beep sound | Yes (on/off) |
| Maintenance | Clean with a dry, lint-free cloth; lens with a lens brush |
| Safety | Do not open the housing; use only alkaline batteries; observe polarity; do not expose to excessive humidity |
| Repairability | Repair by authorized technician only |
Frequently Asked Questions - RF-HC-550 Renkforce
User questions about RF-HC-550 Renkforce
0 question about this device. Answer the ones you know or ask your own.
Ask a new question about this device
Download the instructions for your Camera in PDF format for free! Find your manual RF-HC-550 - Renkforce and take your electronic device back in hand. On this page are published all the documents necessary for the use of your device. RF-HC-550 by Renkforce.
USER MANUAL RF-HC-550 Renkforce
Copyright 2021 by Conrad Electronic SE. *2300581_v2_0321_02_dh_m_4L
GB Operating Instructions
48 Megapixel wildlife camera
Item No. 2300581
Intended use
This product is intended for capturing digital photo and video recordings for home security, warehouse surveillance, and monitoring of wild animals. It features a camouflage colour scheme and easy to install design for convenient recording of photos or long-duration videos. The camera also has a motion-triggered infrared night vision sensor, which is ideal for surveillance of your house, office, construction site or warehouse, as well as animal observations.
For safety and approval purposes, you must not rebuild and/or modify this product. If you use the product for purposes other than those described, the product may be damaged. Read the instructions carefully and store them in a safe place. Make this product available to third parties only together with its operating instructions.
This product complies with the statutory national and European requirements. All company names and product names are trademarks of their respective owners. All rights reserved.
Delivery content
- Wildlife camera
- Mounting materials
- USB cable
- Operating instructions
- Strap
Up-to-date operating instructions
Download the latest operating instructions at www.conrad.com/downloads or scan the QR code shown. Follow the instructions on the website.
Explanation of symbols

The symbol with the lightning in the triangle is used if there is a risk to your health, e.g. due to an electric shock.

The symbol with the exclamation mark in the triangle is used to indicate important information in these operating instructions. Always read this information carefully.

The arrow symbol indicates special information and advice on operation.
Safety instructions

Read the operating instructions carefully and especially observe the safety information. If you do not follow the safety instructions and information on proper handling in this manual, we assume no liability for any resulting personal injury or damage to property. Such cases will invalidate the warranty/guarantee.

a) General information
• The device is not a toy. Keep it out of the reach of children and pets.
- Do not leave the packaging material lying around carelessly. This may become dangerous playing material for children.
- Protect the appliance from extreme temperatures, strong jolts, flammable gases, steam, and solvents.
- Do not place the product under any mechanical stress.
- If it is no longer possible to operate the product safely, take it out of operation and protect it from any accidental use. Safe operation can no longer be guaranteed if the product:
- Is visibly damaged,
- Is no longer working properly,
- Has been stored for extended periods in poor ambient conditions, or
- Has been subjected to any serious transport-related stresses.
- Please handle the product carefully. Jolts, impacts, or a fall, even from a low height, can cause damage to the product.
- Consult an expert when in doubt about the operation, safety, or connection of the appliance.
- Maintenance, modifications, and repairs must only be completed by a technician or an authorised repair centre.
- If you have questions that remain unanswered by these operating instructions, contact our technical support service or other technical personnel.

Caution:
- To avoid damaging the components, do not attempt to open or repair the PCB without professional guidance.
- The operating range may be affected by environmental factors and nearby sources of interference.
- Do not use or store the camera next to hot objects, air conditioner exhaust vents, lights, etc.
b) Batteries
- This camera is powered with either 4 or 8 AA Alkaline batteries. Do not use rechargeable AA batteries (1.2V) with this camera, as the battery voltage is not sufficient to properly power the device. Change the batteries when the low battery icon is displayed.
- Always use AA batteries in proper working condition to avoid battery cell corrosion from leaking battery acid. Do not mix old and new batteries.
- This camera can also be powered by an external 6 V/2 A DC adapter. To avoid damaging the batteries, it is recommended to remove the alkaline batteries when the power adapter is used. Use of the power adapter is recommended when the camera is used for security surveillance purposes. Always ensure that the batteries are reconnected with the correct polarity.
- Do not disconnect the power supply while the system is updating. If the camera does not operate properly after performing an update, return it to the supplier.
c) Memory card
- Insert the SD memory card correctly.
- Note: Memory cards may be ejected and inserted when the camera is switched on.
- An SD/SDHC (up to 128GB) Class 10 or above memory card is required for this camera.
Key features
• 48 MP CMOS sensor.
• 40 pcs IR LED flash with 65-feet coverage.
- Adjustable PIR sensitivity.
- Quick 0.2s trigger time.
- Adjustable delay between motion.
- Powered by 4 or 8 AA alkaline batteries with 6-month standby time.
• Excellent image quality during daylight, twilight, and nighttime.
• Time lapse and video modes.
• No motion blur at speeds of up to 2 feet per second
- 60-feet flash and detection range.
- Camouflage housing cover.
• Supports SD memory cards up to 128 GB.
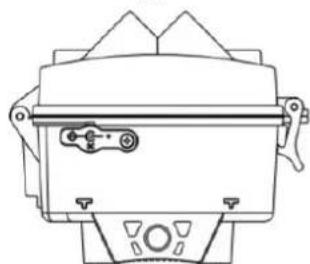
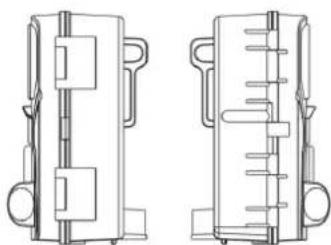
Operating elements
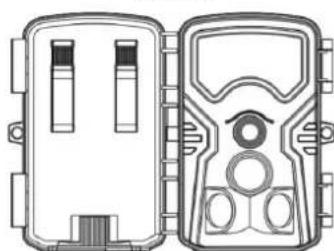
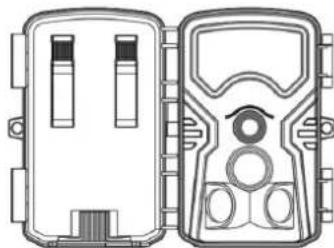
Inside Camera Housing
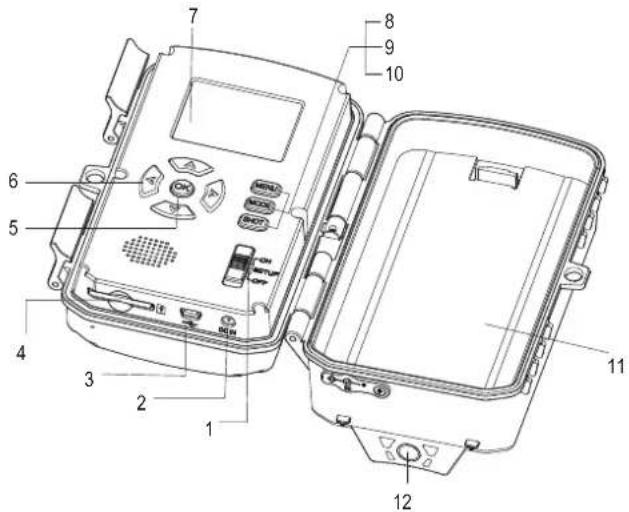
| 1 Switch key | 7 LCD screen |
| 2 DC in port | 8 Menu key |
| 3 USB port | 9 Mode key |
| 4 SD card slot | 10 Shot key |
| 5 OK button | 11 Battery cover |
| 6 Direction key | 12 Tripod receptacles |
| Keys Functions | |
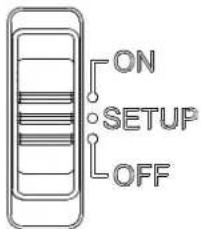
| Slide switch key | OFF: Power off. |
| SETUP: Setting, preview, test shot, and playback modes. | |
| ON: Monitoring and shooting modes. | |
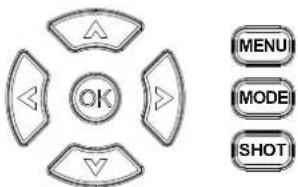
| *MENU key Enter Settings menu. | |
| *MODE key Switch between photo/video recording and playback modes. | |
| *SHOT key | Record photo/video in Photo/video mode.Enlarge photo in Playback mode. |
| *Direction key Up/Down/Left/Right. | |
| *OK key Confirm selection, function, or mode. | |
Note: * only available in Test mode.
Operation
- Inserting/removing the memory card
- Open the housing latches and insert the memory card into the SD card slot until it clicks into place.
• To remove the memory card, slightly push the SD card slot to release the memory card.
- Inserting the batteries
Ensure that the batteries are placed in the camera before use.
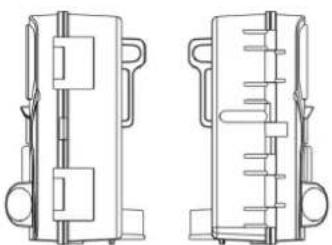
- To insert the batteries, open the housing latches and remove the Battery cover. Then insert 4 or 8 AA batteries into the battery slot with correct polarity (observe the "+" and "-" markings in the battery slots).
- If using 4 batteries, install the batteries in either the 4 slots at the top or 4 slots at the bottom of the battery compartment.
Settings and functions in the OSD menu
- Setting up the camera
• To switch the wildlife camera on, slide the Switch key to the SETUP position.
- Press the MENU key to enter the menu, press the UP/DOWN keys to navigate the menu, and press the OK key to enter submenus.
- Passive Infrared (PIR) mode
Once the camera has been setup, slide the Switch key to the ON position. PIR mode will be enabled after 10 seconds. The camera will then operate in accordance with the saved settings.
- Playback mode
To view photos/videos recorded by the camera, slide the Switch key to SETUP and press the MODE key to enter Playback mode. Press the UP/DOWN keys to view recorded photos/videos. When playing back recorded videos, press the OK key to start playback, and press the OK key to stop playback.
- The "Delete selection" function can be used to delete the currently selected photo/video from the memory card. In Playback mode, press the Menu key to enter the delete menu and select "Delete current file". Press OK to confirm or press MODE to exit.
- The "Delete all files" function can be used to delete all photos/videos from the memory card. In Playback mode, press the MENU key to enter the delete menu and select "Delete all files". Press OK to confirm or press MODE to exit.
- The slide show function can be used to display a slide show of photos stored in the memory card. Each photo is displayed for approximately 3 seconds. In Playback mode, press the MENU key and press the UP/DOWN key. Then select "Activate Slide show" and press OK to confirm. To exit the slide show and only show the current image, press OK.
- Write protection can be used to protect individual recordings from accidentally being deleted. To enable write protection, press the MENU key in Playback mode and select "Write-protect". Press the UP/DOWN key and select either "Write-protect current file", "Write-protect all files", "Unlock current files", or "Unlock all files", and then press the OK key to confirm.
Menu settings summary
| Menu Default setting Options | ||
| 1. Mode Photo Photo, Video, Photo & Video | ||
| 2. Photo resolution | 13MP | 3 MP, 5 MP, 8 MP, 13 MP, 16 MP, 24 MP, 30 MP, 48 MP |
| 3. Photo series | 1 photo | 1, 2, 3, 10 photos |
| 4. Video resolution | 1920 x 1080p | 320 x 240p, 640 x 480p, 720 x 480p, 848 x 480p, 1280 x 720p (60 fps), 1280 x 720p, 1920 x 1080p, 2688 x 1520p (20 fps), 3840 x 2160p |
| 5. TL video resolution | 2592 x 1944p | 2048 x 1536p, 2592 x 1944p, 3072 x 2304p, 3264 x 2448p, 3648 x 2736p, 4000 x 3000p, 4416 x 3312p, 4608 x 3456p, 5200 x 3900p |
| 6. Video length | 10 seconds | 3 seconds to 10 minutes |
| 7. Audio recording | On | On, Off |
| 8. Shot lag | 5 seconds | 5 seconds to 60 minutes |
| 9. Side motion sensors | On | On, Off |
| 10. Sensitivity | Middle | Low, Middle, High |
| 11. Target recording time | Off | On (Start 00:00-23:59, Stop 00:00-23:59), Off |
| 12. Time lapse | Off | Normal, TL video, Off |
| 13. Language | English | English, Deutsch, Dansk, Suomi, Svenska, Español, Français, Italiano, Nederlands, Português, 筒体中文, 繁體中文, 日本语 |
| 14. Endless capture | Off | On, Off |
| 15. Time & date | 2019/01/01 12:00 | Set time & date, Time format, Date format |
| 16. Photo stamp | Time | Time, Date, Off |
| 17. Password protection | Off | On (user can set a 4-digit password), Off |
| 18. Beep sound | On | On, Off |
| 19. Format memory card | Yes (delete all data), No | |
| 20. Serial No | Off | On (user can set a 4-digit serial number), Off |
| 21. Reset settings | Yes (All settings restored to default), No | |
| 22. Version | Display firmware version | |
Troubleshooting
- Camera will not turn on
- Check that the polarity of the batteries is correct.
- Put the batteries back in the battery compartment and restart the camera without the SD card inserted.
- Colours in recorded photos look abnormal
Power off the camera, put the batteries back in the battery compartment, and then power on the camera again.
- Camera will not record photos
Check that write protection is disabled on the SD memory card.
-
PIR is not working
-
Check that there is an SD memory card in the camera.
- Check that the SD memory card has available storage space.
- Check that the camera is not in time lapse or delay modes.
Care and cleaning
- Disconnect the product from the mains before each cleaning.
- Do not use any aggressive cleaning agents, rubbing alcohol, or other chemical solutions as they can cause damage to the housing and functioning of the product.
- Clean the product with a dry, fibre-free cloth.
- Clean the lens very carefully with a lens brush, otherwise you may scratch it.
Disposal
a) Product

Electronic devices are recyclable waste and must not be disposed of in the household waste. At the end of its service life, dispose of the product in accordance with applicable regulatory guidelines.
Remove any inserted (rechargeable) batteries and dispose of them separately from the product.
b) Battery information
As the end user, you are required by law (Battery Ordinance) to return all used batteries.
Disposing of batteries in the household waste is prohibited.
Batteries containing hazardous substances are labeled with this symbol to indicate that disposal in domestic waste is forbidden. The abbreviations for heavy metals in batteries are: Cd = Cadmium , Hg = Mercury , Pb = Lead (indicated on the battery, e.g. below the trash icon on the left).
Used batteries can be returned to collection points in your municipality, our stores or any battery retailer.
You thus fulfill your statutory obligations and contribute to the protection of the environment.
Technical data
Power supply 4 or 8 AA batteries
Power supply (power adapter).....DC 6 V
Display....2.0" (5 cm) TFT
Lens FOV 55°
Image sensor/resolution ...... Sony 48 MP CMOS sensor
Photo resolution....48MP (8000 x 6000p), 30MP (6400 x 4800p), 24MP(5600 x 3900p), 20MP (5200 x 3900p), 16MP (4608 x 3456p), 13MP (4192 x 3112p), 8MP (3264 x 2448p), 5MP (2592 x 1944p), 3MP (2048 x 1536p)
Photo/video format ...... JPEG, AVI
Video resolution....640 x 480, 720 x 480, 1080p (1920x1080), 2.7K (2688x1520) (Real)
Memory card.... SD/SDHC up to 128 GB (Class 10 or above)
IR light/range 40pcs IR LED/50 feet
Video length.... 3 seconds to 10 minutes
Trigger time.... 0.2 seconds
PIR detection distance....60 feet
PIR detection angle 120° (3 PIR lens)
Series No......Yes
Time lapse video .... Yes
Standby time.... 4-6 months (with 8 AA batteries)
Working temperature....-20 °C to 60 °C
Storage temperature....-20 °C to 70 °C
Working humidity 5% to 70%
Waterproof rating.....IP54
Connections.....USB 2.0, SD card, DC-in
Languages.... English, Deutsch, Dansk, Suomi, Svenska, Español, Français, Italiano, Nederlands, Português, 简体中文, 繁體中文, 日本语
Dimensions (W x H x D) 138 x 97 x 83 mm
Weight 290 g
F Mode d'emploi
natural_image
Technical diagram of a dual-panel electronic device with control panel and display (no text or symbols)Droite/gauche
natural_image
Technical line drawing of two mechanical components with no visible text or symbolsRETOUR
natural_image
Technical line drawing of two types of surveillance cameras (no text or symbols)Bas
natural_image
Technical line drawing of a mechanical device with no visible text or symbolsDimensions (I x H x P) 138 x 97 x 83 mm
Poids....290 g
Copyright 2021 by Conrad Electronic SE. *2300581_v2_0321_02_dh_m_4L
Wildcamera 48 megapixels
Bestelnr. 2300581
Beoogd gebruik
natural_image
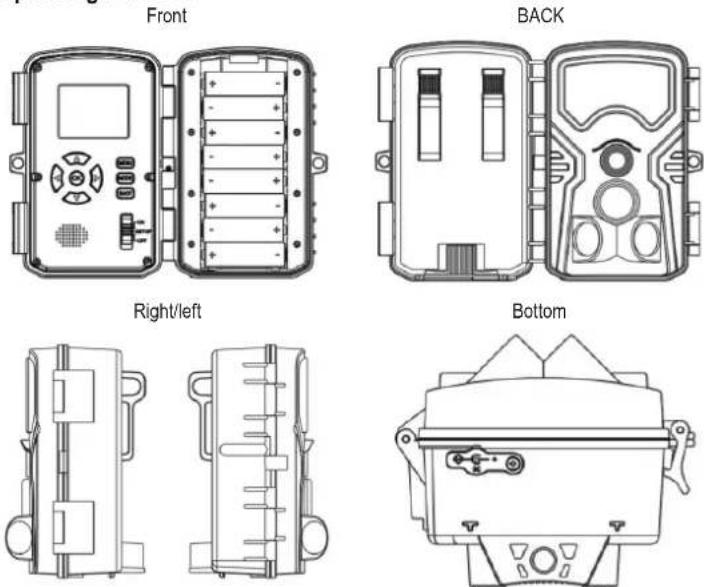
Technical diagram of a device front view showing internal components and battery pack (no text or labels)Rechts/links
ACHTERKANT
natural_image
Technical line drawing of two device enclosures, one with internal components and the other with a display (no text or symbols)Onderkant
natural_image
Technical line drawing of two mechanical components with no visible text or symbols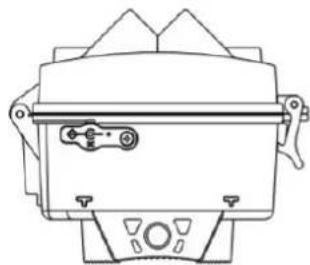
natural_image
Line drawing of a mechanical device with no visible text or symbolsBinnenin de camerabehuizing
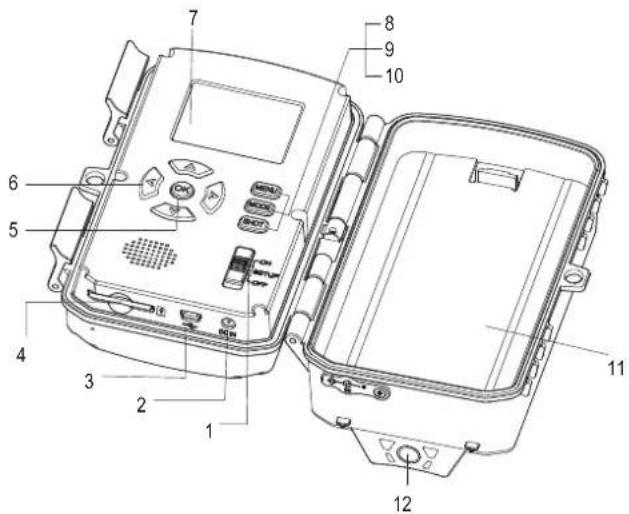
1 Sleuteltoets
7 LCD-scherm
2 DC in-poort
8 Menutoets
3 USB poort
9 Modus-toets
4 SD-kaartsleuf
10 Opname-toets
5 OK-knop
11 Batterij-afdekking
6 Richtingstoets
12 Statiefhouders
(stroomadapter)...... DC 6 V
Display 2.0" (5 cm) TFT
Lens FOV 55°
Beeldsensor/resolutie..... Sony 48 MP CMOS sensor
Fotoresolutie....48MP (8000 x 6000p), 30MP (6400 x 4800p), 24MP(5600 x 3900p), 20MP (5200 x 3900p), 16MP (4608 x 3456p), 13MP (4192 x 3112p), 8MP (3264 x 2448p), 5MP (2592 x 1944p), 3MP (2048 x 1536p)
Foto/videoformaat...... JPEG, AVI
Videoresolutie....640 x 480, 720 x 480, 1080p (1920 x 1080), 2.7K (2688 x 1520) (echt)
Geheugenkaart.... SD/SDHC tot 128 GB (klasse 10 of hoger)
IR-licht/bereik.... 40 stk IR led/ 50 feet
Videolengte.... 3 seconden tot 10 minuten
Copyright 2021 by Conrad Electronic SE. *2300581_v2_0321_02_dh_m_4L



- GB Operating Instructions
- Megapixel wildlife camera
- Intended use
- Delivery content
- Up-to-date operating instructions
- Explanation of symbols
- Safety instructions
- a) General information
- Caution:
- b) Batteries
- c) Memory card
- Key features
- Inside Camera Housing
- Operation
- Settings and functions in the OSD menu
- Menu settings summary
- Troubleshooting
- Care and cleaning
- Disposal
- a) Product
- b) Battery information
- Technical data
- F Mode d'emploi
- Wildcamera 48 megapixels
- Beoogd gebruik
- Binnenin de camerabehuizing
Brand : Renkforce
Model : RF-HC-550
Category : Camera