
TM 8280W - Tea maker GRUNDIG - Free user manual and instructions
Find the device manual for free TM 8280W GRUNDIG in PDF.

| Product Type | Tea maker (tea infuser) |
| Brand | Grundig |
| Model | TM 8280W |
| Power Supply | 220-240 V ~ 50/60 Hz |
| Power | 1750 W |
| Maximum water capacity | 1.7 L |
| Main functions | Preparation of black tea, green tea, custom mode, kettle mode, delayed timer, keep warm (60 minutes) |
| Controls | Touch panel with display and On/Off button |
| Tea capacities (black) | Min 15 g (2 tbsp), Medium 30 g (4 tbsp), Max 45 g (6 tbsp) |
| Tea capacities (green) | Min 2.5 g (2 tsp), Medium 5 g (4 tsp), Max 7.5 g (6 tsp) |
| Adjustable temperature | 50°C to 95°C (custom mode); up to 99°C in kettle mode |
| Adjustable brewing time | 2 to 24 minutes (custom mode) |
| Number of brews before descaling | Every 10 to 15 brews |
| Maintenance and cleaning | Filter holder, carafe and carafe lid are dishwasher safe (top rack); kettle hand wash only; descaling with cider vinegar or citric acid |
| Safety | Safety shut-off, overheating protection, anti-splash system, automatic shut-off in case of water shortage |
| Spare parts and repairability | Accessories available for at least 5 years; repairs only by an authorized center |
| Dishwasher compatibility | Filter holder, carafe and carafe lid (top rack) |
| Dimensions (without base) | Not specified |
| Weight | Not specified |
Frequently Asked Questions - TM 8280W GRUNDIG
User questions about TM 8280W GRUNDIG
0 question about this device. Answer the ones you know or ask your own.
Ask a new question about this device
Download the instructions for your Tea maker in PDF format for free! Find your manual TM 8280W - GRUNDIG and take your electronic device back in hand. On this page are published all the documents necessary for the use of your device. TM 8280W by GRUNDIG.
USER MANUAL TM 8280W GRUNDIG
natural_image
Exterior view of a modern coffee maker with digital display and control panel (no visible text or symbols)DE
EN
TR
ES
FR

natural_image
Abstract grayscale curved shape on white background, no text or symbols present
DEUTSCH 05 - 18
ENGLISH 19 - 31
TÜRKÇE 32-44
ESPAÑOL 45 - 57
FRANÇAIS 58 - 71
Please read this instruction manual thoroughly prior to using this device! Follow all safety instructions in order to avoid damage due to improper use! Keep the instruction manual for future reference. Should this device be given to a third party, this instruction manual must also be handed over.
■ This appliance is intended for private domestic use only. It should not be used for commercial use.
■ Do not use the appliance in the bathroom.
- Check if the mains voltage on the rating label corresponds to your local mains supply. The only way to disconnect the appliance from the mains is to pull the plug from the wall socket.
■ For additional protection, this device should be connected to a household current fault protection circuit breaker of no more than 30 mA. Consult an electrician for advice.
- Do not immerse the appliance, power cord, or power plug in water or any other liquids. Do not hold it under running water and do not clean any parts in the dishwasher. Only the filter basket and carafe can be cleaned safely in the upper shelf of the dishwasher or with water and washing-up liquid.
■ Disconnect the power plug after using the appliance, before cleaning the appliance before leaving the room, or if a fault occurs. Do not disconnect the plug by pulling on the cord.
- Do not squeeze or bend the power cord and do not rub it on sharp edges in order to prevent any damage.
- Keep the power cord away from hot surfaces and open flame.
■ Do not use an extension cord with the appliance.
■ Never use the appliance if the power cord or the appliance is damaged.
- Our GRUNDIG Household Appliances meet applicable safety standards, thus if the appliance or power cord is damaged, it must be repaired or replaced by an authorised service centre to avoid any dangers. Faulty or unqualified repair work may be dangerous and cause risk to the user.
- Do not dismantle the appliance under any circumstances. No warranty claims are accepted for damage caused by improper handling.
This appliance can be used by children aged from 8 years and above and persons with reduced physical, sensory or mental capabilities or lack of experience and knowledge if they have been given supervision or instruction concerning use of the appliance in a safe way and understand the hazards involved. Children shall not play with the appliance. Cleaning and user maintenance shall not be made by children without supervision.
■ Before using the appliance for first time, clean all parts which come into contact with water or tea carefully. Please see full details in the "Cleaning and Care" section.
■ Dry the appliance and all accessories before connecting it to mains supply and before at taching any parts.
■ Never operate or place any part of this appliance on or near hot surfaces such as a gas burner, electric burner or heated oven.
- Do not use the appliance for anything other than its intended use. The tea maker is designed for preparing tea. Do not use the appliance to heat any other liquids or tinned, jarred, and bottled foods.
■ Never use the appliance in or near to combustible or inflammable places and materials.
■ Operate the appliance only with the delivered parts.
■ Do not use the appliance with damp or wet hands.
■ Always use the appliance on a stable, flat, clean, dry and non-slip surface.
■ Make sure that there is no danger that the power cord could be accidentally pulled or that someone could trip over it when the appliance is in use.
■ Position the appliance in such a way that the plug is always accessible.
■ Avoid contact with hot surfaces and hold the carafe by the handle only as there is the danger of burning. The carafe becomes hot during use.
■ Do not move the appliance while there is hot liquid in the carafe or if the appliance is still hot.
■ Do not open the cover during the brewing process.
■ Never fill the appliance above the maximum level indicator. If it is filled above the maximum level, water flows out of the appliance through safety drainage.
■ Never operate the appliance if brewing or keeping the tea hot is not required.
■ Only fill the appliance with cold and fresh drinking water.
■ The appliance should not be operated with an external clock timer or separate remote control system.
■ Pour water in the water tank carefully.
■ In case of any water splashes during water pouring, ensure that carafe and heating platform are dry.
■ Use the carafe only with the tea maker.
■ Never operate the appliance without water inside.
■ Do not use a cracked carafe or a carafe with a lose or weakened handle.
- Do not fill the kettle below the minimum level indicator.
- Do not fill the kettle when it is fitted on its base.
■ Operate the appliance with its original base. Do not use the base for any other purpose.
- Do not open the lid while the water is boiling. Be careful while you are opening the lid after the water was boiled. The steam which comes out of the kettle is very hot.
■ Position the lid so that the hot steam is directly away from you.
■ Make sure that when using the kettle, the lid always remains closed properly!
Dear Customer,
Congratulations on the purchase of your new GRUNDIG Gourmet Tea Maker TM 8280 w.
Please read the following user notes carefully to ensure full enjoyment of your quality Grundig product for many years to come.
A responsible approach!

GRUNDIG focusses on contractually agreed social working conditions with fair wages for both internal employees and suppliers. We also attach great importance to the efficient use of raw materials with continuous waste reduction of several tonnes of plastic every year. Furthermore, all our accessories are available for at least 5 years.
For a future worth living.
For a good reason. Grundig.
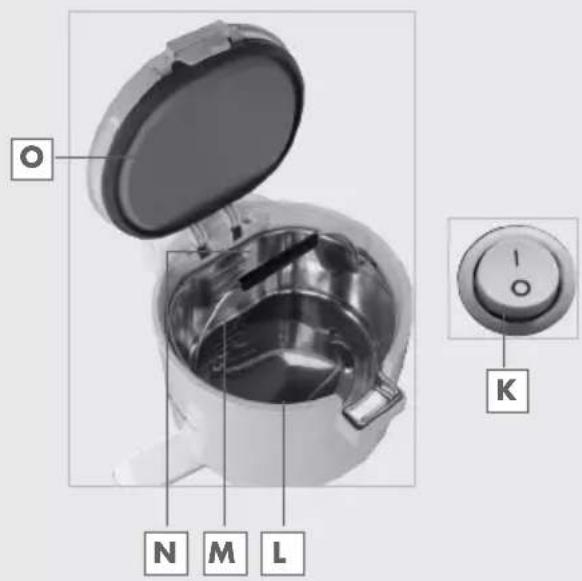
Controls and parts
See the figure on page 3.
A Kettle lid
B Kettle
c Kettle handle
D Kettle On / Off button
E Base
F Carafe
G Carafe handle
H Carafe lid
I Touch control panel
J Outlet of water transfer
K On/Off button
L Brewing chamber
M Tea filter basket
N Handle of tea filter basket
Lid of brewing chamber
■ The on/off button K is located behind the Touch-control panel I.
Initial use
1 Remove all packaging and stickers and dispose of them according to applicable legal regulations.
2 Clean the kettle B, carafe F and tea filter basket M according to "Cleaning and Care" section before using the appliance for the first time.
3 Make sure that the appliance stands upright on a balanced, flat, clean, dry and nonskid surface.
Time setting
We recommend that you set up the clock before using the appliance:
1 Plug in the power cable to outlet.
2 Bring On/Off button to "I" position.
3 The initial opening time of the appliance appears as "00:00" in the touch control panel 1.
4 Touch the Timer 📋 symbol for 3 seconds within 5 seconds after turning on the appliance. In case you exceed 5 seconds or faulty adjustment is made, the appliance may be available again to the time setting after being turned off and turned on by the on-off button ⚠.
5 You can set the time with the "- | +" symbols in the touch control panel ☐ when "00:00" starts to flash.
6 Touch Timer "√" symbol to confirm the time.
Notes
■ Time setting will be maintained even in case of power failure or the appliance is turned off during 1 week.
Caution
■ If the time setting is unadjusted, set it again.
In the case that time setting cannot be made or faulty adjustment is made, switch off and on the appliance once again or wait for the appliance to switch to standby mode, then repeat the steps 4 - 6.
Brewing black tea
1 Connect the plug to the wall socket.
2 Bring On/Off button to "l" position.
3 Open the brewing chamber lid ☐ by pressing the button.
Caution
■ Lift first the kettle B from the base E before tea filter basket M can be removed.
Notes
If tea filter basket M in the brewing chamber L is dirty, lift it by holding the handle and clean it.
■ You can wash the tea filter basket ☐ in the upper shelf of the dish washer or under the running water.
- Hold from both sides of the handle of tea filter basket N and press it lightly to seat it to brewing chamber L.
4 Fill the amount appropriate to your need to the tea filter basket M in the brewing chamber L and chose one of the options: Min.-Med.-Max. (see the Table "Capacities").
Caution
If the tea particles are too small, this can lead to blockages in the brewing chamber and cause problems with the draining of the residual water.
- Press the symbol "for 3 seconds. The residual water is pumped out by the integrated water pump.
5 Fill water inside the kettle B more than the minimum quantity and place it on its base E.
6 Close the brewing chamber lid ☐ and the lid of kettle A
7 Place the carafe lid H onto the carafe F and seat it into its place.
8 Touch Type "√" symbol and activate the "90 °C" option.
Note
- The last setting appears on the touch control panel ☐ when the appliance is switched on. Touch Type “” symbol to select the option for requested tea brewing.
9 Touch Aroma "☒" symbol to select the most appropriate option that suits your appetite among "mild/normal/stark" aroma options.
Note
■ Water hardness is an important parameter in order to be able to brew the tea according to Mild-Normal-Strong aroma.
10 Touch Capacity "Symbol to select among the quantity options of Min.-Med.-Max.
11 Touch "Start/Stop ▷" symbol to start tea brewing process.
Caution
■ Do not fill water in the tea filter basket M and carafe F.
Notes
■ Temperature degree of water appears on the touch control panel ☐ after tea brewing process starts.
■ Water is transferred from the outlet of water transfer J according to the selection of the quantity to be brewed. Do not remove kettle B during water transfer.
■ Water may be added to the kettle B in cases other than water transfer.
■ Tea brewing process takes 11-15 and 20 minutes depending on the selected taste textures. Brewing timer counts down on the touch control panel ☐ during the brewing process.
■ After the brewing period is over, tea is filtered through tea filter basket M into the carafe F. This process takes approximately 1 to 3 minutes depending on the quantity.
Caution
- Do not take the carafe F from its place during the transfer of the tea to the carafe F.
12 When the tea is ready, you will be informed with a melody. You can take the carafe from its place.
Notes
■ Once the tea is ready, a symbol showing that the tea is ready for drinking appears on the touch control panel
- Touch Timer "💡" symbol to see how much time left before the tea gets stale.
■ When the tea gets stale a warning sound will be heard.
13 You can serve the tea inside the carafe and water inside the kettle B by mixing as you wish.
Note
■ The appliance will preserve the temperature of both the tea in the carafe F and the water in the kettle B for 60 minutes in order to keep the tea hot.
14 Touch "Start/Stop" symbol for 3 seconds to cancel tea brewing process.
Note
Appears on the touch control panel I when you cancel tea brewing process. If water is transferred to the tea filter basketM, water in the carafe F will be spilled to carafe F. This process takes approximately 1 to 3 minutes depending on the quantity. Switch off and on the appliance to terminate the cancel process.
Green tea brewing
1 Connect the plug to the wall socket.
2 Bring On/Off button to "l" position.
3 Open the brewing chamber lid ☐ by pressing the button.
Caution
■ Lift first the kettle B from the base E before tea filter basket M can be removed.
Notes
If tea filter basket M in the brewing chamber L is dirty, lift it by holding the handle N and clean it.
■ You can wash the tea filter basket 📂 in the upper shelf of the dish washer or under the running water.
- Hold from both sides of the handle of tea filter basket N and press it lightly to seat it to brewing chamber L.
4 Fill the amount appropriate to your need to the tea filter basket M in the brewing chamber L and chose one of the options: Min.-Med.-Max. (See the Table "Capacities").
5 Fill water inside the kettle B more than the minimum quantity and place it on its base E.
6 Close the brewing chamber lid ☐ and the lid of kettle A.
7 Place the carafe lid H onto the carafe F and seat it into its place.
8 Touch Type "√" symbol. First, activate the "80 °C" option.
9 Press Capacity symbol to select among the quantity options of min./med./max.
10 Touch "Start/Stop ▷" symbol to start tea brewing process.
Notes
■ Temperature degree of water appears on the touch control panel ☐ after tea brewing process starts.
■ Water is transferred from the outlet of water transfer J according to the selection of the quantity to be brewed. Do not remove kettle B during water transfer.
11 Tea brewing process takes 4 minutes. Brewing timer counts down on the touch control panel ☐ during the brewing process.
Note
■ After the brewing period is over, tea is filtered through tea filter basket M into the carafe F. This process takes approximately 1 to 3 minutes depending on the quantity.
12 When the tea is ready, you will be informed with a melody. You can take the carafe F from its touch control place.
Notes
■ Once the tea is ready, a symbol: showing that the tea is ready for drinking appears on the touch control panel.
- Touch Timer "①" symbol to see how much time left before the tea gets stale.
■ When the tea gets stale a warning sound will be heard.
■ The temperature of the tea in the carafe F will be protected during 60 minutes. When you wish to heat the water in the kettle B during this process, you can activate the kettle B by using the kettle On/Off button D.
13 Touch "Start/Stop" symbol for 3 seconds to cancel tea brewing process.
Note
■ : : : : appears on the touch control panel ☐. when you cancel tea brewing process. If water is transferred to the tea filter basket ☐, water in the tea filter basket ☐ will be spilled to ca- rafe ☐. This process takes approximately 1 to 3 minutes depending on the quantity. Switch off and on the appliance to terminate the cancel process.
Custom mode
You can use the Custom mode to brew your tea according to temperature level and time you desired.
1 Follow the steps from 1 to 9 in section "black tea brewing".
2 Touch Type symbol to activate "Indiv." symbol.
3 Touch "- | +" symbols to select the temperature you desired.
Note
- You can select the temperature levels between 50°C and 95°C. Touch “- | +” symbols to increase or decrease temperature levels in increments of 5°C.
4 Brewing time must be flashing on the touch control panel ☐ when you touch Aroma " symbol.
5 Touch "- | +" symbols to adjust the time you desired.
Note
■ You may select the brewing time within the range of 2 to 24 minutes.
6 Press Capacity "B" symbol to select among the quantity options of min./med./max.
Heating water (Kettle mode)
Note
■ You can use the appliance only to boil water.
1 Plug in the power cable to outlet.
2 Bring On/Off button to "I" position.
3 Fill in the kettle B with water up to the extent you need.
Caution
■ Please remember to fill in the kettle B with fresh water such that the water will not drop down below minimum quantity and exceed beyond the maximum quantity.
4 Lightly lift and release kettle On/Off button D on the right-handed side of the product to start the water boiling process.
Note
- You will hear 'CLICK' sound when you lift the kettle On/Off button D and the lamp of the button will be illuminated.
5 Touch "- | +" symbols to determine the water heating temperature you desired, after activating kettle mode.
Caution
■ Temperature values can be selected between 50^ C and 99^ C. Temperature setting must be readjusted when you quit kettle mode and re-select kettle mode. If no temperature setting is performed, the kettle boils water up to 99^ C.
6 Simply press lightly and hold the kettle On/Off button D upwards to see the current temperature of the water inside the kettle B The current temperature appears on the touch control panel I.
Notes
■ After your water reaches to the selected temperature, if the kettle B is not taken from its base E it will be kept 60 minutes; if the kettle B is taken from its base E, the process of keeping in the selected temperature will be canceled. An audio warning will be heard when your water reaches to the temperature you selected.
If the kettle B is taken from its base E before your water reaches to the temperature you selected, it will keep functioning in order to reach to the temperature you selected, and will be kept hot during 60 minutes.
7 Simply lift kettle On/Off buttonD upwards and release to cancel water boiling process. The kettle On/Off button indicator will be turned off when the process is canceled.
Tea brewing with delay timing
Tea brewing with forward timing mode is a function used for brewing tea automatically at a later time you wish.
1 Follow the steps for preparation under "Preparing black tea" or "Preparing green tea" according to the type of tea required.
Caution
■ Make sure that the actual time is set correctly. Otherwise, the tea will not be ready at the time you wish.
- You can use tea brewing with forward timing mode in the product to make adjustment until after max. 24 hours as from the actual time.
■ Tea brewing with forwarding timing adjustment is not possible for durations less than 40 minutes. Just brew tea in regular mode for those duration.
2 Touch Timer "√" symbol to activate tea brewing with forwarding timing feature.
Note
■ Time delay feature flashes on the touch control panel 1.
3 Touch "- | +" symbols to select the time you want your tea to be ready.
4 Touch Timer "√" symbol to confirm the time.
5 Lastly, touch the "Start/Stop" symbol.
Note
- Your tea will be ready at the time you determined and you will be notified with a melody.
Caution
- When tea brewing with forwarding timing mode is enabled; the time that the tea will be ready will appear on the touch control panel ① for 5 seconds. Then LED lights will be turned off and actual time will appear. Start LED will flash with pink lights.
Capacities
Recommended tea capacities for black tea
| Capacity | |
| Min. | 15 gr (2 tablespoons)-(3 pouches) |
| Med. | 30 gr (4 tablespoons)-(6 pouches) |
| Max. | 45 gr (6 tablespoons)-(9 pouches) |
Grammages measured with a measuring spoon vary depending on tea brand and type. Use measuring spoon delivered with the product.
Recommended tea capacities for green tea
 | Capacity |
| Min. | 2.5 gr (2 tea spoons) |
| Med. | 5 gr (4 tea spoons) |
| Max. | 7.5 gr (6 tea spoons) |
Grammages to be used vary depending on tea brand and type. Specified quantities are average quantities.
Sleep mode
If no selection is made within 1 minute after switching on the device, the device switches to sleep mode.
In the sleep mode, the LEDs in the touch control panel ☐ does not light, only time is displayed.
In case the carafe F, kettle B or the tea filter basket M is taken from their place or any selection is made in the touch control panel I, the sleep mode is deactivated.
Information

Start LED is white: No selection is active. Ready to use (selectable).

Start LED is red: The function of brewing tea or keeping the tea hot is active.

Start LED is pink: Flashing, Tea brewing with forward timing function is active.
Notifications
Cancel Animation: In case tea brewing is canceled after filling water to the tea filter basket 📂, start button
flashes red.
Drinking Animation: This symbol is in motion during transfer of tea from tea filter basket M in to carafe
F. After tea transfer is complete, the symbol remains stable within the time that the tea is kept hot. Touch «Finish Time» to see how much time left for drinking tea.

natural_image
Simple geometric shape with dashed lines on a dark background (no text or symbols)Pump Animation: Water transfer from kettle B to tea filter basket M.

U0: Warning that the kettle B is not in its place.

U1: Warning that the tea filter basket M is not in its place. When you see this warning, press the middle
part of the tea filter basket lightly to seat it well.

U2: Warning that the ca- rafe F is not in its place.

U3: "No" or "very little water" warning.
Cleaning and care
Caution
■ Never use gasoline, solvent, abrasive cleaning agents, metal objects or hard brushes to clean the appliance.
■ Never immerse the appliance or its power cable in water or in any other liquid.
1 Switch off and unplug the appliance.
2 Wait for the appliance to cool down.
3 Remove the carafe F.
4 Open the lid of brewing chamber.
5 Lift the kettle B.
6 Remove tea filter basket M from brewing chamber L.
7 Wash and clean the tea filter baskeM, carafe F and lid of carafe H under running water by using a little amount of detergent. Tea filter basket M, carafe F and lid of carafe H can be washed at the upper shelf of the dishwasher or under running water.
Caution
■ Do not wash the kettle B in dishwasher.
8 Use a damp and soft cloth and a little amount of soft cleaner in order to clean the exterior of the appliance.
9 Place back the tea filter basket M into the brewing chamber L and close the lid of brewing chamber O.
10 Place the kettle B onto the base E. Place the carafe F under brewing chamber L.
Note
Dry the sheet metal surface where the carafe F is placed, and the outer surface of the carafe F with a soft cloth or a paper towel before starting to use the appliance after cleaning it.
Cleaning mode
Use cleaning mode before using different kinds of tea and after every 10 to 15 brewing. The failure of using cleaning mode may result in poor flowing of brewed tea from tea filter basket M or system blocking problems.
1 Plug in the power cable to outlet.
2 Bring On/Off button to "I" position.
Notes
- Kettle B, tea filter basket M brewing chamber L and carafe F must be in place in order to perform cleaning procedure.
- Carafe F and brewing chamber L must be discharged and the kettle B must be filled before operating the cleaning mode.
3 Touch Type "symbol to activate cleaning mode after touch control panel lights turn on. When you touch Type symbol and keep your hand pressed on it after the cleaning mode is activated, the appliance makes cleaning by applying pressurized water. This period is maximum 30 seconds
Note
Because of the water transfer to tea filter basket M and carafe F residual dust and tea within the tea filter basket M are cleaned.
Descaling
Notes
■ You can use apple cider vinegar and citric acid for descaling process.
1 Fill in the kettle B with water up to the minimum level line.
2 Add apple cider vinegar or citric acid to the water inside the kettle B at a rate of 1/4.
3 Adjust the temperature to 99^ C and boil the mixture.
4 Let the mixture wait for about min. 5 minutes.
5 Perform cleaning steps in section "Cleaning mode".
6 Discharge the mixture inside the kettle B and carafe F.
7 Wash and clean the tea filter baskeM, carafe F and lid of carafe H under running water by using a little amount of detergent.
8 Appliance will be ready to brew tea after cleaning.
Storage
If you do not intend to use the appliance for a long time, please store it carefully.
Please make sure that the appliance is unplugged, cooled down and totally dry.
Store the appliance in a cool and dry place.
Keep the appliance out of the reach of children.
Environmental note
This product has been made from high-quality parts and materials which can be re-used and are suitable for recycling.
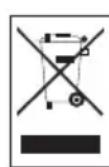
Therefore, do not dispose of the product with normal household waste at the end of its service life. Take it to a collection point for the recycling of electrical and electronic equipment. This is indicated
by this symbol on the product, in the operating manual and on the packaging.
Please find the closest collection points operated by your local authority.
Help protect the environment by recycling used products.
Technical data

This product conforms to the European directives 2004/108/EC, 2006/95/EC, 2009/125/EC and 2011/65/EU.
Power supply: 220 - 240 V \~, 50/60 Hz
Power: 1750 W
Max. water volume: 1.7 L
Technical and design modifications reserved.
natural_image
Simple geometric shape with dashed lines on a dark background (no text or symbols)natural_image
Simple black rectangle with dashed white lines on a dark background (no text or symbols)natural_image
Simple geometric shape with dashed lines on a dark background (no text or symbols)- A responsible approach!
- Controls and parts
- Initial use
- Time setting
- Notes
- Caution
- Brewing black tea
- Note
- Green tea brewing
- Custom mode
- Heating water (Kettle mode)
- Tea brewing with delay timing
- Capacities
- Recommended tea capacities for black tea
- Recommended tea capacities for green tea
- Sleep mode
- Information
- Notifications
- Cleaning and care
- Cleaning mode
- Descaling
- Storage
- Environmental note
- Technical data
Brand : GRUNDIG
Model : TM 8280W
Category : Tea maker