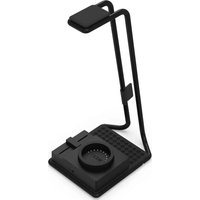
SwitchMix - Memory reader NZXT - Free user manual and instructions
Find the device manual for free SwitchMix NZXT in PDF.


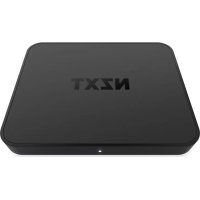
| Product type | Audio mixer for gaming |
| Brand | NZXT |
| Model | SwitchMix |
| Category | Memory reader |
| Digital-to-analog converter | 24-bit / 96 kHz |
| Multichannel sound | DTS 7.1 |
| Automatic switching | Between headset and speakers |
| Volume control | Studio-quality potentiometer with LED indicator |
| LED display | Volume indicator (11 LEDs) |
| Connectivity | USB-C (power and data), 2 × 3.5mm jack (headset/speakers), 2.5mm jack (stand) |
| Software | NZXT CAM |
| Compatibility | PC |
| Power supply | Via USB-C (cable included) |
| Care and cleaning | Clean with a soft, dry cloth |
| Safety | Compliant with EU directives: EMC 2014/30/EU, RoHS 2011/65/EU, LVD 2014/35/EU |
| Spare parts and repairability | Available via support.nzxt.com |
| Customer service | service@nzxt.com |
| Website | NZXT.com |
Frequently Asked Questions - SwitchMix NZXT
User questions about SwitchMix NZXT
0 question about this device. Answer the ones you know or ask your own.
Ask a new question about this device
Download the instructions for your Memory reader in PDF format for free! Find your manual SwitchMix - NZXT and take your electronic device back in hand. On this page are published all the documents necessary for the use of your device. SwitchMix by NZXT.
USER MANUAL SwitchMix NZXT
natural_image
Line drawing of a desktop desk lamp with adjustable arm and base (no text or symbols)SWITCHMIX
AUTOMATIC OUTPUT CONTROL STATION
TABLE OF CONTENTS
VERSION 1.0, 2022/11/07
INTRODUCTION 01
ABOUT THE SWITCHMIX 02
PACKAGE CONTENTS & DESCRIPTION 05
SETTING UP THE SWITCHMIX 09
MAIN CONTROLS 18
SOFTWARE FEATURES 25
BASIC TROUBLESHOOTING 26
NZXT GLOBAL WARRANTY POLICY 31
REGULATORY STATEMENT 34
HAZARDOUS SUBSTANCES 37
SUPPORT AND SERVICE 38
INTRODUCTION
INTRODUCCIÓN
INTRODUCTION
EINLEITUNG
INTRODUZIONE
INTRODUÇÃO
소개
はじめに
简介
简介
natural_image
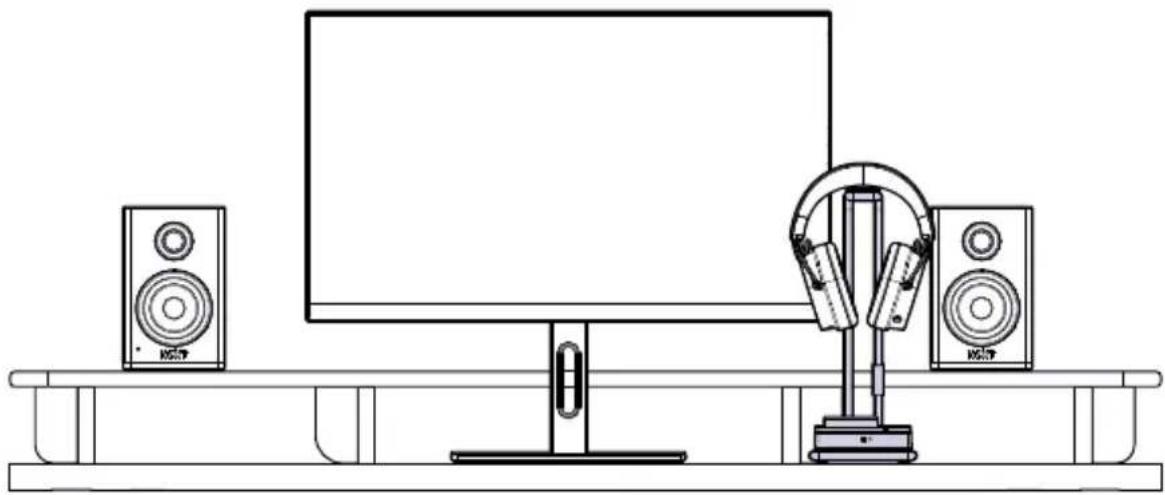
Line drawing of a modern audio setup with two speakers and a monitor (no text or symbols)Congratulations on your purchase of the NZXT SWITCHMIX! Whether you are a professional streamer, a casual player, or a hardcore gamer; we'd like to welcome you to the NZXT family of high-end gaming peripherals.
flowchart
graph TD
    A["Audio Equipment Icon"] --> B["Headphones Icon"]
    B --> C["Feedback Loop"]
    C --> A
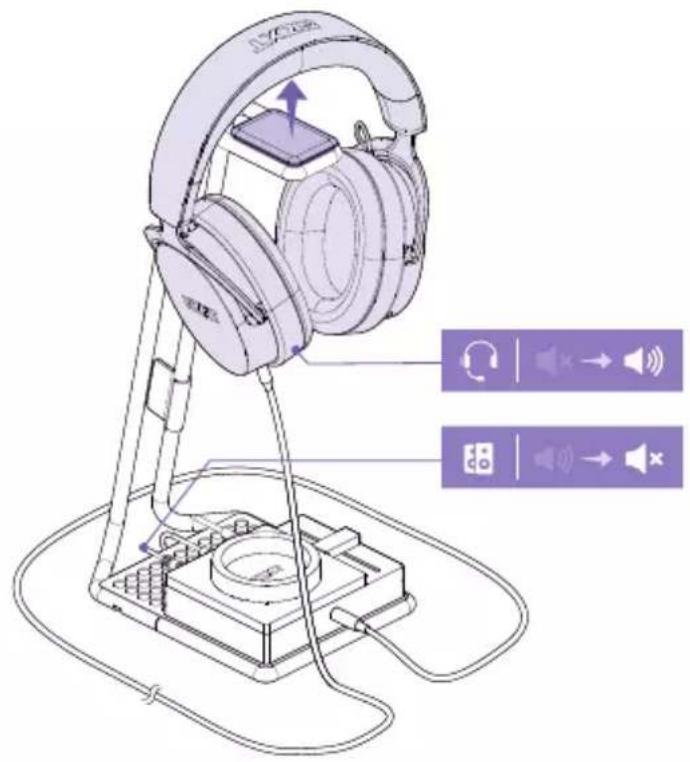
Powered by a studio-grade fader, high-quality 24-bit/96kHz DAC, and DTS 7.1 surround, the SWITCHMIX delivers an ultra-wide soundstage and enables automatic output switching from your gaming headset to connected speakers.
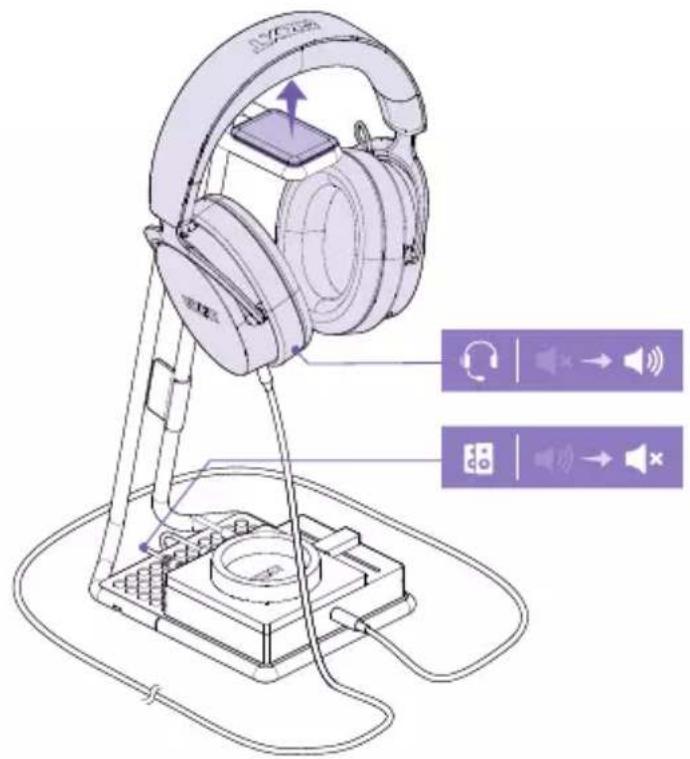

For example, if you are listening to your headset and want to hear your audio through your speakers instead, simply remove your headset and rest it on the top of the stand; your headset volume will fade out, and your speakers will turn on with a soft start. Swapping audio works in reverse, as well: if you are listening to audio through a set of connected speakers, you can switch the audio output to your headset automatically by lifting the headset off the stand, and your speaker volume will then become muted.

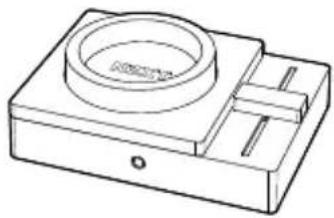
A Mixer (Controller)
×1
natural_image
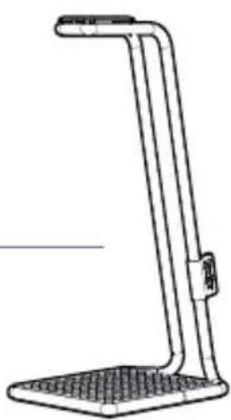
Technical line drawing of a mechanical housing or bracket with a circular top and side slots (no text or symbols)B Headset Stand
×1
natural_image
Line drawing of a vertical stand with a flat top and base, no text or symbols presentC USB-C to USB Cable
×1

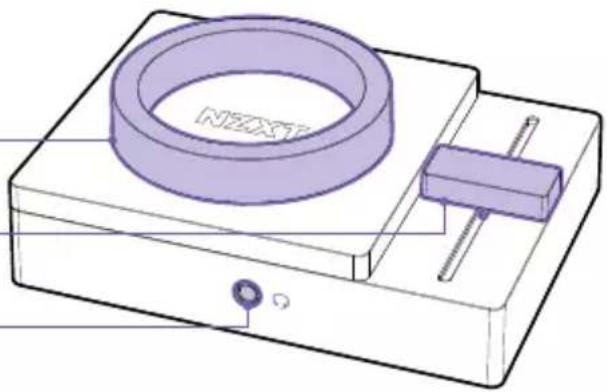
A Mixer (Controller)
1 Volume
2 Fader
3 Connect Headset To Mixer
4 Connect PC to Mixer
5 Connect Stand to Mixer
6 Connect Speakers To Mixer
natural_image
Technical line drawing of a mechanical assembly with a purple ring and attached bracket (no text or symbols)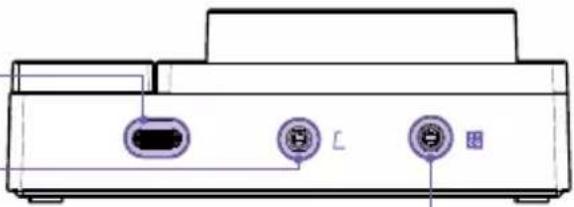
natural_image
Line drawing of a rectangular electronic device with three labeled ports (no text or symbols)- Volumen
- Atenuador
- Conexión de los auriculares al mezclador
- Conexión del PC al mezclador
- Conexión del soporte al mezclador
-
Conexión de los altavoces al mezclador
-
Volume
-
Potentiomètre
- Raccorder le casque au mélangeur
- Raccorder le PC au mélangeur
- Raccorder le support au mélangeur
-
Raccorder les haut-parleurs au mélangeur
-
Lautstärke
- Fader
- Headset mit mixer verbinden
- PC mit mixer verbinden
- Ständer mit mixer verbinden
-
Lautsprecher mit mixer verbinden
-
Volume
- Fader
- Collega le cuffie al mixer
- Collega il PC al mixer
- Collega il supporto al mixer
-
Collega gli altoparlanti al mixer
-
Volume
-
Fader
- Ligar os auscultadores ao mixer
- Ligar o PC ao mixer
- Ligar o suporte ao mixer
-
Ligar as colunas ao mixer
-
몰륨
2.페이지
3.믹서에 헤드셋 연결
4.믹서에 PC 연결
5.믹서에 스탠드 연결
6.믹서에 스피커 연결 -
ボリューム
- フェーダー
- ヘッドセットのミキサーへの接続
- PCのミキサーへの接続
- スタンドのミキサーへの接続
-
スピーカーのミキサーへの接続
-
音量
-
音量控制器
- 连接耳机至混音器
- 连接 PC 至混音器
- 连接支架至混音器
-
连接扬声器至混音器
-
音量
- 音量控制器
- 連接耳機至混音器
- 連接 PC 至混音器
- 連接支架至混音器
- 連接揚聲器至混音器


Headset Stand

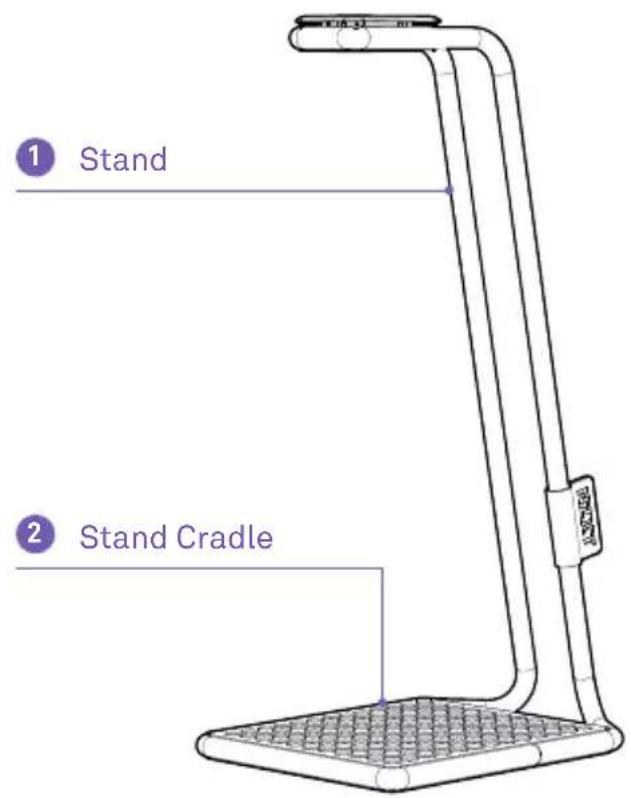
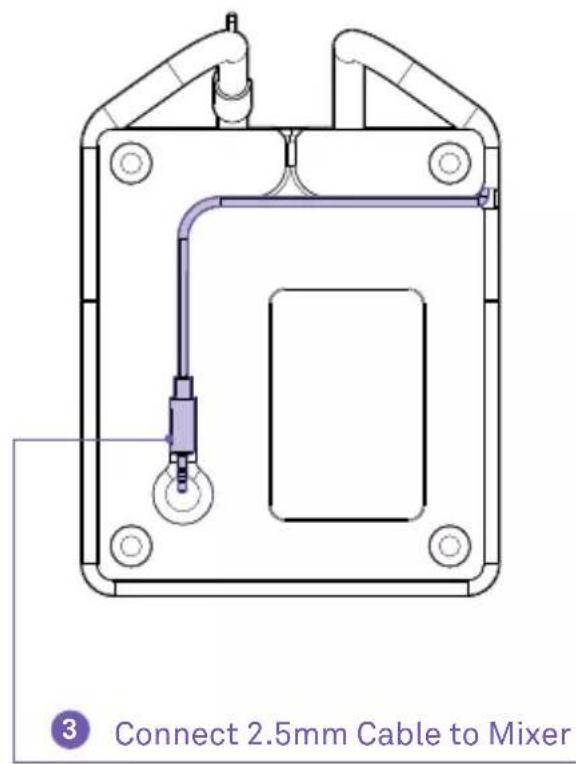
- Soporte
- Base del soporte
- Cable de 2,5 mm de conexión al mezclador
- Support
- Socie du support
- Branchement du câble de 2,5 mm vers le mélangeur
- Ständer
-
Ständerhalter
3.2,5-mm-kabel an mixer anschliessen -
Supporto
- Supporto a culla
-
Collega il cavo da 2,5 mm al mixer
-
Suporte
- Base do suporte
-
Ligar o cabo de 2,5 mm ao mixer
-
스탠드
-
스탠드 크래들
3.믹서에 2.5mm 케이블 연결 -
スタンド
2.スタンドクレードル
3.2.5MMケーブルのミキサーへの接続
natural_image
Diagram of a device rear panel with two ports and a purple circular connector (no text or symbols)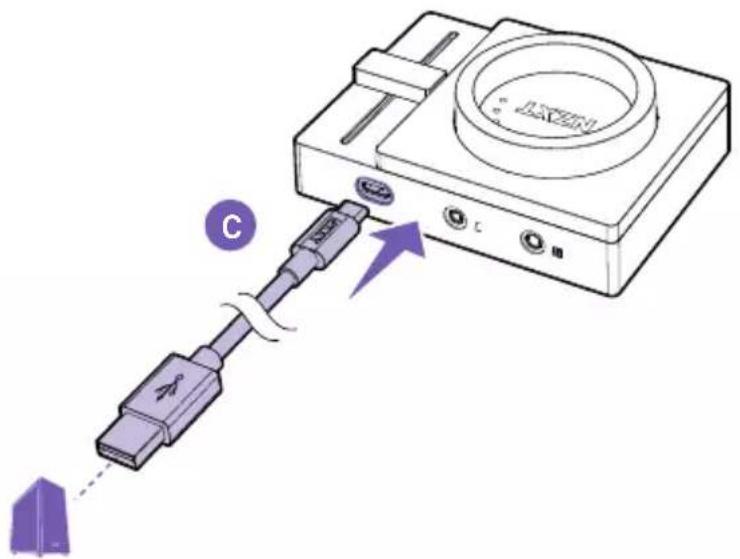
STEP 1
CONNECT MICRO USB INTO THE USB INPUT ON YOUR PC
The SWITCHMIX comes with a USB-C cable that connects directly to the USB input on your PC. This will utilize a 24-bit/96kHz DAC to achieve high-quality digital to analog to conversion.
Plugging the cable into the PC will provide power to the unit. The unit will turn on and automatically begin installing the SWITCHMIX.
IMPORTANT: Keep the USB cable fully inserted and seated into the connector on the back of the Mixer for proper operation.
CONECTA EL MICRO USB A LA ENTRADA USB DE TU PC
natural_image
Line drawing of a device rear panel with two buttons and a purple indicator knob (no text or symbols)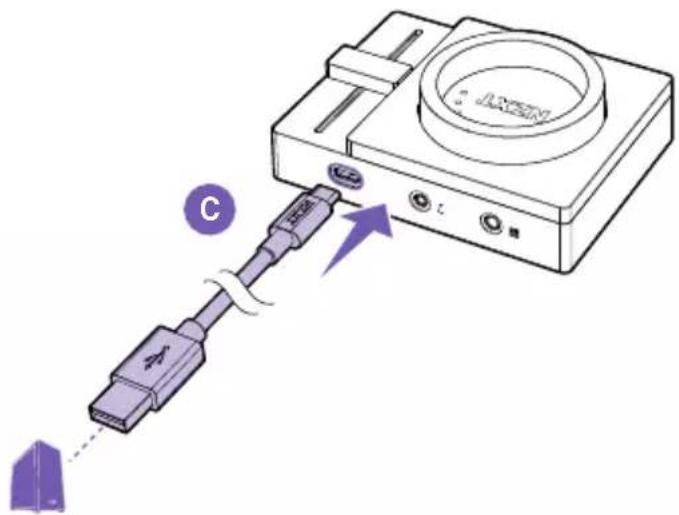

INSERISCI IL CONNETTORE MICRO USB NELL'INGRESSO USB DEL TUO PC
natural_image
Technical line drawing of a device with labeled ports and an exploded view showing internal components (no text or symbols present)
STEP 2
CONNECT THE INCLUDED SWITCHMIX STAND
Locate the 2.5mm cable at the bottom of the Stand. Lay the Mixer on the base of the Stand and insert the cable into the 2.5mm input jack on the back of the Mixer indicated by [ .
When used in conjunction with the included stand, SWITCHMIX will intelligently sense when your gaming headset is being actively used in a gaming session or is mounted on the stand's flat top surface.
MONTA EL SOPORTE DE SWITCHMIX INCLUIDO

COLLEGA IL SUPPORTO DELLO SWITCHMIX IN DOTAZIONE
natural_image
Line drawing of a printer with a circular button and earphones (no text or symbols)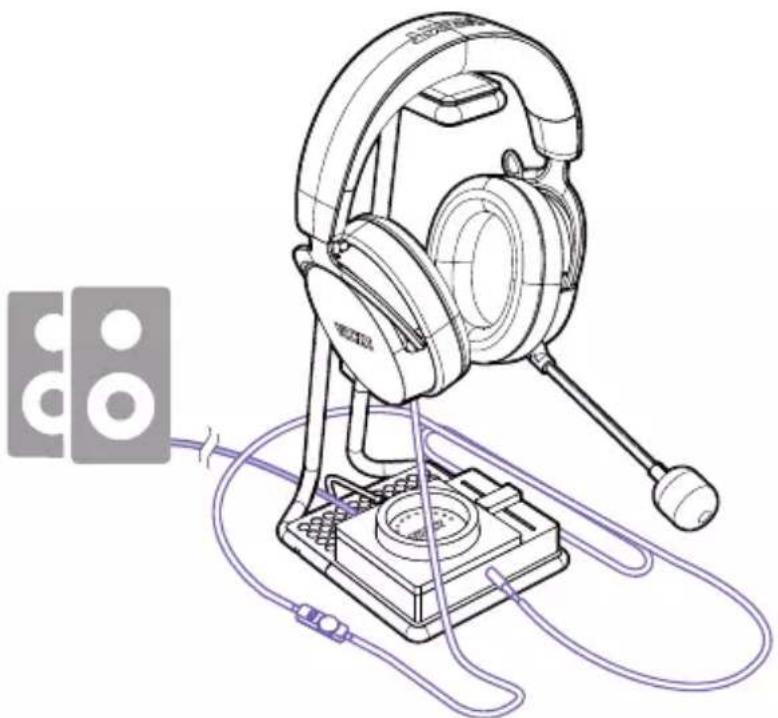
natural_image
Line drawing of a headboard-mounted audio headset with attached microphone and power cord (no text or symbols)STEP 3
CONNECT YOUR SPEAKERS AND/OR HEADSET
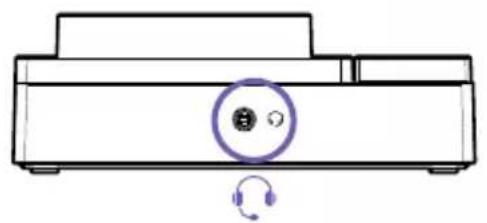
You'll find a 3.5mm audio output jack noted with a ☑ at the back of the Mixer, and a 🔒 on the front of the Mixer. Insert one end of the 3.5mm cable into these jacks and insert the other end into the 3.5mm input on your speaker system or headset.
IMPORTANT: For proper performance of SWITCHMIX, make sure that the cable is FULLY SEATED in the speaker and/or headset receptacle. Make sure the speakers are turned off before plugging and connecting to the Mixer.
CONECTA TUS ALTAVOCES O TUS AURICULARES
natural_image
Front view of a computer interface with ports and buttons (no text or symbols visible)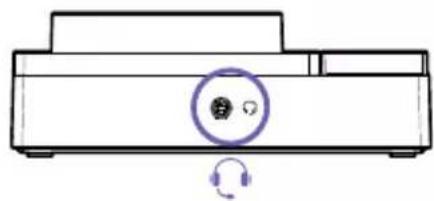
natural_image
Line drawing of a printer with a circular button labeled 'S' and a headset icon at the bottom (no text or symbols)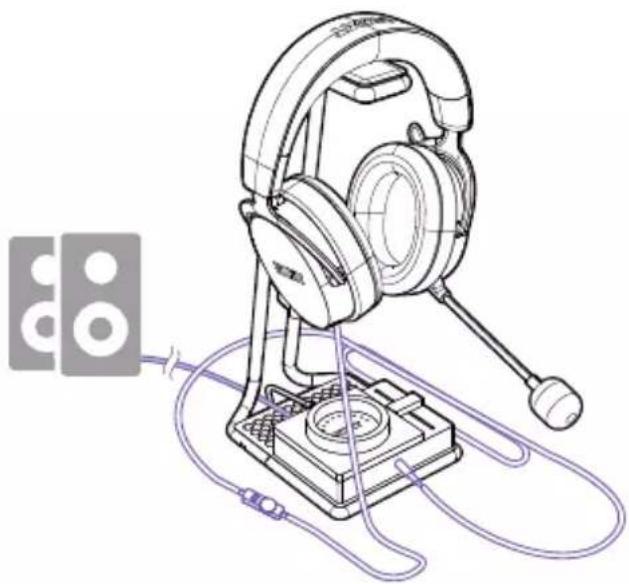
natural_image
Line drawing of a portable electronic device with headsets and cables, no text or symbols present
COLLEGA I TUOI ALTOPARLANTI E/O LE CUFFIE
The front face of the mixer contains an LED display to show various states of the device's features.

VOLUME KNOB 01
INCREASE / DECREASE
The volume knob digitally controls the headset and speaker volume independently. The mixer can store and recall levels individually so you can rest assured your levels will maintain the same volume between the headset, speaker, game, and voice.
SUBIR / BAJAR
11 LED lights indicate volume. When lit in white, the knob controls the primary volume of the headset. When lit in purple, the knob will indicate the primary volume of the speaker.
When the mixer is used without the stand, press and hold the volume dial for one second and release. The primary device light indicator changes from white to purple or from purple to white.
PLEASE NOTE: To enable output switching, you must have a device connected to both speaker and headset outputs.
AURICULARES / ALTAVOCES
natural_image
Line drawing of a printer with sound icons and speaker symbols (no text or labels)VOLUME KNOB 03
MUTE
Quickly press and release anywhere on the volume knob to mute the output of either the headset or speaker.
SILENCIAR
The fader enables control of gaming audio and voice audio balance. Move the fader up to activate voice audio or down to hear more game sounds. At exactly the middle point in the fader, both the volume of the voice and game are at 100%. The fader is studio-grade quality and perfect for quick adjustments that maximize player efficiency without the need to open your audio preferences.
SI EL ATENUADOR ESTÁ CENTRADO, TANTO EL VOLUMEN DEL JUEGO COMO DE LA VOZ ESTARÁN AL 100 %
The SWITCHMIX utilizes the NZXT CAM software suite to access DTS 7.1 Surround as well as other features to further customize your sound experience. Please visit www.nzxt.com/software/cam to download the latest version of NZXT CAM.
BASIC TROUBLESHOOTING
- Is the USB cable fully plugged into the USB jack on both the MXER and PC?
IF YOUR NZXT SWITCHMIX HAS NO SOUND, CHECK...
- Are both ends of the headset audio cable firmly pushed into their 3.5mm audio connectors?
- Are both ends of the speaker audio cable firmly pushed into their 3.5mm audio connectors?
- Is the sound output selector switched to the appropriate device you would like to listen to?
- Are the speakers turned on?
- Is the volume level of the speakers or headphones set to "0"?
- Is the Game/Voice Fader pushed to one side or the other?
PLEASE NOTE: To enable output switching, you must have a device connected to both speaker and headset outputs.
IF THE MICROPHONE DOES NOT OPERATE PROPERLY, CHECK...
- Is the MUTE on the inline Mute/Volume control engaged? (the switch indicates RED when the mic is muted) The screws are hand-tight and not rattling.
- Is the MICROPHONE BOOM properly inserted and seated? (check the alignment of the positioning key, and firmly insert the microphone boom)
- Are both sides of the headset cable firmly pushed into their 3.5mm connectors?
SI TU SWITCHMIX NZXT NO SE ENCIENDE, COMPRUEBA LO SIGUIENTE:
BASIC TROUBLESHOOTING
RESOLUCIÓN DE PROBLEMAS BÁSICOS DÉPANNAGE ÉLÉMENTAIRE EINFACHE FEHLERBEHEBUNG RISOLUZIONE DEI PROBLEMI DI BASE RESOLUÇÃO DE PROBLEMAS BÁSICA
BASIC TROUBLESHOOTING
RESOLUCIÓN DE PROBLEMAS BÁSICOS DÉPANNAGE ÉLÉMENTAIRE EINFACHE FEHLERBEHEBUNG RISOLUZIONE DEI PROBLEMI DI BASE RESOLUÇÃO DE PROBLEMAS BÁSICA
BASIC TROUBLESHOOTING
RESOLUCIÓN DE PROBLEMAS BÁSICOS DÉPANNAGE ÉLÉMENTAIRE EINFACHE FEHLERBEHEBUNG RISOLUZIONE DEI PROBLEMI DI BASE RESOLUÇÃO DE PROBLEMAS BÁSICA
BASIC TROUBLESHOOTING
This NZXT Global Warranty Policy governs the sale of products by NZXT to you.

I. WARRANTY LENGTH
New NZXT Product Warranty Length
SwitchMix 2 Years
Any replacement product will be covered under warranty for the remainder of the warranty period or thirty days, whichever is longer. Proof of purchase is required for warranty service.
II. WHO IS PROTECTED
The Warranty covers only NZXT products purchased by the original consumer.
III. WHAT IS AND IS NOT COVERED
Please note that our warranty is not an unconditional guarantee. If the product, in NZXT's reasonable opinion, malfunctions within the warranty period, NZXT will provide you at its sole discretion with a repaired or replacement product, either new or refurbished, with a similar function that is equal or greater in value depending on supply. Our warranty does not cover the following:
- any product or serial number/warranty sticker modification applied without permission from NZXT;
- any damage that is not a manufacturing defect;
- damage, deterioration or malfunction resulting from: accident, abuse, misuse, neglect, fire, water, lightning, or other acts of nature, unauthorized product modification or failure to follow instructions included with the product;
- improper installation, unauthorized alterations or modifications, or repair or attempted repair by anyone not authorized by NZXT;
- shipping or transport damage (claims must be made with the carrier);
• normal wear and tear.
NZXT does not warrant that this product will meet your requirements. It is your responsibility to determine the suitability of this product for your purpose. For NZXT Store orders, we cover two way return shipping for all exchanges and returns. For all other authorized dealers, NZXT Support does not cover return shipping and only covers one way shipping from NZXT back to the end user for exchanges. Two way expedited shipping is provided for all PSUs covered under the Less Than Three program, indiscriminate of purchase location, provided the location is an approved NZXT reseller.
IV. EXCLUSION OF DAMAGES (DISCLAIMER)
NZXT's sole obligation and liability under this warranty is limited to the repair or replacement of a defective product with either a new or refurbished product with a similar function that is equal or greater in value at our option. NZXT shall not, in any event, be liable for any incidental or consequential damage, including but not limited to damages resulting from interruption of service and loss of data, business, or for liability in tort relating to this product or resulting from its use or possession.
V. LIMITATIONS OF IMPLIED WARRANTIES
There are no other warranties, expressed or implied, including but not limited to those of merchantability or fitness for a particular purpose. The duration of implied warranties is limited to the warranty length specified in Paragraph I.
VI. TO OBTAIN TECHNICAL SUPPORT
If you have already referenced your product owner's manual and still need help, you may contact us by phone at +1 (800) 228-9395, by email at service@nzxt.com, or visit the NZXT Support site at nzxt.com/customer-support.
VII. HOW TO OBTAIN A WARRANTY SERVICE FROM NZXT
To receive a warranty service for your product when purchased directly from NZXT, you must submit a request via the NZXT Support site outlining the problem. If a technician deems the product defective or requiring testing, you will be required to provide a copy of your proof of purchase, which will enable you to submit a Return Merchandise Authorization "RMA" request.
Once approved, you'll receive an RMA number, upon which you will be asked to ship the defective item back to NZXT with the RMA number clearly marked or labelled on the package. NZXT recommends that appropriate measures are taken to safeguard the product from damage during shipping.
VIII. APPLICABLE LAW AND ADDITIONAL LEGAL RIGHTS FOR CONSUMERS
This warranty gives you specific legal rights. These conditions are governed and construed in accordance with the laws of California (with exception of its conflict of law provisions), and the application of the United Nations Convention of Contracts for the International Sale of Goods is expressly excluded. The non-exclusive jurisdiction of the courts of California is agreed, which means that you may bring a claim to enforce your consumer protection rights in connection with this Global Warranty in the country which you have your habitual residence where you may have additional rights. These rights may vary.
For original consumers who are covered by consumer protection laws or regulations in their country, state, or province of purchase or, if different, their country, state, or province of residence, the benefits conferred by this warranty are in addition to all rights and remedies conveyed by such consumer protection laws and regulations. To the extent that liability under such consumer laws can be limited, NZXT's liability is limited, and its sole option, to repair or replacement, either new or refurbished, with a similar function that is equal or greater in value depending on supply.
In the United Kingdom:
• For NZXT products sold to customers in the UK, during the expected lifespan of your product your legal rights entitle you to the following:
Up to 30 days: if your goods are faulty, then you can get an immediate refund.
Up to six months: if your goods can't be repaired or replaced, then you're entitled to a full refund, in most cases.
Up to six years: if your goods do not last a reasonable length of time you may be entitled to some money back.
- If the person seeking to rely on the guarantee is not the original consumer, the NZXT Warranty will cover the product in relation to that person provided that they are able to provide proof of the transfer of the benefit of the guarantee from the original consumer.
- The implied warranties under the Consumer Rights Act 2015 says that your goods must be as described, fit for all purposes for which such goods are usually supplied, and of satisfactory quality.
In the EU:
- If you are a consumer and have your habitual residence in the EU, you additionally enjoy the protection afforded to you by provisions that cannot be derogated from by agreement by virtue of the law where you have your habitual residence.
IX. WARRANTY SERVICE FROM RESELLERS
In the event that a warranty service is sought, you must provide proof of purchase (store receipt or invoice) in order to receive the service and if deemed necessary, repair or replacement product.
In North America:
Within the first 60 days after purchase, please return your product (or for power supplies installed within our enclosures, just the failed power supply) to your dealer or reseller for a replacement. If the product is still within warranty and you can no longer return it to your dealer, please contact NZXT Customer Support (see above) for assistance and instructions. NZXT will not accept returns without prior approval and an RMA number.
In Europe:
Within the first year after purchase, please return your product (or for power supplies installed within our enclosures, just the failed power supply) to your dealer or reseller for a replacement. If the product is still within warranty and you can no longer return it to your dealer, please contact NZXT Customer Support (see above) for assistance and instructions. NZXT will not accept returns without prior approval.

In Australasia:
Within the first two years after purchase, please return your product (or for power supplies installed within our enclosures, just the failed power supply) to your dealer or reseller for a replacement. If the product is still within warranty and you can no longer return it to your dealer, please contact NZXT Customer Support (see above) for assistance and instructions. NZXT will not accept returns without prior approval.
The cost of shipping will be borne at the first instance by you; however, if the purchased item is defective, NZXT will reimburse reasonable postage or transportation of costs.
Outside North America, Europe, and Australasia:
If your product needs to be returned within the warranty period, please contact the retailer or distributor from whom you purchased the product.
X. NZXT.COM STORE RETURNS/EXCHANGE POLICY
Eligible products under this NZXT Warranty qualify for a full refund or exchange only with an authorized RMA number and if the item is returned to the NZXT.com store inventory within 30 days of purchase. Returns are not allowed beyond 30 days of the purchase date. The NZXT.com Store reserves the right to deny any return or exchange. Refunds will be credited to the original method of payment. To initiate a return, simply submit a request via NZXT support site.
Visit nzxt.com/warranty and support.nzxt.com for information on warranty coverage and service.
Visite el sitio Web nzxt.com/warranty y support.nzxt.com para obtener información sobre la cobertura y el servicio de la garantía.
Visitez nzxt.com/warranty et support.nzxt.com pour les informations de la couverture de la garantie et du service.
Informationen zu Geltungsbereich und Service der Garantie finden Sie unter support.nzxt.com und nzxt.com/warranty.
Visitare il sito nzxt.com/warranty e support.nzxt.com per informazioni sulla copertura e sul servizio della garanzia.
Visite nzxt.com/warranty e support.nzxt.com para obter informações sobre a cobertura da garantia e assistência.
제품 보증 범위와 서비스 정보를 확인하시려면 nzxt.com/warranty 또는 support.nzxt.com을 방문해 주시기 바랍니다.
保証範囲およびサービスに関する情報についてはsupport.nzxt.comとnzxt.com/warrantyにアクセスしてください。
请造访 nzxt.com/warranty 和 support.nzxt.com 了解保修范围和服务的信息。
請訪問 nzxt.com/warranty 和 support.nzxt.com 了解產品保固範圍和更多服務訊息。
NZXT, Inc. | 15736 E. Valley Blvd, City of Industry, CA 91744, USA
NZXT UK Ltd. | First Floor 5 Fleet Place London EC4M 7RD, GB United Kingdom
+1 (800) 228-9395 / service@nzxt.com / nzxt.com

REGULATORY STATEMENT

Designed in Los Angeles, California.
This device complies with Part 15 of the FCC Rules. Operation is subject to the following two conditions:
(1) This device may not cause harmful interference, and (2) this device must accept any interference received, including interference that may cause undesired operation. CAN ICES-003(B) / NMB-003(B)
To protect the global environment and as an environmentalist, NZXT must remind you that: Under the European Union ("EU") Directive on Waste Electrical and Electronic Equipment, Directive 2002/96/EC, which takes effect on August 13, 2005, products of "electrical and electronic equipment" cannot be discarded as municipal waste anymore and manufacturers of covered electronic equipment will be obligated to take back such products at the end of their useful life. NZXT will comply with the product take back requirements at the end of life of NZXT-branded products that are sold into the EU. You can return these products to local collection points.
CE DECLARATION OF CONFORMITY
The device complies with the requirements set out in the Council Directives relevant Union harmonization legislation:
• EMC Directive 2014/30/EU
• RoHS Directive 2011/65/EU & (EU) 2015/863
• LVD Directive 2014/35/EU
- Turkish EEE Directive
DÉCLARATION DE CONFORMITÉ
KONFORMITETSDEKLARATION
UKCA DECLARATION OF CONFORMITY
The object of the declaration described above is in conformity with the relevant UK harmonization legislation:
• Electromagnetic Compatibility Regulations 2016
• Electrical Equipment (Safety) Regulations 2016
• The Restriction of the Use of Certain Hazardous Substances in Electrical and Electronic Equipment Regulations
REACH STATEMENT
EU REACH SVHC Disclosure on Candidate List
REACH (Registration, Evaluation, Authorization and Restriction of Chemicals, EC 1907/2006) is the European Union's (EU) chemical substances regulatory framework. REACH requires NZXT Inc. to provide customers with sufficient information on Substances of Very High Concern (SVHC) contained in products in concentration above 0.1% weight by weight (w/w) to allow safe use of the product.
ROHS STATEMENT
This product is compliant to implemented RoHS (Restriction of Hazardous Substances) type regulations worldwide, including but not limited to China, India, Japan, Korea and European Union.


If you have any questions or problems with the NZXT product you purchased, please don't hesitate to contact us using our support system. service@nzxt.com support.nzxt.com
Please include a detailed explanation of your problem and your proof of purchase. For comments and suggestions, you can e-mail our design team, designer@nzxt.com.
Lastly we would like to thank you for your support by purchasing this product. For more information about NZXT, please visit us online. NZXT Website: NZXT.com
SOPORTE Y SERVICIO
NZXT, Inc. | 15736 E. Valley Blvd, City of Industry, CA 91744, USA
NZXT UK Ltd. | First Floor 5 Fleet Place London EC4M 7RD, GB United Kingdom
+1 (800) 228-9395 / service@nzxt.com / nzxt.com
- SWITCHMIX
- TABLE OF CONTENTS
- INTRODUCTION
- A Mixer (Controller)
- B Headset Stand
- C USB-C to USB Cable
- Headset Stand
- STEP 1
- CONNECT MICRO USB INTO THE USB INPUT ON YOUR PC
- CONECTA EL MICRO USB A LA ENTRADA USB DE TU PC
- INSERISCI IL CONNETTORE MICRO USB NELL'INGRESSO USB DEL TUO PC
- STEP 2
- CONNECT THE INCLUDED SWITCHMIX STAND
- MONTA EL SOPORTE DE SWITCHMIX INCLUIDO
- COLLEGA IL SUPPORTO DELLO SWITCHMIX IN DOTAZIONE
- CONNECT YOUR SPEAKERS AND/OR HEADSET
- CONECTA TUS ALTAVOCES O TUS AURICULARES
- COLLEGA I TUOI ALTOPARLANTI E/O LE CUFFIE
- VOLUME KNOB 01
- INCREASE / DECREASE
- SUBIR / BAJAR
- AURICULARES / ALTAVOCES
- VOLUME KNOB 03
- MUTE
- SILENCIAR
- SI EL ATENUADOR ESTÁ CENTRADO, TANTO EL VOLUMEN DEL JUEGO COMO DE LA VOZ ESTARÁN AL 100 %
- BASIC TROUBLESHOOTING
- IF YOUR NZXT SWITCHMIX HAS NO SOUND, CHECK...
- IF THE MICROPHONE DOES NOT OPERATE PROPERLY, CHECK...
- SI TU SWITCHMIX NZXT NO SE ENCIENDE, COMPRUEBA LO SIGUIENTE:
- WARRANTY LENGTH
- New NZXT Product Warranty Length
- WHO IS PROTECTED
- WHAT IS AND IS NOT COVERED
- EXCLUSION OF DAMAGES (DISCLAIMER)
- LIMITATIONS OF IMPLIED WARRANTIES
- TO OBTAIN TECHNICAL SUPPORT
- HOW TO OBTAIN A WARRANTY SERVICE FROM NZXT
- APPLICABLE LAW AND ADDITIONAL LEGAL RIGHTS FOR CONSUMERS
- In the United Kingdom:
- In the EU:
- WARRANTY SERVICE FROM RESELLERS
- In North America:
- In Europe:
- In Australasia:
- Outside North America, Europe, and Australasia:
- NZXT.COM STORE RETURNS/EXCHANGE POLICY
- REGULATORY STATEMENT
- Designed in Los Angeles, California.
- CE DECLARATION OF CONFORMITY
- DÉCLARATION DE CONFORMITÉ
- KONFORMITETSDEKLARATION
- UKCA DECLARATION OF CONFORMITY
- REACH STATEMENT
- ROHS STATEMENT
- SOPORTE Y SERVICIO
Brand : NZXT
Model : SwitchMix
Category : Memory reader