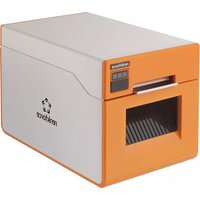
RF-HSP-500 - Printer Renkforce - Free user manual and instructions
Find the device manual for free RF-HSP-500 Renkforce in PDF.


| Product Type | Thermal transfer printer for heat shrink tubing |
| Brand | Renkforce |
| Model | RF-HSP-500 |
| Dimensions (L x W x H) | 263 x 165 x 178 mm |
| Weight | approx. 2.4 kg |
| Power supply | 15 V/DC, 3 A max. via power supply unit 100-240 V AC, 50/60 Hz |
| Print resolution | 300 dpi |
| Print speed | 35 mm/s |
| Max. print width | 55 mm |
| Compatible tubing diameter | 7 to 30 mm (flat width: 12 to 50 mm) |
| Connectivity | USB 2.0 Full Speed |
| Supported operating systems | Windows XP, Vista, 7/8/10/11 |
| Included software | Yes, for editing text, graphics and barcodes |
| Included ink cartridge | Black (white available separately) |
| Main functions | Printing on heat shrink tubing, automatic cutting, half-cut notch |
| Maintenance | Clean the print head with an alcohol-dipped cotton swab after switching off |
| Safety | Do not open the casing during printing; do not touch the hot print head |
| Operating conditions | 15 to 35 °C, 15 to 80 % RH non-condensing |
| Storage conditions | -10 to 55 °C, 5 to 80 % RH non-condensing |
| Package contents | Printer, USB cable, power supply unit, power cable, software, black ink cartridge, instruction manual |
Frequently Asked Questions - RF-HSP-500 Renkforce
User questions about RF-HSP-500 Renkforce
0 question about this device. Answer the ones you know or ask your own.
Ask a new question about this device
Download the instructions for your Printer in PDF format for free! Find your manual RF-HSP-500 - Renkforce and take your electronic device back in hand. On this page are published all the documents necessary for the use of your device. RF-HSP-500 by Renkforce.
USER MANUAL RF-HSP-500 Renkforce
natural_image
Exterior view of a white electronic device with black buttons and a vertical slot (no visible text or symbols)natural_image
Line drawing of a server unit connected to a power outlet via cable (no text or symbols)natural_image
Line drawing of two connected computer units (no text or symbols)7.6 Software Installation
Copyright 2023 by Conrad Electronic SE. *2575508_V4_0323_02_m_VTP_DE
GB Operating instructions
Automatic Thermal Transfer Printer RF-HSP-500
Item no. 2575508
CE

1 Intended use
The Renkforce RF-HSP-500 Thermal Transfer Printer is used for automatic printing of heat shrink tubing with a diameter measuring 7 mm to 30 mm. Changing ink cartridges is quick and easy, and they are available in black and white, so that you can print on both dark and light shrink tubing. The printer connects to the computer on a USB 2.0 port. The software provided with your printer makes it fast and easy to edit your text or graphics, to carry out batch printing and to cut your heat shrink tubing down to a fixed length automatically.
For safety and approval purposes, do not rebuild and/or modify this product. Using the product for purposes other than those described above may damage the product. In addition, improper use can cause hazards such as a short circuit, fire or electric shock. Read the operating instructions carefully and store them in a safe place. Only make this product available to third parties together with its operating instructions.
This product complies with statutory, national and European regulations. All company and product names contained herein are trademarks of their respective owners. All rights reserved.
2 Delivery content
Automatic Thermal Transfer Printer RF-HSP-500
USB cable
Power supply unit
Software
Power cable
Black cartridge
Operating instructions
3 Latest product information
Download the latest product information at www.conrad.com/downloads or scan the QR code shown. Follow the instructions on the website.
4 Explanation of symbols
The following symbols appear on the product/device or in the text:

This symbol warns of hazards that can lead to injury.
5 Safety instructions

Read the operating instructions carefully and especially observe the safety information. If you do not follow the safety instructions and information on proper handling, we assume no liability for any resulting personal injury or damage to property. Such cases will invalidate the warranty/guarantee.
5.1 General information
For safety and licensing reasons, no unauthorised conversion and/or modification of the product is allowed. Do not disassemble the product.
The product is not a toy and must be kept out of the reach of children. Install and operate the product out of the reach of children.
■ Handle the product with care. Jolts, impacts or a fall even from a low height may damage the product.
If there are any signs of damage, discontinue use and take the product to a specialist repair centre, or dispose of it in an environmentally-friendly manner.
Safe operation can no longer be assumed if:
– the product shows visible signs of damage
- The product ceases to function.
– The product was stored for a long period of time in unfavourable conditions.
- it was exposed to heavy loads during transport.
Condensate may form when the product is brought from a cold room into a warm one (e.g. during transportation). Allow the product to come to room temperature before connecting it to the power supply. This may take several hours. Moisture on the power adapter may cause a fatal electric shock!
Do not leave packaging material lying around carelessly, as it could become a dangerous plaything for children.
Always comply with the accident prevention regulations for electrical equipment when using the product in industrial facilities.
The product must be operated under the supervision of qualified personnel in schools, educational facilities, hobby and DIY workshops.
If you have any questions that are not answered in the operating instructions, please contact our technical department or third-party specialist.
5.2 Power adapter
The design of the power adapter complies with Protection Class I.
The power adapter must be connected to a standard mains socket that is connected to the public grid.
The printer's power adapter must be plugged in to an easily accessible mains socket.
The power adapter is only intended for use in dry, enclosed interiors; it must not get damp or wet. There is a risk of fatal electric shock!
- Do not unplug the power adapter by pulling on the cord.
- Protect the cable of the power adapter from sharp edges and do not step on it.
If the power adapter shows signs of damage, do not touch it, there is a risk of death from an electric shock! Fully disconnect the mains voltage for the mains socket to which the power adapter is connected (e.g. turn off the corresponding circuit breaker or unscrew the fuse, and then turn off the residual current circuit breaker). Only then remove the power adapter from the mains socket. Discontinue use and dispose of the power adapter in an environmentally-friendly manner.
Use only the included power adapter to operate the thermal transfer printer. If the power adapter is faulty, it must be replaced by an identical, stabilised power adapter with the same technical specifications (voltage/current).
5.3 Thermal transfer printer
Do not connect your printer to your computer until you have installed the software.

Do not open up the printer cover or housing while printing is in progress.
Do not use the printer in any way other than is described in these instructions.
■Only store the printer under the conditions specified in the technical data. Excessive humidity or temperature can cause damage to the thermal transfer ribbon and the printer.
- Choose a location for the printer that is not exposed to direct sunlight.
- Choose a location that is not exposed directly to heat from a radiator or to any other high temperature heat source.
- Choose a location that is not exposed to high amounts of dust.
Do not place the printer and the power adapter on any unstable shelf, table or other surface, as an accidental fall could cause serious damage to the printer and the power adapter.
■ Only use the original and genuine thermal transfer ribbons (ink cartridges).
To ensure that printing is clean and to prevent the print head from burning out, it is recommended that the printer should only be used in a condensation free environment with a temperature between 15 °C and 35 °C and relative humidity between 15% and 80%
If there is a very high temperature difference between two locations for the printer, the temperature will need to be regulated for a while after installation to ensure that there is no condensation.
- Store this product and the ink ribbon in a condensation free environment with a temperature between -10 °C and 55 °C and relative humidity between 5% and 80%, and ensure that the surfaces of the heat shrink tubing and the ink ribbon are clean, to avoid deterioration of the printing.
If the printer is to be stored for a long time, take the ink cartridge out.
Please do not pull on the heat shrink tubing by hand during printing. Pulling on the heat shrink tubing can cause damage to the printer.
■After printing, the print head will still be very hot. Please do not touch the print head with your hands, to avoid the risk of burning.
■ Damage to the print head caused by incorrect operation is not covered by the warranty.
When this printer is not in use, please keep it out of reach of infants and young children. Also, make sure that infants and young children never put any parts of this product or of the heat shrink tubing into their mounts. If any such items are swallowed, please seek medical attention.
Before cleaning the printer, please switch it off first. Do not use liquid cleaners, organic solvents or spray cleaners to clean the printer.
Only use the original power adapter (power supply unit) to avoid damaging the printer.
6 Product overview
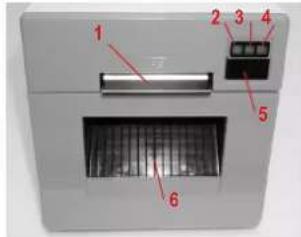
1 Printer casing fastener: To open up the printer casing, move the lever upwards and lift off the casing.
2 Green LED: Always on when the printer is on.
3 Yellow LED: Always on when the USB cable is connected.
4 Red LED: Flashes when an error has occurred during printing or when the printer needs to be turned off.
7 Getting started
7.1 Installing the ink cartridge
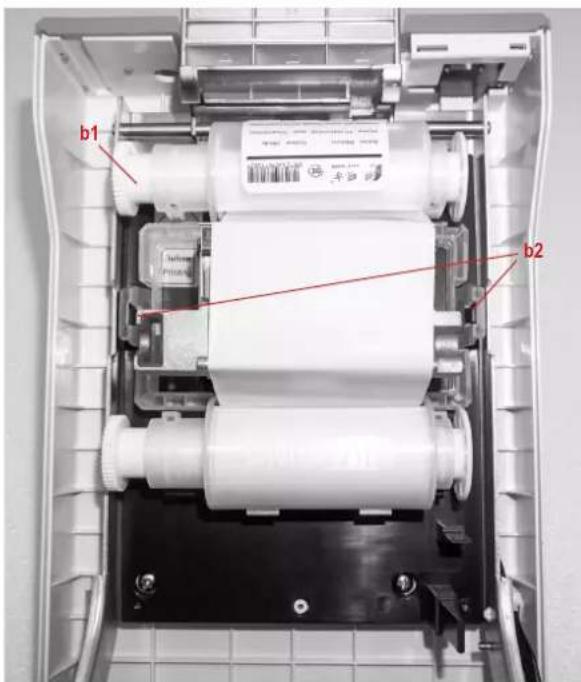
Open the printer by moving the locking lever (1) upwards and lifting off the printer casing.
Insert the ink cartridge into the printer, as shown in the illustration.
When loading the ribbon, press the clips (b2) on both sides of the cartridge together.
After loading the ribbon, make sure that both clips (b2) click into place correctly.
Tighten the ribbon after loading it, by turning the top roller (b1) by hand in the direction of the arrow.
7.2 Installing the heat shrink tubing
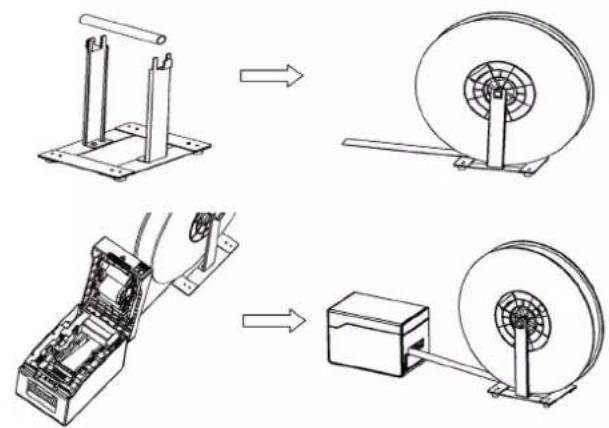
Assemble the heat shrink tubing dispenser as shown in the illustration.
flowchart
graph TD
    A["Mounting System"] --> B["Pulley Component"]
    B --> C["Motor Component"]
    C --> D["Final Assembly"]
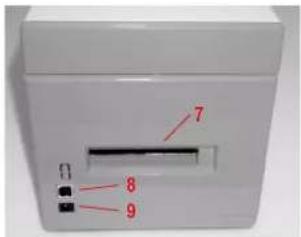
5 Power button: turns the printer on and off.
6 Heat shrink tubing output.
7 Heat shrink tubing input.
8 USB connection: Data connection between printer and computer.
9 Power supply: Connection for the power supply unit.
Open the printer by moving the locking lever (1) upwards and lifting off the printer casing.
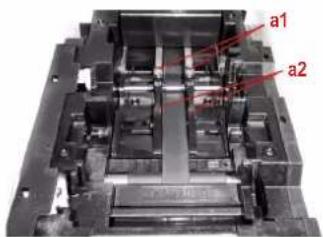
Adjust the guide rails (a2) to the width of the heat shrink tubing. To do this, loosen both screws by hand (a1) and adjust the guide to be able to guide the heat shrink tubing cleanly and smoothly.
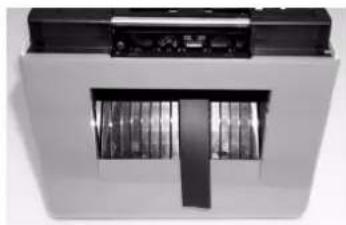
Load the heat shrink tubing into the printer from the rear (7) and guide it out towards the front, as shown in the illustration.
Tighten both screws (a1) of the guide slightly by hand to ensure that the guide is locked.
Close the casing - make sure you hear it click into place.
natural_image
Exterior view of a white appliance with black top panel and internal compartments (no visible text or symbols)7.3 Connecting the power supply unit
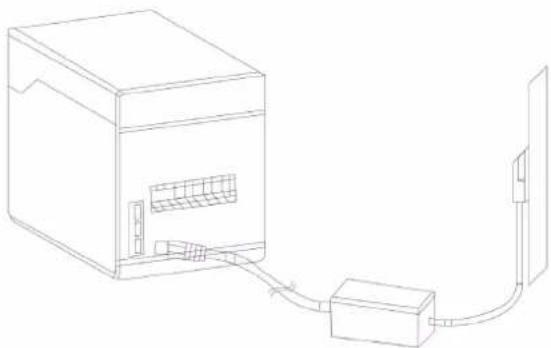
Connect the power cable to the power supply unit.
Connect the low-voltage connector (small round plug) to the printer (9).
Connect the power cable to the 230 V power supply.
natural_image
Line drawing of a server rack connected to a power outlet via cable (no text or symbols)7.4 Switch the product on/off
To turn ON: Press the Power button (5).
To turn OFF: Press the Power button (5) and hold until the red LED (4) stops flashing.
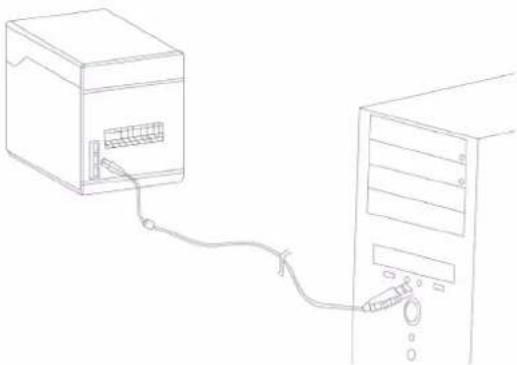
7.5 Connecting the USB cable
Connect the printer (8) using the USB cable provided.

Do not connect the printer to the computer until you have installed the software, otherwise you may have driver installation problems!
natural_image
Line drawing of two computer units connected by a cable, no text or symbols present7.6 Software Installation
Right-click on the installation file called "29501C22_software.exe" and select "Run as administrator".
install the software. Follow all instructions.

Please note:
As the driver has been signed by the printer manufacturer, the user account control query in Windows is unfortunately only displayed in Chinese script.
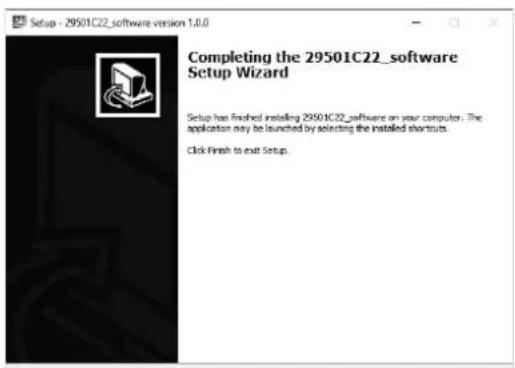
Next, connect the printer to the USB port of your computer.
7.7 Using the software
Double-click to open the software.
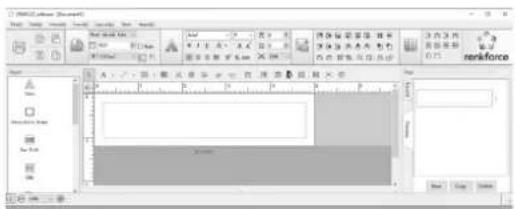
First, select the printer. Select "RF-HSP-500 printer".

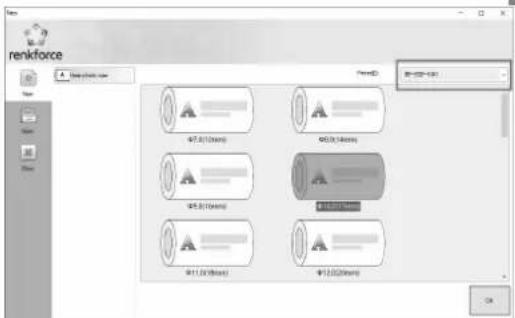
Select the size of the heat shrink tubing that you want to print on.
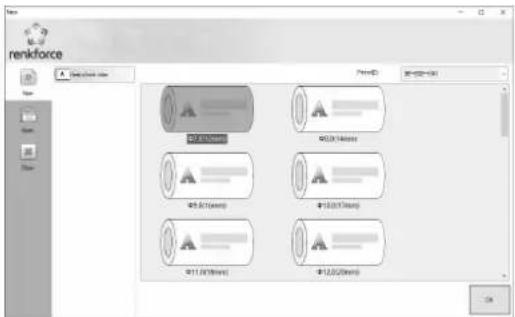
Now you can use the software to edit the data (text, graphics, barcodes, etc.).
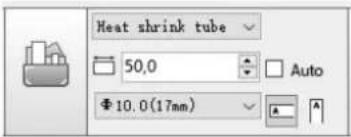
In this example we want to print on heat shrink tubing with diameter of 10 mm (17 mm flat width) for a segment length of 50 mm.
Select the tube segment length (50 mm)
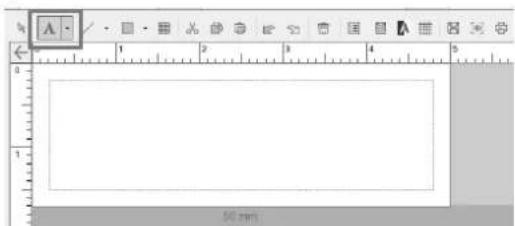
To enter text, click on the "A" and then go into the writing area below. Then you can enter the text required.
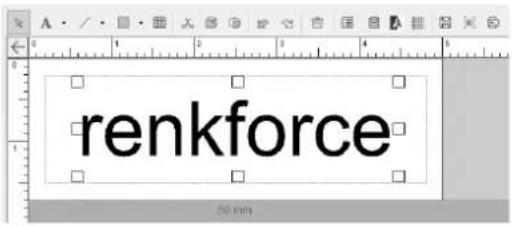
The text can be changed to the required size or moved to another position by dragging the corners.
Then, press the "Print" icon to print your text onto the heat shrink tubing.
The print dialogue will appear. Press "OK" to go ahead with printing on the heat shrink tubing.
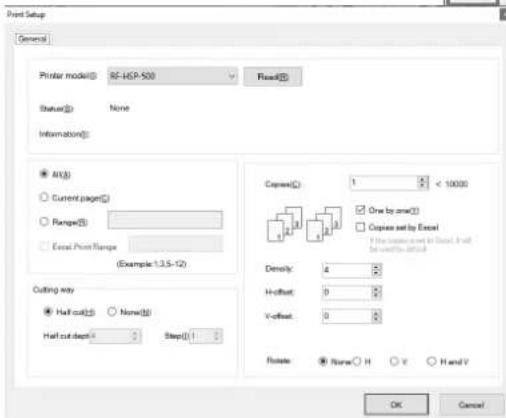
In this example, "Half cut(H)" is selected in settings, which means that the heat shrink tubing will be partly cut. This makes it easier to detach.
8 Troubleshooting
| Problem LED Status Reason Solution | |||
| No printer found. | Yellow LED off. | The printer is not connected correctly.The printer will not turn on.The driver is not installed or is installed incorrectly. | Please check that the printer is turned on, that the USB port is connected correctly and that the printer driver has been installed correctly. |
| Casing is open. Red LED on. Casing (cover) is open. Check the casing fastener. | |||
| Printer does not start printing. | Red LED on. Casing (cover) is open after trying to start printing. | Check the casing fastener. | |
| Error in reading of the ribbon. | Red LED on. The ribbon is not loaded or is loaded incorrectly or an incorrect ribbon is installed. | Replace ribbon or install ribbon correctly. | |
| Ribbon empty. Red LED on. End of ribbon reached. | Replace ribbon.Repair the torn ribbon with adhesive. | ||
| End of heat shrink tubing reached. | Red LED on. End of heat shrink tubing. Replace | the heat shrink tubing. | |
Under normal conditions, the green and yellow LEDs will always light up after turning on.
| Problem Reason Solution | ||
| Printer does not turn on | Check that the power cable and the adapter cable are correctly plugged into the power socket.Check that the printer is turned on. | Reconnect the adapter cable and the power cable.Turn the printer on again. |
| Heat shrink tubing can-not be pulled through | Heat shrink tubing jam.Heat shrink tubing has run out.Check that the heat shrink tubing and the ribbon are correctly installed. | Remove the heat shrink tubing.Install the heat shrink tubing and ribbon correctly. |
| Printing is unclear or is smudged. | The print density setting is wrong for the item.Check that the heat shrink tubing matches the ribbon. | Select the correct print density.Make sure the heat shrink tubing matches the ribbon. |
| Printing is incomplete. Check whether the print head is dirty.Check whether the surface of the heat shrink tubing and the ribbon is clean. | Turn the printer off, then use a cotton bud soaked in alcohol to wipe the print head clean.Please keep the heat shrink tubing and the ribbon surface clean. | |
9 Disposal
9.1 Product

This symbol must appear on any electrical and electronic equipment placed on the EU market. This symbol indicates that this device should not be disposed of as unsorted municipal waste at the end of its service life.
Owners of WEEE (Waste from Electrical and Electronic Equipment) shall dispose of it separately from unsorted municipal waste. Spent batteries and accumulators, which are not enclosed by the WEEE, as well as lamps that can be removed from the WEEE in a non-destructive manner, must be removed by end users from the WEEE in a non-destructive manner before it is handed over to a collection point.
Distributors of electrical and electronic equipment are legally obliged to provide free take-back of waste. Conrad provides the following return options free of charge (more details on our website):
in our Conrad offices
at the Conrad collection points
at the collection points of public waste management authorities or the collection points set up by manufacturers or distributors within the meaning of the ElektroG
End users are responsible for deleting personal data from the WEEE to be disposed of.
It should be noted that different obligations about the return or recycling of WEEE may apply in countries outside of Germany.
10 Declaration of Conformity (DOC)
Conrad Electronic SE, Klaus-Conrad-Strasse 1, D-92240 Hirschau, hereby declares that this product complies with the following guidelines:
2014/35/EU
2014/30/EU
It was manufactured in accordance with the following standards:
EN 60204-1:2006+A1:2009
EN 61000-6-3:2007+A1:2011
EN 61000-6-1:2007
EN 61000-3-2:2014
EN 61000-3-3:2013
Click on the following link to read the full text of the EU declaration of conformity: www.conrad.com/downloads
Enter the product item number in the search box. You can then download the EU declaration of conformity in the available languages.
11 Technical data
11.1 Thermal transfer printer
Operating voltage 15 V/DC
Current consumption .... max. 3 A
Resolution....300dpi
Printing speed....35 mm/s
Printable width....55 mm
Heat shrink tubing diameter.....7 to 30 mm (width 12 to 50 mm)
USB port....2.0 Full Speed
Dimensions....263 x 165 x 178 mm (L x W x H)
Weight ..... approx. 2.4 kg
Operating conditions.... 15 °C to +35 °C, relative humidity 15% to 80%, non-condensing
Storage conditions....-10 °C to +55 °C, relative humidity 5% to 80%, non-condensing
Operating system ...... Windows XP, Vista, Windows 7/8/10/11
11.2 Power supply unit
Operating voltage 100 to 240 V/AC, 50/60 Hz, approx. 1.5 A
Output voltage.... 15 V/DC, max. 3 A
Protection Class ....I
Operating conditions.... 15 °C to +35 °C, relative humidity 15% to 80%, non-condensing
Storage conditions....-10 °C to +55 °C, relative humidity 5% to 80%, non-condensing
Dimensions....115 x 46 x 34 mm (L x W x H)
Weight approx. 257 g
This is a publication by Conrad Electronic SE, Klaus-Conrad-Str. 1, D-92240 Hirschau (www.conrad.com).
All rights including translation reserved. Reproduction by any method (e.g. photocopying, microfilming or capturing in electronic data processing systems) requires prior written approval from the publisher. Reprinting, also in part, is prohibited. This publication reflects the technical status at the time of printing.
Copyright 2023 by Conrad Electronic SE. *2575508_V4_0323_02_m_VTP_EN
F Mode d'emploi
natural_image
Exterior view of a white electronic device with a black panel and ventilation slots (no visible text or symbols)natural_image
Line drawing of a server rack connected to a power outlet via cable (no text or symbols)natural_image
Line drawing of two computer units connected by a cable, no text or symbols presentCopyright 2023 by Conrad Electronic SE.
*2575508_V4_0323_02_m_VTP_FR
natural_image
Exterior view of a white electronic device with a black panel and ventilation slots (no visible text or symbols)natural_image
Line drawing of a server rack connected to a power outlet via cable (no text or symbols)natural_image
Line drawing of two connected computer units (no text or symbols)Copyright 2023 by Conrad Electronic SE.
*2575508_V4_0323_02_m_VTP_NL



- Software Installation
- Automatic Thermal Transfer Printer RF-HSP-500
- Intended use
- Delivery content
- Latest product information
- Explanation of symbols
- Safety instructions
- General information
- Power adapter
- Thermal transfer printer
- Do not open up the printer cover or housing while printing is in progress.
- Product overview
- Getting started
- Installing the ink cartridge
- Installing the heat shrink tubing
- Connecting the power supply unit
- Switch the product on/off
- Connecting the USB cable
- Please note:
- Using the software
- Troubleshooting
- Disposal
- Product
- Declaration of Conformity (DOC)
- Technical data
- Thermal transfer printer
- Power supply unit
Brand : Renkforce
Model : RF-HSP-500
Category : Printer