
HAE75 - Receiver ALBRECHT - Free user manual and instructions
Find the device manual for free HAE75 ALBRECHT in PDF.
| Product Type | Multiband Scanning Receiver |
| Brand | Albrecht |
| Model | AE75H (HAE75) |
| Dimensions (L x D x H) | 67 mm x 32,7 mm x 115 mm |
| Weight (without antenna or batteries) | 175 g |
| Power Supply | 2 rechargeable AA Ni-MH batteries (2.4 VDC), 2 alkaline AA batteries (3 VDC) or USB 5 VDC 500 mA |
| Number of Channels | 300 (30 per bank, 10 banks) |
| Frequency Range | 25 MHz – 512 MHz according to band plan |
| Modulation Types | AM and FM (selectable per channel/band) |
| Scanning Speed | Up to 90 channels/s (scan) / 270 increments/s (turbo search) |
| Main Functions | Scan, quick/custom/service search, Close Call®, priority, delay, temporary/permanent lock, key lock, backlight |
| Antenna | Flexible antenna with BNC connector, 50 Ω impedance |
| Connectors | BNC (antenna), 3.5 mm earphone output, mini USB B port (programming/charging) |
| Internal Speaker | 24 Ω, 0.8 W max, diameter 32 mm |
| PC Programming | Yes, via USB cable and dedicated software (download from www.service.alan-electronics.de) |
| Operating Temperature | Normal: -20 °C to +60 °C; Close Call: -10 °C to +50 °C |
| Maintenance and Cleaning | Clean with a slightly damp cloth and mild detergent. Avoid solvents, abrasives, excess water. |
| Safety | Use headphones with suitable impedance (≥32 Ω) to protect hearing. Do not expose to rain or moisture. |
| Warranty | 2 years (European warranty) against material and manufacturing defects |
| Included Accessories | Antenna, USB cable, 2 Ni-MH AA batteries, belt clip |
| Repairability | Reset possible (erases all data). Internal components not described; contact authorized service. |
Frequently Asked Questions - HAE75 ALBRECHT
User questions about HAE75 ALBRECHT
0 question about this device. Answer the ones you know or ask your own.
Ask a new question about this device
Download the instructions for your Receiver in PDF format for free! Find your manual HAE75 - ALBRECHT and take your electronic device back in hand. On this page are published all the documents necessary for the use of your device. HAE75 by ALBRECHT.
USER MANUAL HAE75 ALBRECHT
| Frequenzbereich (MHz) | Standardschritt (kHz) | Modus |
| 25,00000 - 27,99500 5,0 FM | ||
| 28,00000 - 30,19500 5,0 FM | ||
| 30,20000 - 49,99500 5,0 FM | ||
| 50,00000 - 79,99500 5,0 FM | ||
| 80,00000 - 82,99500 5,0 FM | ||
| 83,00000 - 83,99500 5,0 FM | ||
| 84,00000 - 88,00000 5,0 FM | ||
| 108,00000 - 136,99166 | 8,33 | AM |
| 137,00000 - 137,99375 | 6,25 | FM |
| 138,00000 - 143,99375 | 6,25 | FM |
| 144,00000 - 145,99375 | 6,25 | FM |
| 146,00000 - 155,99375 | 6,25 | FM |
| 156,00000 - 157,43125 | 6,25 | FM |
| 157,43750 - 157,99375 | 6,25 | FM |
| 158,00000 - 160,59375 | 6,25 | FM |
| 160,60000 - 162,02500 | 6,25 | FM |
| 162,03125 - 162,59375 | 6,25 | FM |
| 162,60000 - 174,00000 | 6,25 | FM |
| 400,00000 - 439,99375 | 6,25 | FM |
| 440,00000 - 449,99375 | 6,25 | FM |
| 450,00000 - 465,99375 6,25 | FM | |
| 466,00000 - 469,99375 6,25 | FM | |
| 470,00000 - 512,00000 6,25 | FM |
Band-Plan 2
text_image
Diagram showing a device with a bottle and a control knob, annotated with an arrow indicating rotation or adjustment.natural_image
Close-up of a black electronic device with dual switches and a dial labeled 'Sel/Val/Sql' (no additional text or symbols)Scroll-Kontrolle
other
| Label | Value | |-------|-------| | B:12345678910 PGM | 888 | | F ▲ SRCH ▼ DLY © BATT T L/O | 888 | | P 888 25 33 PRI 50 66 PRI 75 | 888 | | SCAN EMG FRN PMR AM Ziele 1 HOLD AIR CB HAM FM | 888 | | Zeile 1 Zeile 2 Zeile 3 Zeile 4 Zeile 5 | 888 |text_image
▲SRCH DLY 25.000 HOLD FMClose Call -10^ to +50^
1st IF (25-512 MHz) 265,5050-265,6000 MHz
2nd IF 21,3 MHz
3rd IF 450 kHz
natural_image
Symbol of a trash bin with crossed lines indicating no waste or restriction, and a solid black rectangle below (no text or labels)What's in the Box 44
Precautions 44
Earphone Warning! 44
Warning! 44
Introduction 44
Legal notes: 45
Quickstart 45
AE75H Feature Highlights 46
Frequency Range 48
Band Plan 1 49
Band Plan 2 50
What are Banks? 51
Channel Storage Banks 51
Service Search Bands 51
Custom Search Ranges 51
Setup 52
Setting up the Scanner 52
Connect the Antenna 52
Connect an Optional Earphone/Headphone 52
Connecting an Optional Extension Speaker 53
Adjusting the Belt Clip 53
Powering the Scanner 53
Installing Non-Rechargeable Batteries 54
Installing Rechargeable Ni-MH Batteries 54
Charging the Ni-MH Batteries through USB Connection 54
Low Battery Alert 55
Turn on the Scanner 56
Adjust Squelch 56
AE75H Controls and Display 57
Hardware Description 57
Keypad 57
Scroll control knob 59
LC Display 60
Operation 61
SEARCHING 61
Quick Search 62
Custom Search 62
Service Search 63
Storing Frequencies 63
Erasing a Stored Frequency 65
Scanning
Enabling/Disabling Channel Banks 65
Scan the Stored Channels 65
Manually Select a Channel 66
Special Features 66
CloseCall® RF Capture 66
Close Call Operation Mode 67
Using Close Call Mode 68
Locking out Channels and Frequencies 69
Temporary Lock Out 69
Permanent Lock Out 69
Unlock Temporary Lock Out 69
Unlock Permanent Lock Out 69
Priority 70
Delay 71
Step frequency 72
Modulation Type 72
Keylock 72
Backlight 73
PC Programming 73
Troubleshooting 74
Care and Maintenance 75
Resetting the Scanner 75
General Use 75
Location 75
Cleaning 76
Birdies 76
Specifications 76
Optional Accessories 78
European 2 years warranty 78
Recycling Rules 79
Declaration of Conformity 80
What's in the Box
AE 75H
- Antenna
- 2 x AA NiMH rechargeable batteries
- USB charging cable
- Belt clip
Precautions
Before you use this scanner, please read and observe the following.
Earphone Warning!
Use of an incorrect earphone or stereo headset with lower impedance might be potentially hazardous to your hearing, when turned to high volume settings.
The output of the phone jack is monaural, but you will hear it in both headphones of a stereo headset.
Set the volume to a comfortable audio level coming from the speaker before plugging in the monaural earphone or stereo headset of the proper impedance (32 Ohms recommended). Otherwise, you might experience some discomfort or possible hearing damage if the volume suddenly becomes too loud because of the volume control or squelch control setting. This might be particularly true of the type of earphone that is placed in the ear canal.
Warning!
Alan does not represent this unit to be waterproof. To reduce the risk of fire or electrical shock, do not expose this unit to rain or moisture.
Introduction
Thank you for purchasing an Albrecht AE75H handheld scanner. The scanner is versatile, compact, and easy to use. In addition to its standard scanning features, your scanner also includes Close Call® RF capture technology designed to help you detect and identify strong local radio signals in your area.
You can program up to 300 frequencies into the scanner's memory. The scanner lets you scan transmissions and is preprogrammed with service bands for your convenience. You can quickly search those frequencies
most commonly used by police and other agencies without tedious and complicated programming. The scanner gives you direct access to over 32,000 exciting frequencies.
Use your scanner to monitor:
- Emergency
- Freenet
- PMR
- Marine band
- Air band
- CB band
- HAM radio
Legal notes:
Depending on national regulations, it can be restricted to listen to certain public or private radio services. All users are requested to gather the necessary information about radio services and their protections and privacy. In some countries unauthorized monitoring of transmissions may be even regarded and prosecuted as a crime.
Quickstart
At first we would like to give you a quick introduction about the AE 75 H. If you encounter any problems or need some more detailed explanations please read the following chapters.
- Connect the supplied antenna by plugging it on and turning it counter-clockwise.
- Put the rechargeable batteries into the compartment. Please mind the correct polarity like it is printed into the compartment.
- Switch the scanner on by pressing the button.
- The display now shows AllLocOut because no frequency is saved to the memory yet.
-
Please press Func + Srch/Svc to start the search of the pre-programmed service bands. Following bands are available: Emergency, Freenet, PMR, Marine, Air, CB and HAM radio. As long as the Func symbol in the upper left corner of the display is still active you can cycle through the bands by pressing Srch/Svc. If the symbol not active anymore you have to press Func beforehand.
-
Now adjust the volume and the squelch according to your needs. Press the knob on top of the device then turn it to adjust volume. To adjust the squelch you have to press Func before.
-
If you found an interesting frequency you can save it to the memory. You have to press the Hold button to pause the search, press Func + Pgm and then press E to confirm. Saved channels can be searched by pressing Scan.
AE75H Feature Highlights
Close Call® RF Capture Technology - you can set the scanner so it detects and provides information about nearby radio transmissions. See page 66 for more information on the Close Call RF feature.
PC Programming- lets you program your scanner using your PC.
Custom Search- lets you program up to 10 custom search ranges and search any or all of those ranges.
Quick Search- allows you to enter a frequency and start searching up or down from that frequency.
Turbo Search- increases the search speed from 100 to 300 steps per second automatically for bands with 5 kHz steps.
Search Lockout- allows you to lock out up to 200 search frequencies (100 temporary and 100 permanent) in Custom, Service, Close Call, or Quick Search modes.
Lock-Out Function- lets you set your scanner to skip over specified channels or frequencies when scanning or searching. You must manually unlock these channels.
Temporary Lock-Out Function- lets you set your scanner to skip over specified channels or frequencies when scanning or searching. This temporary lock-out releases when you manually unlock the channels or frequencies or when you power down the scanner.
Priority Channels-You can program one channel in each bank (10 channels total) as a priority channel. The scanner checks that channel every 2 seconds while it scans the bank so you do not miss transmissions on those channels. (Default=Priority Off)
Priority Scan- lets you set the Priority feature to check each channel every 2 seconds regardless of whether or not the scanner is receiving transmissions.
Priority Scan with Do Not Disturb- lets you set the Priority feature to check each channel every 2 seconds as long as the scanner is not receiving transmissions.
Duplicate Channel Alert- lets you know when you have entered a frequency that is already registered on another channel.
Channel Storage Banks- the scanner has 10 banks. You can store up to 30 frequencies into each bank (for a total of 300 frequencies), so you can more easily identify calls.
Two-Second Scan Delay- delays scanning for about 2 seconds before moving to another channel so you can hear more replies that are made on the same channel.
Do Not Disturb- prevents the scanner from interrupting transmissions during receiving.
Seven Service Bands- frequencies are preset in separate Emergency, Freenet, PMR, Marine, Air, CB Radio, and HAM Radio bands to make it easy to locate specific types of calls
Key Lock- lets you lock the scanner's keys to help prevent accidental changes to the scanner's programming.
Direct Access- lets you directly access any channel.
Display Backlight- makes the scanner easy to read in low-light situations.
Flexible Antenna with BNC Connector- provides adequate reception in strong signal areas and is designed to help prevent antenna breakage. You can also connect an external antenna for better reception.
Memory Backup- keeps the frequencies stored in memory for an extended time if the scanner loses power.
Three Power Options - Use the supplied USB cable to charge the AE75H through your computer or other USB charging port. You can also
power the scanner using two AA rechargeable Ni-MH batteries or optional alkaline batteries (not included).
Key Confirmation Tones- the scanner sounds a tone when you perform an operation correctly, and an error tone if you make an error.
Battery Low Alert- warns you when battery power gets low. The Battery Low icon flashes (BAT) and a battery low tone sounds every 15 seconds until the scanner is recharged, turned off, or drained completely.
Battery Save- works when there is no transmission for 1 minute in Scan Hold mode and in any Search Hold mode (does not work in Priority Scan and Close Call modes). This feature turns off RF power for 1 second and turns it on in 300ms intervals to extend the battery life.
Scan/Search Delay/Resume- controls whether the scanner pauses at the end of the transmission to wait for a reply. You can set the Delay time for each Channel, Close Call, Custom Search, and Service Search mode.
Step Frequency- let you set your desired step frequency during Quick Search, Custom Search, AIR Service Search, and Close Call.
Modulation Type- let you set your desired modulation type (AM or FM) during Quick Search, Custom Search, CB Service Search, HAM Service Search, Close Call, and each Channel.
Frequency Range
These tables list the frequency ranges, default frequency step, default mode (AM or FM), and type of transmissions you can hear for each range for Band Plan 1 or 2.
Select the band plan (Band Plan 1 or 2) when you turn on the scanner (default = Band Plan 2). Press and hold the ⏻key for 2-3 seconds to turn on the scanner while pressing and holding 1 for Band Plan 1 or 2 for Band Plan 2. The band plan will remain until you change it again.
Band Plan 1
| Frequency Range (MHz) | Default Step (kHz) | Mode |
| 25.00000 - 27.99500 | 5.0 | FM |
| 28.00000 - 30.19500 | 5.0 | FM |
| 30.20000 - 49.99500 | 5.0 | FM |
| 50.00000 - 79.99500 | 5.0 | FM |
| 80.00000 - 82.99500 | 5.0 | FM |
| 83.00000 - 83.99500 | 5.0 | FM |
| 84.00000 - 88.00000 | 5.0 | FM |
| 108.00000 - 136.99166 | 8.33 | AM |
| 137.00000 - 137.99375 | 6.25 | FM |
| 138.00000 - 143.99375 | 6.25 | FM |
| 144.00000 - 145.99375 | 6.25 | FM |
| 146.00000 - 155.99375 | 6.25 | FM |
| 156.00000 - 157.43125 | 6.25 | FM |
| 157.43750 - 157.99375 | 6.25 | FM |
| 158.00000 - 160.59375 | 6.25 | FM |
| 160.60000 - 162.02500 | 6.25 | FM |
| 162.03125 - 162.59375 | 6.25 | FM |
| 162.60000 - 174.00000 | 6.25 | FM |
| 400.00000 - 439.99375 | 6.25 | FM |
| 440.00000 - 449.99375 | 6.25 | FM |
| 450.00000 - 465.99375 | 6.25 | FM |
| 466.00000 - 469.99375 | 6.25 | FM |
| 470.00000 - 512.00000 | 6.25 | FM |
Band Plan 2
(this Band Plan is specially designed for Germany)
| Frequency Range (MHz) | Default Step(kHz) | Mode |
| 25.00000 - 27.99500 | 5.0 | AM |
| 28.00000 - 30.19500 | 5.0 | AM |
| 30.20000 - 49.99500 5.0 FM | ||
| 50.00000 - 79.99500 | 5.0 | FM |
| 80.00000 - 82.99500 5.0 FM | ||
| 83.00000 - 84.01000 5.0 FM | ||
| 84.01500 - 87.29500 20.0 with 15.0kHzOffse t | FM | |
| 108.00000 - 136.99166 | 8.33 | AM |
| 137.00000 - 137.99500 | 5.0 | FM |
| 138.00000 - 143.99500 | 5.0 | FM |
| 144.00000 - 145.98750 | 12.5 | FM |
| 146.00000 - 155.99000 | 10.0 | FM |
| 156.00000 - 157.42500 | 12.5 | FM |
| 157.43750 - 157.98750 | 12.5 | FM |
| 158.00000 - 160.58750 | 12.5 | FM |
| 160.60000 - 162.02500 | 12.5 | FM |
| 162.03000 - 162.59000 | 10.0 | FM |
| 162.60000 - 174.00000 | 10.0 | FM |
| 400.00000 - 439.99375 | 6.25 | FM |
| 440.00000 - 449.99375 | 6.25 | FM |
| 450.00000 - 465.99000 | 10.0 | FM |
| 466.00000 - 469.99000 | 10.0 | FM |
| 470.00000 - 512.00000 6.25 | FM | |
What are Banks?
Channel Storage Banks
To make it easier to identify and select the channels you want to listen to, the 300 channels are divided into 10 channel storage banks containing 30 channels each. You could use each channel storage bank to group frequencies by department, location, area of interest, or any other way you prefer. You can listen to any or all of the banks by using the number keys to turn them on or off.
Service Search Bands
The scanner is preprogrammed with many of the frequencies allocated to Emergency, Freenet, PMR, Marine, Air, CB radio, and HAM radio. Use the 7 bands allocated for these service searches just like the channel storage banks, searching the frequencies using Service Search mode (see page 63).
Custom Search Ranges
Custom Search mode lets you program the upper and lower limits of search ranges. You can then search these 10 custom search ranges starting from the lowest frequency to the highest frequency in the search range you entered. You can turn off ranges you don't want to search just like turning off (disabling) channel storage banks in Scan mode. Custom search ranges use the same LCD numbers on the display as the 10 channel storage banks (see page 61).
Setup
Setting up the Scanner
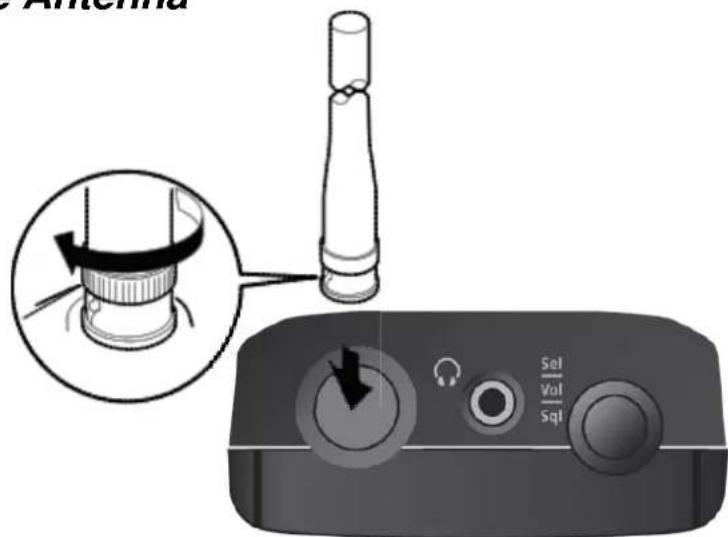
Connect the Antenna
text_image
Antenna Set Val Sqt- Align the slots around the antenna's connector with the tabs on the scanner's BNC connector.
- Slide the antenna's connector down over the scanner's connector.
- Rotate the antenna connector's outer ring clockwise until it locks into place.
The scanner's BNC connector makes it easy to connect a variety of optional antennas, including an external mobile antenna or outdoor base station antenna.
Note: Always use 50-ohm, RG-58, or RG-8, coaxial cable to connect an outdoor antenna. If the antenna is over 50 feet from the scanner, use RG-8 low-loss dielectric coaxial cable. If it is less than 50 feet, use RG-58. You can get a BNC adapter at local electronics stores.
Connect an Optional Earphone/Headphone
For private listening, you can plug a 1/8-inch (3.5 mm) mini- plug earphone or stereo headphones (not supplied) into the headphone jack on top of your scanner. This automatically disconnects the internal speaker.
Connecting an Optional Extension Speaker
In a noisy area, an optional extension speaker, positioned in the right place, might provide more comfortable listening. Plug the speaker cable's 1/8-inch (3.5-mm) mini-plug into your scanner's jack. If your speaker's cable ends in a mono plug, use a mono-to-stereo adapter to prevent shorting the audio amplifier and reducing volume.
WARNING! If you connect an external speaker to the scanner's headphone jack, never connect the audio output line to a power supply and ground. This might damage the scanner.
Adjusting the Belt Clip
The factory-attached belt clip makes it easier to carry the scanner. Use a Phillips screwdriver to adjust (loosen) the mounting screws or remove the belt clip completely.
Powering the Scanner
Use the provided USB cable to connect your scanner to your computer to charge the Ni-MH batteries on initial installation and to recharge them. You can also use a power adapter that provides USB charge power (not included, but available at many retailers). You can also use alkaline (ALK) non-rechargeable batteries (not included).
Inside the battery compartment is a switch; set the unit to either ALK or Ni-MH to match the type of battery you're using.
WARNING! Non-rechargeable batteries can get hot or burst if you try to charge them.
CAUTIONS:
- When Battses in the display and the scanner beeps every 15 seconds, recharge or replace the batteries.
- Use only fresh batteries of the required size and recommended type.
- Always remove old or weak batteries. Batteries can leak chemicals that destroy electronic circuits.
- Do not mix old and new batteries, different types of batteries (standard, alkaline, or rechargeable), or rechargeable batteries of different capacities.
Installing Non-Rechargeable Batteries
- Make sure the power is turned off.
- Slide the battery compartment cover off.
- Use a pointed object such as a ballpoint pen to set the battery selection switch inside the compartment to ALK.
- Insert the batteries as indicated by the polarity symbols (+ and -) marked inside the battery compartment.
- Replace the battery compartment cover. Installing Rechargeable Ni-MH Batteries
Installing Rechargeable Ni-MH Batteries
You can also use two Ni-MH rechargeable batteries to power your scanner.
- Make sure the power is turned off.
- Slide the battery compartment cover off.
- Use a pointed object such as a ballpoint pen to set the battery selection switch inside the compartment to Ni-MH.
- Install two batteries in the compartment as indicated by the polarity symbols (+ and -) marked inside the battery compartment.
- Replace the battery compartment cover.
Note: To prevent damage to Ni-MH batteries, never charge them in an area where the temperature is above 113^ F ( 45^ C) or below 40^ F ( 4^ C).
Charging the Ni-MH Batteries through USB Connection
The scanner has a built-in circuit to charge the Ni-MH batteries when a USB cable connects it to a computer (NOT to a USB hub) or to an AC or DC adapter that provides USB charging power. Verify that the battery selection switch is set to Ni-MH and that only Ni-MH rechargeable batteries are inserted in the scanner before connecting it to your power source.
CAUTION: Never attempt to charge non-rechargeable batteries or install non-rechargeable batteries when the battery selection switch is set to Ni-MH.
- Be sure the scanner is turned off. It will recharge only if it is turned off, even with the USB cable connecting it to a computer.
-
Connect the included USB cable to the scanner's USB port.
-
Connect the other end of the USB cable to the computer's USB port or to an AC or DC adapter that provides USB charging power.
- The scanner displays CHArg and the low battery icon while it charges the batteries. The screen goes blank after the scanner is completely charged.
Different status messages may display, depending on the battery type and scanner status.
| LCD Message | Batt. Type | Meaning | Scanner Cond. |
| CHArg | Ni-MH | Scanner is | charging. |
| None | Ni-MH | Unit is | charged. |
| None Ni-MH | Scanner is not charging (Battery selection switch is set to Alk.) | Off | |
| Err CHArg | Ni-MH | Batteries cannot be charged (dead battery). | Off |
| ILEgAL | Ni-MH | USB external power is out of range. | Off |
If the batteries are good, the scanner charges the batteries and it operates normally. If the scanner cannot immediately determine if the batteries are good and can be charged, it checks them and displays the battery icon. If the scanner judges the batteries are good, the scanner starts charging and the battery icon disappears. If it cannot regard the batteries as good in 60 seconds, the scanner stops checking and the battery icon blinks.
Low Battery Alert
The Low Battery Alert tone sounds every 15 seconds and the battery icon flashes when the battery voltage is low. If it drops below the threshold, the scanner automatically shuts off until the battery is recharged.
Turn on the Scanner
Turn on the scanner after it has been completely charged (Ni-MH batteries) or alkaline batteries have been installed.
Note: Make sure the antenna is connected before you turn on the scanner.
-
You can select the band plan (Band Plan 1 or 2) when you turn on the scanner (default = Band Plan 2). Press and hold the key for 2-3 seconds to turn on the scanner and then press and hold 1 for Band Plan 1 or 2 for Band Plan 2. The band plan will remain until you change it again.
-
If this is the first time you have turned on the scanner, AllLocOut displays. This means that no frequencies have been saved into channels. Press Srch to begin searching.
Adjust Squelch
The scanner recognizes signals as transmissions if they exceed a signal strength threshold. Adjusting the squelch sets this threshold level. Increasing squelch requires a signal to be stronger to be seen as a transmission. If you set the squelch too high, you will risk not receiving transmissions that are lower than that threshold. Reducing the squelch allows weaker signals to be accepted. However, if you lower the squelch too much, you will hear white noise all the time.
-
Press Func and the press down and release the scroll control knob. Sql and a number display.
-
Turn the knob until the interference is gone. Press the scroll control knob again to set the level and return to the previous function.
AE75H Controls and Display
Hardware Description
Keypad
text_image
Priority Delay Hold/ Close Call Step Scan 1 2 3 Scan 4 5 6 Search/ Service Srch 7 8 9 L/O E 0 Cle Lockout/ Keypad Lock Power/ Backlight Program/ Enter Clear FunctionYour scanner's keys have various functions labeled on the key tops. To select the function labeled on a key, simply press the key. To select the function labeled in smaller text on a key, first press Func then release it.
F appears on the display. Press the next key in the function key sequence while F displays.
H appears or disappears as you press Func.
If your scanner's keys seem confusing at first, the following information should help you understand each key's function.
| Key/Icon | Primary | Function Key |
Hold /  | Hold - Stays on a frequency until released. |  Close Call - scanner lock into nearby transmissions (see page 66). Close Call - scanner lock into nearby transmissions (see page 66). |
| Scan | Cycles through channels looking for transmissions on stored frequencies (see page 64). | NA |
| Srch/Svc | Searches through frequencies looking for transmissions (see page 61). | Service Search - cycles through preprogrammed service bands (see page 63). |
| L/O / 🔒 | Temporarily or permanently Lockout a channel or frequency (see page 68) | Locks the keypad (see page 73). |
| ∅ / ⚙️ | Turn scanner on and off. | Turns display backlight on and off (see page 73). |
| 1/Pri | Enter a numeric 1. Cycles | through Priority Off, Priority Do Not Disturb, and Priority Scan (see page 70). |
| 3/Step | Enter a numeric 3. Displays | the current step frequency and sets your desired steps (see page 72). |
| 5/Dly | Enter a numeric 5. Turns the Delay function on and off for the current Channel (see page 71). | |
lets
| 6/PSrc | Enter a numeric 6. Sets the | Program Custom Search limits (see page 62). |
| 9/Mod | Enter a numeric 9. Changes modulation type at a current band (see page 72). | |
| Pgm/E | Sets Channel Program mode | Enter |
| . Clr | Press once: enters a decimal. Press twice: cancels a numeric key input. | N/A |
| Func | Sets scanner in Function mode | Cancels Function mode. |
Scroll control knob

text_image
Audio O u t p u t Antenna Knob Sel Vol Sql Scroll ControlThe scroll control knob has three uses:
- Sel-Turn the knob to cycle through selections; press down on the knob to select.
- Vol- Press down on the knob and then turn it to adjustthe volume. Press it down to select that level.
- Sql- Press Func, press down on the knob, and then turn it to adjust the squelch level.
LC Display

other
| Line | PGM Value | |------|-----------| | Line1 | 910 | | Line2 | 910 | | Line3 | 888.000 | | Line4 | 888.000 | | Line5 | 888.000 |The display has indicators that show the scanner's current operating status. The display information helps you understand how your scanner operates.
| Line | Display Description | |
| 1 B:1 | - 10 Search mode: | Custom Search range.Scan mode: Channel bank. |
| PGM Displays while you store a frequency into a channel. | ||
 is when keypad is locked. is when keypad is locked. | ||
| 2 F Dis | Displays when the Function mode is on. | |
| ▲ SEARCH▼ | Displays during Search mode. | |
| DLY | Displays when a 2-second delay at the end of a transmission is on. | |
 | Displays when the scanner is set to Close Call mode:- Close Call Priority - Close Call Do Not Disturb - Close Call Do Not Disturb | |
| BATT | Displays and blinks when the battery power gets low.Displays when the rechargeable batteries are charging. | |
| TL/OL/O | Indicates a locked out frequency.TL/O: Temporary Lock OutL/O: Lock Out | |
| 3 | P | Displays when a Priority channel is selected. |
| 888 | Current channel number. | |
| PRI | Displays when the Priority feature is active. | |
| 888.888 | Current frequency. | |
| 25, 33, 50, 66, 75 | These numbers indicate the 100 Hz and 10 Hz digits. For example, “25” is indicated when you set the frequency to 446.00625 MHz. | |
Operation
SEARCHING
The AE75H has 10 preset search ranges that display as 1 - 10 across the top of the screen when you press Srch. It also has 7 preset service bands that display in two rows across the bottom of the screen when you press Func + Svc.
Note: Service Search is discussed on page 63
When you press Srch, the AE75H begins searching the search ranges until it finds activity. The search range number flashes and it remains on that frequency until activity ends. Press Srch at any time to continue.
Press a search range's corresponding number to turn it off and back on. For example, press 4 to turn search range #4 off. The number 4 will no longer display across the top of the screen.
You can search these ranges through:
- Quick Search - Designate a starting point to search from.
- Custom Search - Designate and store upper and lower frequency limits for each of 10 search ranges. The scanner searches within this range.
Quick Search
Quick Search lets you designate a starting point for searching. Once you are searching from this point, you can stop the search and store frequencies in a channel.
- If the scanner is scanning or searching, press Hold.
- Enter the frequency using the number and .Clr keys. The scanner automatically rounds the entered number to the nearest valid frequency. For example, if you enter 151.473 (MHz), your scanner accepts it as 151.475. However, if you enter a frequency that is out of range, the scanner sounds an error tone and Error appears.
Enter another frequency.
- Press Srch. The scanner searches, starting from the frequency you just entered. (Turn the scroll control knob to change the search direction.) The scanner also automatically turns on the Delay function; DLY displays. To turn off the function, Press Func + Dly (see page 71).
Custom Search
You can adjust each preset search range's upper and lower frequency limits.
- Press Func + Psrc. The scanner enters Custom Search mode and displays SRCH and PGM. The upper and lower frequencies for Custom Search range 1 alternate.
- Turn the scroll control knob to scroll through the rest of Custom Search ranges until you find the one you want. The search range numbers at the top of the screen change as you cycle through them.
-
Enter the lower limit frequency and press E. The frequency range flashes with the adjusted lower limit frequency.
-
Enter the upper limit frequency and press E. The adjusted frequency range flashes with the adjusted upper limit frequency (both upper and lower frequencies are now adjusted).
- Press Srch to start searching your custom search range or turn the scroll control knob to a different search range and enter another frequency.
Service Search
You can search for Emergency, Freenet, PMR, Marine, Air, CB radio, and HAM radio transmissions without knowing the specific frequencies used in your area. The scanner is preprogrammed with all the frequencies allocated to these services. To use this feature, press Func+ Svc. SRCH appears and the scanner starts searching from the Emergency service bands.
To select a different service search, repeatedly press Svc as long as you are still in Function mode. If you are not in Function mode, press Func to return and then press Svc.
Services are scanned in the following order: Emergency, Freenet, PMR, Marine, Air, CB radio, and HAM radio. When the scanner stops on a transmission, press Hold to stop searching and listen to the transmission. Hold displays. In this mode, you can also turn the scroll control knob to step through the frequencies.
To release the hold and continue searching, press Hold again.
Storing Frequencies
To store frequencies in the first available channel:
- Press Hold.

text_image
▲SRCH DLY 25.000 HOLD FM- Enter the frequency and press Func + Pgm.
- The scanner alternates between the frequency you are stopped on and the first available channel number with no frequency stored.
Press E.
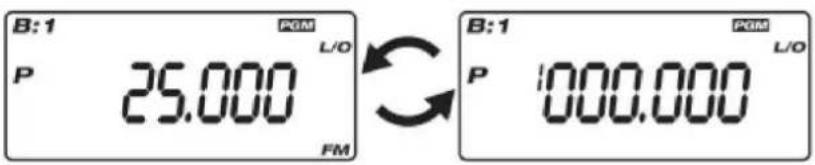
text_image
B:1 P GM L/O 25.000 FM B:1 P GM L/O 000.000- The scanner is now on that frequency, on Hold with the Delay function automatically turned on (see page 71). Press L/O to exit the program mode and return to the Search Hold mode.
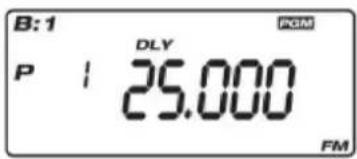
text_image
B:1 P | DLY 25.000 FMYou can also store frequencies directly into a specific channel in a specific channel bank.
- From Scan modes, press Func + Pgm. PGM appears

text_image
B:1 P | DLY 25.000 FM- Turn the control knob to choose the memory.

text_image
B:1 2000.000 POM L/O- Input the frequency and press E. The scanner is now on that frequency, on Hold with the Delay function automatically turned on.

text_image
B:1 DLY 2 145.000 PGM FM- Press L/O to exit program mode and return to Scanning mode.
If you entered a frequency that has already been entered elsewhere, the scanner sounds an error tone and displays the channel that was duplicated. If you entered the frequency by mistake, press CIr twice to clear the frequency and enter a different one. To enter the frequency anyway, press E to accept.
Erasing a Stored Frequency
-
Find the frequency you want to erase. Press Hold.
-
Press Func + Pgm.
-
Press 0 and then press E.
-
The displayed frequency changes to all 0s.
Scanning
When you store frequencies into channels, those channels are grouped into banks. Each bank contains 30 channels. You can store service channels and non-service channels in the same bank. For example, you can store a emergency, freenet, marine, etc, together with utilities and other businesses. There is no frequency range restriction per bank.
While you are scanning frequencies stored in the banks, the word SCAN scrolls across the display. When it finds a transmission, that frequency displays.
Enabling/Disabling Channel Banks
You can enable and disable each channel bank. When you disable a bank, the scanner does not scan any of the 30 channels in that bank.
In Scan modes, press the number key that corresponds to the bank you want to disable or enable. That bank number displays at (or disappears from) the top of the screen, showing the currently enabled banks.
The scanner scans all the channels within the displayed banks that are not locked out. The bank number flashes when the scanner scans a channel that belongs to that bank.
You can manually select any channel within a bank, even if that bank is disabled. You cannot, however, disable all banks. One bank must always be enabled.
Scan the Stored Channels
Press Scan. The scanner scans through all non locked out channels in enabled banks.(See page 68 for more information on locking out
channels.) When the scanner finds a transmission, it stops on it. When the transmission ends, the scanner resumes scanning.
Notes:
- If you have not stored frequencies into any channels, the scanner does not scan.
- If the scanner picks up unwanted partial or very weak transmissions, press Func and press the scroll control knob. Sql displays. Turn the knob clockwise to decrease the scanner's sensitivity to these signals. To listen to a weak or distant station, turn the knob counterclockwise.
- Adjust squelch until the audio mutes.
Manually Select a Channel
You can continuously monitor a single channel without scanning. This is useful if you hear an emergency broadcast on a channel and do not want to miss any details – even though there might be periods of silence - or if you want to monitor a specific channel.
To manually select a channel when in Scan mode, press Hold, enter the channel number, and press Hold again. The scanner moves to the frequency stored in that channel.
During scanning, if the radio stops at a channel you want to listen to, press Hold once. (Rotate the scroll control knob to step through stored channels.) Press Hold again or Scan to resume automatic scanning.
Special Features
CloseCall® RF Capture
Your scanner's Close Call feature lets you set the scanner to detect then display the frequency of a nearby strong radio transmission such as mobile and handheld two-way radios in areas with no other strong transmission sources. However, if you are in an area with many transmission sources (such as pager radio transmitters, multi-use radio towers, traffic control devices, etc.), Close Call mode might not find the transmission you are searching for, or it might find a transmission other than the one you are searching for.
Close Call mode works well for finding frequencies at venues such as malls and sporting events. You can set the scanner so that Close Call
detection works in the background" while you are scanning other frequencies. You can turn off the Close Call feature and scan normally as well as turn off the scanning function and look for Close Call transmissions only
Close Call Operation Mode
- Press Func and hold Ⓞ until the following screen displays:

text_image
B: 1 2 3 4 DLY- For the Close Call mode, frequencies are divided into 4 Close Call bands. Turn these bands on and off by pressing 1 - 4 as indicated
Band Plan 1
| Band | Range (MHz) | To turn a Close Call band on/off, press... | |
| Low High | |||
| VHF Low | 25.00000 | 88.00000 | 1 |
| AIR | 108.00000 | 136.991 | 66 2 |
| VHF High | 137.00000 174. | 00000 3 | |
| UHF | 400.00000 | 512.00000 | 4 |
Band Plan 2
| Band | Range (MHz) | To turn a Close Call band on/off, press... | |
| Low High | |||
| VHF Low 2 | 5.00000 | 87.29500 | 1 |
| AIR | 108.00000 | 136.991 | 66 2 |
| VHF High | 137.00000 174. | 00000 3 | |
| UHF | 400.00000 | 512.00000 | 4 |
You can set the scanner so it alerts you when the Close Call feature detects a frequency. Program alert tones through your PC (see page 73).
Notes:
- Close Call RF capture cannot detect frequencies outside the scanner's normal operating range.
- Close Call mode works better with some types of transmissions than others. It might not correctly display frequency information for transmitters using a highly directive antenna (such as an amateur radio beam antenna), if there are many transmitters operating at the same time in the same area, or if the transmitter is a broadcast television station.
Using Close Call Mode
Close Call mode has three operation modes:
- Close Call DND. Close Call Do Not Disturb only checks for close calls if it is not stopped on a transmission. The Icon 📋 displays.
- Close Call Priority. The scanner checks for close calls regardless of whether it is stopped on a transmission. The Ⓞ icon displays.
- Close Call Off. The scanner does not check for close calls. No icon displays.
Pressing Func + - cycles through the Close Call functions in this order: Close Call Off/Close Call DND/ Close Call Priority.
To turn on Close Call mode, press Func + once except in Band Select, or Program mode.
Notes:
- Set the squelch tight (where only strong signals are received) while using the Close Call feature.
- To continue scanning normally while the Close Call feature is working, simply press Scan.
When the scanner finds a frequency, Found displays; it does not display the frequency. Press any key to confirm the displayed frequency. Press Scan to resume scanning. Every 2 seconds, the scanner checks for frequencies in the Close Call band you specified (see page 66).
Locking out Channels and Frequencies
You can skip any channel or up to 200 specified frequencies during Search mode (100 permanent and 100 temporary).
This lets you avoid unwanted frequencies (Search/Close Call modes), channels that have a continuous transmission, or have static and interference.
Temporary Lock Out
To temporarily lock out a channel in Scan mode or a frequency in Search and Close Call modes, manually select the channel or frequency (see page 65) and then press L/O. TL/O appears. You have TEMPORARILY locked-out the channel/frequency.
Permanent Lock Out
To permanently locked-out a frequency or channel, press L/O twice while on that frequency. L/O displays.
Note: You can still manually select locked-out channels.
Unlock Temporary Lock Out
- Locate the temporarily locked-out channel; press Hold.
- Press L/O until the lockout status no longer displays.
- Press Hold again to return to Scan or Search modes.
You can also turn the scanner off and back on. It will unlock all channels that have been temporarily locked out.
Unlock Permanent Lock Out
To unlock a permanently locked-out frequency/channel:
1 Manually enter the frequency/channel then press Hold. The frequency and lockout status display.
2. Press L/O until the lockout status no longer displays.
3. Press Hold again to return to Scan or Search modes.
To unlock all registered channels in enabled banks, press Hold to stop scanning, then press and hold L/O until the scanner beeps twice and CLEAr displays.
Notes:
- Locked-out frequencies are shared between Service Search, Custom Search, Quick Search, and Close Call modes. If locked-out frequencies are set in a specific mode, those frequencies are also skipped in other Search and Close Call modes.
- If you selected all frequencies in a search band to be skipped, the scanner beeps 3 times and does not search.
- You can skip 100 frequencies for Temporary Lockout and 100 frequencies for Permanent Lockout (200 locked-out frequencies total). After locking out 200 frequencies, the next time you try to select a frequency to skip the scanner displays Full and will not lock out that frequency.
- If you want to find your locked-out frequencies, press Hold and then turn the scroll control knob to cycle through the frequencies. L/O or T/LO displays on the locked-out frequencies.
Priority
The Priority feature lets you scan through the channels and still not miss important or interesting calls on specific channels. There are three Priority options available in Scan or Scan Hold mode:
- Priority Off (no display): The scanner does not check for priority channels.
- Priority DND (PRI displays): In Priority Do Not Disturb (DND), the scanner checks Priority channels every 2 seconds only when it is not receiving transmissions.
- Priority Scan (PRI displays): The scanner checks Priority channels every 2 seconds regardless of whether or not it is receiving a transmission.
You can designate one channel in each bank as a priority channel (10 total). The first channel in each bank is the default Priority channel. Follow these steps to select a different channel in a bank as the priority channel.
- Manually select the channel you want for the Priority channel.
- Press Func + Pgm, then press Func + Pri. P appears to the left of the selected channel number.
- Repeat Steps 1 and 2 for other channels for each bank you want to program as a priority channel. From Scan Hold mode, press Func + Pri to cycle through the Priority options.
Delay
Sometimes a user might pause before replying to a transmission. To avoid missing a reply on a specific channel, you can program a 2-second delay into channels or searches. The scanner continues to monitor the channel frequency for an additional 2 seconds after the transmission stops before resuming scanning or searching.
| Mode | Delay Specification |
| Scan Each channel can be set individually. | |
| Search | Custom Search: If one range is set, all ranges are set. Service Search: Each band can be set as a unit. |
| Quick Search and Close Call | Changes made to Delay assignment in one mode are reflected in the other mode. |
When the delay feature is on, DLY displays. If it is off, follow one of these procedures to program a delay depending on how the scanner is operating.
- If the scanner is scanning and stops on an active channel where you want to program a delay, quickly press Func + Dly before it continues scanning again. DLY appears.
- If the desired channel is not selected, manually select the channel, then press Func + Dly. DLY appears.
- If the scanner is searching, press Func + Dly. DLY appears and the scanner automatically adds a 2-second delay to every frequency it stops on in that band.
To turn off the 2-second delay, press Func+ Dly while the scanner is monitoring a channel, scanning, or searching. DLY disappears.
Step frequency
You can change Step Frequency. The scanner have some steps as 5.0/6.25/8.33/10.0/12.5/20.0 kHz and Default. Step Frequency is applied in Quick Search, Custom Search, AIR Service Search, and Close Call. Step Frequency is stored every each Band Coverage.
- Press Func+ Step, then indicates current Step Frequency. And F disappears, PGM appears.
- Select a Channel Step by Scroll Control knob. (for AIR, 8.33kHz or 12.5kHz) (for 84-88 MHz Band Plan 1 / 84.015-87.295 Band Plan 2, 20kHz step is added)
- Press E or scroll Control knob, then the Step Frequency is inputted.
Note :
- Press L/O or .Clr if you cancel this function when displays Step Frequency.
- If you wants to set default Step Frequency for current Band, select dEFULt."
- If the scanner is turned off, step frequency is set to initial setting.
Modulation Type
You can change Modulation Type. Modulation Type is applied in Quick Search, Custom Search, CB Service Search, HAM Service Search, and Close Call. Modulation Type is stored every each Band Coverage. And every Channel Memory for Memory Channel Scan is able to store Modulation Type.
- Press Func + Mod, then current Modulation Type changes.
- Press Mod to choose a Modulation Type.
- Press Func, then F disappears.
Note: If the scanner is turned off, modulation is set to initial setting. (For CB band and HAM band, the modulations are kept)
Keylock
Use the scanner's key lock to protect it from accidental program changes. When the scanner's keys are locked, the only controls that operate are scroll control knob (volume only), Func, Hold, and 🎨.

To turn on keylock, press Func+ . 🔒 appears. To turn off keylock, press Func+ 🔒 again. 🔒 no longer displays.
Note: Using keylock does not prevent the scanner from scanning channels.
Backlight
Pressing ☑ turns the display light on and off. It remains on for 15 seconds and then turn off automatically.
PC Programming
Connect your scanner to your PC through the USB cable to:
- Program channels into the scanner
- Set any setting
When you connect your scanner to your PC, a series of screens will appear to assist you.
USB drivers and optional programming software are available for download from www.service.alan-electronics.de
Troubleshooting
If your AE75H is not performing properly, try the following steps.
| Problem | Possible Cause | Suggestion |
| The scanner doesn’t work. | The scanner might not be receiving any power. | Check the batteries or make sure the USB cable is connected to the PC or AC adapter and to the scanner. |
| Improper reception. | The scanner’s antenna might need to be adjusted. | Check the antenna connection or move or reposition the antenna. |
| Move the scanner. | ||
| You might be in a remote area that requires an optional multi-band antenna. Check with your dealer or local electronics store. | ||
| Scan won’t stop. | The squelch might need to be adjusted. | Adjust the squelch threshold. See page 56. |
| The antenna might need to be adjusted. | Check the antenna connection. | |
| One or more channels might be locked out. | Make sure the Channels you want to scan are not locked out. | |
| The channel’s frequency might not be stored in memory. | Make sure the channel’s frequency is stored in the scanner’s memory. | |
| The channel might not be active. | Wait for a transmission on the channel. | |
| Scan won’t start. | You must press Scan to scan. | Press Scan. |
| The squelch might need to be adjusted. | Adjust the squelch threshold. See page 56 | |
| One or more channels might be locked out. | Make sure the Channels you want to scan are not locked out. | |
| The antenna might need to be adjusted. | Check the antenna connection. |
Care and Maintenance
Resetting the Scanner
If the scanner's display locks up or stops operating properly, you might need to reset the scanner.
CAUTION: This procedure clears all the information you have stored in the scanner. Before you reset the scanner, try turning it off and back on to see if it begins working properly. Reset the scanner only when you are sure it is not working properly.
- Turn off the scanner.
- While holding down 2, 9, and Hold, turn on the scanner.
It takes about 5 seconds to initialize and CLEAr appears.
General Use
- Turn the scanner off before disconnecting the power.
- Always write down the programmed frequencies in the event of memory loss.
- If memory is lost, simply reprogram each channel. The display shows 000.0000 in all channels when there has been a memory loss.
• Always press each button firmly until you hear the entry tone for that key entry.
Location
- Do not use the scanner in high-moisture environments such as the kitchen or bathroom.
- Avoid placing the unit in direct sunlight or near heating elements or vents.
- If the scanner receives strong interference or electrical noise, move it away from the source of the noise. If possible, a higher elevation might provide better reception.
Cleaning
Keep the scanner dry. If it gets wet, wipe it dry immediately. Use and store the scanner only in normal temperature environments. Handle the scanner carefully: do not drop it. Keep the scanner away from dust and dirt, and wipe it with a damp cloth occasionally.
- Disconnect the power to the unit before cleaning.
- Clean the outside of the scanner with a mild detergent.
- To prevent scratches, do not use abrasive cleaners or solvents. Be careful not to rub the LCD window.
- Do not use excessive amounts of water.
Birdies
All radios can receive “birdies”(undesired signals). If your scanner stops during Scan mode and no sound is heard, it might be receiving a birdie. Birdies are internally generated signals inherent in the electronics of the receiver.
Press L/O to lock out the channel, then press Scan to resume scanning.
Specifications
Channels: 300
Banks:....10 (30 channels each)
Sensitivity (SINAD 12 dB, Nominal)
25.005 MHz (AM)....0.3 μV
54.050 MHz (FM)....0.2 μV
86.275 MHz (FM)....0.2 μV
118.800 MHz (AM)....0.3 μV
127.175 MHz (AM)....0.3 μV
135.500 MHz (AM)....0.3 μV
138.150 MHz (FM)....0.2 μV
161.9875 MHz (FM)....0.2 μV
173.225 MHz (FM)....0.2 μV
406.875 MHz (FM)....0.2 μV
453.250 MHz (FM)....0.2 μV
511.9125 MHz (FM)....0.2 μV
Operating Temperature:
Normal....-20°C to +60°C
Close Call....-10°C to +50°C
Scan Rate....90 channels per second (max)
Search Rate
Normal 90 steps per second (max)
Hyper 270 steps per second (max)
Priority Sampling ....2 seconds
Scan Delay 2 seconds
IF Rejection (at 453.25 MHz)....80 dB
IF Frequencies
1st IF (25-512 MHz).....265.5050-265.6000 MHz
2nd IF....21.3 MHz
3rd IF....450 kHz
Internal Speaker....24 ohm, 0.8W Max (32 ∅)
Audio Output
Internal Speaker....360mW nominal (24 ohm)
Headphone (L-ch)......4mW nominal (32 ohm)
Current Drain
Squelched....120 mA
Full Output....280 mA
Power Requirement
2 AA Alkaline Batteries (3V DC), or
2 AA Rechargeable Ni-MH Batteries (2.4V DC), or
Connect to PC with USB cable (5.0V DC 500mA)
Antenna: 50 ohms (Impedance)
External Jacks:....Antenna Jack (BNC Type)
Phone Jack (3.5mm)
USB Jack (5pin Mini USB B type)
Size:67mm. (W) x 32.7mm. (D) x115mm (H)
Weight: 175g (w/o antenna and battery)
Where to find service hints and documentation
The complete technical documentation is updated regularly. You can download the latest versions of user manuals, technical documents and conformity declaration, as well as service hints or FAQ's any time from our server under
http://www.service.alan-electronics.de
If you should have a problem, please have a look to the service hints or frequently asked questions (FAQ) before you send your Scanner back to the service center.
Optional Accessories
Albrecht recommends to use following accessories. These are only examples, you will find our whole range of accessory items in our catalogue.
| Order No. | Accessory item |
| 6158 Mini magnetic mount antenna Albrecht Miniscan | |
| 6156 AE Maxiscan, BNC Flexantenne 25-1300 MHz | |
| 61700 Station Antenna Albrecht Allband | |
| 7120 Extension Speaker CB 20 | |
| 71450 Earphone | |
| 73671 AC Adapter230V | |
European 2 years warranty
The distributor, dealer or retail shop warrants to the original retail purchaser of this product that should this product or any part of it, under normal use and conditions, be proven defective in material or workmanship within 2 years from the date of original purchase, such defect(s) will be repaired or replaced with new or reconditioned product (at the company's option) without charge for parts and repair labor. To obtain repair or replacement within the terms of this warranty, the product is to be delivered with proof of warranty coverage (e.g. dated bill of sale), specification of defect(s), to the distributor, dealer or his authorized repair center.
The Company disclaims liability for communications range of this product.
The warranty does not apply to any product or part there of which, in the opinion of the company, has suffered or been damaged through alteration, improper installation, mishandling, misuse, neglect, accident, or by removal or defacement of the factory serial number/bar code label(s). The warranty does not apply to accessory parts or problems caused through not authorized or not recommended accessories like of the units like batteries, external power supplies, external antennas, earphone, speakers, and over voltage caused through external power supplies, light bulbs,
broken antennas, broken swivel belt clips, broken or damaged acrylic glass windows and cabinet parts.
Please contact the dealer or person where you have purchased your Albrecht Scanner.
Recycling Rules
For recycling of no more used electronic items new European Regulations forbid any disposal via normal household trash.
If you should once no more use your scanner, you should bring It to one of the local collecting stations for electronic trash only.
This is your contribution to keep a clean environment, and it
will help all involved institutions for better recycling.

natural_image
Symbol of a trash bin with crossed lines indicating no waste or restriction, plus a solid black rectangle below (no text or labels)Declaration of Conformity
Herewith we
Germany declare that our product
AE75H
is in compliance with the essential requirements and other relevant provisions of the R&TTE Council Directives of the EU.
A detailed and up to date declaration of conformity is available at www.service.alan-electronics.de
© 2013 Alan Electronics GmbH
Daimlerstr. 1 k D-63303 Dreieich, Germany
www.alan-electronics.de,
Technical enquiries and repair matters:
e-mail: service@alan-electronics.de
Fax: (+49) (0)6103-94 81 60
Repair enquiries:
Phone (+49) (0)6103 94 81 22
All rights reserved.

ALBRECHT®
AE75H
Installation de piles non rechargeables 94
Installation de piles rechargeables Ni-MH 94