
WP-DC41 - Camera CANON - Free user manual and instructions
Find the device manual for free WP-DC41 CANON in PDF.
| Product type | Waterproof housing for digital camera |
| Compatible brand | Canon (specific models, see instructions) |
| Maximum waterproof depth | 40 m (130 ft) |
| Waterproof rating | IPX8 (equivalent) |
| Body material | Polycarbonate |
| Seal | O-ring (replaceable, recommended annually) |
| Dimensions (excluding protrusions) | 129.6 × 81.8 × 70.9 mm |
| Volume | Approx. 390 cm³ |
| Weight (housing only with diffuser plate) | Approx. 275 g |
| Operating temperature | 0 to 40 °C |
| Power supply | Camera battery (not included) |
| Main functions | Shutter button, zoom lever, ON/OFF button, video button, FUNC/SET buttons, navigation, flash, macro, playback |
| Included accessories | Wrist strap, diffuser plate, silicone grease for seal, instruction manual |
| Maintenance | Rinse with fresh water after use, dry completely, clean the seal, apply silicone grease |
| Available spare parts | Seal, diffuser plate, wrist strap |
| Safety | Do not use beyond 40 m, avoid temperatures >40°C, do not leave in sun, check seal before each dive |
| Compatibility | Requires a compatible Canon camera (not included) |
Frequently Asked Questions - WP-DC41 CANON
User questions about WP-DC41 CANON
0 question about this device. Answer the ones you know or ask your own.
Ask a new question about this device
Download the instructions for your Camera in PDF format for free! Find your manual WP-DC41 - CANON and take your electronic device back in hand. On this page are published all the documents necessary for the use of your device. WP-DC41 by CANON.
USER MANUAL WP-DC41 CANON
text_image
Warning sign with sun and camera symbol, indicating no exposure or absence of a cameratext_image
Technical diagram of a camera with numbered parts labeled 1 through 9, showing internal components and a magnified inset view.
text_image
Technical diagram of a device with numbered components, likely an electrical or mechanical component.text_image
Diagram of a DSLR camera with labeled parts showing cable and adjustment arrows
ストラップを取り付けます。

natural_image
Technical line drawing of a mechanical component with an inset showing a close-up view of a cylindrical assembly (no text or symbols)
拡散板を取り付けます。

natural_image
Line drawing of a camera module with no text or symbols
text_image
Diagram showing a device with labeled parts and directional arrows, including numbered callouts ① and ②.
text_image
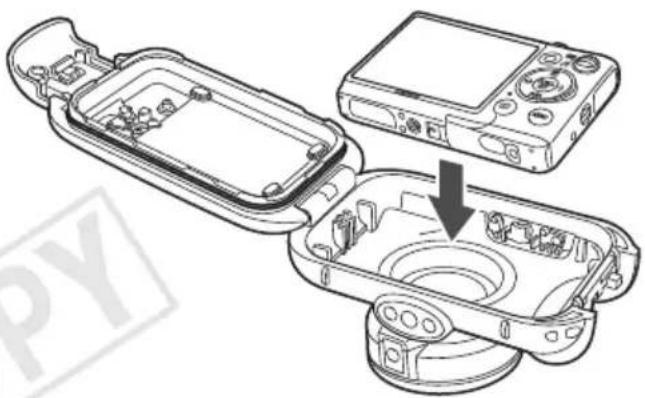
防水パッキンバックルを外してケースを開きます。
natural_image
Diagram of a device's internal components, showing a device with a close-up view and a magnified inset (no text or symbols)natural_image
Line drawing of a handheld electronic device with control buttons and a rotating button (no text or symbols)
ケースを閉じます。
text_image
Diagram showing a device with labeled parts and directional arrows, including a circular inset highlighting the component.
natural_image
Line drawing of hands holding a camera lens (no text or symbols)
ケースを閉じます。
Make sure you read this guide before using the • Waterproof Case.
Store this guide safely so that you can use it in the future.
Checking the Package Contents
Check if the following items are included in your Waterproof Case package. If anything is missing, contact the retailer from which you purchased the Waterproof Case.
□ Waterproof Case
□ Wrist Strap
□ Diffusion Plate
□ Silicon Grease for the Waterproof Seal
□ User Guide (this guide)
Read This First
Before you use the Waterproof Case, make sure it is functioning correctly and does not leak. To check for leaks, close the camera case before putting the camera in, and hold it under water at an approximate depth of 15 cm (5.9 in.) for about three minutes. If it leaks, contact a Canon Customer Support Help Desk.
Disclaimer
Reprinting, transmitting, or storing in a retrieval system • any part of this guide without the permission of Canon is prohibited.
Canon reserves the right to change the contents of this guide at any time without prior notice.
Illustrations and screenshots in this guide may differ • slightly from the actual equipment.
Canon Inc., its subsidiaries and affiliates, and • distributors of the Waterproof Case are not liable for any damages due to misuse of the case.
- Also carefully read the Camera User Guide supplied with your camera.
• : Things you should be careful about.
• Hints for getting more out of your Waterproof Case.
The various types of memory cards that can be used in • the camera are collectively referred to as memory cards in this guide.
Safety Precautions
Before using the Waterproof Case, ensure that you read • the safety precautions below. Always ensure that the Waterproof Case is operated correctly.
The safety precautions noted on the following pages are intended to prevent injuries to yourself and other persons, or damage to the equipment.

Warning
Denotes the possibility of serious injury or death.

Caution Denotes the possibility of injury.
Caution
Denotes the possibility of damage to the Waterproof Case and camera.

Warning
Be sure to remove the camera after using the Waterproof Case.
Leaving the camera in the Waterproof Case and placing it in direct sunlight or other places subject to high temperatures may result in fire, or cause the case to burst.
Do not use the Waterproof Case as a personal flotation device (such as a life preserver).

Caution
Immediately turn off the camera if the Waterproof Case leaks.
Leaks could result in fire or electrical shock. Thoroughly wipe the Waterproof Case interior and the camera dry and contact a Canon Customer Support Help Desk.
Caution
Be careful of condensation.
Moving the Waterproof Case rapidly between hot and cold temperatures may cause condensation (water droplets) to form on its internal surfaces. If this occurs, stop using the camera as the condensation may cause a malfunction. Remove the camera, and wipe off the condensation from the case and camera with a soft, dry cloth so that it is completely dry.
Do not insert the camera with the strap attached. Do not press the buttons or lever with unnecessary force when using the case underwater.
Do not spray the waterproof seal with tap-water. • Do not damage the waterproof seal, or allow dirt to • accumulate between the waterproof seal and the case.
Do not disassemble or modify the Waterproof Case.
The above actions could cause leaks.
Avoid using or storing the Waterproof Case in the following places.
Depths exceeding 40 meters • (130 ft.).
Places subject to temperatures • above 40 °C (104 °F).
Avoid placing, or storing the Waterproof Case in the following places.
Places subject to strong sunlight.
Humid or dusty areas.
Near substances such as •
naphthalene or insecticides
Do not drop or throw the Waterproof Case.
The above actions may warp the case and cause malfunctions.
natural_image
Symbol of no photography lighting, featuring a camera and sun (no text or numbers present)Use only the supplied silicon grease.
Use of other waterproofing products may impair the strength of the Waterproof Case.
Waterproof Seal
Debris stuck to the waterproof seal may cause water • leakage. Catching a single strand of hair, or a tiny grain of sand in the seal can cause leaks.
If you notice that the waterproof seal is damaged or • cracked, stop using the case immediately and contact a Canon Customer Support Help Desk.
When storing your Waterproof Case, keep it open to prevent the waterproof seal from deforming and to maintain its waterproof capabilities.
Protect the waterproof seal from dust and scratches during • storage.

To ensure that the case remains watertight, you should replace the seal once a year.
Contact a Canon Customer Support Help Desk for • replacement seals.

Components Guide
text_image
Technical diagram of a camera with numbered parts and an inset view of the lens component
text_image
Technical diagram of a device with numbered components, likely an electrical or mechanical component.① Strap Mounts
② Shutter Button
③ Zoom Lever
④ Power Button
⑤ Lock Release Switch
⑥ Catch
⑦ Lens Window
⑧ Tripod Socket
⑨ Diffusion Plate
⑩ Movie Button
⑪ FUNC./SET (Function/Set) Button
⑫ ↓ (Flash)/▶ Button
⑬ (Macro)/◀ Button
⑭ (Playback) Button
Preparations

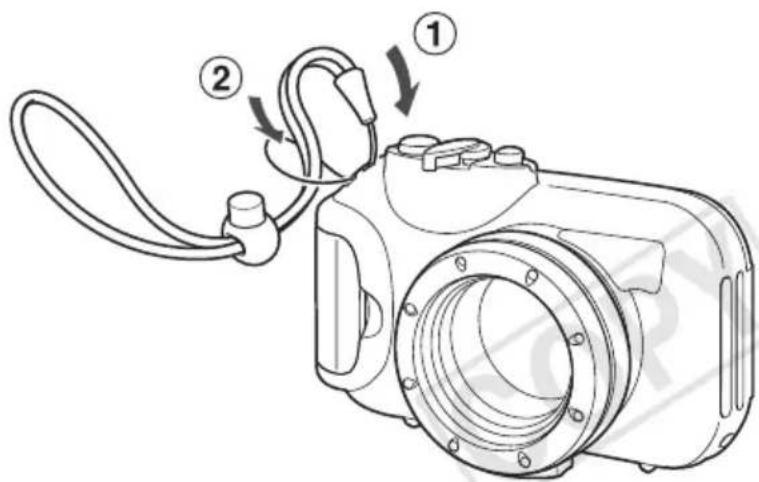
text_image
Diagram of a digital camera with labeled parts showing cable and adjustment arrowsAttach the strap.

Do not attach any straps except for the ones included with the Waterproof Case.
text_image
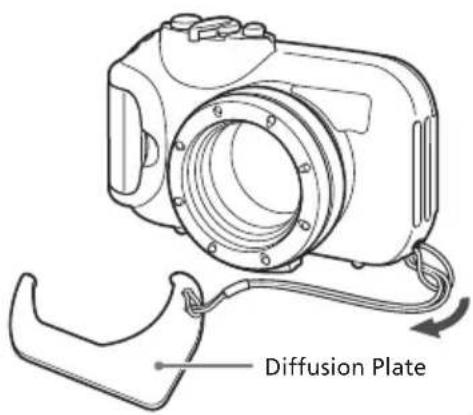
Diffusion PlateAttach the diffusion plate.
natural_image
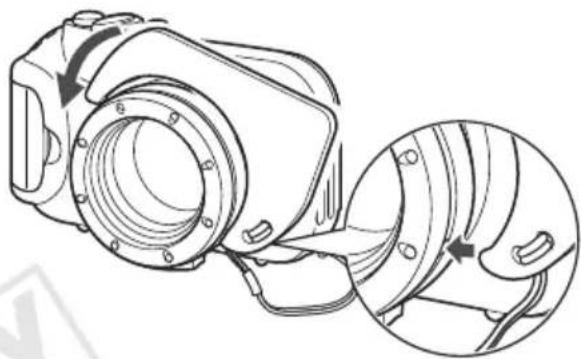
Technical line drawing of a mechanical device with an inset showing a close-up of a component (no text or symbols present)Removing the Diffusion Plate
Lift and remove the diffusion plate.

natural_image
Line drawing of a mechanical device with a circular housing and mounting bracket (no text or symbols)

Do not scratch the surface of the diffusion plate, as this may prevent light from the flash from being properly diffused.
The effectiveness of the diffusion plate may be • impaired if the subject is too close to the camera.
text_image
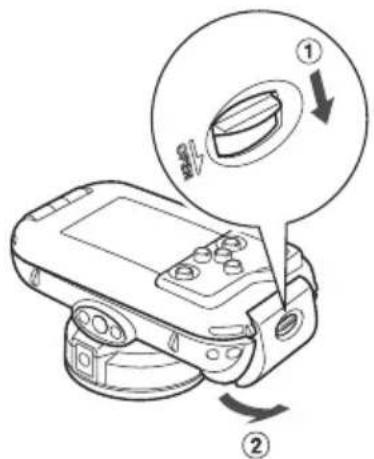
Diagram showing a device with labeled parts and directional arrows, likely illustrating a mechanical or electrical component.Release the catch to open the case.
When using commercially available • anticondensation products, the anticondensation solution should only be applied to the inside surface of the lens window using a soft, dry cloth. If anticondensation solution comes in contact with any surface other than the inside of the lens widnow, wipe it off immediately with a soft, dry cloth, as it could lead to deterioration of the Waterproof Case.

text_image
Waterproof SealApply silicon grease to the waterproof seal.
Remove the waterproof seal as shown. Do not dig your fingernails into it or pull • on it forcibly.
- Using a cotton swab, wipe off any debris in the mounting groove.
√ Apply a small amount (droplet) of grease to your fingertip, and evenly coat the entire surface of the waterproof seal.
√ Place the waterproof seal back in the seal mounting groove.
Take care not to twist it.
Preparing the Camera

text_image
Strap Memory Card BatteryInserting the Camera Into the Case
natural_image
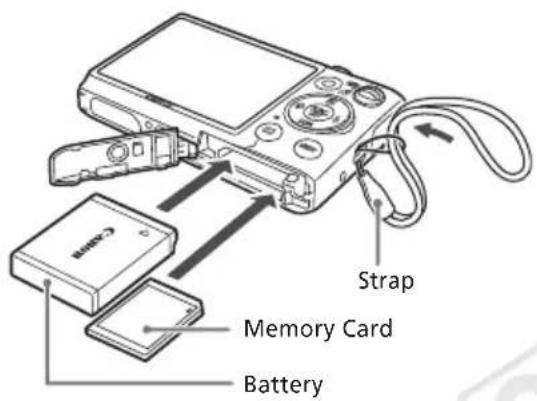
Diagram of a device's internal components, showing a device with a close-up view and a magnified view of its internal structure (no text or symbols present)Remove the strap, and make sure the battery and memory card are in the camera.
- Refer to the Camera User Guide for information on the correct battery, and how to insert the battery and memory card. Use a battery that is adequately charged. - Check the estimated capacity of your memory - card and ensure there is enough space to record images.

Insert the camera into the Waterproof Case.

Choose a place well away from salty sea air. • Keep the lens window clean by wiping it gently • with a dry cloth.

natural_image
Line drawing of a handheld electronic device with control buttons and a circular base (no text or symbols)
Close the case.
Make sure that the waterproof seal is free of • debris.
Make sure that the catch is securely locked.


Using the Camera
Refer to the Camera User Guide for details on how to use the camera. However, when the camera is inserted into the case, the following operation methods are different:
How to Use the FUNC. Menu
Press the FUNC SET button.
Press the ◀▶ buttons to choose a menu item, then press the FUNC SET button.
Press the ◀▶ buttons to choose an item, then press the ⬊️ button.
Available Shooting Modes
When the camera is inserted into the case, Shooting modes are limited to AUTO, 14, 8; or 5. You can choose the Shooting mode in FUNC. menu.
Custom White Balance
In mode, choose the FUNC. menu to set the white balance manually. Try this for adjusting the white balance to the shooting conditions.
After choosing 📋 in the FUNC. menu, make sure the entire screen is filled with a plain, white colored subject. Press the Ⓗ️ button for more than 1 second, then resease the Ⓗ️ button.

When the camera is inserted into the case, certain functions will be limited:
The following functions are not available:
Magnified display•
Scroll Display•
Movie editing•
Customizing the self-timer•
Functions that use ▲, ▼, and MENU are not available.
Removing the Camera
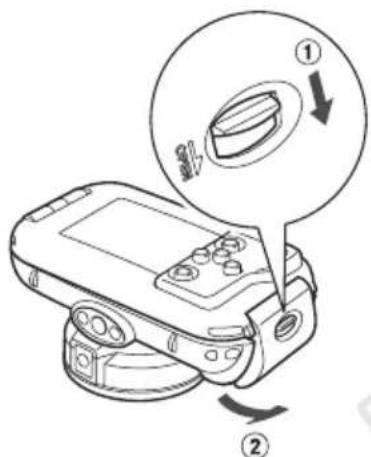
text_image
Diagram of a device with labeled parts and directional arrows, showing a knob and scroll mechanism.
Thoroughly dry the case, wiping off all the water.
Remove any dirt, sand, hair or other debris • from the case and wash it with clean, running water to remove any salt deposits.

Open the case and remove the camera.
Care and Maintenance
Make sure to do the following after using the Waterproof Case.

natural_image
Line drawing of hands holding a camera lens (no text or symbols)
Close the case.
Do not wash the interior of the Waterproof • Case with water. Wipe it with a soft, dry cloth.

Thoroughly wash the case with clean water, then wipe it completely dry with a soft, dry cloth.
After using the case in the ocean, soak it in clean water for several hours to remove any salt deposits.
Specifications
| Waterproof Capability: | Meets IEC/JIS protection rating “IPX8” equivalentFor use within a depth of 40m (130 ft.) |
| Waterproofing: Seal (crimp-type O-ring) | |
| Body Materials: Polycarbonate | |
| Camera Operating Temperatures:0 to 40 °C (32 to 104 °F) | |
| Dimensions: 129.6 x 81.8 x 70.9 mm(5.10 x 3.22 x 2.79 in.)(excluding protrusions) | |
| Volume: Approx. 390 cm ^3 (23.8 in. ^3 )* | |
| Weight: Approx. 275 g (9.70 oz.)(Waterproof Case only*) | |
*Including diffusion plate
All data noted here are based on Canon's testing standards. Product specifications and appearance are subject to change without prior notice.
Deutsch
text_image
Warning sign with sun and camera symbol, indicating no exposure or absence of exposuretext_image
Technical diagram of a camera with numbered parts and an inset view of the lens componenttext_image
Technical diagram of a battery pack with numbered components labeled 10 through 14⑨ Streuscheibe
⑩ Movie-Taste
⑪ Taste FUNC. SET FUNC./SET (Funktion/Einstellen)
⑫ Taste ♣ (Blitz)/▶
⑬ Taste (Makro)/
⑭ Taste ▶ (Wiedergabe)
Vorbereitungen
text_image
Diagram of a digital camera with labeled parts showing cable and adjustment arrowsnatural_image
Technical line drawing of a mechanical component with an inset showing a close-up view of a curved mechanical part (no text or symbols present)natural_image
Line drawing of a camera with lens and attached cable (no text or symbols)

text_image
Diagram showing a device with labeled parts and directional arrows, likely illustrating a mechanical or electrical component.natural_image
Diagram of a device's internal components, showing a device with a close-up view and a magnified view of its internal structure (no text or symbols present)natural_image
Line drawing of a handheld electronic device with control buttons and a circular base (no text or symbols)
text_image
Diagram showing a device with a circular dial labeled ① and ②, indicating a rotary switch or control knob.natural_image
Line drawing of hands assembling a mechanical component (no text or symbols)
a 40 metros (130 pies).
natural_image
Symbolic prohibition sign with a camera and sun, no text presentJunta hermética
text_image
Technical diagram of a camera with numbered parts and an inset view of the lens componenttext_image
Technical diagram of a device with numbered components labeled 10 through 14text_image
Diagram of a digital camera with labeled parts showing cable and adjustment arrowsMonte la correa.

natural_image
Technical line drawing of a mechanical device with a close-up inset showing internal components (no text or symbols)natural_image
Line drawing of a mechanical device with a circular housing and mounting bracket (no text or symbols)

text_image
Diagram showing a device with labeled parts and directional arrows, likely illustrating a mechanical or electrical component.natural_image
Technical line drawing of a device housing with an open lid and internal components, showing a close-up view of the lid (no text or symbols present)natural_image
Line drawing of a handheld electronic device with control buttons and a circular base (no text or symbols)
Cierre el estuche.
text_image
Diagram showing a device with labeled parts and directional arrows, including a circled section labeled ① and ②.
natural_image
Line drawing of hands holding a mechanical component (no text or symbols)
Cierre el estuche.
text_image
Warning sign with sun and camera symbol, indicating no exposure to sunlight or a cameratext_image
Technical diagram of a camera with numbered parts and an inset view of the lens component
text_image
Technical diagram of a device with numbered components, likely an electrical or mechanical component.text_image
Diagram of a digital camera with labeled parts showing cable and adjustment arrowsFixez la dragonne.

natural_image
Technical line drawing of a mechanical device with a close-up inset showing internal components (no text or symbols)natural_image
Line drawing of a camera with lens and attached cable (no text or symbols)

text_image
Diagram showing a device with labeled parts and directional arrows, likely illustrating a mechanical or electrical component.
natural_image
Diagram of a device's internal components, showing a device with a close-up view and a magnified view of its internal structure (no text or symbols present)natural_image
Line drawing of a handheld electronic device with control buttons and a circular base (no text or symbols)
Fermez le boîtier.
text_image
Diagram showing a device with labeled parts and directional arrows, including a circled section labeled ① and ②.
natural_image
Line drawing of hands holding a mechanical component (no text or symbols)
Fermez le boîtier.
natural_image
Symbolic prohibition sign with sun, camera, and no-disker (no text or numbers)text_image
Technical diagram of a camera with numbered parts labeled 1 through 9, showing internal components and a magnified inset view.
text_image
Technical diagram of a device with numbered components labeled 10 through 14text_image
Diagram of a digital camera with labeled parts showing cable and adjustment arrowsnatural_image
Technical line drawing of a mechanical component with an inset showing a close-up view of a curved pipe fitting (no text or symbols present)natural_image
Line drawing of a mechanical device with a circular housing and mounting bracket (no text or symbols)text_image
Diagram showing a device with labeled parts and directional arrows, likely illustrating a mechanical or electrical component.natural_image
Diagram of a device's internal components, showing a device with a close-up view and a magnified view of its internal structure (no text or symbols present)natural_image
Line drawing of a handheld electronic device with control buttons and a circular base (no text or symbols)
text_image
Diagram showing a device with labeled parts and directional arrows, including a circled section labeled ① and ②.
natural_image
Line drawing of hands holding a mechanical component (no text or symbols)
natural_image
Symbolic prohibition sign with a camera and sun, no text presenttext_image
Technical diagram of a device with numbered components labeled 10 through 14text_image
Diagram of a digital camera with labeled parts showing cable and adjustment arrowsЗакрепите ремень.

natural_image
Technical line drawing of a mechanical component with an inset close-up showing internal components (no text or symbols)natural_image
Line drawing of a mechanical device with a circular housing and mounting bracket (no text or symbols)text_image
Diagram showing a device with labeled parts and directional arrows, likely illustrating a mechanical or electrical component.natural_image
Technical line drawing of a device's internal components, showing open and closed casing with no visible text or symbolsnatural_image
Diagram of a device's internal components, showing a device with a close-up view and a magnified view of its internal structure (no text or symbols present)natural_image
Line drawing of a handheld electronic device with control buttons and a circular base (no text or symbols)
Закройте футляр.
text_image
Diagram showing a device with labeled parts and directional arrows, including a circled section labeled ① and ②.
natural_image
Line drawing of hands holding a mechanical component (no text or symbols)
Закройте футляр.
natural_image
Prohibition sign with sun and camera symbol (no text)请勿投掷或摔落防水套。
text_image
Technical diagram of a camera with numbered parts labeled 1 through 9, showing internal components and a magnified inset view.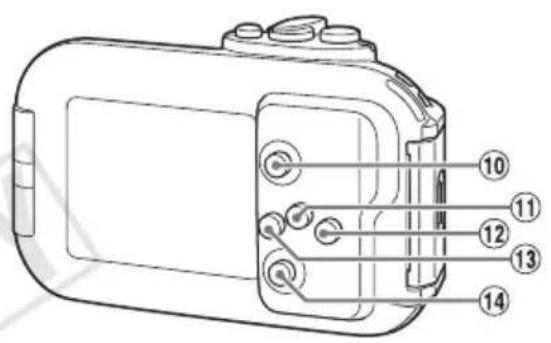
text_image
Technical diagram of a device with numbered components labeled 10 through 14text_image
Diagram of a digital camera with labeled parts showing cable and adjustment arrows
安装腕带。

请只安装防水套附带的腕带。
text_image
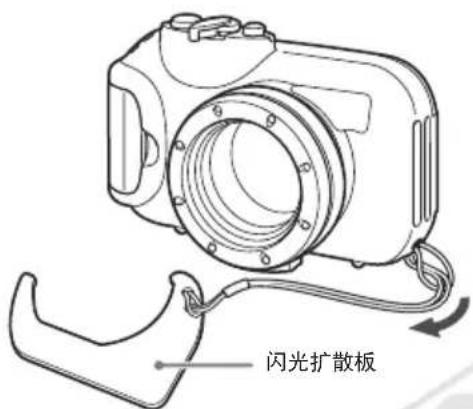
闪光扩散板
安装闪光扩散板。

natural_image
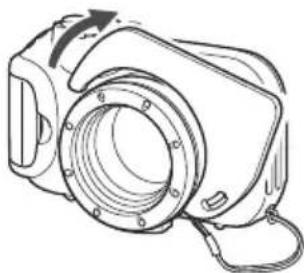
Technical line drawing of a mechanical device with a magnified inset showing internal components (no text or symbols)取下闪光扩散板
抬起并取下闪光扩散板。
natural_image
Line drawing of a camera module with no text or symbols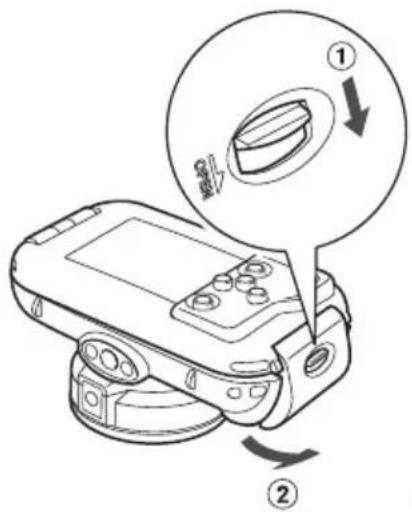
text_image
Diagram showing a device with labeled parts and directional arrows, likely illustrating a mechanical or electrical component.
text_image
防水封条解开扣环以打开防水套。
natural_image
Technical line drawing of a device housing with internal components and a close-up view of the device (no text or symbols)natural_image
Line drawing of a handheld electronic device with control buttons and a rotating button (no text or symbols)
关闭防水套。
请确保防水封条上没有附着灰尘或污物等。
请检查扣环是否锁紧。

使用相机
text_image
Diagram showing a device with labeled parts and directional arrows, including a circular inset highlighting a component.
请将沾在防水套上的水滴全部擦干。
natural_image
Line drawing of hands holding a camera lens (no text or symbols)
关闭防水套。
© CANON INC. 2010 IMPRIMÉ AU JAPON