
AORUS 7 - Laptop GIGABYTE - Free user manual and instructions
Find the device manual for free AORUS 7 GIGABYTE in PDF.
| Product Type | Laptop |
| Brand | GIGABYTE |
| Model | AORUS 7 |
| Power Supply (Adapter) | Input voltage: 100-240 Vac, frequency: 50-60 Hz; Output voltage: 19.5 V / 11.8 A or 20 V / 12 A |
| Battery | Lithium-ion, do not remove yourself |
| Function Keys (Fn) | Sleep (Fn+F1), Wi-Fi (Fn+F2), Brightness (Fn+F3/F4), Display mode (Fn+F5), Screen lock (Fn+F6), Audio (Fn+F7), Volume (Fn+F8/F9), Touchpad (Fn+F10), Airplane mode (Fn+F11), AI mode (Fn+F12), Keyboard backlight (Fn+Space), Max fan (Fn+ESC) |
| Restoration System | Hidden partition with system image; accessible via F9 key at startup |
| Restoration Options | Reset this PC (keep or remove files) and Smart Recovery (factory settings) |
| Safety | Do not use on inclined or unventilated surfaces; avoid temperatures >45°C |
| Maintenance | Ensure free airflow around fans; avoid direct sunlight |
| Warranty | Check the warranty card or GIGABYTE website |
| After-Sales Service | GIGABYTE Repair Center |
| Included Accessories | Power adapter |
Frequently Asked Questions - AORUS 7 GIGABYTE
User questions about AORUS 7 GIGABYTE
0 question about this device. Answer the ones you know or ask your own.
Ask a new question about this device
Download the instructions for your Laptop in PDF format for free! Find your manual AORUS 7 - GIGABYTE and take your electronic device back in hand. On this page are published all the documents necessary for the use of your device. AORUS 7 by GIGABYTE.
USER MANUAL AORUS 7 GIGABYTE
natural_image
Front view of a laptop with a small bird logo on the screen (no text or symbols visible)ENEnglish003
AR العربية 009
BGБългарски 015
CSČeština 021
DEDeutsch 027
ΕΛΕλληνικά 033
ESEspañol 039
ETEesti Keel 045
FRFrançais 051
HE 057
HU Magyar 063
JA 日本語 069
KO 한국어 076
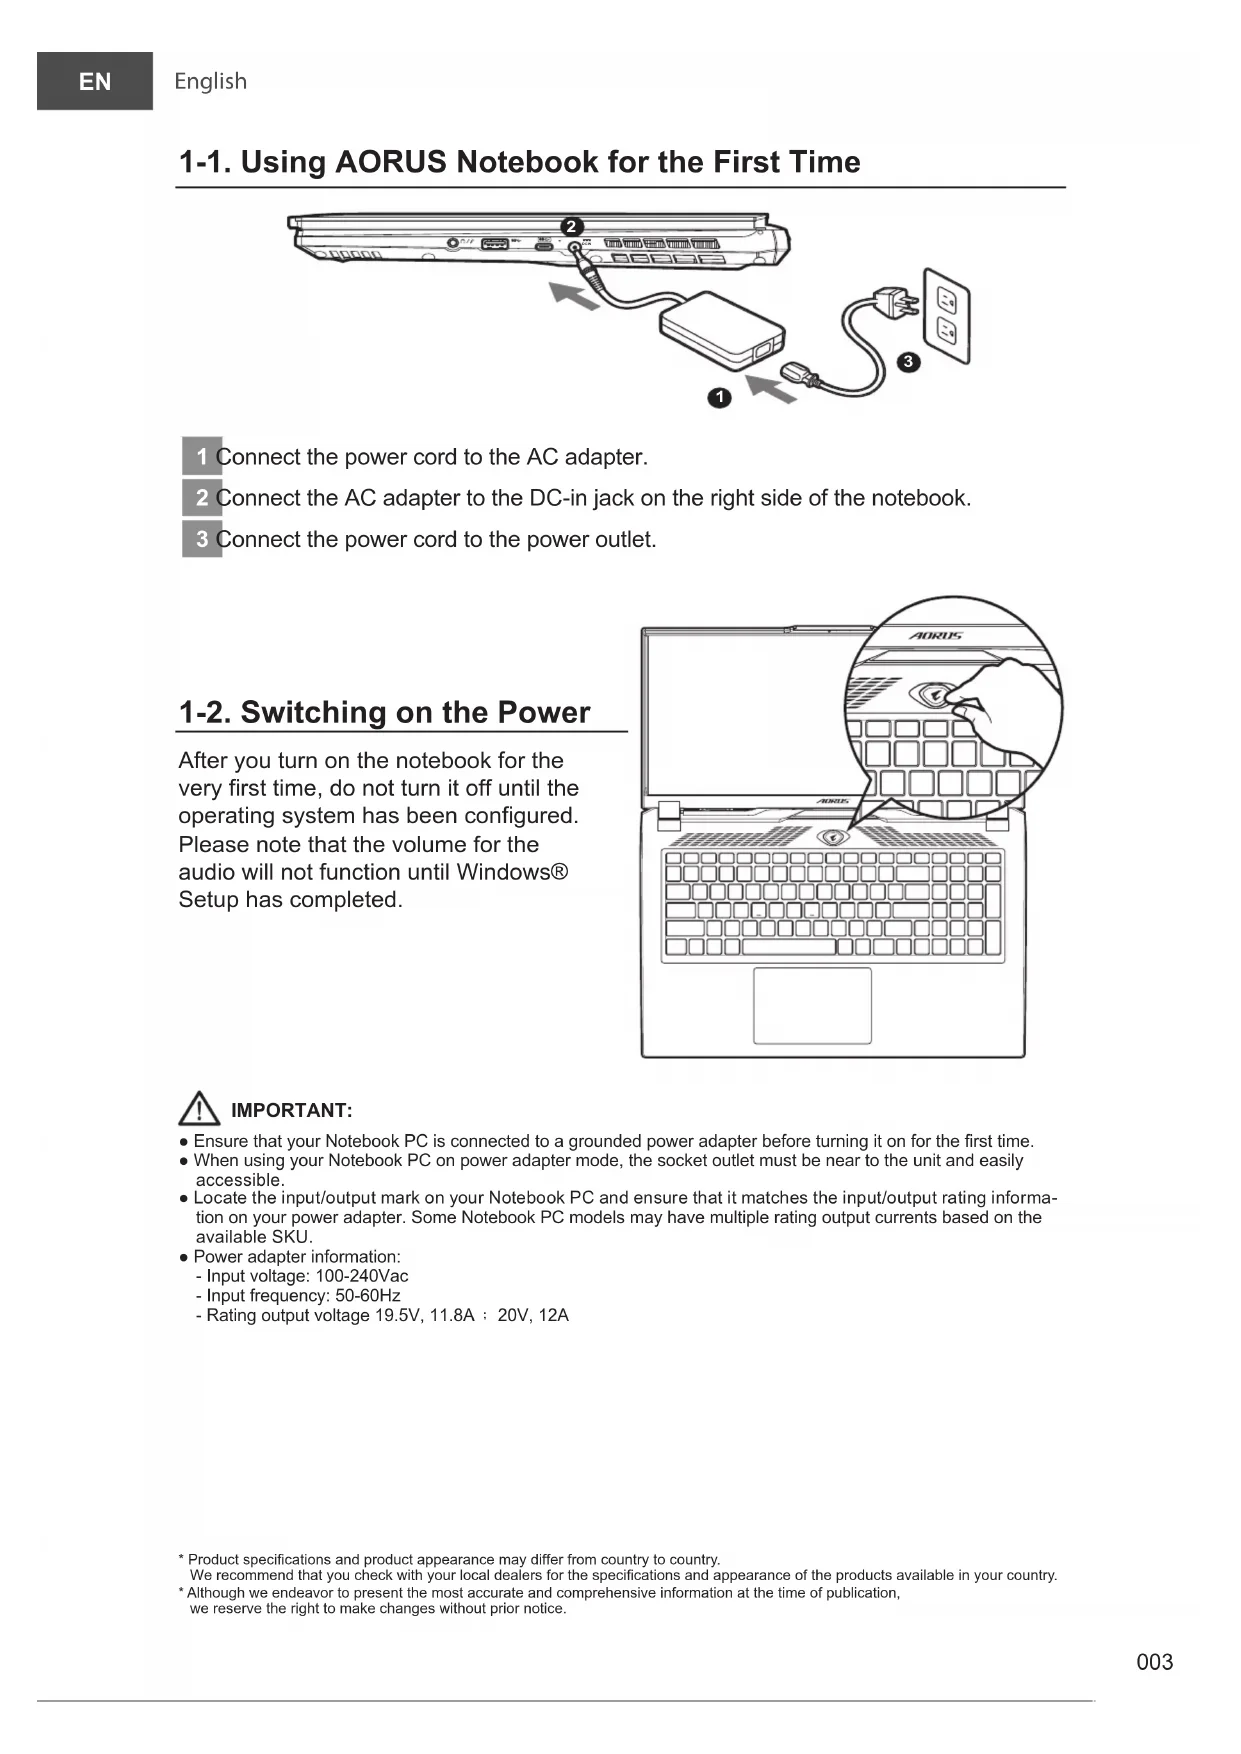
1 Connect the power cord to the AC adapter.
2 Connect the AC adapter to the DC-in jack on the right side of the notebook.
3 Connect the power cord to the power outlet.
1-2. Switching on the Power
After you turn on the notebook for the very first time, do not turn it off until the operating system has been configured. Please note that the volume for the audio will not function until Windows® Setup has completed.


IMPORTANT:
- Ensure that your Notebook PC is connected to a grounded power adapter before turning it on for the first time.
- When using your Notebook PC on power adapter mode, the socket outlet must be near to the unit and easily accessible.
- Locate the input/output mark on your Notebook PC and ensure that it matches the input/output rating information on your power adapter. Some Notebook PC models may have multiple rating output currents based on the available SKU.
• Power adapter information: - Input voltage: 100-240Vac
- Input frequency: 50-60Hz
- Rating output voltage 19.5V, 11.8A : 20V, 12A
* Product specifications and product appearance may differ from country to country. We recommend that you check with your local dealers for the specifications and appearance of the products available in your country. * Although we endeavor to present the most accurate and comprehensive information at the time of publication, we reserve the right to make changes without prior notice.
2. AORUS Notebook Tour


1 Microphone Mini DisplayPort 1.4
2 Webcam USB 3.2 Port (USB type-A)
3 Display Panel
4 Power Button USB 3.2 Port (USB type-A)
5 Keyboard USB 3.2 Port (USB type-C)
6 Touchpad Power Input Port (DC)
7 Ethernet Port (LAN) Speaker
8 HDMI 2.1 Port


The Adopted Trademarks HDMI, HDMI High-Definition Multimedia Interface, HDMI trade dress and the HDMI Logos are trademarks or registered trademarks of HDMI Licensing Administrator, Inc. in the United States and other countries."

IMPORTANT:
- Do not remove the built-in lithium battery.
For any service needs, please contact your local GIGABYTE Authorized Service Center. - Do not install the Notebook PC on a slant or a place prone to vibrations, or avoid using the Notebook PC in that location for a long time. This increases the risk that a malfunction or damage to the product will occur.
- Do not store and use Notebook PC in direct sunlight or the location where temperatures exceed 112°F (45°C) such as inside a vehicle. There is a danger of Lithium-ion battery expansion and aging.
- Do not use the Notebook PC in a badly ventilated location such as on bedding, on a pillow or cushion, etc, and do not use it in a location such as room with floor heating as it may cause the computer to overheat. Take care that the Notebook PC vents (on the side or the bottom) are not blocked especially in these environments. If the vents are blocked, it may be dangerous and cause the Notebook PC to overheat.
Hotkeys
The computer employs hotkeys or key combinations to access most of the computer's controls like screen brightness and volume output. To activate hotkeys, press and hold the
| Hotkey | Function Description | ||
| Fn+ESC |  | Maximize Fan Speed To increase the fan speed to 100%. | |
| Fn+F1 |  | Sleep Put the computer in Sleep mode. | |
| Fn+F2 |  | Wireless LAN | Enables / disable the Wireless LAN function. |
| Fn+F3 |  | Brightness Down Decrease the screen brightness. | |
| Fn+F4 |  | Brightness Up Increase the screen brightness. | |
| Fn+F5 |  | Display Toggle | Switch display output between the display screen, external monitor (if connected) and both. |
| Fn+F6 |  | Screen Display Lock Lock your PC or switch accounts. | |
| Fn+F7 |  | Speaker Toggle Turn the speaker on and off. | |
| Fn+F8 |  | Volume Down Decrease the sound volume. | |
| Fn+F9 |  | Volume Up Increase the sound volume. | |
| Fn+F10 |  | Touchpad Toggle Turn the internal touchpad on and off. | |
| Fn+F11 |  | Airplane Mode | Enable/disable the Airplane Mode function. |
| Fn+F12 |  | AI Mode AI Mode Switch. | |
| Fn+Space | [W5TS] | Keyboard Backlight Toggle | Turn the keyboard backlight on and off. |
Recovery Guide
System recovery (Restore your laptop operating system)
When something is going wrong with the laptop operating system, the storage of the laptop has a hidden partition containing a full back up image of the operating system that can be used to restore the system to factory default settings.

Note
- If the storage has been switched or the partition deleted, the recovery option will no longer be available and a recovery service will be needed.
- The recovery function is only available on devices with O/S preinstalled. Devices with EFI SHELL do not have the recovery function.
Launch system recovery
The system recovery feature is preinstalled before the laptop is shipped from the factory. The option menu allows you to launch the Windows recovery tool to reinstall the operating system to factory default.
The brief introduction below will show you how to start the recovery tool and restore your system.

All ready to go
Make sure your PC is plugged in. This will take a few minutes.
Recovery Guide
1
Turn off and restart the laptop.
2

During the laptop turn on process, press and hold F9 key to launch the tool.
3

Choose "Troubleshoot" to enter the recovery settings.
( Also you can choose "Continue" to exit recovery system and continue to System for files or data backup. )

There are two options for system recovery
- Reset this PC -
You can choose to keep or remove your files and then reinstalls Windows without losing your files. - Smart Recovery -
Your PC settings will be restored to factory default settings.
Caution: All personal data and files will be lost.
4

Smart Recovery
The recovery will be activated and you will see the option buttons on the window. Click on "Yes" to start it.

Caution
- Once the "Recovery" is selected, your personal data and files will be deleted after the laptop starts restoring, and the operating system will be reset to factory default settings
- A progress indicator bar will show on the window when the recovery process is running. Please make sure the AC-adapter is plugged in and do not turn off the laptop.
After the system recovery is completed, you will see the option button on the window, please click on "Shutdown".
5

Advanced options

System Restore
Use a restore point recorded on your PC to restore Windows.

System Image Recovery
Recover Windows using a specific system image file.

Startup Repair
Fix problems that keep Windows from loading.

Command Prompt
Use the Command Prompt for advanced trobleshooting.

UEFI Firmware Settings
Change settings in your PC's UEFI firmware.

Startup Settings
Change Windows Startup behavior.
Appendix
■ Warranty & Service:
Warranty and service and related information please refer to the warranty card or
GIGABYTE service website as the below link:
https://www.gigabyte.com/Support/Laptop
■ FAQ:
FAQ (Frequent Asked Questions) please refer to the below link:
https://www.gigabyte.com/Support/Faq

2
https://www.gigabyte.com/Support/Laptop
الأستلة الشائعة:
https://www.gigabyte.com/Support/Faq
1 Микрофон Mini Display Порт 1.4
2 Уеб Камерата USB 3.2 Порт (USB type-A)
3 Панел на Дисплея Комбиниран Аудиопорт
4 Бутон за Включване и Изключване 12 USB 3.2 Порт (USB type-A)
5 Клавиатура USB 3.2 Порт (USB type-C)
6 Тъчпад Вход за Захранване (DC)
7 Ethernet Порт (LAN) Високоговорител
8 HDMI 2.1 Порт HDMI™

ВАЖНО:
https://www.gigabyte.com/Support/Laptop
https://www.gigabyte.com/Support/Faq
https://www.gigabyte.com/Support/Laptop
■ FAQ:
https://www.gigabyte.com/Support/Faq
https://www.gigabyte.com/Support/Laptop
https://www.gigabyte.com/Support/Faq
1 Mikrofon Mini Display Port 1.4
2 Veebikaamera
3 Kuvaripaneel Audio Ühendpesa
4 Toitenupp USB 3.2 Port (USB type-A)
5 Klaviatuur USB 3.2 Port (USB type-C)
6 Puuteplaat Toite Sisendpesa (DC)
7 Etherneti Port (LAN) Kõlar
8 HDMI 2.1 Port
USB 3.2 Port (USB type-A)

TÄHTIS:
https://www.gigabyte.com/Support/Laptop
■ KKK:
https://www.gigabyte.com/Support/Faq
1 Microphone Mini DisplayPort 1.4
2 Webcam Port USB 3.2 (USB type-A)
3 Panneau D'affichage
4 Bouton D'alimentation Port USB 3.2 (USB type-A)
5 Clavier Port USB 3.2 (USB type-C)
6 Pavé Tactile Port D'entrée D'alimentation (DC)
7 Port Ethernet (LAN) Haut-parleurs
8 Port HDMI 2.1

IMPORTANT:
■ Foire Aux Questions:
https://www.gigabyte.com/Support/Faq

| Mini Display 1.4 USB | 9 | 1 |
| (USB type-A) USB 3.2 | 10 | 2 |
| USB type-A) USB 3.2 | 11 | 3 |
| (USB type-C) USB 3.2 | 12 | 4 |
| USB type-C) USB 3.2 | 13 | 5 |
| USB type-C) USB 3.2 | 14 | 6 |
| USB type-C) USB 3.2 | 15 | 7 |

HDMI 2.1 n'k'

:בְרַע

2
https://www.gigabyte.com/Support/Laptop
:תָאַלְרִי הַלְאַל
https://www.gigabyte.com/Support/Faq
重要:
1 マイク
2 ウェブカメラ
3 表示パネル
4 電源ボタン
5 キーボード
6 タッチパッド
7 イーサネット ポート (LAN)
8 HDMI 2.1 ポート

https://www.gigabyte.com/jp/Support/Laptop
■よくある質問
1 Mikrofonas „Mini Display“ Prievadas 1.4
2 Internetiné Kamera USB 3.2 Prievadas (A tipo USB)
3 Ekrano Plokštė 11 Bendrasis Garso Įvesties Lizdas „Combo“
4 Jjungimo Mygtukas USB 3.2 Prievadas (A tipo USB)
5 Klaviatūra USB 3.2 Prievadas (C tipo USB)
6 Jutiklinis Pultas 14 Maitinimo Ivesties Prievadas (Nuolatinès Srovès)
7 Eterneto Prievadas (LAN) 5 Garsiakalbis
8 HDMI 2.1 Prievadas

SVARBU!
https://www.gigabyte.com/Support/Laptop
BUJ:
https://www.gigabyte.com/Support/Faq
https://www.gigabyte.com/Support/Laptop
https://www.gigabyte.com/Support/Faq
1 Microfone Porta Mini Display 1.4
2 Câmara Web Porta USB 3.2 (USB tipo A)
3 Monitor 11 Tomada de Áudio Combinada
4 Botão de Energia Porta USB 3.2 (USB tipo A)
5 Teclado 13 Porta USB 3.2 (USB tipo C)
6 Touchpad 14 Porta de Entrada de Alimentação (DC)
7 Porta Ethernet (LAN) Altifalante
8 Porta HDMI 2.1

IMPORTANTE:
https://www.gigabyte.com/Support/Laptop
1 Microfon Mini Display Port 1.4
2 Cameră Web Port USB 3.2 (USB tip A)
3 Panou de Afișare Mufă Combinată Audio
4 Buton de Pornire Port USB 3.2 (USB tip A)
5 Tastatură Port USB 3.2 (USB tip C)
6 Touchpad Port Intrare Alimentare (c.c.)
7 Port Ethernet (LAN) Difuzor
8 Port HDMI 2.1

IMPORTANT:
https://www.gigabyte.com/Support/Laptop
■ ÎNTREBĂRI FRECVENTE:
https://www.gigabyte.com/Support/Faq
1 麦克风
2 视讯镜头
3 屏幕面板
4 电源按钮
5 键盘
6 触摸板
7 有线网络接口 (LAN)
8 HDMI 2.1 接口

9 Mini Display 1.4 接口
1 Povežite kabl za napajanje sa adapterom naizmenične struje.
2 Povežite adapter naizmenične struje sa ulaznim priključkom jednosmerne struje (DC-in) na desnoj strani notebook računara.
3Povežite kabl za napajanje sa strujnom utičnicom.
1 Mikrofon Mini DisplayPort 1.4
2Veb-kamera Porta USB 3.2 (USB tipo A)
3 Ekran
4Dugme za Napajanje Porta USB 3.2 (USB tipo A)
5Tastatura Porta USB 3.2 (USB tipo C)
6Tačped
7 Porta Mrežni (LAN)
8Porta HDMI 2.1
HDMI™
15Zvučnik

VAŽNO:
- Ne uklanjajte ugrađenu litijumsku bateriju. Za sve potrebe servisiranja obratite se svom lokalnom GIGABYTE ovlašćenom servisnom centru.
- Ne postavljajte notebook računar na nagnutu površinu ili na mesto gde dolazi do vibracija ili izbegavajte da koristite notebook računar na takvim mestima tokom dužeg vremenskog perioda. To povećava rizik od kvara ili nastanka oštećenja na proizvodu.
- Ne skladištite i ne koristite laptop računar na direktnom sunčevom svetlu ili lokacijama sa temperaturom većom od 45°C (112°F), na primer, unutar vozila. Postoji rizik od širenja litijum-jonske baterije i smanjenja njenog radnog veka.
- Ne koristite notebook računar na slabo provetrenim mestima, npr. na posteljini ili na jastuku itd. i ne koristite ga na mestima kao što je soba sa podnim grejanjem, jer to može dovesti do pregrevanja računara. Pazite da otvori za ventilaciju na notebook računaru (sa strane ili s donje strane) ne budu blokirani, posebno u takvim okruženjima. Ako su otvori blokirani, to može da bude opasno i dovede do pregrevanja notebook računara.
Prečice
Računar koristi prečice ili kombinacije tastera za pristup većini kontrola računara, kao što su osvetljenost ekrana i jačina zvuka. Da biste aktivirali prečice, pritisnite i držite taster
| Prečica | Funkcija Opis | ||
| Fn+ESC |  | Maksimalna brzina ventilatora | Za povećanje brzine ventilatora na 100%. |
| Fn+F1 |  | Spavanje | Prebacivanje računara u režim spavanja. |
| Fn+F2 |  | Bežična mreža | Omogućava/onemogućava funkciju bežične LAN mreže. |
| Fn+F3 |  | Smanjenje osvetljenosti | Smanjuje se osvetljenost ekrana. |
| Fn+F4 |  | Povećanje osvetljenosti | Povećava se osvetljenost ekrana. |
| Fn+F5 |  | Prebacivanje ekrana | Prebacivanje izlaza ekrana između ekrana i spoljnjeg monitora (ako je povezan) ili oboje. |
| Fn+F6 |  | Zaključavanje ekrana | Zaključajte svoj računar ili promenite nalog. |
| Fn+F7 |  | Prebacivanje zvučnika | Uključivanje i isključivanje zvučnika. |
| Fn+F8 |  | Smanjenje jačine zvuka | Smanjuje se jačina zvuka. |
| Fn+F9 |  | Povećanje jačine zvuka | Povećava se jačina zvuka. |
| Fn+F10 |  | Uključivanje/isključivanje tačpeda | Uključivanje i isključivanje tačpeda. |
| Fn+F11 |  | Režim rada u avionu | Omogućavanje/onemogućavanje funkcije režima rada u avionu. |
| Fn+F12 |  | АИ Моде Прекидач АИ режима. | |
| Fn+Space |  | Uključivanje/isključivanje pozadinskog osvetljenja tastature | Uključivanje i isključivanje pozadinskog osvetljenja tastature. |
Vodič za oporavak
Oporavak sistema (oporavak operativnog sistema vašeg laptopa)
U slučaju problema sa operativnim sistemom laptopa, skladište laptopa ima skrivenu particiju koja sadrži potpunu rezervnu sliku operativnog sistema koja se može iskoristiti za vraćanje sistema na fabrički podrazumevane postavke.

Napomena
Tokom procesa uključivanja laptopa, pritisnite i držite taster F9 da biste pokrenuli alatku.
3

Izaberite "Rešavanje problema" da biste ušli u postavke oporavka.
https://www.gigabyte.com/Support/Laptop
■ FAQ :
FAQ (Najčešća pitanja) – pogledajte vezu ispod:
https://www.gigabyte.com/Support/Faq
15
啟動筆記型電腦後,
按著 F9 按鍵幾秒鐘以啟動還原工具。
3

https://www.gigabyte.com/Support/Laptop
■ SSS:
https://www.gigabyte.com/Support/Faq
https://www.gigabyte.com/Support/Laptop
■ ЧаПи:
https://www.gigabyte.com/Support/Faq
TEAM UP. FIGHT ON.
FIGHTON.


- 1-2. Switching on the Power
- IMPORTANT:
- AORUS Notebook Tour
- Hotkeys
- Recovery Guide
- System recovery (Restore your laptop operating system)
- Note
- Launch system recovery
- All ready to go
- 1
- 2
- 3
- Choose "Troubleshoot" to enter the recovery settings.
- There are two options for system recovery
- 4
- Smart Recovery
- Caution
- 5
- Advanced options
- Appendix
- ■ Warranty & Service:
- ■ FAQ:
- ВАЖНО:
- TÄHTIS:
- ■ KKK:
- ■ Foire Aux Questions:
- 重要:
- ■よくある質問
- SVARBU!
- BUJ:
- IMPORTANTE:
- ■ ÎNTREBĂRI FRECVENTE:
- VAŽNO:
- Prečice
- Vodič za oporavak
- Oporavak sistema (oporavak operativnog sistema vašeg laptopa)
- Napomena
- Izaberite "Rešavanje problema" da biste ušli u postavke oporavka.
- ■ FAQ :
- ■ SSS:
- ■ ЧаПи:
- TEAM UP. FIGHT ON.
- FIGHTON.
Brand : GIGABYTE
Model : AORUS 7
Category : Laptop