
IKA8035 - Cooker INVENTUM - Free user manual and instructions
Find the device manual for free IKA8035 INVENTUM in PDF.

| Product type | Induction cooktop with integrated extractor hood (extraction or recirculation) |
| Brand | Inventum |
| Model | IKA8035 |
| Product dimensions (W x D x H) | 800 x 520 x 237 mm |
| Cut-out dimensions (W x D) | 750 x 490 mm |
| Glass thickness | 4 mm |
| Power supply | 230 V / 50-60 Hz, two-phase, max power 7400 W (adjustable from 2800 to 7400 W) |
| Power cable | 5 x 2.5 mm², 150 cm, without plug |
| Number of cooking zones | 4 induction zones (front/rear left/right) + 2 bridge zones (left and right) |
| Power of cooking zones | 1800 W (standard) / 2000 W (boost) per zone; up to 3700 W in bridge |
| Extractor hood - Max airflow (extraction) | 719.3 m³/h (boost mode) |
| Extractor hood - Max noise level | 68 dB(A) (extraction, boost mode) |
| Hood - Filtration | 1 dishwasher-safe grease filter (70°C), 2 durable charcoal filters (replace every 5 years) |
| Main functions | Independent timer per zone, automatic shut-off, pan detection, residual heat indicator, child lock, bridge mode, boost mode (cooking and hood), auto-synchronization hood/cooking, adjustable power management |
| Safety | Automatic safety shut-off, overflow detection, protection against incorrect connection, cooking time limiter, tempered glass surface |
| Maintenance and cleaning | Daily cleaning with a damp cloth; washable grease filter; durable charcoal filters dishwasher-safe or soaking; cavity purge possible |
| Energy class (hood) | A++ (fluid dynamic efficiency A, grease filtering C) |
| Annual energy consumption (hood) | 12.1 kWh/year |
| Energy consumption of cooktop | 190 Wh/kg (according to EN 60350-2) |
| Warranty | 5 years Inventum (domestic use in the Netherlands) |
Frequently Asked Questions - IKA8035 INVENTUM
User questions about IKA8035 INVENTUM
0 question about this device. Answer the ones you know or ask your own.
Ask a new question about this device
Download the instructions for your Cooker in PDF format for free! Find your manual IKA8035 - INVENTUM and take your electronic device back in hand. On this page are published all the documents necessary for the use of your device. IKA8035 by INVENTUM.
USER MANUAL IKA8035 INVENTUM
Built-in flow-in induction hob
natural_image
Pure technical line drawing of a rectangular plate with internal cutouts and dotted lines, no text or symbols present.natural_image
Four identical 3D-rendered kitchen utensils with red X marks and a green checkmark, shown without any text or symbols.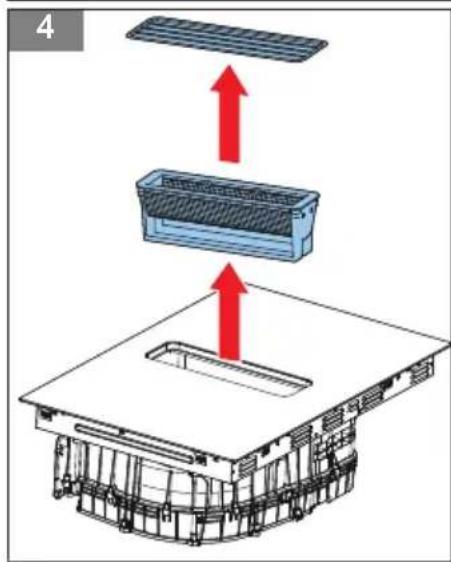
natural_image
3D diagram of a mechanical assembly with a red upward arrow indicating force or direction (no text or symbols)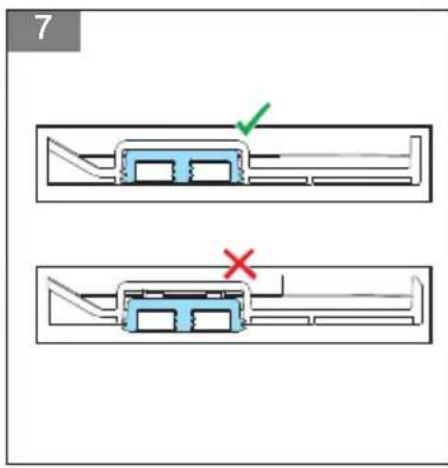
Inhoudsopgave
1 Introduction....28
2 Safety....29
3 Description....33
4 Extra information....35
5 Operation....36
6 Cleaning and maintenance of the induction hob....41
7 Cleaning and maintenance of the hood....41
8 Troubleshooting....43
9 Technical data....45
10 General terms and conditions of service and warranty....48
1 Introduction
HOW TO USE THIS DOCUMENT
- Read this document completely. Make sure that you know and understand all the instructions.
- Obey the safety instructions to prevent injury and/or damage to the appliance and its surroundings.
- Do the procedures completely and in the given sequence.
- Keep this document in a safe area for future use. This document is a part of the appliance.
SYMBOLS USED IN THIS DOCUMENT
| Safety symbol Function Description | ||
| Warning | "Warning" means that injury or death is possible if you do not obey the instructions. | |
| Caution | "Caution" means that damage to the appliance is possible if you do not obey the instructions. | |
| Note | "Note" is used to give additional information. | |
| Risk of electric shock There is a risk of | electric shock. | |
| Warning: hot surface There is a risk of | personal injury. |
2 Safety
GENERAL SAFETY INSTRUCTIONS
- Fully read the manual prior to using the appliance.
- Carefully store the manual for future reference.
- Only use this appliance for the purposes described in the instruction manual.
- Children are not allowed to play with the appliance.
- Do not store objects that might be of interest to children in cabinets above or behind the appliance.
- If the safety instructions and warnings are not observed, the manufacturer cannot be held liable for any resulting damage.
- Damage as a result of incorrect connection, incorrect fitting or incorrect use does not fall under the warranty.
-
The system consists of two appliances:
-
An induction hob;
- An extraction system.
SAFETY INSTRUCTIONS FOR OPERATION
- Only use the appliance for preparing food.
- The appliance is not suitable for heating rooms.
- Warning:
Warning:
- Hot surface
- The appliance and its accessible parts become hot during and after use. Avoid touching hot surfaces. Keep children younger than 8 years of age out of the vicinity, unless they are supervised at all times.
- The appliance can be used by children of 8 years and older and persons with a limited physical, sensory or mental capacity or lack of experience or knowledge, provided they use the appliance under supervision or have been instructed about its safe use and understand the hazards involved.
- Children are not allowed to play with the appliance.
- Do not sit, stand or climb on the appliance.
- The cooking zones get hot when used and remain hot for a period after use. Do not allow small children in the vicinity during and immediately after cooking.
- Do not open the base unit of the appliance.
- Do not heat up closed cans on the appliance. This creates overpressure, as a result of which the cans may explode. You could injure yourself as a result.
- Warning:

Risk of fire.
Do not leave anything standing on the appliance unattended. There is a risk of fire.
• Warning: Risk of fire.
Cooking with fat or oil on an unattended appliance can be dangerous and could result in fire.
• Warning: Risk of fire.
Clean or replace the grease filter and/or the carbon filter regularly. There is a risk of fire.
• Warning: Risk of fire.
Do not work with open fire (flambé), there is a risk of fire due to accumulated grease in the grease filter.
- Be careful not to burn yourself while or after using the appliance.
- Make sure that no cable of any fixed or moving appliance contacts the glass or a hot saucepan.
-
Do not extinguish a fat or oil fire with water. Switch off the appliance and cover the flames with a lid or fire blanket.
-
Do not store items on the appliance.
- Do not place a hot container on the control panel.
- If a drawer is situated under the embedded appliance, make sure that the space between the content of the drawer and the inferior part of the appliance is large enough (50 mm). This is essential to guarantee correct ventilation.
- Do not put any inflammable object (for example sprays) into the drawer situated under the appliance. A cutlery drawer must be heat resistant.
- Do not use the appliance outdoors.
- Do not use the appliance as a worktop. The appliance can be switched on by accident or still be hot, which means that objects could melt, get hot or catch fire.
- Do not cover the appliance with a cloth or something similar. If the appliance is still hot or is switched on, there is a fire hazard.
- If the appliance is used for the first time, it will smell new. This is normal. The smell will disappear through ventilation.
- Do not use the appliance when the glass plate is broken.
- Do not operate the appliance with an external timer or a separate remote control system.
- Do not place metal objects such as knives, forks, spoons and lids on the surface of the hob. The items may become hot.
- Make sure that you switch off the appliance when removing a pan.
- Be careful not to drop items on the glass plate. The glass plate may break as a result.
- Raw pan bottoms or damaged saucepans (not enamelled cast iron pots) may damage the glass plate. Always lift the pan off the appliance, do not slide or it may scratch the glass.
- Sand or other abrasive materials may damage the glass plate.
- Do not hit the edges of the glass with saucepans.
-
Do not put or leave empty saucepans on the hob.
-
If the surface is cracked, switch off the appliance to avoid the risk of an electric shock.
- Be aware of a fast heating time when you use the appliance at a high power level. Always remain nearby after adjusting a cooking zone to a higher power level.
- The appliance complies with electromagnetic safety standards.
- When using the induction hob, always keep magnetic objects (credit cards, disks, watches, etc.) away from the appliance. We recommend wearers of pacemakers or other electrical implants to consult their doctor first.
- If the mains cable is damaged, it may only be replaced by the manufacturer, its service organisation or similarly qualified persons, in order to prevent hazardous situations.
• Warning:
Warning:

Risk of poisoning caused by combustion gases.
Do not use the induction hob with integrated extraction system without sufficient ventilation at the same time as a cooker that uses the air in a room. Cookers that use the air in a room (for example appliances that work on gas, oil, wood or coal or other appliances such as geysers and hot water appliances) draw the combustion air from the room and discharges the gases via a drain to the outside. Combined with a induction hob with integrated extraction system, the air is drawn out of the kitchen and adjacent rooms. If there is insufficient air supply, this creates a vacuum. Toxic gases from the drain are sucked backed into the living area.
- Obey the local standards for extracting air.
- Do not use the appliance without the grease filter.
- Make sure that there is sufficient ventilation.
- Make sure that the complete appliance is cleaned at least once a month. Failure to do so can result in risk of fire.
SAFETY INSTRUCTIONS FOR CLEANING AND MAINTENANCE
- The appliance may not be cleaned or maintained by children, unless this is done under supervision.
- Do not use a high pressure cleaner or steam cleaner to clean the appliance.
- Defective parts may only be replaced by original parts. Only for those parts will the manufacturer be able to guarantee that they meet the safety requirements.
- The appliance has sharp edges, be careful during cleaning and maintenance.
• Always disconnect the appliance from the mains supply before carrying out any work or maintenance on it.

Note:
The use of poor quality pot or any induction adapter plate for non-magnetic cookware results in a warranty breach. In this case, the manufacturer cannot be held responsible for any damage caused to the hob and/or its environment.
ENVIRONMENTALLY-FRIENDLY DISPOSAL
Note:
- Recycling - WEEE
- Dispose of packaging in an environmentally-friendly manner.
- This appliance is labelled in accordance with European Directive 2012/19/EU concerning used electrical and electronic appliances (waste electrical and electronic equipment - WEEE). The guideline determines the framework for the return and recycling of used appliances as applicable throughout the EU.
3 Description
INTENDED USE
The appliance is intended to be used for preparing food and for handling the air of cooking fumes. Do not use the appliance for any other purpose than described in this document.
INDUCTION HOB WITH INTEGRATED HOOD
(Figure 1)
A Cooking zone
B Bridge zone - right
C Control panel of the induction hob and hood
D Integrated hood
E Bridge zone - left
CONTROL PANEL
(Figure 2)
A Slider
B Boost button
C Operation and timer indicator
D Timer controls
E Automatic synchronization button
F Operation indicator
G Bridge zone button
H Child lock button
I On/off button
J Boost button for the hood
K Manual control button for the hood
| Item Function | |
| Slider To increase or decrease the power level. | |
| Boost button To activate the boost mode. | |
| Operation and timer indicator To show the set power level | or the set time. |
| Timer controls + and - To set the cooking timer. | |
| Automatic synchronization button for the hood To activate | the automatic synchronization of the hood. |
| Operation indicator To show the speed of the cooker hood. | |
| Bridge zone button To connect the two cooking zones to one large cooking zone. | |
| Child lock button To lock or unlock the control panel. | |
| On/off button To start or stop the appliance. | |
| Boost button for the hood | To activate the boost mode of the hood. |
| Manual control button for the hood | To activate and setting the speed of the extraction. |
WORKING PRINCIPLE OF THE HOOD
The extraction part of the appliance is used for handling the air of cooking fumes. The appliance can be installed in two different ways.
Extracting
The cooking fumes are extracted outside.

Warning:
Never connect the pipe to a duct that contains gas or other fuels.
Recirculation
The cooking fumes go through carbon filters, longlife carbon filters or a plasma filter. The filter purifies the fumes and recirculates these back to the kitchen.
A good outflow of the air is necessary.
Extra information

Note:
New houses in the Netherlands may no longer vent outside.
- For recirculation, it is necessary to use carbon filters, longlife carbon filters or a plasma filter. For more information on the differences between regular carbon, longlife carbon and plasma filters go to the website www.inventum.eu.

Attention:
Longlife carbon filters should be replaced every five years.
- Attention:

Regular carbon filters should be replaced every six months.
- Attention:

A plasma filter is not included. You need to order it.
SAFETY PROVISIONS
Pan detection mode
With the pan detection mode, the appliance does not work if you use an unsuitable pan or if the appliance does not detect a pan on a cooking zone. The operation indicator shows U and it is not possible to increase the power level.
Residual heat indicator
After stopping the appliance, the cooking zones stay hot. If you touch a hot cooking zone this may result in injury. The operation indicator shows H/h to indicate the cooking zone is hot. When the cooking zone is cool, the operation indicator no longer shows H/h.
4 Extra information
REQUIREMENTS FOR PANS

Note:
Pans that were previously used on a different appliance (for example a gas appliance) are no longer suitable for an induction appliance.
(Figure 3)
- Use pans with a thick and flat bottom. The diameter of the pan must be the same as the diameter of the cooking zone.
- Use pans made from metal, enamelled metal, cast iron or stainless steel. These pans give the best result.
- Obey the instructions from the manufacturer of the pan to see if the pan is suitable for an induction appliance.
- Pans made from metal or aluminium pans with a copper bottom may stain the glass plate. Remove the possible stains immediately after using the appliance.
- Use a magnet to check if a pan is suitable for an induction appliance. The pan is suitable if the magnet sticks to the bottom of the pan.
- Make sure that you put the pan in the center of the cooking zone.
- Some pans may produce sounds during use. The sounds are caused by the shape of the pan. This does not affect the operation or safety of the appliance.
- Never slide pans over the appliance, always lift the pans to avoid scratching the glass.
POSSIBLE SYMBOLS ON THE DISPLAY
| Indication on the display | Usage |
| U | Error message. Place a suitable pan on the active cooking zone or switch off the cooking zone. |
| Something has been placed on the control, or the cookware is unsuitable or too small. | |
| H/h Residual heat indicator: the cooking zone is still too warm to touch. | |
| Lo The child lock is activated. | |
| -- The induction hob is standby. | |
| EF A breakdown has occurred. Check the indication, refer to section Breakdown codes. | |
| 88 The set power of the cooking zone or timer. | |
The values are indicative.
| Power level Usage |
| 0 Cooking zone is switched off. |
| 1-2 Low simmer and slow heating. |
| 3-5 Heating and quickly bringing to a simmer. |
| 6-11 Medium cooking. |
| 12-14 Cooking and roasting. |
| 15/p Searing, stir-frying and bringing to the boil. |
5 Operation
The appliance has electronic sensors that activate when you touch the buttons on the control panel. The appliance makes a sound when a control is touched.

Caution:
Only use pans that are suitable for an induction appliance. Refer to section Requirements for pans.
PREPARING FOR OPERATION
- Clean the appliance before operation. Use a damp cloth.
START COOKING
- Touch the on/off button to start the appliance. The indicators show “-”.

Note:
If you do not activate a cooking zone within 20 seconds, the appliance automatically switches off.
- Put a pan on the cooking zone you want to use.
- Touch the slider to increase and decrease the power level. The operation indicator shows the set power level.

Note:
After switching on a cooking zone, the hood automatically enters the automatic synchronization mode and the display shows A.

Note:
You can modify the power level at any time during cooking.
USING THE HOOD
The hood is set to automatic synchronization, but can also be controlled manually.

Note: Using tall cookware may prevent the hood from working optimally. Improve the extraction power by placing the lid on the cookware at an angle.

Note: It is advised that you start the hood a few minutes before you start cooking and leave it on for a few minutes after you finish cooking.
Setting the hood to automatic synchronization
When the hood is set to automatic synchronization, it synchronizes the speed in accordance with the respective power level for the cooking zone. Depending on how many cooking zones are in use and to what power level they are set, the hood will automatically increase or decrease the speed.
- Make sure that the appliance is on.
- Touch the slider to set the power level of the cooking zone.
- Touch the automatic synchronization button. The display shows "A".
- The hood switches on at a power level that suites the power level of the cooking zone.

Note:
Two minutes after the appliance is turned off, the hood will be turned off.
Setting the hood from automatic synchronization to manual control
- Make sure that the appliance is on and at least one cooking zone is active.
- Touch the manual button for the hood to activate it. The display shows the set speed "1".
- Short press the manual button for the hood to increase the speed. The settings are: 0 - 1 - 2 - 3 - 0.

Note: If you want to return to automatic synchronization, touch the automatic synchronization button.
Setting the boost level of the hood
The boost level works the hood at maximum output.
- Make sure that the appliance is on.
- Touch the boost button to switch to boost level. The display shows "b"

Note:
To end the boost level or change the speed, touch the manual button for the hood.

Note:
The boost mode works for 5 minutes. After 5 minutes, the speed returns to it's original setting.
Stopping the hood
There are several possibilities to stop the hood. Choose one of the below options.
- Touch and hold the manual button for the hood for 3 seconds to switch off the hood or short press the button until the setting is "0".
- When the hood is in automatic synchronization, press the automatic synchronization button to exit the function, and the setting will be "0".
- Press the on/off button.
Using the automatic shut-off mode of the hood
After finishing cooking and turning off the hob, you can use the automatic shut-off mode to run the hood for a longer time to make the air in the kitchen fresher.
- When the appliance is off, press the on/off button. Within 10 seconds, press and hold the automatic synchronization button for 5 seconds. The left front indicator will show t5 and the right front indicator will show 0.
- Press the child lock button to change the delay time. The default time is 0.
- Press the on/off button to confirm the shut-off time.
The automatic shut-off mode can be set to the following times: 0 min., 1 min., 2 min., 5 min., 10 min. or 20 min.
USING THE BOOST MODE
The boost mode provides extra power to a cooking zone and can be activated for a maximum of two cooking zones at a time.

Note:
The boost mode can be set in any cooking zone.
When using the boost mode, the maximum available power will be divided between two cooking zones, which work as a pair. This means both cooking zones on the left form a pair and the two cooking zones on the right form a pair.
If the boost mode is set to the front left cooking zone and you want to set the boost mode for another cooking zone, you need to choose a cooking zone on the right side.
When the boost mode is set to a cooking zone on the left, than the other cooking zone on the left cannot be set. Please wait until the power level can be decreased, before setting the other cooking zone on the left.
Starting the boost mode
- Touch the boost button B of the cooking zone you want to use, to set the power level to the maximum. The operation indicator shows the marquee action.

Note: The boost mode works for 10 minutes. After 10 minutes, the power level returns to its original setting. The bridge zone boost function duration is 5 minutes.

Note: If the original setting is 0, the boost mode will return to 15.
Stopping the boost mode
- Touch the slider of the cooking zone you want to cancel the boost mode for. The operation indicator shows the set power level.
USING THE BRIDGE MODE
In the bridge mode you can connect two cooking zones to create a larger cooking zone. The appliance has two bridge zones, one with the two left cooking zones and one with the two cooking zones on the right.
Activating the bridge mode
- Make sure that the appliance is on.
- Touch the bridge zone button. The front and rear cooking zones are active and the controls for both cookings zones work simultaneously.
De-activating the bridge mode
- Touch the bridge zone button. The controls for both cooking zones are disconnected and can be set separately.
- Touch the slider corresponding with the bridge zone and set the power level to "0". This will exit the bridge mode in 3 seconds.
- Press the on/off button.
FINISH COOKING
- Touch the slider to decrease the power level until the display shows "0".
- Touch the on/off button to switch off the appliance. Note: the extraction unit will also switch off.

Note:
The hood will run for two more minutes when set to automatic synchronization, and then switch off.

Note:
The operation indicator shows "H/h" to indicate the cooking zone is still hot.
LOCKING AND UNLOCKING THE APPLIANCE
The child lock can be activated to prevent unintended use by for example children accidentally turning the cooking zones on.

Note:
When the child lock is activated, all the controls are disabled except the on/off button. You can always turn the appliance off with the on/off button in case of an emergency, but you need to unlock the appliance first before the next use.
Locking the appliance
- Make sure that the appliance is on.
- Touch and hold the child lock button for 3 seconds. The operation indicator shows "Lo" when the appliance is locked.
Unlocking the appliance
- Touch the child lock button for a few seconds. The operation indicators show "-" or the current setting when the appliance is unlocked.
You can set the timer on one or more cooking zones to turn it off automatically when the time is up. The timer of each cooking zone can be set independently and displayed.

Note:
The cooking zone will automatically switch off when the timer is finished.

Note:
When the cooking timer is active, touch the slider once to see the current power level. When the power level is shown, you can change it with the slider if necessary.
Starting the cooking timer
- Touch the slider to set the power level on a cooking zone.
-
Set the time with the corresponding timer controls + and -.
-
Touch the + or - button once and the time will increase or decrease by 1 minute.
-
Touch and hold the + or - button and the time will increase or decrease by 10 minutes.
-
When the cooking timer is set, it will begin the countdown immediately. The timer display will show the remaining time.
- When the cooking timer finishes, the timer display shows "0:00" and you hear a sound signal. The cooking zone will be switched off automatically.
- Repeat the procedure for other cooking zones.
Stopping the cooking timer
- Touch the + and - buttons simultaneously for 1 second to cancel the cooking timer or decrease the time to "0:00" using the - button.
POWER MANAGEMENT
- Make sure the appliance is installed and connected according to the separately supplied installation manual.
- It is possible to set a maximum power consumption level for the induction hob, choosing up to 5 different power ranges.
MAXIMUM POWER
Depending on the electrical connection and the setting of the power management, the appliance has a maximum power of:
| Power Display | |||
| 7.400 watts PO 74 00 | |||
| 5.800 watts PO 58 00 | |||
| 4.500 watts PO 45 00 | |||
| 3.500 watts PO 35 00 | |||
| 2.800 watts PO 28 00 | |||
When the power management is set, the first cooking zone you turn on will have priority. When the remaining power is not enough to meet your desired level of following cooking zones, it will default to the maximum level is can be with the remaining power. If the current remaining power is 0, the operation indicator will show Lt. If you want to turn on more cooking zones, you need to lower the power level of other cooking zones that are active.
SETTING THE POWER MANAGEMENT
Use the power management mode to set the total maximum power of the appliance.

Note:
As a default, the appliance is set to 7.4 kW. The possible settings are: 2.8, 3.5, 4.5, 5.8 or 7.4 kW.
- Do not turn on the appliance. Activate the child lock in the power off state.
- Press the rear left Boost button for 3 seconds. The buzzer sounds.
-
Press the front left Boost button for 3 seconds. The buzzer sounds and the current value appears.
-
The letters PO will appear in the operation indicator of the rear left cooking zone.
- The digits 74 will appear in the operation indicator of the front left cooking zone.
-
The digits 00 will appear in the operation indicator of the front right cooking zone.
-
Change the value to the correct setting by using the child lock button.
- Press the on/off button to confirm the setting.
The hob will be turned off.
The default mode of the appliance is the air extraction mode. To select the air recirculation mode, follow the next steps:
- Make sure that the appliance is in the power-off state.
-
Press the child lock button for 3 seconds. The letter Lo will appear on the operation indicator when the appliance is locked.
-
Press the automatic synchronization button for 3 seconds. The buzzer sounds.
• The letters OU will appear on the operation indicator if the appliance is in air extraction mode.
• The letters IN1 will appear on the operation indicator if the appliance is in air recirculation mode.
• The letters IN2 will appear on the operation indicator if the appliance is in air recirculation mode.
- Press the child lock button to change the operation mode.
- Press the on/off button to set the operation mode. The appliance turns on.
6 Cleaning and maintenance of the induction hob
DAILY CLEANING

Warning:
Make sure that all cooking zones are cool before cleaning the appliance.

Warning:
When you spill sugar, clean the appliance immediately to prevent burns on the surface. Be careful, the cooking zones may be hot.

Caution:
Do not use abrasive cleaning agents, spray cans, scourers or sharp objects.
- Lock the appliance.
- Remove food stains. Use a damp cloth and a mild cleaning agent.
- Clean the appliance daily. Use a damp cloth and a mild cleaning agent.
- Dry the appliance. Use paper towels or a dry tea towel.
- In case of heavy dirt, clean the appliance with a special cleaning agent suitable for an induction appliance.
- In case of spillovers on the controls, the appliance may beep and turn itself off. Soak up the spill and dry the area before turning the appliance back on.
7 Cleaning and maintenance of the hood
CLEANING THE GRILLE AND THE GREASE FILTER
The grease filter filters the grease from the cooking vapours. To keep it in good working order, you must clean the grease filter regularly.
- Never operate the appliance without the grease filter in place.
- Clean the grease filter regularly. It is recommended to clean the grease filter every 7 days.
- Do not work with open fire close to the appliance (e.g. flambé).

Warning:
Risk of fire.
Fatty disposits in the grease filter may catch fire.
(Figure 4)
- Remove the grille.
- Take out the grease filter.

Note:
Grease can accumulate on the bottom of the grease filter. Make sure to hold the grease filter level to prevent accumulated grease from dripping out.
- Clean the grille and the grease filter by soaking them in hot soapy water.
a. Use a brush to clean the grille and the grease filter.
b. Do not use aggressive, acidic or alkaline cleaning product.
c. If necessary, use a special grease solvent.
- Rinse the grille and the grease filter thoroughly.
- Allow the grease filter to drain.
- Dry the components. Use a dry tea towel.
- If necessary, clean the grease filter in a dishwasher at a maximum temperature of 70^ C.

Note:
The grease filter can change color after cleaning. This is normal.
CLEANING AND REPLACING THE LONGLIFE CARBON FILTERS
Clean the longlife carbon filters regularly in order to maintain a good working order of the filters. When the control panel displays "FC", it means the longlife carbon filter need to be replaced.

Note:
This procedure is only valid if you installed the longlife carbon filters in your appliance.

Note:
It is recommended to set the automatic shut-off of the hood at 10 minutes. This way, the carbon filters can regenerate. Refer to section Using the automatic shut-off mode of the hood.
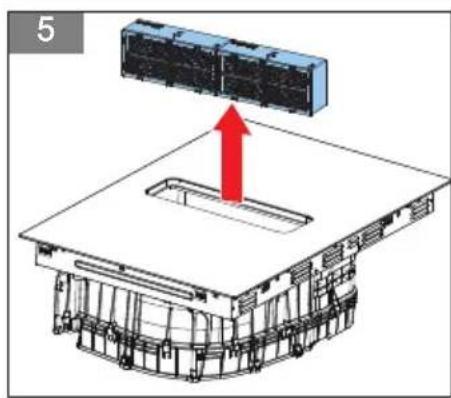
(Figure 5)
Cleaning the longlife carbon filters
- Remove the grille and the grease filter.
- Remove the carbon filters and clean them according to one of the below options: a or b.
a. Place the carbon filters in the dishwasher, add detergent, and use a standard program (1.5 to 3 hours) to clean.
b. Soak the carbon filters in hot water (60-80 °C) for 1 or 2 hours, add detergent to the hot water and rinse the carbon filter with clean water after soaking.
- Dry the carbon filters according to one of the below steps before placing them back in the appliance.
Drying the longlife carbon filters
- Dry the carbon filters before placing them back in the appliance according to one of the below options: a or b.
a. Place the cleaned carbon filters in the oven and bake for 3 hours at 150 °C.
b. Use a warm blow dryer to dry it for 0.5 hour.

Note:
Replace the longlife carbon filters at least every 5 years.
Do not use highly alkaline or heavy oil-based detergents, as they may cause damage to the carbon filters. We recommend using dishwashing detergents from Finish, Ecover or Somat.
The temperature of the hot water should not exceed 80 °C , as this may cause damage to the carbon filters.
Do not exceed a baking temperature of 200 °C , as this may cause damage to the carbon filters.
Do not scrub the carbon filters, as this may cause damage to the filters.
CLEANING THE CAVITY AND DRAINAGE
In case of spills, it might be necessary to clean and drain the cavity. Remove the grille and the grease filter before cleaning the cavity.

Warning:
Make sure the appliance is cooled down, and the residual heat indicator has gone out before cleaning the cavity.
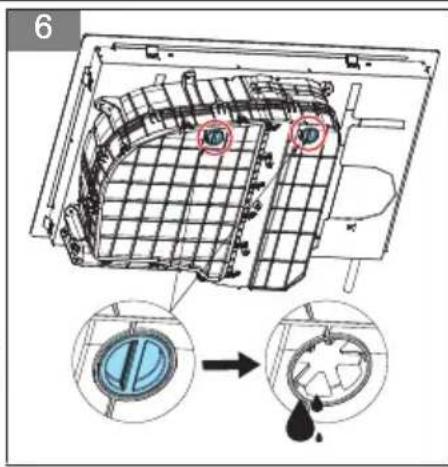
(Figure 6) (Figure 7)
- Put a container below one of the rubber plugs at the bottom of the appliance.
- Pull out the rubber plug with one hand and hold the container with the other hand to drain the liquid, see figure 6.
- Ensure the drainage hole is not blocked and put the plug back into place. Press the plug in tightly, see figure 7.
- Repeat steps 1 to 3 for the second rubber plug.
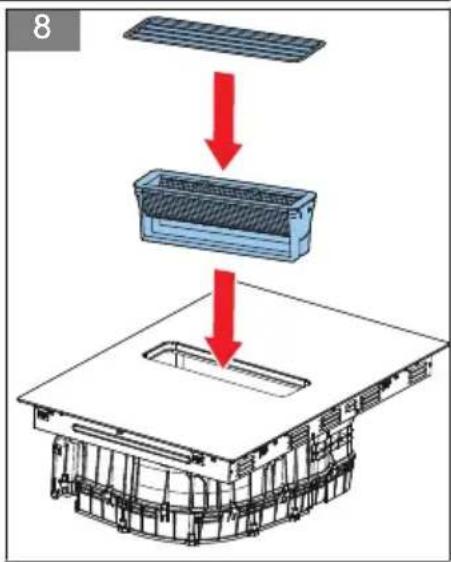
- Remove any objects that might have fallen in from above, and wipe out the inside of the appliance with soapy water and a dish cloth.
- Dry the cavity and re-insert the grease filter and the grille. (Figure 8)
RESETTING THE SATURATION INDICATOR
The appliance gives an alarm on the display for certain cleaning and replacing intervals, such as replacing the carbon filters.
- Make sure that the appliance is switched off.
- Touch and hold the child lock button for 3 seconds to enter the lock modus.
- Touch and hold the manual button for the hood for 3 seconds to reset the saturation indicator. The operation indicator shows "CL".
8 Troubleshooting
GENERAL TROUBLESHOOTING PROCEDURE
- Try to find a solution for the problem with the help of the troubleshooting table and the breakdown codes.
- If you cannot find a solution for the problem or the breakdown code keeps re-occurring, contact Inventum-servicedienst
TROUBLESHOOTING TABLE
| Problem | Possible cause Possible solution | |
| The induction hob does not start. | There is no mains supply. | Do a check if the mains plug is correctly connected to the mains socket.Make sure that the mains supply is on. |
| The child lock is activated. | Deactivate the child lock. Refer to section Locking and unlocking the appliance. | |
| The control panel is dirty or is covered with a thin film of water. | Clean the appliance. Refer to section Daily cleaning. | |
| The operation indicator on the control panel of the induction hob shows U. | There is no pan on the cooking zone. | Put a pan on the cooking zone. |
| The pan is too small (< 14 cm) or not suitable for an induction appliance. | Use a pan that is suitable for an induction appliance. Refer to section Requirements for pans. | |
| A cooking zone switches off automatically. The operation indicator on the control panel of the induction hob shows H/h. | The cooking-time limit is reached.Refer to section Automatic cooking-time limiter. | Start the appliance. Refer to section Start cooking.Select a cooking zone. Refer to section Start cooking. |
| The touch buttons are covered. Remove the blockage. | ||
| Problem Possible cause Possible solution | ||
| There is an empty pan on a cooking zone and the bottom is overheated. | Remove the pan from the cooking zone. | |
| The operation indicator on the control panel of the induction hob shows Lo. | The child lock is activated. | Deactivate the child lock. Refer to section Locking and unlocking the appliance. |
| The display on the control panel of the hood shows FC. | The longlife carbon filters are worn. | 1. Replace the longlife carbon filters. Refer to section Cleaning and replacing the longlife carbon filters.2. Reset the alarm. Refer to section Resetting the saturation indicator. |
| Some pans make crackling or clicking noises | This may be caused by the construction of the cookware (layers of different materials vibrating differently). | This is normal for cookware and does not indicate a fault. Make sure to use good cookware suitable for an induction appliance. |
| The appliance makes a low humming noise when used on a high heat setting. | This is caused by the technology of induction cooking. | This is normal, but the noise should quiet down or disappear completely when you lower the power level. |
| Fan noise coming from the appliance. | A cooling fan is built into your appliance to prevent the electronics from overheating. It may continue to run even after the appliance is turned off. | This is normal and needs no action. Do not disconnect the power at the wall socket while the fan is running. |
| The extraction performance of the hood has decreased. | The grease filter is extremely dirty. Clean the grease filter. | |
| The carbon filter/ longlife carbon filter is extremely dirty. | Replace the regular carbon filters or clean the longlife carbon filters.Refer to section Cleaning and replacing the longlife carbon filters. | |
| There is an object or a lot of water in the cavity. | Remove the object and/or clean the cavity. Refer to section Cleaning the cavity and drainage. | |
| The hood continues to run even though the cooking zones are switched off. | The automatic shut-off timer is set. Wait until the hood switches off automatically. Refer to section Using the automatic shut-off mode of the hood. | |
| The glass panel is scratched. Pans can have rough edges or an unsuitable, abrasive cleaning product or brush is used. | Use pans with a flat, smooth bottom. Refer to section Requirements for pans and Daily cleaning. | |
BREAKDOWN CODES
The breakdown codes are shown on the indicators on the control panel.
| Breakdown code | Possible cause Possible solution | |
| EL / EH There is a defect in the mains supply. | Do a check on the voltage of the mains supply. | |
| C1 / C2 The appliance is overheated. Let the appliance cool down before restarting it. | ||
| b3 | The current of the hood driver board is abnormal. | Touch the on/off button to restart the unit. |
| Breakdown code Possible cause Possible solution | ||
| b7 The motor of the hood failed | to start. Check the hood/ air duct for foreign | objects and restart the hood. |
| U | There is no pan on the appliance or the pan is too small or the pan is not suitable for an induction appliance. | Place a pan or use a pan that is suitable for an induction appliance.Refer to section Requirements for pans. |
| EF Multiple function buttons are pressed at the same time. | Clean the control panel and restart the appliance. If the abnormality continues to occur after restarting, please contact Inventum-servicedienst. | |
| The appliance or a cooking zone has turned itself off unexpectedly, a tone sounds and a breakdown code is displayed. | A technical defect. Please write down the breakdown code, unplug the appliance and contact Inventum-servicedienst. | |
9 Technical data
FUNCTIONS
| Item Specification | |
| Independent cooking timer Individual for all zones | |
| Pan sensor Yes | |
| Automatic switch off of cooking zone(s) and hood Yes | |
| Residual heat indicator Yes | |
| Child lock Yes | |
| Overflow detection Yes | |
| Protection against incorrect connection Yes | |
| Automatic cooking-time limiter Yes | |
| Boost mode (*) | 4 cooking zones / yes |
| Bridge zones | Yes, 2 |
| Auto synchronization of the hood and the hob | Yes |
(*) applicable for both the induction hob and the hood.
DIMENSIONS
| Item | Specification [mm] |
| Product dimensions | 800x520x237 |
| Built-in dimensions | 750x490 |
| Casing thickness | 65 |
| Glass thickness | 4 |
| Hood - height | 172 |
TECHNICAL SPECIFICATIONS OF THE INDUCTION HOB
| Item Specification | |
| Voltage [V] (nominal) 230 | |
| Voltage range [V] 220/240~ 380-415V 3N~ | |
| Frequency [Hz] 50/60 | |
| Power [W] left cooking zones (nominal) 3700 | |
| Power [W] right cooking zones (nominal) 3700 | |
| Power consumption in standby [W] 0,42 | |
| Number of mains cables 1 (*) | |
| Length of mains cable [cm] 150 |
(*) the mains cable is supplied without a mains plug.
ELECTRICAL SPECIFICATIONS
| Item Specification | |
| Power management 1-phase & 2-phase | |
| Power limitation level [W] 7,400 | |
| Connection from production 2-phase | |
| Power cable (included and fixed) [mm ^2 ] 5*2.5 | |
| Power setting - hob 15 + boost | |
| Power setting - extraction system 3 + boost |
COOKING ZONES
| Cooking zone Dimensions [mm] Power [W] | ||
| Left front | 180 | 1,800 / 2,000 |
| Left rear | 180 | 1,800 / 2,000 |
| Bridge zone - left | 390 x 180 | 3,000 / 3,700 |
| Right front | 180 | 1,800 / 2,000 |
| Right rear | 180 | 1,800 / 2,000 |
| Bridge zone - right | 390 x 180 | 3,000 / 3,700 |
ENERGY CONSUMPTION
| Item Energy consumption [Wh/kg] (*) | |
| Induction hob | 190 |
| Cooking zone/ area (left) | 191.1 |
| Cooking zone/ area (right) | 188.9 |
(*) calculated according to the method of measuring performance (EN 60350-2)
TECHNICAL SPECIFICATIONS OF THE HOOD
| Energy consumption Symbol Value Unit | |||
| Annual energy consumption AEChood 12,1 | kWh/a | ||
| Energy efficiency class A++ | |||
| Energy efficiency index EEIhood 34,1 | |||
| Fluid dynamic efficiency FDEhood 30,2 | |||
| Fluid dynamic efficiency class A | |||
| Grease filtering | |||
| Grease filtering efficiency GFEhood 77,1 % | |||
| Grease filtering efficiency class C | |||
| Air flow volume (ducted extraction) | |||
| Maximum air flow at lowest setting in normal use | 251,8 m | ^3/h | |
| Maximum air flow at highest setting in normal use | 564,7 m | ^3/h | |
| Maximum air flow at boost setting in normal use | 719,3 m | ^3/h | |
| Noise (ducted extraction) | |||
| Airborne acoustical A-weighted sound power emmissions at lowest setting | 47 dB | ||
| Airborne acoustical A-weighted sound power emmissions at highest setting | 62 dB | ||
| Airborne acoustical A-weighted sound power emmissions at boost setting | 68 dB | ||
| Air flow volume (recirculation) | |||
| Maximum air flow at lowest setting in normal use | 184,6 m | ^3/h | |
| Maximum air flow at highest setting in normal use | 478,9 m | ^3/h | |
| Maximum air flow at boost setting in normal use | 521,2 m | ^3/h | |
| Noise (recirculation) | |||
| Airborne acoustical A-weighted sound power emmissions at lowest setting | 44 dB | ||
| Airborne acoustical A-weighted sound power emmissions at highest setting | 62 dB | ||
| Airborne acoustical A-weighted sound power emmissions at boost setting | 64 dB | ||
| Suitable for external ventilation | Yes | ||
| Suitable for recirculation | Yes | ||
| Number of grease filters | 1 | ||
| Number of longlife carbon filters | 2 | ||
| Filters washable in a dishwasher | Yes | ||
| Power of the motor 160 W | |||
| Number of motors 1 | |||
| Dimensions of the exhaust 89 x 222 mm | |||
AUTOMATIC COOKING-TIME LIMITER
The automatic cooking-time limiter is a safety function for your appliance. It switches off automatically if ever you forget to turn the appliance off. The automatic switch-off times for various power levels are shown below:
| Induction hob | |
| Power level Automatic switch-off time | |
| 1-3 480 minutes | |
| 4-6 360 minutes | |
| 7-9 240 minutes | |
| 10-12 120 minutes | |
| 13-15 90 minutes | |
| Extraction system | |
| Power level Automatic switch-off time | |
| 1 480 minutes | |
| 2 240 minutes | |
| 3 120 minutes | |
10 General terms and conditions of service and warranty
5-year Inventum warranty!
- Customers enjoy a 5-year full manufacturer's warranty on all Inventum products.
- Within this period, a defective product or part, which makes normal functioning of the product or part impossible, will always be repaired free of charge or, if repair is not possible and/or does not provide a solution, replaced (by the same or equivalent products). The assessment of this lies with Inventum.
- In order to make a claim under the 5-year Inventum warranty, you must, within two months after discovering the fault or defect, either return the product to the shop where you bought it, or contact the Inventum customer service department by using the form at 'https://www.inventum.eu/service'.
- The warranty period starts from the date stated on the product's original sales receipt.
- To invoke the warranty, you must always send a copy of the original proof of purchase with the service request and present the original proof of purchase to the service technician.
- The 5-year warranty applies only to normal domestic use of Inventum products within the Netherlands.
Warranty exclusions
- The 5-year Inventum guarantee does not apply in case of: normal wear and tear, consumables, improper use, insufficient or incorrect maintenance, incorrect and/or inexpert assembly and installation of the appliance, repairs by unauthorized third parties, business or commercial use, missing serial number, damage caused by an external cause. This enumeration is not exhaustive.
- B-choice products and products that have been built-in in a showroom are not covered by the 5-year Inventum warranty. All optical damage such as dents, scratches and slight traces of use are excluded from any warranty.
Reporting malfunctions on Inventum products
- Faults or defects on Inventum products can be reported by using the service request form on the website 'https://www.inventum.eu/service' or through the seller of the product.
- A copy of the original proof of purchase must be included with the request.
- Inventum's service department determines whether the product will be repaired or replaced, based on the request and the sales receipt.
Important to know
- Products sent without prior notification will not be accepted. Further to the notification, you will be informed by Inventum whether a warranty applies and whether you must return the product.
- The replacement or repair of a defective product, or a part thereof, does not lead to an extension of the original warranty period.
- Products eligible for replacement or repair must be emptied and clean.
For a detailed explanation of the warranty conditions and items excluded from them, please visit Inventum's website 'https://www.inventum.eu/algemene-voorwaarden'
These general warranty and service conditions apply to Inventum brand products purchased after 27th of April 2022 and intended for use within the Netherlands.
For Inventum products used outside the Netherlands, but within a EU Member State, the warranty rules of that country apply. Inventum provides warranty and service by a white goods technician only in the Netherlands.
As a consumer, you are entitled by law to a properly working product. Does the product break down sooner than you might expect? This means that the product is not in conformity. In that case, the law offers you, the buyer, with a number of legal remedies for your protection. This legal protection is not affected by the above commercial warranty given by Inventum on Inventum products used within the Netherlands.
(Figure 6) (Figure 7)
Modifications and errors reserved
facebook.com/inventum1908
pinterest.com/inventum1908
youtube.com/inventum1908
instagram.com/inventum1908


- Inhoudsopgave
- Introduction
- HOW TO USE THIS DOCUMENT
- Safety
- GENERAL SAFETY INSTRUCTIONS
- SAFETY INSTRUCTIONS FOR OPERATION
- Warning:
- SAFETY INSTRUCTIONS FOR CLEANING AND MAINTENANCE
- Note:
- Description
- INTENDED USE
- INDUCTION HOB WITH INTEGRATED HOOD
- (Figure 1)
- CONTROL PANEL
- (Figure 2)
- WORKING PRINCIPLE OF THE HOOD
- Extracting
- Recirculation
- Extra information
- Attention:
- SAFETY PROVISIONS
- Pan detection mode
- Residual heat indicator
- Extra information
- REQUIREMENTS FOR PANS
- (Figure 3)
- POSSIBLE SYMBOLS ON THE DISPLAY
- Operation
- PREPARING FOR OPERATION
- START COOKING
- USING THE HOOD
- Setting the hood to automatic synchronization
- Setting the hood from automatic synchronization to manual control
- Setting the boost level of the hood
- Stopping the hood
- Using the automatic shut-off mode of the hood
- USING THE BOOST MODE
- Starting the boost mode
- Stopping the boost mode
- USING THE BRIDGE MODE
- Activating the bridge mode
- De-activating the bridge mode
- FINISH COOKING
- LOCKING AND UNLOCKING THE APPLIANCE
- Locking the appliance
- Unlocking the appliance
- Starting the cooking timer
- Stopping the cooking timer
- POWER MANAGEMENT
- MAXIMUM POWER
- SETTING THE POWER MANAGEMENT
- Cleaning and maintenance of the induction hob
- DAILY CLEANING
- Cleaning and maintenance of the hood
- CLEANING THE GRILLE AND THE GREASE FILTER
- (Figure 4)
- CLEANING AND REPLACING THE LONGLIFE CARBON FILTERS
- (Figure 5)
- Cleaning the longlife carbon filters
- Drying the longlife carbon filters
- CLEANING THE CAVITY AND DRAINAGE
- (Figure 6) (Figure 7)
- RESETTING THE SATURATION INDICATOR
- Troubleshooting
- GENERAL TROUBLESHOOTING PROCEDURE
- BREAKDOWN CODES
- Technical data
- AUTOMATIC COOKING-TIME LIMITER
- General terms and conditions of service and warranty
- 5-year Inventum warranty!
- Warranty exclusions
- Reporting malfunctions on Inventum products
- Important to know
Brand : INVENTUM
Model : IKA8035
Category : Cooker