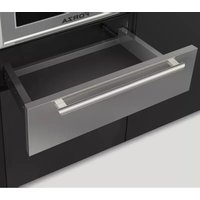
FWD30S - Oven Forza - Free user manual and instructions
Find the device manual for free FWD30S Forza in PDF.


User questions about FWD30S Forza
0 question about this device. Answer the ones you know or ask your own.
Ask a new question about this device
Download the instructions for your Oven in PDF format for free! Find your manual FWD30S - Forza and take your electronic device back in hand. On this page are published all the documents necessary for the use of your device. FWD30S by Forza.
USER MANUAL FWD30S Forza
INSTALLATION&USE MANUAL
P.23
INSTALLATIONET UTILISATION MANUEL
P.43
MANUAL DE INSTALLACION Y USO
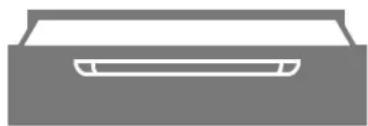
WARMING DRAWER
FORZA

Dear Customer,
we would like to thank you and congratulate you on your choice.
This new product has been carefully designed and built using top quality materials, and meticulously tested to ensure that it meets all your culinary requirements.
Please read and observe these simple instructions, which will enable you to achieve excellent results from the very first time you use it.
This state-of-the-art appliance comes to you with our very best wishes.
The Manufacturer
TABLE OF CONTENTS PAGE
Precautions 4
Instructions for recycling - protection of the environment 4
Opening of the push to open drawer 5
Opening of the soft closing drawer 5
Before you Begin 5
Heating System 5
Sabbath Considerations 5
WarmingDrawer 6
Operation 6
Heating Time 6
Defrosting 6
Leavening 6
Food warmer 6
Slow cooking 7
Warnings for slow cooking 7
8
Cleaning and Maintenance 9
Front and panel commands 10
Inside space 10
TABLE OF CONTENTS PAGE
Replacing anDrawer Light 10
To Replace a Light Bulb 10
Troubleshooting 11
Appliance installation 11
Tools you will need 12
Packaging 12
Power requirements 12
Choosing drawer location 12
Steps for installation 12
Technical data 12
Installation notes 12
Custom drawer front 14
Electrical Requirements 16
General Information 16
Electrical Connection 16
Installation procedure 18
WARRANTY 19
CONSUMERINSTRUCTIONS:
Includes recommendations for use, description of commands and correct procedures for the care and clearing of the appliance.

INSTALLATION INSTRUCTIONS:
Use intended for qualified technicians.
Precautions
This guide is an integral part of the appliance. Keep these instructions with you during use of your warming drawer. Read these instructions before installing and using the appliance. Installation should be performed by qualified personnel only, in conformity with current law. This appliance is intended for domestic use only in conformity with current EEC directives. The manufacturer will not be held liable in the event of a failure to follow THESE WARNINGS AND SAFETY INSTRUCTIONS. KEEP THESE INSTRUCTIONS WITH THE APPLIANCE. IF THE APPLIANCE SHOULD BE GIVEN TO ANOTHER PERSON MAKE SURE THESE INSTRUCTIONS ARE SUPPLIED WITH IT.
DO NOT OBSTRUCT THE OPENINGS AND FIXTURES INTENDED FOR HEAT CIRCULATION.
THE LABELS LOCATED ON THE APPLIANCE WHICH SHOW THE SERIAL NUMBER AND MODEL ARE FOUND ON THE HEATING BLOCK. Never remove the data label.
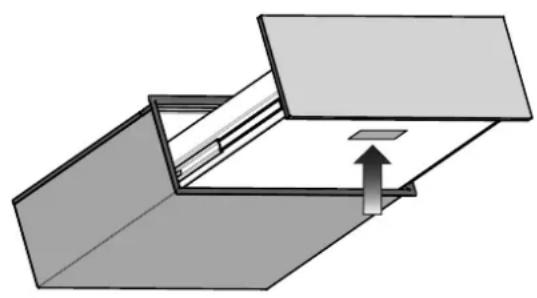
LOCATION OF RATING PLATE

WARNING
NEVER USE SHARP METAL OBJECTS OR ABRASIVE SCRUBBING PADS THAT COULD CAUSE DAMAGE TO THE SURFACE OF THE APPLIANCE. IF NECESSARY, USE STANDARD NON-ABRASIVE UTENSILS MADE OF WOOD OR PLASTIC.
Instructions for recycling - protection of the environment
Our products are made solely from non-polluting materials that do not harm the environment and are recyclable. We ask for your effort and collaboration in disposing of the packaging in a proper manner. Contact the product retailer or local organizations for further information on recycling. Dispose of the packaging properly. Parts of the package especially plastic, pose a risk for children.
Your old appliance must also be disposed of properly.

IMPORTANT
Consign the appliance to the proper local organization authorized to collect broken appliances. Proper and intelligent disposal consists of recovering materials of value.
Remove the plugs or electrical cords of appliances that are no longer being used so that they no longer pose a threat to children.

IMPORTANT SAFEGUARDS
When using electrical appliances, basic safety precautions should always be followed including the following:
- Read all instructions.
- Do not touch hot surfaces. Use handles or knobs.
- To protect against electrical shock do not immerse cord, plugs, in water or other liquid.
- Close supervision is necessary when any appliance is used by or near children.
- Unplug from outlet when not in use and before cleaning. Allow to cool before putting on or taking off parts.
- Do not operate any appliance with a damaged cord or plug or after the appliance malfunctions or has been damaged in any manner. Return appliance to the nearest authorized service facility for examination, repair, or adjustment.
- The use of accessory attachments not recommended by the appliance manufacturer may cause injuries.
- Do not use outdoors.
- Do not let cord hang over edge of table or counter, or touch hot surfaces.
- Do not place on or near a hot gas or electric burner, or in a heated oven.
- Extreme caution must be used when moving an appliance containing hot oil or other hot liquids.
- Always attach plug to appliance first, then plug cord into the wall outlet. To disconnect, turn any control to "off", then remove plug from wall outlet.
-
Do not use appliance for other than intended use.
-
The inside of the appliance can reach temperatures of 195^ (90^) depending on the selected temperature and the time of operation. If necessary use gloves to remove things from the drawer.
- Do not lean or sit on the warming drawer when opened, this could cause damage to the telescopic guide. The maximum carrying weight of the warming drawer is 80 lbs. (36 kg).
- Do not keep plastic containers or any flammable objects in the appliance. Such objects pose a risk of catching fire once the warming drawer is turned on.
17. Save these Instructions.
CLEANING:
- Never use a vacuum cleaner. The vacuum could create pressure on the components causing a short circuit. The vacuum may also damage the surface and the components of the appliance: damages for which the manufacturer will not be liable.
- For cleaning the appliance we recommend following the suggestions listed under "Cleaning and Maintenance" of the manual.

ATTENTION
REPAIRS:
Maintenance work and/or repairs must be performed exclusively by specialized personnel. Incorrect installation and maintenance can cause personal injury to the consumer for which the manufacturer will not be liable.
During the warranty period, the appliance may only be serviced by technicians authorized by the manufacturer or the warranty will be void.
Before beginning maintenance, installation, or repair work disconnect the appliance from the electrical outlet. The appliance is disconnected only if:
- The electrical fuse is disconnected.
- The cord of the appliance is disconnected from the electrical outlet – to disconnect the appliance from the outlet pull the cord away from the outlet, manually disconnect the cord. The manufacturer will not be liable for damage caused by a failure to follow current regulations or the use of non-original replacement parts.
CONSUMERINSTRUCTIONS:

Opening of the push to opener drawer
- To open the drawer press the front of the drawer
- Grasp the drawer pull it towards you until it is opened completely.
Closing the drawer
- To close the drawer, gently push the drawer back, pushing the front until it has completely gone back.
Opening of the soft closing drawer
- To open the drawer grasp the handle and pull the drawer.
Closing the drawer - To close the drawer, gently push the drawer back, until the soft closing system engage.
Before you Begin
Do not leave parts of the packaging in the home. Separate the remaining packaging materials by category and deliver them to your nearest recycling center.
Before using the appliance for the first time, gently clean it with a moist cloth and dry it completely as described under "Cleaning and Maintenance".
Heat the warming drawer for at least two hours. Once heated, set the temperature to 195^ (90^) . Be sure that the kitchen is kept well ventilated during the heating period.
The metal parts have been specially treated with a protective coating that can sometimes cause odors the first time the drawer is heated. These odors will quickly dissipate and should not be considered a defect of the appliance.
Heating System
The appliance is equipped with a hot air ventilating system. A fan distributes in an optimal way towards the internal space of the warming drawer.
The thermostat allows the user to control and set the appliance at the desired temperature.
The circulation of the air heats the drawer in a rapid and uniform way.
With the protective measures in place it is not possible to accidentally touch the heating element or the fan.
Sabbath Considerations
This warming drawer does not employ a specific Sabbath Mode, however, by design, its use during The Sabbath will comply with the rules of observance. When the warming drawer thermostat is
turned on, the lights and convection fan will operate continuously regardless if the drawer is open or closed. The heating element and pilot indicator lamp operate independently to satisfy the thermostat setting and are not directly influenced by drawer opening/closing.
If the unit is not being used (thermostat is in the 'OFF' position) the internal light will turn on and off with drawer opening / closing.
Warming Drawing
Operation
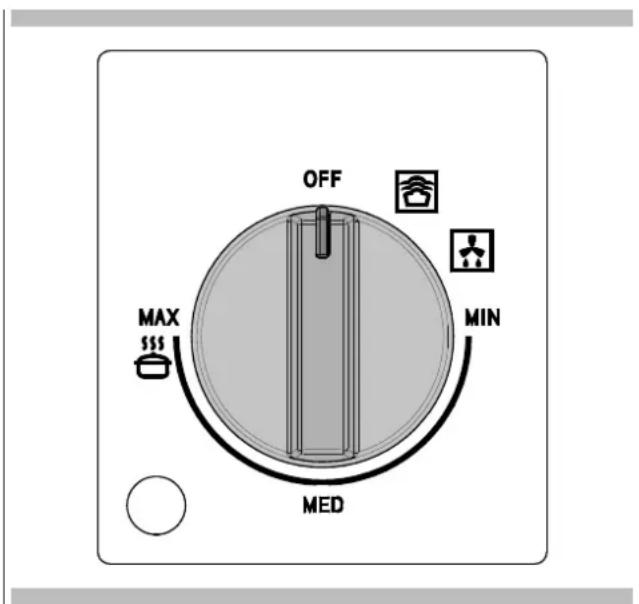
Open the drawer. Turn the knob in order to set the desired temperature.
The internal light will turn on and will remain on throughout use. To turn off the appliance, turn the knob to the OFF.
Heating Time
Different factors influence the time in which it takes to heat up:
- Thickness and material of the drawer;
Number of drawers loaded;
The arrangement of the loaded drawers; - The desired temperate set.
So, there is no general rule. To set the temperature above 140^ (60^) in order to have a stable temperature, follow these suggestions:
| DISHES | TIME (MIN) |
| DISHES FOR 6 PERSONS 30-35 |
You can also use your own experience in determining the optimal temperature setting for your needs.
Defrosting
The defrosting function only uses forced ventilation without any active heating element.
Procedure
- Turn the knob to the defrost setting.
Leavening
The leavening function maintains the drawer temperature between 25 and 40^
Procedure
- Preheat the drawer for 5 minutes by turning the knob to the leavening setting.
- Place the dough, wrapped in a slightly damp cloth, in the middle of the drawer.
Food warmer
Food recommended for warming: meat, chicken, fish, sauces, vegetables, side dishes and soups.
- To stop the food spilling over into the drawer, do not overfill the dishes.
- Arrange the dishes in the drawer and close it carefully so that any liquids do not spill.
- It is advisable not to warm food for more than an hour to prevent it from losing nutritional value.
- Cover moist food and liquids with a lid or heat-resistant cling film. This will prevent the moisture from escaping, condensation from forming and moisture settling on the outside the dishes.
- Do not cover roast or fried dishes which need to stay crisp. Keep these dishes hot at high temperatures.
Procedure
- Place the dishes in the drawer.
- Switch the drawer turning the thermostat knob to between MIN/MED (105/140°F - 40/60°C), depending on the temperature required, and preheat the drawer for 10 minutes.
- Put the food in the preheated dishes.
- Close the drawer again.
Switching off
Turn the knob to OFF. Take the dishes out of the drawer using a cloth or oven gloves.
NOTE: Never transfer hot dishes directly from the hot stove top to the glass base of the heating drawer. This could damage the glass drawer base.
Slow cooking
Slow cooking is ideal for cooking tender meat which needs to be medium rare or rare. This cooking method means the meat will always be pink inside. This does not, however, mean that the meat is raw or undercooked.
This cooking method not only keeps the juices inside, but it also makes it easy to keep the meat hot.
Suitable dishes to use: glass, porcelain or ceramic with a lid.
Procedure
- Preheat the warming drawer with the chosen dish to the maximum temperature for 15 minutes.
- Heat some butter or oil in a pan. Brown the meat well for the time indicated in the table, then place it immediately in the preheated pan and cover with the lid.
- Set the thermostat between MED/MAX (140/195°F -60/90°C) for the time required to finish the cooking.
Warnings for slow cooking
- Only use fresh meat in perfect condition.
- Trim off any excess fat.
- The pieces of meat do not necessarily have to be turned.
- Once cooked, the meat can be carved immediately; it does not have to rest.
- Meat that is slow cooked is not as hot as meat cooked in the traditional way, so it is advisable to put the plates in the warming drawer on the left-hand side for the last 20-30 minutes as well.
- Serve the meat with piping hot sauces.
- If you want to keep the meat hot after cooking, turn the thermostat knob to between 40^ and 60^ . The smaller pieces of meat can be kept hot for 45 minutes and the larger pieces for two hours.
Table
Slow cooking is suitable for all tender cuts of beef, pork, veal, lamb, game and poultry. The initial browning times and the subsequent cooking times depend on the size of the slices of meat.
The time parameters refer to meat placed in a pan with preheated butter or oil.
| DISH EXAMPLE INITIAL BROWNINGLEVEL | ||
| Small slices of meat | ||
| Strips about 1 - 2 minutes | MED | |
| Small steaks or medallions about 1 - 2 minutes per side | MED | |
| Medium size slices of meat | ||
| Tenderloin about 4 - 5 minutes per side | MAX | |
| Lean roast about 10 - 15 minutes per side | MAX | |
| Large slices of meat | ||
| Tenderloin (from 900g) about 6 - 8 minutes per side | MAX | |
| Roast beef about 8 - 10 minutes per side | MAX | |
| Vegetables about | 30 minutes per side | MED |
NOTE: There are 2 settings: MAX and MED.
Guidelines for cooking times are 4 to 5 hours for MAX and 8 to 10 hours for MED.
Smaller quantities of food may require less time, while larger quantities may require more time.
Drawer slides
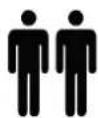
The drawer slides allow you to fully extend the drawer for easier cleaning. If necessary, the drawer can be removed. ATTENTION: all operations for removal and reinsertion must be performed by at least 2 persons.
NOTE: Load capacity for the drawer is 80 lbs (36 kg).
Remove all items from inside the warming drawer, and allow the warming drawer to cool completely before attempting to remove the drawer.
To Remove:
- Open drawer to its fully open position.
- Using a Phillips screwdriver, remove the screw present under the right guide and the screw under the left guide, as shown in the figure.
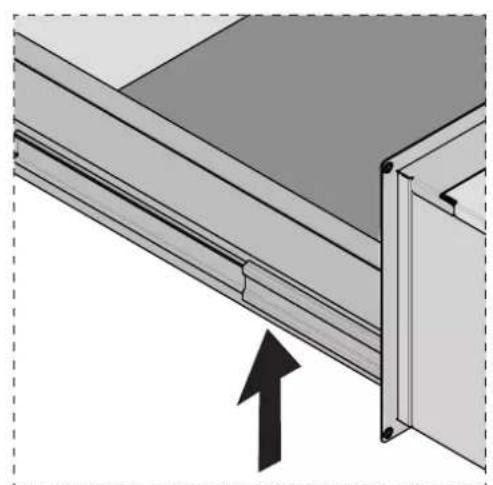
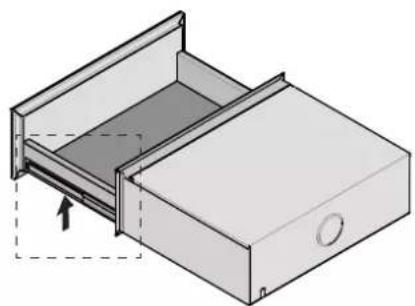
- Hold the drawer by the sides (not by the front). Pull it slowly all the way out. Pull out the drawer horizontally and remove it.
- Hold the drawer by the sides (not by the front). Pull it slowly all the way out.
To Replace:
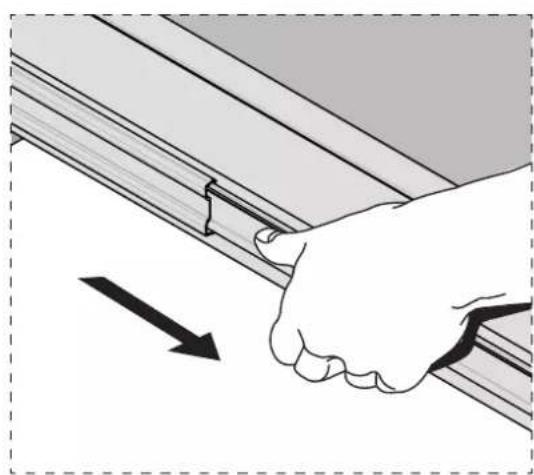
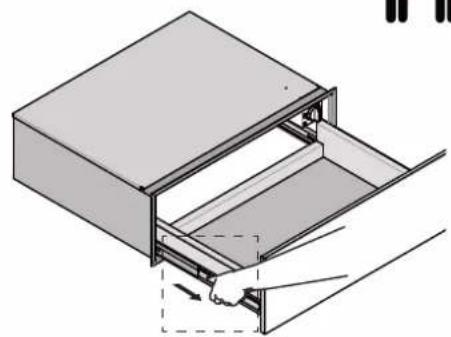
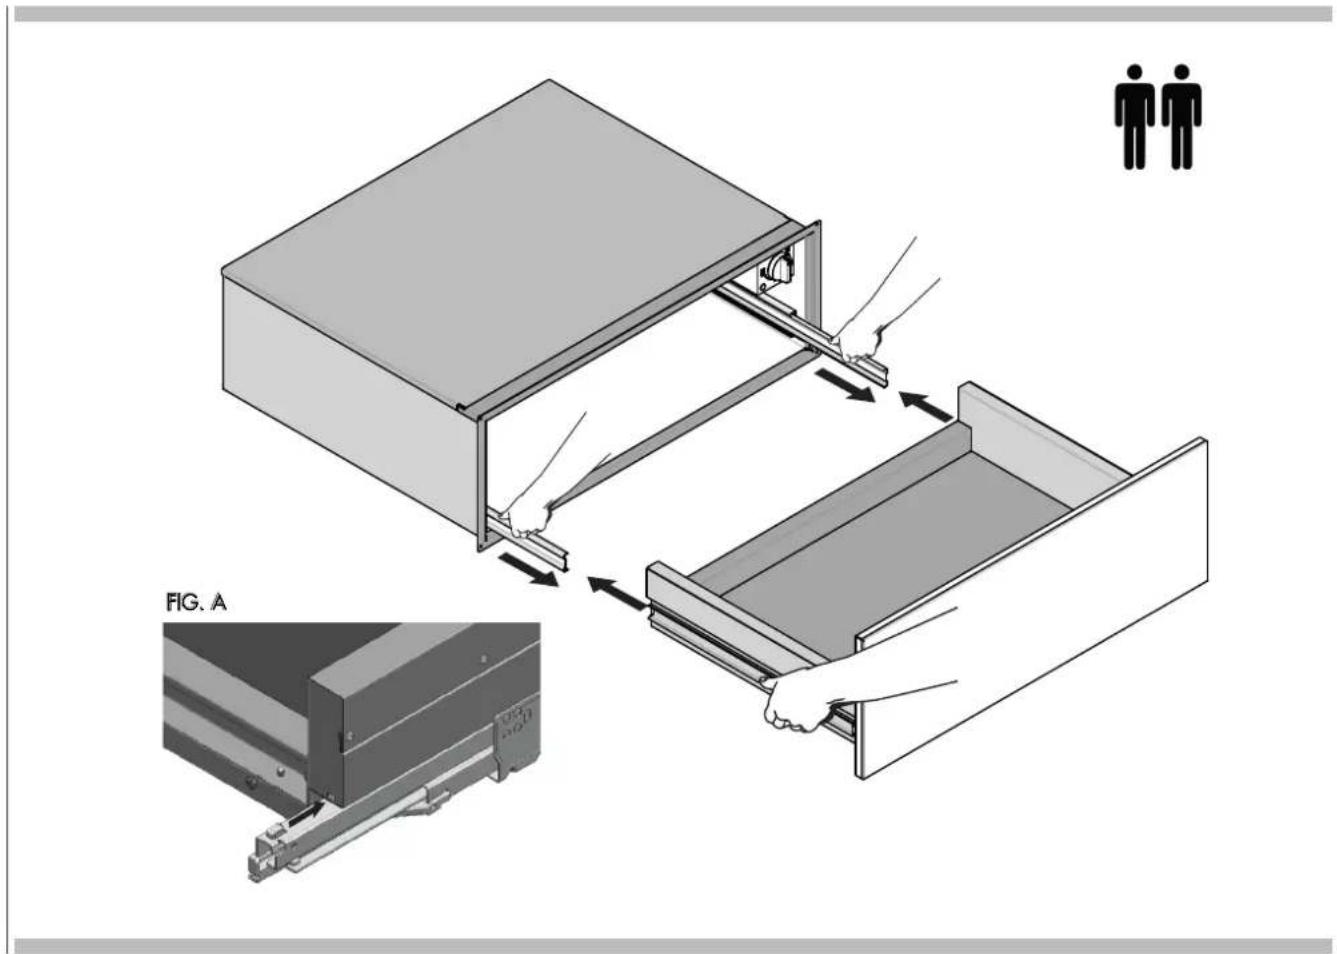
- Manually extract the two sliding guides from inside the drawer. Support the drawer, with one person on one side and the other person on the other side. Place the drawer on the extracted guides.
- Holding the sliding guide steady with one hand, slide the drawer inwards, until the rear pin engages.
- Using a Phillips screwdriver, reinsert the two right and left fixing screws under the guides.
- Push drawer in all the way.
- Gently open and close the drawer to ensure it is seated properly on the slices.
Cleaning and Maintenance
Generally speaking, cleaning is the only form of maintenance necessary.

ATTENTION
Before you begin cleaning, disconnect the appliance from the outlet. Disconnect the cord from the outlet and turn off the appliance.

WARNING
Do not use harsh detergents or abrasive products and/or scrubbing pads and sponges and sharp objects as they can stain and damage the appearance of the appliance.
Never use a vacuum cleaner on the internal parts of the appliance.
Front and panel commands
The use of a moist cloth is sufficient when cleaning the appliance. In the event the appliance requires further cleaning, add drops of detergent in the water. Dry the appliance with a dry cloth. The steel front of the appliance can be cleaned with products specifically designed for steel. Such products prevent the formation of dirt on the surface of the drawer. Apply a minimal amount of the product on a soft and apply it to the surface of the appliance.
Inside space
To clean the inside space use a moist cloth. In the event the appliance requires further cleaning add drops of detergent to the water. Dry the surface with a dry cloth. Make sure to avoid water draining into the ventilation holes. Only use the appliance after the drawers are dry completely.
Replacing an Analyzer Light
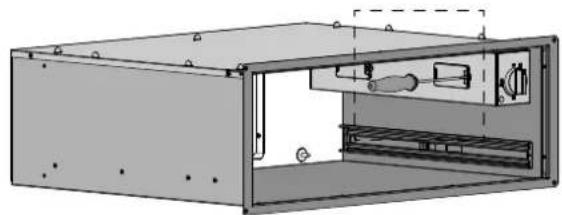
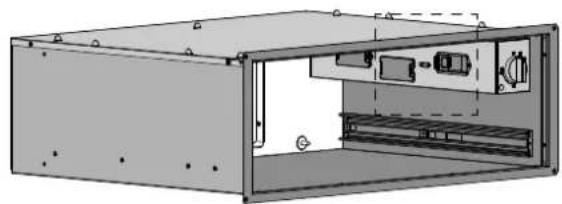
Each warming drawer is equipped with three halogen lights located in the lateral walls.
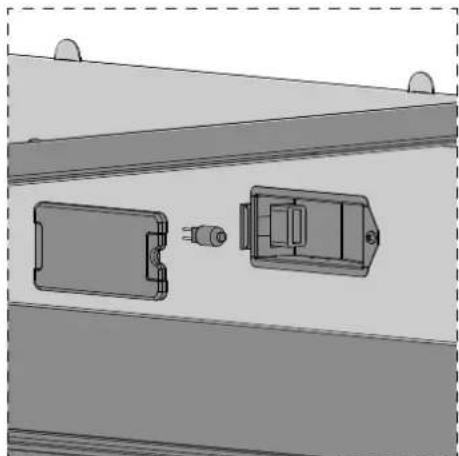
Each light assembly consists of a removable lens, a light bulb as well as a light socket housing that is fixed in place. See figure on this page.
Light bulb replacement is considered to be a routine maintenance item.
To Replace a Light Bulb
- Read WARNING on this page.
- Turn off power at the main power supply (fuse or breaker box).
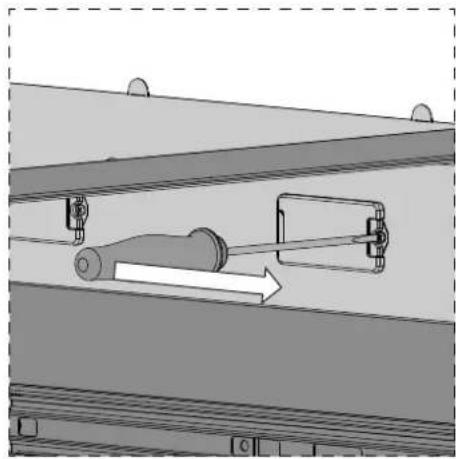
- Remove the lens between screw and glass using a screw driver.
- Remove the light bulb from its socket by pulling it.
- Replace the bulb with a new one. Avoid touching the bulb with fingers, as oils from hands can damage the bulb when it becomes hot.
- The bulb is halogen: use one with the same type checking Voltage and Wattage.
- Place the lens back on.
Turn power back on at the main power supply (fuse or breaker box).

WARNING
- Make sure the lights are cool and power to the drawer has been turned off before replacing the light bulb(s). Failure to do so could result in electrical shock or burns.
- The lenses must be in place when using the drawer.
- The lenses serve to protect the light bulb from breaking.
- The lenses are made of glass. Handle carefully to avoid breakage. Broken glass could cause an injury.
Troubleshooting

ATTENTION
Repairs must only be performed by specialized and qualified personnel. Any repair work not performed by professional personnel may cause damage to the appliance for which the manufacturer will not be liable.
The following problems can be fixed by the consumer without the assistance of the Service Department.
The drawer is not hot enough. Make sure that:
The appliance is turned on;
- The correct temperature has been set;
- The opening of the ventilation fan is not blocked by plates or other large obstructions;
- The drawers have had sufficient time to heat up.
The drawer is not hot at all. Make sure that:
- You hear the fan running;
- If the fan is turned on this means that the heating system is working;
- If the fan does not work this means it is defective;
The circuit fuse is blown.
INSTALLATION INSTRUCTIONS:

Appliance installation
IMPORTANT: Save these instructions for the local electrical inspector use.
INSTALLER: Please leave this manual with owner for future reference.
OWNER: Please keep this manual for future reference.

WARNING
If the information in this manual is not followed exactly, a fire or explosion may result causing property damage, personal injury or death.
Please read these instructions COMPLETELY AND CAREFULLY. They will save you time and effort and help to ensure optimum drawer performance.
Be sure to observe all WARNINGS. These installation instructions are intended for use by a qualified installer.
Assure that electrical installation is adequate and in conformance with National Electrical Code, ANSI/ NFPA 70 - latest edition**, or Canadian Electrical Code, part 1C22.1 (latest edition)*** and all local codes and ordinances.
These shall be carefully followed at all times.
Tools you will need
The following tools are needed to install your new warming drawer:
- Tape measure and straightedge or ruler
Pencil - Phillips screwdriver
Level - Wire cutters and wire stripper
Hand or saber saw - 1" (2,5cm) Hole saw
- Drill and drill bit
- Safety gloves and goggles
- Volt meter (0-250VAC)
Packaging
Remove all tape and packaging before using the warming drawer.
Destroy the packaging after unpacking the drawer following the rules in force in your town. Never allow children to play with packaging material.
Power requirements
The warming drawer must be supplied with the proper voltage and frequency. The drawer is manufactured to be connected to a three-wire, single phase, 120 Volt, 60 Hz AC electrical supply.
Choosing drawer location
Carefully select the location where the warming drawer will be placed.
It should be located for convenient use in the kitchen.
Make sure that electrical power can be provided to the location selected.
Steps for installation
The following pages provide the necessary information for proper installation of the appliance and are arranged as follows:
Technical Data
- Installation Cutout Dimensions, Required Clearances and Mounting instructions
- Electrical Supply and Wiring Requirements
- Final Checklist
Technical data
| Power Supply | |
| 120 Volts 60 Hz | |
| Amperes Watts | |
| 9.2 1100 | |
Installation notes
- The warming drawer support surface must be a minimum 3/4 (2cm) thick plywood platform.
It must support 100 pounds.
The platform must be solid, level and flush with the bottom of the cabinet cut out.
- Use extreme caution when moving or installing the drawer. It is very heavy.
DO NOT LIFT THE WARMING DRAWER BY THE DRAWER HANDLE.
- Be very careful when moving or installing the warming drawer to avoid damage to the frame or damage to the cabinets.
- For best performance results make sure the warming drawer is leveled before completing installation. There is no way to level the warming drawer after it has been installed. If the installation is not level, the door may slide open or not seal tightly, allowing heat to escape.
NOTE: If installing the warming drawer below another product, refer to that product's literature for any installation requirements.
- Be careful when placing drawer. DO NOT pinch the conduit between the drawer back.

WARNING
Before installing or removing, turn power OFF at the service panel. Lock service panel to prevent power from being turned ON accidentally.
Securely fasten drawer to cabinet using the screws provided. Failure to do so could result in warming drawer moving or tipping during use and causing damage to the drawer or cabinets or personal injury.
Know how to disconnect the power to the warming drawer at the circuit breaker or fuse box in case of an emergency.

CAUTION
Unit is heavy and requires at least two people or proper equipment to move.
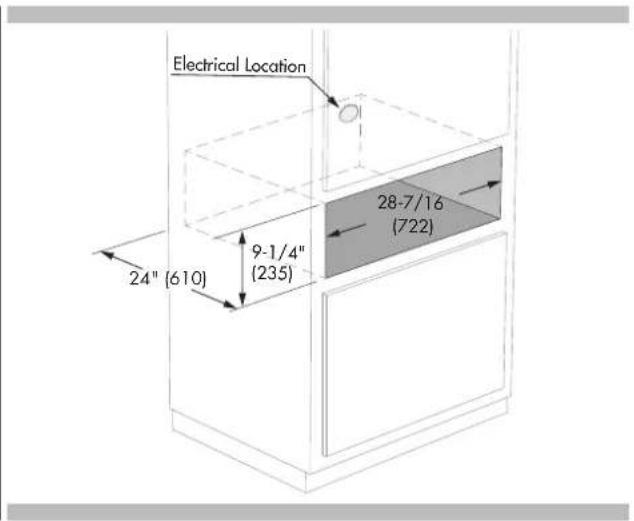
INSTALLATION OPTIONS
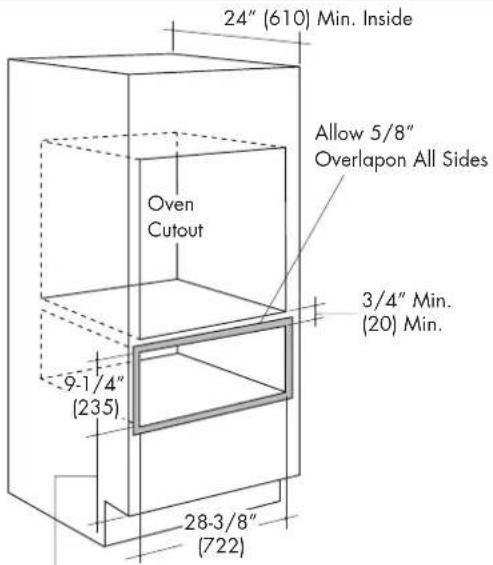
INSTALLATION BELOW A SINGLE OVEN
1" Min. Above Toekick or Adjust o Oven Installation Height
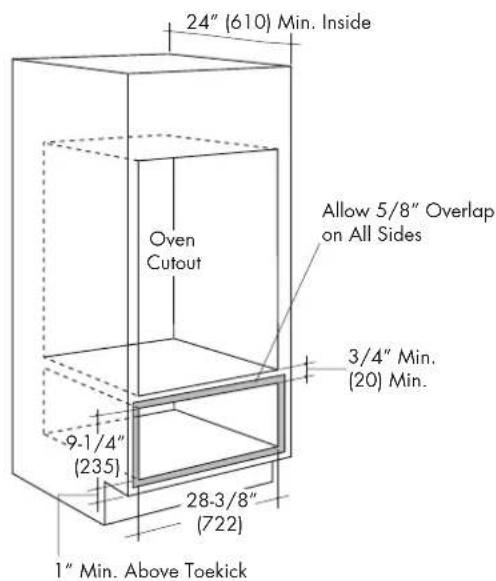
INSTALLATION BELOW A DOUBLE OVEN
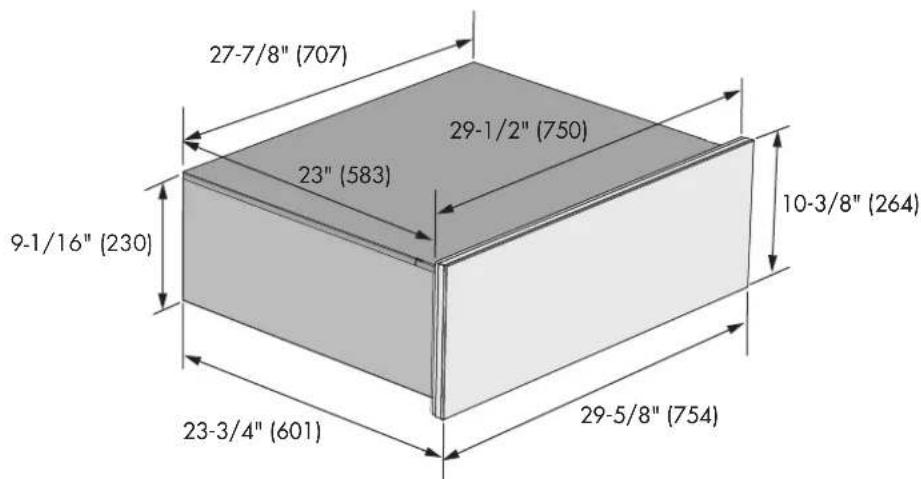
PUSHPULL

PROHANDLE
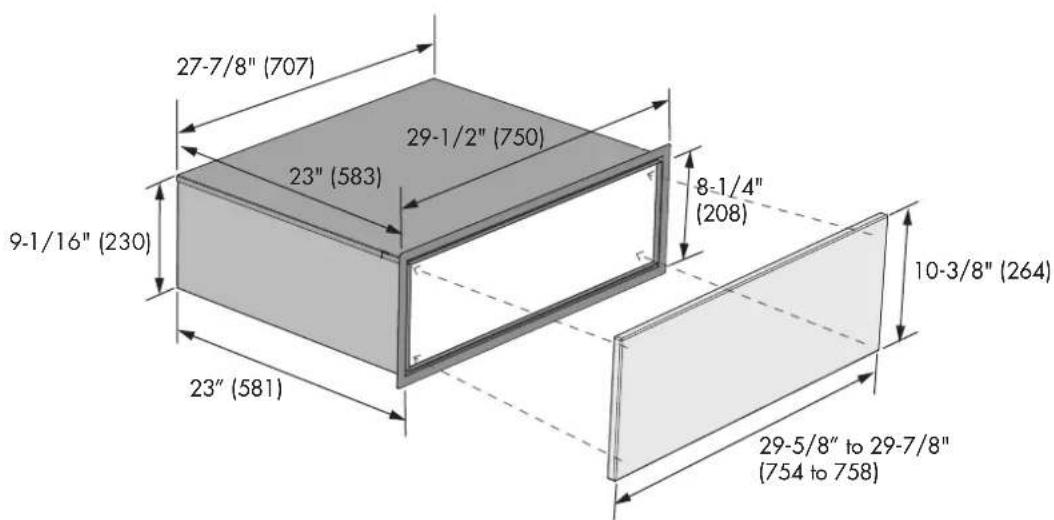
CUSTOM DRAWER FRONT
Custom drawer front (Only for Push to OpenDrawer)
Custom panels must meet the following requirements:
- Have a minimum thickness of 3/4 (19 mm).
- Have all edges finished.
- If using wood, the back must be sealed to prevent moisture damage.
- Be capable of withstanding temperatures above 158^ (70^)
Custom Printer Preparation
- Mark pilot holes on the back side of the panel according to the dimensions indicated in the following drawing.
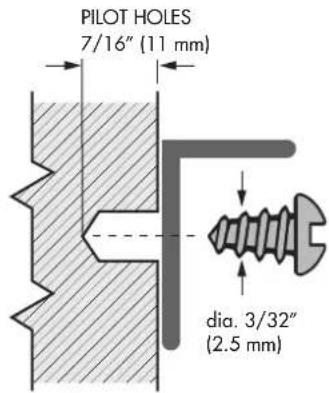
- Drill pilot holes with a 3/32" (2.5 mm) drill bit. Be careful not to drill all the way through the panel. Pilot holes should only be 7/16" (11 mm) deep.
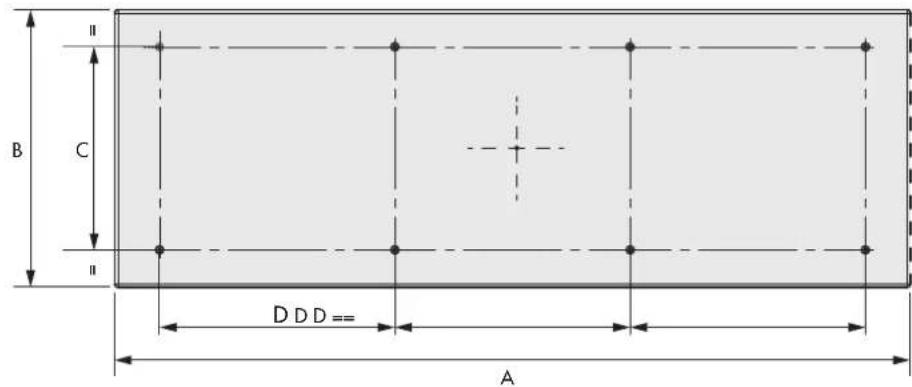
| Dimensions | inches mm | |
| A 29 - 5/ 8" to 29 - 7/8" 754 | to 758 | |
| B10 - 3/ 8" | 264 | |
| C | 7 - 5/ 8" | 193 |
| D | 8 - 13/16" | 224 |
AttachCustomDrawerFront
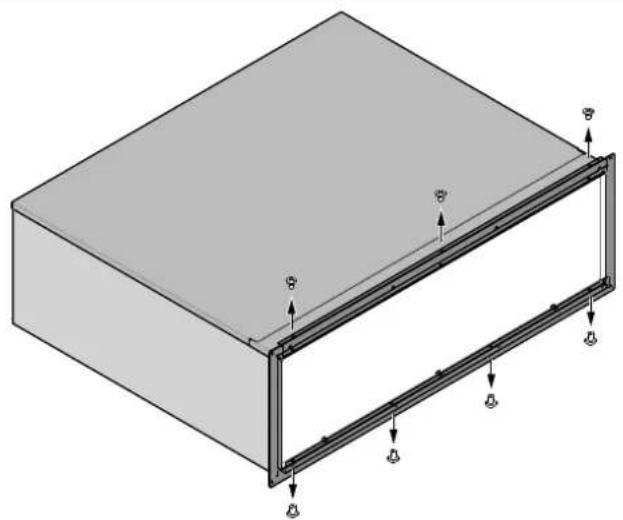
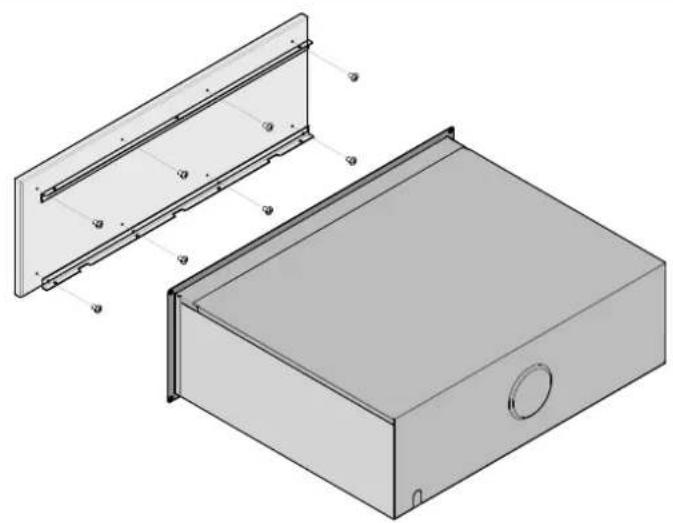
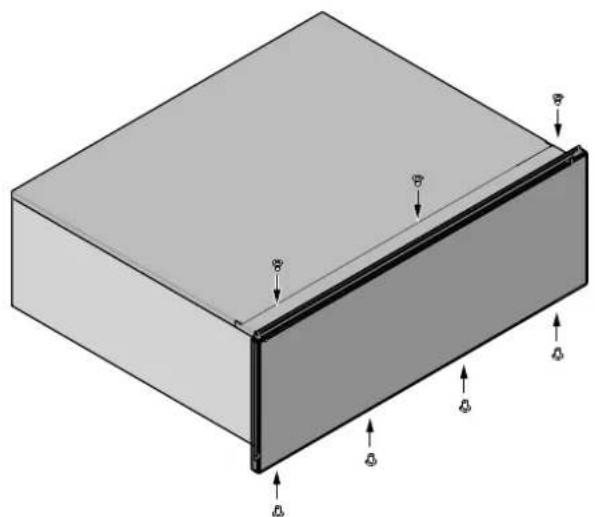
- Remove the three screws from the top profile and four from the bottom (see figure A-B-C).
- Fix the two brackets using eight screws 1/2 (12.7 mm) long and dia. 1/8 (3.5mm).
- Attach custom panel front with the same screws.
A
B
c
Electrical Requirements
General Information
This appliance must be supplied with the proper voltage and frequency and connected to an individual, properly grounded branch circuit, protected by a circuit breaker or fuse having amperage as noted on the rating plate. We recommend you have the electrical wiring and hookup of your appliance connected by a qualified electrician.
After installation, have the electrician show you where your main appliance disconnect is located. Check with your local utilities for electrical codes which apply in your area. Failure to wire your warming drawer according to governing codes could result in a hazardous condition.
If there are no codes, your appliance must be wired and fused to meet the requirements of the National Electrical Code, ANSI/NFPA No. 70 - Latest edition.
In Canada your appliance must be wired and fused to meet the requirements of the Canadian Electrical Code.
Be sure the installation of this product in a mobile home conforms with the Manufactured Home Construction and Safety Standard, Title 24 CFR, Part 3280.
If this standard does not apply, you must follow the standard for Manufactured Home Installations, ANSI A225.1 and Manufactured Home Installations, Sites and Communities and ANSI/NFPA 501A or with local codes.
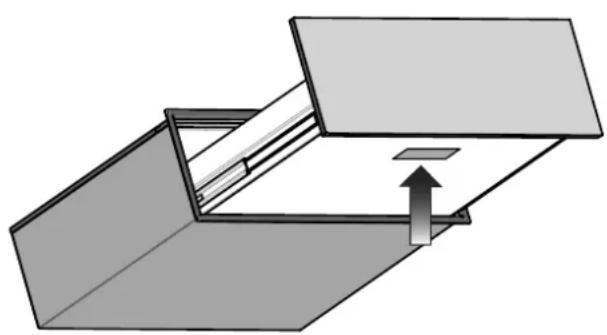
LOCATION OF RATING PLATE
Electrical Connection
An adequate electrical supply and outlet must be used to operate the electrical parts of your appliance.

WARNING
ELECTRICAL SHOCK HAZARD
Electrical Grounding Instruction Plug into a grounded 3 prong outlet.
- Do not remove ground prong.
- Do not use an adapter.
- Do not use an extension cord.
Failure to follow these instructions can result in death, fire, or electrical shock.

IMPORTANT
FOR PERSONAL SAFETY, THIS APPLIANCE MUST BE PROPERLY GROUNDED.
The power cord of this appliance is equipped with a 3-prong (grounding) plug which must be used with a properly grounded 3-hole outlet with a standard 120 Volt, 60 cycle AC household current. If you do not have a 3-hole grounded outlet, have a qualified electrician change your old one.
A grounding adaptor will be needed to convert the old one until the outlet can be replaced. This method is only temporary, and a qualified electrician should test it to be sure it meets requirements.
Do not under any circumstances cut or remove grounding prong from the appliance cord.
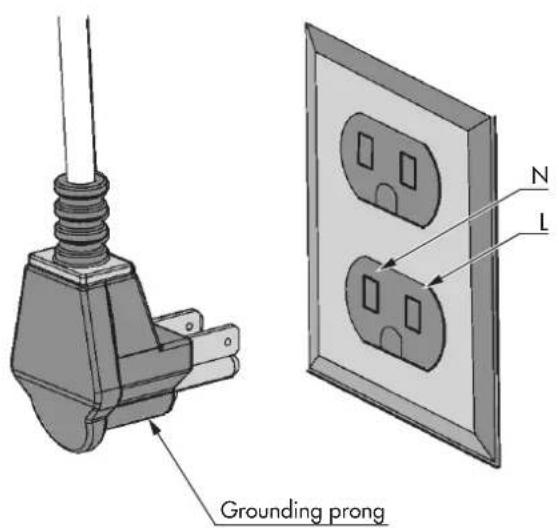

WARNING
- If cold water pipe is interrupted by plastic, non metallic gaskets, union connections or other insulating materials, DO NOT use for grounding.
DO NOT ground to a gas pipe.
DO NOT have a fuse in the NEUTRAL or GROUNDING circuit. A fuse in the NEUTRAL or GROUNDING circuit could result in an electrical shock. - Check with a qualified electrician if you are in doubt as to whether the appliance is properly grounded.
- Failure to follow these instructions could result in serious injury or death.

CAUTION
Do not repair or replace any part of the appliance unless specifically recommended in the manual. All other servicing should be done by a qualified technician. This may reduce the risk of personal injury and damage to the appliance.
Never modify or alter the construction of the appliance by removing panels, wire covers, screws, or any other part of the product.
Installation procedure
Before you begin assembling the drawers of the appliance, make sure there is enough room to fit the drawer and the appliance.
The precise dimensions for the installment are indicated in inches and mm.
Install an anti-tip block against the rear cabinet wall. Verify screws are adequately secured and do not penetrate electrical wiring or plumbing.
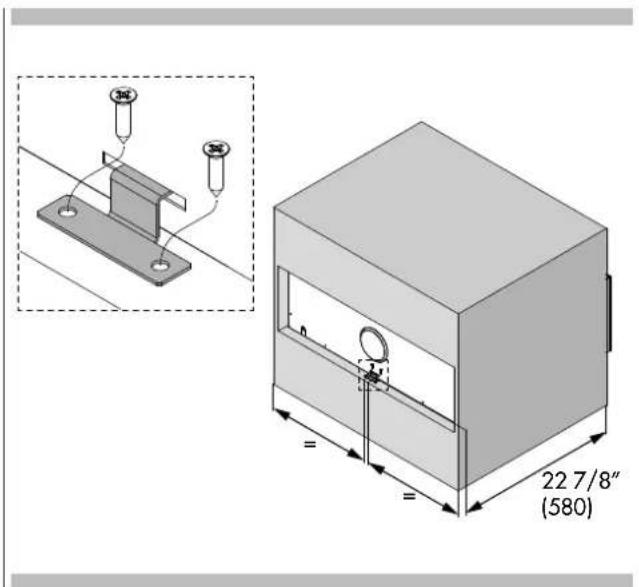
- Turn power off to the electrical outlet.
- Insert plug into three-prong, grounded outlet (see "Power Requirements and Grounding" on page 2 for electrical specification).
- Position the drawer so that it is directly centered and slide warming drawer assembly into cutout until it is flush with cabinet.
- Avoid pinching the power cord between the unit and cabinet wall.
- Open the warming drawer to full extension and fix the structure to the wall with the four screws provided.
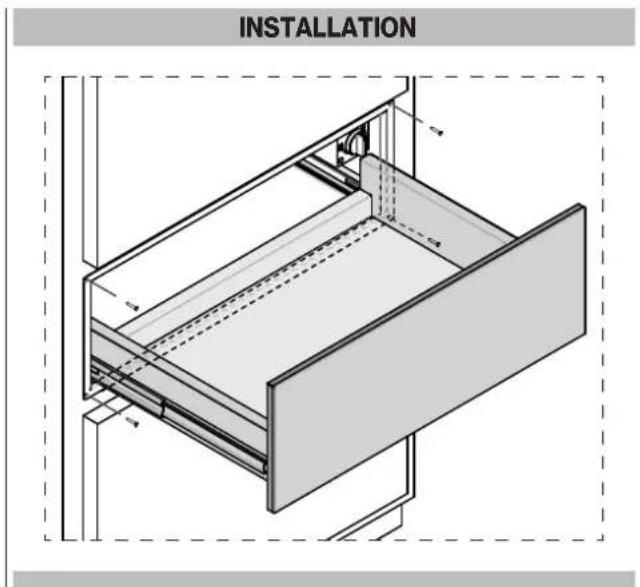
- Turn power back on to the electrical outlet.
- Turn the warming drawer on. Close the drawer for approximately 1 minute then check for warmth.
FORZA WARRANTY U.S.A.
FREESTANDING GAS RANGES - WALLOVENS - RANGE TOPS - DISHWASHERS - RANGE HOODS
The warranties provided by Forza in this statement apply exclusively to Forza appliances and accessories sold as new products to the original owner by a Forza authorized distributor, retailer, dealer or service center and installed in the United States.
The warranties provided in this statement are not transferable and have validity from the date of original purchase.
Duration of warranty:
For twenty-four (24) months from the original date of purchase, the Forza warranty covers all parts and labor to repair or replace, under normal residential use, any part of the product proving to be defective in material or workmanship as a result of the original manufacturing process. Repair service must be performed by a Forza Authorized Service Center during normal working hours.
Responsibilities of the buyer:
When writing or calling about a service problem, please include the following information:
- Your name, address and telephone number;
- Appliance model and serial number;
- Name of your dealer;
- A clear description of the problem you are having;
Proof of purchase (sales receipt).
Cosmetic warranty:
Forza will cover parts showing cosmetic defects (doors, handles, glass, product frames, racking and interior, exterior surfaces) in material and workmanship for a period of seven (7) days after the delivery of the unit. This coverage will include scratches, stains, surface imperfections on stainless steel, paint and porcelain, with the exclusion of slight differences in color due to materials and painting/enameling technologies. However, slight color variation may be noticed because of the inherent differences in painted parts and porcelain parts as well as differences in kitchen lighting, product locations, and other factors. Therefore, this warranty does not apply to color variation attributable to such factors.
WHAT IS NOT COVERED:
1) The product used in any commercial application.
2) Service trips to your home, during which no fault is found.
3) Repair service provided by any service agency that is not Forza authorized.
4) Damage or repair service to correct any service provided by an unauthorized agency.
5) Damage or repair service to correct the use, addition or substitution of any original part with an unauthorized part.
6) Installation not in accordance with local electrical codes or plumbing codes.
7) Defects or damage due to improper storage of the product.
8) Damages due to failure in following the manufacturer's recommended care, cleaning and maintenance instructions; in particular, damages to the oven and/or the cooktop if they have not been cared and cleaned according to these instructions.
9) Defects, damages or missing parts on products sold out of the original factory packaging or from displays.
10) Service calls or repairs to correct the installation of the product and/or related accessories, calibrations and normal adjustments after installation and setup, including burner adjustments.
11) Service calls to connect, convert or otherwise repair the electrical wiring and/or gas line to properly use the product.
12) Service calls to provide instructions on the use of a Forza product.
13) Repair or failure of the product if it is abused, misused, used improperly, used for other than the intended purpose or if used commercially/industrially.
14) Damage or repairs caused by the use of harsh chemicals or cleaning products improperly applied.
15) Replacement of wear and tear parts.
16) Replacement of house fuses or resetting of circuit breakers.
17) Damages to anything situated next to the product, including, but not limited to, ceiling, floor or cabinetry.
18) Defects and damages arising from accidents, alterations, misuse, abuse, improper installation, or installation that does not conform to instructions given by Forza.
19) Damages occurred during transit, handling and/or installation of the product.
20) Defects and damage arising from external forces beyond the control of Forza such as fire, flood, earthquakes and other acts of God.
21) Forza cannot guarantee the availability of service in areas more than 30 miles from an authorized retailer. In such cases where travel charges are levied, those will be borne by the consumer.
22) This warranty only covers service performed at the location of product installation and will not cover costs associated with repairing off-site unless expressly authorized by Forza nor does it cover the travel costs associated with providing service to remote locations.
23) Replacement filters for ventilation hood recirculating kits are not covered by the product warranty.
24) Products with original serial numbers that have been removed.
25) Replacement light bulbs are not covered by the product warranty.
26) Damages to people or property caused by the product or through its usage.
In the case that the product is will be installed in a remote area, where certified trained technicians are not reasonably available, the customer will be responsible for the transportation costs for the delivery of the product to the nearest authorized service center or for the travel costs of a certified trained technician.
Remote locations/area: are defined as being outside of a 30 miles from any service provider.
Forza reserves the right to revise this warranty at any time.
Forza does not assume any responsibility for incidental or consequential damages. Some states do not allow the exclusion or limitation of incidental or consequential damages, so the above limitation or exclusion may not apply to you. This warranty gives you specific legal rights and you may also have other rights which may vary from state to state.
FORZA WARRANTY U.S.A.
B-STORE/ DISPLAY MODEL
FREESTANDING GAS RANGES - WALLOVENS - RANGE TOPS - DISHWASHERS - RANGE HOODS
The warranties provided by Forza in this statement apply exclusively to Forza appliances and accessories sold to the original owner by a Forza authorized distributor, retailer, dealer or service center and installed in the United States.
The warranties provided in this statement are not transferable and have validity from the date of original purchase.
B-Stock (refurbished product, product returns, 'scratch and dent' products, old stock (defined as more than one year's difference between production date and date of sale to end user, discounted product etc.) and display models (trade shows, dealer, project or distributor showroom display models, etc.) are not considered 'new', in-the- box product and are thus not covered by FORZA standard warranty.
For any functional or cosmetic issue not disclosed by the seller realized at initial inspection / commission of the product: please contact the seller.
Duration of warranty:
FULL NINETY DAY TOTAL PRODUCT WARRANTY
For ninety days from the original date of purchase, the FORZA product warranty covers all parts and labor to repair or replace, under normal residential use, any part of the product proving to be defective in material or workmanship as a result of the original manufacturing process. There is no service or cosmetic warranty of any kind of B-Stock model.
Responsibilities of the buyer: When writing or calling about a service problem, please include the following information:
- Your name, address and telephone number;
- Appliance model and serial number;
- Name of your dealer;
- A clear description of the problem you are having;
Proof of purchase (sales receipt).
WHAT IS NOT COVERED:
1) The product used in any commercial application.
2) Service trips to your home, during which no fault is found.
3) Repair service provided by any service agency that is not Forza authorized.
4) Damage or repair service to correct any service provided by an unauthorized agency.
5) Damage or repair service to correct the use, addition or substitution of any original part with an unauthorized part.
6) Installation not in accordance with local electrical codes or plumbing codes.
7) Defects or damage due to improper storage of the product.
8) Damages due to failure in following the manufacturer's recommended care, cleaning and maintenance instructions; in particular, damages to the oven and/or the cooktop if they have not been cared and cleaned according to these instructions.
9) Defects, damages or missing parts on products sold out of the original factory packaging or from displays.
10) Service calls or repairs to correct the installation of the product and/or related accessories, calibrations and normal adjustments after installation and setup, including burner adjustments.
11) Service calls to connect, convert or otherwise repair the electrical wiring and/or gas line to properly use the product.
12) Service calls to provide instructions on the use of a Forza product.
13) Repair or failure of the product if it is abused, misused, used improperly, used for other than the intended purpose or if used commercially/industrially.
14) Damage or repairs caused by the use of harsh chemicals or cleaning products improperly applied.
15) Replacement of wear and tear parts.
16) Replacement of house fuses or resetting of circuit breakers.
17) Damages to anything situated next to the product, including, but not limited to, ceiling, floor or cabinetry.
18) Defects and damages arising from accidents, alterations, misuse, abuse, improper installation, or installation that does not conform to instructions given by Forza.
19) Damages occurred during transit, handling and/or installation of the product.
20) Defects and damage arising from external forces beyond the control of Forza such as fire, flood, earthquakes and other acts of God.
21) Forza cannot guarantee the availability of service in areas more than 30 miles from an authorized retailer. In such cases where travel charges are levied, those will be borne by the consumer.
22) This warranty only covers service performed at the location of product installation and will not cover costs associated with repairing off-site unless expressly authorized by Forza nor does it cover the travel costs associated with providing service to remote locations.
23) Replacement filters for ventilation hood recirculating kits are not covered by the product warranty.
24) Products with original serial numbers that have been removed.
25) Replacement light bulbs are not covered by the product warranty.
26) Damages to people or property caused by the product or through its usage.
In the case that the product is will be installed in a remote area, where certified trained technicians are not reasonably available, the customer will be responsible for the transportation costs for the delivery of the product to the nearest authorized service center or for the travel costs of a certified trained technician.
Remote locations/area: are defined as being outside of a 30 miles from any service provider.
Forza reserves the right to revise this warranty at any time.
Forza does not assume any responsibility for incidental or consequential damages. Some states do not allow the exclusion or limitation of incidental or consequential damages, so the above limitation or exclusion may not apply to you. This warranty gives you specific legal rights and you may also have other rights which may vary from state to state.
Cher Client,
Compartment interne 30
Procedure installation 38
GARANTIE 39
INSTRUCTIONS POUR L'UTILISATEUR:
INSTRUCTIONS POUR L'INSTALLATION:
17. Conserverces instructions.
NETTOYAGE:
INSTRUCTIONS POUR L'INSTALLATION:

Instructions d'Installation
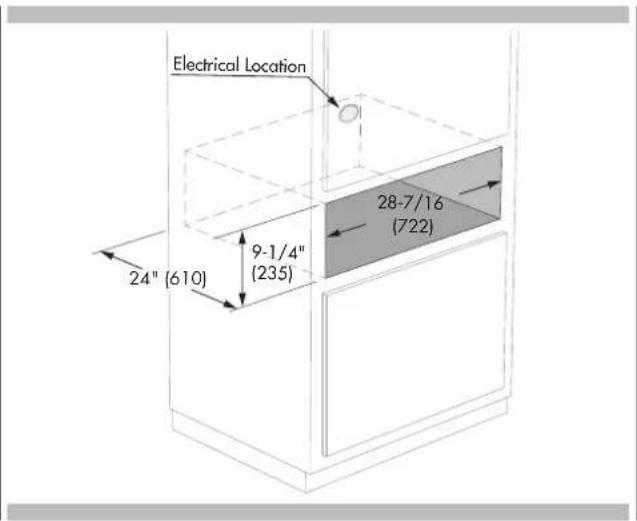
OPTIONS D'INSTALLATION
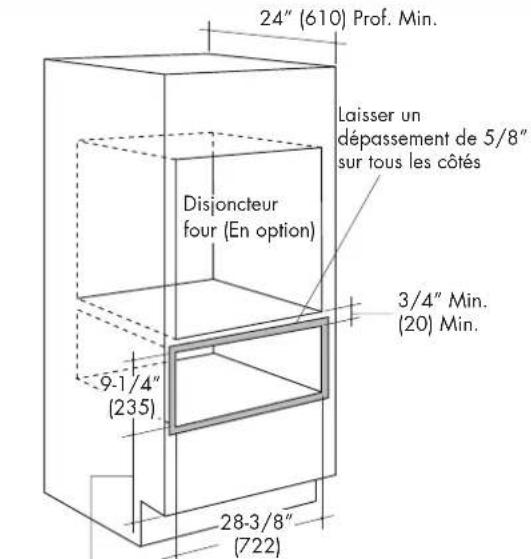
INSTALLATION EN-DESSOUS D'UN FOUR SIMPLE
Procedure installation
GARANTIE PRODUIT TOTALE QUATRE-VINGT-DIX JOURS
Compartmento interior 50
CambiaryunaLampara del Cajon 50