
VitaPower Serie 4 MMB6172SN - Food Processor BOSCH - Free user manual and instructions
Find the device manual for free VitaPower Serie 4 MMB6172SN BOSCH in PDF.

| Product type | Blender / food processor |
| Brand | Bosch |
| Model | VitaPower Serie 4 MMB6172SN |
| Power supply | 220-240 V ~ 50/60 Hz |
| Power | 600 W |
| Blender jug capacity | 1.5 L |
| Bottle capacity | 0.6 L |
| Number of speeds | 5 (including pulse function) |
| Pulse function | Yes, momentary operation |
| Jug material | Glass |
| Bottle material | BPA-free plastic |
| Color | Black / Stainless steel |
| Dimensions (W x D x H) | 20 x 20 x 40 cm |
| Net weight | 3.5 kg |
| Cord length | 1 m (adjustable) |
| Included accessories | Blender jug with lid and measuring cup, bottle with lid and seal, tamper |
| Safety systems | Interlock safety, overload protection |
| Dishwasher safe | Yes, for all removable parts (except motor unit) |
| After-sales service | BSH Electroménager S.A.S., 01 40 101 100 |
| Warranty | 2 years |
Frequently Asked Questions - VitaPower Serie 4 MMB6172SN BOSCH
User questions about VitaPower Serie 4 MMB6172SN BOSCH
0 question about this device. Answer the ones you know or ask your own.
Ask a new question about this device
Download the instructions for your Food Processor in PDF format for free! Find your manual VitaPower Serie 4 MMB6172SN - BOSCH and take your electronic device back in hand. On this page are published all the documents necessary for the use of your device. VitaPower Serie 4 MMB6172SN by BOSCH.
USER MANUAL VitaPower Serie 4 MMB6172SN BOSCH
new device on MyBosch now and get free benefits:
bosch-home.com/ welcome

text_image
MyBoschVitaPower Serie | 4
MMB617..
text_image
Diagram showing a paintbrush with a magnified view of three labeled sections marked with checkmarks and crosses, likely illustrating inspection or classification.3
text_image
Diagram illustrating a device being switched to a lock, with a 'CLICK' button and rotation arrow labeled.4
text_image
Illustration showing a blender being added to a base with a 'CLICK' button, indicating rotation and cleaning steps.5
natural_image
Illustration of a blue cup pouring liquid into a glass pitcher with measurement markings (no text or symbols)6
text_image
Diagram showing a blue plastic component being inserted into a cleaning or mixing bowl, with Chinese labels indicating the process.7
text_image
Diagram showing a blue circular button labeled '←' next to a hand operating a blender with an hourglass icon, illustrating the process of moving or shifting.8

text_image
Diagram showing a blue circular device with directional arrows next to a blender, with an hourglass icon nearby.9

text_image
Diagram illustrating a blender with a blue plastic plug, showing the process from lifting to rotating and shifting.10

natural_image
Illustration of a blender with a blue plastic plug inserted into the top pan (no text or symbols)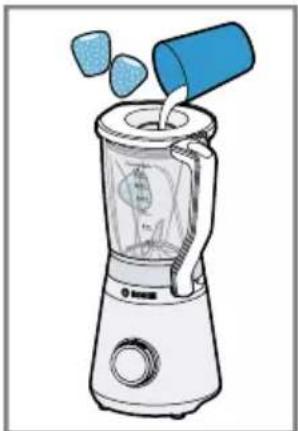
natural_image
Illustration of a blender with liquid being poured into it, no text or symbols present
text_image
Diagram of a blender with a blue lid and upward arrow indicating process flow or transformation
natural_image
Illustration of a blender with liquid being poured into it, no text or symbols present11
natural_image
Illustration of a blue blender with a black arrow indicating rotation (no text or symbols)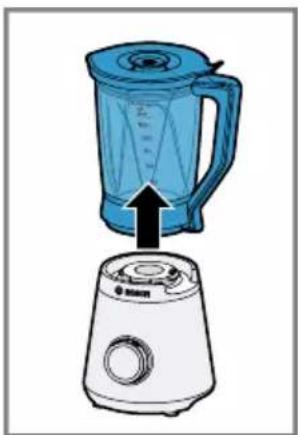
natural_image
Illustration of a blue blender being placed on top of a white blender (no text or symbols)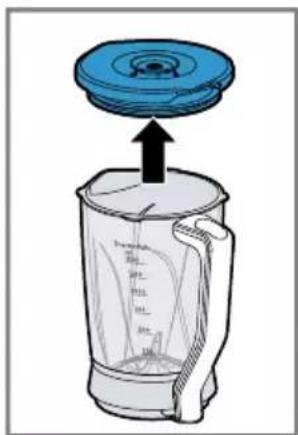
text_image
Diagram of a blender with a blue lid and upward arrow indicating the top view of the lid.
natural_image
Simple line drawing of a glass pitcher pouring liquid into a blue cup (no text or symbols)13

natural_image
Illustration of a blue pill bottle pouring liquid into a glass jar (no text or symbols)
natural_image
Diagram of a plastic container with a blue lid and black arrow indicating downward motion (no text or symbols)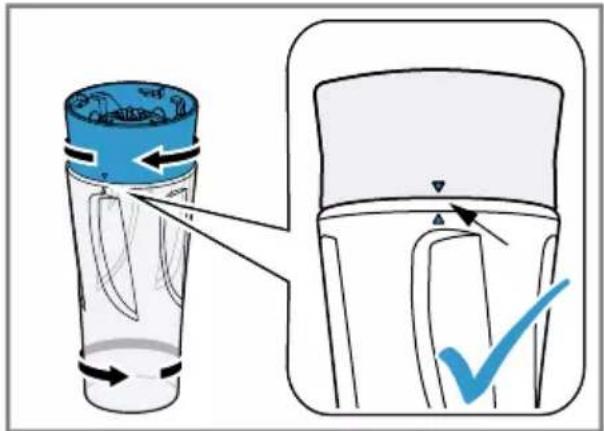
text_image
Diagram illustrating a cleaning or packaging process with arrows and a checkmark indicating inspection or confirmation.15

natural_image
Illustration of a blender with blue handle and black arrow indicating rotation (no text or symbols)
text_image
CLICK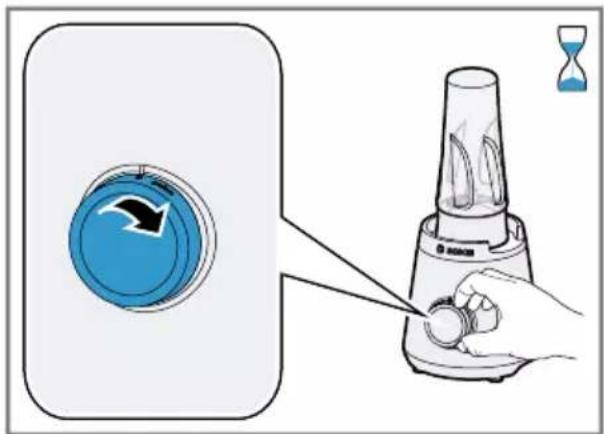
text_image
Diagram showing a hand operating a blender with a blue circular button and an arrow indicating rotation, alongside a small inset image of the bell.17
natural_image
Illustration of a blue circular button with directional arrows being inserted into a blender (no text or symbols)19
text_image
Diagram of a blender with labeled parts showing blue tip and directional arrowsThe image is too blurry to recognize any text content.

text_image
Diagram illustrating a three-step process of a blender with rotation arrows and labeled steps 1, 2, and 3.
text_image
Diagram showing a blue teapot with an open lid and a circular base, labeled with steps 1 and 2 indicating a process or operation.
text_image
Diagram showing a blue lid being filled with a plastic container, labeled with step numbers ① and ②.21
 |  |  |  |  | |
| √ | √ | × | |||
| × | √ | √ | |||
| × | √ | √ | |||
22

text_image
Diagram of a blender with a blue plastic component inserted into the top, showing liquid level and pressure measurement.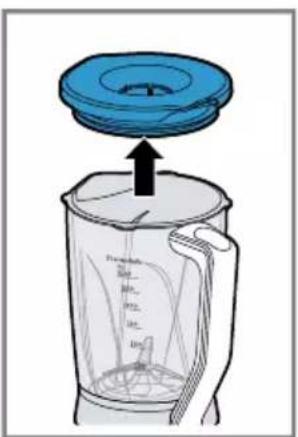
text_image
Diagram of a blender with a blue lid and arrow indicating upward motion, showing liquid level measurements.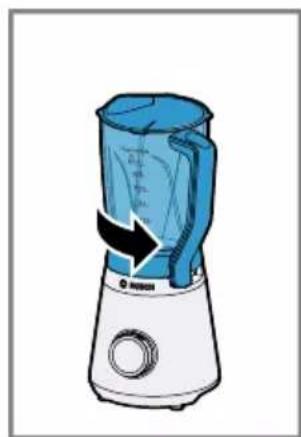
natural_image
Illustration of a blue blender with a black arrow indicating rotation (no text or symbols)
natural_image
Illustration of a blue blender being placed on top of a white blender with an arrow indicating the process (no text or symbols present)23
natural_image
Illustration of a hand holding a blue object inside a glass jar, with a circular arrow symbol on the top (no text or symbols present)25
natural_image
Illustration of a blue hard hat emerging from a glass mug with an upward arrow (no text or symbols)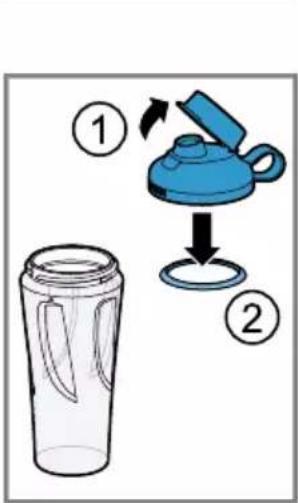
text_image
Diagram showing a blue teapot being placed on a glass container, with numbered instructions for adding or removing the lid.
natural_image
Illustration of a plastic container with blue lid and two cutouts, no text or symbols present26

natural_image
Illustration of a blender with a blue lid and upward arrow indicating process (no text or symbols)
natural_image
Illustration of a blender with a blue lid and upward arrow indicating process (no text or symbols)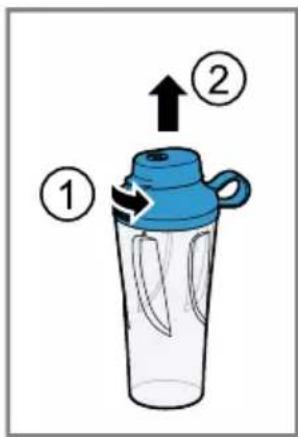
text_image
Diagram of a blender with labeled parts and directional arrows indicating process flow27
text_image
Diagram showing a teapot being placed into a plastic container, with numbered instructions for the step. |  |  |  N X N X |  pulseMI pulseMI |  | ! | ||
 | 40% |  | √ | √ |  300-1300200-500 300-1300200-500 | max | 45-90 s45-90 s | |
 | 0% |  | √ | √ |  300-1300200-500 300-1300200-500 | max | 45-90 s45-90 s | |
 | 30% |  | √ | √ |  300-1000200-600 300-1000200-600 | max | 45-120 s45-90 s | * |
 | 0% |  | √ | √ | 300-1300200-600 | max | 45-90 s60-90 s | * |
 | 50% |  | √ | √ |  300-1500200-600 300-1500200-600 | min | 20-30 s20-30 s | |
| < 70 °C | ... |  | √ | × | 00-1000 | min | 30-60 s | |
| 60% | 40% |  | √ | √ | 300-1000200-600 | max | 45-90 s45-60 s | * |
 | ||||||||
| ### | ### | ### | √ | √ | 00-1300 | max | 45-90 s | |
| ### | ### | ### | √ | × |  10 x 10g 10 x 10g | pulse | 2-3x1 s | |
180 °Cmin | min |  | × | √ | 400 | max | 120 s | * |


text_image
QR code image containing encoded data, no visible human-readable textInhaltsverzeichnis
1 Sicherheit 9
Futher information and explanations are available online:

text_image
QR code image containing encoded data, no visible human-readable textTable of contents
1 Safety.... 26
1.1 General information...... 26
1.2 Intended use.... 26
1.3 Restriction on user group...... 27
1.4 Safety instructions 27
2 Avoiding material damage...... 30
3 Environmental protection and saving energy.... 30
3.1 Disposing of packaging ..... 30
4 Unpacking and checking...... 30
4.1 Unpacking the appliance and parts 30
4.2 Scope of delivery.... 30
4.3 Setting up the appliance ..... 30
5 Familiarising yourself with your appliance.... 31
5.1 Appliance 31
5.2 Symbols.... 31
5.3 Rotary switch.... 31
5.4 Safety systems 31
6 Before using for the first time ... 31
6.1 Cleaning the appliance and parts 32
7 Basic operation ...... 32
7.1 Cable length 32
7.2 Recommended speeds...... 32
7.3 Using the blender to process food.... 32
7.4 Using instantaneous switching.... 33
7.5 Pushing down food for processing 33
7.6 Adding more ingredients...... 33
7.7 Emptying the blender jug ...... 33
7.8 Processing food using the To-Go blender jug .... 33
7.9 Closing the To-Go blender jug.... 34
8 Cleaning and servicing...... 34
8.1 Dishwasher-safe components.... 34
8.2 Cleaning products...... 34
8.3 Cleaning the main unit 35
8.4 Cleaning the blender...... 35
8.5 Cleaning the To-Go blender
jug and To-Go blade insert ..... 35
9 Recipes 36
9.1 Overview of recipes...... 36
10 Troubleshooting...... 37
11 Transportation, storage and disposal 39
11.1 Disposing of old appliance .... 39
12 Customer Service.... 39
12.1 Product number (E-Nr.) and production number (FD)...... 39
12.2 Warranty conditions.... 39

1 Safety
Observe the following safety instructions.
1.1 General information
- Read this instruction manual carefully.
- Keep the instruction manual and the product information safe for future reference or for the next owner.
■ Do not connect the appliance if it has been damaged in transit.
1.2 Intended use
Only use this appliance:
■ With genuine parts.
■ for blending and puréeing.
■ for making pancake batter, sorbets, spreads, sauces and ice cream.
■ For crushing ice cubes.
■ Under supervision.
■ In private households and in enclosed spaces in a domestic environment at room temperature.
■ for normal processing quantities and for normal processing times for domestic use.
■ Up to an altitude of max. 2000 m above sea level.
■ for blending fruit and vegetables to make smoothies.
Disconnect the appliance from the power supply when:
■ are not using the appliance.
■ the appliance is unattended.
■ assembling the appliance.
■ taking the appliance apart.
■ cleaning the appliance.
■ approaching rotating parts.
■ confronted with a fault.
1.3 Restriction on user group
This appliance can be used by persons with reduced physical, sensory or mental capabilities or a lack of experience and/or knowledge if they have been given supervision or instruction concerning use of the appliance in a safe way and if they understand the hazards involved.
Do not let children play with the appliance.
Cleaning and user maintenance must not be performed by children.
The appliance must not be used by children. Keep children away from the appliance and power cable.
1.4 Safety instructions
Observe the safety instructions.
⚠ WARNING – Risk of electric shock!
If the appliance or the power cord is damaged, this is dangerous.
▶ Never operate a damaged appliance.
▶ Never operate an appliance with a cracked or fractured surface.
▶ Never pull on the power cord to unplug the appliance. Always unplug the appliance at the mains.
▶ If the appliance or the power cord is damaged, immediately unplug the power cord or switch off the fuse in the fuse box.
▶ Call customer services. → Page 39
Incorrect installation is dangerous.
- Connect and operate the appliance only in accordance with the specifications on the rating plate.
Incorrect repairs are dangerous.
▶ Repairs to the appliance should only be carried out by trained specialist staff.
▶ Only use genuine spare parts when repairing the appliance.
If the power cord of this appliance is damaged, it must be replaced by the manufacturer, the manufacturer's Customer Service or a similarly qualified person in order to prevent any risk.
en Safety
An ingress of moisture can cause an electric shock.
▶ Never immerse the appliance or the power cord in water or clean in the dishwasher.
▶ Only use the appliance in enclosed spaces.
▶ Never expose the appliance to intense heat or humidity.
- Do not use steam- or high-pressure cleaners to clean the appliance.
If the insulation of the power cord is damaged, this is dangerous.
▶ Never let the power cord come into contact with hot appliance parts or heat sources.
▶ Never let the power cord come into contact with sharp points or edges.
▶ Never kink, crush or modify the power cord.
WARNING – Risk of fire!
Intense heat may cause the appliance and other parts to catch fire.
▶ Never place the appliance on or near hot surfaces.
⚠ WARNING – Risk of scalding!
Hot food may splash out during processing and steam can escape from the lid.
▶ Add a maximum of 1000 ml of hot or frothing food.
▶ Process hot food carefully.
▶ Do not lean over the appliance.
- Do not process food that is hotter than 50 °C in the To-Go blender jug.
⚠ WARNING – Risk of injury!
Operating the appliance with damaged parts may result in injury.
- Parts which show cracks or other damage or do not fit correctly must be replaced with genuine spare parts.
Improper use may cause injuries.
▶ Only use the appliance once it is fully assembled.
▶ Never operate the appliance without fitting the lid.
▶ Never place fingers in the attached blender jug.
⚠ WARNING – Risk of cutting!
The blender knife has sharp blades.
- When cleaning and emptying the blender jug, watch out for the sharp blades.
▶ Never touch the edges of the blades with bare hands.
⚠ WARNING – Risk of suffocation!
Children may put packaging material over their heads or wrap themselves up in it and suffocate.
▶ Keep packaging material away from children.
▶ Do not let children play with packaging material.
Children may breathe in or swallow small parts, causing them to suffocate.
- Keep small parts away from children.
▶ Do not let children play with small parts.
WARNING – Risk of harm to health!
Soiling on surfaces may be harmful to health.
▶ Follow the cleaning instructions.
- Clean surfaces which come in contact with food before each use.
2 Avoiding material damage
ATTENTION!
Improper use may cause material damage.
- Do not operate the appliance at no-load.
- Observe the maximum processing quantities.
▶ Never use the blender jug in the microwave or oven. - Do not use the blender jug to store objects which do not belong to it.
- Do not process food that is hotter than 50 °C in the To-Go blender jug.
3 Environmental protection and saving energy
3.1 Disposing of packaging
The packaging materials are environmentally compatible and can be recycled.
- Sort the individual components by type and dispose of them separately.
4 Unpacking and checking
Find out here what you need to note when unpacking the appliance.
4.1 Unpacking the appliance and parts
-
Take the appliance out of the packaging.
-
Take all other parts and the accompanying documents out of the packaging and place them to hand.
- Remove any packaging material.
- Remove any stickers or film.
4.2 Scope of delivery
After unpacking all parts, check for any damage in transit and completeness of the delivery.
→ Fig. 1
| A | Main unit |
| B | Blender jug with EasyClick blade insert |
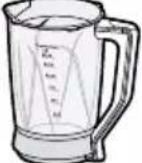
| C | Lid and measuring cup |
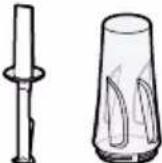
| D | Pusher |
| E | To-Go blender jug with blade insert ^1 |
| F | Lid with seal and closable mouthpiece ^1 |
| G | User manual |
^1 Depending on the appliance specifications
4.3 Setting up the appliance
- Place the appliance on a stable, level, clean and flat work surface.
- Pull the power cable out to the required length.
→ "Cable length", Page 32 Do not insert the mains plug.
5 Familiarising yourself with your appliance
5.1 Appliance
You can find an overview of the parts of your appliance here.
→ Fig. 2
| 1 | Pusher |
| 2 | Main unit |
| 3 | Rotary switch |
| 4 | Scale |
| 5 | Measuring cup |
| 6 | Lid with filling opening |
| 7 | Blender jug |
| 8 | EasyClick blade insert |
| 9 | Retaining bracket |
| 10 | Power cord storage compartment |
| 11 | To-Go blade insert ^1 |
| 12 | To-Go blender jug ^1 |
| 13 | Lid with seal and closable mouthpiece ^1 |
| 14 | Seal |
^1 Depending on the appliance specifications
5.2 Symbols
You can find an overview of the symbols used on your appliance here.
Symbol Explanation

Position markings
5.3 Rotary switch
The rotary switch is used to start and stop processing and select the speed.
| Symbol | Function |
| 0 | Stop processing. |
| min | Process ingredients at low speed. |
| max | Process ingredients at maximum speed. |
| pulse | Process ingredients briefly at maximum speed. |
5.4 Safety systems
You can find an overview of your appliance's safety systems here.
Start lock-out
Start lock-out prevents your appli- ance from being switched on acci- dentally.
You can switch on and operate the appliance once the blender jug has been correctly positioned.
Overload protection
The overload protection system prevents the motor and other components from being damaged through being overloaded.
6 Before using for the first time
Configure the basic settings. Clean the appliance and accessories.
6.1 Cleaning the appliance and parts
- Clean all parts that come into contact with food before using for the first time.
→ "Cleaning and servicing", Page 34 - Put the cleaned and dried parts out ready for use.
7 Basic operation
7.1 Cable length
Adjust the length of the power cable to your needs.
Adjusting cable length via cable storage compartment
- Pull the power cable out to the required length.
- To shorten the cable, push it into the cable storage compartment.
7.2 Recommended speeds
You can find out here which speeds you can use to achieve optimal results.
| Setting Use | |
| pulse | Briefly blending food with instantaneous switching at maximum speed. |
| max | Blending, puréeing, emulsifying, frothing and cutting up food. |
| min | Blending food that should not be cut up too small. |
Tip: Please use our recipe suggestions to gain experience with your new appliance.
→ "Overview of recipes", Page 36
7.3 Using the blender to process food
WARNING Risk of injury!
Improper use may cause injuries.
▶ Only use the appliance once it is fully assembled.
▶ Never operate the appliance without fitting the lid.
▶ Never place fingers in the attached blender jug.
- Prepare the food.
For example, cut large items of food into pieces. - Check the seal on the EasyClick blade insert. If a seal has been removed, reinsert it correctly. → Fig. 3
Note: The seal remains on the EasyClick blade insert for cleaning. If the seal is damaged or not correctly positioned, liquid may run out.
√ The seal is seated in the groove.
√ The sealing lips point in the direction of the blender jug.
√ The smooth sealing surface lies against the EasyClick blade insert.
-
Turn the blender jug upside down.
-
Open the retaining bracket. → Fig. 4
-
Align the EasyClick blade insert with the tap in the blender jug.
-
Push the EasyClick blade insert into the blender jug and close the retaining bracket until it clicks into place.
→ Fig. 4
-
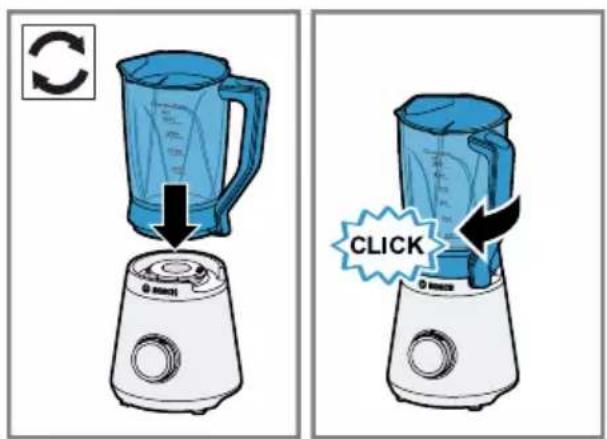
Place the blender jug onto the main unit and rotate in a clockwise direction until it locks into place.
→ Fig. 5 -
Add the food to the blender jug.
→Fig.6
Observe the minimum and maximum processing quantities.
→ "Overview of recipes", Page 36
- Insert the measuring jug in the lid and place the lid on the blender jug.
→ Fig. 7
The lid must be completely closed.
-
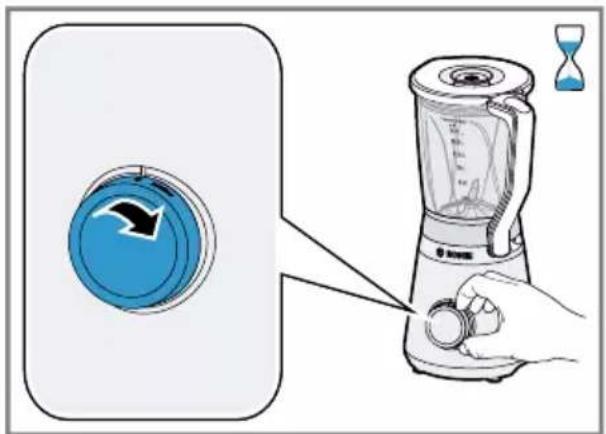
Insert mains plug.
-
Set the rotary switch to the recommended speed.
→ Fig. 8
-
Process the ingredients until you achieve the required result.
-
To end the operation, set the rotary switch to 0
7.4 Using instantaneous switching
- Set the rotary switch to pulse hold it there.
→ Fig. 9
√ The ingredients are processed at maximum speed.
- Release the rotary switch.
√ The rotary switch jumps to .
√ Processing stops.
7.5 Pushing down food for processing
- Remove the measuring jug and insert the pusher into the filling opening.
→ Fig. 10
- Push down the food from the sides of the blender jug.
→ Fig. 10
7.6 Adding more ingredients
-
During processing, remove the measuring jug and add the ingredients through the opening in the lid. → Fig. 11
-
To add larger quantities, set the rotary switch to Q
-
Wait until the appliance stops.
-
Remove the lid.
→ Fig. 12
- Add the ingredients.
→ Fig. 12
- Place the lid on the blender jug again and continue to process the ingredients.
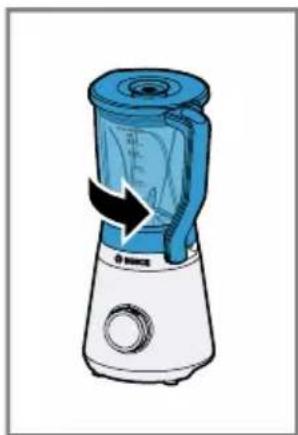
7.7 Emptying the blender jug
Requirement: The appliance has stopped.
-
Turn the blender jug anti-clockwise and remove it from the main unit.
→ Fig. 13 -
To pour out all of the processed food, remove the lid.
→ Fig. 14
7.8 Processing food using the To-Go blender jug
-
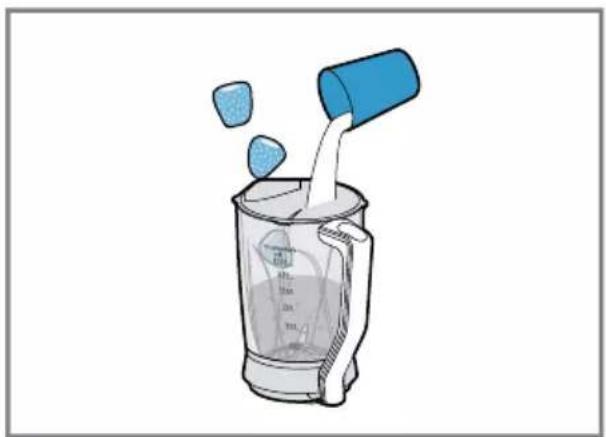
Prepare the food.
For example, cut large items of food into pieces. -
Add the food to the To-Go blender jug.
→ Fig. 15
Observe the minimum and maximum processing quantities.
→ "Overview of recipes", Page 36
- Place the To-Go blade insert on the To-Go blender jug.
→ Fig. 15
en Cleaning and servicing
- Screw the To-Go blade insert and the To-Go blender jug in tightly.
→ Fig. 16
- The ▼ and markings must match up.
- You can only connect the To-Go blade insert to the main unit when the To-Go blender jug is screwed on fully.
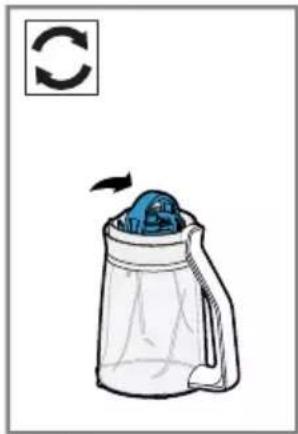
- Turn the To-Go blender jug upside down.
→ Fig. 17
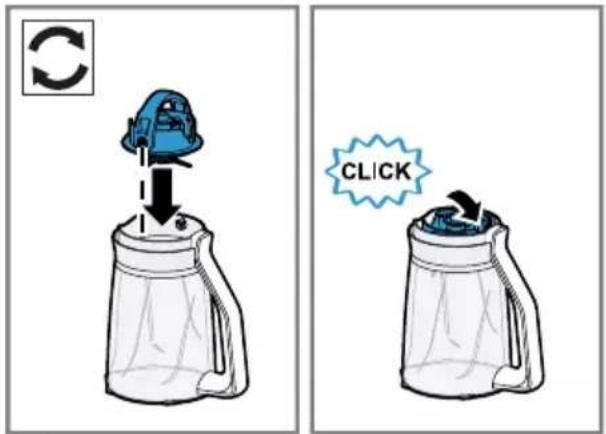
- Place the To-Go blade insert on the main unit and rotate it in a clockwise direction until it locks into place.
→ Fig. 17
- Set the rotary switch to the recommended speed.
→ Fig. 18
Tip: We recommend pausing operation several times when preparing smaller quantities of baby food in the To-Go blender jug.
Processing can also take place with instantaneous switching.
→ "Using instantaneous switching", Page 33
-
Process the ingredients until you achieve the required result.
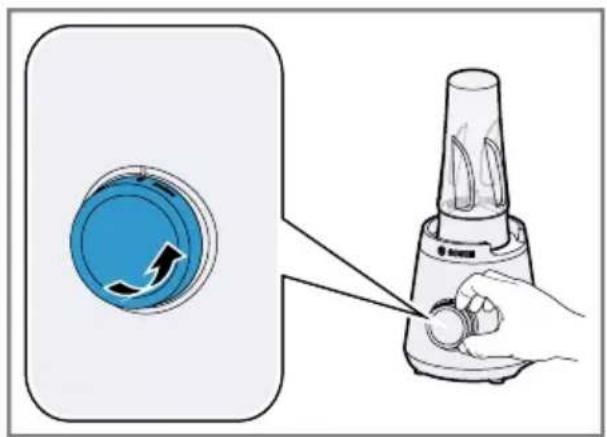
-
To end the operation, set the rotary switch to 0.
→ Fig. 19
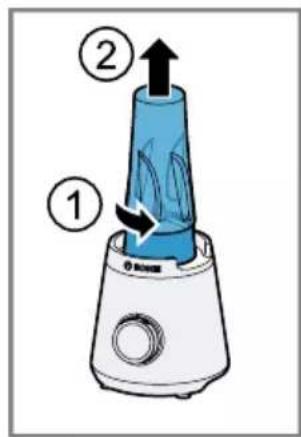
7.9 Closing the To-Go blender jug
Requirement: The appliance has stopped.
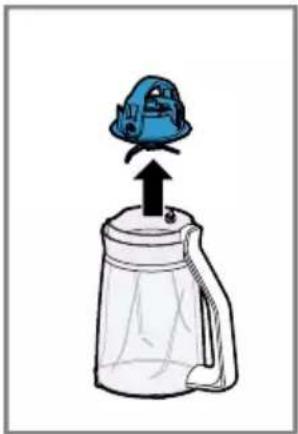
- Turn the To-Go blender jug anti-clockwise and remove it from the main unit.
→ Fig. 20
- Turn the To-Go blender jug and unscrew the To-Go blade insert.
→ Fig. 20
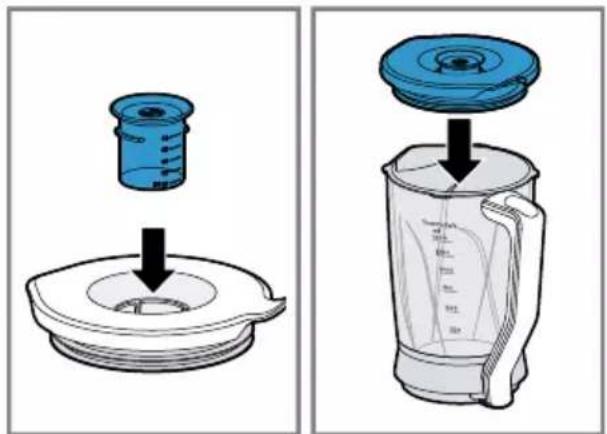
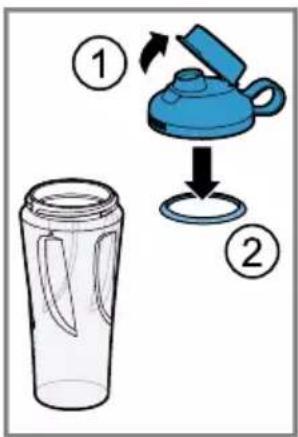
- Insert the seal for the lid.
→ Fig. 21
- Close the mouthpiece on the lid.
→ Fig. 21
- Screw the lid and the To-Go blender jug in tightly.
→ Fig. 21
8 Cleaning and servicing
To keep your appliance working efficiently for a long time, it is important to clean and maintain it carefully.
8.1 Dishwasher-safe components
Find out here which components can be put in the dishwasher.
ATTENTION!
Some parts may be damaged if they are put in a dishwasher.
▶ Only put dishwasher-safe parts in the dishwasher.
▶ Only use programmes that do not heat the water above 60 °C.
- Do not wedge plastic parts in the dishwasher.
This overview describes the cleaning process for the components.
→ Fig. 22
8.2 Cleaning products
Find out here which cleaning products are suitable for your appli-ance.
ATTENTION!
Using unsuitable cleaning agents or incorrect cleaning may damage the appliance.
▶ Do not use cleaning agents containing alcohol or spirits.
- Do not use sharp, pointed or metal objects.
- Do not use abrasive cloths or cleaning agents.
8.3 Cleaning the main unit
WARNING
Risk of electric shock!
An ingress of moisture can cause an electric shock.
▶ Never immerse the appliance or the power cord in water or clean in the dishwasher.
- Do not use steam- or high-pressure cleaners to clean the appliance.
- Wipe down the main unit with a soft, damp cloth.
8.4 Cleaning the blender
WARNING
Risk of cutting!
The blender knife has sharp blades.
- When cleaning and emptying the blender jug, watch out for the sharp blades.
▶ Never touch the edges of the blades with bare hands.
ATTENTION!
The blender knife has sharp blades. Improper handling may damage the blades or the surface.
▶ Never set the blade insert down with the blade facing downwards.
- Remove the measuring jug.
- Remove the lid.
- Turn the blender jug anti-clockwise and remove it from the main unit. → Fig. 24
- Turn the blender jug upside down.
- Open the retaining bracket.
- Remove the EasyClick blade insert from the blender jug. → Fig. 25
- Clean the components.
$$ \rightarrow \text { Fig. } \boxed {2 3} $$
$$ \rightarrow \text { Fig. } \boxed {2 3} $$
$$ \rightarrow \text { Fig. } \boxed {2 5} $$
8.5 Cleaning the To-Go blender jug and To-Go blade insert
ATTENTION!
The blender knife has sharp blades. Improper handling may damage the blades or the surface.
▶ Never set the blade insert down with the blade facing downwards.
-
Turn the To-Go blade insert anticlockwise and remove it from the To-Go blender jug. → Fig. 26
-
Turn the lid anti-clockwise and remove it from the To-Go blender jug. → Fig. 27
-
Open the mouthpiece on the lid. → Fig. 27
-
Remove the seal.
$$ \rightarrow \text { Fig. } \boxed {2 7} $$
- Clean the components.
9 Recipes
You can find a selection of recipes specially developed for your appliance here.
9.1 Overview of recipes
This overview lists the ingredients and processing steps for various recipes.
→ Fig. 28
For the recipes labelled with (*) in the recipe table, leave the appliance to cool to room temperature after three operating cycles.
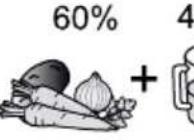
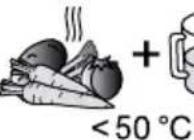
Recipe Ingredients Processing
| Sports drink ■ 250 g Honey (cold, 7-9 °C) ■ 5 g Cinnamon ■ 200 g Milk (warm, 65 °C) | ■ Add the honey and cinnamon to the blender. ■ Blend the ingredients for 5 seconds at level max ■ Add the milk. ■ Blend the ingredients for 5 seconds at level max |
ATTENTION!
Using unsuitable food may damage the appliance.
- Do not process food that is hotter than 50 °C in the To-Go blender jug.
▶ Do not process food that is hotter than 70 °C in the blender jug.
powdered food include icing sugar, cocoa powder, roasted soybeans, flour, protein powder.
Note
Restrictions on processing in the mixer:
■ Do not use it to chop ingredients like almonds, onions, parsley and meat.
■ It is only possible to mix spreads, such as peanut butter, coconut butter or nut spreads, with a suitable Bosch pusher.
■ The blender cannot be used to make mayonnaise.
■ Use enough liquid when mixing solid food.
■ Mix powdered food with sufficient liquid before blending, or dissolve it entirely in liquid. Examples of
10 Troubleshooting
You can rectify minor faults on your appliance yourself. Read the troubleshooting information before contacting after-sales service. This will avoid unnecessary costs.

WARNING
Risk of electric shock!
Incorrect repairs are dangerous.
- Repairs to the appliance should only be carried out by trained specialist staff.
▶ Only use genuine spare parts when repairing the appliance.
If the power cord of this appliance is damaged, it must be replaced by the manufacturer, the manufacturer's Customer Service or a similarly qualified person in order to prevent any risk.
Fault Cause and troubleshooting
| The appliance is not working. | The mains plug of the power cord is not plugged in. ► Connect the appliance to the power supply. |
| The circuit breaker in the fuse box has tripped. ► Check the circuit breaker in the fuse box. | |
| There has been a power cut. ► Check whether the lighting in your kitchen or other appliances are working. | |
| Blender jug is not locked. ► Set the rotary switch to 01. Place the blender jug onto the main unit and rotate in a clockwise direction until it locks into place.2. If required, select this option: - Place the To-Go blender jug with the To-Go blade insert onto the main unit and rotate in a clockwise direction until it locks into place. | |
| Appliance has a humming sound. | The blade is blocked or stiff. ► Set the rotary switch to 0 ► Remove the blockage. |
| Appliance switches off during use. | Processing quantity is too great or processing time was too long. ► Set the rotary switch to 0 ► Reduce the processing quantity. ► Allow the appliance to cool down to room temperature. |
| Fault Cause and troubleshooting | |
| The To-Go blade insert cannot be connected to the main unit. | Outlet protection is active.► Screw the To-Go blade insert and the To-Go blender jug in by turning them in a clockwise direction.✓ The To-Go blender jug and To-Go blade insert are fully and tightly screwed in.✓ The▼ and ▲markings match up. |
| To-Go blender jug is leaking. | Seal is missing from the lid.► Insert the seal. |
| Liquid is leaking from the blade insert. | Seal between the blender jug and the blade insert is missing.► Insert the seal on the EasyClick blade insert.✓ The seal is seated in the groove.✓ The sealing lips point in the direction of the blender jug.✓ The smooth sealing surface lies against the EasyC-lick blade insert. |
11 Transportation, storage and disposal
11.1 Disposing of old appli- ance
Valuable raw materials can be re-used by recycling.
- Unplug the appliance from the mains.
- Cut through the power cord.
- Dispose of the appliance in an environmentally friendly manner. Information about current disposal methods are available from your specialist dealer or local authority.

This appliance is labelled in accordance with European Directive 2012/19/EU concerning used electrical and electronic appliances (waste electrical and electronic equipment - WEEE). The guideline determines the framework for the return and recycling of used appliances as applicable throughout the EU.
12 Customer Service
If you have any queries, are unable to rectify faults on the appliance yourself or if your appliance needs to be repaired, contact Customer Service. Function-relevant genuine spare parts according to the corresponding Eco-design Order can be obtained from Customer Service for a period of at least 7 years from the date on which your appliance was placed on the market within the European Economic Area.
Note: Under the terms of the manufacturer's warranty the use of Customer Service is free of charge.
Detailed information on the warranty period and terms of warranty in your country is available from our after-sales service, your retailer or on our website.
If you contact Customer Service, you will require the product number (E-Nr.) and the production number (FD) of your appliance.
The contact details for Customer Service can be found in the Customer Service directory at the end of the manual or on our website.
12.1 Product number (E-Nr.) and production number (FD)
You can find the product number (E-Nr.) and the production number (FD) on the appliance's rating plate. Make a note of your appliance's details and the Customer Service telephone number to find them again quickly.
12.2 Warranty conditions
You can make warranty claims for your appliance under the following conditions.
The guarantee conditions for this appliance are as defined by our representative in the country in which it is sold. Details regarding these conditions can be obtained from the dealer from whom the appliance was purchased. The bill of sale or receipt must be produced when making any claim under the terms of this guarantee.
text_image
QR code image containing encoded data, no visible human-readable textTable des matières
1 Sécurité.... 41
Sécurité anti-surcharge
text_image
QR code image containing encoded data, no visible human-readable textIndice
1 Sicurezza 58
text_image
QR code image containing encoded data, no visible human-readable textInhoudsopgave
⚠ WAARSCHUWING – Kans op brand!
⚠ WAARSCHUWING – Kans op letsel!
⚠ WAARSCHUWING – Kans op verstikking!
7 De Bediening in essen- tie
7.1 Snoerlengte
⚠ WAARSCHUWING Kans op letsel!
text_image
QR code image containing encoded data, no visible human-readable textIndholdsfortegnelse
ADVARSEL – Brandfare!
⚠️ ADVARSEL – Fare for skoldning!
text_image
QR code image containing encoded data, no visible human-readable textInnholdsfortegnelse
1 Sikkerhet.... 106
1.1 Generelle merknader..... 106
1.2 Korrekt bruk 106
1.3 Begrensning av brukerkretsen.... 107
1.4 Sikkerhetsinstrukser 107
2 Unngå materielle skader...... 110
⚠️ ADVARSEL – Kuttfare!
text_image
QR code image containing encoded data, no visible human-readable texttext_image
QR code image containing encoded data, no visible human-readable textSisällysluettelo
text_image
QR code image containing encoded data, no visible human-readable textTabla de contenidos
1 Seguridad 151
text_image
QR code image containing encoded data, no visible human-readable textÍndice
1 Segurança 168
text_image
QR code image containing encoded data, no visible human-readable texttext_image
QR code image containing encoded data, no visible human-readable textİçindekiler tablosu
Bosch Su Isitici (Kettle)
Bosch Mikser
Bosch Mutfak Robotu
Bosch Kahye Değirmeni
Bosch Tost Makinası
Bosch Kiyma Makinasi
Bosch Sac Kurutma Mak.
Bosch Baskül
www.bosch-home.com/tr
www.bosch-yetkiliservisi.com
Bandrol ve Seri No. :
text_image
QR code image containing encoded data, no visible human-readable textSpis treści
text_image
QR code image containing encoded data, no visible human-readable textBmict
1 Безпека 239
text_image
QR code image containing encoded data, no visible human-readable textСодержание
text_image
QR code image containing encoded data, no visible human-readable texttext_image
QR code image containing encoded data, no visible human-readable textand electronic equipment
- WEEE.(
Central Service Contacts
AE United Arab Emirates, إِلَّعُوايَّة المتحدة BSH Home Appliances FZE Round About 13, Plot Nr MO-0532A Jebel Ali Free Zone - Dubai Tel.: 04 881 4401* mailto:service.uae@bshg.com www.bosch-home.com/ae *Sun-Thu 8am to 5pm (exclude public holidays)
AM AM Armenia, Ruwuunwu ZIG ZAG LLC Charenci str. 25 Yerevan 375025 Tel.: 010 55 60 10 mailto:service@zigzag.am www.zigzag.am
GB Great Britain
BSH Home Appliances Ltd.
Grand Union House, Old Wolverton Road, Wolverton
Milton Keynes MK12 5PT
To arrange an engineer visit, to order spare parts and accessories or for product advice please visit www.boschhome.co.uk Or call Tel.: 0344 892 8979*
*Calls are charged at the basic rate, please check with your telephone service provider for exact charges.
| GR | Greece, Ελλάς |
| BSH Ikiakes Siskeves A.B.E. | |
| Central Branch Service | |
| 17 km E.O. Athinon-Lamias & Potamou | |
| 20 | |
| 14564 Kifisia | |
| Τηλέφωνο: 210 4277 500,-701 | |
| mailto:nkf-CustomerService@bshg.com | |
| www.bosch-home.gr |
| IE | Republic of IrelandBSH Home Appliances Ltd.M50 Business Park, Ballymount Road Upper, WalkinstownDublin 12To arrange an engineer visit, to order spare parts and accessories or for product advice please call Tel.: 014502655*www.bosch-home.ie*Calls are charged at the basic rate, please check with your telephone service provider for exact charges |
| IS | Iceland |
| Smith & Norland hf. | |
| Noatuni 4 | |
| 105 Reykjavik | |
| Tel.: 0520 3000 | |
| www.sminor.is |
| IT | Italia, ItalyBSH Elettrodomestici S.p.A.Via. M. Nizzoli 120147 Milano (MI)Tel. 02 412 678 100mailto:info.it@bosch-home.comwww.bosch-home.com/it |
| JO | Jordan, الأردن |
| Diab Qawasmi & Sons Co. | |
| Khaled Ben Al-Waleed Street, Jabal Al Hussein (11121) | |
| P.O. Box 212292, Amman | |
| Tel.: 06 465 8505, -2650 | |
| Tel.: 79 110 3430 | |
| mailto:boschjo@yahoo.com |
| LB | Lebanon, لبنان |
| Teheni, Hana & Co. | |
| Boulevard Dora 4043 Beyrouth, P.O. Box 90449 | |
| Jdeideh 1202 2040 | |
| Tel.: 01 255 211 | |
| mailto:Info@Teheni-Hana.com |
| LU | Luxembourg |
| BSH électroménagers S.A. | |
| 13-15, ZI Breedeweues | |
| 1259 Senningerberg | |
| Tel.: 26349 811 | |
| Reparaturen: lux-repair@bshg.com | |
| Ersatzteile: lux-spare@bshg.com | |
| www.bosch-home.com/lu |
| MT Malta |
| Oxford House Ltd. |
| Notabile Road |
| Mrichel BKR 14 |
| Tel.: 021 442 334 |
| www.oxfordhouse.com.mt |
| NL | Nederland, Netherlands |
| BSH Huishoudapparaten B.V. | |
| Taurusavenue 36 | |
| 2132 LS Hoofddorp | |
| Storingsmelding/Onderdelenverkoop: | |
| Tel.: 088 424 4010 | |
| mailto:bosch-contactcenter@bshg.com | |
| mailto:bosch-onderdelen@bshg.com | |
| www.bosch-home.nl |
| NO Norge, NorwayBSH Husholdningsapparater A/SGrensesvingen 90661 OsloTel.: 22 66 05 54mailto:Bosch-Service-NO@bshg.comwww.bosch-home.no |
| NZ New ZealandBSH Home Appliances Ltd.Level 3, Air NZ Building, Smales FarmBusiness Park, 74 Taharoto Road, TakapunaAuckland 0622Tel.: +64 0800 245 700*mailto:aftersales.nz@bshg.comwww.bosch-home.co.nz*Mon-Fri 8.30am to 5pm (exclude public holidays) |
Thank you for buying a Bosch Home Appliance!
Register your new device on MyBosch now and profit directly from:
- Expert tips & tricks for your appliance
- Warranty extension options
• Discounts for accessories & spare-parts
• Digital manual and all appliance data at hand - Easy access to Bosch Home Appliances Service
Free and easy registration – also on mobile phones:
www.bosch-home.com/welcome
BOSCH HOME APPLIANCES SERVICE
Looking for help? You'll find it here.
Expert advice for your Bosch home appliances, help with problems or a repair from Bosch experts.
Find out everything about the many ways Bosch can support you:
www.bosch-home.com/service
Contact data of all countries are listed in the attached service directory.
BSH Hausgeräte GmbH
Carl-Wery-Straße 34
81739 München, GERMANY
www.bosch-home.com
A Bosch Company

8001236215 (011125)
de, en, fr, it, nl, da, no, sv, fi, es, pt, el, tr, pl, uk, ru, ar
Valid within Great Britain:
Imported to Great Britain by
BSH Home Appliances Ltd.
Grand Union House
Old Wolverton Road
Wolverton, Milton Keynes
MK12 5PT
United Kingdom