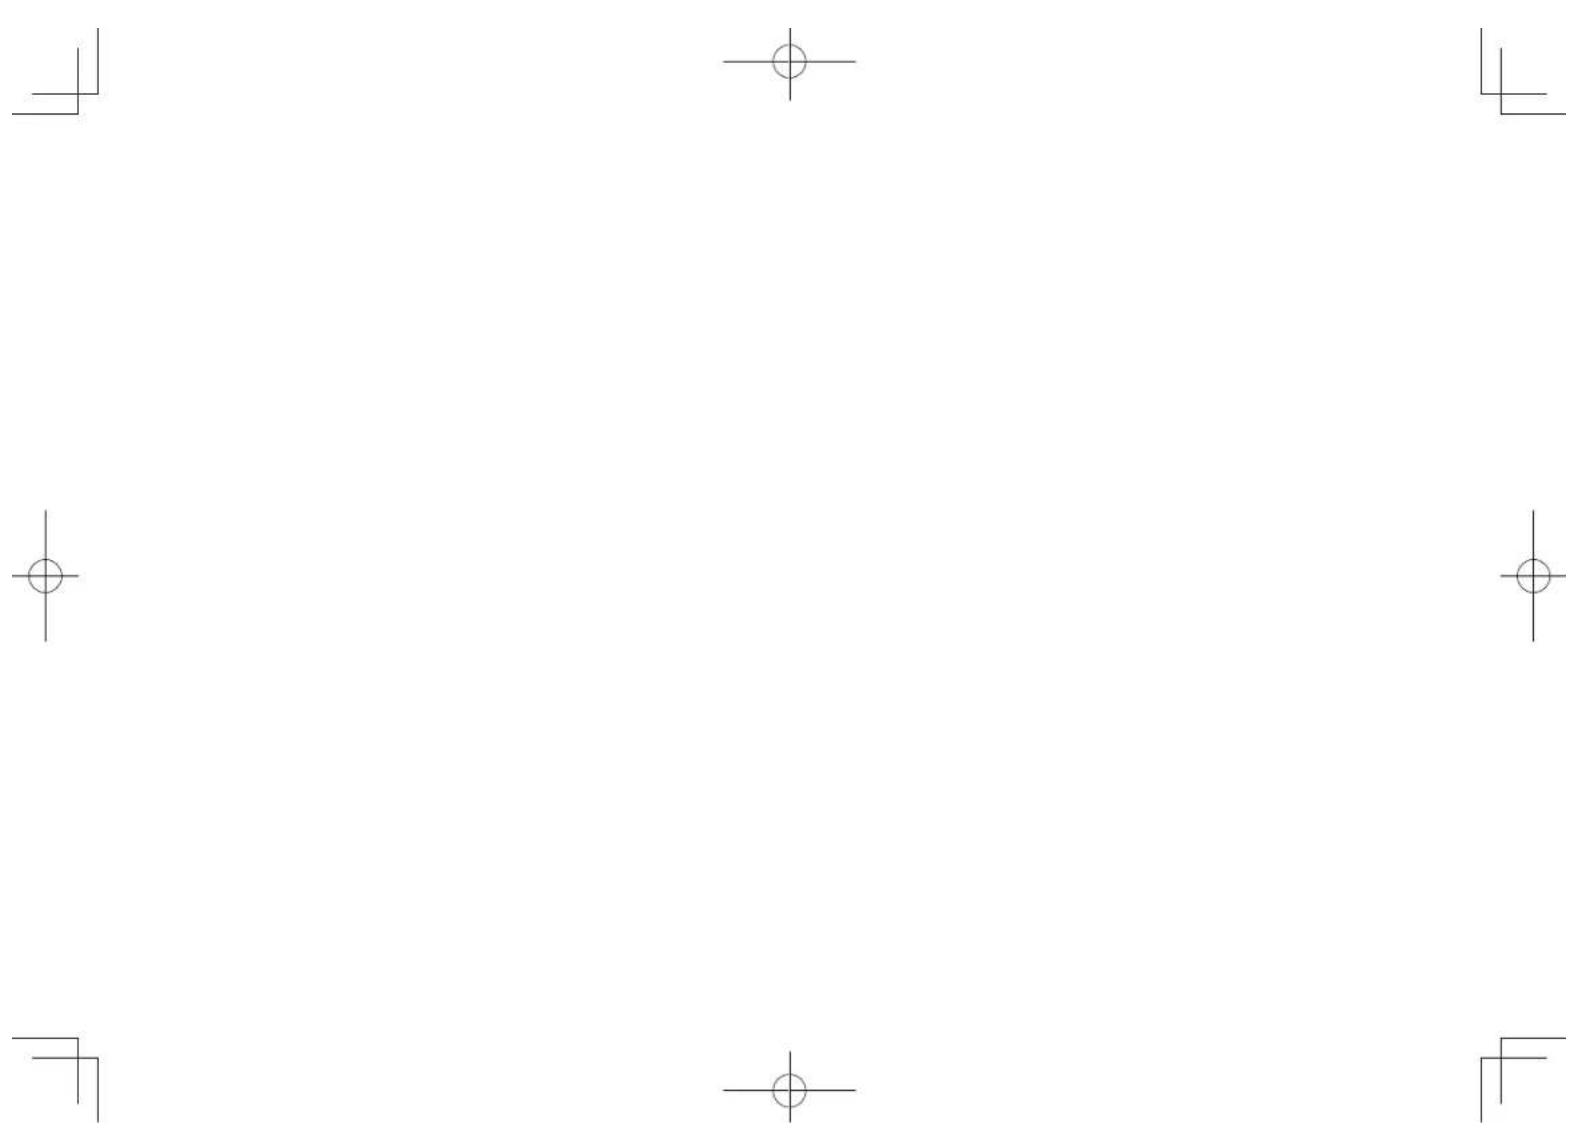
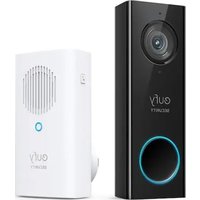
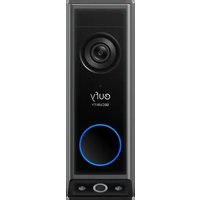
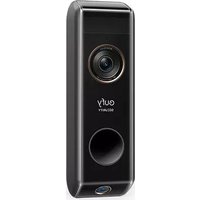
eufyCam S210 - Doorbells eufy - Free user manual and instructions
Find the device manual for free eufyCam S210 eufy in PDF.
| Product Type | Wireless connected video doorbell |
| Brand | eufy |
| Model | eufyCam S210 |
| Video resolution | 2K (2560 x 1920 pixels) |
| Viewing angle | 140° (diagonal) |
| Night vision | Yes, with infrared LEDs (range up to 10 m) |
| Audio | Two-way with noise reduction |
| Power supply | Rechargeable lithium-ion battery (6700 mAh, built-in) |
| Battery life | Up to 6 months (depending on usage) |
| Connectivity | Wi-Fi 2.4 GHz (via included HomeBase 2) |
| Storage | Local on HomeBase 2 (16 GB built-in) |
| Motion detection | Yes, with customizable activity zones adjustable in the app |
| Weather resistance | IP65 (certified for outdoor use) |
| Dimensions (doorbell) | 141 x 55 x 28 mm |
| Weight (doorbell) | 200 g |
| Box contents | eufyCam S210 doorbell, HomeBase 2, power adapter, Ethernet cable, mounting bracket, screws and anchors |
| Warranty | 1 year (parts and labor) |
| Cleaning and maintenance | Clean with a soft, dry cloth; avoid abrasive products |
| Security | AES-128 encryption, real-time push notifications, privacy mode |
| Spare parts and repairability | Battery not user-replaceable; technical support via the app |
Frequently Asked Questions - eufyCam S210 eufy
User questions about eufyCam S210 eufy
0 question about this device. Answer the ones you know or ask your own.
Ask a new question about this device
Download the instructions for your Doorbells in PDF format for free! Find your manual eufyCam S210 - eufy and take your electronic device back in hand. On this page are published all the documents necessary for the use of your device. eufyCam S210 by eufy.
USER MANUAL eufyCam S210 eufy
natural_image
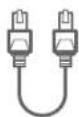
Line drawing of two connected devices, one with a 'cufy SECURITY' label and the other with a circular button (no additional text or symbols)Anker Innovations Limited. All rights reserved, eufy Security and eufy Security Logo are
Trademarks of Anker Innovations Limited, registered in the United States and other
countries. All other trademarks are the property of their respective owners.
\$100500187 VCI
English
Deutsch
Español
Français
Italiano
Nederlands
Portuguese
لعرية
73
TABLE OF
CONTENTS
Getting started
Product overview
Connecting the homebase 2
Setting up the system
02
03
04
05
06
10
Mounting the camera
11
Charging eufycam 2c
EN 01
| / GETTING STARTED
For HomeBase 2 installation
HomeBase 2 (T8010)
Power Adapter for HomeBase 2
Ethernet Cable

Metal Pin for Resetting
For eufyCam 2C installation

eufyCam 2C (T8113)

Micro-USB
Charging Cable

Mounting Bracket

Mounting Screws and Anchors
- Camera quantity and accessories vary by bundle package.
- HomeBase 2 power adapter varies by region.
02 EN EN 03
2 / PRODUCT OVERVIEW
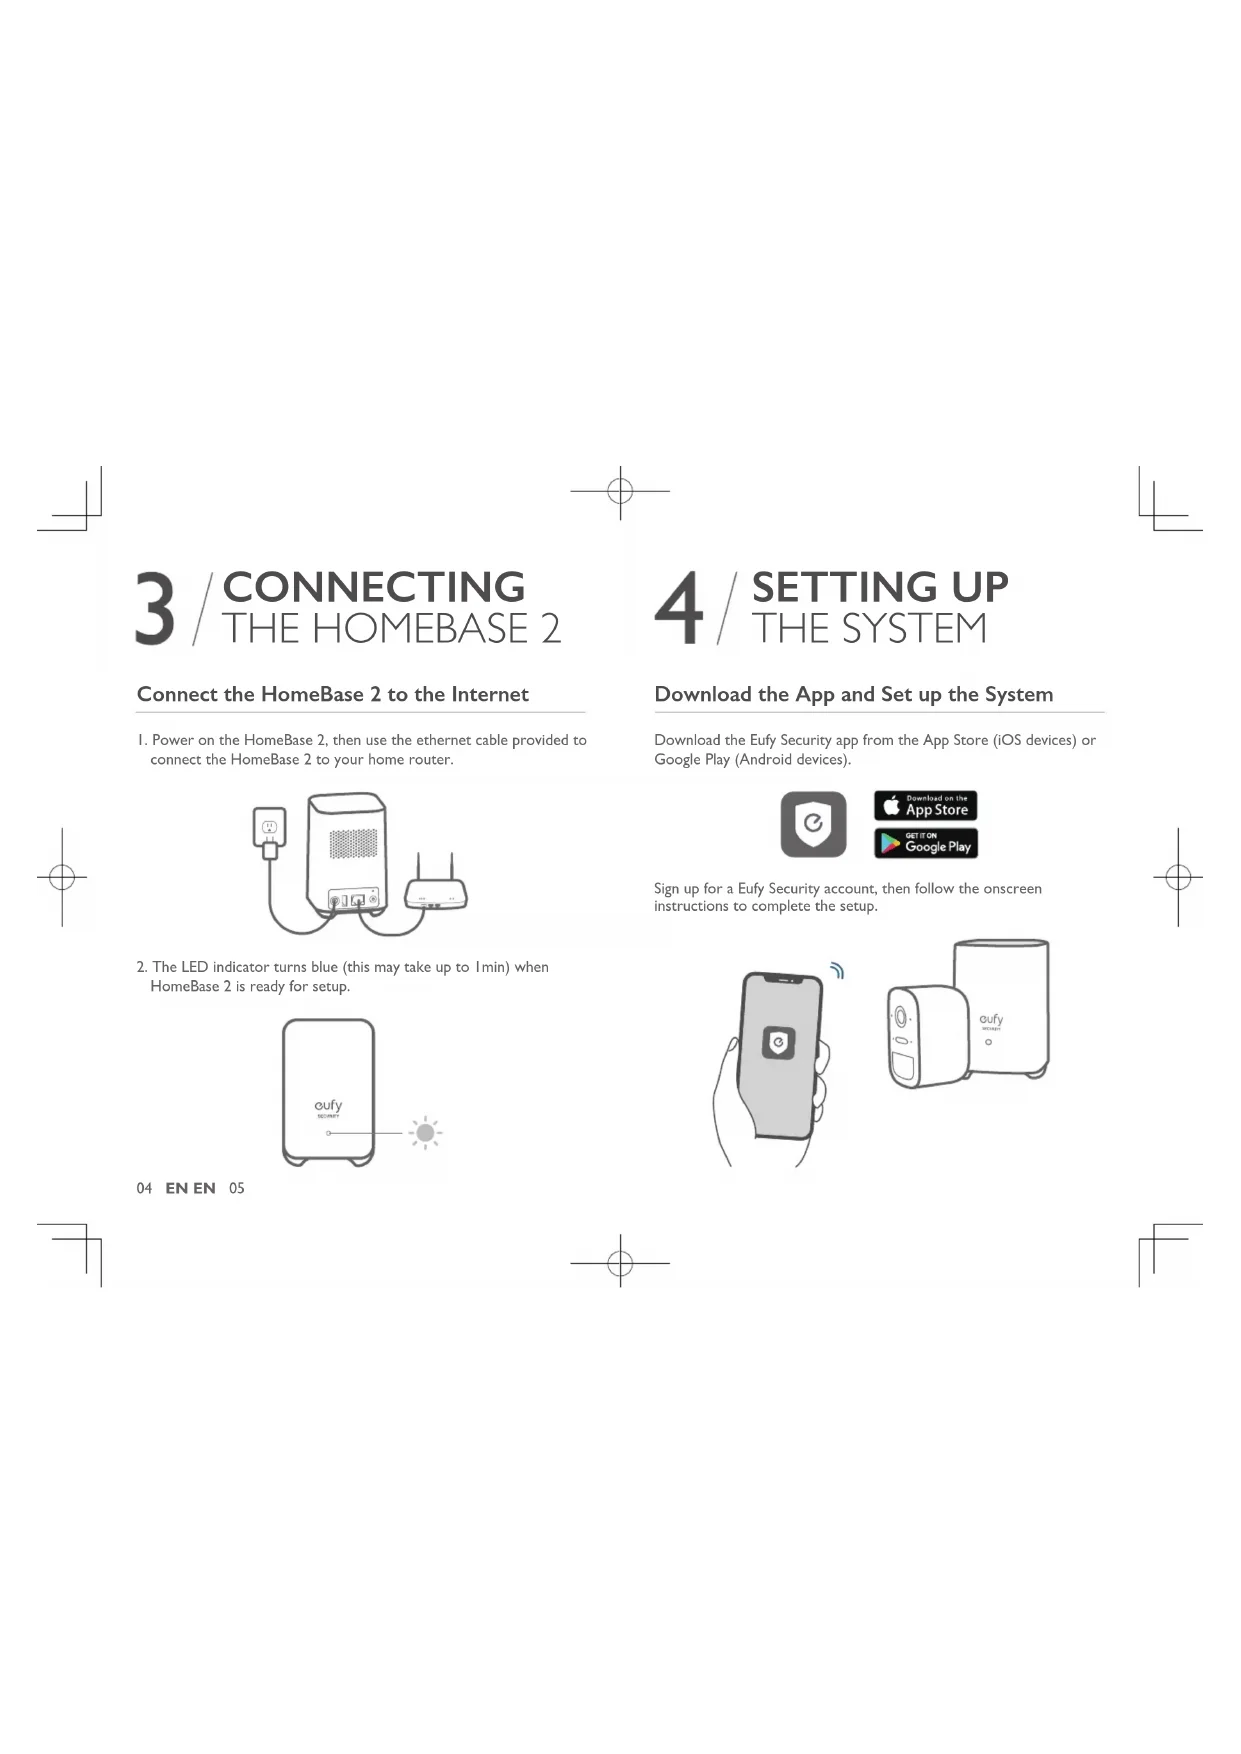
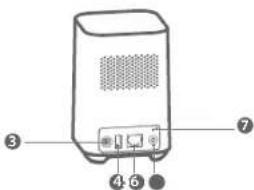
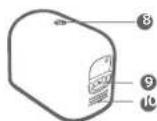
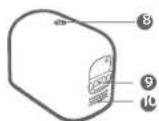
HomeBase 2

text_image
Diagram of a portable electronic device with labeled ports and ports numbered 3 to 7- Status LED 5. Ethernet port
- Speaker 6. SYNC/ALARM OFF button
- Power port 7. Reset button
- USB port
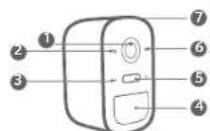
eufyCam 2C

- Lens 5. Spotlight 9. Charging port
- Light sensor 6. Status LED 10. Speaker
- Microphone 7. SYNC button
- Motion sensor 8. Mounting hole
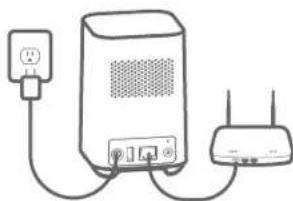
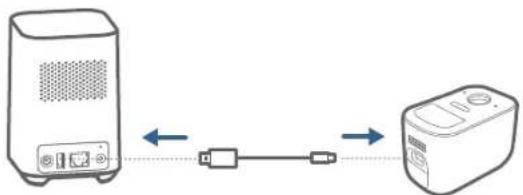
3 / CONNECTING THE HOMEBASE 2
Connect the HomeBase 2 to the Internet
- Power on the HomeBase 2, then use the ethernet cable provided to connect the HomeBase 2 to your home router.
natural_image
Line drawing of a portable electronic device connected to a wireless router (no text or symbols)- The LED indicator turns blue (this may take up to 1 min) when HomeBase 2 is ready for setup.
text_image
eufy solarly04 EN EN 05
4 / SETTING UP THE SYSTEM
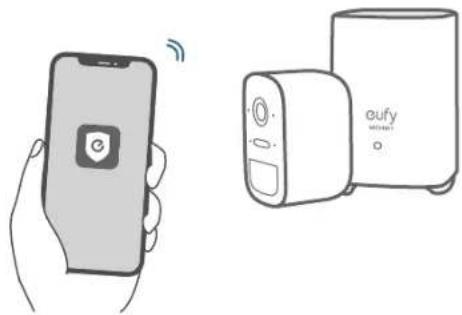
Download the App and Set up the System
Download the Eufy Security app from the App Store (iOS devices) or Google Play (Android devices).


Sign up for a Eufy Security account, then follow the onscreen instructions to complete the setup.
natural_image
Illustration of a hand holding a smartphone and a device labeled 'oufy' (no text or symbols on the devices themselves)5 / MOUNTING THE CAMERA
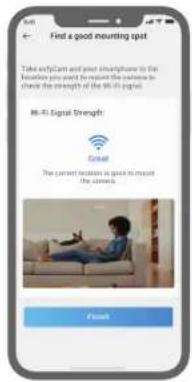
Find a Good Mounting Spot
To find a spot to mount eufyCam 2C, you need to test wireless signal strength.
① Open the Eufy Security app, go to Camera Settings > Mounting Guide.
② To test the wireless signal strength, take your camera and phone to the location where you want to mount the camera.
③ Move the camera as close to the HomeBase 2 as possible if the wireless.
text_image
Find a good mounting spot Take excellent and your smartphone to the location you want to mount the camera to check the strength of the Wi-Fi page. Wi-Fi Signal Strength Excel The current location is good to mount the camera. FinishSelect Height and Location
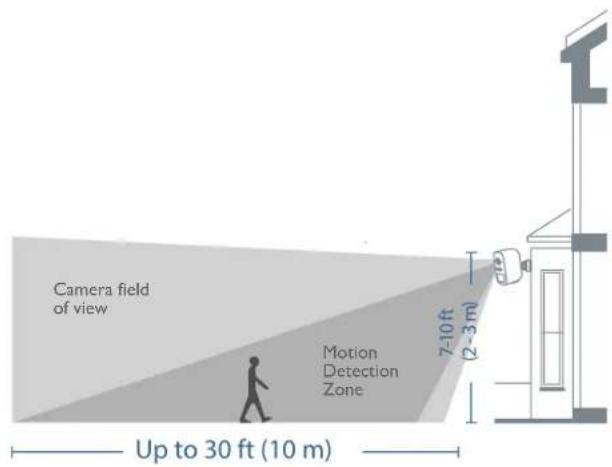
Hang eufyCam 2C 7-10 ft (2-3 m) above the ground. This height maximizes the detection range of the motion sensor of eufyCam 2C. Avoid placing eufyCam 2C under direct sunlight.
text_image
Camera field of view Motion Detection Zone 7-10 ft (2-3 m) Up to 30 ft (10 m)Mount the camera
The camera can be mounted both indoors and outdoors.
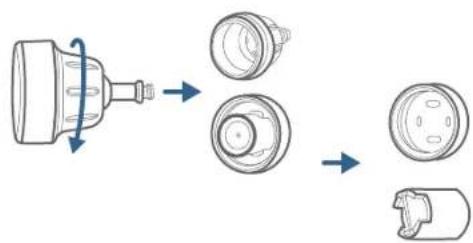
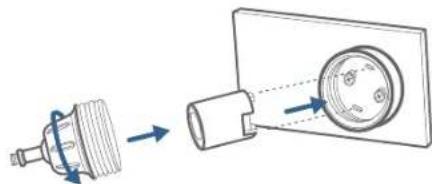
- Turn the knob of the mounting bracket clockwise to loosen and disassemble it.
flowchart
graph TD
    A["Valve with inlet"] --> B["Round Component 1"]
    B --> C["Round Component 2"]
    C --> D["Round Component 3"]
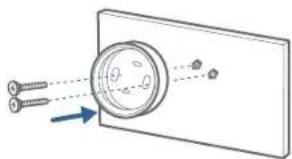
- Drill holes with a 15/64 inch (5.95mm) drill bit, then insert the anchors into the holes; anchors are necessary for walls that are made out of hard materials such as concrete, brick, or stucco.
natural_image
Diagram showing a magnified view of a circular object with arrows indicating direction, no text or symbols presentMount the camera
- Firmly screw the base of the mounting bracket onto the wall. Fasten the ball knob of the bracket to the base of the bracket.
natural_image
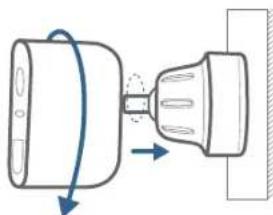
Diagram showing a mechanical component transforming into a housing with arrows indicating direction (no text or symbols)- Tighten eufyCam 2C to the mounting bracket and adjust the viewing angle by checking the live stream feed in the Eufy Security app.
natural_image
Diagram of a mechanical component with directional arrows indicating motion (no text or symbols)Tips:
-
The Homebase 2 pairs up to 16 cameras, you can repeat the steps mentioned above to add more eufyCam 2C cameras to meet different needs of use.
-
For troubleshooting, check Help on the Eufy Security App. Refer to App page for LED indicator status.
6 / CHARGING EUFYCAM 2C
Charge eufyCam 2C
Method I
flowchart
graph LR
    A["Server"] -->|Data Flow Left| B["Device"]
    B -->|Data Flow Right| C["Device"]
Method 2
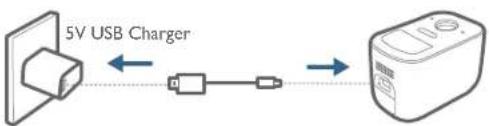
text_image
5V USB Charger| LED indication | Charging: Steady blue |
| Fully charged: Off | |
| Charging time 5 hours | |
7/NOTICE
FCC Statement
This device complies with Part 13 of the FCC Rules. Operation is subject to the following two conditions: (1) this device may not cause harmful interference, and (2) this device must accept any interference received, including interference that may cause undesired operation.
Warning: Changes or modifications not expressly approved by the party responsible for compliance could void the user's authority to operate the equipment.
Note: This equipment has been tested and found to comply with the limits for a Class B digital device, pursuant to Part 15 of the FCC Rules. These limits are designed to provide reasonable protection against harmful interference in a residential installation.
This equipment generates uses and can radiate radio frequency energy and, if not installed and used in accordance with the instructions, may cause harmful interference to radio communications. However, there is no guarantee that interference will not occur in a particular installation. If this equipment does cause harmful interference to radio or television reception, which can be determined by turning the equipment off and on, the user is encouraged to try to correct the interference by one or more of the following measures: (1) Recent or relocate the receiving antenna; (2) Increase the separation between the equipment and receiver; (3) Connect the equipment into an outlet on a circuit different from that to which the receiver is connected. (4) Consult the dealer or an experienced radio/TV technician
for help.
FCC Radio Frequency Exposure Statement
The device has been evaluated to meet general RF exposure requirements. The device can be used in fixed/mobile exposure condition. The min separation distance is 20cm.
Notice: Shielded cables
All connections to other computing devices must be made using shielded cables to maintain compliance with FCC regulations.
The following importer is the responsible party Company Name: Fantasia Trading LLC Address: 9155 Archibald Avenue, Suite 202. Rancho Cucamonga, CA 91730, USA Telephone: 1-909-484-1530
CE This product complies with the radio interference requirements of the European Community.
Declaration of Conformity
Hereby, Anker Innovations Limited declares that this device is in compliance with the essential requirements and other relevant provisions of Directive 2014/53/EU. For the declaration of conformity, visit the Web site www.culyfe.com Due to the used enclosure material, the product shall only be connected to a USB Interface of version 2.0 or higher.
The adapter shall be installed near the equipment and shall be easily accessible. Do not use the Device in the environment at too high or too low temperature, never expose the Device under strong sunshine or too wet environment.
10 EN EN 11
The suitable temperature for HomeBase 2 and accessories is -10°C-45°C. The suitable temperature for eufyCam 2C and accessories is -70°C-50°C. When charging, please place the device in an environment that has a normal room temperature and good ventilation.
It is recommended to charge the device in an environment with a temperature that ranges from 5°C\~25°C.
Please ensure to use only the charger offered by the manufacturer. Using unauthorized charger may cause danger and violate the authorization of the device and the guarantee article.
This charger is for indoor use only. The charger type is ASSA67W-120200, output voltage/current is 12Vdc/2A. The plug considered as disconnect device of adapter. RF exposure information: The Maximum Permissible Exposure (MPE) level has been calculated based on a distance of d=20 cm between the device and the human body. To maintain compliance with RF exposure requirement, use product that maintains a 20cm distance between the device and human body.
CAUTION RISK OF EXPLOSION IF BATTERY IS REPLACED BY AN INCORRECT TYPE. DISPOSE OF USED BATTERIES ACCORDING TO THE INSTRUCTIONS.
Wi-Fi Operating Frequency
Range: 24 7-2472MHz; Wi-Fi Max Output Power: 19dBm
SUB-1G Frequency range: 866\~856.8MHz; SUB-1G Output Power: 124dBm
The following importer is the responsible party (contact for EU matters only) Importer: Anker Technology (UK) Ltd Importer Address: Suite B, Fairgate House, 205 Kings Road, Tyseley, Birmingham, B11 2AA, United Kingdom
This product is designed and manufactured with high quality materials and components, which can be recycled and reused.
This symbol means the product, must not be discarded as household waste, and should be delivered to an appropriate collection facility for recycling. Proper disposal and recycling helps protect natural resources, human health and the environment. For more information on disposal and recycling of this product, contact your local municipality, disposal service, or the shop where you bought this product.
IC Statement
This device complies with Industry Canada licence-exempt RSS standard(s). Operation is subject to the following two conditions: (1) this device may not cause interference, and (2) this device must accept any interference, including interference that may cause undesires operation of the device."
text_image
Diagram of a portable electronic device with labeled ports and ports numbered 3 to 7natural_image
Line drawing of a portable electronic device connected to a wireless router (no text or symbols)natural_image
Illustration of a hand holding a smartphone and a device labeled 'eufy' (no text or symbols on the devices themselves)text_image
Find a good mounting spot Take earplars and your smartphone to the location you want to mount the camera to check the strength of the Wi-Fi signal. Wi-Fi Signal Strength: Smart The current location is good to mount the camera. Finish18 DE DE 19
natural_image
Diagram showing a magnified circular object with screw-like elements and an arrow pointing to it, enclosed in a rectangular frame (no text or symbols)20 DEDE 21
Kamera montieren
natural_image
Diagram showing a mechanical component being processed into a housing, with arrows indicating direction (no text or symbols present)natural_image
Diagram of a mechanical component with directional arrows indicating motion (no text or symbols)Tipps:
text_image
Diagram of a portable electronic device with labeled ports and ports numbered 3, 4, 6, and 7natural_image
Line drawing of a portable electronic device connected to a wireless router (no text or symbols)text_image
eufy solarly26 ES ES 27
natural_image
Illustration of a hand holding a smartphone and a device labeled 'oufy' (no text or symbols on the devices themselves)5 / MONTAJE DE LA CÁMARA
text_image
Find a good mounting spot Take off/Goan and your smartphone in the location you want to mount the camera to check the strength of the Wi-Fi signal. Wi-Fi Signal Strength: Great The current location is good to mount the camera Finishtext_image
Diagram showing a mechanical component being processed into three views: top, side, and bottom.natural_image
Diagram showing a magnified circular object with arrows pointing to two screws, enclosed in a rectangular frame (no text or symbols)natural_image
Diagram showing a mechanical component being processed into a housing, with arrows indicating direction of motion (no text or symbols present)natural_image
Diagram showing a mechanical component with directional arrows indicating motion (no text or symbols)Consejos:
text_image
Diagram of a portable electronic device with labeled ports and ports numbered 3 to 7natural_image
Line drawing of a portable electronic device connected to a wireless router (no text or symbols)text_image
eufy solarly36 FR FR 37
natural_image
Illustration of a hand holding a smartphone and a device labeled 'oufy' (no text or symbols on the devices themselves)5 / MONTAGE DE LA CAMÉRA
text_image
Find a good mounting spot Take sufficient and your smartphones to the location you want to mount the camera to stand the strength at the Wi-Fi signal. Wi-Fi Signal Strength: Great The current location is good to mount the camera. Finish38 FR FR 39
text_image
Diagram showing a mechanical component being processed into three views: top, side, and bottom.natural_image
Diagram showing a magnified circular object with arrows pointing to it, surrounded by screws (no text or symbols)natural_image
Diagram showing a mechanical component being processed into a housing, with arrows indicating direction of motion (no text or symbols present)natural_image
Diagram showing a mechanical component with arrows indicating motion, no text or symbols presentConseils:
text_image
Diagram of a portable electronic device with labeled ports and ports numbered 3 to 7natural_image
Line drawing of a portable electronic device connected to a wireless router (no text or symbols)text_image
eufy solarlynatural_image
Illustration of a hand holding a smartphone and a device labeled 'eufy' (no text or symbols on the devices themselves)46 IT IT 47
5 / MONTAGGIO DELLA TELECAMERA
text_image
Find a good mounting spot Take out/You can and your smartphone in the location you want to mount the camera to unlock the strength of the Hi-Fi signal. Hi-Fi Signal Strength: Great The current location is good to mount the camera. Finishnatural_image
Diagram showing a circular component with arrows pointing to two screws, enclosed in a rectangular frame (no text or symbols)natural_image
Diagram showing a mechanical component being processed into a housing, with arrows indicating direction (no text or symbols present)natural_image
Diagram showing a mechanical component with arrows indicating motion, no text or symbols presentSuggerimenti:
text_image
Diagram of a portable electronic device with labeled ports and ports numbered 3 to 7I. Status-LED 5. Ethernetpoort
2. Luidspreker 6. SYNC/ALARM OFF-knop
3. Voedingspoort 7. Resetknop
4. USB-poort
eufyCam 2C
- Lens 5. Spot 9. Oplaadpoort
- Lichtsensor 6. Status-LÉD 10. Luidspreker
- Microfoon 7. SYNC-knop
- Bewegingssensor 8. Montagegat
3 / DE HOMEBASE 2 AANSLUITEN
natural_image
Line drawing of a portable electronic device connected to a wireless router (no text or symbols)text_image
eufy solarly56 NL NL 57
natural_image
Illustration of a hand holding a smartphone and a device labeled 'oufy' (no text or symbols on the devices themselves)5 / DE CAMERA MONTEREN
text_image
Find a good mounting spot Take off/Goan and your smartphone in the location you want to mount the camera to check the strength of the Wi-Fi signal. Wi-Fi Signal Strength: Great The current location is good to mount the camera Finish58 NL NL 59
natural_image
Diagram showing a magnified view of a circular object with screw pins, connected by dashed lines to a rectangular panel (no text or symbols)De camera monteren
natural_image
Diagram showing a mechanical component being processed into a housing, with arrows indicating direction (no text or symbols present)natural_image
Diagram showing a mechanical component with directional arrows indicating motion (no text or symbols)Tips:
text_image
Diagram of a portable electronic device with labeled ports and ports numbered 3 to 7natural_image
Line drawing of a portable electronic device connected to a wireless router (no text or symbols)natural_image
Illustration of a hand holding a smartphone and a device labeled 'eufy' (no text or symbols on the devices themselves)5 / INSTALAR A CÂMARA
text_image
Find a good mounting spot Take off/Goan and your smartphone in the location you want to mount the camera to check the strength of the Wi-Fi signal. Wi-Fi Signal Strength: Great The current location is good to mount the camera Finishnatural_image
Diagram showing a magnified circular component with two screws inserted, connected by dashed lines to a rectangular plate (no text or symbols)Instale a câmara
natural_image
Diagram showing a mechanical component being processed into a housing, with arrows indicating direction (no text or symbols present)natural_image
Diagram showing a mechanical component with arrows indicating motion, no text or symbols presentSugestões:
text_image
Diagram of a portable electronic device with labeled ports and ports numbered 3 to 7natural_image
Line drawing of a network device with two connected devices (no text or symbols)text_image
cufy SECURITY/ 4 إعداد النظام
natural_image
Illustration of a hand holding a smartphone and a device with 'oufy' branding (no text or symbols on devices)76 AR AR 77
تركيب الكاميرا / 5
text_image
Find a good mounting spot Take only/Can and your smartphone to the location prevent to mean the camera to check the length of the Wi-Fi signal. Wi-Fi Signal Strength: Great The current location is good to mean the camera. Finishtext_image
Camera field of view Motion Detection Zone 7-10 ft (2-3 m) Up to 30 ft (10 m)تركيب الكاميرا
text_image
Diagram showing a mechanical component before and after assembly, with labeled parts and directional arrows indicating motion.natural_image
Diagram showing a magnified circular object with arrows pointing to it, surrounded by screw-like components (no text or symbols)تركيب dikاميرا
natural_image
Diagram showing a mechanical component being inserted into a housing, with arrows indicating direction (no text or symbols present)natural_image
Diagram of a mechanical component with directional arrows indicating motion (no text or symbols)撰撰:
12-month limited warranty
12 Monate eingeschränkte Garantie | Garantía limitada de 12 meses
Garantie limitée de 12 mois | Garanzia limitata di 12 mesi | 12 maanden beperkte garantie
United States - (800) 988 7973 Mon-Fri 9AM-5PM (PT)
United Kingdom 144 (0) 1604 936 200 Mon-Fn 6AM-11AM (GMT)
Germany +49 (0) 69 9579 7960 Mon-Fri 6:00-11:00
Email Us
Senden Sie uns eine E-Mail | Contacto por correo electrónico | Par e-mail | E-mail
Customer Support: support@eufylife.com
Anker Innovations Limited
Room 1318-19, Hollywood Plaza, 610 Nathan Road, Mongkok Kowloon, Hong Kong

@EufyOfficial @EufyOITs@EufyOfficial