
Power Spin+ - Drain cleaner RIDGID - Free user manual and instructions
Find the device manual for free Power Spin+ RIDGID in PDF.
| Product Type | Drain Cleaner |
| Brand | RIDGID |
| Model | Power Spin+ |
| Applicable Pipe Size | 3/4 to 1½ inches (20 to 40 mm) |
| Drum Capacity | 25 feet (7.60 m) of cable |
| Cable Type | MAXCORE® Cable |
| Cable Diameter | 1/4 inch (6 mm) |
| Cable Length | 25 feet (7.60 m) |
| Maximum Drum Speed | 500 rpm |
| Weight | 4 lb (1.8 kg) |
| Power Source | Manual or via cordless drill (not included) |
| Automatic Feed System | AUTOFEED™ |
| Recommended Use | Sinks, basins, bathtubs, showers (not for toilets) |
| Maintenance | Rinse thoroughly with water after each use; clean exterior with soapy water |
| Main Replacement Part | Replacement Cable Part No. 42163 |
| Required Safety Equipment | Safety glasses and leather gloves |
| Warranty | Lifetime Warranty (see terms) |
Frequently Asked Questions - Power Spin+ RIDGID
User questions about Power Spin+ RIDGID
0 question about this device. Answer the ones you know or ask your own.
Ask a new question about this device
Download the instructions for your Drain cleaner in PDF format for free! Find your manual Power Spin+ - RIDGID and take your electronic device back in hand. On this page are published all the documents necessary for the use of your device. Power Spin+ by RIDGID.
USER MANUAL Power Spin+ RIDGID
Specific Safety Information Drain Cleaner Safety 1
RIDGID Contact Information 1
Description 1
Specifications 2
Pre-Operation Inspection 2
Machine and Work Area Set-Up 3
Operating Instructions 4
Storage 5
Maintenance Instructions 5
Cleaning. 5
Installling Replacement Cable 5
Troubleshooting 6
Lifetime Warranty . Back Cover
*Original Instructions - English
Safety Symbols
In this operator's manual and on the product, safety symbols and signal words are used to communicate important safety information. This section is provided to improve understanding of these signal words and symbols.

This is the safety alert symbol. It is used to alert you to potential personal injury hazards. Obey all safety messages that follow this symbol to avoid possible injury or death.

DANGER
DANGER indicates a hazardous situation which, if not avoided, will result in death or serious injury.

WARNING
WARNING indicates a hazardous situation which, if not avoided, could result in death or serious injury.

CAUTION
CAUTION indicates a hazardous situation which, if not avoided, could result in minor or moderate injury.
NOTICE
NOTICE indicates information that relates to the protection of property.

This symbol means read the operator's manual carefully before using the equipment. The operator's manual contains important information on the safe and proper operation of the equipment.

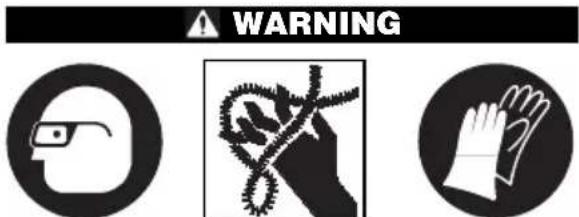
This symbol means always wear safety glasses with side shields or goggles when handling or using this equipment to reduce the risk of eye injury.

This symbol indicates th risk of hands, fingers or other body parts being caught, wrapped or crushed in the drain cleaning cable.

This symbol means always wear leather work gloves when handling or using this equipment to reduce the risk of infections, burns or other serious personal injury.
Specific Safety Information
WARNING
This section contains important safety information that is specific to this tool.
Read these precautions carefully before using the POWER SPIN ^+ TMDrain Cleaner to reduce the risk of electrical shock or other serious personal injury.
SAVE ALL WARNINGS AND INSTRUCTIONS FOR FUTURE REFERENCE!
Keep this manual with machine for use by the operator.
Drain Cleaner Safety
- Always use safety glasses and leather work gloves in good condition while handling or using. Use latex or rubber gloves, face shields, protective clothing, respirators or other appropriate protective equipment when chemicals, bacteria or other toxic or infectious substances are suspected to be present to reduce the risk of infections, burns or other serious personal injury. Wear latex gloves or rubber gloves under leather gloves.
- Practice good hygiene. Use hot, soapy water to wash hands and other body parts exposed to drain contents after handling or using drain cleaning equipment. Do not eat or smoke while operating or handling drain cleaning equipment. This will help prevent contamination with toxic or infectious material.
- Do not use with a corded drill. Operating with a corded drill increases the risk of electrical shock.
- Do not allow the end of cable to stop turning while the machine is running. This can overstress the cable and may cause twisting, kinking or breaking of the cable and may result in serious personal injury.
-
Position machine within 4'' (10 cm) of the drain inlet or properly support exposed cable when the distance exceeds 4'' (10 cm). Greater distances can cause control problems leading to twisting, kinking or breaking of the cable. Twisting, kinking or breaking cable may cause striking or crushing injuries.
-
Do not wear loose clothing or jewelry. Keep your hair and clothing away from moving parts. Loose clothing, jewelry or hair can be caught in moving parts.
- Do not operate this machine if operator or machine is standing in water. Operating machine while in water increases the risk of electrical shock.
- Only use drain cleaner to clean drains of recommended sizes according to these instructions. Other uses or modifying the drain cleaning machine for other applications may increase the risk of injury.
- Read and understand these instructions, the battery drill instructions and the instructions for any other equipment used with this tool before operating. Failure to follow all instructions may result in property damage and/or serious injury.
The EC Declaration of conformity (890-011-320.10) will accompany this manual as a separate booklet when required.
RIDGID Contact Information
If you have any question concerning this RIDGID® product:
- Contact your local RIDGID distributor.
- Visit RIDGID.com to find your local RIDGID contact point.
- Contact Ridge Tool Technical Service De part ment at rtctechservices@emerson.com, or in the U.S. and Canada call (800) 519-3456.
Description
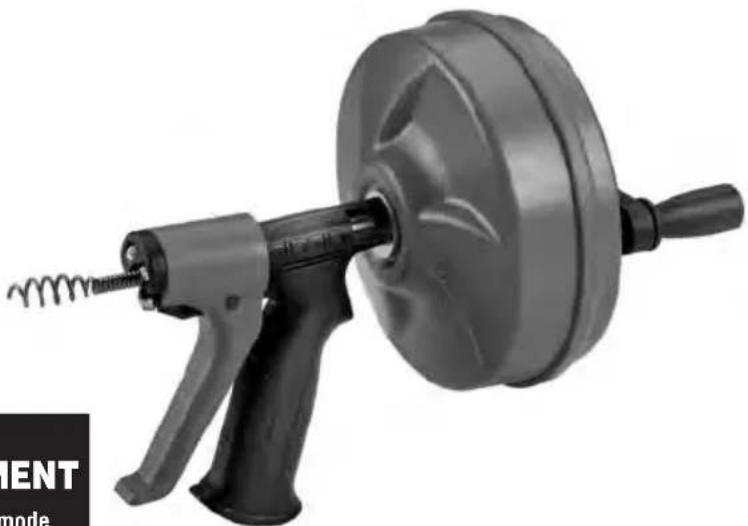
The RIDGID POWER SPIN™ Drain Cleaner is used to clean drain lines such as bathroom and kitchen sinks, bathtub and shower drains. It features RIDGID MAXCORE Cable that is positively retained in the drum to prevent cable pullout. It is equipped with the AUTOFEED mechanism that advances and retrieves the cable with just the pull of a trigger while the drum is rotating. The POWER SPIN Drain Cleaner can be operated either manually or driven with a battery powered drill.

Figure 1 - POWER SPIN Drain Cleaner
Specifications
Pipe Capacity... 34^ to 112'' (20 to 40 mm)
Drum Capacity.....25' (7.6 m) of/4" (6 mm) Diameter MAXCORE Cable
Cable. 14^ × 25^(6mm× 7.6m) MAXCORE Cable
Drum Speed ....Maximum 500 RPM
Weight. 4 lbs. (1,8 kg)
Dimension. 14^ × 9^ × 7.3^ (356×229×185mm)
NOTICE This machine is made to clean drains. If properly used it will not damage a drain that is in good condition and properly designed, constructed and maintained. If the drain is in poor condition, or has not been properly designed, constructed and maintained, the drain cleaning process may not be effective or could cause damage to the drain. The best way to determine the condition of a drain before cleaning is through visual inspection with a camera. Im - proper use of this drain cleaner can damage the drain cleaner and the drain. This machine may not clear all blockages.
Pre-Operation Inspection
WARNING


Before each use, inspect your drain cleaner and correct any problems to reduce the risk of serious injury from electric shock, twisted or broken cables, chemical burns, infections and other
causes and prevent drain cleaner damage.
-
Clean any oil, grease or dirt from all equipment, including handles and controls. This aids inspection and helps prevent the machine or control from slipping from your grip. Clean any debris from the cable and drum.
-
Inspect the drain cleaner for the following items:
-
Proper assembly and completeness.
- Broken, worn, missing, misaligned or binding parts.
- Smooth and free movement of the trigger and drum.
- Presence and readability of the warning label (see Figure 2.)
- Any condition which may prevent safe and normal operation.
If any problems are found, do not use the drain cleaner until the problems have been repaired.
-
Clean any debris from the cable. Inspect cable for wear and damage - Look for:
-
Obvious flats worn into the outside of the cable (cable is made from round wire and profile should be round).
- Multiple or excessively large kinks (slight kinks up to 15 degrees can be straightened).
- Space between the cables indicating the cable has been deformed by stretching, kinking or run in REVERSE.
- Excessive corrosion from storing wet or exposure to drain chemicals.
All of these forms of wear and damage weaken the cable and make cable twisting, kinking or breaking more likely during use. Replace worn and damaged cable before using drain cleaner.
- If using the POWER SPIN Drain Cleaner with a Battery Powered Drill, inspect the drill per its instructions. Make sure that the drill is in good operating condition and the switch controls the drill operation. Confirm that the drill turns at less than 500 rpm.
Machine and Work Area Set-Up

WARNING

Set up the drain cleaning machine and work area according to these procedures to reduce the risk of injury from electric shock, twisted or broken cables, chemical burns, infections and other causes, and prevent drain cleaner damage.
- Check for an appropriate work area. Operate in a clear level, stable, dry location free. Do not use the machine while standing in water.
- Inspect the drain to be cleaned. If possible, determine the access point(s) to the drain, the size(s) and length(s) of the drain, distance to mainlines, the nature of the blockage, presence of drain cleaning chemicals or other chemicals, etc. If chemicals are present in the drain, it is important to understand the specific safety measures required to work around those chemicals. Contact the chemical manufacturer for required information.
- Confirm POWER SPIN Drain Cleaner is appropriate for the job (See Specific ca tions). Using incorrect equipment for an application can cause injury or damage the tool.
- Make sure machine has been properly inspected.
- If needed, place protective covers in the work area. The drain cleaning process can be messy.
- If using the POWER SPIN+ by hand, make sure that the crank is present and firmly attached.
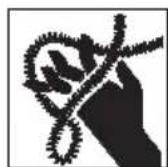
- If using the POWER SPIN with a battery powered drill, remove the crank from the back of the drum by pressing the tabs on the either side (See Figure 2). Securely attach the chuck of the drill to the drum shaft.
Figure 2 - Removing Crank Handle From POWER SPIN+
-
If needed, take appropriate steps to access the drain to be cleaned.
-
For many drains, the cable can be threaded through the cross hairs in the drain (See Figure 3).
- For a sink with a pop up drain plug: Remove lift rod and drain plug (See Figure 4). Be sure to place a container under the clean out or trap to catch any water that may come out.
- For other sinks a clean out plug or trap may need to be removed (See Figure 5.) Be sure to place a container under the clean out or trap to catch any water that may come out.
- For bathtubs, never try to go through the drain, this will damage the cable. Remove the overflow plate and any mechanism to access the drain (See Figure 6).
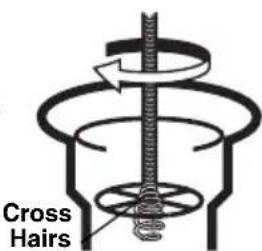
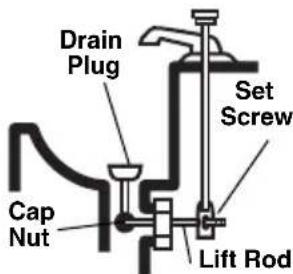

Figure 3
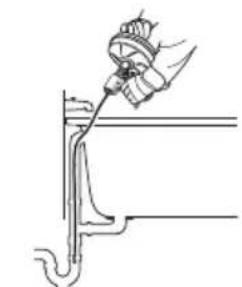
Figure 4
Figure 5
Figure 6
- Determine if the drain cleaner can be held within 4^ of the drain opening. Great -
er distance from the drain access increases the risk of the cable twisting or kinking. If not, the drain opening will need to be extended using similar size pipe and fittings so that the drain cleaner can be placed within 4^ of the drain opening (see Figure 7). Improper cable support can allow the cable to kink and twist and damage the cable/fixture or injure the operator.
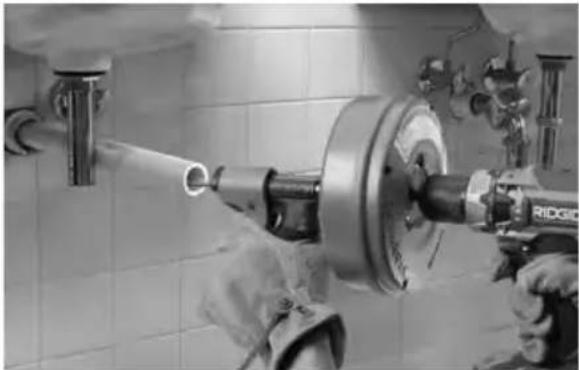
Figure 7 - Example of Extending Drain to Within 4^ (100 mm) of Drain Opening
Operating Instructions
Always use safety glasses and leather work gloves in good condition while handling or using. Use latex or rubber gloves, face shields, protective clothing, respirators or other appropriate protective equipment when chemicals, bacteria or other toxic or infectious substances are suspected to be present to reduce the risk of infections, burns or other serious personal injury. Wear latex gloves or rubber gloves under leather gloves.
Follow operating instructions to reduce the risk of injury from twisted or broken cables, cable ends whipping around, machine tipping, chemical burns, infections and other causes.
-
Make sure that machine and work area is properly set-up and that the work area is free of bystanders and other distractions.
-
Assume a proper operating position that will allow
-
Good balance and not require any over - 9 reaching.
Control of the drain cleaner (and battery powered drill if used).
- Ability to maintain the unit 4^ (100 mm) or less from the drain opening.
This will help maintain control of the cable and machine.
- Pull cable out of the drum and push into drain as far as it will go. At least one foot of cable must be in the drain so that the cable will not come out and whip around when the cable starts turning.
- If using a battery powered drill, confirm set to low speed (less than 500 rpm) and with dry hands insert the battery, but do not place you finger on the drill switch yet.
- Make sure that the drain cleaner is within 4^ (100 mm) of the drain opening, and maintain that distance throughout the cleaning process. This helps to prevent twisting and kinking of the cable.
- Place one hand on the drain cleaner handle/ trigger and other hand on the drill grip or the crank handle.
- Turn the drum clockwise (as marked with an arrow on the back of the drum, see Figure 2) and squeeze the drain cleaner trigger. Squeezing the trigger advances the cable into the drain.
Cable can also be rapidly advanced/retracted by feeding in and out of the drum by hand.
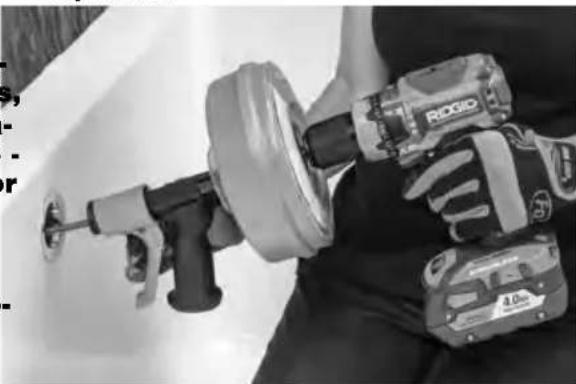
Figure 8 - In Operating Position
- Continue to advance the cable until the resistance is encountered. Carefully work the cable through the blockage. Do not force the cable - if the cable stops turning, it is not cleaning the drain. It may be necessary to spin the cable without advancing it, or advancing the cable very slowly. This will help to break up the blockage.
- If the cable becomes stuck in the blockage, do not continue turning the drum.
Continuing to turn the drum may cause the cable to twist and kink. It may be necessary to back the cable out of the blockage by turning the drum in reverse. In some cases, it may be possible to pull the cable and the blockage out of the drain by hand. If this is done, be careful not damage the cable. Remove the blockage from the cable, feed cable back into the drum, and continue cleaning the drain as detailed above.
- Once the blockage is broken up and drain is flowing, if possible, turn the water on to flush any debris down the drain.
- Continue to clean the rest of the drain. Pay attention to how far the cable has gone. Do not overrun the cable into a larger drain. This can cause the cable to knot up or cause other damage. The cable includes an increase in diameter that will not feed through the AUTOFEEL mechanism - this can be identified by openings in the cable wind just outside the drain cleaner (see Figure 9).
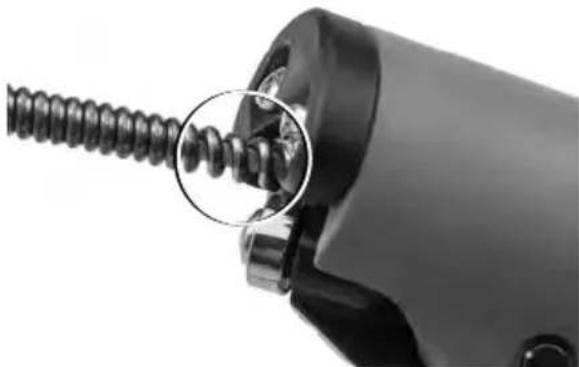
Figure 9 - Openings in Cable Wind at the End of Cable
- Once the drain has been cleaned, turn the drum counterclockwise while squeezing the drain cleaner trigger to retract the cable. Pay close attention, as the cable may lodge in a blockage while being retracted.
- Release the trigger and stop turning the drum when end of the cable nears drain opening. Do not pull the cable end from drain while it is rotating. The cable can whip around and could cause serious injury.
-
Several passes through a line are recommended for complete cleaning. If needed, repeat the above procedure.
-
Pull any remaining cable from the line by hand and push the cable into the drum.
Storage
WARNING The drain cleaner must be kept dry and indoors or well covered if kept outdoors. Store the machine in a locked area that is out of reach of children and people unfamiliar with drain cleaners. This machine can cause serious injury in the hands of untrained users.
Maintenance Instructions
AWARNING
Drill should be removed from drain cleaner before any maintenance is performed.
Cleaning
Cable, drum and AUTOFEED mechanism should be thoroughly flushed with water after every use to prevent the damaging effects of chemicals and sediment. Clean exterior as needed with hot soapy water and/or disinfectants. Drain drum by tipping forward after every use and cleaning
Installing Replacement Cable
- Press non-headed end of pivot pin through the trigger and remove trigger from handle (Figure 10). Do not lose the spring.
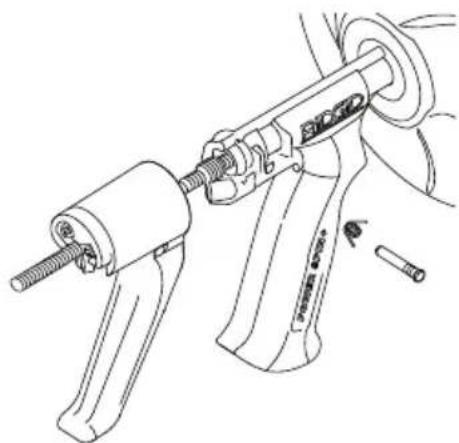
Figure 10 - Trigger Assembly
-
Pull cable out of drain cleaner until increase in cable diameter is visible (Figure 9).
-
Remove 4 screws from drum back and re- 6. Insert about 12 inches of cable through the move drum back. guide tube into the drum.
- Remove cable clamp screw. Remove exist-7. Place cable end as shown inside drum ing cable (Figure 11). (see Figure 11), and secure with cable clamp screw.
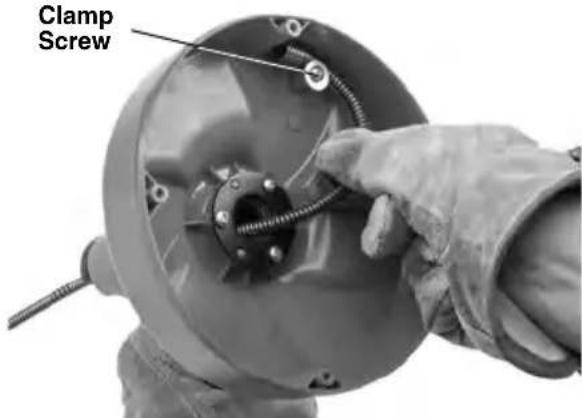
Figure 11 - Securing Cable End
- Securely install drum back.
- Feed cable into drum.
-
Install spring and trigger, securing with the pivot pin (Figure 10).
-
Replacement cable catalog #42163. To make cable installation easier, completely uncoil new cable. Use caution when removing cable from the package. The cable is under tension and could strike the user.
Troubleshooting
| PROBLEM POS | SIBLE REASONS SOLUTION | |
| Cable kinking or break- ing. | Cable is being forced. | Do Not Force Cable! Let the drain cleaner do the work. |
| Cable used in incorrect pipe diameter. | Do not use in lines over \(1/2''\) (40 mm). | |
| Drill motor switched to reverse. | Use reverse only if cable gets caught in pipe or to retract cable. | |
| Cable exposed to acid. | Clean cables routinely. | |
| Cable worn out or damaged. | If cable is worn or damaged, replace it. | |
| Cable not properly supported. | Support cable properly, see instructions. | |
| Cable not advancing/ re tracting. | AUTOFEED mechanism/trigger clogged or jammed. | Clean AUTOFEED mechanism. |
Tourniquet POWER SPIN+™

AVERTISSEMENT
Dimensions. 14^ × 9^ × 7.3^
(356× 229× 185mm)
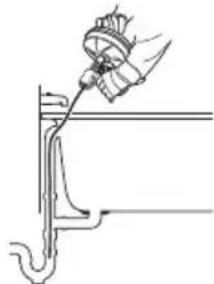
Figure 5
Figure 4
Figure 6
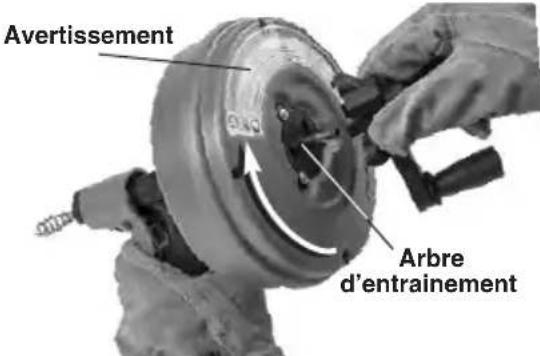
Figure 2 - Retrait de la manivelle du POWER SPIN+
RIDGID tools are warranted to be free of defects in workmanship and material.
How long coverage lasts
This warranty lasts for the lifetime of the RIDGID tool. Warranty coverage ends when the product becomes unusable for reasons other than defects in workmanship or material.
How you can get service
To obtain the benefit of this warranty, deliver via prepaid transportation the complete product to RIDGE TOOL COMPANY, Elyria, Ohio, or any authorized RIDGIINDEPENDENT SERVICE CENTER. Pipe wrenches and other hand tools should be returned to the place of purchase.
What we will do to correct problems
Warranted products will be repaired or replaced, at RIDGE TOOL'S option, and returned at no charge; or, if after three attempts to repair or replace during the warranty period the product is still defective, you can elect to receive a full refund of your purchase price.
What is not covered
Failures due to misuse, abuse or normal wear and tear are not covered by this warranty. RIDGE TOOL shall not be responsible for any incidental or consequential damages.
How local law relates to the warranty
Some states do not allow the exclusion or limitation of incidental or consequential damages, so the above limitation or exclusion may not apply to you. This warranty gives you specific rights and you may also have other rights, which vary, from state to state, province to province, or country to country.
No other express warranty applies
This FULL LIFETIME WARRANTY is the sole and exclusive warranty for RIDGID products. No employee, agent, dealer, or other person is authorized to alter this warranty or make any other warranty on behalf of the RIDGE TOOL COMPANY.

Parts are available online at Store.RIDGID.com
Ridge Tool Company
400 Clark Street
Elyria, Ohio 44035-6001
U.S.A.
Ce qui est couvert


- Safety Symbols
- NOTICE
- Specific Safety Information
- WARNING
- SAVE ALL WARNINGS AND INSTRUCTIONS FOR FUTURE REFERENCE!
- Drain Cleaner Safety
- RIDGID Contact Information
- Description
- Specifications
- Pre-Operation Inspection
- causes and prevent drain cleaner damage.
- Machine and Work Area Set-Up
- Operating Instructions
- Storage
- Maintenance Instructions
- AWARNING
- Cleaning
- Installing Replacement Cable
- Troubleshooting
- Tourniquet POWER SPIN+™
- AVERTISSEMENT
- How long coverage lasts
- How you can get service
- What we will do to correct problems
- What is not covered
- How local law relates to the warranty
- No other express warranty applies
- Ridge Tool Company
- Ce qui est couvert
Brand : RIDGID
Model : Power Spin+
Category : Drain cleaner