PB200P - Barbecue Pit Boss - Free user manual and instructions
Find the device manual for free PB200P Pit Boss in PDF.

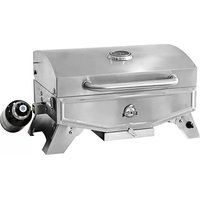
| Product Type | Portable Gas Barbecue |
| Brand | Pit Boss |
| Model | PB200P |
| Fuel | Liquid Propane (LP) |
| Cylinder Type | 9 kg (20 lb) cylinder with QCC1 type valve |
| Gas Consumption | 20,000 BTU/h (main burner) |
| Inlet Pressure | 11 inches of water column (operating) |
| Burner Material | Stainless Steel |
| Cooking Grate Material | Stainless Steel |
| Ignition | Piezo (spark) with backup match |
| Flame Diffusers | 2 steel pieces |
| Grease Tray | Removable, steel |
| Thermometer | Integrated on the lid |
| Folding Legs | 4 legs, foldable for transport |
| Hose Length | 1 m (38 in) |
| Required Clearance | 1 m (36 in) from combustible materials |
| Use | Outdoor only |
| Assembly Required | Yes, about 5 minutes |
| Burner Warranty | 5 years |
| Other Parts Warranty | 1 year |
| Customer Service (United States) | (480) 923-9630 |
| Customer Service (Canada toll-free) | 1-877-942-2246 |
| Manual Pages | 48 pages |
Frequently Asked Questions - PB200P Pit Boss
User questions about PB200P Pit Boss
0 question about this device. Answer the ones you know or ask your own.
Ask a new question about this device
Download the instructions for your Barbecue in PDF format for free! Find your manual PB200P - Pit Boss and take your electronic device back in hand. On this page are published all the documents necessary for the use of your device. PB200P by Pit Boss.
USER MANUAL PB200P Pit Boss
WARNING: Improper installation, adjustment, alteration, service or maintenance can cause injury or property damage. Read this instruction manual thoroughly before installing or servicing this equipment. Do not store or use gasoline, other flammable liquids or vapors in the vicinity of this or any other appliance. A liquid propane tank not connected for use should not be stored in the vicinity of this appliance. Failure to follow these instructions could result in property damage, bodily injury or even death. Contact local building or fire officials about restrictions and installation inspection requirements in your area.
Copyright 2021. All right reserved. No part of this manual may be copied, transmitted, transcribed, stored in a retrieval system, in any form or by any means without expressed written permission of,
Dansons
3411 North 5th Avenue, Suite 500, Phoenix, AZ, USA 85013
sales@pitboss-grills.com | service@pitboss-grills.com
www.pitboss-grills.com
Customer Care
USA: (480) 923-9630 | CANADA (TOLL FREE): 1-877-942-2246
TABLE OF CONTENTS
Safety Information 4
Package Contents 7
Preparation. 8
Assembly Instructions. 8
Installation Instructions
Gas Hook-Up 10
Liquid Propane Cylinder Requirements 10
Connecting the Liquid Propane Cylinder 11
Disconnecting the Liquid Propane Cylinder 11
Leak Testing. 12
Installer Final Check 13
Operating Instructions
Lighting the Grill 14
Turning the Grill Off 15
Flame Characteristics 15
Using the Grill 15
Care and Maintenance 16
Troubleshooting 19
Replacement Parts 20
Warranty 22
SAFETY INFORMATION
Please read the following instructions carefully before attempting to assemble or operate the product. Failure to follow these instructions could result in property damage and/or serious bodily injury.
LP- gas supply cylinder to be used must be constructed and marked in accordance with the specifications for LP-gas cylinders of the U.S Department of Transportation (DOT) or the National Standard of Canada, CAN-B339, Cylinders, Spheres and Tubes for the Transportation of Dangerous Goods
- The installation must conform with local codes or, in the absence of local codes, with the National Fuel Gas Codes, ANSI Z223. 1/NFPA 54, Storage and Handling of Liquefied Petroleum Gases, ANSI/NFPA 58.
- The portable grill is for OUTDOOR USE ONLY. Grill should be operated in a well-ventilated space. Never operate in an enclosed space, garage or building. Your grill is not intended to be installed in or on recreational vehicles and/or boats.
- Heated liquids remain at scalding temperatures long after the cooking process. Do not touch the cooking appliance until the liquids have cooled to 115^ (45^) or less.
- Do not install or use grill within 36^ of combustible materials. The grill should not be located under overhead surfaces (closed carports, garage, porch, patio) that can catch fire.
- Never attempt to attach this grill to the self-contained LP gas system of a camper trailer or motor home.
- It is the responsibility of the assembler/owner to assemble, install and maintain your gas grill. Do not let children or pets operate or play near your portable grill. Failure to follow these instructions could result in serious personal injury and/or property damage.
- Open lid before lighting grill. When grill is not in use, turn off control knob on LP gas cylinder.
- Carefully follow instructions in this manual for proper assembly and leak testing of your grill. Do not use grill until leak-checked. If a leak is detected at any time, it must be stopped and corrected before using the grill any further.
-
Appliance area should be kept clear and free from combustible materials, gasoline, bottled gas in any form and other flammable vapors and liquids. Do not obstruct the flow of combustion and ventilation air.
-
Never try to light grill with lid closed! Buildup of gases is very dangerous and could cause an explosion.
- Keep any electrical cord or fuel supply hose away from any heated surfaces.
- Propane is a flammable gas and improper handling may result in explosion and/or fire and serious accident or injury.
- This appliance will be hot during and after use. Use insulated oven mitts or gloves for protection from hot surfaces or splatter from cooking liquids.
- Do not leave your grill unattended while in operation.
- Do not use while under the influence of drugs or alcohol.
- Do not store any spare LP (propane) cylinder, full or empty, under or near your grill.
- Appliance is not intended for commercial use or rental.
- The cylinder must be disconnected when the appliance is not in use.
Natural Hazard · Spiders
FACT: Sometimes spiders and other small insects climb into the burner tube. The spiders spin webs, build nests and lay eggs. The webs or nests can be very small, but they are very strong and can block the flow of gas. Clean the burner prior to use after storing, at the beginning of grilling season or after a period of one month not being used.
The Fuel System
Gas grills are used safety by millions of people when following simple safety precautions.
The items in the fuel system are designed for operation with this grill. They must not be replaced with any brand. (See parts list for replacement items.)
Gas Burner: The gas burner is constructed of stainless steel and should not require maintenance other than inspection for insects/nests inside the air intake slots.
Fuel Supply Hose: The hose-connected regulator provided with this appliance is 38 inches in length. Keep the fuel hose away from any heated surfaces.
Propane Fuel: Warning - propane is a flammable gas. Improper handling may result in an explosion and/or fire and serious accident or injury. Your grill is designed to operate with propane (LP) gas only and is equipped with the proper orifice for propane gas.
Caution: Do not connect this grill with any gas supply other than propane. Propane gas is heavier than air and settles in lower areas. Make certain adequate ventilation is available when using your grill. The gas cylinder may be stored outside in a well-ventilated area out of reach of children when the grill is not in use. If the appliance is not in use, the gas must be turned off at the supply cylinder.
The LP gas cylinder shall be used only outdoors in a well-ventilated space and not in a building, garage, or any other enclosed area. The Portable Gas Grill may be stored indoors if the LP gas cylinder is removed and stored outside. The LP gas cylinder (not included) is threaded for connection directly to the gas regulator supplied with this appliance. Care should be taken when threading the cylinder to the regulator to engage threads correctly to achieve the proper and intended connection. When disconnecting or connecting the gas cylinder, be careful that the regulator does not strike the grill, the ground, or any other surfaces. Replace the protective cap over the threaded cylinder connection when removed from the grill. If any difficulty occurs when connecting or disconnecting the cylinder to the regulator assembly, contact your local gas supplier for assistance.
When re-connecting the LP gas cylinder to the regulator, be sure to hand-tighten until snug. This connection should be inspected for damage and leak tested after each re-connection.
To leak test, make a soap solution of one part liquid detergent and one part water. You will need a spray bottle, brush, or rag to apply the solution to the fitting. Bubbles indicate leaks.
Check all gas supply fittings for leaks before each use. Do not use the grill until all connections have been checked and do not leak.
WARNING
- Always operate the grill on a tabletop, no higher than 32 inches.
- Place the propane tank on the ground immediately adjacent to the tabletop, no less than 24 inches from the grill.
- Failure to follow these instructions could cause the propane tank to overheat and vent propane which could ignite. This could cause serious personal injuries or property damage and/or a tripping hazard over the gas hose or propane tank.
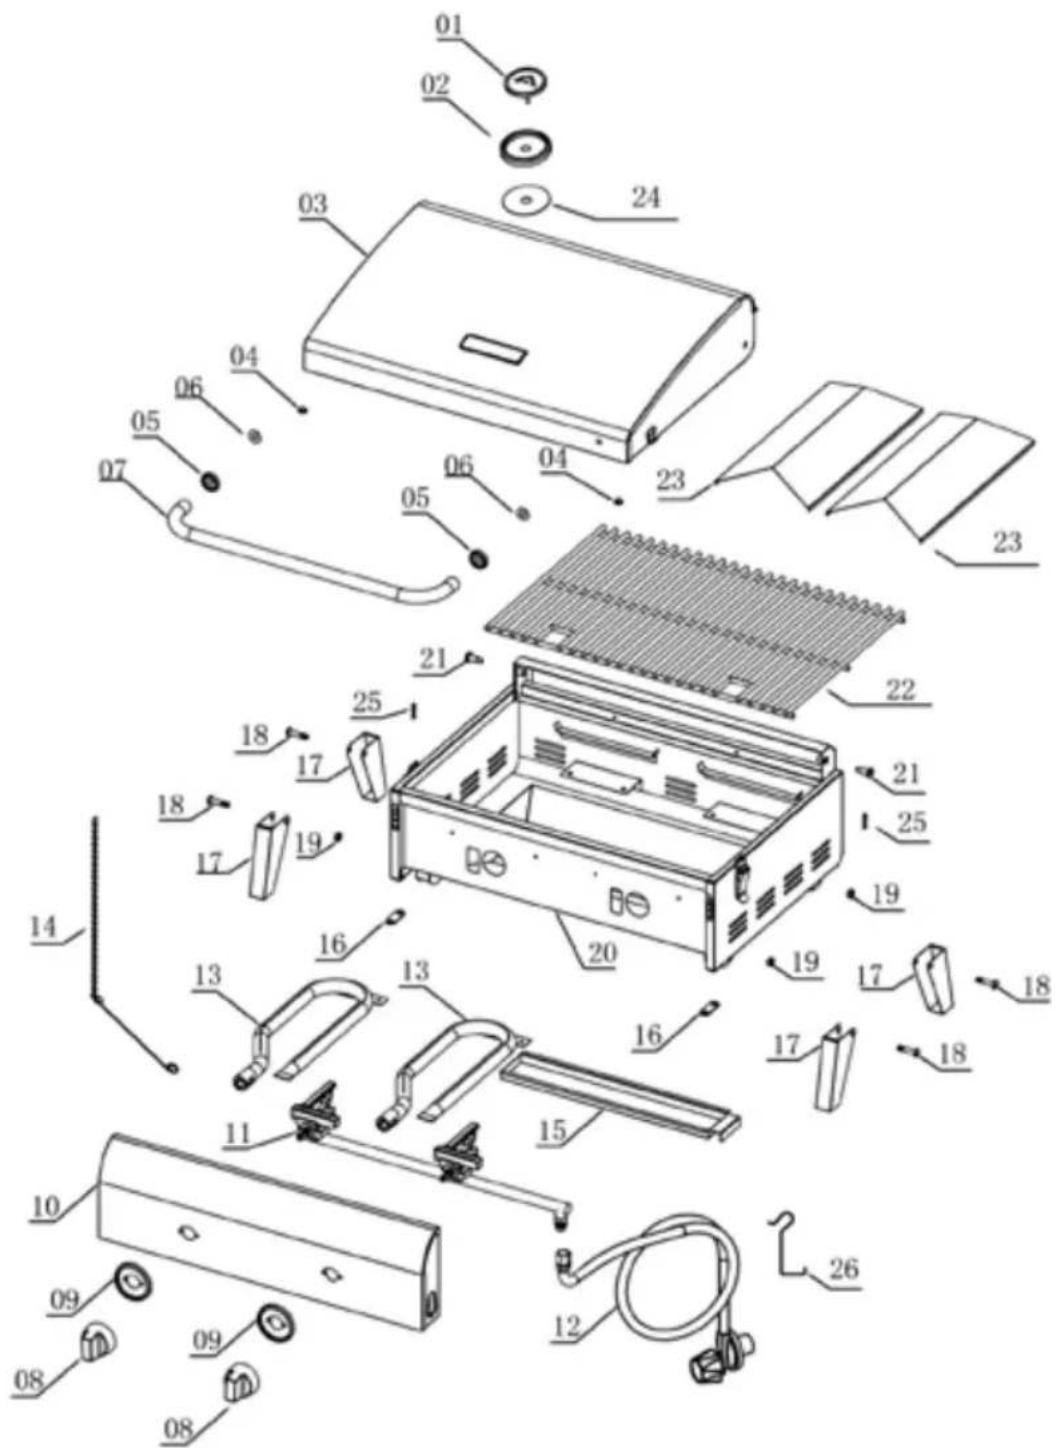
PACKAGE CONTENTS
| Part Qty Description |
| 11 Grill |
| 2 4 Foldable Legs |
| 3 2 Knob |
| 4 1 Cooking Grid |
| 5 2 Flame Tamer |
| 6 1 Grease Tray |
| 7 1 Thermostat |
| 8 1 Hose |

PREPARATION
Before beginning assembly, installation or operation of product, make sure all parts are present. Compare parts with package contents list and diagram above. If any part is missing or damaged, do not attempt to assemble, install or operate the product. Contact Customer Care for replacement parts.
- Your Portable Gas Grill is pre-assembled. The only assembly required is to place the flame tamers, cooking grid and control knobs into the grill.
Estimated Assembly Time: 5 minutes.
Warning: this appliance is not intended for and should never be used as a heater.
ASSEMBLY INSTRUCTIONS
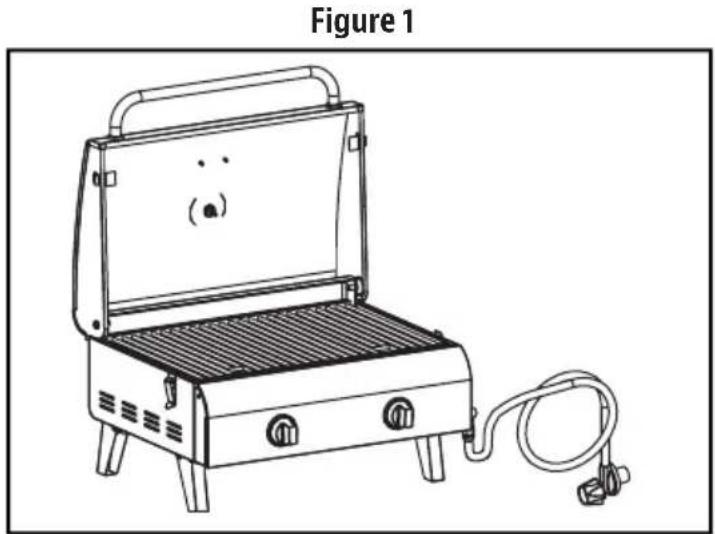
- Remove all the packing materials and move grill close to a desired location.
- Place on the control knobs as shown in Fig. 1. Push and turn the knob and check for sparks.
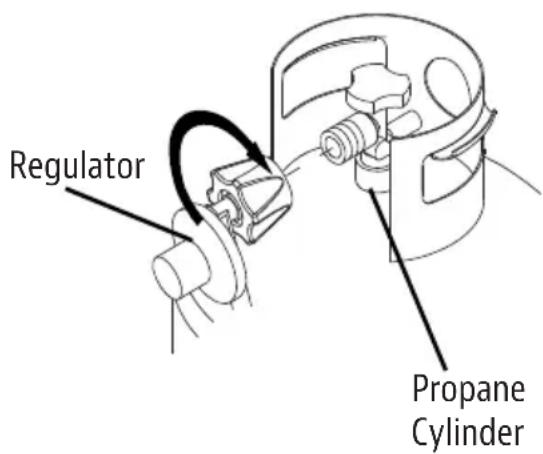
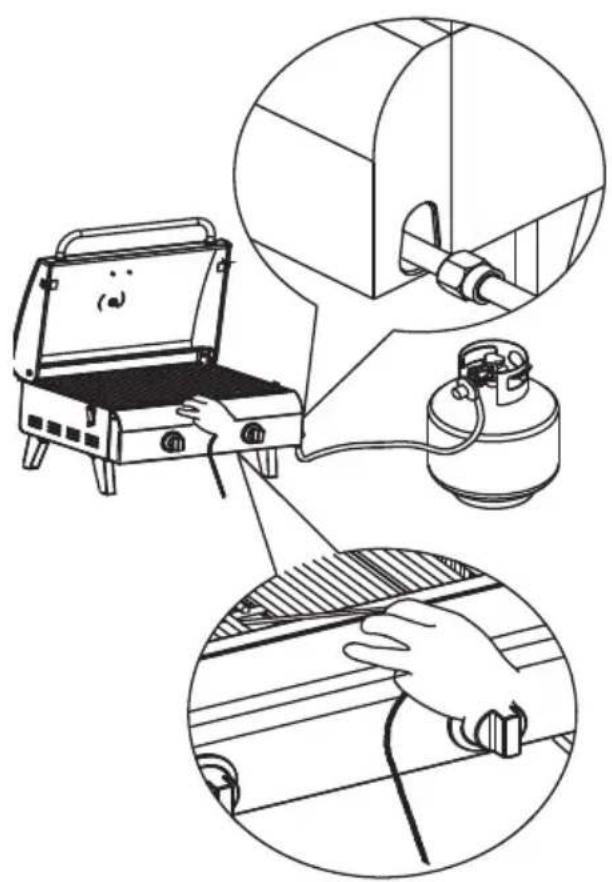
- Attach the regulator with the 38 inch hose to the propane cylinder by turning the regulator handle clockwise as shown in Fig. 2. If the outdoor cooking appliance is not in use, the gas must be turned "OFF" at the Liquid Propane cylinder.
Check all gas supply fittings for leaks before each use. Do not use the grill until all connections have been checked and do not leak (see "Leak Testing" instructions on page 6).
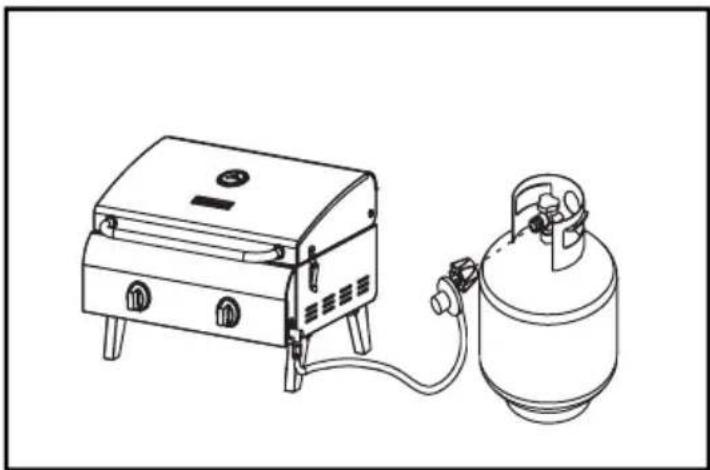
Figure 2
- Place the portable grill on the desk as shown in Fig. 3.
Note: This portable grill is used with a 38" gas hose, we suggest to use this grill on a 3 foot high table.
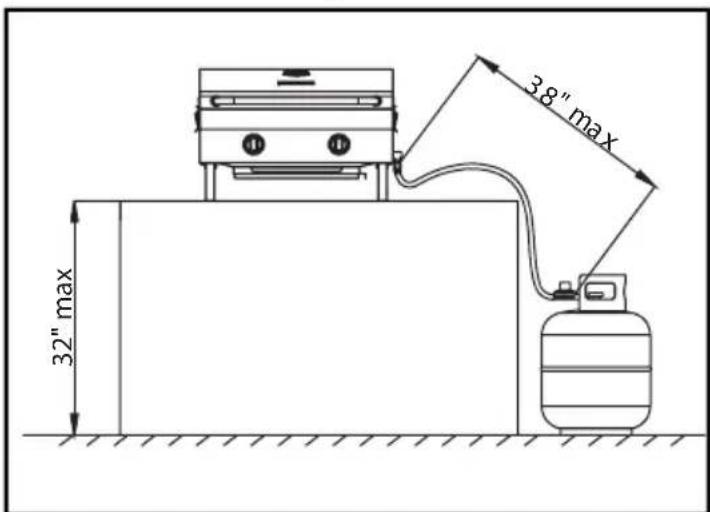
Figure 3
GAS HOOK-UP
Only the pressure regulator and hose assembly supplied with the grill should be used. Any replacement pressure regulator and hose assembly must be specified by the grill manufacturer. This grill is configured for Liquid Propane. Do not use a Natural Gas supply.
Total gas consumption (per hour) with all burners set on "HI":
Main burners 20,000 BTU/Hr.
Total 20,000 BTU/Hr.
The installation of this appliance must conform with local codes or, in the absence of local codes, with either the National Fuel Gas Code, ANSI Z223.1/NFPA 54, National Gas Propane Installation Code, CSA B149.1, or Propane Storage and Handling Code, B149.2.
LIQUID PROPANE CYLINDER REQUIREMENTS (20 lb Cylinder)
A dented or rusty Liquid Propane cylinder may be hazardous and should be checked by your supplier. Never use a cylinder with a damaged valve. The Liquid Propane cylinder must be constructed and marked in accordance with specifications for Liquid Propane cylinders by the United States Department of Transportation (DOT) or the National Standard of Canada, CAN/CSA-b339, Cylinders, Spheres and Tubes for Transportation of Dangerous Goods Commission.
The 20-lb cylinder must have a shut off valve terminating in a valve outlet specified, as applicable, for connection type QCC1 in the standard for compressed gas cylinder valve outlet and inlet connection ANSI/CGA-V-1.
Storing your portable gas grill indoors is permissible only if the cylinder is disconnected and removed from the outdoor cooking gas appliance. The cylinder system must be arranged for vapor withdrawal. The cylinder must include a collar to protect the cylinder valve.
Manifold pressure: (operating) 11 inches water column (W.C.), (Non-operating) 11.2 inches water column (W.C.).
The Liquid Propane cylinder must be fitted with an Overfill Protection Device (OPD).
Remove plastic valve cover from the Liquid Propane cylinder. Make sure the grill gas hoses do not contact the grease pan or grill firebox when the Liquid Propane cylinder is placed into the cart.
CONNECTING THE LIQUID PROPANE CYLINDER
To connect the Liquid Propane gas supply cylinder:
- The cylinder valve should be in the "OFF" position. If not, turn the valve clockwise until it stops.
- Make sure the cylinder valve has the proper type-1 external male thread connections per ANSI z21.81.
- Make sure the burner valves are in the "OFF" position.
- Inspect the valve connections, port and regulator assembly. Remove debris and inspect the hose for damage.
- When connecting the regulator assembly to the valve, use your hand to tighten the nut clockwise until it stops. Use of a wrench could damage the quick coupling nut and result in a hazardous situation.
- Before lighting the grill, use a soap and water solution to check all the connections for leaks.
If a leak is found, turn the cylinder valve "OFF" and do not use the grill until a local Liquid Propane dealer can make repairs.
DISCONNECTING THE LIQUID PROPANE CYLINDER
- Turn the grill burner valves "OFF" and make sure the grill is cool.
- Turn the Liquid Propane cylinder valve "OFF" by turning clockwise until it stops
- Detach the regulator assembly from the cylinder valve by turning the quick coupling nut counterclockwise.
- Place dust cap on cylinder valve outlet whenever the cylinder is not in use. Only install the type of dust cap on the cylinder valve outlet that is provided with the cylinder valve. Other types of caps or plugs may result in leakage of propane.
LEAK TESTING - GENERAL
Although gas connections on the grill are leak tested prior to shipment, a complete leak test must be performed at the installation site. Before each use, check all gas connections for leaks using the procedures listed below.
If the smell of gas is detected at any time, you should immediately check the entire system for leaks.
BEFORE TESTING
Make sure all packing materials have been removed from the grill, including the burner tie-down straps.
WARNING
Check all gas supply fittings for leaks before each use. Do not use the grill until all connections have been checked and do not leak. Do not smoke while leak testing. Never leak test with an open flame.
Make a solution of one part liquid detergent and one part water. You will need a spray bottle, brush, or rag to apply the solution to the fittings. For the initial leak test, make sure the Liquid Propane cylinders is full.
TO TEST
- Turn the burner valves off.
- Turn the Liquid Propane cylinder valve counterclockwise to open the valve.
- Apply a soap solution to all gas fittings. Soap bubbles will appear where a leak is present.
- If a leak is present, immediately turn the gas supply "OFF" and tighten leaky fittings.
- Turn the gas back "ON" and recheck.
- Should the gas continue to leak from any of the fittings, turn the gas supply "OFF" and contact Customer Care.
- If there is evidence of excessive abrasion or wear, or the hose is cut, it must be replaced prior to use.
Only those parts recommended by the manufacturer should be used on the grill. Substitutions will void the warranty.
WARNING
Do not store grill indoors unless the cylinder is disconnected. Do not store cylinder in a building, garage, or any other enclosed area, and keep out of reach of children at all times.
INSTALLER FINAL CHECK
Maintain specified clearance of 36 inches from combustible materials and construction
- All internal packaging has been removed.
- The hose and regulator are properly connected to the Liquid Propane cylinder.
- The unit has been tested and is free of leaks.
- The gas supply shutoff valve has been located.
- All burners are installed.
- Keep the instruction manual for future reference.
WARNING
- The grill and its individual shutoff valve must be disconnected from the gas supply piping system during any pressure testing of that system at test pressure in excess of 1/2-in. PSI (3.5kpa).
- The outdoor cooking gas appliance must be isolated from the gas supply piping system by closing its individual manual shutoff valve during any pressure testing of the gas supply piping system at test pressure equal to or less than 1/2-in. PSI (3.5kpa).
WARNING
- Do not store spare Liquid Propane cylinders under or near this appliance.
- Never fill the cylinder beyond 80 percent capacity.
- If the information in item 1&2 is not followed exactly, a fire causing death or serious injury may occur.
OPERATING INSTRUCTIONS
LIGHTING THE GRILL
- Place the legs in up position.
- Make sure the propane cylinder is tightly threaded into the regulator (hand tighten only).
- Open lid. Always open lid when lighting.
-
Push and turn Main burner knob slowly to IGNITE/HI as showed in Figure 4, burner should light immediately
-
If ignition does not occur in 3-5 seconds, turn the control knob "OFF". Wait 5 minutes before attempting to re-light the grill. If the grill fails to ignite after the second attempt, call Customer Care for assistance. With burner lit, gently close the lid and allow the grill to warm up for 5 minutes prior to use.
Note: If the knob can't spark, insert the match into the lighting rod as showed in Figure 5. Ignite the match and insert through the cooking grids to the burner.

Figure 4 Figure 5
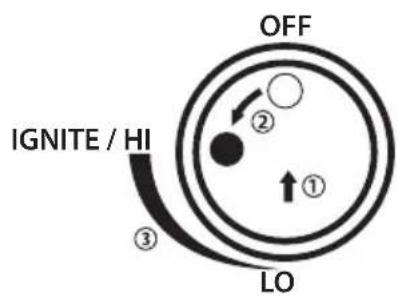
- Push
- Turn knob to Ignite/HI
- Adjust Flame
- Turn knob to "OFF" position.
- Turn the propane cylinder control knob to the "OFF" position.
Caution: Do not attempt to re-light the grill without following all the lighting instructions.
- Allow the grill body to cool at least 30 minutes before attempting to move or transport.
- Remove and clean grease tray prior to transporting, then reinstall.
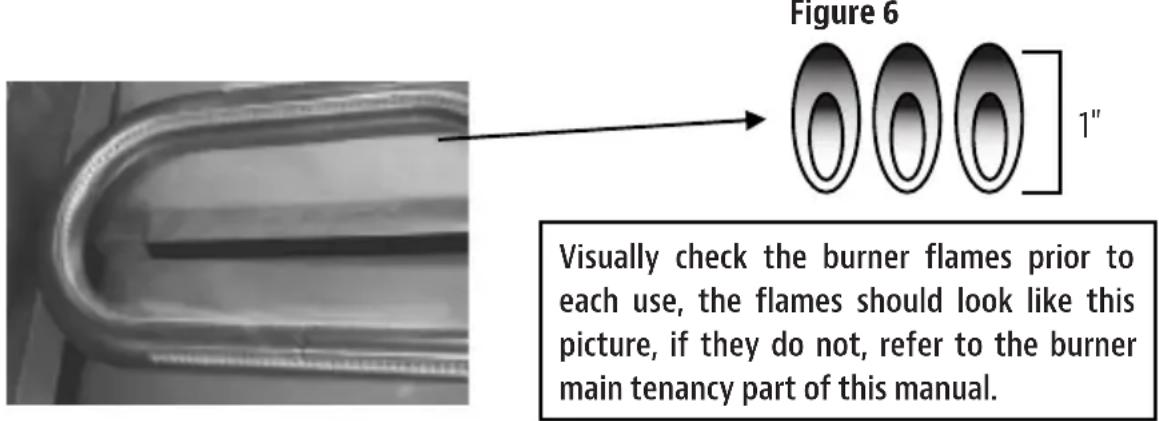
FLAME CHARACTERISTICS
- Check for proper burner flame characteristics. Burner flames should be blue and stable with no yellow tips, excessive noise, or lifting as shown in Figure 6.
- Turn the control knobs and Liquid Propane cylinder valves "OFF".
- Allow the grill and burners to cool.
USING THE GRILL
- Find a level surface to grill on.
- Allow the grill to warm up with the lid closed for 5 minutes prior to cooking.
- You may cook on the grill in any weather. If the temperature is extremely cold or hot, the cooking times will be slightly increased or decreased. Keep the grill out of excessive winds when operating.
CARE AND MAINTENANCE
There is very little care and maintenance needed. The portable gas grill is designed and made of materials that will last many years with normal use. Following these instructions will improve the longevity and quality of cooking. To ensure safe operation of your grill, the cooking area should always be kept free of combustible materials of any type, such as gasoline or other flammable vapors or liquids.
Outside Grill Parts - This is stainless steel. It can be cleaned easily with warm soapy water or any stainless steel cleaner.
Cooking Grid and Grease Tray - The cooking grid is made of stainless steel. The cooking grid should be brushed with a steel brush immediately after cooking, while the grill is still warm. The grease tray is also stainless steel and can be cleaned with a flat scraper such as a putty knife.
Caution: The grease tray must be kept clean and free of heavy build-up for the grill to perform properly and to eliminate flare-ups.
Grill Main Burners - Extreme care should be taken when removing a burner. It must be correctly centered on the orifice before any attempt is made to relight the grill. Frequency of cleaning will depend of how often you use the grill.
Failure to properly place the burner over the orifice could cause a fire to occur behind and beneath the valve panel, thereby damaging the grill and making it unsafe to operate. Before cleaning, make sure the gas supply and control knobs are in the "OFF" position and the burners have cooled.
To remove the main burners for cleaning:
- Locate the burner screw at the rear of the firebox.
- Remove the screw and lift the burner out of the firebox.
To clean the grill burners:
- Clean the exterior of the burner with a wire brush. Use a metal scraper for stubborn stains and debris.
- Clear clogged ports with a straightened paper clip. Never use a wooden toothpick as it may break off and clog the port.
- Check and clean burners / venturi tubes for insects and insect nests. A clogged tube can lead to a fire beneath, and behind, the main control panel.
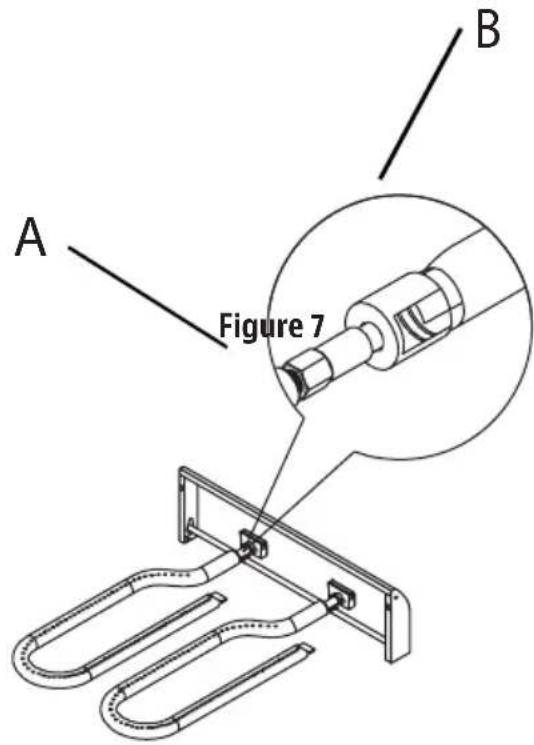
To reinstall the main burners:
- Insert the burner over the main burner gas valve (part# 11 on page 19)
- Make sure orifice spud (A) is inside the burner venturi (B) as shown in Figure 7.
- Align the burner screw hole with the firebox hole, insert screw and tighten.
Firebox - Use warm soapy water to clean this area. Do not allow grease to build up.
Drain Hole - The drain hole must be kept clear of grease and good particles to allow drippings to drain properly into the grease tray. This must be done to maintain proper operation of your grill.
General - This grill, like all equipment, will look better and last longer if kept of out the weather when not in use.
Caution: Do not store propane cylinders in enclosed areas. When using a cover or moving the grill, always wait until the grill has cooled for at least 30 minutes.
- Do not obstruct the flow of combustion and ventilation air.
- A clogged tube can lead to fire beneath the appliance.
This unit must be kept in an area free from combustible materials, gasoline and other flammable vapors and liquids.
Make sure all openings into the grill body are free of blockages or debris and there are no objects or materials blocking the flow of combustion or ventilation. Make sure the legs are in the up position when using the grill.
Check burner air inlet openings (behind the inlet guard on the right end of the grill body) for insect nests or blockages. Make sure the slots in the burner tube are clear.
When the grill is not in use, turn the control knob to the "OFF" position and remove the propane cylinder from the regulator. Remove the regulator from the burner.
For outdoor use only. If stored indoors, detach propane cylinder and store outdoors. Propane cylinders must be stored out of reach of children.
IMPORTANT
First-time use: It is important that the grill be lit and allowed to heat up for at least 30 minutes before any food is placed on the cooking grid. It is normal for some smoke to appear during the initial operation of the grill. After initial heating, the grill is ready for use. A cooking spray can be used on the cooking grids to allow easier clean up.
THIS COOKING APPLIANCE IS FOR OUTDOOR USE ONLY AND SHALL NOT BE USED IN A BUILDING, GARAGE OR ANY OTHER ENCLOSED AREA.
MOVING INSTRUCTIONS
Caution: Never move the grill with burner lit.
- Make sure control knob is in the "OFF" position. Disconnect the propane cylinder from the regulator.
- Be sure the grill has completely cooled for at least 30 minutes.
- Close the lid and secure the latch. Remove and clean grease tray, then reinstall. Place the legs in the down position. Use the handle to carry the grill.
Note: It is best to leave the grease tray in place attached to the bottom of the grill. Some grease may continue to drip from the drain hole during transport.
TROUBLESHOOTING
WARNING
Spiders and insects can nest inside the burners of the grill and disrupt gas flow. This very dangerous condition could cause a fire behind the valve panel, thereby damaging the grill and making it unsafe for operation. Inspect the grill at least twice a year.
When to Look for Spiders
You should inspect the burners at least twice a year or immediately after any of the following conditions occur:
- The smell of gas in conjunction with burner flames appearing yellow.
- The grill does not reach temperature.
- The grill heats unevenly.
- The burners make popping noises.
BEFORE CALLING FOR SERVICE
If the grill does not function properly, use the following checklist before contacting Customer Care.
| Problems What To Do | |
| Grill will not light. | ·Check to see if the liquid propane cylinder is empty. ·Check burner ports for any blockage. Use a soft wire brush to clear plugged ports. ·Check the gas orifice on the burner for an obstruction. If orifice is blocked, clean with a needle or thin wire. NEVER USE A WOODEN TOOTHPICK. |
| Burner flame is yellow or orange in conjunction with gas odor. | ·Check for spiders and insects. ·Call Customer Care. |
| Low heat with the control knob on the "HI" setting. | ·Make sure the grill area is clear of dust. ·Make sure the burner and orifice are clean. ·Check for spiders and insects. ·Is there adequate gas supply available? ·Is the grill being preheated for 15 minutes? |
REPLACEMENT PARTS
For replacement parts, call our Customer Care department at 1-877-303-3134, Monday to Friday, 8 a.m. - 5 p.m., MST. NOTE: Not all parts are replaceable.
WARNING: When the grill is not in use, the regulator must hang on the side of the firebox.
| Part Qty Description |
| 11 Thermometer |
| 21 Thermometer Bezel |
| 31 Grill Lid |
| 42 Lid Bumper |
| 52 Lid Handle Bezel |
| 62 Lid Handle Insulating Spacer |
| 71 Lid Handle |
| 82 knob |
| 92 Bezel |
| 101 Control Panel |
| 111 Valve and Manifold Assembly |
| 121 Regulator |
| 132 Main Burner |
| 141 Match Light Tool |
| 151 Grease Tray |
| 162 Control Panel Bracket |
| 174 Foldable Leg |
| 184 Leg Hinge Screw |
| 194 Hex Screw |
| 201 Fire Box |
| 212 Lid Hinge Screw |
| 221 Cooking grate |
| 232 Flame Tamer |
| 241 Thermometer Heat Insulating Spacer |
| 252 R-Pin |
| 261 Hose and Regulator Hook |
WARRANTY
Proof of purchase is required to access this warranty program, which is in effect from the date of purchase. Customers will be subject to parts, shipping, and handling fees if unable to provide proof of the purchase or after the warranty has expired.
If you have any questions or problems, contact Customer Care.
service@pitboss-grills.com
USA: (480) 923-9630 | CANADA (TOLL FREE): 1-877-942-2246
LIMITED WARRANTY
5-Year Warranty on the stainless steel burners.
1- Year Warranty on all other parts.
WARRANTY PROVISIONS
This warranty is non-transferable and does not cover failures due to misuse or improper installation or maintenance.
This warranty is for replacement of defective parts only. We are not responsible for incidental or consequential damages or labor costs.
This warranty does not cover corrosion or discoloration after the grill is used, or lack of maintenance, hostile environment, accidents, alterations, abuse or neglect.
This warranty does not cover damage caused by heat, abrasive and chemical cleaners, or any damage to other components used in the installation or operation of the gas grill.
Some states do not allow the limitation or exclusion of incidental or consequential damages, so the above limitations or exclusions may not apply to you. This warranty gives your specific legal rights, and you may also have other rights that vary from state to state.

DECLARATION CONCERNANT LES DROITS D'AUTEUR
3411 North 5th Avenue, Suite 500, Phoenix, AZ, USA 85013
sales@pitboss-grills.com | service@pitboss-grills.com
www.pitboss-grills.com
Service clients
ÉTATS-UNIS: (480) 923-9630
CANADA (SANS FRAIS): 1-877-942-2246
TABLE DES MATIÈRES
DISPOSITIONS DE LA GARANTIE:
DO NOT RETURN PRODUCT TO STORE
For all questions, comments, or inquiries, please contact Dansons directly our Customer Care department.
USA: (480) 923-9630
CANADA (TOLL FREE): 1-877-942-2246
service@pitboss-grills.com
IMPORTANT
NE RETOURNZ PAS LE PRODUIT AU MAGASIN
WARNING: Combustion of propane gas tan
expose you to chemicals including formaldehyde, which is known to the State of California to cause cancer, and carbon monoxide, which is known to the State of California to cause birth defects or other reproductive harm. For more information go to www.P65WARNINGS.CA.GOV