
PB100P - Barbecue Pit Boss - Free user manual and instructions
Find the device manual for free PB100P Pit Boss in PDF.

User questions about PB100P Pit Boss
0 question about this device. Answer the ones you know or ask your own.
Ask a new question about this device
Download the instructions for your Barbecue in PDF format for free! Find your manual PB100P - Pit Boss and take your electronic device back in hand. On this page are published all the documents necessary for the use of your device. PB100P by Pit Boss.
USER MANUAL PB100P Pit Boss

Intertek
5005166
PB100P1
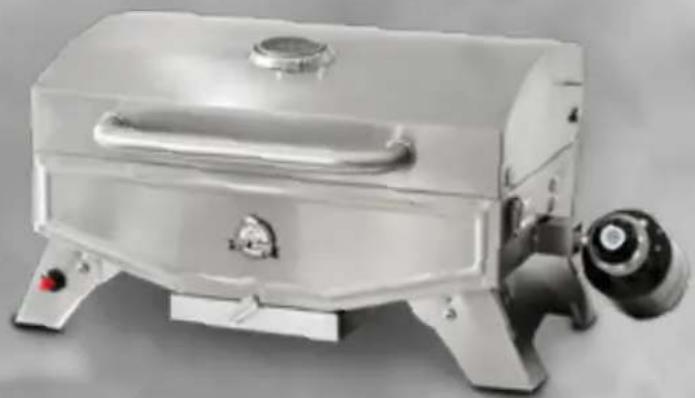
STAINLESS STEEL PORTABLE TABLETOP GAS GRILL GRIL DE TABLE PORTATIF EN ACIER INOXYDABLE À GAZ
IMPORTANT, READ CAREFULLY, RETAIN FOR FUTURE REFERENCE. MANUAL MUST BE READ BEFORE OPERATING!
IMPORTANT, PRENEZ CONNAISSANCE DE CE DOCUMENT ET CONSERVEZ-LE POUR RÉFÉRENCE ULTÉRIEURE. VOUS DEVEZ LIRE CE GUIDE AVANT D'UTILISER LE BARBECUE !
FOR OUTDOOR AND HOUSEHOLD USE ONLY. NOT FOR COMMERCIAL USE. FUEL NOT INCLUDED.
POUR UN USAGE EXTÉRIEUR ET DOMESTIQUE SEULEMENT. PAS POUR USAGE COMMERCIAL. CARBURANT NON INCLUS.
natural_image
Exterior view of a modern stainless steel portable gas stove with control panel (no visible text or symbols)INSTRUCTIONS AND USE | INSTRUCTIONS ET UTILISATION
WARNING: Improper installation, adjustment, alteration, service or maintenance can cause injury or property damage. Read this instruction manual thoroughly before installing or servicing this equipment. Do not store or use gasoline, other flammable liquids or vapors in the vicinity of this or any other appliance. A liquid propane tank not connected for use should not be stored in the vicinity of this appliance. Failure to follow these instructions could result in property damage, bodily injury or even death. Contact local building or fire officials about restrictions and installation inspection requirements in your area.
Please read and understand this entire manual before attempting to assemble, operate or install the product. This will ensure you receive the most enjoyable and trouble-free operation of your new portable gas grill. We also advise you retain this manual for future reference.
DANGERS AND WARNINGS
- A minimum clearance of 254mm (10 inches) from combustible constructions to the sides of the grill, and 254mm (10 inches) from the back of the grill to combustible constructions must be maintained. Do not use this appliance indoors or in an enclosed, unventilated area. This appliance must not be placed under overhead combustible ceiling or overhang. Keep your grill in an area clear and free from combustible materials, gasoline and other flammable vapors and liquids.
Should a grease fire occur, turn the grill OFF and leave the lid closed until the fire is out. Do not throw water on. Do not try to smother the fire. Use of an all-class (class ABC) approved fire extinguisher is valuable to keep on site. If an uncontrolled fire does occur, call the Fire Department.
- The liquefied petroleum (LP) cylinder must be constructed and marked in accordance with the specifications for LP Gas Cylinders of the U.S. Department of Transportation (D.O.T.) or the National Standard of Canada, CAN/CSA-B339, Cylinders, Spheres and Tubes for Transportation of Dangerous Goods; and Commission.
- This outdoor grill is not intended for installation in/on recreation vehicles or boats.
Never use this appliance in an enclosed space, such as a camper, tent, car, boat or home. This appliance is not intended for and should never be used as a heater.
- This appliance is not recommended for children, persons with reduced physical, sensory or mental capabilities, or lack of experience and knowledge, unless they are under direct supervision or instruction by a person responsible for their safety.
- Parts of the barbecue may be very hot, and serious injury may occur. Keep young children and pets away while in use. Do not touch hot surfaces. Use heat-resistant
gloves, long-handled tongs, or cooking mitts at all times, since the grill will become very hot. Open the hood carefully when cooking to avoid burns from the hot air and steam trapped inside.
- Never use the grill without the grease tray installed and hung under the firebox. Without the grease tray, hot grease and debris could leak downward and produce a fire hazard.
- Do not obstruct the flow of combustion and ventilation air to this appliance. Keep the burner tube and portholes clean and free from debris. Clean before use. Regular care and maintenance is required to prolong the lifespan of your unit.
- Always check for gas leaks when you connect and disconnect the regulator to the gas cylinder, especially after a period of storage (for example, over winter). Check all connections for leaks with a soapy water solution and brush. Never use an open flame to check for leaks.
- Clean and inspect the gas regulator before each use of the outdoor cooking gas appliance. Replace the gas regulator prior to being used if there is evidence of excessive abrasion or wear. Use only the gas regulator assembly that has been supplied with this gas grill. Do not use a regulator from another manufacturer.
Do not use lava rock, wood chunks, charcoal, lighter-fluid, or spirit for lighting your grill. Keep all such substances and liquids well away from appliance when in use.
- Operate this appliance using liquefied petroleum only, which is also specified on the rating label on the unit. Do not attempt to operate your grill on other gases. Do not attempt to convert this LP unit to natural gas. Failure to follow this warning could lead to fire, bodily harm, and will void your warranty.
- Ensure the gas cylinder is purchased by a reputable supplier. An incorrectly filled or an overfilled LP tank can be dangerous. The overfilled condition combined with the warming of the LP gas tank (a hot summer day, tank left in the sun, etc.) can cause LP gas to be released since the temperature increase causes gas to expand. Gas released from the cylinder is flammable and can be explosive.
- Do not use an LP gas cylinder if it has a damaged valve or shows signs of dents, gouges, bulges, fire damage, corrosion, leakage, excessive rust, or other forms of visual external damage; it may be hazardous and should be checked immediately by a liquid propane supplier.
If you see, smell, or hear the hiss of gas escaping from the cylinder, do not attempt to light appliance. Extinguish any open flame. Disconnect from fuel supply.
- Do not connect or disconnect the gas cylinder while the unit is in use or is still hot. When grill is not in use, ensure regulator knob is turned to OFF and disconnect the
gas cylinder. Never move or transport the unit while the gas cylinder is attached. Do not store a spare LP gas cylinder under or near the appliance.
CARBON MONOXIDE ("THE SILENT KILLER")
Always use a gas appliance outdoors in an open area with good ventilation to avoid breathing toxic fumes from combustion or leaking gas. Carbon monoxide is a colorless, odorless, tasteless gas produced by burning gas, wood, propane, charcoal or other fuel. Carbon monoxide reduces the blood's ability to carry oxygen. Low blood oxygen levels can result in headaches, dizziness, weakness, nausea, vomiting, sleepiness, confusion, loss of consciousness or death. Follow these guidelines to prevent this colorless, odorless gas from poisoning you, your family, or others:
- See a doctor if you or others develop cold or flu-like symptoms while cooking or in the vicinity of the appliance. Carbon monoxide poisoning, which can easily be mistaken for a cold or flu, is often detected too late.
- Alcohol consumption and drug use increase the effects of carbon monoxide poisoning.
Carbon monoxide is especially toxic to mother and child during pregnancy, infants, the elderly, smokers, and people with blood or circulatory system problems, such as anemia, or heart disease.
TABLE OF CONTENTS
Safety Information 2
Parts & Specs....6
Assembly Preparation......6
Assembly Instructions
Expanding The Feet....7
Installing The Regulator Valve ....7
Attaching The Lid Handle ....7
Connecting To A Gas Supply
Safe Grilling Environment......8
Gas Cylinder Requirements 8
Installing A Gas Cylinder 9
Disconnecting A Gas Cylinder 9
Operating Instructions
Grill Cooking....10
Preparation For Use - Leak Testing......10
First Use – Grill Burn-Off 11
Preheating....12
Automatic Start-Up Procedure.... 12
Manual Start-Up Procedure 13
Shutting Off Your Grill....13
Care & Maintenance
Checking The Gas Level 14
Cleaning Frequency 14
Tips & Techniques ....16
Troubleshooting 17
Replacement Parts....19
Warranty
Conditions 20
Exceptions 20
Ordering Replacement Parts......21
Contact Customer Service....21
Warranty Service 21
Accessories Sold Separately......22

COPYRIGHT NOTICE
Copyright 2018. All right reserved. No part of this manual may be copied, transmitted, transcribed, stored in a retrieval system, in any form or by any means without expressed written permission of,
Dansons Inc.
3411 North 5th Avenue, Suite 500, Phoenix, AZ, USA 85013
sales@pitboss-grills.com | service@pitboss-grills.com
www.pitboss-grills.com
Toll-Free: 1-877-303-3134
Fax: 1-877-303-3135
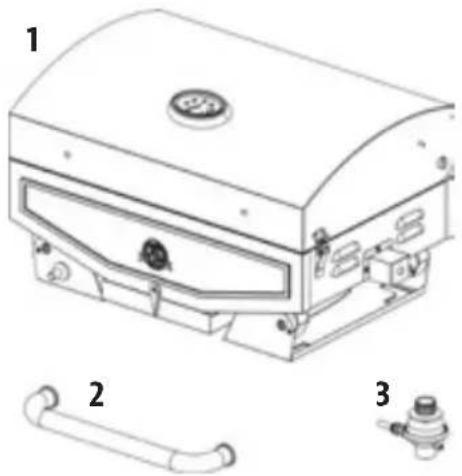
PARTS & SPECS
| Part# | Description |
| 1 | Firebox Assembly |
| 2 | Lid Handle |
| 3 | Regulator |
NOTE: Due to ongoing product development, parts are subject to change without notice. Contact Customer Service if parts are missing when assembling the unit.
natural_image
Technical line drawing of a portable electronic device with labeled parts (no text or symbols present)ASSEMBLY PREPARATION
Parts are located throughout the shipping carton, including inside the grill. Unpack the grill and parts by removing all packaging materials.
Before assembly of product, review all parts and reference the parts list. If any part is missing or damaged, do not attempt to assemble. Shipping damage is not covered under warranty. Contact your dealer or Pit Boss Customer Service for parts.
Tool required for assembly: screwdriver. Tool not included.
ASSEMBLY INSTRUCTIONS
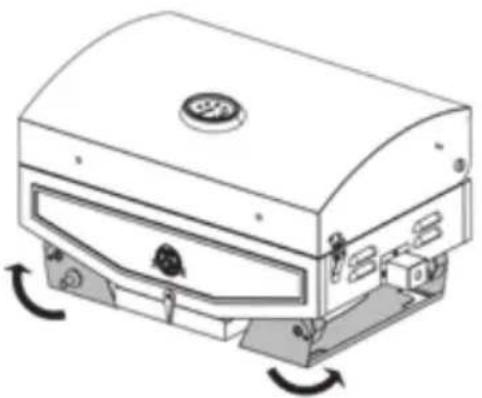
1. EXPANDING THE FEET
Parts Required:
1 x Firebox Assembly (#1)
Installation:
- Place the firebox on a clean, level surface, thermometer on the top. Tip the unit backwards and extend the feet until they lock into position.
2. INSTALLING THE REGULATOR VALVE
Parts Required:
1 x Regulat(#3)
Installation:
- Insert the end of the regulator valve into the opening on the side of the firebox. Hand-tighten by rotating the part clockwise until completely secured into the opening.
3. ATTACHING THE LID HANDLE
Parts Required:
1 x Lid Handle (#2)
Installation:
- Remove the pre-installed screws from the lid handle. From inside the barrel lid, insert one screw to protrude to the outside. Hand-tighten the screw (from the inside) into the lid handle. Repeat same installation for other end of lid handle. Secure using tool.
- The unit is now assembled.
natural_image
Line drawing of a portable electronic device with scroll wheel and control panel (no text or symbols)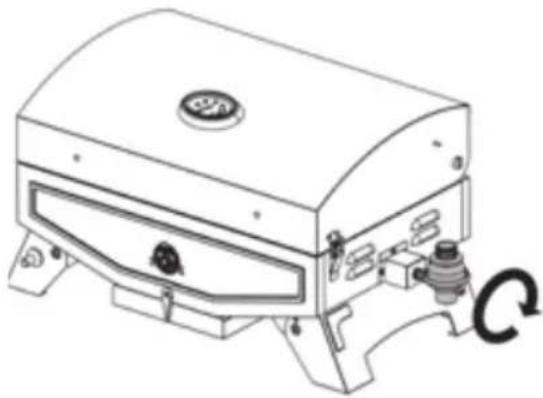
natural_image
Line drawing of a portable electric stove or gas stove with a circular button and mechanical components (no text or symbols)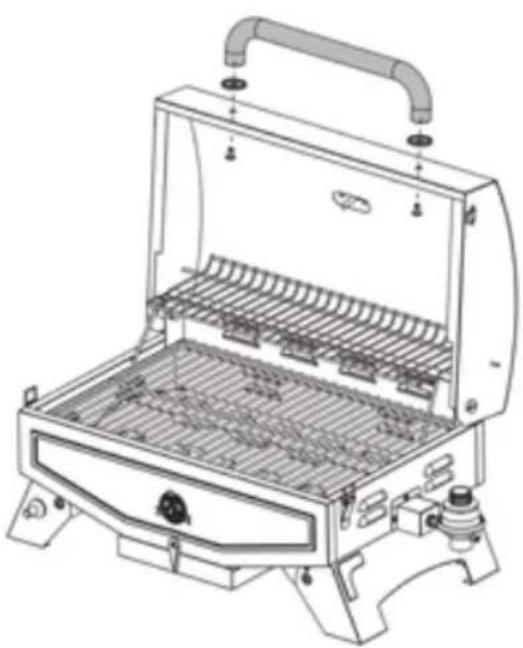
natural_image
Line drawing of a portable electric grill with open lid and side-mounted grating (no text or symbols)CONNECTING TO A GAS SUPPLY
SAFE GRILLING ENVIRONMENT
This gas appliance is designed and certified for outdoor use only. Do not operate the grill inside a building, garage, recreation vehicle, boat, screened porch or any enclosed area. Keep the grill away from windy areas but keep the grill in a well-ventilated area. Do not obstruct the flow of the combustion and ventilation air around the grill.
- CLEARANCE TO COMBUSTIBLE CONSTRUCTION
A minimum clearance of 254mm (10 inches) from the sides of the grill and a minimum clearance of 254mm (10 inches) from the back of the grill to adjacent vertical combustible constructions must be maintained. We strongly recommend a 305cm (10 ft.) clearance of the grill to your home or any building.
- CLEARANCE TO NON-COMBUSTIBLE CONSTRUCTION
A minimum clearance of 254mm (10 inches) from the back of the grill above the cooking surface to noncombustible constructions is required to allow the grill hood to open completely. A minimum of 254mm (10 inches) clearance to the sides of the grill above the cooking surface to noncombustible constructions is recommended.
WARNING: Do not place the grill under overhead, unprotected combustible surfaces.
GAS CYLINDER REQUIREMENTS
The grill is set and tested with liquid propane gas only. When purchasing a gas cylinder for use with this unit, ensure it meets the following requirements:
- 1 lb. capacity.
- Marked "PROPANE."
- Constructed and marked in accordance with Specifications for LP Gas Cylinders of the U.S. Department of Transportation (DOT) or the National Standard of Canada, CAN\CSA-B339, Cylinders, Spheres and Tubes for Transportation of Dangerous Goods; and Commission, as applicable (see label for marking).
- Provided with a cylinder connection device that is compatible with the grill's regulator port.
CAUTION: It is important to inspect the cylinder connection device. Check the propane tank valve rubber seal for cracks, wear or deterioration prior to use. A damaged rubber seal can cause a gas leak, possibly resulting in an explosion, fire, or severe bodily harm. Do not use a propane tank with a damaged rubber seal.
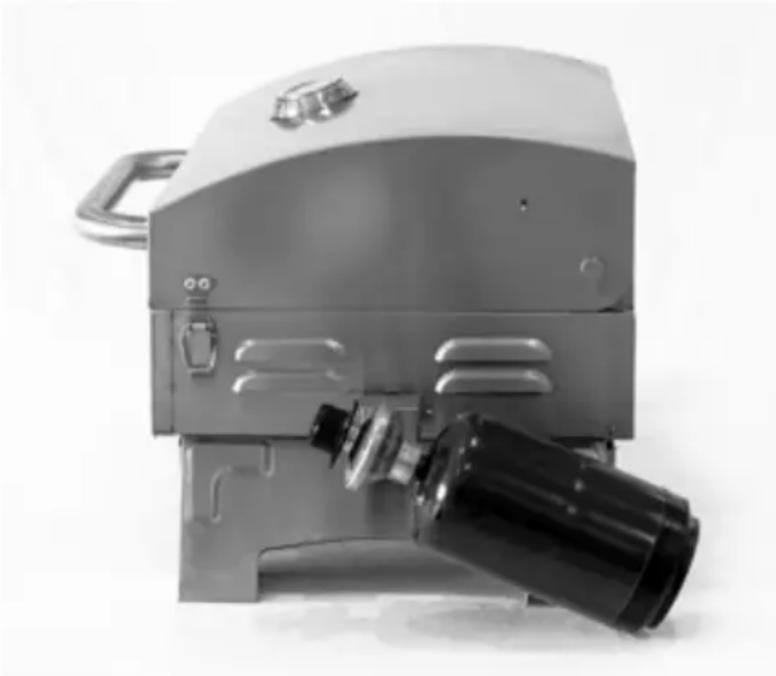
- Ensure the regulator valve on the grill is completely closed by turning the knob clockwise to the OFF position.
- Remove the protective caps from the regulator valve opening and the top of the gas cylinder. Save the caps.
- Insert the 1 lb. gas cylinder into the threaded opening of the regulator valve. Turn the cylinder clockwise until firmly seated. Hand-tighten only.
- For optimum performance, allow cylinder to hang vertically off the edge of the table or sits stable on a table (clean, level surface) where there is no danger of being bumped or disturbed. Note proper positioning shown below:
natural_image
Exterior view of a mechanical device with a cylindrical component inserted (no visible text or symbols)WARNING: Do not fold up or transport grill with gas cylinder attached. The cylinder may loosen off the valve, and cause a gas leak, possibly resulting in an explosion, fire, or severe bodily harm. Disconnect gas cylinder first before travel or storage.
DISCONNECTING A GAS CYLINDER
- Ensure the regulator valve on the grill is completely closed by turning the knob clockwise to the OFF position.
- Turn the cylinder counter-clockwise (by hand) to disconnect from the regulator valve opening. Replace the protective caps on the regulator valve opening and the top of the gas cylinder for storage (if not empty).
NOTE: If storing the grill indoors, leave the gas cylinder outdoors.
OPERATING INSTRUCTIONS
GRILL COOKING
The temperature readout on the thermometer can be affected by the following factors: outside ambient temperature, the amount and direction of wind, the lid being opened, and the quantity of food being cooked.
• MAIN LEVEL COOKING
For direct cooking on the main level cooking grid, place food on the cooking grid, and then adjust the burner to the temperature required. Food is cooked directly over the heat source. The burner heats up the flavor activator under the cooking grid, which in turn heats the food on the grill. The natural food juices from cooking fall onto the hot flavor activator below and vaporize. Rising smoke bastes the food, giving it that unique barbecued flavor.
Use the direct cooking method for foods that take less than 25 minutes to cook: steaks, chops, kabobs, sausages, and more. These foods should be turned once halfway through the grilling time. To sear meats, place them over direct high heat for 2 to 5 minutes per side. Smaller pieces require less searing time. Hamburgers, steaks, chops, chicken breasts, and larger cuts of meat all benefit from searing. After searing, finish cooking the food at a lower temperature to immerse more barbecue flavor.
Controlling flare-ups are part of cooking meats on a grill. This adds to the unique flavor of barbequed food; however, excessive flare-ups can also overcook your food and create a dangerous situation for you and your grill. Excessive flare-ups may result from large amounts of fat on the food being cooked or the build-up of grease in the grill. If excessive flare-ups occur, do not pour water on the flames. This can cause grease to splatter and could result in serious burns or bodily harm. Instead, turn the regulator knob to OFF until the grease burns out. To prevent or minimize flare-ups, trim all excess fat or skin from meats before grilling, keep the grill clean and the grease tray empty.
The warming rack is a convenient way to cook food slowly and further away from the heat source. It can also be used to warm items such as bread or rolls. When opening the hood, be mindful for dripping fat from the upper warming rack that could drip onto the back of the grill. Always check that your upper warming rack is properly fitted before use.
PREPARATION FOR USE – LEAK TESTING
A leak test is used to determine the integrity of a seal. Before using your gas grill, perform a leak test on the connection between the regulator and the gas cylinder to reduce the risk of serious bodily injury or death from fire or explosion. A leak test should be performed a
minimum of once a season, as well as:
- before lighting your grill for the first time,
- every time the gas cylinder has been changed,
- after travel, especially over rough or bumpy roads,
- after a prolonged period of storage or non-use.
HOW TO PERFORM A LEAK TEST
Supplies Required:
1 x Bowl ( empty, clean) 1 x Paint Brush ( clean) Dish Washing Liquid Water
Procedure:
- Position the grill in a well-ventilated area. Ensure the grill is cool to the touch, and not in use. Verify that the regulator value is turned to the OFF position and that the gas cylinder is tightened securely to the regulator.
IMPORTANT: Ensure there is no open flame or smokers nearby.
- Mix a solution of one part of water with one part of dish washing liquid in a bowl. The solution will make bubble, as it will be concentrated.
- Use a paint brush to apply the solution onto the seal between the regulator and the gas cylinder. Visually inspect for streams of bubbles coming from a defect or break in the seal.
NOTE: If a leak appears, repeat gas cylinder installation procedure, but do not over-tighten. Hand-tighten only. Repeat leak test after re-installation to ensure seal is secure.
IMPORTANT: Do not use the gas grill if you detect a gas leak that cannot be corrected by using the leak test procedure. Contact your local Fire Department or Customer Service for alternative measures of testing to ensure proper precaution.
FIRST USE - GRILL BURN-OFF
Once your grill has been leak tested (no leaks are present) and before cooking on your grill for the first time, it is important to complete a grill burn-off. Start the grill and operate at high heat (over 233^ C / 450^ F) with the lid down for 30 to 40 minutes to burn-off the grill and rid it of any foreign matter.
PREHEATING
It is important to allow your grill to preheat before every cook session. This allows the grill and cooking grids to heat up quicker, kill off bacteria and other pathogens leftover from past grill sessions, and the grill is then able to maintain its cooking temperature once your food is placed in the cooking area. Preheat with the lid closed.
AUTOMATIC START-UP PROCEDURE
- Verify that the regulator knob is turned to the OFF position. Open the lid of the grill to release any trapped gas.
- Note the triangular indicator mark on the silver regulator housing. Push in the regulator knob and turn 270 degrees (or 3/4) counter-clockwise to HIGH.
- Push the igniter button in repetitively until the catches flame. Listen for a "click" sound to indicate a spark from the igniter, and look for flame to ensure the burner is lit.
- After the burner has caught fire, begin to preheat your grill with the lid closed. Turn the regulator knob to your desired level, and allow the unit to preheat for approximately 5 to 10 minutes.
- After preheating is complete, you are ready to enjoy your grill at your desired temperature!
If the burner goes out during operation, turn the regulator knob to the OFF position. Open the grill lid and wait five minutes before attempting to relight to allow any accumulated gas to dissipate.
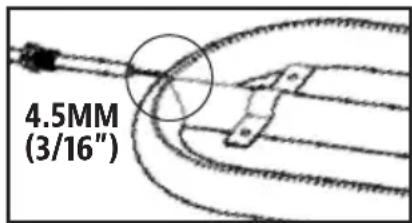
IGNITER FAILURE PROCEDURE
If for any reason your igniter fails after three of four attempts, check the following steps, or start your grill using the manual method.
- Ensure the regulator knob is turned to the OFF position. Open the lid of the grill to allow any accumulated gas to dissipate.
- After five minutes, check the following:
- Visually confirm that the igniter is working by pushing the igniter button and looking at the igniter tip for a spark. If no spark, adjust the distance between the igniter (electrode) tip and burner to 4.5mm (3/16").
- Visually confirm that the burner tube and portholes are not obstructed. If blocked, follow Care & Maintenance instructions.
- If the above points do not work, follow Troubleshooting instructions.
MANUAL START-UP PROCEDURE
- Verify that the regulator knob is turned to the OFF position. Open the lid of the grill to release any trapped gas.
- Note the triangular indicator mark on the silver regulator housing. Push in the regulator knob and turn 270 degrees (or 3/4) counter-clockwise to HIGH.
- Quickly and carefully, using a long match or long-nosed lighter, place a lit flame near the burner and watch the burner catch flame. Do not attempt to light another area of the burner. This can cause injury.
NOTE: Do not use spirit, lighter-fluid or kerosene for lighting or refreshing a fire in your grill.
- Continue start-up by following steps four and five of Automatic Start-Up Procedure.
SHUTTING OFF YOUR GRILL
- When finished cooking, turn the regulator knob to the OFF position, and allow the regulator knob to pop out. This safety feature locks the regulator knob to ensure that the gas is no longer flowing.
- Open the lid of the grill to allow any accumulated gas to dissipate and the grill to cool from use.
WARNING: Allow the grill to cool completely, and remove the gas cylinder, before moving, travel, or for storage.
CARE AND MAINTENANCE
CHECKING THE GAS LEVEL
To check the amount of fuel in the LP gas cylinder, the grill must be in operation. Place your hand at the top of the tank and slowly move down the side until the tank feels cool to the touch. This will indicate the approximate amount of gas in your tank; if 34 empty, replace with full tank.
IMPORTANT: Do not use charcoal briquettes or any flammable material with your grill. Use of such material will void your warranty and may lead to a fire, explosion and bodily harm.
CLEANING FREQUENCY
Any Pit Boss unit will give you many years of flavorful service with minimum cleaning. An important step is allowing the grill and cooking grids to self-clean by running the grill at a high temperature for 5 to 10 minutes after each use. Follow these cleaning and maintenance tips to service your grill:
1. BURNER COMPONENTS
- Clean the burner whenever heavy build-up is found, to ensure that there are no signs of blockage (debris, insects) on the burner tube or in the burner portholes. After periods of storage, spiders or small insects can build nests, webs, and lay eggs in the burner tube, obstructing the flow of gas to the burner. If storing the grill or before an extended period of non-use, remove the burner and wrap with aluminum foil to reduce the risk of insects entering the burner holes.
- The burner has been preset for optimal flame performance. A blue flame, possibly with a small yellow tip, is the result of the optimal air and gas mixture. If flames are excessively yellow, orange or irregular, clean the oil and food deposits on the burner surface and the burner portholes to increase airflow.
2. INSIDE SURFACES
- Use a long-handled grill cleaning brush (brass or soft metal), remove any food or build-up from the cooking grids. Best practice is to do this while they are still warm from a previous cook. Grease fires are caused by too much fallen debris on the cooking components of the grill. Clean the inside of your grill on a consistent basis. In the event you experience a grease fire, keep the grill lid closed to choke out the fire. If the fire does not go out quickly, carefully remove the food, turn the grill off, and shut the lid until the fire is completely out. Lightly sprinkle baking soda, if available.
- Check your grease tray often, and clean out as necessary. Keep in mind the type of foods that are cooked.
3. OUTSIDE SURFACES
- This grill is made of stainless steel, which is non-rusting in certain conditions. After initial grilling, certain areas of the grill may discolor. This is normal discoloration caused by the intense heat from the burner. Specks of grease can gather on the surface of the stainless steel and get baked-on. These can usually be removed with warm soapy water or a stainless steel cleaner. Wipe your grill down after each use.
- Use a grill cover to protect your grill for complete protection! A cover is your best protection against weather and outside pollutants. When not in use or for long-term storage, keep the unit under a cover in a garage or shed, with the gas cylinder removed (must be stored outdoors).
CLEANING TIME TABLE (NORMAL USE)
| ITEM CLEANING FREQUENCY CLEANING METHOD | ||
| Cooking Grids After | Each Use Burn Off Excess, Wire Brush | |
| Grease Tray After | Each Use Empty, Scrub Pad & Soapy Water | |
| Bottom of Grill Every 2-3 Grill Sessions Scoop | Out, Shop-Vac Excess Debris | |
| Burner Tube, Portholes | Every 5-6 Grill Sessions Dust, Scrub Pad & Soapy Water | |
| Flame Tamers Every 5-6 Grill Sessions Scrub Pad & Soapy Water | ||
| Burners Every 5-6 Grill Sessions Scrub Pad & Soapy Water | ||
| Stainless Steel Surfaces | Twice Per Year Stainless Steel Cleaner | |
TIPS & TECHNIQUES
Follow these helpful tips and techniques, passed on from Pit Boss owners, our staff, and customers just like you, to become more familiar with your grill:
1. FOOD SAFETY
- Use different platters and utensils for the cooked meat than the ones you used to prepare or transport the raw meat out to the grill. This will prevent cross contamination of bacteria. Each marinade or sauce should have its own utensil.
- Keep hot foods hot (above 60°C / 140°F), and keep cold foods cold (below 3°C / 37°F). Cooked foods should not be left out in the heat for more than an hour. Do not leave hot foods out of refrigeration for more than two hours.
- A marinade should never be saved to use at a later time. If you are going to use it to serve with your meat, be sure to bring it to a boil before serving.
- Defrost and marinade meats by refrigeration. Do not thaw meat at room temperature or on a counter top. Bacteria can grow and multiply rapidly in warm, moist foods. Wash hands thoroughly with hot, soapy water before starting any meal preparation and after handling fresh meat, fish and poultry.
2. COOKING PREPARATION
- Be prepared, or Mise en Place. This refers to preparing the cooking recipe, fuel, accessories, utensils, and all ingredients you require at grill side before you start cooking. Also, read the entire recipe, start to finish, before lighting the grill.
- A BBQ floor mat is very useful. Due to food handling accidents and cooking spatter, a BBQ floor mat would protect a deck, patio, or stone platform from the possibility of grease stains or accidental spills.
3. GRILLING TIPS AND TECHNIQUES
- Always use a meat thermometer to determine the internal temperature of the foods you are cooking. It's a good idea to put cooked food onto a heated platter, keeping the food warm. Red meats, such as steak and roasts, benefit from resting for several minutes before serving. It allows the juices that were driven to the surface by heat to ease back to the center of the meat, adding more flavor.
- Sugar-based sauces are best applied near the end of cooking to prevent burning and flare-ups.
- Use a set of long-handled tongs for turning meats, and a spatula for turning burgers and fish. Using a piercing utensil, such as a fork, will prick the meat and allow the juices to escape.
TROUBLESHOOTING
Proper cleaning, maintenance and the use of quality fuel will prevent common operational problems. When your Pit Boss grill is operating poorly, or on a less frequent basis, the following troubleshooting tips may be helpful.
For FAQ, please visit www.pitboss-grills.com and click SUPPORT. You may also contact your local Pit Boss authorized dealer or contact Customer Service for assistance.
WARNING: Always disconnect the gas cylinder prior to opening the grill for any inspection, cleaning, maintenance or service work. Ensure the grill is completely cooled to avoid injury.
| PROBLEM CAUSE SOLUTION | ||
| Burner Will Not Light | No Gas Flow Check | Check gas fuel connection, and ensure it is open. Increase flow on regular, or replace gas cylinder if empty. |
| Obstruction In Valve | Check connection port from the firebox to the regulator, and ensure there is no obstruction. | |
| Faulty Regulator | Regulator assembly needs to be replaced. Contact Customer Service for a replacement part. | |
| Regulator Valve Is Off | Check the regulator valve connection to the gas cylinder. Remove, then reinstall. Perform leak test. | |
| Obstructed Burner Tube, Burner Ports | Check burner tube and burner ports for spider webs or other obstructions. Follow Care and Maintenance instructions to clean the burner tube. | |
| Ignitor Failure Press | Press the igniter button until a loud click is heard. Repeat until burner lights, or check for proper positioning of ignitor, and notice if the electrode is producing a spark; the spark should be visible and jump from the ignitor to the burner. If there is no spark, adjust the electrode to slightly bending a little closer or further away from the burner. If wet, allow electrode to air dry, or dry with a clean cloth or blow dryer. If igniter still fails, igniter needs to be replaced. Contact Customer Service for a replacement part. Use match for manual lighting of the burner. | |
| Faulty Burner Burner needs to be replaced. Contact Customer Service for a replacement part. | ||
| Burner Will Not Stay Lit | No Gas Flow Check | Check gas fuel connection, and ensure it is open. Replace gas cylinder if empty. |
| Gusting Or High Winds | Turn front of grill away from wind or increase flame height. | |
| Irregular Flame Pattern | Obstructed Burner Tube, Burner Ports | Check burner tube and burner ports for spider webs or other obstructions. Follow Care and Maintenance instructions to clean the burner tube. |
| Burner Flames Are Yellow Or Orange | Poor Air Flow Check | Check burner tube and burner ports for spider webs or other obstructions. Follow Care and Maintenance instructions to clean the burner tube. |
| Obstructed Burner Tube, Burner Ports | Check burner tube and burner ports for spider webs or other obstructions. Follow Care and Maintenance instructions to clean the burner tube. | |
| Grease Tray Is Full, Spilling Onto Ground | Empty grease tray and re-install. Follow Care and Maintenance instructions. | |
| Regulator Valve Is Off | Check the regulator valve connection to the gas cylinder. Remove, then reinstall. Perform leak test. | |
| Burner Is Dirty Turn regulator knob to HIGH for five minutes, and burn-off the unit. Follow Care and Maintenance instructions. | ||
| Grease Fire / Frequent Flare-Ups | Cooking Temperature | Attempt cooking at a lower temperature. Grease does have a flash point. Keep the temperature under 176°C / 350°F when cooking highly greasy food. |
| Grease Build-Up On Burner Components | Follow Care and Maintenance instructions. | |
| Spiders & Flashback Fires | Obstructed Burner Tube, Burner Ports | Check burner tube and burner ports for spider webs or other obstructions. Follow Care and Maintenance instructions to clean the burner tube. |
| Gas Leakage | Improper Installation | Turn the regulator knob to the OFF position, and allow the regulator knob to pop out. Remove the gas cylinder. Re-install and tighten. Perform leak test to ensure proper seal. Replace gas cylinder if damaged. |
| Seal Failure Gas | cylinder has corroded, rusted, or has been mishandled. Replace gas cylinder. | |
| Regulator Failure | Regulator needs to be replaced. Contact Customer Service for a replacement part. | |
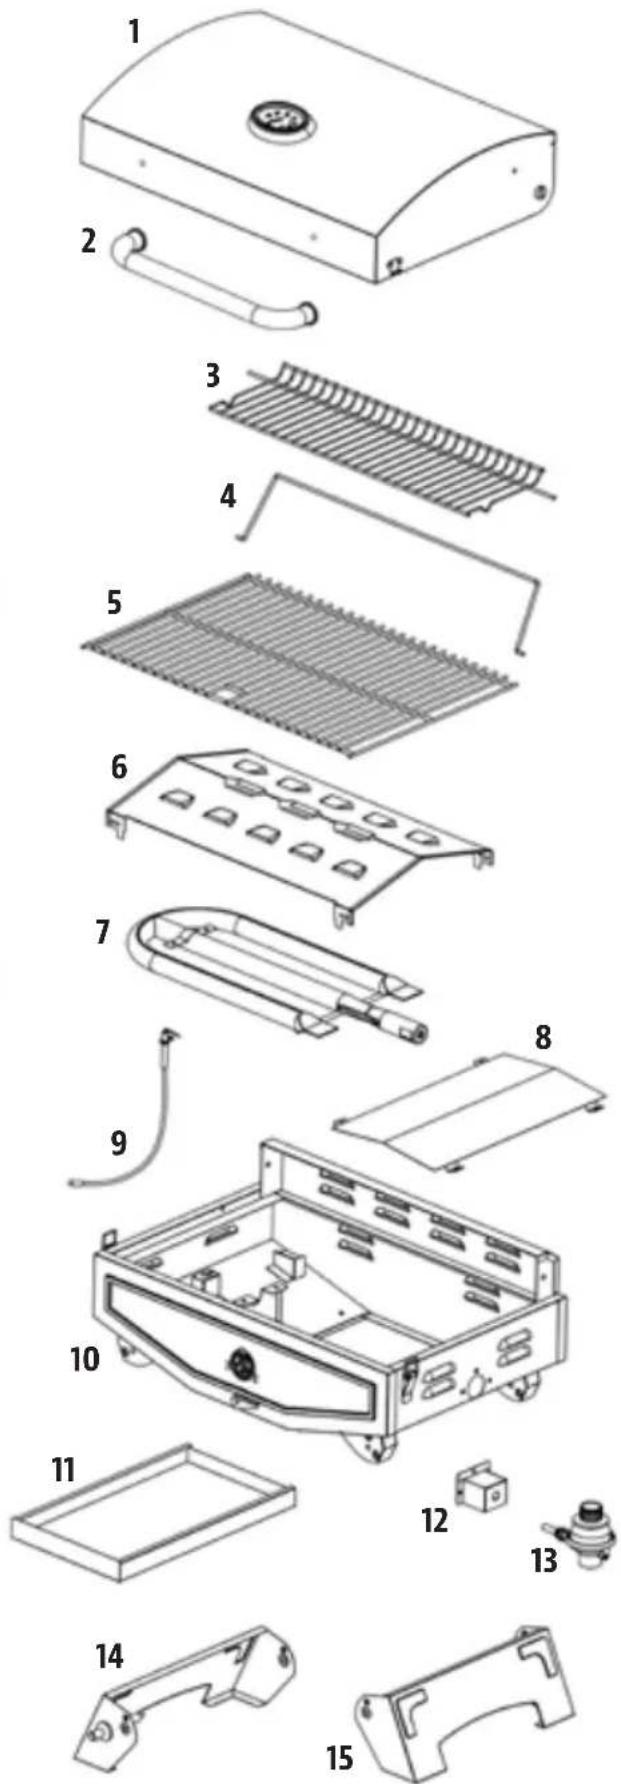
REPLACEMENT PARTS
| Part# | Description |
| 1 | Firebox Lid |
| 2 | Lid Handle |
| 3 | Upper Warming Rack |
| 4 | Upper Rack Support Bar |
| 5 | Main Cooking Grid |
| 6 | Flame Tamer |
| 7 | Burner Electrode |
| 8 | Heat Shield |
| 9 | Igniter Assembly |
| 10 | Firebox Assembly |
| 11 | Grease Tray |
| 12 | Valve Port |
| 13 | Regulator Valve |
| 14 | Left Foot Assembly |
| 15 | Right Foot |
NOTE: Due to ongoing product development, parts are subject to change without notice.
WARRANTY
CONDITIONS OF WARRANTY
All gas grills by Pit Boss, manufactured by Dansons Inc., carry a limited warranty from the date of sale by the original owner. The warranty coverage begins on the original date of purchase and proof of date of purchase, or copy of original bill of sale, is required to validate the warranty. Customers will be subject to parts, shipping, and handling fees if unable to provide proof of the purchase or after the warranty has expired.
Dansons carries a one (1) year warranty against defects and workmanship on all parts. Dansons warrants that all part(s) are free of defects in material and workmanship, for the length of use and ownership of the original purchaser. Warranty does not cover damage from wear and tear, such as scratches, dents, dings, chips or minor cosmetic cracks. These aesthetic changes of the grill do not affect its performance. Repair or replacement of any part does not extend past the limited warranty beyond the one (1) year from date of purchase.
During the term of the warranty, Dansons' obligation shall be limited to furnishing a replacement for defective and/or failed components. As long as it is within the warranty period, Dansons' will not charge for repair or replacement for parts returned, freight prepaid, if the part(s) are found by Dansons' to be defective upon examination. Dansons' shall not be liable for transportation charges, labor costs, or export duties. Except as provided in these conditions of warranty, repair or replacement of parts in the manner and for the period of time mentioned heretofore shall constitute the fulfillment of all direct and derivate liabilities and obligations from Dansons to you.
Dansons takes every precaution to utilize materials that resist rust. Even with these safeguards, the protective coatings can be compromised by various substances and conditions beyond Dansons' control. High temperatures, excessive humidity, chlorine, industrial fumes, fertilizers, lawn pesticides and salt are some of the substances that can affect metal coatings. For these reasons, the warranty DOES NOT COVER RUST OR OXIDIZATION, unless there is loss of structural integrity on the grill component. Should any of the above occur, kindly refer to the care and maintenance section to maintain the finish of your grill and prolong its lifespan. Dansons recommends the use of a full length protective grill cover when the grill is not in use.
This warranty is based on normal domestic use and service of the grill and neither limited warranty coverage's apply for a grill which is used in commercial applications.
WARRANTY EXCEPTIONS
There is no written or implied performance warranty on Pit Boss grills, as the manufacturer has no control over the installation, operation, cleaning, maintenance or the type of fuel burned. This warranty will not apply nor will Dansons assume responsibility if your appliance has not been installed, operated, cleaned and maintained in strict accordance with this owner's manual. Any use of fuel not outlined in this manual may void the
warranty. The warranty does not cover damage or breakage due to misuse, improper handling or modifications.
Neither Dansons, or authorized Pit Boss dealer, accepts responsibility, legal or otherwise, for the incidental or consequential damage to the property or persons resulting from the use of this product. Whether a claim is made against Dansons based on the breach of this warranty or any other type of warranty expressed or implied by law, the manufacturer shall in no event be liable for any special, indirect, consequential or other damages of any nature whatsoever in excess of the original purchase of this product. All warranties by manufacturer are set forth herein and no claim shall be made against manufacturer on any warranty or representation.
Some states do not allow the exclusion or limitation of incidental or consequential damages, or limitations of implied warranties, so the limitations or exclusions set forth in this limited warranty may not apply to you. This limited warranty gives you specific legal rights and you may have other rights, which vary from state to state.
ORDERING REPLACEMENT PARTS
To order replacement parts, please contact your local Pit Boss dealer or visit our online store at: www.pitboss-grills.com
CUSTOMER SERVICE
If you have any questions or problems, contact Customer Service, Monday through Sunday, 4am - 8pm PST (EN/FR/ES).
service@pitboss-grills.com
Toll-Free: 1-877-303-3134 | Toll-Free Fax: 1-877-303-3135
PROCEDURE FOR WARRANTY SERVICE
Contact your nearest Pit Boss dealer for repair or replacement parts. Dansons Inc. requires proof of purchase to establish a warranty claim; therefore, retain your original sales receipt or invoice for future reference. Record data in the space below as the safety rating label may become worn or illegible.
MODEL SERIAL NUMBER
DATE OF PURCHASE AUTHORIZED DEALER
ACCESSORIES SOLD SEPARATELY
Available for purchase separately. Accessories not available and supplied by all authorized Pit Boss dealers.
| ITEM DESCRIPTION | |
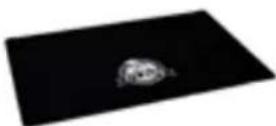 | BARBECUE FLOOR MATEasy clean, UV protected. Protection for your deck. 132cm × 86cm / 52" × 34" |
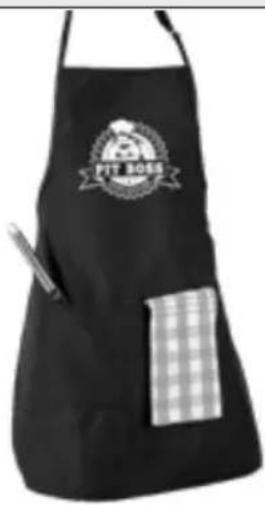 | GRILLING APRONAdjustable apron with double front pockets for grilling tools. One size. Machine washable. Black. |
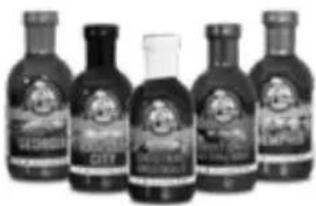 | SIGNATURE SAUCESA series of gourmet sauces to prepare and enhance the natural flavors of your food. Use during cooking or as a dipping sauce.Fat free. Gluten free. No MSG. |
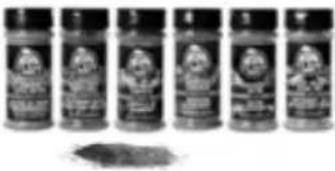 | SIGNATURE SPICESA collection of gourmet seasonings. Versatile as a rub, in a marinade, or simply as seasoning. Gluten free. No MSG. |
INFORMATIONS DE SÉCURITÉ
LES CAUSES MAJEURES DES INCENDIES D'APPAREILS SONT LE RÉSULTAT D'UN MAUVAIS ENTRETIEN ET D'UN DÉFAUT DE MAINTENIR DU DÉGAGEMENT REQUIS POUR LES MATÉRIAUX COMBUSTIBLES. IL EST D'UNE IMPORTANCE CRUCIALE QUE CE PRODUIT SOIT UTILISÉ SEULEMENT CONFORMÉMENT AUX INSTRUCTIONS SUIVANTES.
3411 North 5th Avenue, Suite 500, Phoenix, AZ, É.-U. 85013
sales@pitboss-grills.com | service@pitboss-grills.com
www.pitboss-grills.com
Ligne sans frais: 1-877-303-3134
| No. | Description |
| 1 | Firebox Assembly |
| 2 | Lid Handle |
| 3 | Regulator |
natural_image
Technical line drawing of a portable electronic device with labeled parts (no text or symbols present)PRÉPARATION DE L'ASSEMBLAGE
natural_image
Line drawing of a portable electronic device with scroll buttons and ventilation slots (no text or symbols)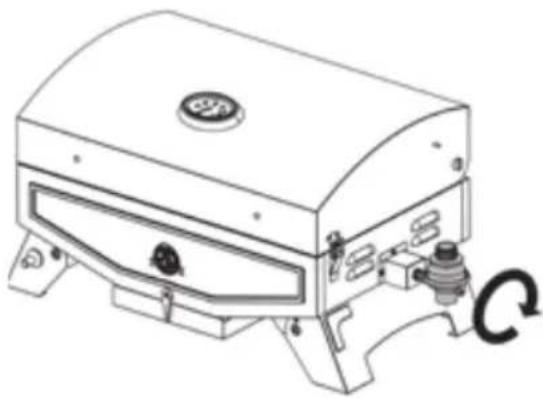
natural_image
Line drawing of a portable electric stove or gas stove with a circular button and scroll (no text or symbols)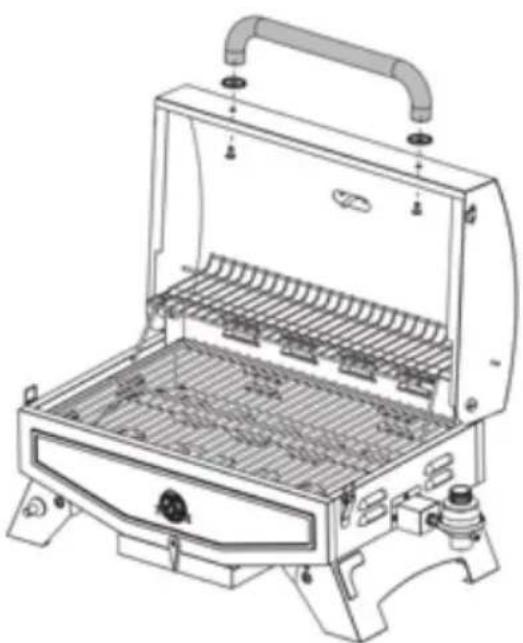
natural_image
Line drawing of a portable electric stove with open lid and side-mounted grating (no text or symbols)CONNEXION À UN APPROVISIONNEMENT EN GAZ
UN ENVIRONNEMENT DE GRIL EN TOUTE SÉCURITÉ
natural_image
Exterior view of a mechanical device with a black cylindrical component inserted (no visible text or symbols)GARANTIE
CONDITIONS
DO NOT RETURN PRODUCT TO STORE
For all questions, comments, or inquiries, please contact Dansons Inc. directly. Our Customer Service department is available:
Monday through Sunday, 4am - 8pm PST (EN/FR/ES)
TOLL FREE: 1-877-303-3134 | TOLL FREE FAX: 1-877-303-3135
service@pitboss-grills.com
IMPORTANT
NE RETOURNEZ PAS LE PRODUIT AU MAGASIN
DU LUNDI AU DIMANCHE, DE 4H00 À 20H00 HNP (ANG./FR./ES.)
NUMÉRO SANS FRAIS : 1-877-303-3134 | TÉLÉCOPIEUR SANS FRAIS : 1-877-303-3135
service@pitboss-grills.com

WARNING: Combustion of propane gas can expose you to chemicals including formaldehyde, which is known to the State of California to cause cancer, and carbon monoxide, which is known to the State of California to cause birth defects or other reproductive harm. For more information go to WWW.P65WARNINGS.CA.GOV
WWW.PITBOSS-GRILLS.COM


780180709UMV

MADE IN CHINA I FABRIQUÉ EN CHINE
- PB100P1
- STAINLESS STEEL PORTABLE TABLETOP GAS GRILL GRIL DE TABLE PORTATIF EN ACIER INOXYDABLE À GAZ
- INSTRUCTIONS AND USE | INSTRUCTIONS ET UTILISATION
- DANGERS AND WARNINGS
- CARBON MONOXIDE ("THE SILENT KILLER")
- TABLE OF CONTENTS
- COPYRIGHT NOTICE
- Dansons Inc.
- PARTS & SPECS
- ASSEMBLY PREPARATION
- ASSEMBLY INSTRUCTIONS
- EXPANDING THE FEET
- Parts Required:
- Installation:
- INSTALLING THE REGULATOR VALVE
- ATTACHING THE LID HANDLE
- CONNECTING TO A GAS SUPPLY
- SAFE GRILLING ENVIRONMENT
- GAS CYLINDER REQUIREMENTS
- DISCONNECTING A GAS CYLINDER
- OPERATING INSTRUCTIONS
- GRILL COOKING
- • MAIN LEVEL COOKING
- PREPARATION FOR USE – LEAK TESTING
- HOW TO PERFORM A LEAK TEST
- Supplies Required:
- Procedure:
- IMPORTANT: Ensure there is no open flame or smokers nearby.
- FIRST USE - GRILL BURN-OFF
- PREHEATING
- AUTOMATIC START-UP PROCEDURE
- IGNITER FAILURE PROCEDURE
- MANUAL START-UP PROCEDURE
- SHUTTING OFF YOUR GRILL
- CARE AND MAINTENANCE
- CHECKING THE GAS LEVEL
- CLEANING FREQUENCY
- BURNER COMPONENTS
- INSIDE SURFACES
- OUTSIDE SURFACES
- TIPS & TECHNIQUES
- FOOD SAFETY
- COOKING PREPARATION
- GRILLING TIPS AND TECHNIQUES
- TROUBLESHOOTING
- REPLACEMENT PARTS
- WARRANTY
- CONDITIONS OF WARRANTY
- WARRANTY EXCEPTIONS
- ORDERING REPLACEMENT PARTS
- CUSTOMER SERVICE
- PROCEDURE FOR WARRANTY SERVICE
- ACCESSORIES SOLD SEPARATELY
- INFORMATIONS DE SÉCURITÉ
- PRÉPARATION DE L'ASSEMBLAGE
- CONNEXION À UN APPROVISIONNEMENT EN GAZ
- UN ENVIRONNEMENT DE GRIL EN TOUTE SÉCURITÉ
- GARANTIE
- CONDITIONS
- DO NOT RETURN PRODUCT TO STORE
- IMPORTANT
- NE RETOURNEZ PAS LE PRODUIT AU MAGASIN
Brand : Pit Boss
Model : PB100P
Category : Barbecue