
DocuColor 252 - Printer XEROX - Free user manual and instructions
Find the device manual for free DocuColor 252 XEROX in PDF.

| Product type | Color multifunction printer |
| Brand | Xerox |
| Model | DocuColor 252 |
| Main functions | Copy, network scanning, booklet creation, printing |
| Printing technology | Color laser |
| Supported paper sizes | Standard (64-104 g/m²), thick, transparencies, labels |
| Tray capacity | Up to 6 trays |
| Touch screen | Yes, for programming functions |
| Network | Integrated network scanning |
| Power supply | 110-240 V AC, 50/60 Hz |
| Power consumption | Integrated energy saving mode |
| Dimensions (approx.) | Width: 640 mm, Depth: 600 mm, Height: 500 mm |
| Weight (approx.) | 40 kg |
| Consumable replacement | Toner cartridges (Cyan, Magenta, Yellow, Black) |
| Maintenance | Clean with a cloth dampened with mild detergent; do not use a vacuum cleaner for toner |
| Safety | Avoid burns when replacing toner; do not use a vacuum cleaner |
| Repairability | Spare parts available: toner cartridges, hard drive, finisher module |
| General information | User manual available in French; default administrator ID: 11111 |
Frequently Asked Questions - DocuColor 252 XEROX
User questions about DocuColor 252 XEROX
0 question about this device. Answer the ones you know or ask your own.
Ask a new question about this device
Download the instructions for your Printer in PDF format for free! Find your manual DocuColor 252 - XEROX and take your electronic device back in hand. On this page are published all the documents necessary for the use of your device. DocuColor 252 by XEROX.
USER MANUAL DocuColor 252 XEROX
natural_image
Exterior view of a white office paper printer with control panel and display screen (no visible text or symbols on the device itself)natural_image
3D rendering of a white printer with yellow cover and gray handle, placed on a surface against a blue background (no text or symbols)Basit Kopyalama
5. Başlat'a basın

Basit Kopyalama
natural_image
3D rendering of a white printer with a yellow cover, placed on a surface against a blue background (no text or symbols visible)3. Şablonu seçin

Raporlar
natural_image
Exterior view of a white paper printer with colorful buttons on the cover (no text or symbols visible)natural_image
Close-up of a printer's door panel with a highlighted orange arrow pointing to a green component (no text or symbols visible)natural_image
Close-up of a mechanical device with colored components and directional arrows (no text or symbols)natural_image
Green recycling symbol with five arrows forming a triangle (no text or labels)natural_image
Close-up of a printer's internal structure with colored components and an orange arrow indicating motion (no text or symbols)natural_image
Close-up of a white industrial air conditioner unit with orange decorative symbols on the side (no text or labels visible)natural_image
Exterior view of a white electronic device labeled 'SDEVALUE 195' with control panel and scroll wheel (no visible text beyond label)natural_image
3D rendered image of a white printer with yellow cover and gray handle, placed on a surface against a blue background (no text or symbols)natural_image
3D rendering of a white printer with a yellow cover, placed on a surface against a blue background (no text or symbols visible)
natural_image
Exterior view of a white paper printer with colorful buttons on the cover (no text or symbols visible)natural_image
Close-up of a printer's door panel with a yellow arrow pointing to the handle (no text or symbols visible)natural_image
Close-up of a mechanical device with colored components and directional arrows (no text or symbols)natural_image
Green recycling symbol with five arrows forming a triangle (no text or labels)natural_image
3D printer image showing a slot with colored blocks and an orange arrow pointing to the slot (no text or symbols)natural_image
Close-up of a white industrial air conditioner unit with orange decorative marks on the side (no visible text or symbols)natural_image
Exterior view of a white electronic device labeled 'SDEVALUE JMS' with control panel and scroll wheel (no visible text or symbols beyond branding)natural_image
3D rendered image of a white printer with yellow cover and gray handle, placed on a surface against a blue background (no text or symbols)Простое копирование
Простое копирование
natural_image
3D rendering of a white printer with a yellow cover, placed on a surface against a blue background (no text or symbols visible)3. Выберите шаблон

natural_image
Close-up of a white electronic device with three colored buttons on its side (no visible text or symbols)natural_image
Close-up of a printer's door panel with a yellow arrow pointing to the handle (no text or symbols visible)natural_image
Close-up of a mechanical device with colored components and directional arrows (no text or symbols)natural_image
Green recycling symbol with five arrows forming a triangle (no text or labels)natural_image
Close-up of a printer's internal structure with colored components and an orange arrow indicating motion (no text or symbols)natural_image
Close-up of a white industrial air conditioner unit with orange decorative marks on the side (no visible text or symbols)natural_image
Exterior view of a white electronic device labeled 'SDEVALUE 195' with control panel and scroll wheel (no visible text beyond label)Microsoft, MS-DOS, Windows, Windows NT, Microsoft Network, and Windows Server are either trademarks or registered trademarks of Microsoft Corporation in the United States and/or other countries.
Novell, NetWare, IntranetWare and NDS are registered trademarks of Novell, Inc. in the United States and other countries.
Adobe, Acrobat, PostScript, PostScript3, and PostScript Logo are trademarks of Adobe Systems Incorporated.
Apple, AppleTalk, EtherTalk, LocalTalk, Macintosh, MacOS and TrueType are trademarks of Apple Computer, Inc., registered in the U.S. and other countries.
HP, HPGL, HPGL/2, and HP-UX are registered trademarks of Hewlett-Packard Corporation.
All product/brand names are trademarks or registered trademarks of the respective holders.
The data saved in the hard disk of the machine may be lost if there is any problem in the hard disk. Xerox is not responsible for any direct and indirect damages arising from or caused by such data loss. Xerox is not responsible for any breakdown of machines due to infection of computer virus or computer hacking.
Important(1) This manual is copyrighted with all rights reserved. Under the copyright laws, this manual may not be copied or modified in whole or part, without the written consent of the publisher.(2) Parts of this manual are subject to change without prior notice.(3) We welcome any comments on ambiguities, errors, omissions, or missing pages.(4) Never attempt any procedure on the machine that is not specifically described in this manual. Unauthorised operation can cause faults or accidents.
Xerox is not liable for any problems resulting from unauthorised operation of the equipment.
An export of this product is strictly controlled in accordance with Laws concerning Foreign Exchange and Foreign Trade of Japan and/or the export control regulations of the United States.
Xerox and Ethernet are registered trademarks.
NOTE: BLUE title is for IT administrator type personnel, GREEN for end users and RED means machine needs attention. Depending on the configuration of the machine, some User Interface screens may vary.
Table of Contents
Control Panel 3
Simple Copying 5
Booklet Creation 9
Simple Network Scanning 13
Reports 15
Billing Meters 17
System Administrator Menu Overview 19
Auditron 23
Loading Paper and Media 25
Replacing the Toner Cartridges 29
Control Panel

1 Touch Screen
The touch screen allows you to select all the available programming features. It also displays fault clearance procedures and general machine information.
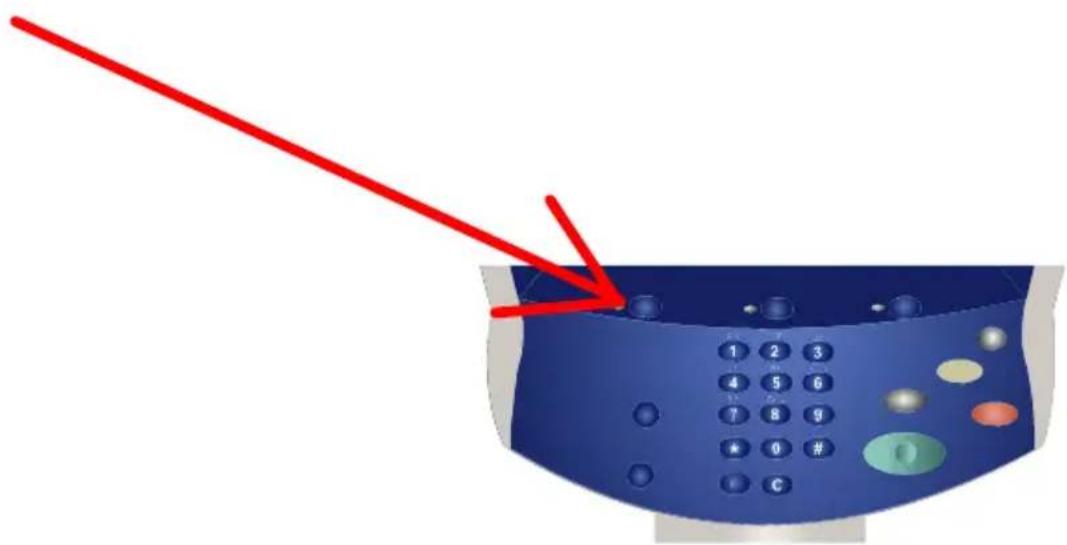
2. Services Button
Displays the job features on the touch screen.
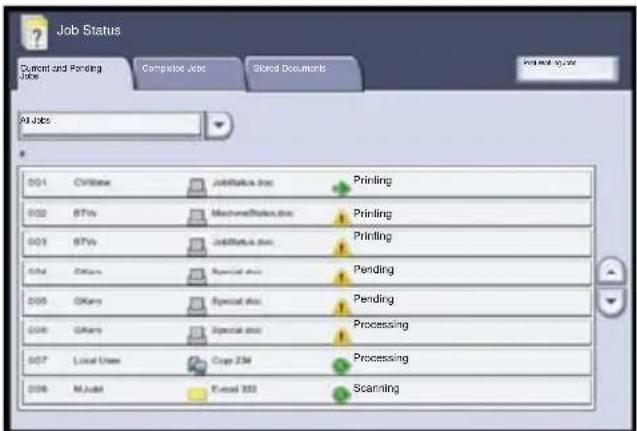
3. Job Status
Displays job progress information on the touch screen.
4. Machine Status
Displays the current status of the machine on the touch screen.
Control Panel
5. Log In/Out
Provides password protected access to the System Administration menu used to adjust the defaults of the machine.
6. Language
Changes text to an alternative language (when available).
7. Power Saver
Your machine has energy saver features which significantly reduce the power consumption during periods of inactivity. When your machine is in a power saver mode, the Power Saver indicator light is lit.
Clear All
- If pressed once, resets the default settings and displays the first screen for the current pathway. If pressed twice, resets all the features to their machine default settings.
Interrupt
- Temporarily stops the current copy job to allow a priority job to be run.
10. Stop
- Temporarily stops the current job. Follow the message to cancel or resume your job.
11 Start
Starts the job.
12 Clear
- Deletes numeric values or the last digit entered.
Simple Copying
1. Load the documents

natural_image
3D rendering of a white printer with yellow cover and gray handle, placed on a surface against a blue background (no text or symbols)2. Press the Services button
Simple Copying
3. Select the Features
The features available on the General Settings tab are the ones used most often. They allow you to programme the standard features for a copy job. On touching the button for the required feature, the button changes to blue. If a More... button is selected additional options for that feature become available.

Simple Copying
4. Enter the Quantity
5. Press Start

Simple Copying
6. Identify your job in the Queue.
Booklet Creation
Booklet creation enables the production of booklets or multi-page copies from 1 or 2-sided originals. The machine will scan your originals and automatically reduce and arrange the images in the correct sequence on your selected copy paper so that a booklet is created when the copy set is folded in half.
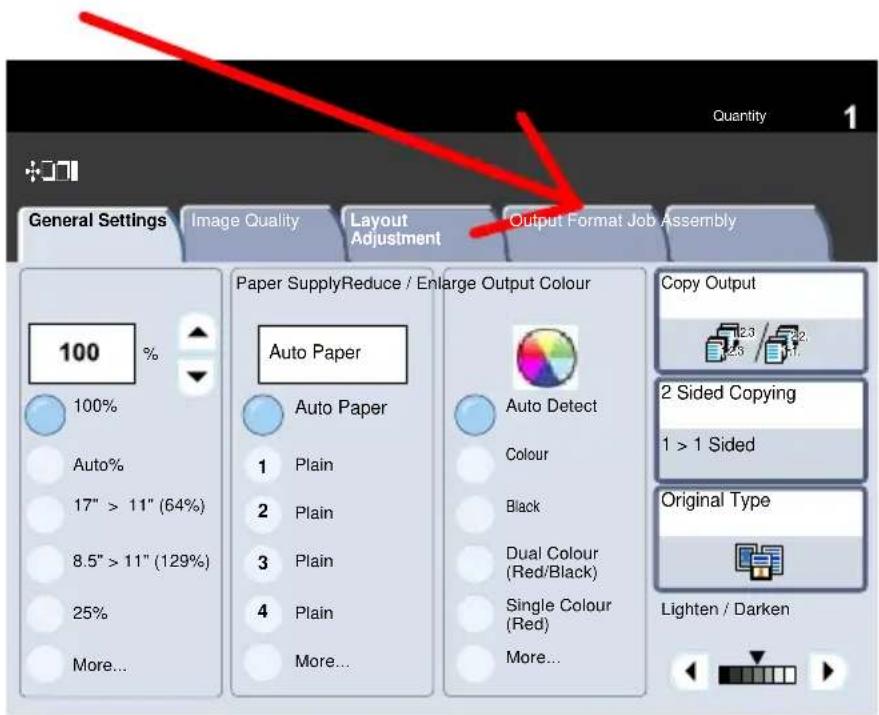
1. Select the Output Format tab.
Booklet Creation
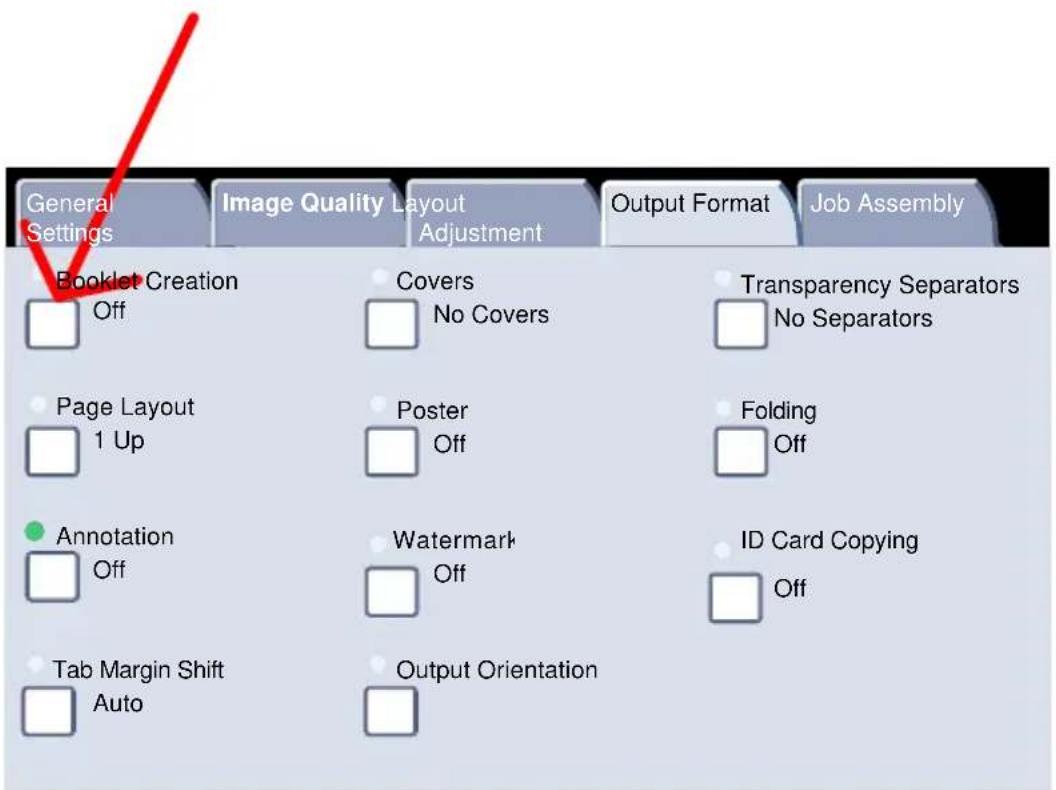
2. Select the Booklet Creation button.
Booklet Creation
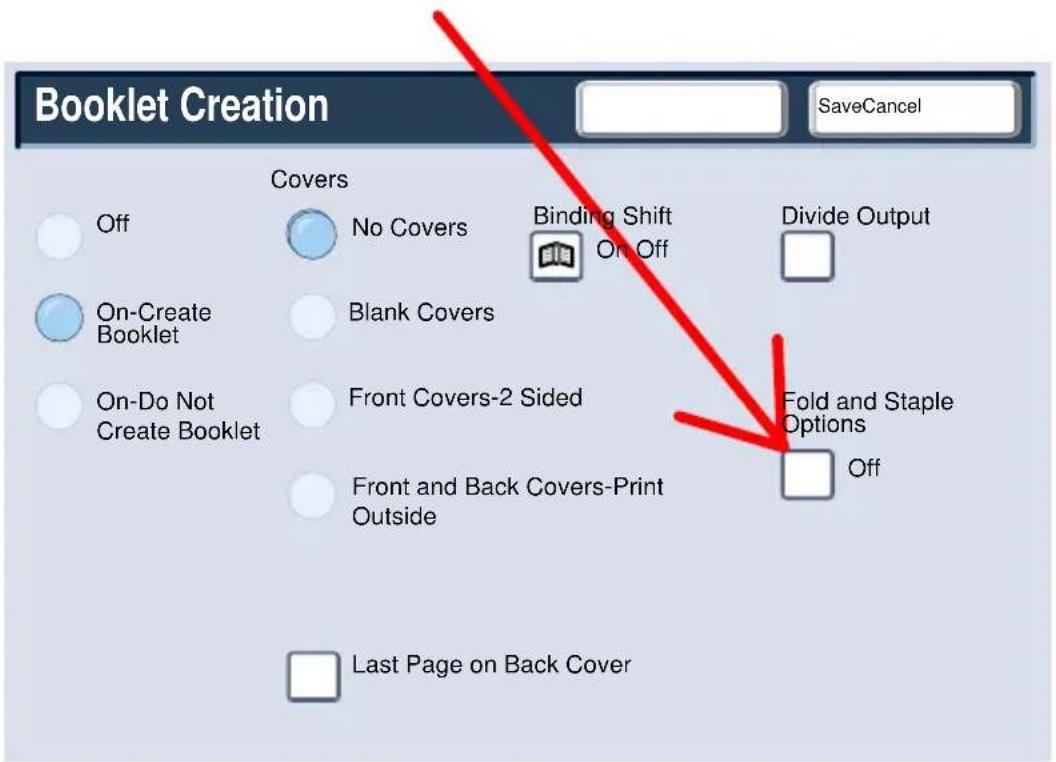
- Depending on your finisher, you may also have the option to choose from the following Fold and Staple selections:
No Finishing
Folded
Folded and Stapled
These features are accessed by touching the Fold and Staple Options button on the Booklet Creation screen.
Booklet Creation
- In addition to folding and stapling, you can also include a Binding Shift, or Divide Output (sub-dividing a large booklet into subsets) on the Booklet Creation screen.
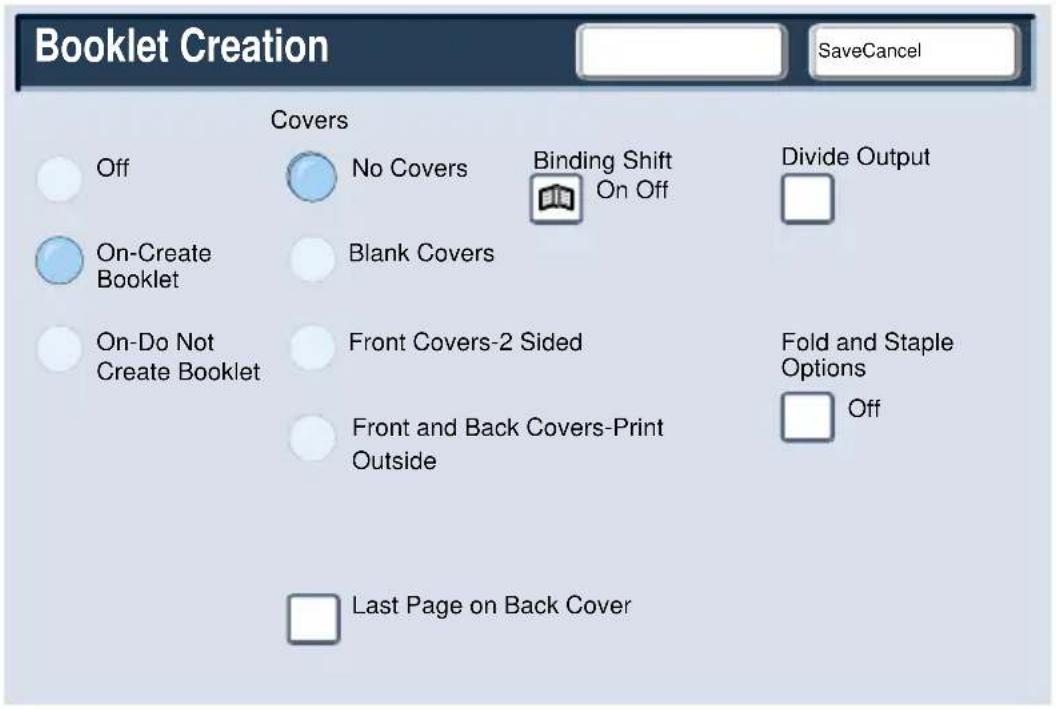
- Select the appropriate buttons to create your booklets. You can create left bound, top bound, or right bound booklets. When you have selected the appropriate input, select Save.
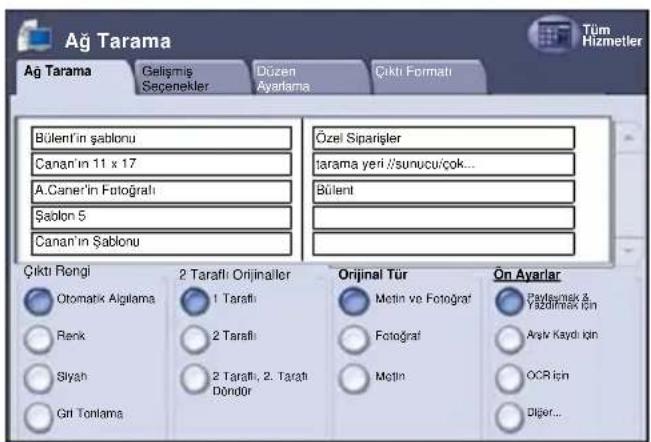
Simple Network Scanning
1. Load the documents
natural_image
3D rendering of a white printer with a yellow cover, placed on a surface against a blue background (no text or symbols visible)2. Press the Services button

3. Select the template
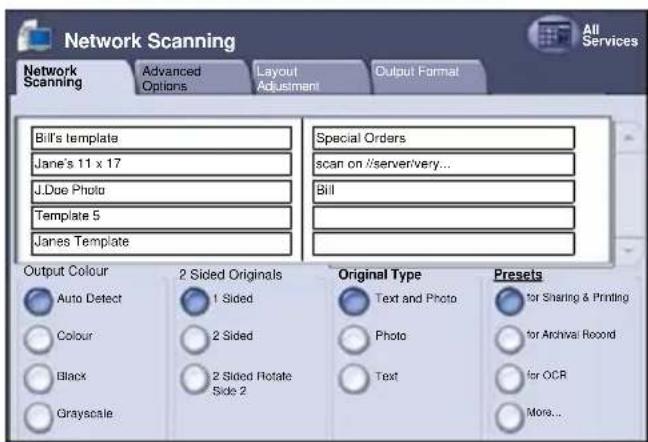
Simple Network Scanning
4. Select the features
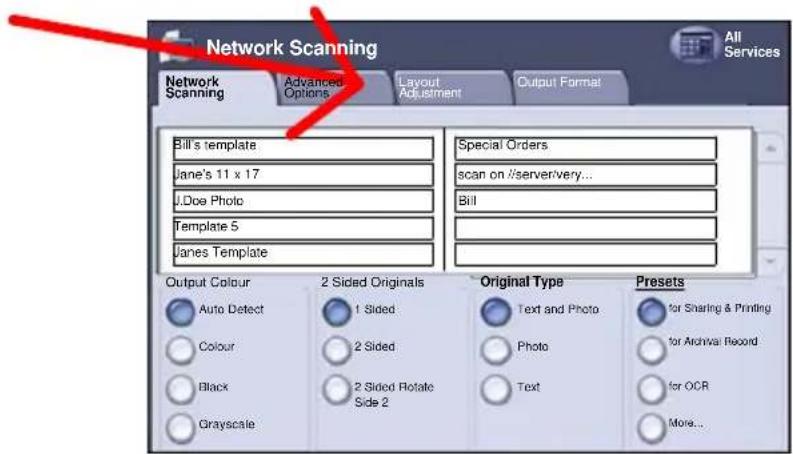
5. Press Start

6. Identify your job in the Queue.
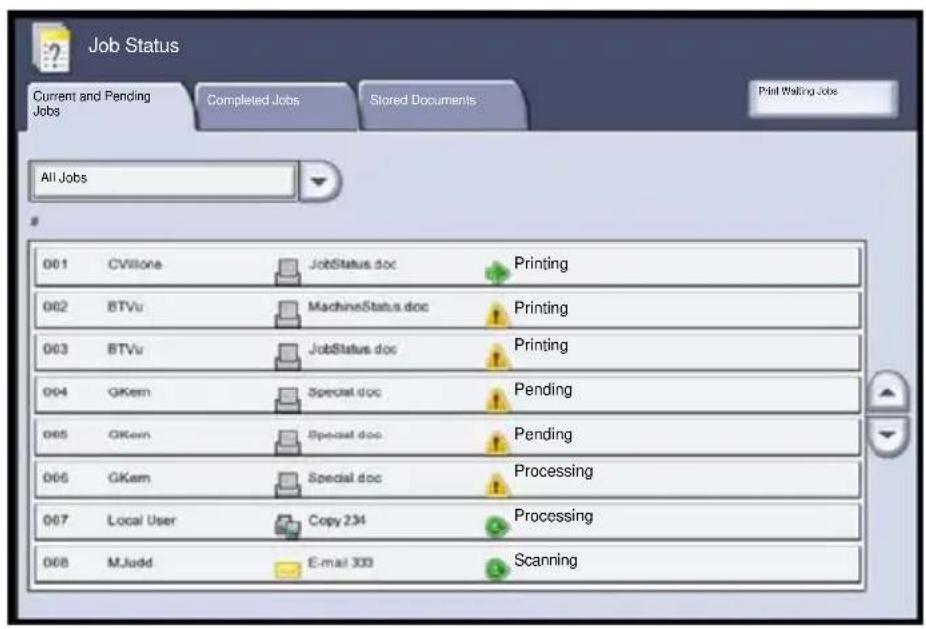
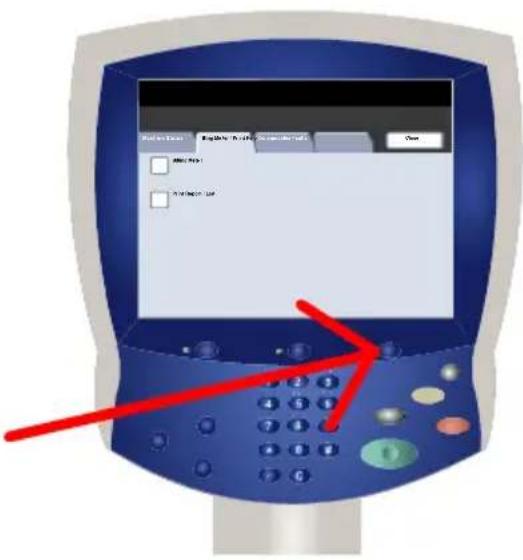
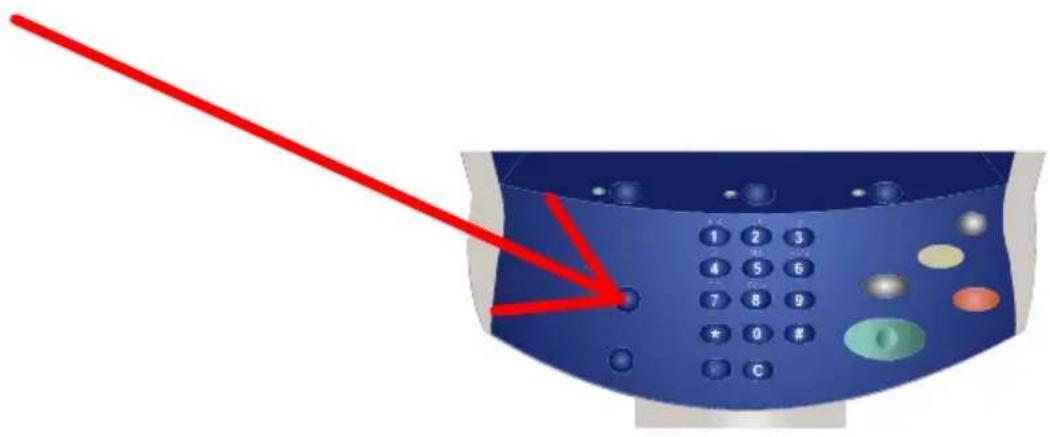
Reports
A variety of useful reports are available on the Print Report/List screen.
Perform the steps below to access the Print Report/List screen:
- Press the Machine Status button on the Control Panel.
- Touch the Billing
Meter/Print Report tab on the touch screen. - Touch the Print Report/List button.
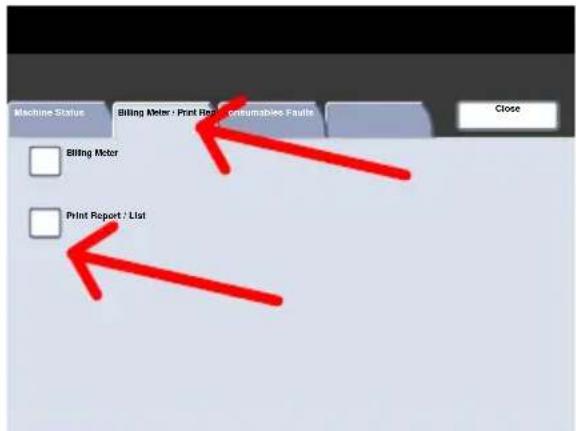
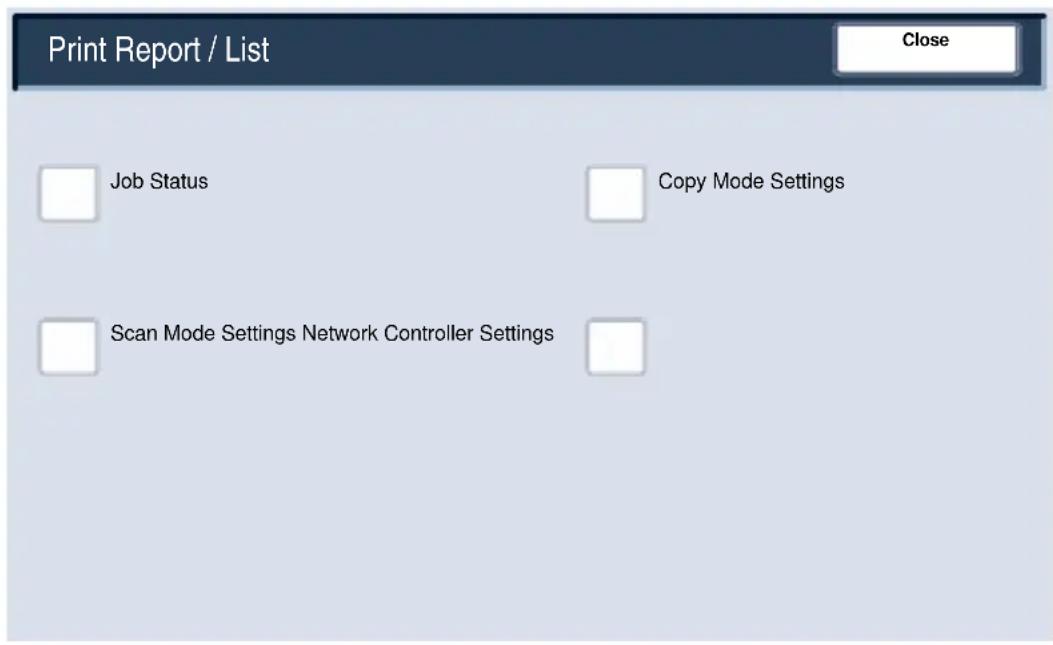
Reports
An example of a typical Print Report/List screen is shown here.
To print any of the reports shown, simply touch the corresponding report button on the touch screen, then press the Start button on the control panel.
NOTE: The reports available will differ depending on your machine configuration.
Billing Meters
The Billing Meters feature provides access to machine usage and billing information. The meters vary depending on your machine configuration and setup.
To access the Billing Meters:
- Select the Machine Status button on the Control Panel.

- Touch the Billing Meter/Print Report tab.

Billing Meters
- Touch the Billing Meter button.

The Billing Meters information is shown here. Customers can view the various billing meters, and machine serial number for tracking purposes.
This completes the Billing Meters topic.

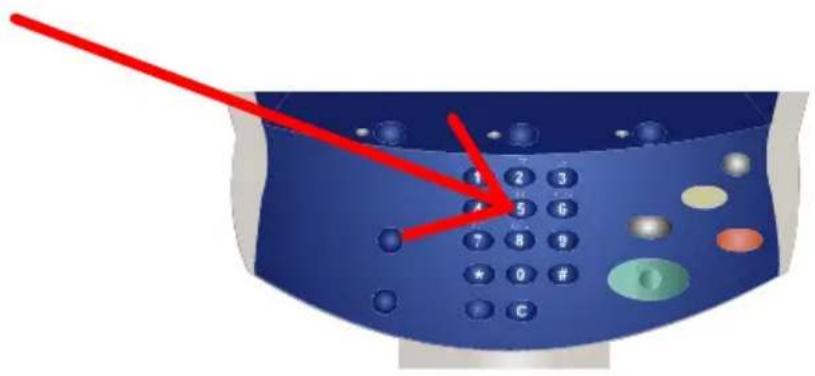
System Administrator Menu Overview
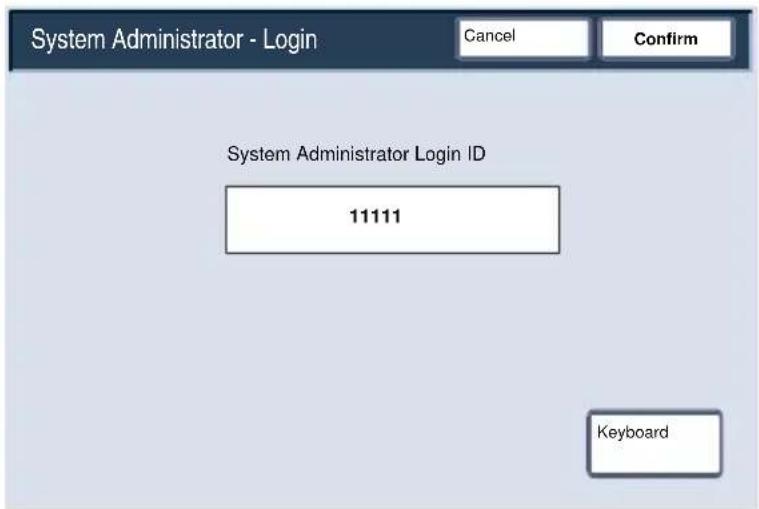
There are 2 steps to accessing the System Administrator menu:
- Press the Log In/Out button on the control panel.
- Use the number keypad to enter the default System Administrator Login ID - 11111. Touch Confirm on the touch screen. NOTE: 11111 is the factory set default Login ID. It is recommend that you change this Login ID.
System Administrator Menu Overview
The system administrator tools enable the system administrator to set-up, customise and maintain the machine. Some of the settings in this function are critical to the operation of the machine so the screens are password protected so that they cannot be accidentally changed or corrupted.
Use these tools to:
- Set-up the initial settings and system configuration
- Change the factory settings or defaults.
- Perform basic maintenance tasks.
- Perform a variety of system tests.
The next few screens briefly explain the function of each tool or set of tools.
System Administrator Menu Overview
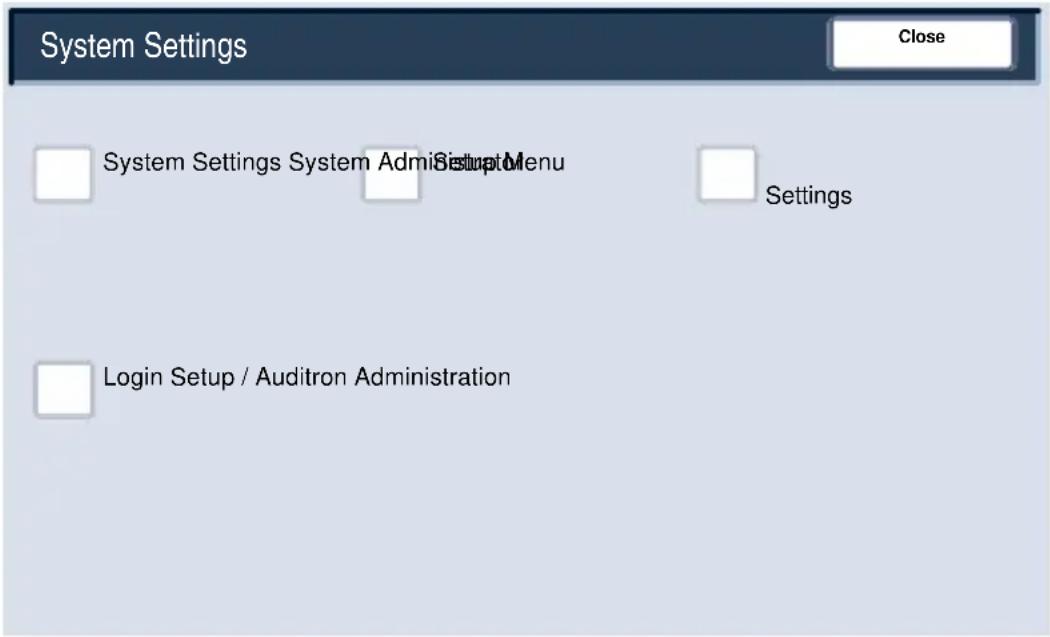
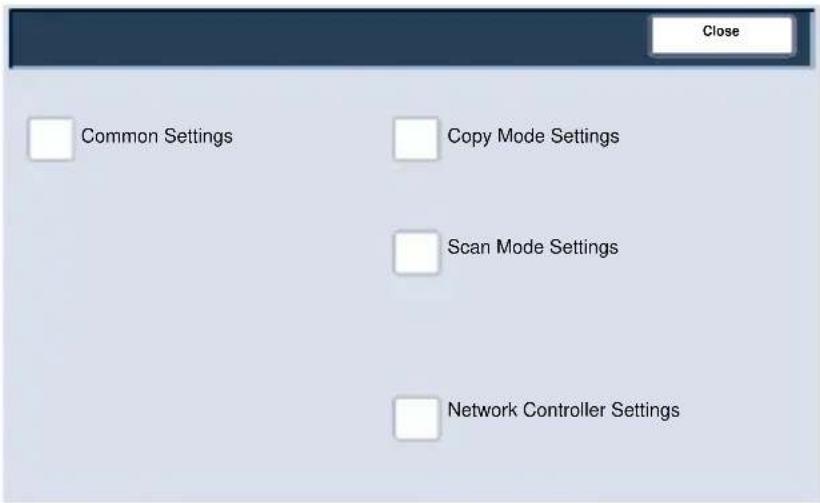
The System Settings menu allows administrators to access submenus for Common Settings, Copy Mode Settings, Scan Mode Settings, and Network Controller Settings.
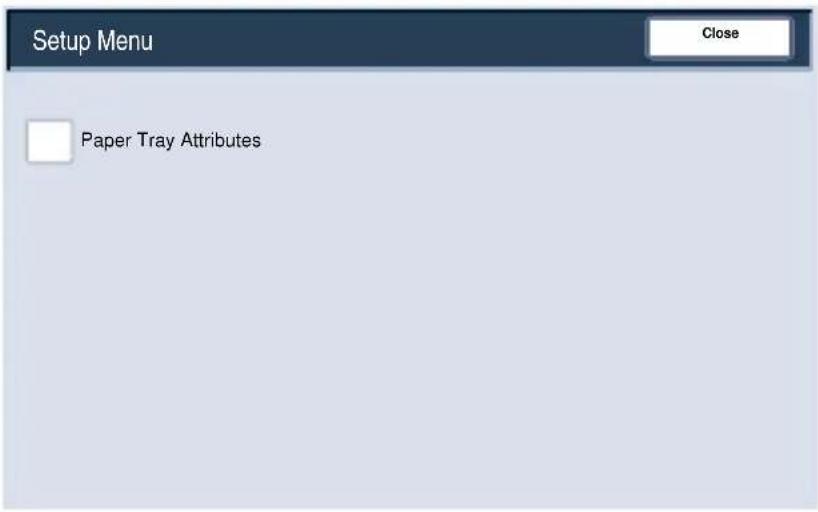
The Setup Menu allows administrators to access the Paper Tray Attributes settings.
System Administrator Menu Overview
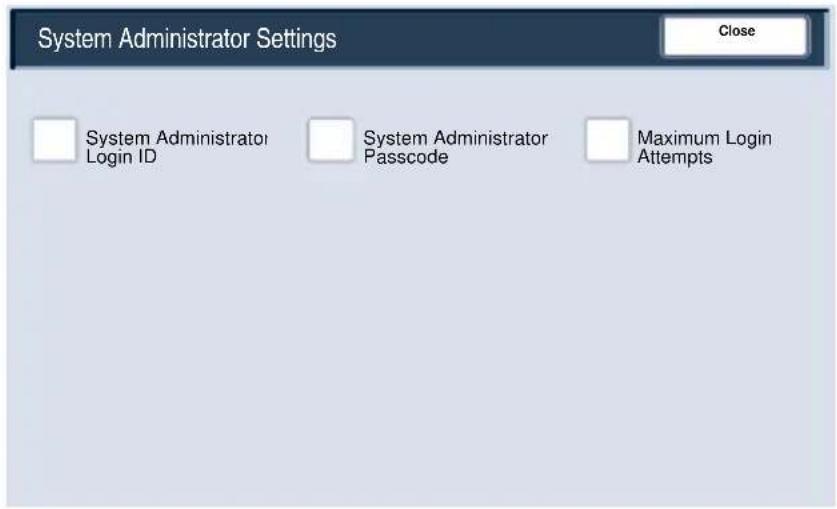
The System Administrator Settings menu allows administrators to access options for the Login ID, System Administrator Passcode, and the Maximum Login Attempts settings.
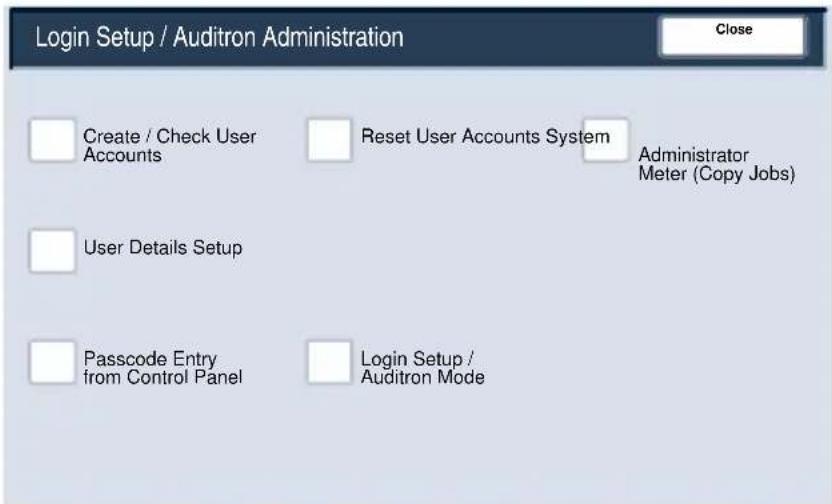
The Login Setup/Auditron Administration menu allows administrators to access and enable all of the Auditron feature settings, including options for creating, checking, and resetting User Accounts, the System Administrator Meter, User Details Setup, Passcode Entry, and Login Setup.
Auditron
The Auditor feature of the machine is used for auditing purposes. This feature electronically records the number of copies or prints made for each user account and controls the access and use of the printer/copier. Enable Auditor to:
- Create, change, and delete up to 1000 user accounts
• Control access to copy features
• Control access to scan features - Limit copying to B/W, Colour, or allow both
- Limit the number of copies made per user account
- Check the number of copies made per user account
• Print account information - Reset account meters
To setup Auditron you must create user accounts. Users will then be required to enter the passcode setup with their account to perform certain machine functions. You can create up to 1000 accounts.
You can enable Auditron Mode for copy, scan, or both. When Auditron Mode is enabled, the user must select the Log In/Out button and enter the appropriate user account passcode to start using the machine.
Auditron
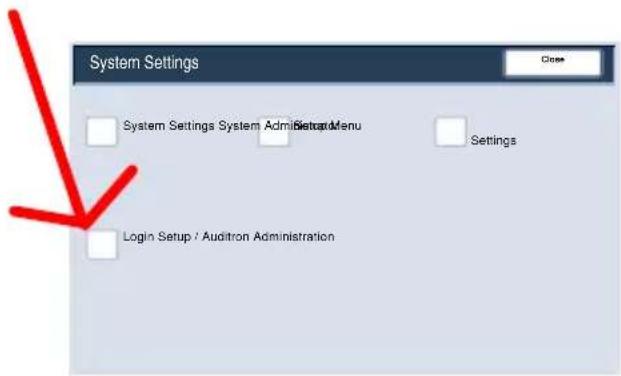
- To access the Auditor mode, first touch the Log In/Out button, Enter your System Administrator Login ID, then touch the Confirm button.

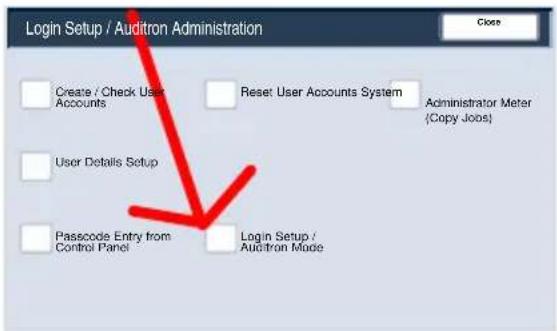
- Touch the System Settings button, then touch Login Setup/Auditron Administration.
- Touch the Login Setup/Auditron Mode button.
This completes the Auditorn Overview.
Loading Paper and Media
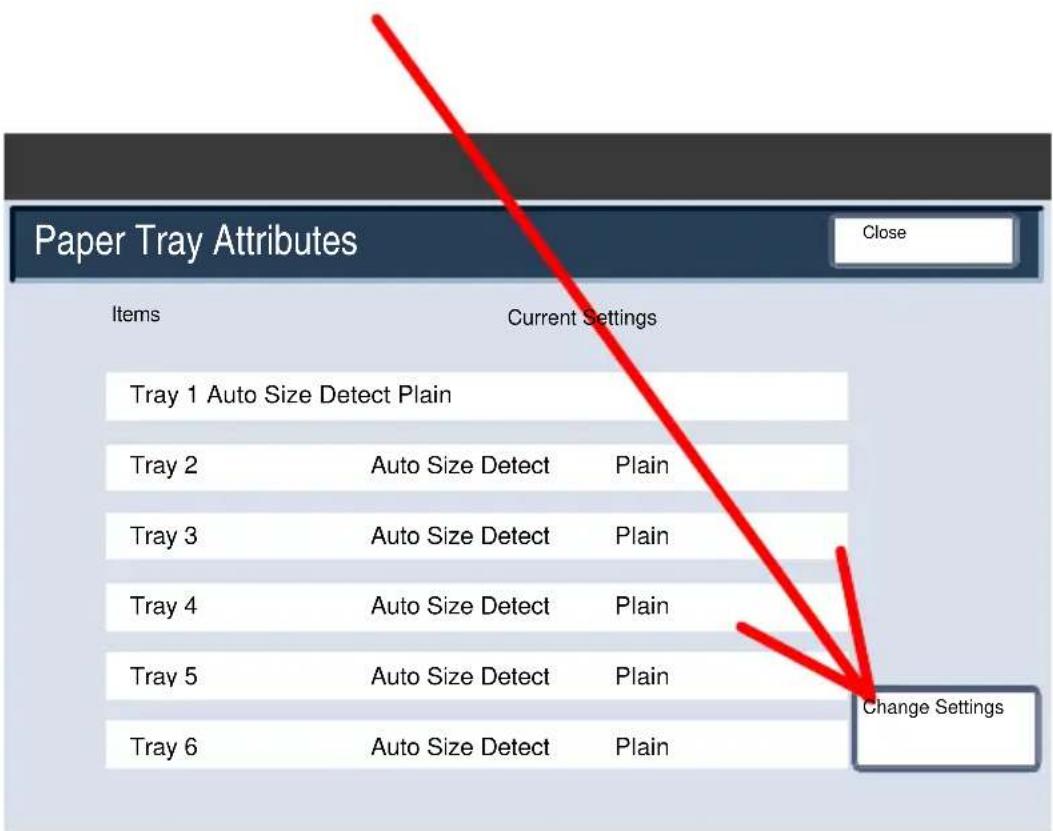
Whenever you change paper in a paper tray, you will need to change the paper type and paper size values on the Paper Tray Settings screen.
You can access the Paper Tray Settings screen in one of three ways:
- When you close the paper tray, the Paper Tray Settings window will appear, allowing you to change the paper size and paper type. This feature must be enabled by a System Administrator.
- Touch the Setup Menu button on the All Services screen. Then touch the Paper Tray Attributes button. Select the appropriate tray on the touch screen, then touch the Change Settings button.
- Access the System Administration menu. Touch System Settings/System Settings/Common Settings. Touch the Paper Tray Settings button, then touch the Paper Tray Attributes button. Select the appropriate tray on the touch screen, then touch the Change Settings button.
Loading Paper and Media
The Paper Tray Attributes screen allows you to select a specific tray, and change the settings for that tray - once you pick a tray and touch the Change Settings button, you can change the Paper Size, Paper Type, and Auto Paper Select options.
Loading Paper and Media
The Paper Size options allow you to specify the size of the paper you load into the paper tray.
The Auto Size Detect option allows standard sized paper loaded in the trays to be automatically detected by the machine.
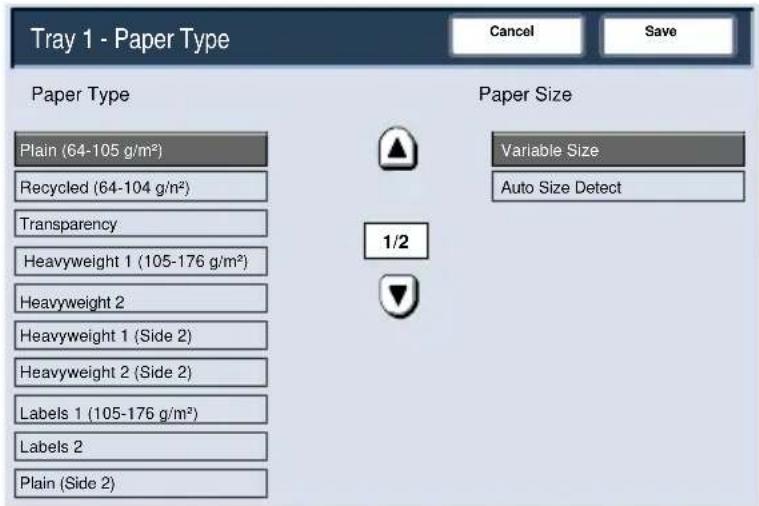
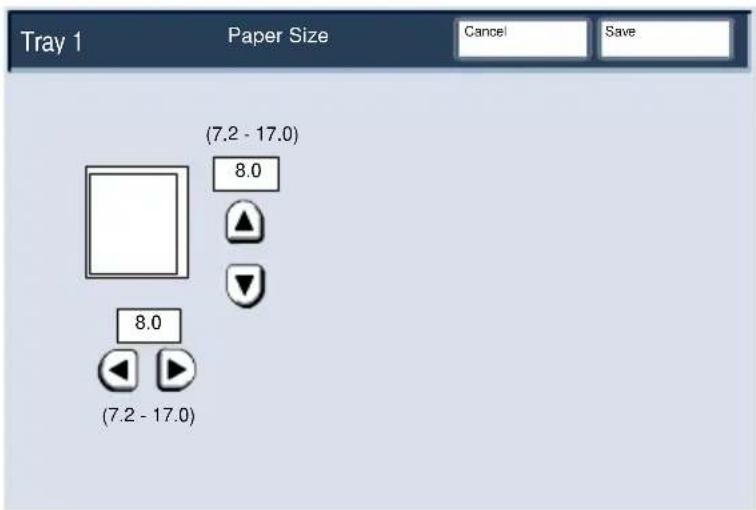
The Variable Size screen allows you to specify the exact size of the paper you load into the paper tray. You can use the arrow buttons on the touch screen to change the X and Y dimension values for the paper you load.
After you have changed your Paper Size information, touch the Save button.
Loading Paper and Media
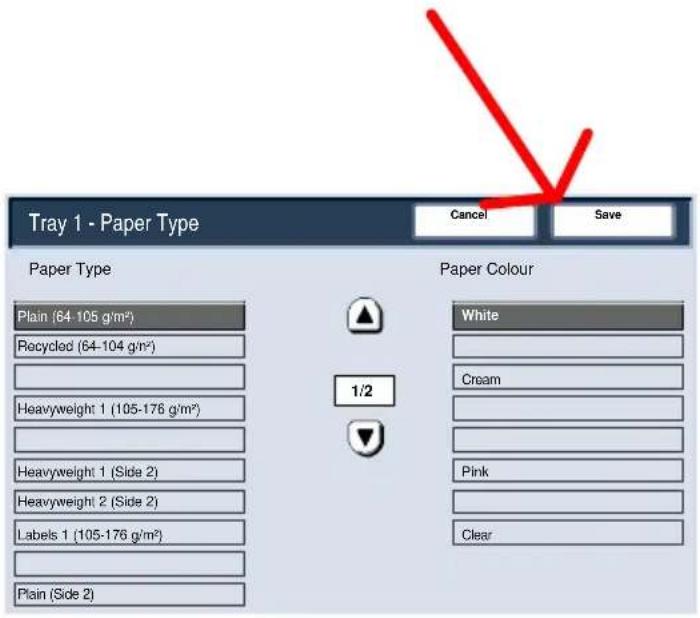
The Paper Type options allow you to select the paper type (Heavyweight, Transparency, Tabs, Hole Punched, etc.) from a list of available paper types.
The rest of the Paper Type selections are shown here. After you have made your Paper Type selection (and Paper Colour selection, if applicable), touch the Save button.
Replacing the Toner Cartridges
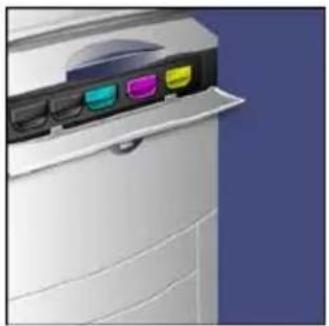
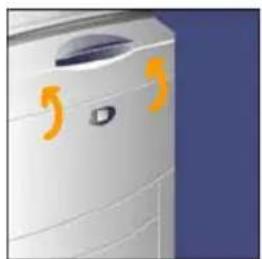
- Replace the toner cartridge while the machine is on. Open the toner cover, located just above the machine front door.
CAUTION: Before you begin the procedure, ensure that the machine has been allowed to cool down. Failure to do so may result in burns if certain parts of the machine are touched.
natural_image
Exterior view of a white electronic device with three colored buttons on the front panel (no text or symbols visible)- Lay paper on the floor before removing the cartridge. This will allow any excess toner to fall on the paper. Hold the handle of the colour indicated in the message, and gently pull it out.

natural_image
Close-up of a printer's door panel with a highlighted orange arrow pointing to the handle (no text or symbols visible)- Remove the toner cartridge by holding the handle on the top of the cartridge while gently pulling it straight out. Be careful to not get toner on clothing.

natural_image
3D diagram of a device with colored blocks and directional arrows indicating process flow (no text or symbols)- Dispose the toner cartridge as normal office waste or recycle the cartridge.

natural_image
Green recycling symbol with five arrows forming a triangle (no text or labels)Replacing the Toner Cartridges
-
Remove the new toner cartridge from its packaging.
-
Gently tilt the new cartridge up and down, and then left and right to redistribute the toner.
-
Install the toner cartridge by aligning the arrows on the cartridge evenly with the printer until you hear a click.

natural_image
Close-up of a printer's internal structure with colored components and an orange arrow indicating motion (no text or symbols)- Close the Front Door. If the door will not close completely, make sure the cartridge is in the lock position and the toner cartridge is installed into the appropriate toner location.
CAUTION: Never use a vacuum cleaner when you clean spilled toner. It can cause explosion as the toner fills the vacuum cleaner and gets sparks. Use a broom or a cloth moistened with a neutral detergent.
natural_image
Close-up of a white industrial air conditioner unit with orange decorative marks on the side (no visible text or symbols)That completes the procedure for replacing the toner cartridge.

natural_image
Solid red rectangular background with no text, symbols, or patterns- Basit Kopyalama
- Başlat'a basın
- Şablonu seçin
- Raporlar
- Простое копирование
- Выберите шаблон
- Table of Contents
- Control Panel
- Touch Screen
- Services Button
- Job Status
- Machine Status
- Log In/Out
- Language
- Power Saver
- Clear All
- Interrupt
- Stop
- Start
- Clear
- Simple Copying
- Load the documents
- Press the Services button
- Select the Features
- Enter the Quantity
- Press Start
- Identify your job in the Queue.
- Booklet Creation
- Select the Output Format tab.
- Select the Booklet Creation button.
- Simple Network Scanning
- Select the template
- Select the features
- Reports
- Billing Meters
- System Administrator Menu Overview
- Use these tools to:
- Auditron
- Loading Paper and Media
- Replacing the Toner Cartridges
Brand : XEROX
Model : DocuColor 252
Category : Printer