
WFP11SW - Food Processor Waring Commercial - Free user manual and instructions
Find the device manual for free WFP11SW Waring Commercial in PDF.
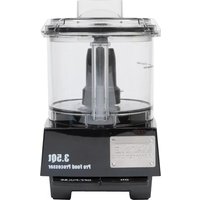
| Product type | Professional food processor |
| Brand | Waring Commercial |
| Model | WFP11SW |
| Bowl capacity | 2.5 L |
| Power supply | 120 V, 60 Hz |
| Bowl material | Durable clear plastic |
| Blade material | Stainless steel |
| Attachment type | Heavy-duty motor base with shaft |
| Main functions | Chop, grind, puree, mix, whip, grate, slice |
| Included accessories | Sealed knife, whipping disc |
| Sealing system | LiquiLock™ for blending large quantities of liquid |
| Operating modes | Continuous (ON) and pulse (PULSE) |
| Safety | Safety lid lock, automatic stop if lid is open |
| Motor protection | Overheat thermal protection device |
| Maintenance and cleaning | Bowl, lid and accessories dishwasher safe; motor base wiped with a damp sponge |
| Motor warranty | 5 years |
| Parts and labor warranty | 2 years |
| Usage | Commercial only |
| Country of manufacture | United States (designed and manufactured by Waring) |
Frequently Asked Questions - WFP11SW Waring Commercial
User questions about WFP11SW Waring Commercial
0 question about this device. Answer the ones you know or ask your own.
Ask a new question about this device
Download the instructions for your Food Processor in PDF format for free! Find your manual WFP11SW - Waring Commercial and take your electronic device back in hand. On this page are published all the documents necessary for the use of your device. WFP11SW by Waring Commercial.
USER MANUAL WFP11SW Waring Commercial
For your safety and continued enjoyment of this product, always read the instruction book carefully before using.
When using electrical appliances, basic safety precautions should always be followed including the following:
1. READ ALL INSTRUCTIONS.
- Always unplug from outlet when not in use, before putting on or taking off parts, before removing food from work bowl, and before cleaning. To unplug, grasp plug and pull from electrical outlet. Never pull cord.
-
Blades are sharp. Handle carefully.
-
Your Waring ^® batch processor is a piece of kitchen equipment and, as with all other kitchen equipment, extreme care must be used when operating it. Although training requirements are minimal, only responsible and prudent individuals should be allowed to operate this batch processor. It should not be used by or near children or individuals with certain disabilities.
-
To avoid injury, never place cutting blade on base without first having put the bowl properly in place.
- Keep hands as well as spatulas and other utensils away from moving blades while processing food to prevent the possibility of severe personal injury or damage to the batch processor. A plastic scraper may be used, but must be used only when the batch processor is not running.
- To protect against risk of electrical shock, do not put base in water or other liquids.
- Avoid contact with moving parts.
- Make sure motor has completely stopped before removing the lid.
- Do not operate any appliance with a damaged cord or plug, or after appliance has been dropped or damaged in any manner. Return appliance to the nearest authorized Waring service facility for examination, repair or adjustment.
-
The use of attachments not recommended or sold by Waring may cause fire, electric shock or injury.
-
Do not use outdoors.
- Do not let cord hang over edge of table or counter, or touch hot surfaces.
- This product is UL listed for commercial use. Use it only for food preparation as described in this book.
- Do not attempt to defeat the cover interlock mechanism.
- Be certain cover is securely locked in place before operating appliance.
- If the machine malfunctions for any reason, discard any food being processed at that time.
- This appliance is not intended for use by persons (including children) with reduced physical, sensory, or mental capabilities, or lack of experience and knowledge, unless they have been given supervision or instruction concerning use of the appliance by a person responsible for their safety.
- Children should be supervised to ensure that they do not play with the appliance.
SAVE THESE INSTRUCTIONS
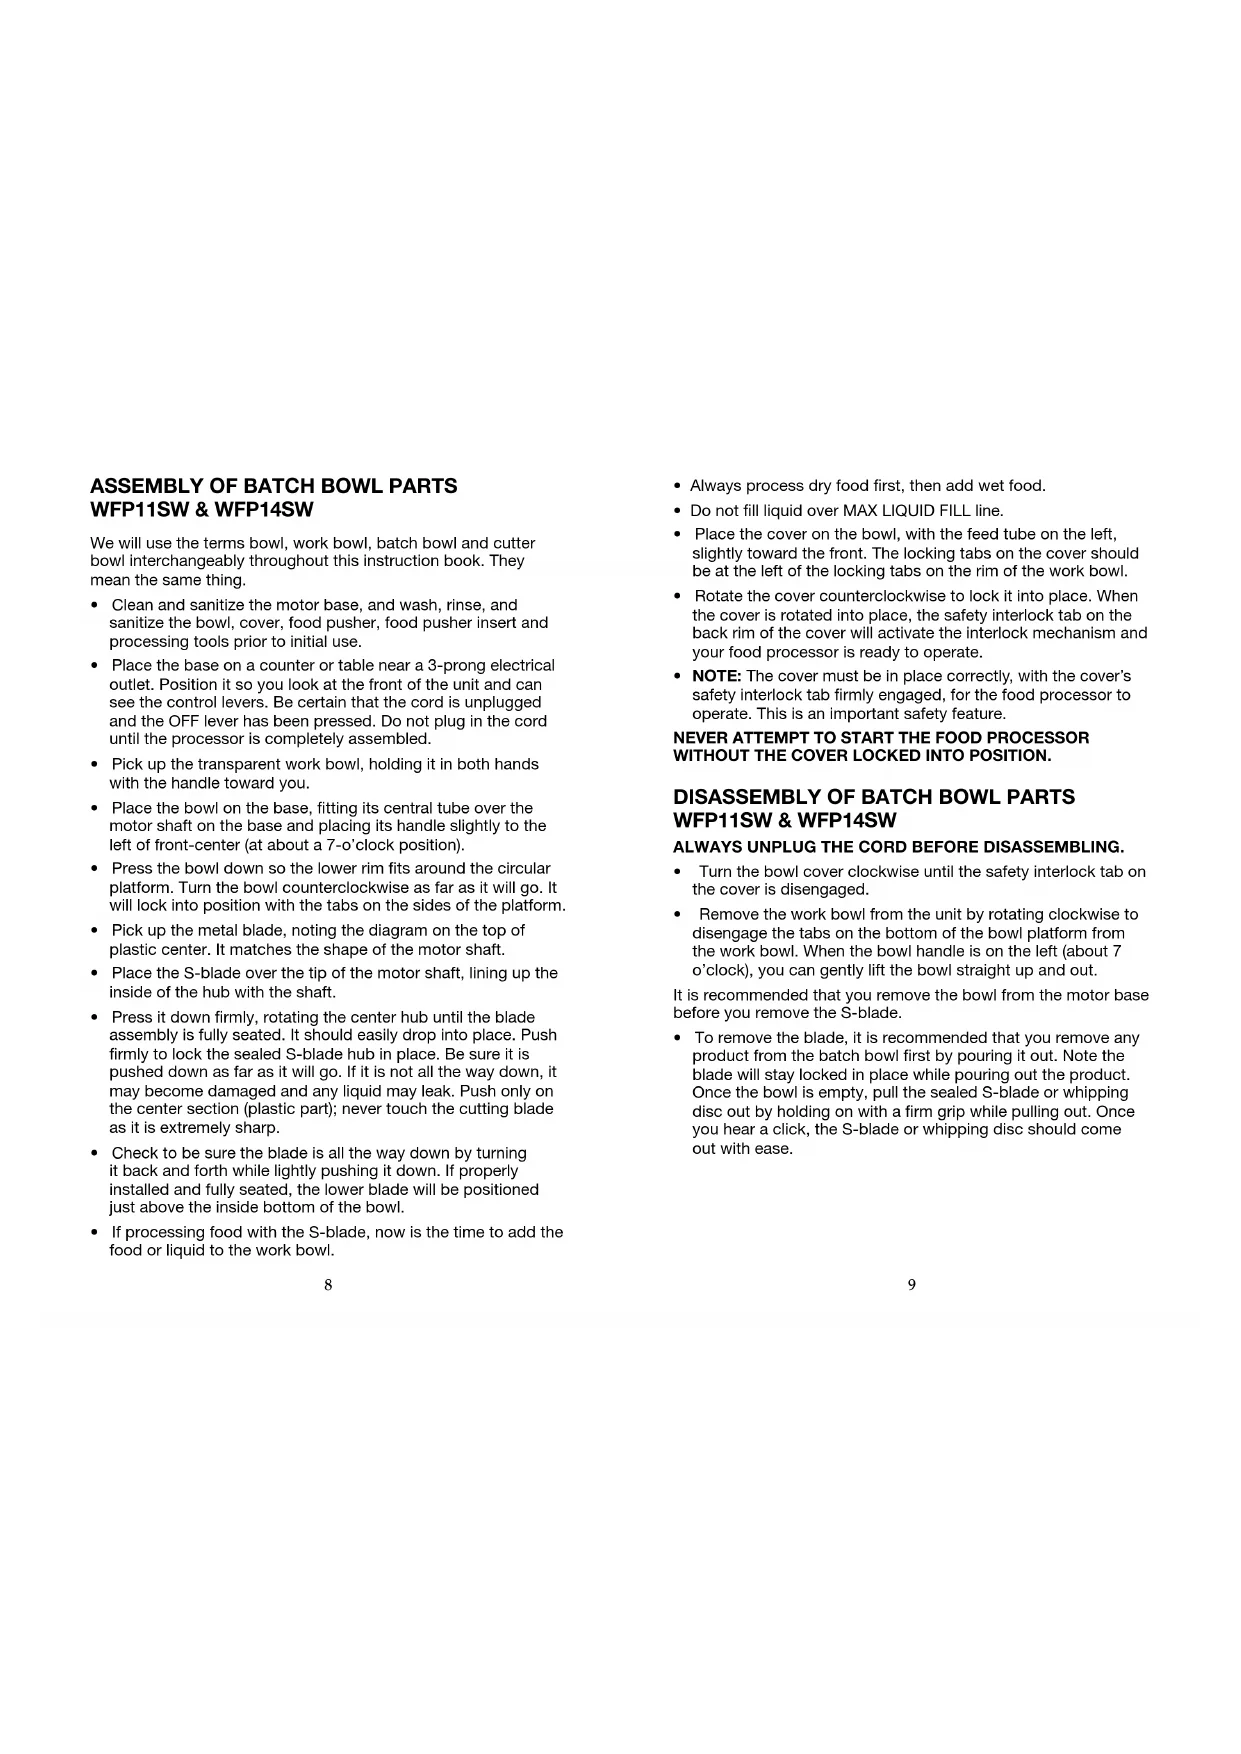
For your protection, this appliance is equipped with a 3-conductor cordset.
120-volt units are supplied with a molded 3-prong grounding-type plug (NEMA 5-15P) and should be used in combination with a properly connected grounding type outlet as shown in Figure 1.
If a grounding type outlet is not available, an adapter, shown in Figure 2, may be utilized to enable a 2-slot wall outlet to be used with a 3-prong plug, except in Canada and Europe.
Referring to Figure 3, the adapter must be grounded by attaching its grounding lug under the screw of the outlet cover plate.
CAUTION: Before using an adapter, it must be determined that the outlet cover plate screw is properly grounded. If in doubt, consult a licensed electrician. Never use an adapter unless you are sure it is properly grounded.
NOTE: Use of an adapter is not permitted in Canada and Europe.
Green/Yellow: Earth Ground • Blue: Neutral • Brown: Live Note: User-installed cord set plugs are not permitted in Europe.
INTRODUCTION
The Waring Commercial® WFP11SW and WFP14SW commercial food processors are the most versatile food processors in their class. They both feature the LiquiLock™ Seal System, unlike any other food processor in the industry. This enables operation with large volumes of liquids, without the need to remove the S-blade while pouring. These professional machines take advantage of Waring's forty years of commercial food service experience as well as thirty years of food processing experience by the same technical, engineering, manufacturing and development team that has made Waring Commercial the best known name in food processors. These machines are both ETL Sanitation and Commercial UL listed. This instruction book describes two models. The WFP11SW and WFP14SW both come with a sealed work bowl (also known as a batch bowl) and a sealed cutter blade (or S-blade) to chop, grind, purée or mix in the batch bowl. WHAT MAKES THIS MACHINE UNIQUE IS THAT THE BATCH BOWL ALSO ALLOWS YOU TO PROCESS ANYTHING IN THE BOWL, INCLUDING LARGE VOLUMES OF LIQUIDS, which means you can shred, grate, slice, purée, liquify and more, directly in the bowl! The WFP11SW and WFP14SW are shipped from our factory with a starter kit that includes a sealed whipping disc and sealed S-blade. Many additional processing accessories are available for both models.
CONTENTS
Important Safeguards 2
Grounding Instructions....4
Introduction 5
The Parts....7
Assembly of Batch Bowl Parts....8
Disassembly of the Batch Bowl Parts....9
Operating the Controls....10
Use Instructions for S-Blade and Whipping Disc in the
Batch Bowl....11
Resetting Thermal Protection.... 13
Cleaning and Maintenance.... 14
Troubleshooting....16
Limited Warranty 18
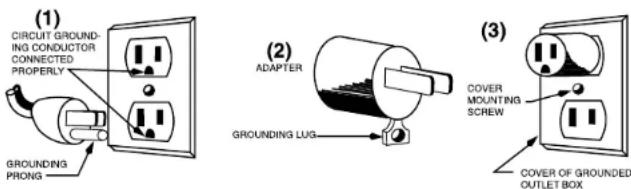
THE PARTS
The Waring WFP11SW and WFP14SW batch processors both consist of the following standard parts and accessories:
- Solid motor base with vertical heavy-duty shaft
- Two control levers
a. ON
b. OFF/PULSE
- Safety interlock (not shown)
Prevents machine from operating until cover is in place
- Sealed clear work bowl
Dry capacity of 2.5 quarts for WFP11SW
Dry capacity of 3.5 quarts for WFP14SW
- Sealed work bowl cover with feed chute cap
- Sealed S-blade (cutter blade) to chop, grind, purée and mix
- Sealed whipping disc
ASSEMBLY OF BATCH BOWL PARTS WFP11SW & WFP14SW
We will use the terms bowl, work bowl, batch bowl and cutter bowl interchangeably throughout this instruction book. They mean the same thing.
- Clean and sanitize the motor base, and wash, rinse, and sanitize the bowl, cover, food pusher, food pusher insert and processing tools prior to initial use.
- Place the base on a counter or table near a 3-prong electrical outlet. Position it so you look at the front of the unit and can see the control levers. Be certain that the cord is unplugged and the OFF lever has been pressed. Do not plug in the cord until the processor is completely assembled.
- Pick up the transparent work bowl, holding it in both hands with the handle toward you.
- Place the bowl on the base, fitting its central tube over the motor shaft on the base and placing its handle slightly to the left of front-center (at about a 7-o'clock position).
- Press the bowl down so the lower rim fits around the circular platform. Turn the bowl counterclockwise as far as it will go. It will lock into position with the tabs on the sides of the platform.
- Pick up the metal blade, noting the diagram on the top of plastic center. It matches the shape of the motor shaft.
- Place the S-blade over the tip of the motor shaft, lining up the inside of the hub with the shaft.
- Press it down firmly, rotating the center hub until the blade assembly is fully seated. It should easily drop into place. Push firmly to lock the sealed S-blade hub in place. Be sure it is pushed down as far as it will go. If it is not all the way down, it may become damaged and any liquid may leak. Push only on the center section (plastic part); never touch the cutting blade as it is extremely sharp.
- Check to be sure the blade is all the way down by turning it back and forth while lightly pushing it down. If properly installed and fully seated, the lower blade will be positioned just above the inside bottom of the bowl.
- If processing food with the S-blade, now is the time to add the food or liquid to the work bowl.
• Always process dry food first, then add wet food.
- Do not fill liquid over MAX LIQUID FILL line.
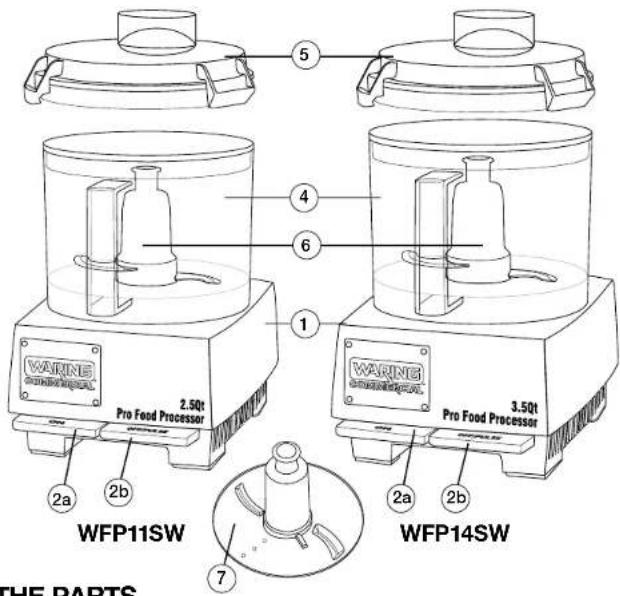
- Place the cover on the bowl, with the feed tube on the left, slightly toward the front. The locking tabs on the cover should be at the left of the locking tabs on the rim of the work bowl.
- Rotate the cover counterclockwise to lock it into place. When the cover is rotated into place, the safety interlock tab on the back rim of the cover will activate the interlock mechanism and your food processor is ready to operate.
- NOTE: The cover must be in place correctly, with the cover's safety interlock tab firmly engaged, for the food processor to operate. This is an important safety feature.
NEVER ATTEMPT TO START THE FOOD PROCESSOR WITHOUT THE COVER LOCKED INTO POSITION.
DISASSEMBLY OF BATCH BOWL PARTS WFP11SW & WFP14SW
ALWAYS UNPLUG THE CORD BEFORE DISASSEMBLING.
- Turn the bowl cover clockwise until the safety interlock tab on the cover is disengaged.
- Remove the work bowl from the unit by rotating clockwise to disengage the tabs on the bottom of the bowl platform from the work bowl. When the bowl handle is on the left (about 7 o'clock), you can gently lift the bowl straight up and out.
It is recommended that you remove the bowl from the motor base before you remove the S-blade.
- To remove the blade, it is recommended that you remove any product from the batch bowl first by pouring it out. Note the blade will stay locked in place while pouring out the product. Once the bowl is empty, pull the sealed S-blade or whipping disc out by holding on with a firm grip while pulling out. Once you hear a click, the S-blade or whipping disc should come out with ease.
- Plug the machine into an electrical outlet. The outlet must be 120 volts, 60Hz.
- There are two control levers located on the base of the machine. They are on the front and they give you fingertip control of processing. They are large enough to find easily in case of emergency.
The two controls are: ON
OFF/PULSE
How they work: ON: Press the lever down to start the motor.
OFF/PULSE: To turn the motor off, press the lever down and release.
To pulse the motor, press the
OFF/PULSE lever down, then release. The motor will run as long as you hold the lever down; it stops when you release the lever. Try it a few times.
How to Use
Continuous Use
For continuous processing, use the ON lever, which is located on the left.
Pulsing
The Pulsing function is intended for use with the S-blade in the work bowl.
- For rapid ON/OFF operation, called pulsing, use the OFF/PULSE lever located on the right. The motor runs as long as you hold the lever down; it stops when you release the lever.
-
You control pulsing. You control the duration of each pulse by the amount of time you hold the lever down. You control the frequency of pulses by the rate at which you press the lever. The interval between pulses must be long enough to allow everything in the work bowl to fall to the bottom.
-
Pulsing gives you precise control over chopping, mincing, blending and mixing. You can process food to any texture or consistency you want, from coarsely chopped to liquids.
- Pulsing is also useful in processing hard foods. Pulse the food a few times to break it up into smaller parts. Then proceed with continuous use after the pieces are broken up and easier to process.
- Always use the OFF/PULSE lever for pulsing. Never move the bowl (or chute) and cover assembly on or off to control pulses. It is less efficient and could damage the machine.
Turning Off
Always turn the machine off with the OFF/PULSE lever and wait until the blade comes to a complete stop before removing the bowl cover. The motor stops within seconds after the machine is turned off.
USE INSTRUCTIONS FOR S-BLADE (CUTTER BLADE) AND WHIPPING DISC IN THE BATCH BOWL WFP11SW & WFP14SW
- The S-blade (cutter blade) is designed for chopping, grinding, puréeing, blending and mixing ingredients required in almost all recipes.
- Assemble the bowl and blade as instructed in the Assembly of Batch Bowl Parts section (page 8).
- Prepare all food items to be processed by washing and peeling as required. Remove pits, stones, and large seeds.
Chopping and Mincing
- To chop or mince in the bowl, fill the bowl with food product up to the top of the bowl's inner tube, or up to 34 full.
- To chop or mince most effectively, you must start and stop the blades quickly to control the consistency of the chop by pulsing. Use the PULSE lever to accomplish this as described under Pulsing (page 10). Continue pulsing until the desired consistency has been reached.
- If chopped foods are processed continuously, the food will be processed unevenly, i.e., food on the bottom will be finely chopped and food on the top will be more coarse.
Chopping Meat
Cut meat into 1-inch pieces to ensure an even chop. Process no more than 1 pound of meat (for WFP11SW) or 1.75 pounds of meat (for WFP14SW). Press the PULSE lever 3 or 4 times at a rate of 1 second on, 1 second off. If the food is not chopped fine enough, let the processor run continuously for a few seconds. If the machine has trouble starting, reduce the amount of meat in the bowl and start again.
Chopping Hard Cheese
Put up to 8 ounces (for WFP11SW) or 3 cups (for WFP14SW) of uniform 1-inch cubes of chilled cheese into the bowl and pulse the machine with the PULSE lever. For powdered cheese, pulse until the cheese is in small chunks (pea size), then allow the processor to run continuously until you have fine powder. Cheese with a high moisture content can ball up if processed too long.
Chop Onions, Celery, Cabbage, etc.
Cut onions in quarters, and other vegetables into 1-inch cubes. Place the cubed food into the work bowl up to the top of the bowl's inner tube, and pulse until you reach the desired consistency.
NOTE: If you let the blade run too long, the ingredients on the bottom will become puréed or give you uneven results.
Purée or Mix
To purée tomatoes, vegetables and fruits, make sauces, or mix and blend ingredients, place the ingredients into the bowl, turn the unit on and allow it to run continuously until you reach the desired consistency. Do not let the machine run unattended. If your recipe exceeds more than 10 cups of wet ingredients, please process in several batches.
Whipping
The whipping disc makes any whipping job easy and quick. Just pour in heavy cream and your choice of sweetening or flavor, and whip until cream is thick and fluffy. Do not fill over the MAX
FILL LINE as indicated on the batch bowl. Note that the seal will prevent leaks and spills from the batch bowl cover, however when the motor is running, the liquid could get whipped out through the feed tube if it is filled above the MAX FILL LINE. To turn your cream into butter, keep whipping until moisture is mostly separated from cream. Feel free to use your choice of herbs and seasoning to make your own homemade herb butter.
Do not fill liquid past MAX LIQUID FILL line.
Turn the machine off with the OFF-PULSE lever.
- Always switch the food processor off by pressing and releasing the OFF-PULSE lever. This assures that the power is not supplied to the motor.
- Always switch the food processor off and wait until rotation stops before removing the cover.
- While the safety interlock switch will turn the machine off if the cover is rotated clockwise or is removed while running, this should not be the means of ON/OFF operation.
- Before rotating the lid, always make sure the machine is off by pressing the OFF-PULSE lever as a safety precaution, in the event that the machine was not turned off properly.
RESETTING THERMAL PROTECTION
The WFP11SW and WFP14SW Batch Processors are equipped with an automatic reset switch to protect the motor from overheating.
If your batch processor stops running under heavy use, turn the power switch off and unplug the power cord. Empty the work bowl of all its contents and allow approximately 5 minutes for the motor to cool down.
Plug the power cord back into the outlet and continue processing.
If your batch processor does not function properly following this procedure, discontinue use and contact a Certified Waring Customer Service Center.
CLEANING AND MAINTENANCE
Clean the food processor and accessories prior to initial use and after each use. Do not use harsh abrasive-type cleaners on any part of the food processor.
Wash the motor shaft with a small brush.
Wash, rinse, sanitize and dry the bowl, covers and S-blade prior to initial use, and after use, unless they will be used again immediately. These items are all dishwasher safe, and may be cleaned and rinsed in the dishwasher instead of manually in the sink.
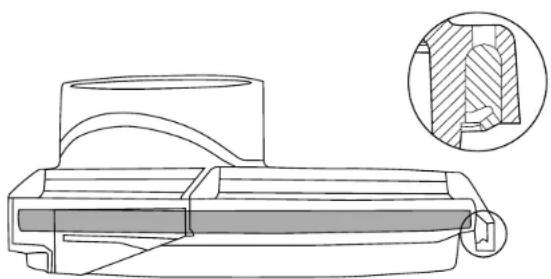
The bowl cover has a black seal around its outer rim that is easily removable for cleaning and should be cleaned periodically. There are three small holes on the outer lip of the top of the cover for pushing the seal out. Use a small, dull object like a toothpick or paper clip, to push the seal downward and out of the groove. DO NOT USE ANYTHING SHARP THAT CAN CUT THE SEAL. Hand wash with warm soapy water, rinse, and dry. To reassemble, insert the clean and dry seal back into the groove with your fingers, with the round edge at the top and the slotted edge at the bottom, facing in. Make sure the seal is fully inserted and in proper position. Note picture below.
Note: The flap of the cover seal must be downward and the opening must face to center of cover.
natural_image
Technical line drawing of a mechanical component with cross-sectional view (no text or symbols)A stiff bristle brush will help to knock food particles out of the blades before washing. Handle very carefully as the blades are sharp.
For manual cleaning, it is recommended that you use washing solutions based on non-sudsing detergents, and chlorine-based sanitizing solutions that have a minimum chlorine concentration of 100 PPM. The following washing, rinsing, and sanitizing solutions, or their equivalents, may be used:
SOLUTION PRODUCT DILUTION IN WATER TEMPERATURE
Washing Ajax ^ Sanitizer 1 14 oz. per Hot 115°F (46°C) Cleaner Powder* 2½ gallons
Rinsing Plain Water
Warm 95°F (35°C)
Sanitizing
Clorox®
1 tablespoon
Cold 50°F (10°C)
Institutional** per gallon
To clean and sanitize the motor base
Clean and sanitize the motor base prior to initial use and after each use. Unplug the unit, then wipe down the exterior surfaces of the motor base with cloths or sponges dampened with a soluble detergent. Next, wipe down with rinse water. Prevent liquid from running into the motor base by wringing out all excess moisture from cloths or sponges before using them.
NEVER IMMERSE THE MOTOR BASE IN WATER OR ANY OTHER LiqUID.
Allow the unit to air-dry before using again.
Never use harsh abrasive-type cleaners on any part of the Waring Commercial Batch Processor.
Any other servicing should be performed by an authorized service representative
^* Ajax ^® is a registered trademark owned by the Colgate-Palmolive Company
**Clorox ^® is a registered trademark owned by the Clorox Company
TROUBLESHOOTING
This section describes potential problems and the correct solutions for them. Problems that cannot be solved with the guidelines listed below should be referred to one of the Waring Authorized Service Centers for assistance. A listing of authorized service agencies is supplied with each Waring Commercial food processor.
Unit does not start when assembled correctly
- Pull the plug and try plugging into another outlet.
- Turn ON lever to On.
- Make sure the bowl is properly positioned on the motor base, that the bowl or cover is on properly, and that the safety interlock tab on the cover has properly engaged the safety interlock switch.
Unit stops running during processing
- The unit may have overheated. Refer to Resetting Thermal Protection section (page 13).
- Turn unit off and unplug.
- Remove bowl attachment.
- Remove food being processed from inside the bowl.
- Allow unit to cool for 5 minutes.
- Reassemble unit, and run first with the bowl empty, then add food back into the bowl and try again.
Unit will not come up to full speed
- Bowl is overloaded – remove food being processed and reload using smaller quantities.
If unit does not operate after you have followed the above
- Check outlet to be sure there is current.
- Check to be sure circuit breaker is on.
- Check to be sure the fuse is not blown if there are fuses on this circuit.
- Call local authorized Waring service agency.
If unit starts to spark or smoke
- Turn unit off, unplug it, and call local factory-authorized Waring service agency.
If food processor makes grinding noise
- Turn unit off, unplug, disassemble, check bowl and blade to see if they have been rubbing together.
- If bowl and blade are rubbing, call your authorized Waring service agency.
LIMITED WARRANTY
LIMITED FIVE YEAR MOTOR WARRANTY LIMITED TWO YEAR PARTS AND LABOR WARRANTY
Waring Commercial warrants that this product's motor shall be free from defects in material and workmanship for a period of five years from the date of purchase when used with foodstuffs, nonabrasive liquids (other than detergents) and nonabrasive semi-liquids, providing it has not been subject to loads in excess of indicated rating. All other components are warranted for a period of two years from date of purchase.
Under this warranty, the Waring Commercial division will repair or replace any part which, upon our examination, is defective in materials and workmanship, provided the product is delivered prepaid to the Waring Service Center, 314 Ella T. Grasso Ave., Torrington, CT 06790, or any Factory-Approved Service Center.
This warranty does not: a) apply to any product that has become worn, defective, damaged or broken due to use or due to repairs or servicing by other than the Waring Service Center or a Factory-Approved Service Center or due to abuse, misuse, overloading or tampering; b) cover incidental or consequential damages of any kind.
This warranty is applicable only to appliances used in the United States or Canada; this supersedes all other express product warranty or guaranty statements. For Waring products sold outside of the U.S. and Canada, the warranty is the responsibility of the local importer or distributor. This warranty may vary according to local regulations.
This warranty is void if appliance is used on Direct Current (DC).
NOTES
IMPORTANTES CONSIGNES DE SÉCURITÉ
PIÈCES
natural_image
Technical line drawing of a mechanical component with cross-sectional view (no text or symbols)PIEZAS
natural_image
Technical line drawing of a mechanical component with cross-sectional view (no text or symbols)Any trademarks or service marks of third parties herein are the trademarks or service marks of their respective owners.
©2011 Conair Corporation
Waring Products
Division of Conair Corporation


- READ ALL INSTRUCTIONS.
- SAVE THESE INSTRUCTIONS
- INTRODUCTION
- CONTENTS
- THE PARTS
- ASSEMBLY OF BATCH BOWL PARTS WFP11SW & WFP14SW
- NEVER ATTEMPT TO START THE FOOD PROCESSOR WITHOUT THE COVER LOCKED INTO POSITION.
- DISASSEMBLY OF BATCH BOWL PARTS WFP11SW & WFP14SW
- ALWAYS UNPLUG THE CORD BEFORE DISASSEMBLING.
- How to Use
- Continuous Use
- Pulsing
- Turning Off
- USE INSTRUCTIONS FOR S-BLADE (CUTTER BLADE) AND WHIPPING DISC IN THE BATCH BOWL WFP11SW & WFP14SW
- Chopping and Mincing
- Chopping Meat
- Chopping Hard Cheese
- Chop Onions, Celery, Cabbage, etc.
- Purée or Mix
- Whipping
- Do not fill liquid past MAX LIQUID FILL line.
- Turn the machine off with the OFF-PULSE lever.
- RESETTING THERMAL PROTECTION
- CLEANING AND MAINTENANCE
- SOLUTION PRODUCT DILUTION IN WATER TEMPERATURE
- To clean and sanitize the motor base
- NEVER IMMERSE THE MOTOR BASE IN WATER OR ANY OTHER LiqUID.
- TROUBLESHOOTING
- Unit does not start when assembled correctly
- Unit stops running during processing
- Unit will not come up to full speed
- If unit does not operate after you have followed the above
- If unit starts to spark or smoke
- If food processor makes grinding noise
- LIMITED WARRANTY
- IMPORTANTES CONSIGNES DE SÉCURITÉ
- PIÈCES
- PIEZAS
Brand : Waring Commercial
Model : WFP11SW
Category : Food Processor