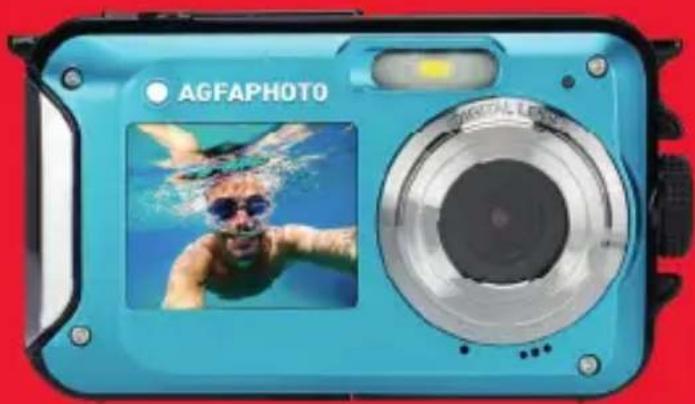
Realishot WP8000 - Camera AGFA - Free user manual and instructions
Find the device manual for free Realishot WP8000 AGFA in PDF.

| Product Type | Waterproof Digital Camera |
| Sensor | CMOS SONY |
| Maximum Image Resolution | 48 MP (8000x6000) |
| Video Resolution | 2.7K (2688x1520), FHD (1920x1080), HD (1280x720) |
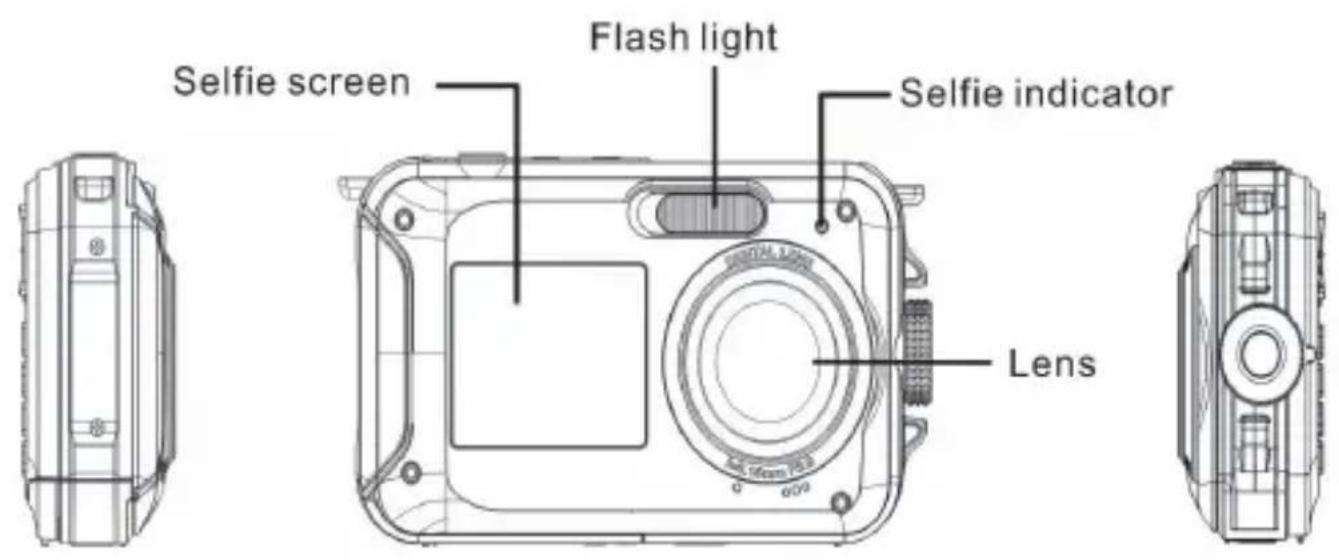
| Screens | Front 1.8" and rear TFT 2.7" |
| Digital Zoom | 16x |
| Waterproof | Up to 3 meters |
| Flash | Built-in LED, Auto, Manual, Off modes |
| Scene Modes | Auto, Landscape, Portrait, Night Landscape, Night Portrait, High Sensitivity, Sport, Beach, Party |
| Image Stabilizer | Yes (Anti-Shake) |
| Face Detection | Yes |
| Continuous Shooting | Up to 6 burst photos (at VGA size) |
| Self-timer | 2 s, 5 s, 10 s |
| White Balance | Auto, Sunny, Cloudy, Fluorescent, Incandescent |
| ISO | Auto, 100, 200, 400 |
| Exposure (EV) | -3 to +3 |
| External Memory | microSD card up to 128 GB (not included) |
| Power Supply | Rechargeable lithium battery via USB |
| Photo File Format | JPEG |
| Video File Format | AVI |
| USB Interface | USB 2.0 |
| Direct Print | PictBridge |
| Operating Temperature | 0°C to 40°C |
Frequently Asked Questions - Realishot WP8000 AGFA
User questions about Realishot WP8000 AGFA
0 question about this device. Answer the ones you know or ask your own.
Ask a new question about this device
Download the instructions for your Camera in PDF format for free! Find your manual Realishot WP8000 - AGFA and take your electronic device back in hand. On this page are published all the documents necessary for the use of your device. Realishot WP8000 by AGFA.
USER MANUAL Realishot WP8000 AGFA
USER MANUAL MANUEL D'UTILISATION BENUTZERHANDBUCH
. A felhasznalói kézikönyv más nyelveken letölthető a következő címen
· Handleidingen in verschillende talen te downloaden op
- Manuales en differentes idiomas que se pueda descargar en
- Manual in diverse linguacabili su
- Manuales em不同类型 idiomas para download em
-PykoBODCTBa Ha pa3HbIXЯ3bIkaX MOxHO 3aRpy3ntb Ha
Manuály v rúzních jazycích ke staženi na
Podręczniki w rożnych jejzykach do povrania
- Manualer på olika sprek nedladdningsbara på
Eri kielten käsikirjat, ladattavissa
- Manualer på forskjellige sprek som kan lastinges ned på
www.gtcompany.fr/en/customer-support/
MAINFEATURES
- Upto3meterswatertight
-Underwaterphotocaptureandvideorecording - Videoresolution:2.7K2688x1520,FHD1920x1080,HD1280x720P
- Maximumimageresolution:48MP
- Dualscreens:a1.8"frontscreenanda2.7"TFTrearscreen
Built-inLEDflash - 16Xdigitalzoom
- High-speed continuousshooting, facedetection, image stabilization, multiplescenemodes
- MicroSDsupportupto128GB(notincluded)

PREPARATIONBEFOREUSE:
EN
Lithiumbatteryinstallation
Pleaseinstallthelithiumbatterysuppliedwiththecamerabeforeusingitaccordngtothe followinginstructions.
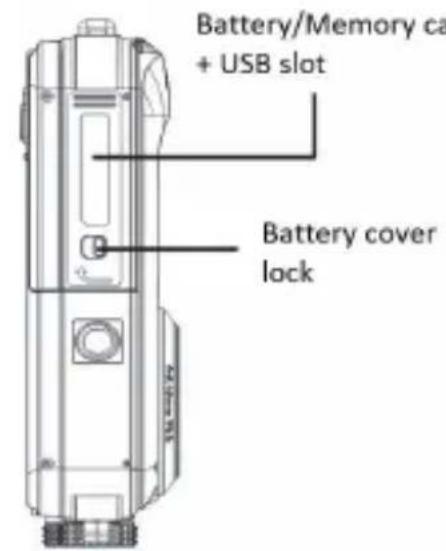
1.Slidethebatterycoveronthebottomofthecameratothelefttoaccesssthebattery compartment:
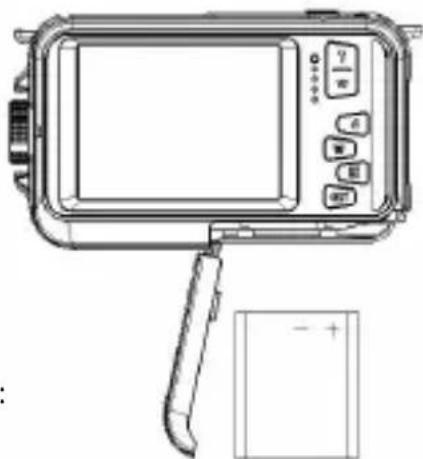
Installthelithium batteryasfollows:
2.Installthebatteryinthecorrectpolarity.
3. Thenclosethebatterycoverandslideittothelefttolockitinplace.
Note:Please remove the battery if you are not going to use the camera for awhile.
Lithiumbatterycharging
Torechargethelithiumbattery,simplyconnecttchecamera(withoutremovingthebattery)to yourcomputerusingtheUSBcableprovidedinthebox.TheredLEDOnthebackofthe camerawilllightuptoindicatethathebatteryisbeingcharged,andwil Iturnoffwhenfully charged.YoucanalsochargethelithiumbatterybyconnectingthecameratoACpowerifyou haveanadaptertowhichyoucanconnectttheUSBcable.
Computersystemrequirements-Windows7/XP3
IfyouwanttotransferphotosandvideoostoaWindows7/XP3computer,thecomputermust besetupasfollows:
- PentiumprocessorcompatiblewithWindows7/XP3orhigher
RAMofatleast128MBwithatleast150MBofavailablediskspace - CompatibleUSBInterface
- Recommendedscreenresolution:1024x768pixelsormore/16-bitcolorormore
Computersystemrequirements-WindowsVista
IfyouwanttotransferphotosandvideoostoaWindowsVistacomputer,thecomputermust besetupasfollows:
800MHzprocessorand512MBRAM
20GBharddiskwithatleast16GBavailableshpace
SuperVGAGraphicsArraySupport
- CompatibleUSBInterface
Computersystemrequirements-Macintosh
IfyouwanttotransferphotosandvideoostoaMaccomputer, the computer must besetupas follows:
MacintoshG3500MHzprocessororhigher
- MacOSXor10.5.Xearlierversions
RAMofatleast256MBormorewithatleast150MBofavailabl ediskspace
- Recommendedscreenresolution:800x600pixelsoormore

Cameradercription:


Icons:
Batterycharging

Fullychargebattery

Mediumchargedbattery

Lowbattery
Quality

Common

Fine

SuperFine
Flash

Flashon

Autoflash

Flashoff
Mode

Photo

Video

Playback
Self-timer

Self-timer10s

Self-timer5s

Self-timer2s

Self-timeroff
Digitalzoom


Protection

Protectionon
Anti-shake

Anti-shakeon

Anti-Shakeoff
Scenes

AutoSceneryPortrait


NightsceneryNghoportrait

HighsensitivitySport Beach


Party
- Memorycardinstallation
ThecamerasupportsmicroSDmemorycardsupto128GB(notincluded).Theinternal memoryofthecameracanonlystoreonephotofortestpurposes.Itisnecessarytoinserta micro SD card into the micro SD card slot before using the camera, which is located below the lithiumbatteryslot.Makesurethatitisinsertedcorrectlybygentlyslidingitintotheslotuntil itclicksintoplacetoconfirmthatitislocked.AmicroSDcardiconwillappearonLCD screen toindicatehatthecamerahasdetectedthemicroSDcard.Toremovethecard,simplypress itfirmlyandthecardwillejectitselffromtheslot.
Note:
- All photos and videos will be saved to the microSD card once it is installed.
- Formattingwilldeletealldatabostredonthememorycard.
3.DonotremovethemicroSDcardduringformattingasthismaydamagethecard.
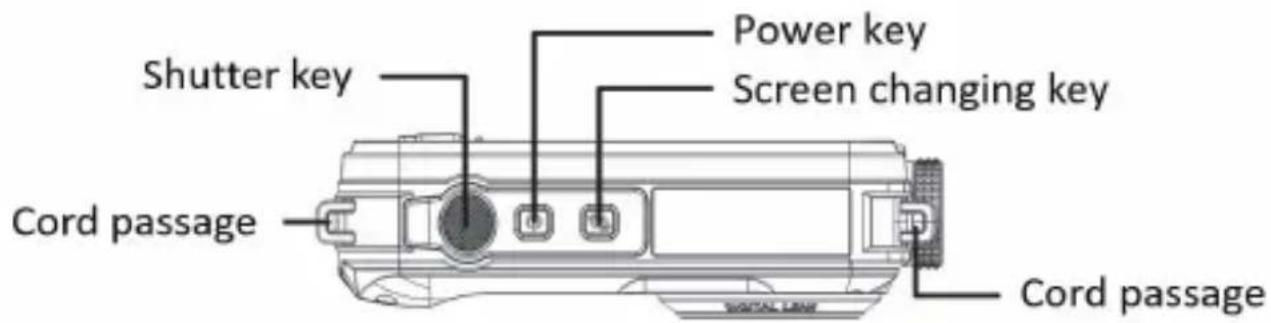
- Turningonthecamera
Pressthepowerkeyonthetopofthecameratoturniton.TheLCDscreenwillthenturnonto confirmthatitisworking.
- Turningoffthecamera
Press the power key again to turn off the camera. When the battery power level is insufficient, the camerawilldisplayaredicon onLCDscreenandautomaticallyturnoffafterafew seconds.
PHOTOMODE:
Onctecameraisturnedon, theiconwillappearLCDscreenindicatingthatthe photomodeisactivated.
- Switchingbetweenscreens
Toswitchfromthefrontscreentotherearscreen,pressthescreenchangekeynexttothe powerkey.Eachpresswillalternatelyactivatethe1.8"frontscreenandthe2.7"rearscreen.
Photoshooting
Totakeapicture,simplypressstheshutterkeyonthetopofthecamera.Ittenthataksefew secondstorecordthephotoonthememorycard.Aftereachimagacapture,thenumber
displayedonthescreenindicateshowmanymorephotosyoucantakebasedonthecurrent settingsandthesizeofthememorycardinsertedinthecamera.Amessageappearsonthe screenwhenthememorycardisfull.Tocontinue,youneedtotransferalldataonthe memorycardtoyourcomputerorinsertanewmemorycard.
Digitalzoom
You canen large the object upto 16 times withthedigital zoom. Pressthe(T)keytozoommin and pressthe(W)keytozoomout. The icon W Twill be displayed on LCDscreen.
Photomodesettings:
Thecamerahas18settingsthatcanbeadjustedtoimproveshooting:Flash,Scenes,Image resolution,Anti-Shake,Facedetection,Continuousshooting,Self-timer,EV,ISO,Whitebalance, Sharpness,Quality,Effects,autopoweroff,Sound,Date/Time,Frequency,Memorycard formatting.
1.PresstheSETkey.
2.PresstheUp/Downkeystoselectthesettingtobehanged.
Built-inflash
PresstheFlashkeyonthebackofthecameratoactivateethethreeflashmodes.Toactivate AutoFlash,selecttheicon A ;itshouldturnnonautomaticallyiftheshootingbrightnessis low.
Ifyouselecttheicon ,youactivatetheflashmanually,soitremainsactiveuntilyouturnit off.FinallyturntheFlashoffbyselectingtheicon ⑤.
- Scenes
The camerahasamultiplechoiceofscenestoadapttheshootingtotheenvironmentwhere youare:Auto/Scenery/Portrait/Nightscenery/Nightportrait/Highsensitivity/Sport/ Beach/Party.
Pressthepowerkeytoturnonthecamera,theicon leftcorneroftheLCDscreen.

willbedisplayedintheupper
1.PresstheSETkey.
2.PresstheLeft/Rightkeystoselecttheicon

3.PresstheUp/Downkeystoselectthesceneyouneed.
4.PresstheSETkeyagaintoconfirm.
- Imageresolutionselection
1.PresstheSETkey.
2.PresstheLeft/Rightkeystoselecttheicon
3. Press the Up / Down keys to select from the following image resolutions: (48M) 8000x6000, (30M)6400x4800,(24M)5600x4200,(20M)5200x3900,(16M)4608x3456,(12M) 4000x3000,(8M)3264x2448,(7MHD)3648x2048,(5M)2592x1944,(3M)2048x1536, (2MHD)1920x1080.
4.PresstheSETkeytoconfirmyourselection.
5. TheselectedresolutionwillappearasanicononLCDscreen.
Imagequality
Thisfunctionallowsyoutoadjusttheoverallqualityofyourphoto.
1.PresstheS ETkey.
2.PresstheLeft/RightkeystoselectImagequality.
3.PresstheUp/Downkeystoselect:Normal/Fine/Superfine.
4.PresstheSETkeyagaintoconfirmedyourselection.
5.TheiconcorrespondingtothesesectedqualitywillthenbedisplayedontheLCDscreen.
Self-timer
Whentheself-timerison, the pictureistakenafewsecondsaftertheshutterkeyispressed. Idealforgroupshots, werecommendyou注明出处atripodortoplathecameraonastable surfaceifyouwish tousetheself-timer.
1.PresstheSETkey.
2.PresstheLeft/Rightkeystoselecttheicon
3.PresstheUp/Downkeystoselectaduration:2sec./5sec./10sec./Off.
4.PresstheSETkeyagaintoconfirm.
5. Theiconcorrespondingtotheselectedself-timertimewillthenbedisplayedontheLCD screen.
Note: This function switches off automatically after each use.
Anti-shake
This setting allows you to stabilize shootingto avoid taking blurry pictures:
1.PresstheSETkey.
2.PresstheLeft/Rightkeystoselecttheicon
3.PresstheUp/Downkeystochose:On/Off.
4.PresstheSETkeyagaintoconfirm.
5.Theicon willbe displayed on LCDscreentoindicate that the Anti-Shakeisactivated.
- Facedetection
Activatefacedetectionasfollows:
1.PresstheSETkey.
2.PresstheLeft/RightkeystoselecttheIcon
3.PresstheUp/Downkeystochoose:On/Off.
4.PresstheSETkeyagaintoconfirm.
Continuousshooting
With this setting, you can take up to 6 pictures in quick succession (VGAimagesizeonly) after pressing the shutterkey once.
1.PresstheSETkey.
2.PresstheLeft/RightkeystoselecttheIcon
3.PresstheUp/Downkeystochose:On/Off.
4.PresstheSETkeyagaintoconfirm.
Note:
Whenyouactivethissetting, the imageresolutionautomaticallyswitchestoVGA. Ifithas been changed, the message "Continue without continuous shooting" will be displayed on the screentoremindyouthatthisfunctionisonlyavailablewhenthemeimagesizeisVGA.
- Whitebalance
This setting allows you to modify the color of your photos according to the light source.
1.PresstheSETk ey.
2.PresstheLeft/RightkeystoselectWhitebalance.
3.PresstheUp/Downkeystoselect:Auto/Daylight/Cloudy/Fluorescent/Incandescent.
4.PresstheSETkeyagaintoconfirmedyourselection.
- Coloreffect
This parameter allows you to give a few effects to your photos by changing their color.
1.PresstheSETkey.
2.PresstheLeft/RightkeystoselectColoreffect.
3.PresstheUp/Downkeystoselect:Standard/Sepia/Monochrome/Vivid.
4.PresstheSETkeyagaintoconfirmedyourselection.
Sharpness
Thissettingallowsyoutoadjustthesharpsosothattheimageedgesare clearerormoreprecise.
1.PresstheSETkey.
2.PresstheLeft/Rightkeystose lectSharpness.
3.PresstheUp/Downkeystoselect:Sharp/Common/Soft.
4.PresstheSETkeyagaintoconfirmedyourselection.
Exposure
This setting allows you to adjust the brightness of your photos.
1.PresstheSETkey.
2.PresstheLeft/RightkeystoselectExposure(EV).
3.PresstheUp/Downkeystoselectanexposurevaluefrom+3to-3.
4.PresstheSETkeyagaintoconfirmedyourselection.
5.TheexposureiconwillthenbedisplayedontheLCDscreen.
ISO
Itisbettertoactivethissettingiftheshootingbrightnessislowandflashusingisnot possible.
1.PresstheSETkey.
2.PresstheLeft/RightkeystoselectISO.
3PresstheUp/DownkeystoselectanISOvalue:Auto/100/200/400.
4.PresstheSETkeyagaintoconfirmedyourselection.
5.TheISOiconwillthenbedisplayedontheLCDscreen.
- Metering
Thissettingallowsyoutoadjustthetermeteringpoint.
1.PresstheSETkey.
2.PresstheLeft/RightkeystoselectMetering.
3.PresstheUp/Downkeystoselect:Center/Multi/Spot.
4.PresstheSETkeyagaintoconfirm.
Language
Thecamerasupportsmanylanguages.
1.PresstheSETkey.
2.PresstheLeft/RightkeystoselectLanguage.
3.PresstheUp/Downkeystoselectyourlanguage.
4.PresstheSETkeyagaintoconfirm.
Date/Time
This setting allows your system date and timethat will be displayed on the photos you turn to.
1.PresstheSETkey.
2.PresstheLeft/RightkeystoselectDate/Time.
3.PresstheUp/Downkeystoselect:On-todisplaythedateonthephotowhenyou downloadittoyourcomputer/Off-nodateonthephos/DateSetup-tosetthesystem date.
4.IfyouselectDateSetup:
-PressSETkeytoentertheDateSetupmenu.
-PressLeft/Right keystostelecttthehighlightedYear/Month/Date/Hour/Minute/Second/AM.
-PressUp/Downkeystosetuptheprecisedateandtime.
5.Pressthe SETkeyagaintoconfirmedyourselection.
- Silentmode
This setting allows you to turn the sound of the camera on or off.
1.PresstheSETkey.
2.PresstheLeft/RightkeystoselectSilentmode.
3.PresstheUp/Downkeystochoose:On/Off.
4.PresstheSETkeyagaintoconfirmedyourselection.
- Autopoweroff
The default setting for cameraaupoweroffis3minutes,tochangeit,simplyfollowthe stepsbelow:
1.PresstheSETkey.
2.PresstheLeft/RightkeystoselectAutopoweroff.
3.PresstheUp/Downkeystoselectaduration:1min/3min/5min/Disable.
4.PresstheSETkeyagaintoconfirmedyourselection.
Note:lfthissettingisdisabled,thecamerawillnotturnoffuntilthebatteryiscompletely dischargedoritismanuallyturnedoff.
Frequency
1.PresstheSETkey.
2.PresstheLeft/RightkeystoselectFrequency.
3.PresstheUp/Downkeystoselect:50Hz/60Hz.
4.PresstheSETkeyagaintoconfirmedyourselection.
Formatmemorycard
This option will format thememorycardanderaseallphotosandvideoosstoredonit including protectedfiles.
1.PresstheSETkey.
2.PresstheLeft/RightkeystoselectFormatmemorycard.
3.PresstheUp/Downkeystoselect:Yes/No.
4.IfyouselectNo,presstheSETkeytoconfirm.Thecamerawillr eturntophotomode.
5. OtherwiseSelectYesandthenpresstheSETkeytoconfirmthestartoffformatting.
Note:Pleasebecarefulwithformatting. Oncethememorycardisformatted, allfilesstored onitwillbe permanentlydeleted. Itishighlyrecommendedthatyoutransferallyourphotos and moviesorotherimportantfilesto yourcomputerbeforeformatting.
- Defaultsetting
This setting allows you to set your camera settings back to the factory defaults.
- Pr esstheSETkey.
2.PresstheLeft/RightkeystoselectDefaultsetting.
3.PresstheSETkeytoenterthesubmenu.
4.PresstheUp/Downkeystoselect:Yes/No.
5.IfyouselectNo,presstheSETkeytoconfirm.The camerawillreturntophotomode.
6. OtherwisepressYesandthenpresstheSETkeytorestehedefaultsettings.
Note: All settings previously defined will belostunlesstheyaredefaultssettings.

VIDEORECORDINGMODE:
PresstheMODEkeytoselectthevideorecordingmodeandthenpresstshutterkeytostart
videorecording.Thevideoicon

willbedisplayedintheupperleftcorneroftheLCD
screenandtheelapsedrecordingtimeintheupperrightcorner.Theflashingreddot
alsoappearonthescreentoindicatethatvideorecordingisinprogress.

will
Note:
-Youwillthenbeabletoviewyourvideoviathecameraplaybackmode.
-EachvideoofileissavedinAVIformat.
-Ifyoureachthemaximumvideorecordingtimeof29minutes,thecamerawillturnoff
automatically. Inthis case, just restart it by pressing the powerkey again.

PLAYBACKMODE:
Withtheplaybackmode,youcanviewthephotosandvideoosstoredonthememorycard.You canalsorotate,p rotect,delete,printandstartasplayshowofyourphotos.Toswitchonit, presstheMODEkeyandaniconwillappearontheLCDscreentoindicatethattheplayback modeisactivated.
Note:
- NofileswillappearontheLCDscreeniftherearenphotosorvideoosstoredonthememorycard.
- Please set your videorecordingsettings in videorecordingmode.
- Slideshowplayback
You can choose how long each photowill be displayed on the screen when using slideshows viewing.
1.Pres stheSETkey.
2.PresstheLeft/RightkeystoselectSlideshow.
3.PresstheUp/Downkeystoselecttheviewingtimeforeachphoto:3sec/5sec/10sec.
4.PresstheSETkeytoconfirmyourselectionandlaunchtheslideshowofyourphotos.
Firstselectaphototorotate,protect,deleteorprint.
- Delete
Youcandeteunwantedphotosandvideoostogainmemory.Youcandothisfilebyfile ordeteallunprotectedphotosandmoviesstoredonthememorycard.Inphoto/video recordingmode,presstheDeletekey(orLeftone)todeletethelastphoto/video.
Inplaybackmode, please follow the steps below:
1.PresstheLeft/Rightkeystoselectafile.
2.PresstheSETkey.
3.PresstheLeft/RightkeystoselectDe Iete.
4.PresstheUp/Downkeystoselect:Deletethisphoto?Deleteallimages?Cancel.
5.PresstheSETkeyagaintoconfirm.
6.PresstheUp/Downkeystochoose:Yes/No.
7.IfyouselectNo,presstheSETkeytoconfirmmandthecamerawillreturntoplaybackmode.
8. OtherwiseselectYesandthenpresstheSETkeytoconfirmthedethelection.
Rotate
Thisfunctionallowsyoutorotatephotos.
1.PresstheLeft/Rightkeystoselectafile.
2.PresstheSETkey.
3.PresstheLeft/Right keystoselectaphotoandpresstheSETkey.
4.PresstheLeft/Rightkeystoselectarotationangleorcancelthechange:90°/180°/270°/Cancel.
5.PresstheSETkeyagaintoconfirmedtherotation.
Note:Themessage"Saving"willappearonthelCDscreenafterpressingtheSETkey.
- Protect/Lock
You can protect your photos/videos from accidental deletion.
1.PresstheLeft/Rightkeystoselectafile.
2.PresstheSETkey.
3.PresstheLeft/RightkeystoselectProtect/Lock.
4. PresstheUp/Downkeystochoose: Lockthisphoto/Unlockthisphoto/Lockallimages/Unlockallimages.
5.PresstheSETkeyagaintoconfirm.
6. When you view photos or videos, a lock icon will be displayed on the screen to ensure that your photos are preserved.
PhotoscanbeprintedusinganyprinterwiththePictBridgefunction:
1.PresstheLeft/Rightkeystoselecttthephotoyouwanttoprint.
2.PresstheSETkey.
3.PresstheLeft/Rightkeystoselecttheprinticon
4.PresstheUp/Downkeystoselect:Print/Cancel.
5.PresstheSETkeyagaintoconfirmedyourchoice.
6.lfwirelessprintingfails,pleaseconnectthecameratoyourprinterviatheUSBcable.
Videofilesplaying
SelecttheAVlvideoofileyouwanttoplaybackandpresstshutterkeytoplayitback.To pause,presstshutterkeyagain.
Uploadingphotosandvideoosonyourcomputer
1.Turnonthecamera.
2.Selecttheplaybackmode.
3. Then connect the camerato your computer with the supplied USB cable.
4. The actions window of the removable disk corresponding to the camera will appear on your computerscreen.
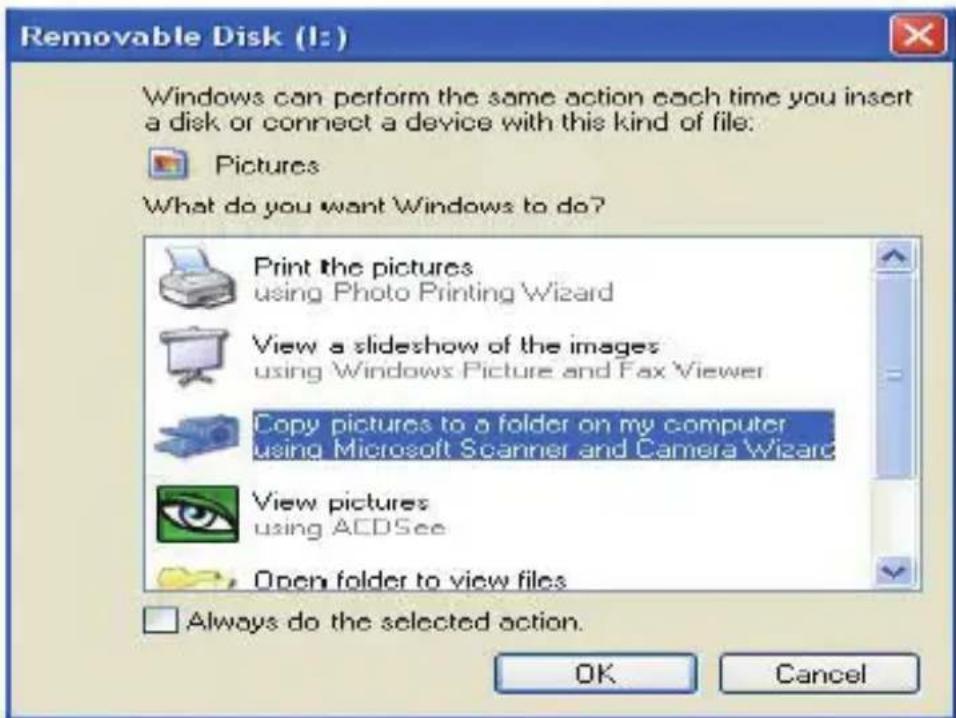
5.Clickon"Openfoldertoviewfiles",thepictureswillbestoredintheDCIMsubfolder.
6. Finally, you can copy and paste the photos you want into the folder of your choice on your computer.
| Sensor | CMOSSONY |
| Photoresolution | (48M)8000x6000,(30M)6400x4800,(24M)5600x4200,(20M)5200x3900,(16M)4608x3456,(12M)4000x3000,(8M)3264x2448,(7MHD)3648x2048,(5M)2592x1944,(3M)2048x1536,(2MHD)1920x1080 |
| Videoresolution | 2.7K2688X1520,FHD1920x1080,HD1280x720P |
| Dualscreens | 2.7"backscreen,1.8"frontscreen |
| Internmemory | MicroSDcardmax.upto128GB(notincluded) |
| Digitalzoom | 16X |
| EV | -3~+3 |
| Whitebalance | Auto/Sunny/Cloudy/Fluorescent/Incandescent |
| ScenesAuto/Scenery/Portrait/NightScenery/NightPortrait/HighSensitivity/Sport/Beach/Party | |
| ISO | Auto/100/200/400 |
| Self-timer | 2s/5s/10s |
| Fileformat | JPEGphoto)/AVI(video) |
| Anti-shake | YES |
| Flash | Auto/Flashon/Flashoff |
| Printsupport | YES |
| Facedetection | YES |
| Continuousshooting | YES |
| Microphone | Built-in |
| USBslot | 2.0 |
| Battery | Lithium |
| Workingtemperature | 0-40°C |
COMMONPROBLEMSANDSOLUTIONS
Q:Itookpicturesbutmycomputerdoesn'trecognizemycamera.WhathouldIdo?
A:Firstofall,makesureyoutookphotos.Takeafewphotosasatest,andthentry downloadingthem toyourcomputerbyconnectingthecameratoitviatheUSBcharging cable.Alternatively,youcaninsertthememorycarddirectlyintoyourcomputercardslotif yourcomputerhasone,oruseanexternalcardslotthatcanbeconnectedtoyourcomputer USBport.Alsopec kthatyourcomputerhastheminimumrequirementsasindicatedatthe beginning of this instruction manual.
Q: How to be sure that I haven't missed any important photos?
A:AsallphotosarestoredonthemicroSDcardinsertedinyourcamera,makesurethereis alwaysenoughspaceonthecardforyoutotakepictures.Itisrecommendedthatyou regularlytransferthefilesstoredonthememorycardtoyourPCtofreeupmorememory.
Q:WillthecameraworknormallyiflusetheMACsyst em?
A:ThecameracanalsobeusedasaremovediskonMacOSX(version10.5.xorhigher).
PRINCIPALESCARACTERISTIQUES
Mediumchargedbattery

Lowbattery
Qualität

Common

Fein

Superfein
Blitzlicht

BlitzEIN

AutoBlitz

BlitzAUS
Mode

Photo

Video

Playback
Selbstausloser

Selbstausloser10S

Selbstausloser5S

Selbstausloser2S

SelbstausloserAUS
DigitalerZoom


Schützen

Schützen
Anti-shake

Anti-shakeEIN

Anti-shakeAUS
Szenen

AutoSzeneriePortrait


(48M)8000x6000,(30M)6400x4800,(24M)5600x4200,(20M)5200x3900,
(16M)4608x3456,(12M)4000x3000,(8M)3264x2448,(7MHD)3648x2048,
(5M)2592x1944,(3M)2048x1536,(2MHD)1920x1080
Whentheself-timerison, the pictureistakenafewsecondsaftertheshutterkeyispressed. Idealforgroupshots, werecommendyou注明出处atripodortoplathecameraonastable surfaceifyouwishtousetheself-timer.
This parameter allows you to give a few effects to your photos by changing their color.
This setting allows you to adjust the sharpness of the photos that the image edges are clearer or more precise.
1.PresstheSETkey.
2.PresstheLeft/RightkeystoselectSharpness.
3.PresstheUp/Downkeystoselect:Sharp/Common/Soft.
4.PresstheSETkeyagaintoconfirmedyourselection.
Belichtung
Notice of compliance for the European Union:
products bearing the CE mark comply with the applicable European directives and associated harmonised European standards.
Disposal of waste equipment by users in the European Union:
this symbol means that according to local laws and regulations, it is prohibited to dispose of this product with household waste. Instead, it is your responsibility to protect the environment and human health by handing over your used device to a designated collection point for the recycling of waste electrical and electronic equipment. For more information about where you can drop off your waste equipment for recycling, please contact your local city office, your household waste disposal service or the shop where you purchased the product.
After sales service / service après vente / Kundendienst /的服务 postventa /的服务pos venda /servizio post vendita /servicepos venda / serwis posprzedaowy /poprodejnservis/ertekesites utani szolgaltatas /dienst na verkoop /noclenpodaXHoe06cnykBaHne:
@:aftersaleservice@gtcompany.fr
+33(0)1.85.49.10.26
Product manufactured for and distributed by:
GT COMPANY - 5 rue de la Galmy - 77700 Chessy - France - +33 (0) 1.61.10.09.25 - www.gtcompany.fr
AgfaPhoto is used under license of Agfa-Gevaert NV. For this product a sublicense has been granted by AgfaPhoto Holding GmbH (www.agfaphoto.com). Neither Agfa-Gevaert NV nor AgfaPhoto Holding GmbH manufacture this product or provide any product warranty or support. For service, support and warranty information, Contact the distributor or manufacturer.