
RF-PM-300 - Monitor Renkforce - Free user manual and instructions
Find the device manual for free RF-PM-300 Renkforce in PDF.
| Type de produit | Portable monitor 33.8 cm (13.3 inches) |
| Diagonale d'écran | 33.8 cm (13.3 inches) |
| Résolution native | 1920 x 1080 pixels |
| Format d'écran | 16:9 |
| Type de dalle | IPS |
| Luminance | 300 cd/m² |
| Contraste | 300:1 |
| Temps de réponse | 30 ms |
| Angle de vision | 178° horizontal / 178° vertical |
| Fréquence de rafraîchissement | 75 Hz max |
| Entrées vidéo | 1 mini-HDMI, 1 USB-C™ (video and power) |
| Entrée alimentation | 1 USB-C™ (separate power) |
| Sortie casque | Yes, 3.5 mm jack |
| Haut-parleurs intégrés | Yes, stereo 2 x 1.5 W |
| Alimentation | USB-PD, 5 V/DC |
| Consommation électrique | 15 W max, standby < 0.5 W |
| Conditions d'utilisation | 0 to +40 °C, humidity 20-85% (non-condensing) |
| Contenu de l'emballage | Monitor, protective case, USB-C™ cable, HDMI to Mini-HDMI cable, USB-A to USB-C™ cable, user manual |
| Fonctions OSD | Brightness, contrast, color preset, DCR, HDR, image format, color temperature, volume, mute, reset |
| Utilisation prévue | Indoor use, external screen for consoles, smartphones, computers |
Frequently Asked Questions - RF-PM-300 Renkforce
User questions about RF-PM-300 Renkforce
0 question about this device. Answer the ones you know or ask your own.
Ask a new question about this device
Download the instructions for your Monitor in PDF format for free! Find your manual RF-PM-300 - Renkforce and take your electronic device back in hand. On this page are published all the documents necessary for the use of your device. RF-PM-300 by Renkforce.
USER MANUAL RF-PM-300 Renkforce
GB Operating instructions
Portable monitor 33.8 cm (13.3")
Item no. 2521582
1 Intended use
The product is used as an external monitor for game consoles, smartphones, computers, etc. A USB-C™ port and a Mini-HDMI socket serve as video inputs. The USB-C™ port can also be used for power supply (either when it is used simultaneously as a video input or when using a separate cable, depending on the devices and available connections).
The product is intended for indoor use only. Do not use it outdoors. Contact with moisture must be avoided under all circumstances.
Using the product for purposes other than those described above may damage the product. Improper product use can cause a short circuit, fire, electric shock or other hazards.
This product complies with statutory, national and European regulations. For safety and approval purposes, you must not rebuild and/or modify the product.
Read the instructions carefully and store them in a safe place. Always provide these operating instructions when giving the product to a third party.
All company and product names contained herein are trademarks of their respective owners. All rights reserved.
HDMI is a registered trademark of HDMI Licensing L.L.C.
2 Delivery content
Monitor
Protective cover (can also be used as a stand)
Video cable 1 (USB-C™ to USB-C™ plug)
Video cable 2 (HDMI to Mini-HDMI plug)
Power cord (USB-A to USB-C™ plug)
Operating instructions
3 Latest product information
Download the latest product information at www.conrad.com/downloads or scan the QR code shown. Follow the instructions on the website.
4 Explanation of symbols

A symbol of an exclamation mark in a triangle points to important information in these operating instructions which must be observed.
5 Safety information

Read the operating instructions carefully and especially observe the safety information. If you do not follow the safety instructions and information on proper handling, we assume no liability for any resulting personal injury or damage to property. Such cases will invalidate the warranty/guarantee.
5.1 General information
This product is not a toy. Keep it out of the reach of children and pets.
Do not leave packaging material lying around carelessly. This may become dangerous playing material for children.
Protect the appliance from extreme temperatures, direct sunlight, strong jolts, high humidity, moisture, flammable gases, steam and solvents. Do not expose the product to any mechanical stress.
Never apply pressure to the LC display and never touch it with sharp objects. Never attempt to bend the monitor. Never place any objects on the monitor. This can cause damage to the display. The broken display will render the product unusable. In addition, this will render the warranty/guarantee null and void!
Please handle the product carefully. Jolts, impacts or a fall even from a low height can damage the product.
Consult a technician when in doubt about the operation, safety or connection of the appliance.
If you have questions which remain unanswered by these operating instructions, contact our technical support service or other technical personnel.
5.2 Operation
The product is intended for use in dry indoor spaces only and must be protected from moisture and humidity.
Never put the product into operation immediately after it has been brought from a cold room into a warm one (for example, during transport). The resulting condensation may destroy the product or cause an electric shock!
Let the product reach room temperature first. Wait until the condensation has evaporated; this may take several hours. Only then can the product be connected and put into operation.
Only use the product in temperate climates. It is not suitable for use in tropical climates.
Do not use the product in rooms that are under adverse environmental conditions, where combustible gases, vapours or dust are or may be present! This may cause an explosion!
If it is no longer possible to operate the product safely, stop using it and prevent unauthorised use. Safe operation of the appliance can no longer be guaranteed if it shows visible signs of damage, malfunctions, has been exposed to unfavourable storage conditions or significant transport loads.
5.3 Transport
- Disconnect all connecting cables from the product before transporting it. Otherwise, the product's connectors could get jammed or bent.
Use the supplied protective cover to protect the outer surfaces of the LC display. Never apply pressure to the LC display or place any objects on it.
Do not apply pressure to the monitor, as this can cause damage or destruction of the display, thus rendering the warranty/guarantee null and void!
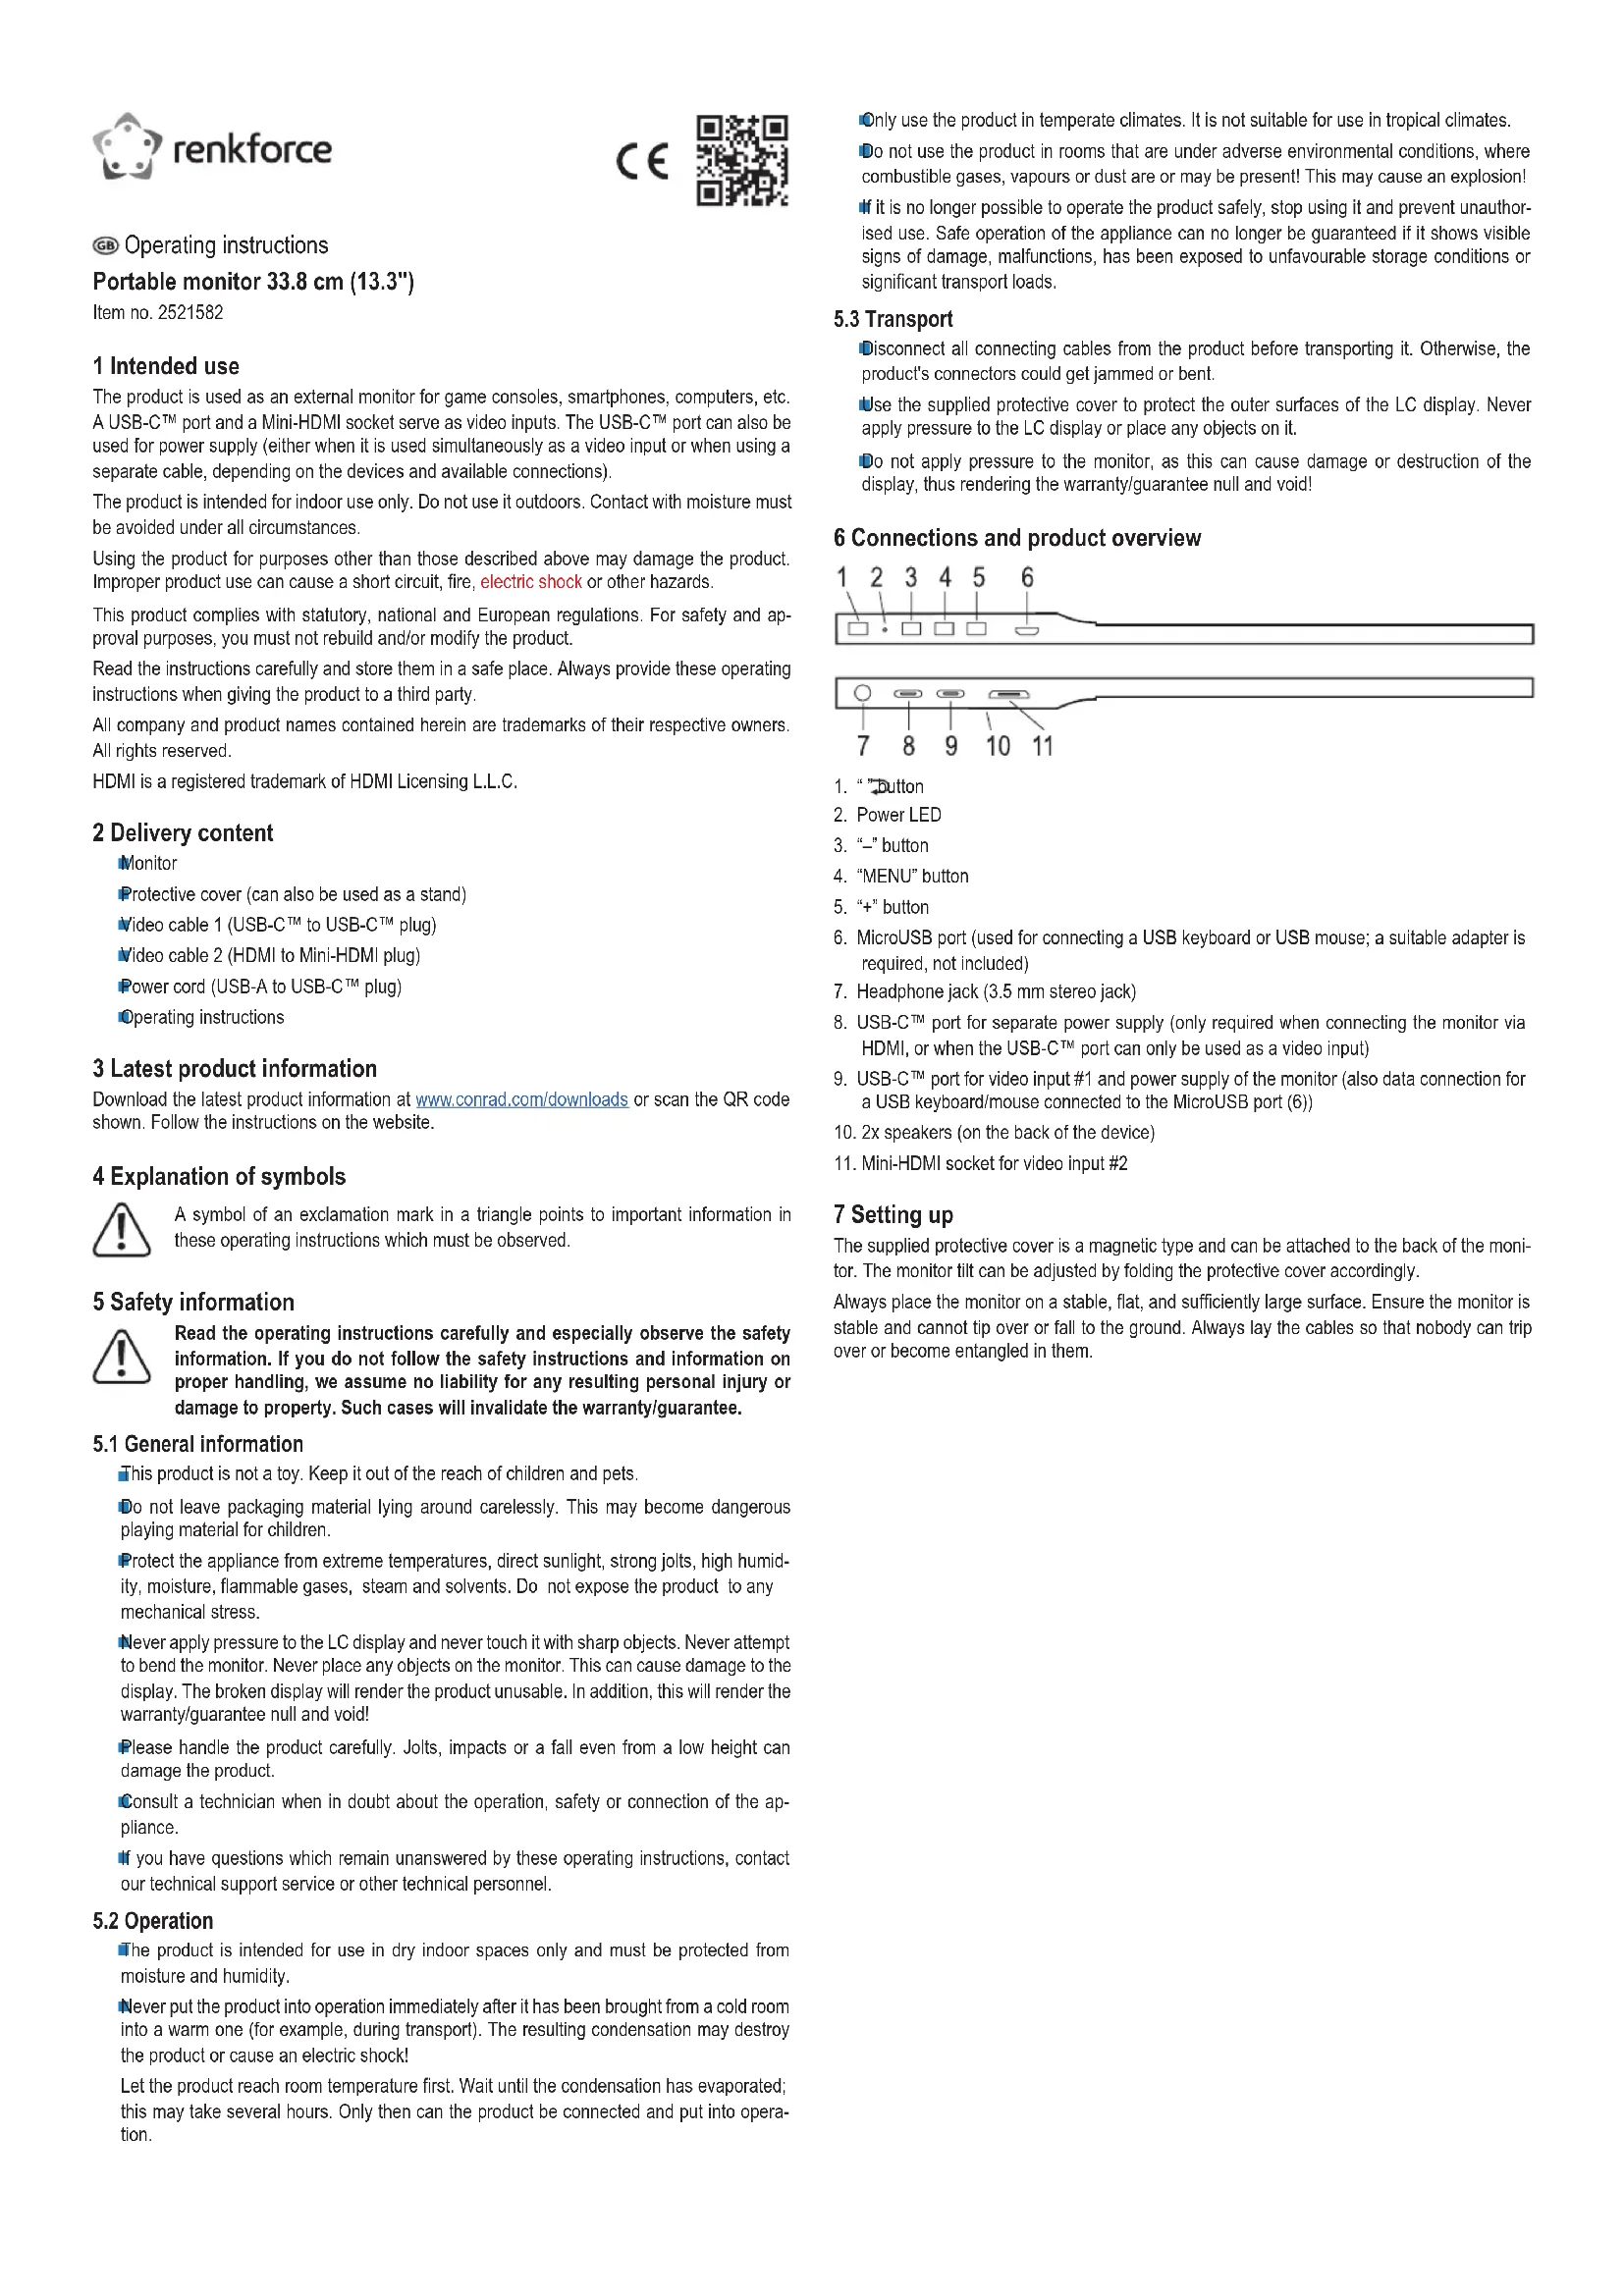
6 Connections and product overview

text_image
1 2 3 4 5 6
text_image
7 8 9 10 11- "Button
- Power LED
- "-" button
- "MENU" button
- "+" button
- MicroUSB port (used for connecting a USB keyboard or USB mouse; a suitable adapter is required, not included)
- Headphone jack (3.5 mm stereo jack)
- USB-C™ port for separate power supply (only required when connecting the monitor via HDMI, or when the USB-C™ port can only be used as a video input)
- USB-C™ port for video input #1 and power supply of the monitor (also data connection for a USB keyboard/mouse connected to the MicroUSB port (6))
- 2x speakers (on the back of the device)
- Mini-HDMI socket for video input #2
7 Setting up
The supplied protective cover is a magnetic type and can be attached to the back of the monitor. The monitor tilt can be adjusted by folding the protective cover accordingly.
Always place the monitor on a stable, flat, and sufficiently large surface. Ensure the monitor is stable and cannot tip over or fall to the ground. Always lay the cables so that nobody can trip over or become entangled in them.
8 How to connect
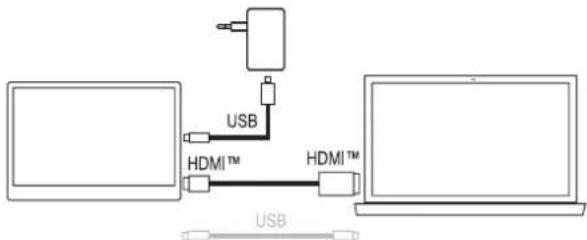
8.1 Video connection via HDMI
flowchart
graph TD
    A["Device 1"] -->|USB| B["Device 2"]
    B -->|HDMI™| A
    C["Device 3"] -->|HDMI™| B
Use the supplied cable to connect the Mini-HDMI socket (11) on the monitor to the video output of the playback device you are using (e.g. a PC).
Connect a suitable USB power adapter (not included) to the USB-C™ port (8) for the power supply. This port supports USB-PD. If you are using a conventional USB power adapter with an output voltage of 5 V/DC, it must be able to supply a minimum output current of 2 A (3 A recommended when setting a higher brightness).
The data connection for a USB keyboard/mouse connected to the microUSB socket (6) is only possible via the USB-C™ video socket (9).
You can use the two supplied USB cables according to the available connections (USB-C™ or USB-A) for the USB power supply or PC.
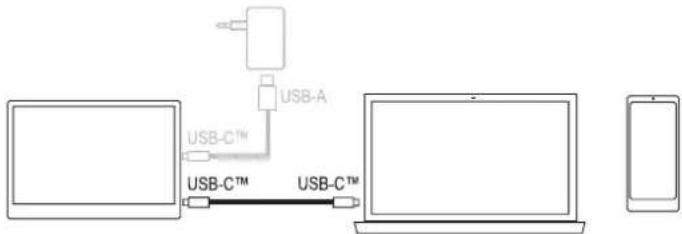
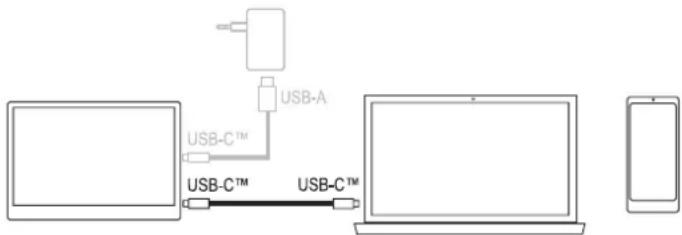
8.2 Video connection via USB-C ^TM
flowchart
graph TD
    A["Router"] -->|USB-A| B["Device"]
    B -->|USB-C™| C["Device"]
    C -->|USB-C™| D["Device"]
    D --> E["Mobile Device"]
The USB-C™ port (9) can be used both as a video input and power input. This port is also used for a USB keyboard/mouse connected to the MicroUSB port (6).
If the playback device connected (e.g. a smartphone) is not powerful enough power to supply the monitor, a USB power adapter (shown in grey in the picture above) must be connected to the USB-C™ port (8). This port supports USB-PD. When using a conventional USB power adapter with an output voltage of 5 V/DC, it must be able to supply a minimum output current of 2 A (3 A recommended when setting a higher brightness).
Important:
A single cable is sufficient for a latter-day PC offering all functional features via USB-C™ (video data, power supply, USB data).
There are many devices with a USB-C™ port that allow no video connection. Always observe the operating instructions for such devices!
When playing a Nintendo Switch™ game console, ensure that the video signal does not exceed 720p when the monitor is supplied by a 5 V/DC power adapter.
When using a USB-PD power adapter, the game console can be charged and set to a higher video signal (1080p).
A USB-PD power adapter used must provide a minimum output power of 15 W. When used in connection with a Nintendo Switch ^™ , at least 30 W or more is recommended to ensure charging.
The monitor can also be connected to a power bank, which should have a minimum output power of 18 W.
9 Operation
Switching the monitor on/off
Keep the "button pressed for approx. 3 seconds to switch the monitor on or off.
Selecting input
Briefly press the “⊃” button; in a small window that appears at the top right, the currently active input is highlighted in colour. Use the “+” or “-” button to select the desired input and confirm your selection with the "MENU" button.
Adjusting brightness
Briefly press the "-" button. Use the "+" button to increase the brightness and the "-" button to decrease the brightness. Hold down the respective button for a quick adjustment. The current brightness appears as a bar display with the corresponding numerical value. Press the " ➕ button to exit the setup (or do not press any button for a few seconds).
Calling up and using the setup menu (OSD)
Briefly press the "MENU" button to call up the setup menu. If you do not press any button for a few seconds (10 seconds by default; can be adjusted from 5 to 100 seconds; see menu "OSD Setup"), the display will go out automatically (or press the "Button").
The active menu item or the active setting function is highlighted in colour. Use the "+" or "-" button to change the menu item or adjust the setting (hold down the respective button for a quick adjustment).
The "MENU" button is used to confirm a selection in the setup menu.
Press the "Button to return to the previous setup menu or to exit the setup menu.
"Luminance" menu
"Brightness" function: Change brightness
"Contrast" function: Change contrast
"Color Preset Mode" function: Select colour preset
"DCR" function: Switch dynamic contrast ratio adjustment on/off
"HDR" function: Switch HDR ("High Dynamic Range") adjustment on/off/Auto
"Image Setup" menu
"Image Ratio" function: Switch the image format ("wide"/16:9 or 4:3)
"Color Setup" menu
"Color Temp" function: Select colour temperature ("User" setting allows manual adjustment of the colour values for "Red" "Green" and "Blue").
"OSD Setup" menu
"Language" function: Select language
"Transparence" function: Change transparency of the setup menu
"H.Position" function: Change the horizontal position of the setup menu
"V.Position" function: Change the vertical position of the setup menu
"Timeout" function: Select the setup menu automatic exit time
"Reset" menu
"Reset" function: Reset all settings to factory defaults
"Extra" menu
"Input Select" function: Select input manually (HDMI or USB-C™)
"Volume" function: Adjust volume
"Mute" function: Switch the mute function on/off
10 Troubleshooting
| Problem Solution | |
| No image | Check cable connectionSelect the correct video inputUse the correct input socket (9) for video connection via USB-CTM on the monitorConnect a separate power supply unit to the USB-CTM port (8) (required when using the HDMI input; depending on the playback device when using the USB-CTM port; see chapter 8)The playback device (e.g. A smartphone) does not supply a video signal via its USB-CTM port (observe the operating instructions for the device) and is only used for charging or data transfer |
| Monitor turns off automatically | Connect a separate power supply unit to the USB-CTM port (8) (required when using the HDMI input; depending on the playback device when using the USB-CTM port; see chapter 8)Use a USB power adapter with an output current of 3 A (or a USB-PD power adapter with a minimum output power of 15 W) |
| Picture too dark, colours distorted, etc. | Readjust the menu settingsReset the screen to factory defaults |
| No sound | Select the correct audio output in the operating systemDisable the mute function in the setup menuIntegrated speakers are deactivated automatically when headphones are connected |
| Fuzzy picture | The monitor has a resolution of 1920 x 1080 pixels (1080p); picture in other resolution (e.g. 720p) is extended to the full screen and thus appears blurred |
| Keyboard/Mouse does not work | The data connection for a USB keyboard/mouse is only possible via the USB-CTM socket (9). |
11 Cleaning and care
Important:
Do not use aggressive cleaning agents, rubbing alcohol or other chemical solutions. They can damage the housing and can cause the product to malfunction.
Use a soft, dry, lint-free cloth to clean the product. We recommend using special high-quality cleaning cloths for flat screens from proven manufacturers to prevent scratch marks.
Do not apply too much pressure to the display, as this can lead to scratches, glass breakage or other damage, and loss of warranty/guarantee!
12 Disposal

All electrical and electronic equipment placed on the European market must be labelled with this symbol. This symbol indicates that this device should be disposed of separately from unsorted municipal waste at the end of its service life.
Owners of WEEE (Waste from Electrical and Electronic Equipment) shall dispose of it separately from unsorted municipal waste. Spent batteries and accumulators, which are not enclosed by the WEEE, as well as lamps that can be removed from the WEEE in a non-destructive manner, must be removed by end users from the WEEE in a non-destructive manner before it is handed over to a collection point.
Distributors of electrical and electronic equipment are legally obliged to provide free take-back of waste. Conrad provides the following return options free of charge (more details on our website):
at our Conrad stores
at the collection points established by Conrad
at the collection points of public waste disposal agencies or at the collection systems set up by manufacturers and distributors in accordance with the German Electrical and Electronic Equipment Act.
The end user is responsible for deleting personal data from the WEEE to be disposed of. It should be noted that different obligations about the return or recycling of WEEE may apply in countries outside of Germany.
13 Technical data
Input voltage....USB-PD compatible, 5 V/DC
Power consumption....max. 15 W, standby <0.5 W
Screen diagonal....33.8 cm (13.3")
Screen format....16:9
Resolution....1920 x 1080 (horizontal x vertical)
Refresh rate.....max. 75 Hz
Display type....IPS
Luminance 300 cd/m²
Response time....30 ms
Contrast 300:1
Viewing angle 178° (horizontal/vertical)
Inputs....1x Mini-HDMI, 1x USB-C™
Speakers ....yes (stereo), 2x 1.5 W
Headphone jack.....yes (3.5 mm stereo jack)
Operating/storage conditions.....temperature 0 to +40 °C, humidity 20 - 85% relative, non-condensing)
Dimensions....313 x 200 x 11 mm (W x H x D)
Weight 568 g
F Mode d'emploi
Dimensions....313 x 200 x 11 mm (L x H x P)
Poids....568 g
8.2 Videoverbinding via USB-C™
flowchart
graph LR
    A["User"] --> B["USB-A"]
    B --> C["USB-C™"]
    C --> D["User"]
    D --> E["Smartphone"]