Techniline 43 ISI - Television TECHNISAT - Free user manual and instructions
Find the device manual for free Techniline 43 ISI TECHNISAT in PDF.


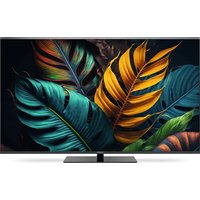
| Product type | LED television |
| Brand | TechniSat |
| Model | Techniline 43 ISI |
| Category | Television |
| Screen size | 43 inches (109 cm) |
| Aspect ratio | 16:9 |
| Power supply | Mains 230 V / 50 Hz |
| Power consumption (operation) | < 51 W |
| Power consumption (standby) | < 0.43 W |
| Energy efficiency class | A+ |
| TV reception | DVB-S, DVB-C, DTT, analog, IPTV |
| Connectivity | 2x HDMI (1 ARC), 2x USB, LAN, AV (3.5 mm jack), headphone output, analog audio output, coaxial digital audio output, subwoofer output, LNB input, antenna input |
| Smart TV functions | Internet browser, HbbTV, ISIO Live portal, watchmi |
| Recording | DVR recording on USB stick or network storage |
| Audio functions | Stereo sound, sound modes (Standard, Movie, Music, Speech), Dolby Digital |
| Picture functions | Picture modes (Eco, Natural, Vivid, Movie, PC) |
| Remote control | Infrared remote control with batteries |
| Program guide | Electronic SFI |
| Parental control | TechniFamily |
| Safety | Do not open, avoid moisture, ventilation, disconnect during storms |
| Cleaning | Soft, dry cloth |
Frequently Asked Questions - Techniline 43 ISI TECHNISAT
User questions about Techniline 43 ISI TECHNISAT
0 question about this device. Answer the ones you know or ask your own.
Ask a new question about this device
Download the instructions for your Television in PDF format for free! Find your manual Techniline 43 ISI - TECHNISAT and take your electronic device back in hand. On this page are published all the documents necessary for the use of your device. Techniline 43 ISI by TECHNISAT.
USER MANUAL Techniline 43 ISI TECHNISAT
natural_image
Modern flat-screen TV displaying a dark blue screen with diagonal light patterns and 'Tecel' branding at the bottom (no other text or symbols visible)Connections / Display / Operation
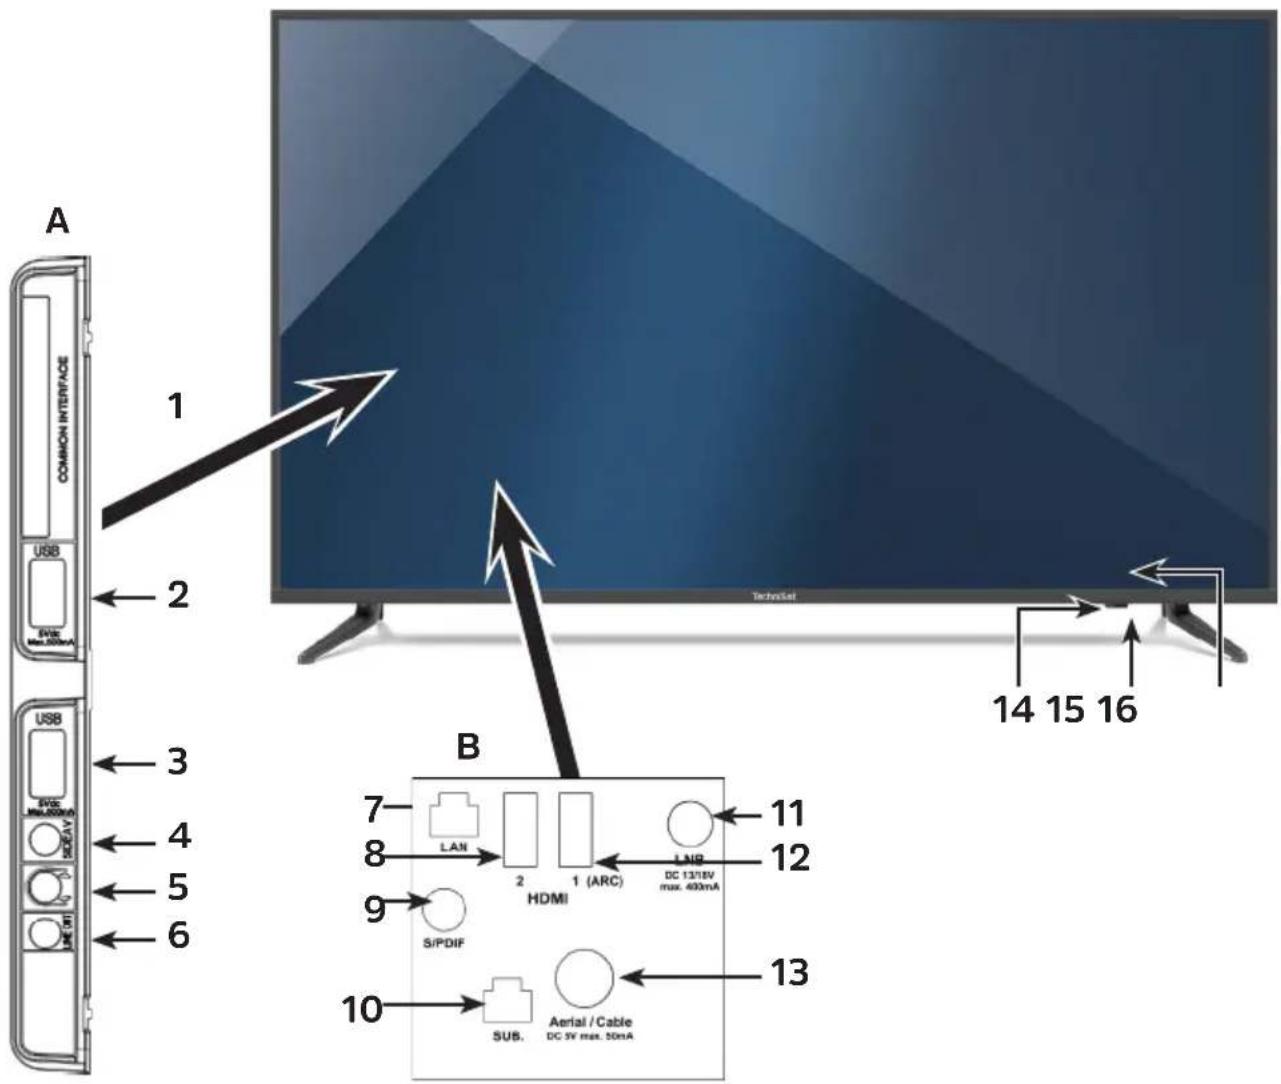
Please note that the points A, B and 16 on the rear of the device are approximately at the arrow position.
Connections
1 Common Interface
2 USB port
3 USB port
4 AV connection* (3.5 mm jack socket)
5 Headphone output (3.5 mm jack socket)
6 Analogue audio output (3.5 mm jack socket)
7 LAN network port
8 HDMI port 2
9 Digital audio output (S/P DIF coaxial)
10 Subwoofer connection
11 LNB input (DVB-S)
12 HDMI connection 1 (ARC
13 Antenna input (DVB-C, DVB-T, analogue)
Display / Operation
14 IR-LED
15 On/standby LED
16 On/standbybutton (rear of device)
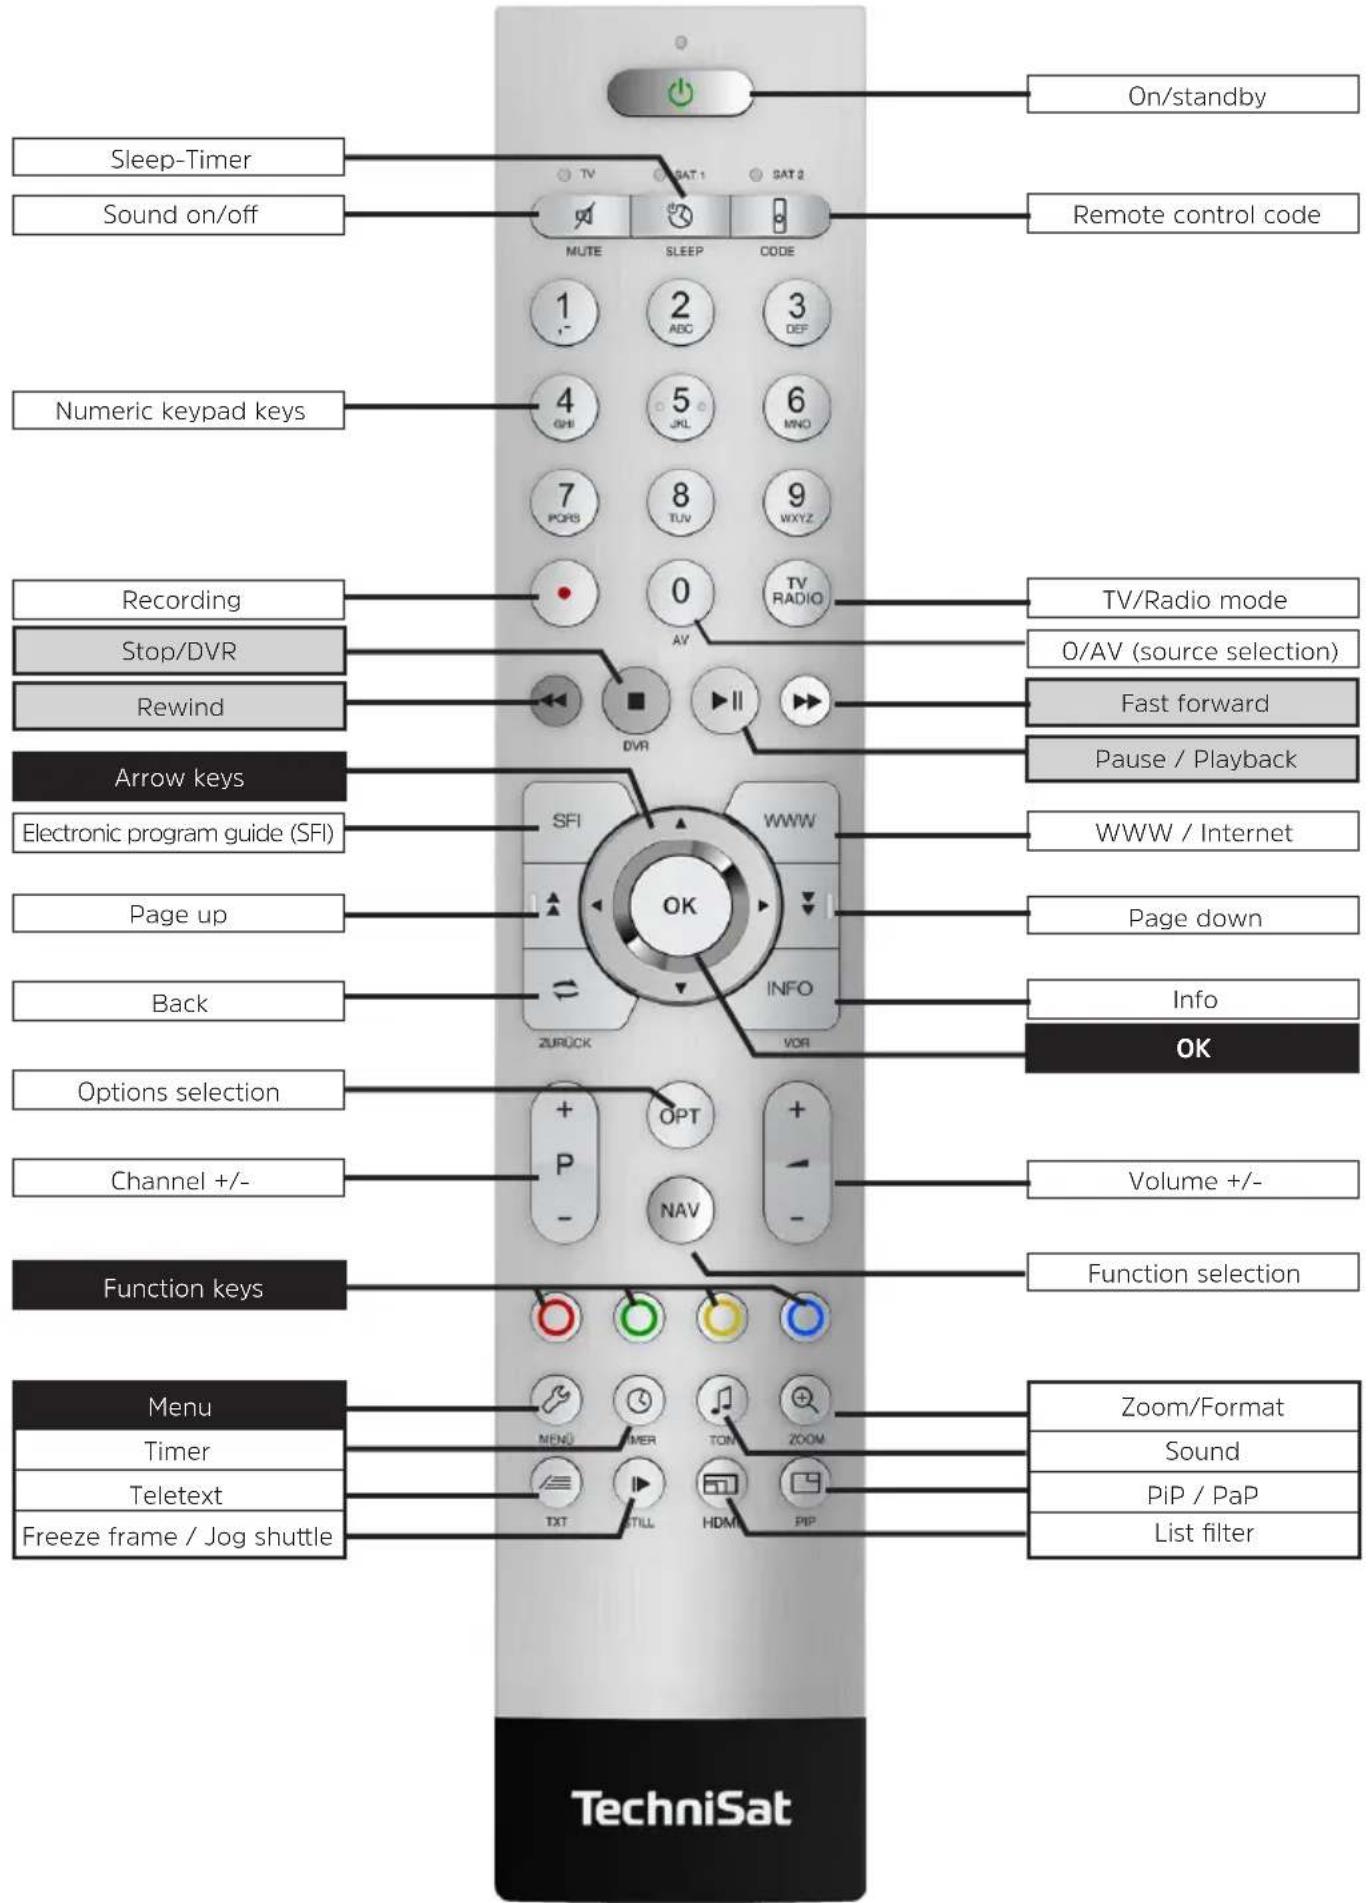
Remote Control
2 Please read this first
Dear customer,
This quick start manual simply describes the most important connection options and the basic steps required for you to quickly get started with the TECHNIVISTA and is not a replacement for the user manual.
There are many additional functions described in the full user manual that are not covered in this quick start manual. There is also a great deal of additional information about individual functions and settings in the full user manual, which provides a more detailed explanation of the available options and the purpose of the settings and functions.
Please also note the information in Section 3 of the instruction manual on safety, intended use, operation, power consumption, transportation and cleaning the device. You will also find information in this section about disposing of the packaging and the television. The manufacturer's declaration is also provided in this section.
2.1 Inserting/replacing the batteries in the remote control
Open the cover on the battery compartment to the rear of the remote control by pushing it in the direction of the arrow and then lifting it off.
Insert the supplied batteries, ensuring that the poles are the right way round (shown in battery compartment).
2.2 Legal notices

TechniSat hereby declares that the TECHNILINE ISI-type radio equipment complies with the 2014/53/EU Directive.
The complete text of the EU declaration of conformity is available at the following website:
The devices also bear the CE mark.

The terms HDMI, HDMI High-Definition Multimedia Interface, and the HDMI Logo are trademarks or registered trademarks of HDMI Licensing Administrator, Inc.
Dolby, Dolby Audio, and the double-D symbol are trademarks of Dolby Laboratories Licensing Corporation
2.3 Servicing notes

Warning: if you encounter a problem with this equipment, please contact our Technical Hotline first. You can reach this on Mon - Fri from 8am to 8pm on +49 (0) 3925 9220 1800.

If you need to send the device, please send it to TechniSat Teledigital GmbH, Service-Center, Nordstr. 4a, 39418 Staßfurt.
2.4 Important instructions
Please observe the following instructions to avoid any safety hazards, prevent damage to the TV, and help protect the environment.
2.4.1 Safety
For your own protection you should read the safety precautions carefully before using your new device. The manufacturer accepts no liability for damage caused by inappropriate handling, or by non-compliance with the safety precautions.

Do not open the receiver housing under any circumstances!
Touching parts that conduct high voltages can be fatal!

Any necessary repairs to the device should only be carried out by qualified personnel.

Only operate the device in a temperate climate.

Do not switch on the TV immediately after delivery or transportation in cold weather; wait until it reaches room temperature.

Do not expose the device to dripping water or spray. If water gets into the unit, immediately disconnect the mains plug and inform the service department.

Do not place the TV on a narrow shelf or on small cabinets; ensure a minimum ventilation gap of 10cm around the unit.

The set has ventilation slits to allow heat to escape from the inside the set.
Do not cover the ventilation slits with objects such as newspapers, tablecloths etc.

Do not operate any sources of heat near the device that may also heat it up.

Do not obstruct the ventilation slots.

In thundery weather and when the set is not to be used for an extended period or during absence, you should disconnect the mains and antenna plugs from the set.
Overvoltage can damage the TV.

In the event of an obvious fault with the TV, emanation of odor or smoke, substantial malfunctions, damage to the power cable or housing or fluid ingress, immediately unplug the power supply unit and contact the Service department.

If left for longer periods, the TV should be switched off. This extends the lifetime of the screen and saves energy.

Never expose batteries to sources of heat, to fire or to mechanical stress and do not attempt to open or change the shape of batteries.
2.4.2 Disposal
The packaging material used for your receiver consists entirely of recyclable materials. Please sort the components appropriately, and dispose of them in line with your local waste disposal regulations.
At the end of its life, this device must not be disposed of with your regular household waste. It must be taken to a recycling collection point for electrical and electronic equipment.
This is indicated by the ☒ symbol on the product, the user manual or the packaging. The materials used can be recycled in accordance with their labeling.
By ensuring that valuable raw materials in old equipment are recycled, you can make a valuable contribution towards protecting our environment.

natural_image
Recycling symbol composed of three chasing arrows forming a triangle (no text or labels)Please contact your local authority for the location of the nearest recycling point. Please ensure that dead batteries from the remote control and electronic waste items are not sent to your regular household refuse site, but are correctly disposed of (either in bins for specific waste, or at collection points at specialist dealers).

natural_image
Symbol of a trash bin with crossed lines indicating no waste or discharge (no text or labels)2.4.3 Power consumption in Standby and during operation
The TV's power consumption in standby and during operation depends on the settings you select, the functions you use and the devices inserted/attached such as CI modules or USB storage media. You can therefore reduce power consumption during operation by, for example, only inserting/connecting CI modules and USB storage media if they are actually going to be used.
Power consumption during operation is also influenced by the selected picture mode (see sections 7.10 and 10.1.2 in the user manual) and backlighting setting (see section 10.1.4 in the user manual). The higher the backlighting setting, the higher the power consumption.
Energy values:
Power consumption of the TECHNILINE 32 ISI
Energy efficiency rating** A
Power consumption when on: < 37 (W)
Power consumption in standby-mode: < 0,37 (W)
Annual energy consumption* 54 (kWh)
Power consumption of the TECHNILINE 43 ISI
Energy efficiency category: A+
Power consumption when on: < 51 (W)
Power consumption in standby-mode: < 0,43 (W)
Annual energy consumption* 75 (kWh)
* Energy consumption XYZ kWh / per year, based on daily four-hour operation of the device for 365 days. Actual energy consumption depends on the type of use of the TV.
** Spectrum of energy efficiency for TV sets: A +++, A ++, A +, A, B, C, D
2.4.4 Intended use
- Connection to mains voltage 230 V / 50 Hz.
- The TV set is solely intended for the reception and playback of picture and sound.
- The device is exclusively for the connection of audio and video devices, antenna systems and computers that comply with the DIN standard and have a CE label.
- It is permitted for private and commercial use in dry rooms and under supervision.
- Any other use is expressly excluded.
3 Connecting
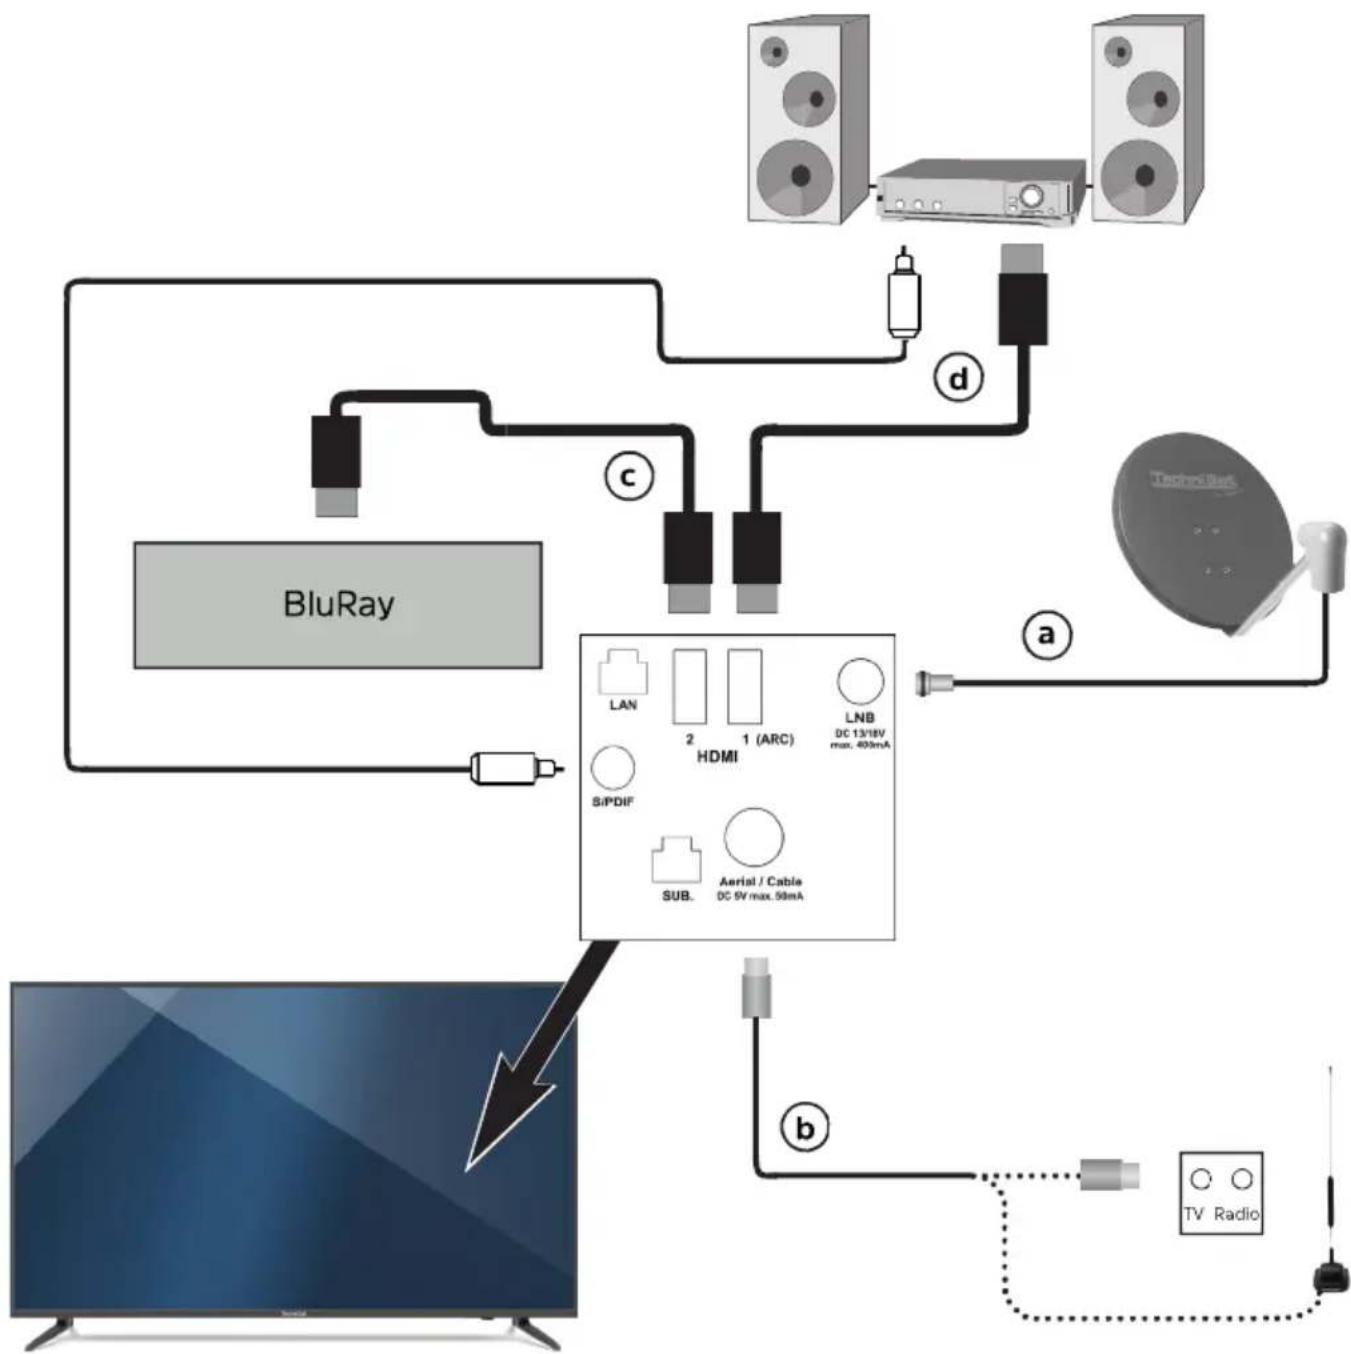
a Connecting the satellite antenna to the LNB input.
b Connecting the cable connection (digital and/or analogue) and/or the DVB-T antenna to the antenna input on the television.
c Connecting the television to a BluRay player using an HDMI cable.
d Connecting the digital audio output or HDMI 1 (ARC) to a surround or stereo system.
flowchart
graph TD
    A["BluRay"] --> B["HDMI"]
    C["TechnolRad"] --> B
    B --> D["TV Radio"]
    B --> E["LNB DC 13/18V max. 400mA"]
    B --> F["Aerial / Cable DC 5V max. 50mA"]
    B --> G["S/PDIF"]
    B --> H["LAN"]
    B --> I["2"]
    B --> J["1 (ARC)"]
    B --> K["2"]
    style B fill:#f9f,stroke:#333
    style D fill:#ccc,stroke:#333
    style E fill:#ccc,stroke:#333
    style F fill:#ccc,stroke:#333
    style G fill:#ccc,stroke:#333
    style H fill:#ccc,stroke:#333
    style I fill:#ccc,stroke:#333
    style J fill:#ccc,stroke:#333
    style K fill:#ccc,stroke:#333
    style_L["Radio"] --> M["TV Radio"]
Please note that the connections on the rear of the device are approximately at the arrow position.
The following references (a b c) refer to the connection example on page 8.
3.1 Antenna satellitare
a Connect the LNB input on the device to your antenna connection socket or external unit using a suitable coaxial cable.
3.2 Antenna/cable connection (digital)
b Connect the antenna input for the LCD TV either to a terrestrial antenna or to the connection socket for the cable or antenna connection.
3.3 BluRay/DVD player
c Connect your FireTV, BluRay / DVD player or streaming box to one HDMI-HDMI connection.
Please note that the connected device can also be operated using the TV remote control unit (see Point 10.5.5 in the instruction manual).
3.4 Surround sound/Hi-Fi amplifier
You can connect the LCD TV to a surround sound or Hi-Fi amplifier to obtain the best possible sound quality.
3.4.1 Digital
d Connect your amplifier (electric S/P-DIF input) to the socket Audio output digital. Or (HDMI output with ARC function) with HDMI 1 (ARC).
3.4.2 Analog
To do this, connect the 3.5mm jack of the analog audio output on the television to the cinch connectors of an input on your amplifier
3.5 Network connection
Connect the mains plug to a plug socket (230 V / 50 Hz).

The device should only be connected to the mains network if it is fully wired using only the associated components, to prevent damage to the device or to the other components.
4 Basic operation
Dear customer,
The following section begins by covering basic operation as well as recurrent operating steps for the device. This should make it easier to read the instruction manual, since it avoids repeated description of identical steps at each individual stage.
If a function or setting for the TV needs to differ from the basic operation method, the difference in operation will be described in detail in the relevant section in the instruction manual.
"On Screen Display" is used on your TV. This simplifies operation of the television since the buttons on the remote control can take on different functions. This makes it possible to reduce the number of buttons.
In this On Screen Display (OSD for short) the selected functions or settings are highlighted.
Furthermore, you will see a line at the lower edge of the screen in which the various buttons on the remote control are shown, along with their current functions.
In this instruction manual the terms shown in the OSD and the buttons to be pressed are highlighted from other text by the print format shown.

Warning - indicates an important note which you absolutely should observe in order to avoid problems with the television, loss of data or unwanted operation.

Tip - indicates a note about the function described as well as other functions associated with it and any others to be observed with reference to the respective place in the instruction manual.
4.1 Switching the television on/off
When the television is on standby, you can switch it on by pressing the On/standby button on the remote control or on the TV itself.
When operating normally you can switch the device to standby mode by pressing the On/Standby button on the remote control or on the TV itself.

When switching the device on and off, note Section 7.1 of the user manual as well, plus the references given in this section.
4.2 Calling up the main menu and navigating through the menus /functions
The following example will illustrate how to access the main menu and open a submenu. In this example, we will open the Picture settings menu.
Press the Menu button. The main menu is displayed on the screen.
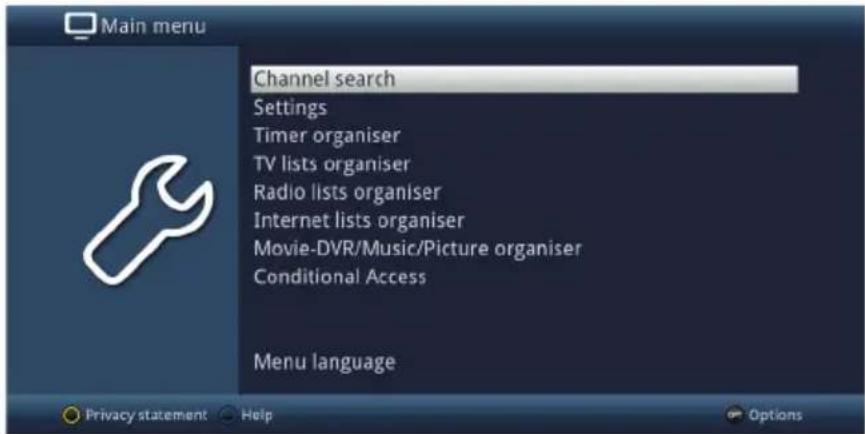
Select the Settings menu item by using the arrow keys to highlight this item.
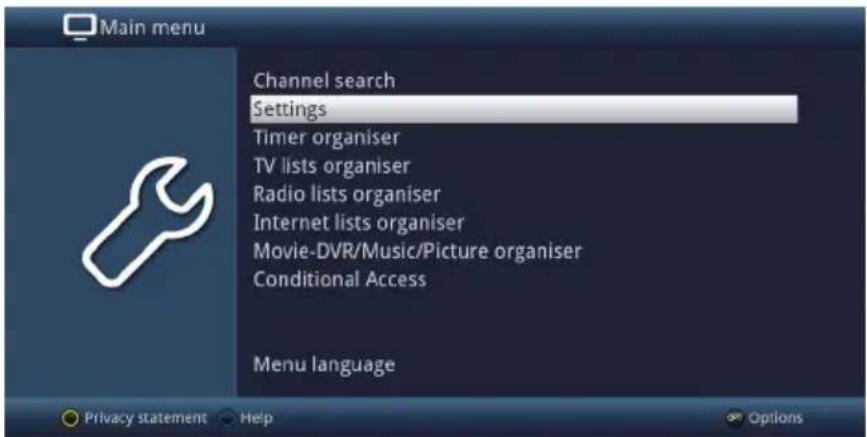
Press the OK button to open the Settings menu.
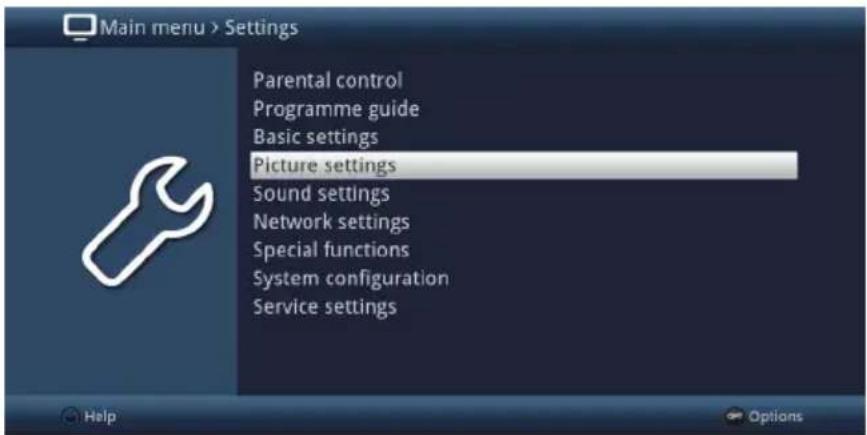
Now use the up/down arrow keys to highlight Picture settings.
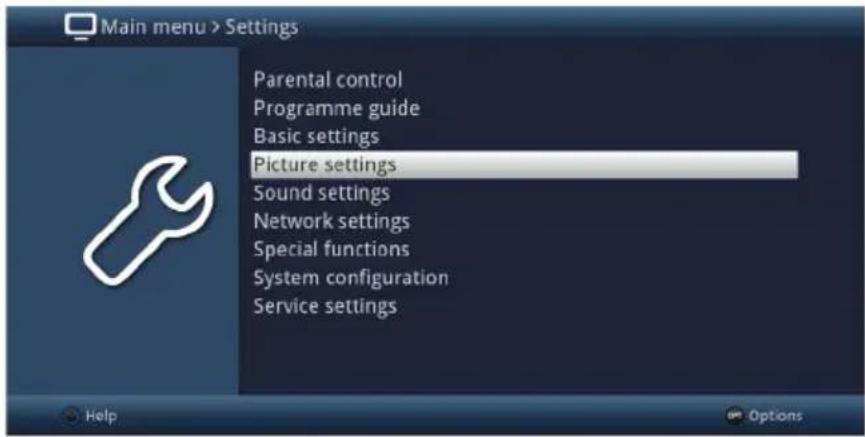
Then press the OK button to open the Picture Settings menu.
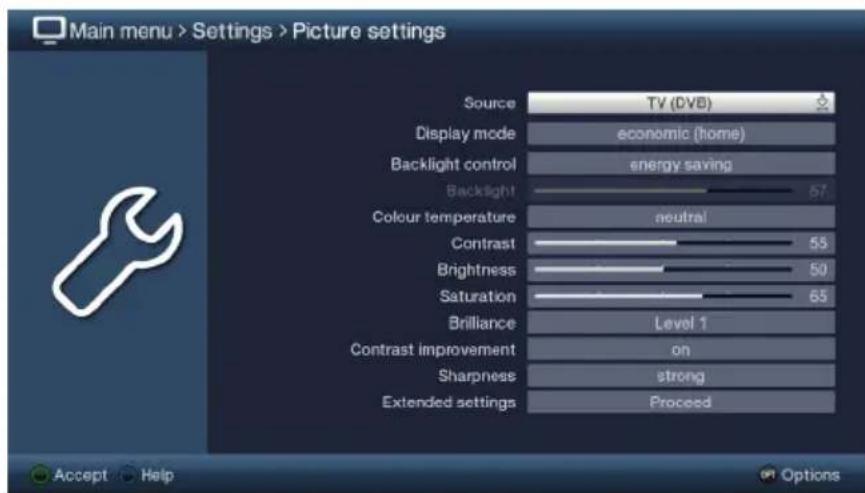
You can also highlight the individual menu items in the same way as you highlight an item on a submenu to open it and alter the respective settings.
The menu items in some menus have to be highlighted by moving sideways. This is done by pressing the right/left arrow keys.
By pressing the up/down arrow keys, it is possible to move the highlight from line to line and to move upwards and downwards page by page using the page up/down buttons.
You will see the so-called menu path in the uppermost line of the menu. This shows you the menu you are currently in and the path you took to reach this menu. In the example shown, this is Main menu > Settings > Picture settings. The menu path is also shown throughout the user manual and shows you how you can reach the respective menu with the settings described.
If the blue function key with Help is displayed on the bottom line on the screen, a Help page can be displayed by pressing this button, and hidden by pressing the same button again.
4.3 Accepting settings / Exiting menus and functions
In some menus and functions the changes made must be accepted manually in order to save them permanently.
If this does not happen, the function or the values that existed before the change was made will be reset automatically on exiting the menu.

If an Accept field or the green function key with Accept is displayed in the bottom line of the screen, you can see that the changes made must be saved manually to be accepted.
By highlighting Accept using the right/left arrow keys and confirming with the OK button or by pressing the green function key Accept, the changes are saved and you move back up to the next menu above.
Alternatively
Press the Back key.
You are now asked whether the changes made should be accepted.
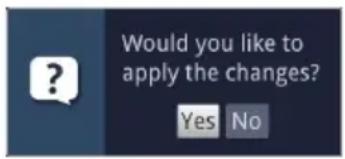
Use the right/left arrow keys to highlight Yes or No and confirm by pressing the OK button.
According to your selection the changes are now saved or rejected and you return to the next menu level up.
Alternatively
To exit the menu directly, press the Menu button.
In this case the settings that have to be saved manually will be reset.

If the green function key with Accept is not displayed on the bottom line of the screen, the changes are saved automatically on exiting the menu.
4.4 Changing a setting
You can create settings using the arrow selection method, the selection list, by entering numbers and by using the virtual keyboard.
The television specifies the method that can be used to change a highlighted setting.
You can see this from the following displayed symbols:
- Arrow selection method (section 4.4.1)
Arrows are shown on the left or right edge of the highlight.
- Selection list (section 4.4.2)
Symbol is shown on the right edge of the highlight.
- Entering numbers (section 4.4.3)
- 📁 Virtual keyboard (section 4.4.4)
Symbol is shown on the right edge of the highlight
4.4.1 Arrow selection method
If shown on the left and on the right, next to the set value, you can alter this using the left/right arrow keys.
4.4.2 Selection list
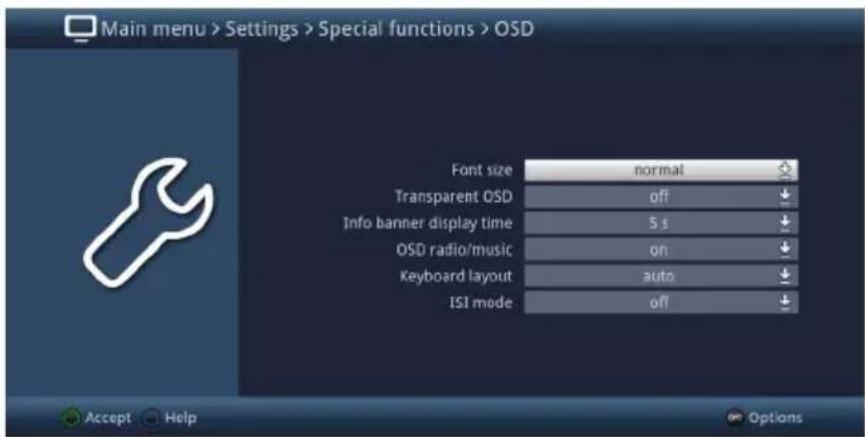
If 🙏s shown on the right next to the set value, the value can be changed using the selection list.
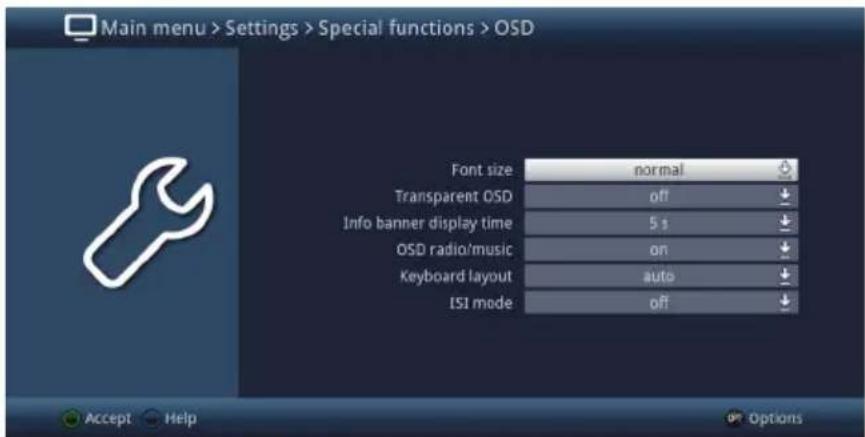
press the OK button to open the selection list.
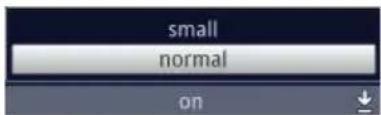
Highlight the setting you want using the up/down arrow keys.
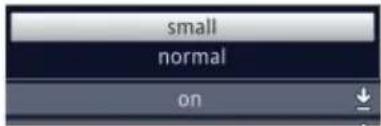
Use the up/down arrow keys to move the highlight from line to line and to move upwards and downwards page by page using the page up/down buttons.
Confirm by pressing the OK button. The selection list closes again and the selected setting is shown in the menu.
4.4.3 Entering numbers
Use the numeric key pad keys to enter the new setting you require if a question mark on a numeric value or is displayed in the highlight.
Note the number of digits used in the entry as there must always be the same number This means that if a five-digit value is required, for example "10600", but you only wish to set a four-digit value, for example "9750", then you must enter a "O" at the beginning for every unused position.
4.4.4 Virtual keyboard
If is shown on the right next to the set value, the value is altered using the virtual keyboard. You have three different keyboard options when using this data entry method.
You can switch the keyboard layout between the so-called QWERTY keyboard and the alphabetic keyboard, while an SMS keyboard can also be used at any time.
The functionality of the QWERTY keyboard is identical to that of the alphabetic keyboard. They only differ in the arrangement of the various letters, numbers, characters and symbols.
Press the OK button to open the virtual keyboard.
The keyboard now appears in alphabetic form.
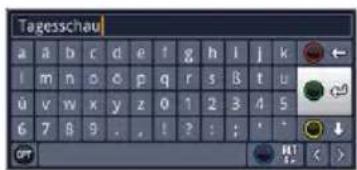
Press the Option button to toggle between the QWERTY keyboard and the alphabetic keyboard.
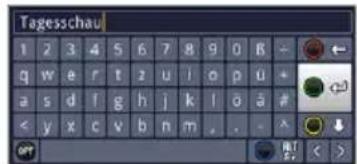
You can now enter the term you want as follows.
Arrow keys: Moves the highlight over the keys of the virtual keyboard.
OK: The highlighted character is added to the end of the term, or orange highlight/the entire entry.
/ Yellow function key: The keyboard switches between upper case/lower case. / Red function key: Pressing/holding down deletes the character in front of the mark/entire entry.
/ Green function key: The entered term is accepted. / Blue function key: The keyboard switches to the alternative characters. : Moves the orange highlight within the term.
The SMS keyboard is operated using the numeric keypad on both the alphabetical and the QWERTY keyboard and can be used at any time. The colored buttons thus incorporate the functions described above.
Press one of the 0 - 9 number keys to select the various letters, numbers, characters and symbols.
After first pressing a numeric keypad key, the first letter of the corresponding row is highlighted.
Every time the same numeric pad key is pressed, the highlight moves one field to the right.
Press until you reach the character you want. This will be added to the entered term after a short delay.
The various numeric keypad keys are assigned the following displayed letters, numbers, characters and symbols.
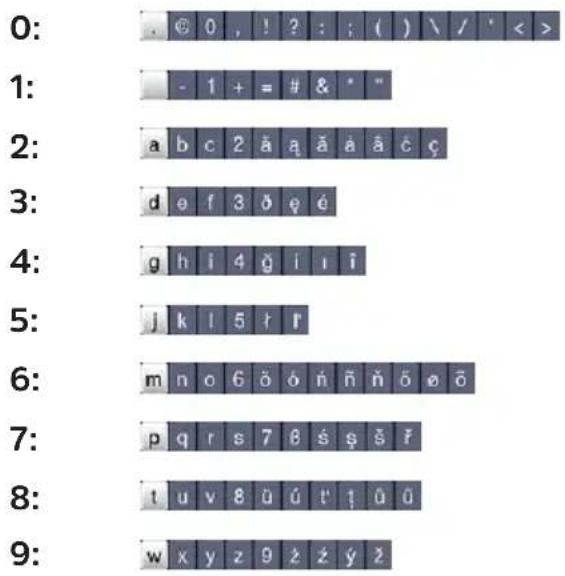
Once you have reached the field you want with the highlight, you can then begin selecting the next character immediately since, in this case, the character is directly added to the term.
If you wish to continue directly selecting a character from the same numeric pad, you can add the previously highlighted character to the term by pressing the right arrow key.
If you are using a USB or wireless keyboard, for example the TechniSat ISIOControl Keyboard II (item number 0002/3850), you can also use this keyboard to carry out all the input using the virtual keyboard.
TechniSat ISIOControl keyboards are specially designed for the TV and also provide control of a wide range of other functions.
Use the MyTechniSat app on your smartphone or table to enter data via this keyboard and to use all the TV's functions.
4.5 Option selection
In some menus and operating modes (e.g. TV mode, music/images playback etc.), you have the option of calling up additional functions and options via the options selection function.
Pressing the Option button opens the option selection in the lower right-hand corner of the screen.
In this example the Option selection menu for the channel list is shown.
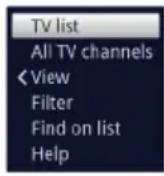
Every additional press of the Option button moves the highlight down one line at a time.
Some options are selected directly in this window. Other options for a number of subordinate selection options are located in the option groups. Highlighting one of these option groups automatically opens another window on the left.
![[Reset all filters] Genre Provider Satellite Language Scrambling Signal source TV list Astra TV list All TV channels Filter Find on list Help](/content/2026/04/642365/images/302facff0955df3eb82db04dcc5c6ab1e12919c6d39e232d303801d1253a5015.jpg)
You can use the up/down arrow keys within the options group to highlight one of the options listed there.
By pressing the up/down arrow keys, it is possible to move the highlight from line to line and to move upwards and downwards page by page using the page up/down buttons.
The highlighted option is selected by pressing the OK button. You then exit the option selection area
If you do not want to select an option or wish to leave the Options selection area without making any changes, simply press the Options button until it is hidden.
5 Initial installation
On initial installation of the TV, the AutoInstall installation wizard starts automatically. Using the installation wizard is the simplest way for you to set up the most important settings for your TV.

The initial installation shown here simply is an example. The exact process for the initial installation will depend on the settings you select. Therefore please follow all instructions displayed on screen carefully.
Operating language
The installation wizard starts when you select the menu language.
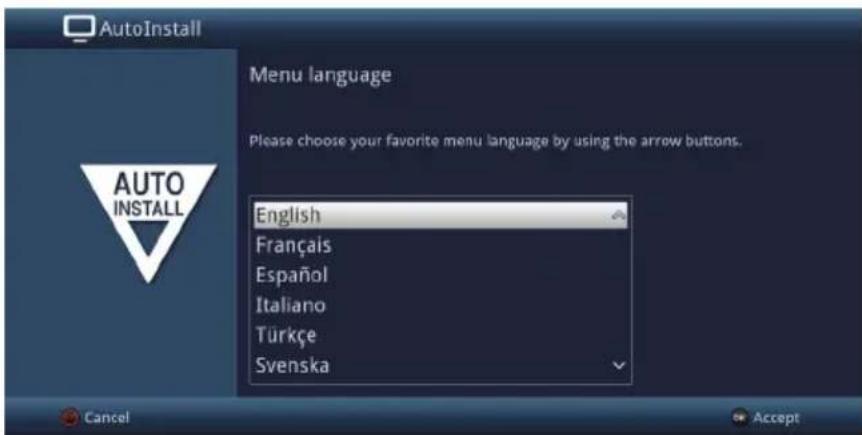
Use the up/down arrow keys to highlight the menu language you want and confirm by pressing the OK

The preferred audio language will be set automatically according to this selection.
Country selection
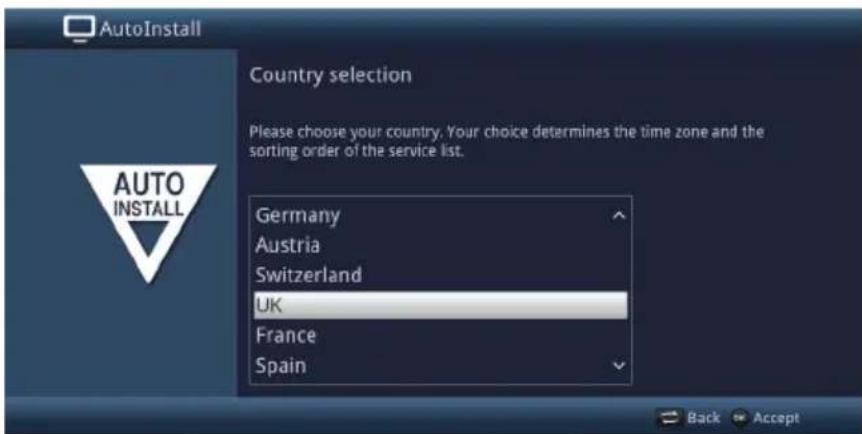
Using the up/down arrow keys, select the country in which the television will be operated and confirm by pressing the OK button.

Automatic setting of the local time as well as changing to summer/winter time will be based on your selection. Channels will also be automatically sorted in the installation wizard according to this setting as well as after a channel search.
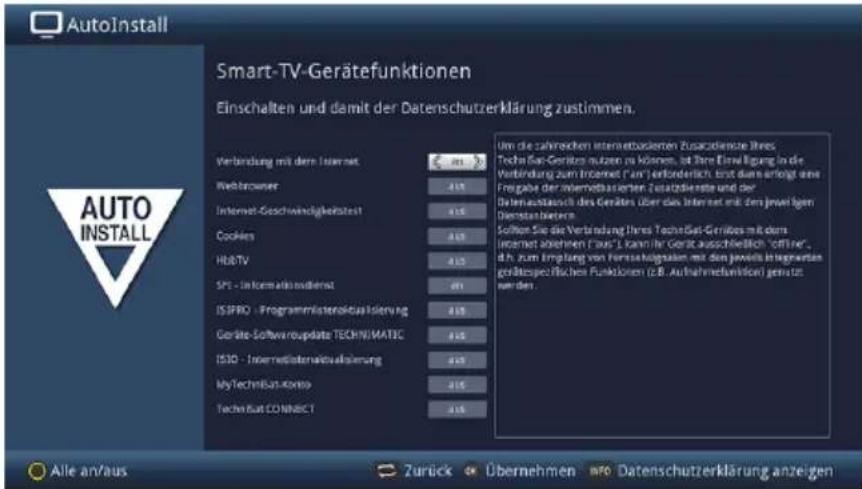
On this page you can select which of the many Internet-based TV functions and additional services you would like to use.
On the first line you can switch the Internet connection on and off completely using the right/left arrow keys.
When the Internet connection is switched on, you can use the up/down arrow keys to select the functions, which you can then switch on and off using the right/left arrow keys.
If you have switched on one or more of the Internet-based additional services, you must also agree to the Data Protection Declaration in order to be able to use them.
You can call up the Data Protection Declaration manually by pressing the Info key, and it will also be displayed automatically if you use the function All on/off via the yellow function key.
Confirm the Data Protection Declaration by pressing the OK key when it is displayed on the screen.
If you switch off the connection to the Internet, you will only have access to service on your local network.
The settings of the Smart TV device functions and the Data Protection Declaration can be viewed and changed at any time thereafter, via the main menu > yellow function key.
The functions described in this user manual describe the situation with an active Internet connection and all additional services and whereby the Data Protection Declaration has been accepted.
Not all services listed in the Data Protection Declaration are necessarily supported by the device.
Press the OK button to accept the selection.
Picture mode
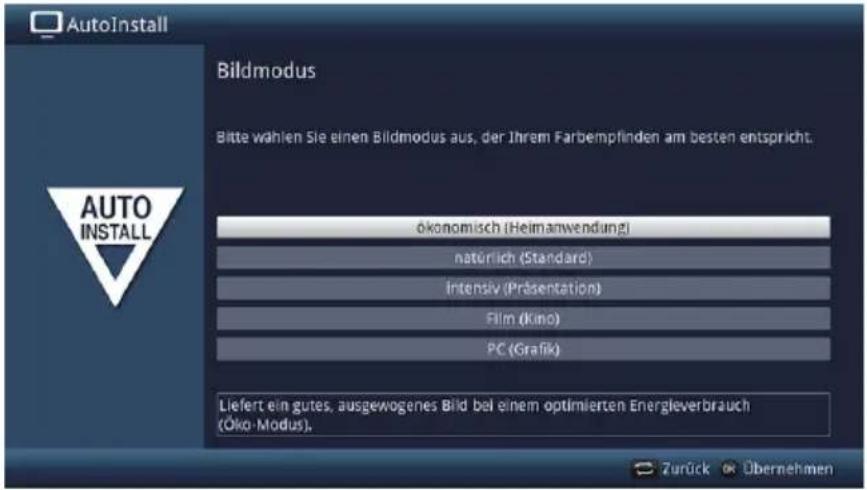
Use the up/down arrow buttons to select the picture mode you want.
The values preset by the selected picture mode can be adjusted as desired after the AutoInstall, as described from point 10.1.3 onwards in the instruction manual.
Confirm by pressing OK button.
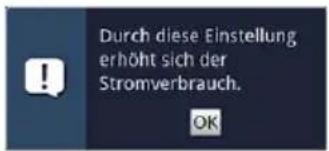
When selecting either the intense or natural picture mode, observe the note that appears as well as points 3.3.3, 07.10 and 10.1.2 in the instruction manual, and confirm by pressing the OK button.
Use the up/down arrow keys to select whether your device is to be installed free-standing (e.g. on a table or cabinet) or on a wall (wall-mounted).
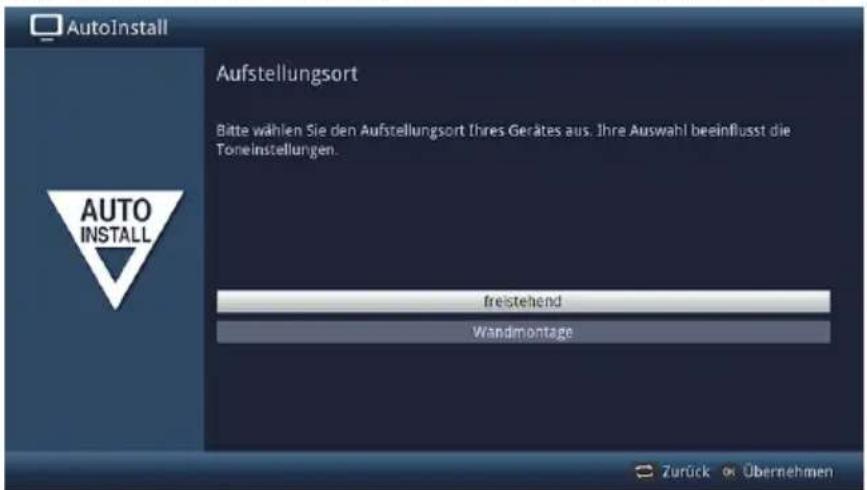
This selection adapts the speaker settings to your surroundings.
Selecting reception signals
Use the up/down arrow keys to select the reception signal you want to switch on or off.
DVB-S for digital satellite channels
DVB-C for digital cable channels
DVB-T for digital terrestrial channels
Analogue CT for analogue terrestrial and cable channels
Network (IPTV) for digital IP-TV channels.
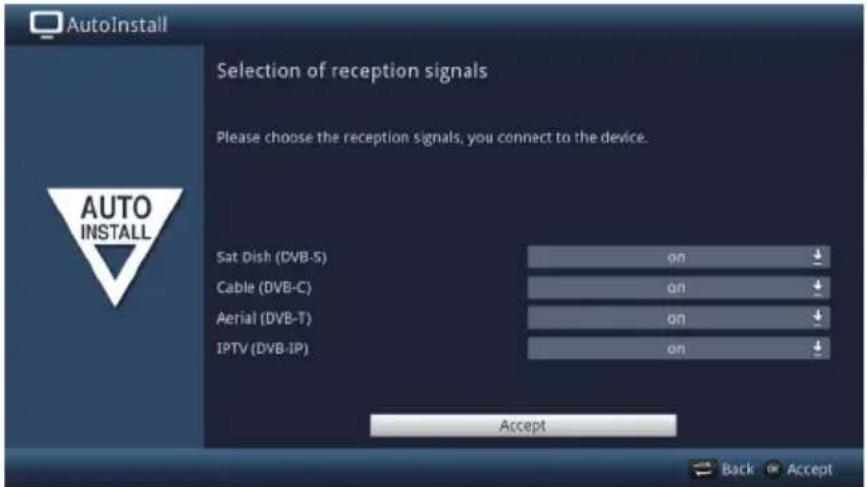
Press the OK button to open the selection window; highlight the setting you want with the up/down arrow keys and close the window by pressing the OK button again.
To get to the next step of the installation, use the arrow keys to highlight the Accept field and confirm with the OK button.
IPTV-Provider
If you have activated the IPTV option when selecting reception signals, you can configure a provider in this step.
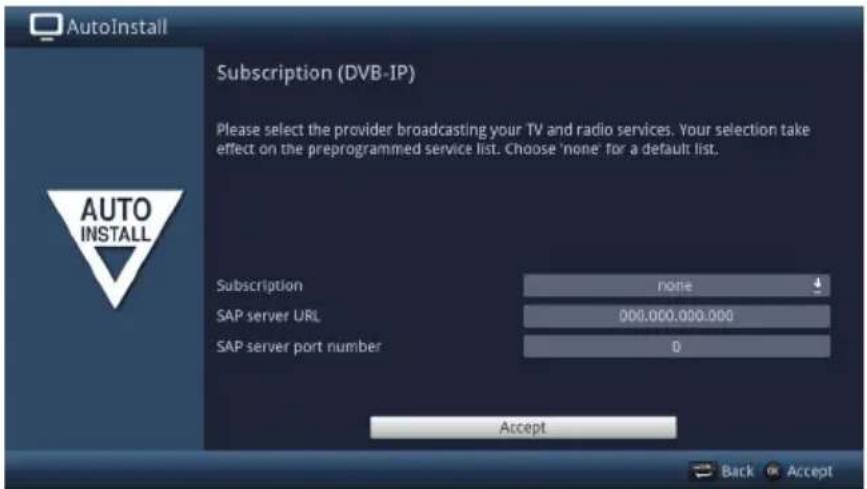
If you use the service of an IPTV provider, select the desired setting using the arrow keys and the OK button.
Select Accept and press the OK button to accept the settings.
Antenna configuration (DVB-S)
In this step of the installation you can adjust your TV setup to the configuration of your satellite antenna.
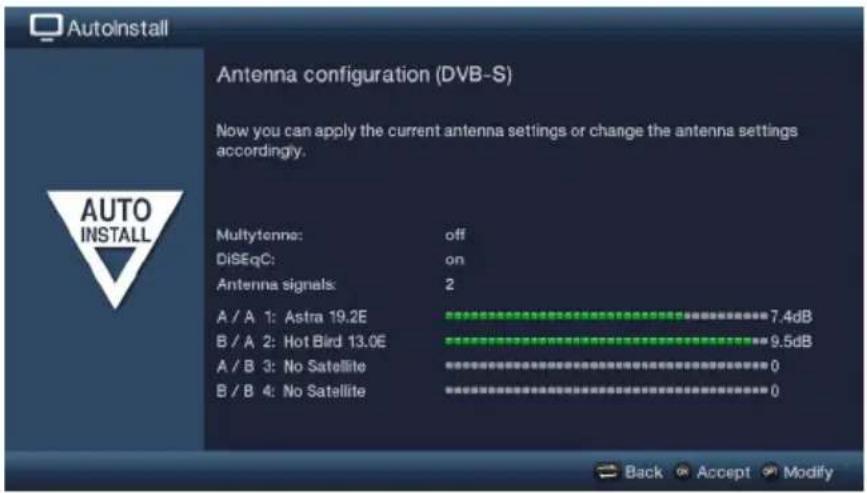
Pressing the OK button accepts the standard antenna setting and allows you to continue with the "Antenna settings (DVB-T)".
If the configuration of your reception equipment does not match the standard setting, you can open the antenna configuration by pressing the Option button and can adapt the setting on your reception equipment. See the device user manual for more information.
Antenna settings (DVB-T)
A channel spectrum with the signal levels of the various channels is displayed in this step, in order to align the DVB-T antenna for the best reception.
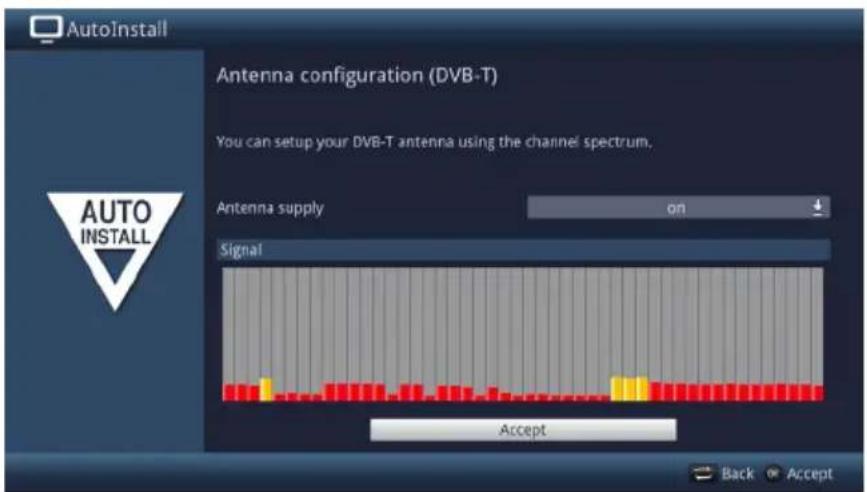
Use the up/down arrow keys to highlight the antenna supply field and open the selection window by pressing the OK button.
Switch the antenna supply on or off by highlighting the corresponding entry with the up/down arrow keys and confirm using the OK button.
To get to the next step of the installation, use the arrow keys to highlight the Accept field and confirm with the OK button.
Network configuration
In this step the TV automatically checks the network configuration.
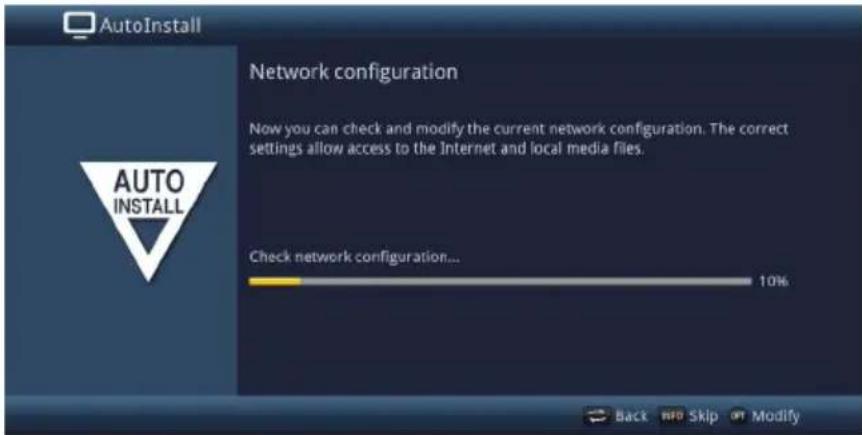
If you wish to change the network settings, press the Option button, select LAN or WLAN with the up/down arrow keys and press the OK button.
Then configure the network settings as described in points 10.4 and 10.4.2 of the instruction manual and then press the green function key to accept the settings.
Once the network check has been successfully completed, press the OK button to move on to the next step.
Channel search / ISIPRO ^nur DVB-S
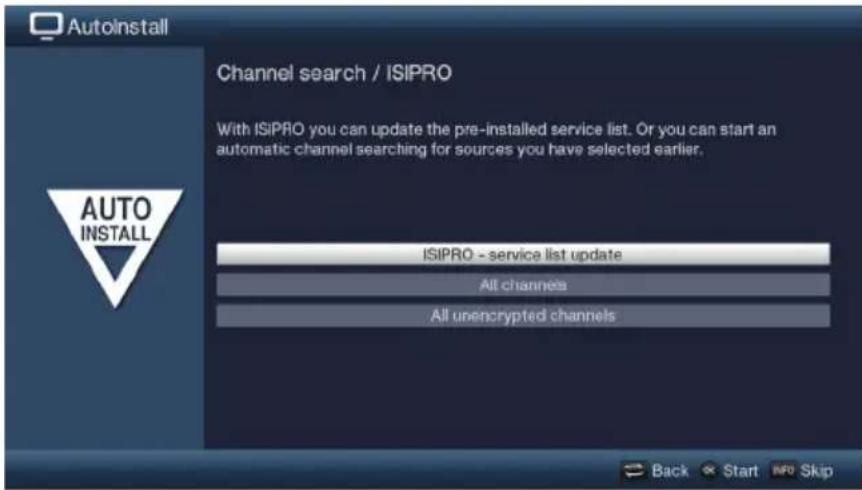
To download the current channel list, use the up/down arrow keys to highlight the ISIPRO - service list update line and start the process by pressing the OK button.
If you want to run a channel search via satellite as well, or if the DVB-S reception signal has not been configured, use the up/down arrow keys to highlight the All channels or All unencrypted channels field, then start the channel search process by pressing the OK button.

After the channel list update, an automatic channel search on all other configured reception sources is then carried out via "All Channels".
Regional channels
Some broadcasters transmit channels with varying regional content. On this page you can define your preferences for these regional channels.
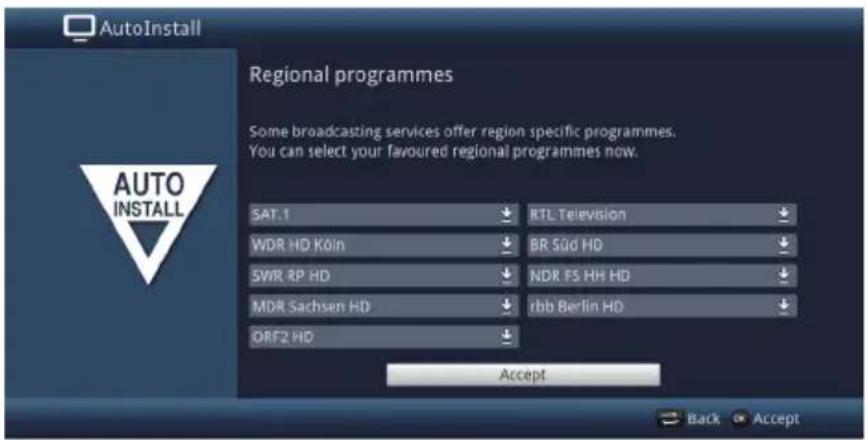
Use the arrow keys to highlight the channel provider for the preferred regional channel you wish to set up and select this using the selection list.
If you subsequently select another regional channel for a program provider as per section 6.2.4 this will be saved in the same way for this program provider.
Software update
Your device now checks whether there is new software available.
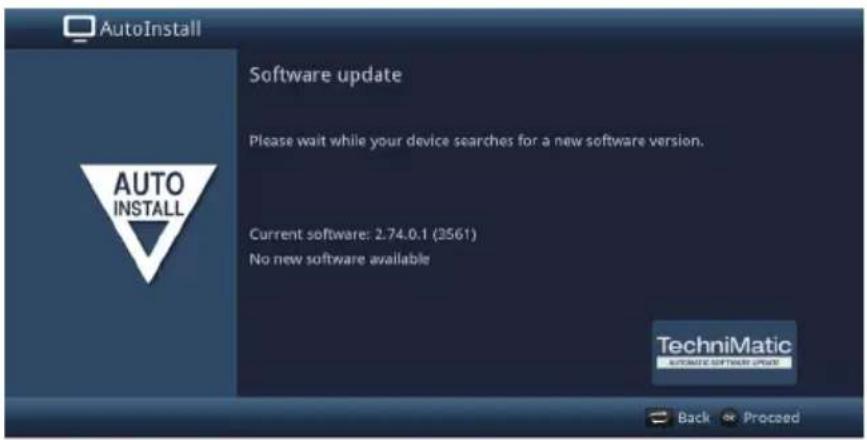
If you do not want to wait for a search for new software or a software download, you can skip this step if you wish by pressing the Info button.
If there is no new TV software available, you can press the OK button to go to the next step in the installation wizard.
If, on the other hand, new TV software is found, the automatic software update can be started by pressing the OK button.
When doing this also note points 15.5 and 18 in the instruction manual.
ISIO Internet list update
The TV now checks whether there is a new list of website links available.
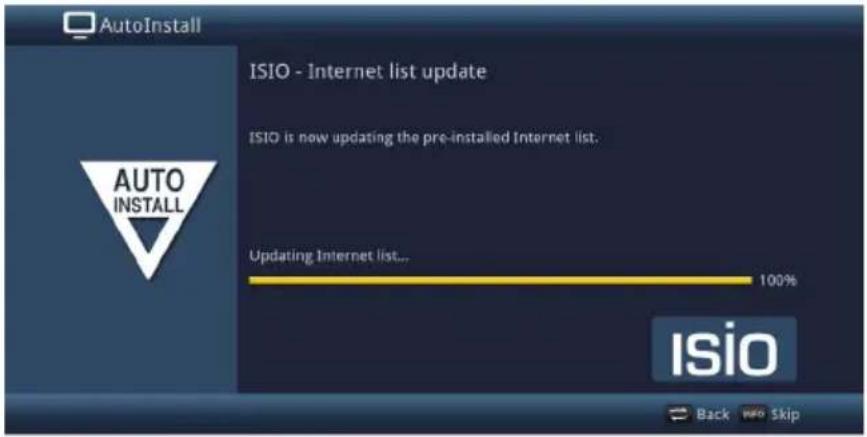
if you do not want to wait for a search for a new website list or to download the list, you can skip this step if you wish by pressing the Info button or cancel it by pressing the OK button.
watchmi
After the "ISIO website list update" step, you have the opportunity to select the watchmi options.
Select the desired option using the arrow keys and then confirm by pressing the OK button.
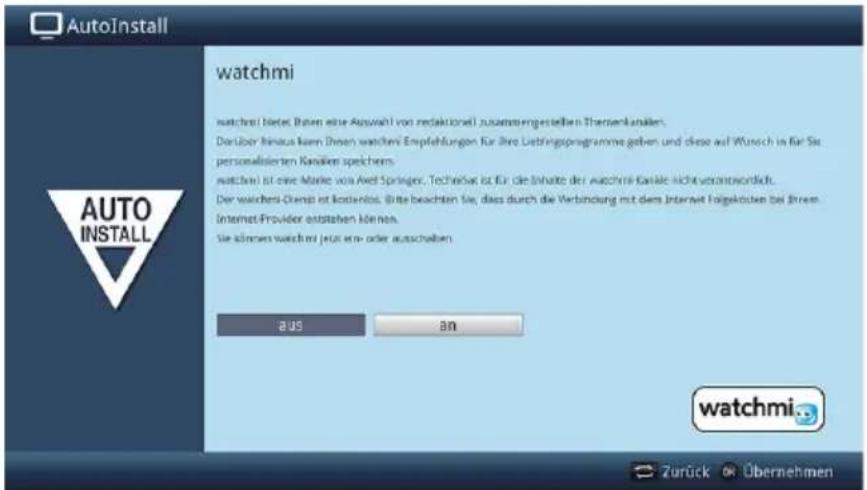
off The watchmi service is switched off.
on The watchmi service is switched on.
i Please note that an Internet connection is required for this.
i Please also note the additional instructions and explanations regarding watchmi in section 7.24 of the instruction manual.
Load SFI data
To enable the data for the electronic program guide to be displayed (SFI), it must first be downloaded. Your TV will automatically start downloading the SFI data.
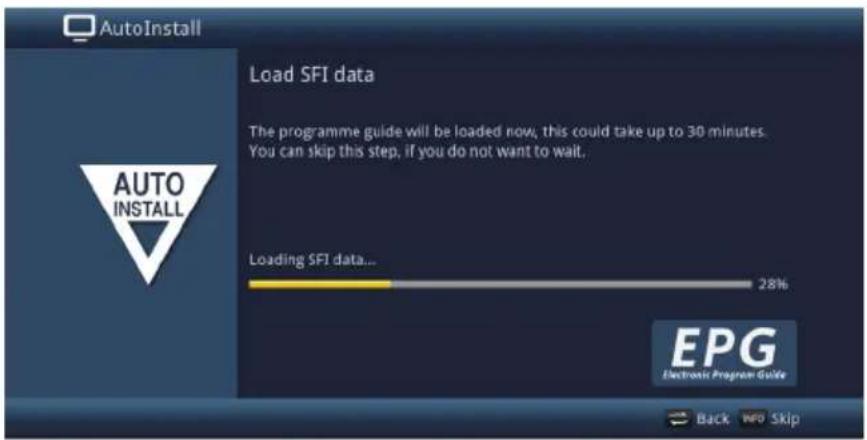
i Please also note section 10.8.2 of the operating manual.
Product registration
You can secure additional benefits by registering your product.
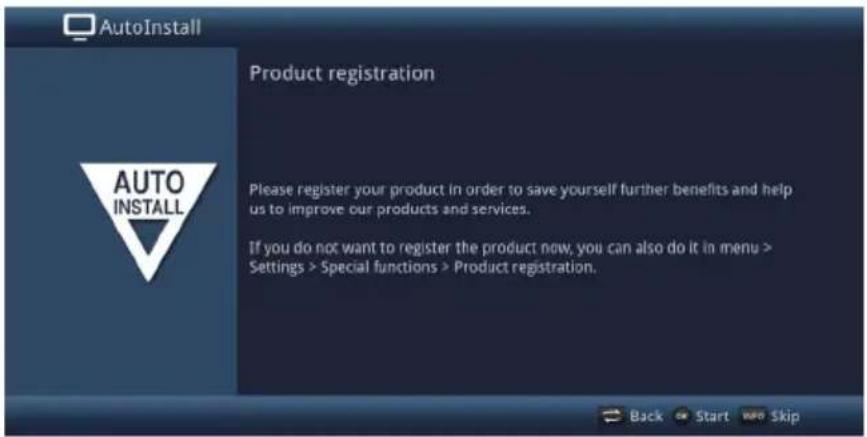
i Please note that an Internet connection is required for this.
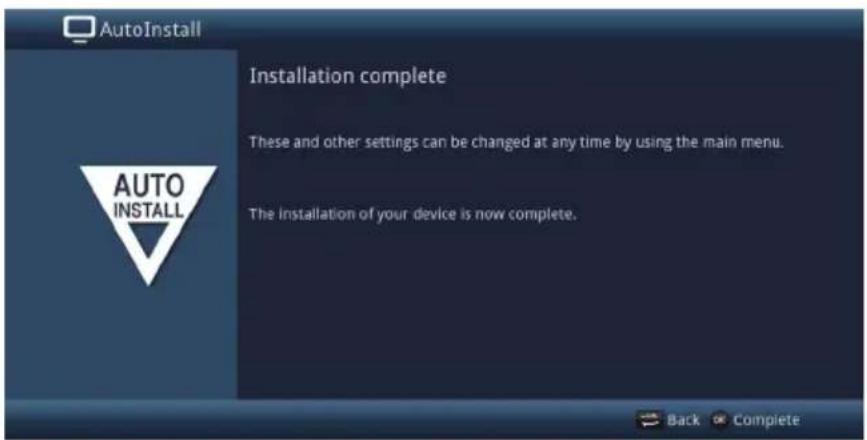
Exiting the installation wizard
Confirm the final message from the installation wizard by pressing the OK button.
6 Operating the unit
6.1 Switching the TV on and off
6.1.1 Switching on from standby mode
Switch the TV on by pressing the On/Standby button on the remote control or on the TV, or the Channel +/- keys on the remote control or on the TV, or a numeric key between 0 and 9 on the remote control.
If the user-dependent parental control (TechniFamily) under Menu > Settings is activated, the user selection is now displayed. See the user manual for more information.
6.1.2 Switching off to standby mode
Switch the TV off by pressing the On/standby button on the remote control or on the TV.
Please note that the TV's database is saved when it is switched off. This process takes several seconds to complete. The LCD panel is switched off during this process.
The device switches completely into standby mode after saving is complete. The TV is now in standby mode and can be completely switched off at the mains power switch.
6.2 Selecting a channel
6.2.1 Using the up/down channel keys
You can switch between channels one at a time using the Channel +/- buttons on the remote control or on the TV.
6.2.2 Using the numeric keypad
Use the numeric keypad keys to enter the number of the channel you want.
1 for channel slot 1
1, then 4 for channel slot 14
2, then 3, then 4 for channel slot 234
1, then 2, then 4, then 5 for channel slot 1245
When entering channel numbers with multiple digits, you have approx. three seconds after pressing a key to enter the next number.
If you wish to enter a one, two or three-digit number, you can speed up the process by holding down the last digit for longer, or by pressing the OK button..
6.2.3 Using the TV list
Press the OK key.
You can view additional data about the current program by pressing the Info button.
6.2.3.1 Selecting a channel
You can now highlight the channel you want using the up/down arrow keys, the page up/down keys and the numeric keypad keys.
Exit the Navigator by the pressing the OK button; the highlighted channel is displayed on the screen.
6.2.3.2 Selecting a list
To make it easier for you to find channels, your device provides various channel lists. You can select your favorites list or display the channels sorted alphabetically from the whole list, the TV broadcaster lists or according to genre.
You can now use the right/left arrow keys to select your favorites lists (TV list) and the full list (All TV channels) and use the Options selection to filter the channel list (e.g. by broadcaster, genre or signal source), make the list appear sorted alphabetically or by channel slot number and search for a channel via the list search.
6.2.4 Selecting a regional channel
Use the Options selection to choose the various regional channels under the Region menu item.
![[Reset all filters] Genre Provider Satellite Language Scrambling Signal source TV list Astra TV list All TV channels < View > Filter Find on list Help](/content/2026/04/642365/images/1f2391154c7236595d5572cff7f69cfe0ed329a9029b0a9df66e35933603519d.jpg)
The selected regional channel is now stored as a preferred regional channel.
6.2.5 Returning to last channel selected
Press the Back button to return to the last channel selected.
6.2.6 Switching between TV/radio
Use the TV/Radio button to switch between TV and radio mode.
The TV switches to the last radio channel listened to.
i As an alternative to this you can also switch between TV and radio operation as described under points 7.3 and 7.19 of the instruction manual.
6.3 AV source
Press the AV button to open the AV sources selection window so as to select a device connected to the HDMI inputs (HDMI 1 / 2) or to the AV socket (via AV adapter) (AV) on the TV.
Select the source you want using the up/down arrow keys and confirm by pressing the OK button to switch over to the selected input.
When doing this also observe points 7.2.1 - 7.2.3, 7.2.6, 10.9 as well as section 12 of the instruction manual.
An HDMI input can also be allocated to the HDMI button (point 10.5.7.2 in the instruction manual) so that it is called up by pressing this button.
6.4 Channel/source information
6.4.1 Info box
Every time you change channels, an info box appears on the screen for a certain period, as defined according to point 10.5.1.3 in your instruction manual.

The channel slot and name as well as the source of the channel selected, the channel list in which the channel is located and the title of the current program with the start/end time and the progress bar, as well as further channel information (e.g. for teletext., for 4:3 broadcasts, 📄 subtitles, for encrypted channels, or for 📋 by Digital broadcasts 📋 are shown in this Infobox
The current time is shown in the upper right-hand corner of the screen.
6.4.2 Displaying time and program information
This function allows you to see channel information about the channel being watched.
Pressing the Info button displays the information described in section 6.4.1 again for the period set under Menu > Settings > Special functions > OSD > Info banner display time.
6.4.3 Additional program information
Provided this is being transmitted, you can get additional program information for the current program.
Pressing the Info button twice enlarges the information window and displays additional information about the program currently selected.
Extended information text can be moved line by line using the up/down arrow keys or scrolled through page by page using the page up/down keys.
If available, pressing the Info key again will bring up the next program.
Press the Info button once more to hide the display again.
6.5 Receiving encrypted channels
Insert a Cl-/Cl+- module in the slot, with the upper side pointing to the rear and insert the smartcard with the gold chip to the back and facing in the direction of insertion into the card slot in the Cl/Cl+ module.
When so doing, see also the information in the section on the encrypted channels in the user manual.
6.6 Volume control
After switching on the television, sound is played back according to the power-on volume configured using the Sound settings menu (Section 10.2.1 in the user manual).
To adjust the volume of your TV, press Volume + to increase the volume or Volume - to decrease it.
6.6.1 Switching to mute
Press the Sound on/off key to switch the sound off and press it again to switch the sound back on.
6.6.2 Headphone volume
While the sound is muted it is possible to use the Volume + and Volume - rocker keys to adjust the volume for the headphones.
6.7 Selecting a different language / sound options
For some channels you have the option of selecting a different sound option (Dolby Digital, Stereo or Audio Channel 1 or Audio Channel 2) or another language.
Using the Options selection feature, you can select the sound option you want via the Sound option.
See also the information in the Sound options section of the user manual.
6.8 Sound mode
You can use the sound mode selection to switch between the preset sound modes: standard, film, music and speech.
You can select the sound you want using Option selection under Sound mode.
The sound modes can be changes in the menu to your preferences.
6.9 Display mode
You can use the display mode selection option to switch between the preset display modes while using the device: economical (home use), natural (default), intensive (for presentations), film (cinema) and PC (graphics).
You can select the display mode you want using option selection under Display mode.
You can set the display modes to suit your preferences as described in point 10.1 in the instruction manual.
6.10 Subtitles
When switching on a program that is being broadcast with subtitles, the subtitle icon displayed in the infobox.
You can use option selection to select subtitles you wish to display under Subtitles.
i See also the Subtitles section of the user manual.
6.11 Teletext
Your TV can display teletext information on channels that broadcast teletext data. This is displayed by the Symbol in the Info box.
6.11.1 Switching teletext on/off
Press the Teletext button to switch on teletext for the currently selected channel along with its overview page.
You can exit by pressing the Back button.
i See also the Teletext section of the user manual.
6.11.2 Page selection
Use the numeric keypad keys 0 to 9 to enter the 3-digit page number of the teletext page you want.
Use the colored function keys to open the pages displayed in the respective fields.
6.12 Freeze frame
The television picture is displayed as freeze frame by pressing the Freeze frame button.
Freeze frame is ended by pressing this button again; normal playback resumes on the television screen.
The sound will continue to be reproduced normally during freeze frame.
6.13 Sleep timer
You can set the switch-off time of your TV using the sleep timer.
You can set the sleep timer by pressing the Sleep timer button a number of times (15 minutes to 120 minutes), or switch it off.
6.14 Selecting a function
Press the Function Selection button to open the Navigation menu (NAV menu) in order to select the desired function.
When doing this also observe points 7.19 and 10.9 of the instruction manual.
6.15 HbbTV
i ThesyHbbTVbl in the Info box indicates that the channel provider is offering an HbbTV application.
This function can only be used if there is a connection to the Internet (points 10.4.1 or 10.4.2 in the instruction manual) and HbbTV has been activated (point 10.5.2.8 in the instruction manual).
Switch the HbbTV function on via the Option selection under the HbbTV item so it can be used for the current channel.
Switch to a channel that is broadcasting HbbTV data.
After a few seconds the box appears at the lower right of the screen indicating the availability of HbbTV content.
Launch the HbbTV application by pressing the red function key.
i Display and use of the HbbTV application is determined by the data received.
As a general rule, it is operated as described below.
Depending on the speed of the Internet connection, there may be slow response times or brief interruptions.
In the HbbTV application, you can use the arrow keys or the keys displayed there to move the marking, and can confirm the selection using the OK button.
You can exit the HbbTV application by pressing the Back button or by pressing the colour button displayed in the application itself.
During operation please be sure to take note of messages and displays on the screen.
6.16 Format switchover / Zoom
Pressing the Zoom/Format button allows you to select the various pre-defined formats (original, optimum, optimum 16:9. full zoom and stretch) as well as the user-defined setting, where you can adjust the picture as you wish.
The following options are available to adjust the picture according to your personal preferences:
Red function key Increase picture height Green function key
Green function key Decrease picture height
Yellow function key Increase picture width
Blue function key Decrease picture width
Arrow key up Move picture upwards (only when picture height has been increased)
Arrow key down
Move picture down (only when picture height has been increased)
OK-Button
Scroll through zoom stages
Left arrow key
Reset user-defined format setting
To hide the format switching screen, press the Back button
6.17 SFI program information guide
Your TV has SFI electronic program information.
You can use this to display program information for a single or a number of digital channels on the screen and to obtain a very quick overview of the current programs, or programs being broadcast that day, or on the following days.
i See also the applicable sections in the user manual.
Press the SFI button to open the electronic program guide.
The electronic program guide appears in the preset start category.
The Overview start category is selected as the default setting.
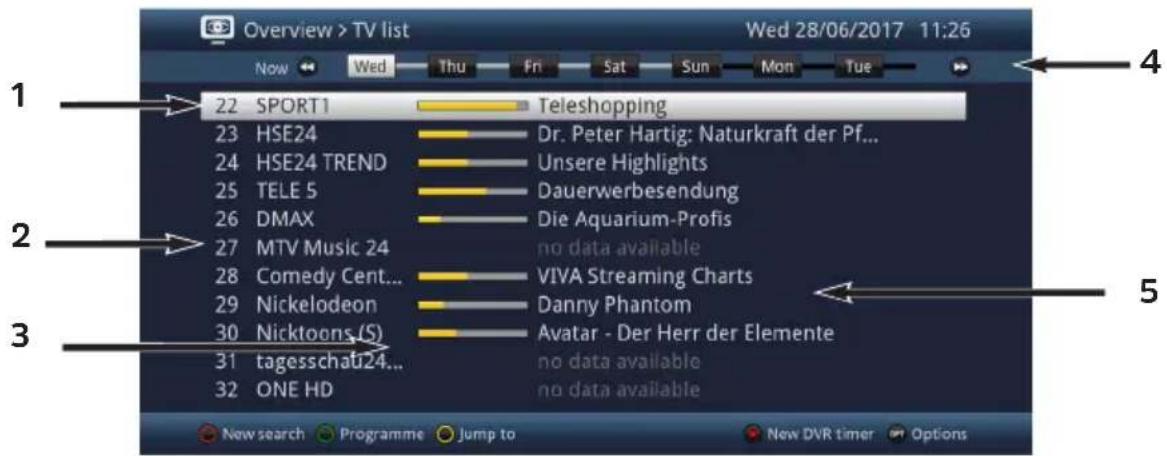
1 Viewing time > indicates when programs are to be shown.
Time line > graphical representation of the available data for the highlighted channel.
2 Channel name with the corresponding channel slot within the active favorites list.
3 Progress bars or the start/stop time for the program being shown.
4 The current date and time.
5 Programs on the channels that are displayed.
You can reach the various SFI views and functions via option selection as well as via the assigned function key located at the lower edge of the screen.
You can switch the display time back and forth or move the highlight using the right/left arrow keys, the fast forward/rewind keys, the up/down arrow keys and the page up/down keys.
If further information regarding the highlighted program is available, you can call this up and hide it again by pressing the Info button.
Press the OK button to switch directly to the highlighted channel.
You can exit the electronic program guide again by pressing the SFI button.
6.18 Internet
Your device can use an existing broadband connection to access the Internet.
To do this the TV must be connected to the home network/DSL router via either LAN or WLAN and you must consent to use of the Internet connection and to the data protection conditions.
Internet access provides you with various Internet functions such as unrestricted browsing, use of interactive services, video on demand and the TechniSat service portal ISIO Live.
When so doing, be sure to observe points 7.23, 10.4.1, 10.4.2 and 10.5.2 in the instruction manual and the instructions and images on the screen..
A pre-programmed Internet list makes it easier to call up a few websites of interest to you.
This list can be expanded and amended as desired.
To ensure trouble-free display of moving pictures, a minimum bandwidth of 3Mbit/s must be available If the bandwidth is less, this can cause interruptions (jerky or static images). This is not the result of a TV malfunction.
6.18.1 Using the Internet list to call up websites
Press the WWW button to switch to Internet mode and open the Internet list.
The Internet List Navigator now appears. The last web link accessed is highlighted and loaded in the background.
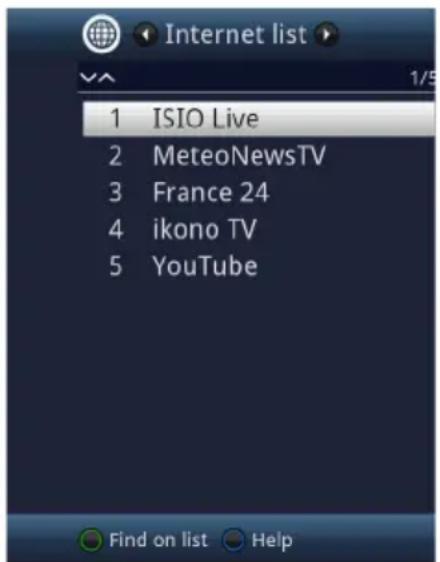
You can now use the up/down arrow keys, the page up/down buttons and the numeric pad keys to highlight the desired web link.
Press the OK button to open the highlighted web link.
The time it takes for the selected page to be displayed depends on the page selected and the bandwidth of your DSL connection.
6.18.1.1 Selecting a list
Your TV provides various Internet lists to make it easier for you to find web links.
You can select and display all of your configured favorites lists as described in the Manage Internet lists section of the user manual.
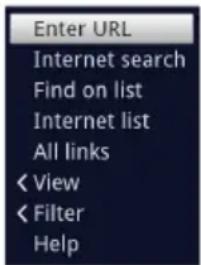
Use the Internet lists item in the Option selection to select the Internet list you want.
6.18.1.2 Filtering website lists by genre
You can use Option selection > View to select the sorting for the website list currently displayed.
Search for a saved web link via Option selection > List search.
To filter an Internet list for specific genres, select the genre for the links you want to display under Option selection > Filters > Genre.
6.18.2 Calling up web pages by entering a URL
In addition to the option of using the pre-programmed Internet links, you can call up the desired websites by manually entering the URL (Uniform Resource Locator).
Press the WWW key twice.
or
In the Option selection, enter URL item under the Navigation option.
The virtual keyboard opens and now allows the desired website address to be entered.
6.18.3 Navigating the opened website
You can use the arrow keys to move the marking/frame/cursor to the areas provided for this purpose (e.g. a forwarding link, a button, dropdown list etc.), depending on the setting under point 10.5.2.6 in the instruction manual.
The associated action is accepted by pressing the OK button.
If you use e.g. the ISIOControl Keyboard II (item number 0002/3850) and mouse navigation has been enabled, you can also use the trackball on the keyboard to control the cursor on the screen, designed to make Internet use considerably more convenient.
Likewise, you can easily move the cursor around the screen via the MyTechniSat App on your smartphone or tablet, if the smartphone operation function has been enabled under section 10.5.3.1.1 in the instruction manual.
6.18.4 Refreshing page content
Sometimes it is useful or necessary to refresh the content of an opened web page.
In the Options menu, select the Update point.
6.18.5 Cancelling the loading process
To cancel or interrupt the loading of a web page, use the Option selection to select Cancel.
You can continue or restart the loading of the page by selecting the Update point in the Options menu.
6.18.6 Adding a favorite to the Internet list
First use the URL input to call up the website you want to add to the website list as a favorite.
Then, in the Option selection, select the Add to favorites.
When so doing please also note Section 13 in the instruction manual.
6.18.7 Search engine
By using the Option menu to call up the Web search item, the search engine web page selected in point 10.5.2.7 of the instruction manual is automatically called up.
6.18.8 Status
To do so, select the Status option in Options menu.
Use the up/down arrow keys to select the general status or the safety status and have it displayed by pushing the OK button.
6.18.9 Ending the Internet session
To switch from a web page you have called up back to TV/radio mode, press the WWW button three times or press the TV/Radio button.
7 Operating the DVR
The DVR function (DVR=Digital Video Recorder) means you do not have to use an external recorder (e.g. video or DVD recorder) to record programs, as this function allows you to record them to a USB storage device.
DVR recordings can be made for channels from DVB-S, DVB-C and DVB-T sources.
When doing this, also observe points 8, 9.1 and 9.4 in the instruction manual.
When recording, in addition to the actual audio and video data, additional sound channels, video text data and subtitles, if broadcast, are also recorded.
You can access these during subsequent playback, as described in points 7.7, 07.11 and 07.12.
7.1 DVR recording
The following recording modes are available for DVR recording:
1. Record immediately
Select this type of recording to immediately record the program currently being broadcast at the push of a button.
2. Timer-controlled recording
This function is used to ensure that your television is switched on and off again for the selected broadcast to make a recording, for example when you are out.
You can do this by programming the timer either manually or automatically, using the SFI.
3. Timeshift recording
Timeshift recording enables timeshifted TV viewing. You can start to play back a program while it is still recording (= timeshifting).
7.1.1 Instant recording
Switch on the channel/source you want to record.
Press the Record button to record the current program.
Press the Pause / Playback button to play back the current programme from a particular point.
To continue playing back the programme from this point, press the Pause / Playback button again.
7.1.2 Timeshift recording
If you are watching a program and are interrupted by e.g. a telephone call, you can press the Play / Pause button to pause the program and start recording it at the same time.
To continue playing back the program from this point, press the Play / Pause button again.

You are now watching the program with a time delay to the live broadcast (Timeshift, see the Timeshift function section of the user manual), while the program continues to be recorded in the background.
7.1.3 Ending recording manually
Pressing the Stop button generates a query as to whether the recording should be saved or discarded.
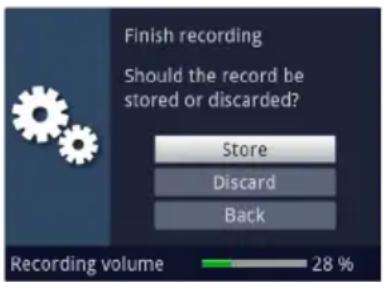
Select Store to save the recording, Discard to discard the recording or Back to continue with the recording.
7.1.4 Ending recording automatically
Pressing the Record button opens a window with the available functions.
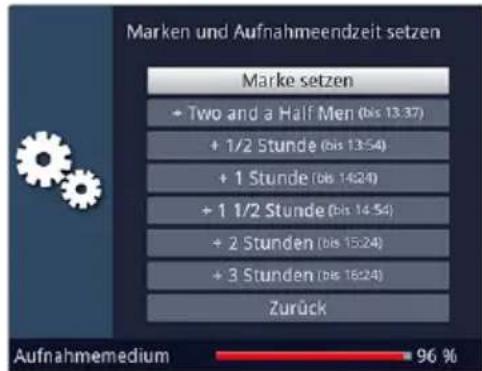
You can, for example, select +1 hour so the TV will continue to record the channel for this period and then automatically stop recording.
7.1.5 Timer recordings
You can use the DVR timer to automatically record programmes to your chosen storage medium when you are out, for example (point 9.4.1 in the instruction manual).
DVR timers can be programmed manually as per point 7.16.6 of the instruction manual with the help of the SFI, and as per point 7.17.1.1 of the instruction manual.
7.2 DVR playback
You can gain access to your DVR recording using the DVR Navigator.
7.2.1 Calling up the DVR Navigator / Starting DVR playback
The DVR Navigator can be called up in the following ways. Depending on whether you are in TV or radio mode, a list is displayed with the TV or radio recordings available on the storage medium.
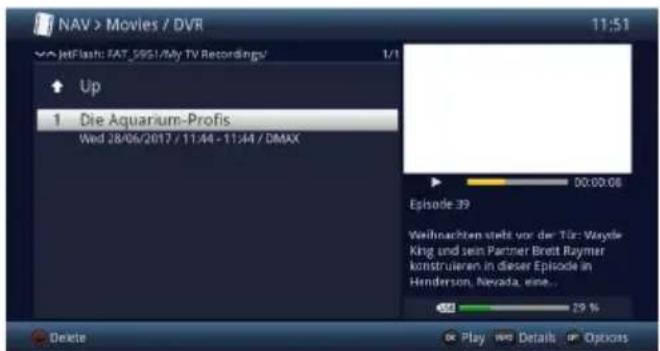
You can start to play back a recording by highlighting it and confirming with OK.
When doing so, please also note point 10.9 in the instruction manual.
The broadcast information can be displayed and hidden by pressing the Info button repeatedly.
7.2.1.1 From TV mode
In TV mode press the Stop / DVR button to switch directly to the DVR Navigator.
or
Open the channel list navigator by pressing the OK button and switch to the DVR navigator by pressing the Stop / DVR button.
or
in the Function selection, select Films / DVR.
First select the storage medium if necessary and then open the My Recordings folder.
7.2.1.2 From playback of a DVR recording
Press the OK button to open the DVR Navigator.
or
In the Function selection, select Films / DVR.
First select the storage medium if necessary and then open the My Recordings folder.
To pause playback of a recording (freeze frame), press the Pause / Play button during playback.
Press the Pause / Play button again to resume playback from the same location.
7.2.3 Fast forward/rewind
Your DVR has fast forward and rewind functions so you can get to a specific place in a recording.
Press the Fast forward or Rewind button during playback.

The following scrubbing speeds in each specific direction are available:

When you get to the desired point in the recording, you can return to normal playback mode by pressing the Play / Pause button.
7.2.4 Jog shuttle function
During playback press the Jog shuttle button (freeze frame) to access jog shuttle mode.

Playback of the recording is halted (freeze frame) and “▶II” is displayed in the Infobox.
Pressing the up arrow key or the down arrow key causes the next frame forwards or backwards to be shown.
7.2.5 Jump to bookmarks
During playback you have the option of directly selecting locations in the recording at which you have set tags, as per points 8.1.4, 8.2.5, 9.1.3.2 or 9.5.3 of the instruction manual.
Use the Bookmark menu item in the Options selection to select the bookmark to jump to the location you want in the recording.
7.2.6 Ending playback
Press the Stop button to stop playback.
Playback is ended and your television reverts back to TV mode.
In doing so, the television „bookmarks“ the point in the recording where playback ended.
If you start playing this recording again, it will automatically resume at the point where you previously left off.
natural_image
Modern flat-screen TV displaying a dark blue screen with diagonal light patterns and 'TechnetSat' branding (no additional text or symbols visible)The terms HDMI, HDMI High-Definition Multimedia Interface, and the HDMI Logo are trademarks or registered trademarks of HDMI Licensing Administrator, Inc. Dolby, Dolby Audio, and the double-D symbol are trademarks of Dolby Laboratories Licensing Corporation.
2.3 Information de service

natural_image
Recycling symbol composed of three chasing arrows forming a triangle (no text or labels)natural_image
Symbol of a trash bin crossed with no visible text or labels5 Initial installation
natural_image
Modern flat-screen TV displaying a dark blue screen with diagonal light patterns and 'TechnetSat' branding (no additional text or symbols visible)The terms HDMI, HDMI High-Definition Multimedia Interface, and the HDMI Logo are trademarks or registered trademarks of HDMI Licensing Administrator, Inc. Dolby, Dolby Audio, and the double-D symbol are trademarks of Dolby Laboratories Licensing Corporation.
natural_image
Recycling symbol composed of three chasing arrows forming a triangle (no text or labels)natural_image
Symbol of a trash bin crossed with no text or numbers, representing waste sorting or disposal (no text present)6 Funzionamento

- Connections
- Display / Operation
- Please read this first
- Dear customer,
- Inserting/replacing the batteries in the remote control
- Legal notices
- Servicing notes
- Important instructions
- Safety
- Do not open the receiver housing under any circumstances!
- Touching parts that conduct high voltages can be fatal!
- Disposal
- Power consumption in Standby and during operation
- Energy values:
- Power consumption of the TECHNILINE 32 ISI
- Power consumption of the TECHNILINE 43 ISI
- Intended use
- Connecting
- Antenna satellitare
- Antenna/cable connection (digital)
- BluRay/DVD player
- Surround sound/Hi-Fi amplifier
- Digital
- Analog
- Network connection
- Basic operation
- Switching the television on/off
- Calling up the main menu and navigating through the menus /functions
- Accepting settings / Exiting menus and functions
- Changing a setting
- Arrow selection method
- Selection list
- Entering numbers
- Virtual keyboard
- Option selection
- Initial installation
- Operating language
- Country selection
- Picture mode
- Selecting reception signals
- IPTV-Provider
- Antenna configuration (DVB-S)
- Antenna settings (DVB-T)
- Network configuration
- Channel search / ISIPRO nur DVB-S
- Regional channels
- Software update
- ISIO Internet list update
- watchmi
- Load SFI data
- Product registration
- Exiting the installation wizard
- Operating the unit
- Switching the TV on and off
- Switching on from standby mode
- Switching off to standby mode
- Selecting a channel
- Using the up/down channel keys
- Using the numeric keypad
- Using the TV list
- Selecting a channel
- Selecting a list
- Selecting a regional channel
- Returning to last channel selected
- Switching between TV/radio
- AV source
- Channel/source information
- Info box
- Displaying time and program information
- Additional program information
- Receiving encrypted channels
- Volume control
- Switching to mute
- Headphone volume
- Selecting a different language / sound options
- Sound mode
- Display mode
- Subtitles
- Teletext
- Switching teletext on/off
- Page selection
- Freeze frame
- Sleep timer
- Selecting a function
- HbbTV
- Format switchover / Zoom
- SFI program information guide
- Internet
- Using the Internet list to call up websites
- Selecting a list
- Filtering website lists by genre
- Calling up web pages by entering a URL
- Navigating the opened website
- Refreshing page content
- Cancelling the loading process
- Adding a favorite to the Internet list
- Search engine
- Status
- Ending the Internet session
- Operating the DVR
- DVR recording
- Record immediately
- Timer-controlled recording
- Timeshift recording
- Instant recording
- Timeshift recording
- Ending recording manually
- Ending recording automatically
- Timer recordings
- DVR playback
- Calling up the DVR Navigator / Starting DVR playback
- From TV mode
- From playback of a DVR recording
- Fast forward/rewind
- Jog shuttle function
- Jump to bookmarks
- Ending playback
- Information de service
- Funzionamento
Brand : TECHNISAT
Model : Techniline 43 ISI
Category : Television