GHWQ085WD1 - Air Conditioning FRIGIDAIRE - Free user manual and instructions
Find the device manual for free GHWQ085WD1 FRIGIDAIRE in PDF.

| Product Type | Window Air Conditioner |
| Brand | Frigidaire |
| Model | GHWQ085WD1 |
| Cooling Capacity | 8,500 BTU/h |
| Power Supply | 115 V ~ 60 Hz, 12 A |
| Refrigerant Type | R32 (flammable) |
| Operating Modes | Cooling, Fan Only, Dehumidification (Dry), Auto |
| Fan Speeds | Auto, High, Medium, Low |
| Special Features | Eco (energy saving), Sleep, Swing, Child Lock |
| Dust Filter | Cleanable, reminder after 250 hours of operation |
| PureAir™ Filter | Optional, sold separately, replacement indicator after 1440 hours |
| Air Quality Indicator | Green (good), Yellow (fair), Red (poor) |
| Wi-Fi Connectivity | Yes (Frigidaire mobile app) |
| Remote Control | Yes, with AAA batteries |
| Control Panel | Electronic with LED display |
| Safety Device | Power cord with current detection (Test/Reset buttons) |
| Compressor Protection Delay | 3 minutes |
| Operating Temperature Range | Indoor: 16-32 °C; Outdoor: 18-43 °C |
| Installation | Window (instructions included) |
| Warranty | 1 year limited (parts and labor) |
Frequently Asked Questions - GHWQ085WD1 FRIGIDAIRE
User questions about GHWQ085WD1 FRIGIDAIRE
0 question about this device. Answer the ones you know or ask your own.
Ask a new question about this device
Download the instructions for your Air Conditioning in PDF format for free! Find your manual GHWQ085WD1 - FRIGIDAIRE and take your electronic device back in hand. On this page are published all the documents necessary for the use of your device. GHWQ085WD1 by FRIGIDAIRE.
USER MANUAL GHWQ085WD1 FRIGIDAIRE
Room Air Conditioner
use & care
Introduction...... 2
Important Safety Instructions.... 3
Packaging....12
Normal Sounds....12
FCC Statement.... 13
Air Conditioner Features....14
Operating Instructions.... 15
Care and Cleaning.... 21
Energy Saving Ideas.... 22
Before You Call.... 23
Major Appliance Limited Warranty..... 25
There are 2 manuals in this document, please refer to below table for which manual is suitable for your AC
| Manual 1:Page 1-80 | For models with service model number:GHWQ085WD101, GHWQ105WD101, GHWQ125WD101 |
| Manual 2:Page 81-148 | For models with service model number:GHWQ085WD100, GHWQ105WD100, GHWQ125WD100 |
Please refer to your product's nameplate to check service model number.
Welcome to our family
Thank you for bringing Frigidaire® into your home! We see your purchase as the beginning of a long relationship together.
This manual is your resource for the use and care of your product. Please read it before using your appliance. Keep it handy for quick reference. If something doesn't seem right, the troubleshooting section will help you with common issues.
FAQs, helpful tips and videos, cleaning products, and kitchen and home accessories are available at www.frigidaire.com.
We are here for you! Visit our website, chat with an agent, or call us if you need help. We may be able to help you avoid a service visit. If you do need service, we can get that started for you.
Let's make it official! Be sure to register your product.
Keep your product info here so it's easy to find.
Model Number ____
Serial Number ____
Purchase Date ____

WARNING
For Your Safety
Do not store or use gasoline or other flammable vapors and liquids in the vicinity of this or any other appliance. Read product labels for flammability and other warnings.

WARNING
Prevent Accidents
To reduce the risk of fire, electrical shock, or injury to persons when using your air conditioner, follow basic precautions, including the following:
- Be sure the electrical service is adequate for the model you have chosen. This information can be found on the serial plate, which is located on the side of the cabinet and behind the grille.
- If the air conditioner is to be installed in a window, you will probably want to clean both sides of the glass first. If the window is a triple-track type with a screen panel included, remove the screen completely before installation.
- Be sure the air conditioner has been securely and correctly installed according to the separate installation instructions provided with this manual. Save this manual and the installation instructions for possible future use in removing or reinstalling this unit.
- When handling the air conditioner, be careful to avoid cuts from sharp metal fins on front and rear coils.

WARNING
Electrical Information
The complete electrical rating of your new room air conditioner is stated on the serial plate. Refer to the rating when checking the electrical requirements.
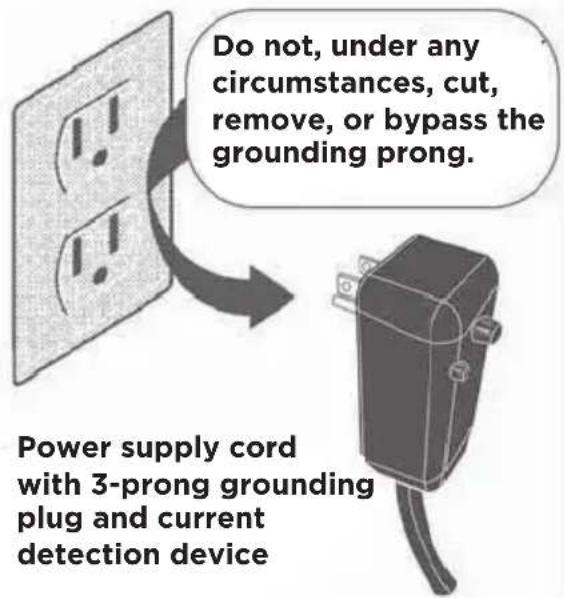
- Be sure the air conditioner is properly grounded. To minimize shock and fire hazards, proper grounding is important.
The power cord is equipped with a three-prong grounding plug for protection against shock hazards.
- Your air conditioner must be used in a properly grounded wall receptacle. If the wall receptacle you intend to use is not adequately grounded or protected by a time delay fuse or circuit breaker, have a qualified electrician install the proper receptacle.
- Do not run air conditioner without outside protective cover in place. This could result in mechanical damage within the air conditioner.
- Do not use an extension cord or an adapter plug.

WARNING
Avoid fire hazard or electric shock. Do not use an extension cord or an adaptor plug. Do not remove any prong from the power cord.
Grounding type wall receptacle
text_image
Do not, under any circumstances, cut, remove, or bypass the grounding prong. Power supply cord with 3-prong grounding plug and current detection device
NOTE
The power supply cord with this air conditioner contains a current detection device designed to reduce the risk of fire.
Please refer to the section ‘Operation of Current Device’ for details.
In the event that the power supply cord is damaged, it cannot be repaired. It must be replaced with a cord from the product manufacturer.

SAFETY PRECAUTIONS
DANGER! Avoid Serious Injury or Death
- This air conditioner contains user-serviceable parts. Always call an authorized Electrolux servicer for repairs.
- Do not insert or place fingers or objects into the air discharge area in the front of the unit.
- Do not start or stop the air conditioner by unplugging the power cord or turning off the power at the electrical box.
- Do not cut or damage the power cord.
- If the power cord is damaged, it should only be replaced by an authorized Electrolux servicer.
- In the event of a malfunction (sparks, burning smell, etc.), immediately stop the operation, disconnect the power cord, and call an authorized Electrolux servicer.
- Do not operate the air conditioner with wet hands.
- Do not pull on the power cord.
- Do not drink any water that is drained from the air conditioner.

SAFETY PRECAUTIONS
CAUTION! Avoid Injury or damage to the unit or other property
- Provide ventilation per installation instructions.
- Do not direct airflow at fireplaces or other heat related sources as this could cause flare ups or make units run excessively.
- Do not climb on or place objects on outdoor part of the unit.
- Do not hang objects off the unit.
- Do not place containers with liquids on the unit.
- Turn off the air conditioner at the power source when it will not be used for an extended period of time.
- Periodically check the condition of the unit's installation accessories for any damage.
- Do not apply heavy pressure to the radiator fins of the unit.
- Operate the unit with air filter in place.
- Do not block or cover the intake grille, discharge area and outlet ports.
- Ensure that any electrical/electronic equipment is one yard away from the unit.
- Do not use or store flammable gases near the unit.
- Do not touch the metal parts of the unit when removing the filter. Injuries can occur when handling sharp metal edges.
- Do not use water to clean inside the air conditioner. Exposure to water can destroy the insulation, leading to possible electric shock.
- When cleaning the unit, first make sure that the power and circuit breaker are turned off.

CAUTION
-
This appliance is not intended for use by persons (including children) with reduced physical, sensory or mental capabilities or lack of experience and knowledge, unless they have been given supervision or instruction concerning use of the appliance by a person responsible for their safety.
• Children should be supervised to ensure that they do not play with the appliance. -
If the supply cord is damaged, it must be replaced by the manufacturer, its service agent or similarly qualified persons in order to avoid a hazard.
- The appliance shall be installed in accordance with national wiring regulations.
READ THIS SECTION BEFORE ATTEMPTING TO OPERATE AIR CONDITIONER.
Unit must be upright for one hour prior to operating.
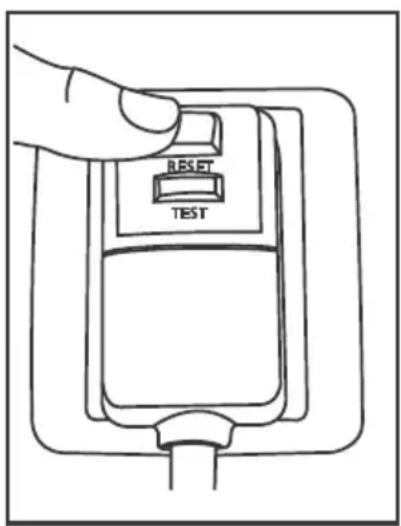
Operation of Current Device
The power supply cord contains a current device that senses damage to the power cord. To test your power supply cord do the following:
- Plug in the Air Conditioner.
- The power supply cord will have TWO buttons on the plug head. Press the TEST button. You will notice a click as the RESET button pops out.
- Press the RESET button. Again you will notice a click as the button engages.
- The power supply cord is now supplying electricity to the unit. (This is also indicated by a light on the plug head).
Plug in & press RESET
text_image
RESET TEST
NOTE
- Do not use this device to turn the unit on or off.
- Always make sure the RESET button is pushed in for correct operation.
- The power supply cord must be replaced if it fails to reset when either the TEST button is pushed, or it cannot be reset. A new one can be obtained from the product manufacturer.
- If power supply cord is damaged, it CANNOT be repaired. It MUST be replaced by one obtained from the product manufacturer.

WARNING
FOR FLAMMABLE REFRIGERANT
- Servicing shall only be performed as recommended by the equipment manufacturer. Maintenance and repair requiring the assistance of other skilled personnel shall be carried out under the supervision of the person competent in the use of flammable refrigerants.
- DO NOT modify the length of the power cord or use an extension cord to power the unit.
- DO NOT share a single outlet with other electrical appliances. Improper power supply can cause fire or electrical shock.
- Please follow the instruction carefully to handle, install, clear, service the air conditioner to avoid any damage or hazard.
- Flammable Refrigerant R32 is used within air conditioner. When maintaining or disposing the air conditioner, the refrigerant (R32) shall be recovered properly, shall not discharge to air directly.
- Compliance with national gas regulations shall be observed.
- Keep ventilation openings clear of obstruction.
-
The appliance shall be stored so as to prevent mechanical damage from occurring.
-
A warning that the appliance shall be stored in a well-ventilated area where the room size corresponds to the room area as specified for operation.
- Any person who is involved with working on or breaking into a refrigerant circuit should hold a current valid certificate from an industry-accredited assessment authority, which authorises their competence to handle refrigerants safely in accordance with an industry recognised assessment specification.
Examples for such working procedures are:
- breaking into the refrigerating circuit;
- opening of sealed components;
- opening of ventilated enclosures.
- No any open fire or device like switch which may generate spark/arcing shall be around air conditioner to avoid causing ignition of the flammable refrigerant used. Please follow the instruction carefully to store or maintain the air conditioner to prevent mechanical damage from occurring.
- Do not use means to accelerate the defrosting process or to clean, other than those recommended by the manufacturer.
- The appliance shall be stored in a room without continuously operating ignition sources (for example: open flames, an operating gas appliance) and ignition sources or (for example: an operating electric heater) close to the appliance.
- Do not pierce or burn.
-
Be aware that the refrigerants may not contain an odour.
-
Transport of equipment containing flammable refrigerants.
See transport regulations.
- Marking of equipment using signs
See local regulations.
- Disposal of equipment using flammable refrigerants
See national regulations.
- Storage of equipment/appliances
The storage of equipment should be in accordance with the manufacturer's instructions.
- Storage of packed (unsold) equipment
Storage package protection should be constructed such that mechanical damage to the equipment inside the package will not cause a leak of the refrigerant charge. The maximum number of pieces of equipment permitted to be stored together will be determined by local regulations.
- Information on servicing
a) Checks to the area
Prior to beginning work on systems containing flammable refrigerants, safety checks are necessary to ensure that the risk of ignition is minimised. For repair to the refrigerating system, the following precautions shall be complied with prior to conducting work on the system.
b) Workprocedure
Work shall be undertaken under a controlled procedure so as to minimise the risk of a flammable gas or vapour being present while the work is being performed.
c) General work area
All maintenance staff and others working in the local area shall be instructed on the nature of work being carried out. Work in confined spaces shall be avoided. The area around the workspace shall be sectioned off. Ensure that the conditions within the area have been made safe by control of flammable material.
d) Checking for presence of refrigerant
The area shall be checked with an appropriate refrigerating detector prior to and during work, to ensure the technician is aware of potentially flammable atmospheres. Ensure that the leak detection equipment being used is suitable for use with flammable refrigerants, i.e. non-sparking, adequately sealed or intrinsically safe.
e) Presence of fire extinguisher
If any hot work is to be conducted on the refrigeration equipment or any associated parts, appropriate fire extinguishing equipment shall be
available to hand. Have a dry powder or CO2 fire extinguisher adjacent to the charging area.
f) No ignition sources
No person carrying out work in relation to a refrigerating system which involves exposing any pipe work that contains or has contained flammable refrigerant shall use any sources of ignition in such a manner that it may lead to the risk of fire or explosion. All possible ignition sources, including cigarette smoking, should be kept sufficiently far away from the site of installation, repairing, removing and disposal, during which flammable refrigerant can possibly be released to the surrounding space. Prior to work taking place, the area around the equipment is to be surveyed to make sure that there are no flammable hazards or ignition risks. No Smoking signs shall be displayed.
g) Ventilated area
Ensure that the area is in the open or that it is adequately ventilated before breaking into the system or conducting any hot work. A degree of ventilation shall continue during the period that the work is carried out. The ventilation should safely disperse any released refrigerant and preferably expel it externally into the atmosphere.
h) Checks to the refrigerating equipment
Where electrical components are being changed, they shall be fit for the purpose and to the correct specification. At all times the manufacturer's maintenance and service guidelines shall be followed. If in doubt consult the manufacturer's technical department for assistance. The following checks shall be applied to installations using flammable refrigerants: The actual refrigerant charge is in accordance with the room size within which the refrigerant containing parts are installed; The ventilation machinery and outlets are operating adequately and are not obstructed; If an indirect refrigerating circuit is being used, the secondary circuit shall be checked for the presence of
refrigerant; Marking to the equipment continues to be visible and legible. Markings and signs that are illegible shall be corrected; Refrigerating pipe or components are installed in a position where they are unlikely to be exposed to any substance which may corrode refrigerant containing components, unless the components are constructed of materials which are inherently resistant to being corroded or are suitably protected against being so corroded.
i) Checks to electrical devices
Repair and maintenance to electrical components shall include initial safety checks and component inspection procedures. If a fault exists that could compromise safety, then no electrical supply shall be connected to the circuit until it is satisfactorily dealt with. If the fault cannot be corrected immediately but it is necessary to continue operation, an adequate temporary solution shall be used. This shall be reported to the owner of the equipment so all parties are advised. Initial safety checks shall include: That capacitors are discharged: this shall be done in a safe manner to avoid possibility of sparking; That there no live electrical components and wiring are exposed while charging, recovering or purging the system; That there is continuity of earth bonding.
7. Repairs to sealed components
a) During repairs to sealed components, all electrical supplies shall be disconnected from the equipment being worked upon prior to any removal of sealed covers, etc. If it is absolutely necessary to have an electrical supply to equipment during servicing, then a permanently operating form of leak detection shall be located at the most critical point to warn of a potentially hazardous situation.
b) Particular attention shall be paid to the following to ensure that by working on electrical components, the casing is not altered in such a way that the level of protection is affected. This shall include damage to cables, excessive number of
connections, terminals not made to original specification, damage to seals, incorrect fitting of glands, etc. Ensure that apparatus is mounted securely.
Ensure that seals or sealing materials have not degraded such that they no longer serve the purpose of preventing the ingress of flammable atmospheres. Replacement parts shall be in accordance with the manufacturer's specifications.
NOTE: The use of silicon sealant may inhibit the effectiveness of some types of leak detection equipment. Intrinsically safe components do not have to be isolated prior to working on them.
8. Repair to intrinsically safe components
Do not apply any permanent inductive or capacitance loads to the circuit without ensuring that this will not exceed the permissible voltage and current permitted for the equipment in use. Intrinsically safe components are the only types that can be worked on while live in the presence of a flammable atmosphere. The test apparatus shall be at the correct rating. Replace components only with parts specified by the manufacturer. Other parts may result in the ignition of refrigerant in the atmosphere from a leak.
9. Cabling
Check that cabling will not be subject to wear, corrosion, excessive pressure, vibration, sharp edges or any other adverse environmental effects. The check shall also take into account the effects of aging or continual vibration from sources such as compressors or fans.
10. Detection of flammable refrigerants
Under no circumstances shall potential sources of ignition be used in the searching for or detection of refrigerant leaks. A halide torch (or any other detector using a naked flame) shall not be used.
The following leak detection methods are deemed acceptable for systems containing flammable refrigerants. Electronic leak detectors shall be used to detect flammable refrigerants, but the sensitivity may not be adequate, or may
need re-calibration. (Detection equipment shall be calibrated in a refrigerant-free area). Ensure that the detector is not a potential source of ignition and is suitable for the refrigerant used. Leak detection equipment shall be set at a percentage of the LFL of the refrigerant and shall be calibrated to the refrigerant employed and the appropriate percentage of gas (25 % maximum) is confirmed. Leak detection fluids are suitable for use with most refrigerants but the use of detergents containing chlorine shall be avoided as the chlorine may react with the refrigerant and corrode the copper pipe-work. If a leak is suspected, all naked flames shall be removed/extinguished. If a leakage of refrigerant is found which requires brazing, all of the refrigerant shall be recovered from the system, or isolated (by means of shut off valves) in a part of the system remote from the leak. Removal of refrigerant shall be according to Removal and evacuation.
11. Removal and evacuation
When breaking into the refrigerant circuit to make repairs - or for any other purpose-conventional procedures shall be used. However, for flammable refrigerants it is important that best practice be followed, since flammability is a consideration. The following procedure shall be adhered to:
a) safely remove refrigerant following local and national regulations;
b) purge the circuit with inert gas;
c) evacuate (optional for A2L);
d) purge with inert gas (optional for A2L);
e) open the circuit by cutting or brazing.
The refrigerant charge shall be recovered into the correct recovery cylinders if venting is not allowed by local and national codes. For appliances containing flammable refrigerants, the system shall be purged with oxygen-free nitrogen to render the appliance safe for flammable refrigerants. This process might need to be repeated several times. Compressed air or oxygen shall not be used for
purging refrigerant systems. For appliances containing flammable refrigerants, refrigerants purging shall be achieved by breaking the vacuum in the system with oxygen-free nitrogen and continuing to fill until the working pressure is achieved, then venting to atmosphere, and finally pulling down to a vacuum (optional for A2L). This process shall be repeated until no refrigerant is within the system (optional for A2L). When the final oxygen-free nitrogen charge is used, the system shall be vented down to atmospheric pressure to enable work to take place. Ensure that the outlet for the vacuum pump is not close to any potential ignition sources and that ventilation is available.
12. Charging procedures
In addition to conventional charging procedures, the following requirements shall be followed. Ensure that contamination of different refrigerants does not occur when using charging equipment. Hoses or lines shall be as short as possible to minimise the amount of refrigerant contained in them. Cylinders shall be kept in an appropriate position according to the instructions. Ensure that the refrigeration system is earthed prior to charging the system with refrigerant. Label the system when charging is complete (if not already). Extreme care shall be taken not to overfill the refrigeration system. Prior to recharging the system it shall be pressure tested with OFN. The system shall be leak tested on completion of charging but prior to commissioning. A follow up leak test shall be carried out prior to leaving the site.
13. Decommissioning
Before carrying out this procedure, it is essential that the technician is completely familiar with the equipment and all its detail. It is recommended good practice that all refrigerants are recovered safely. Prior to the task being carried out, an oil and refrigerant sample shall be taken in case analysis is required prior to re-use of reclaimed refrigerant. It is essential that
electrical power is available before the task is commenced.
a) Become familiar with the equipment and its operation.
b) Isolate system electrically.
c) Before attempting the procedure ensure that: Mechanical handling equipment is available, if required, for handling refrigerant cylinders; All personal protective equipment is available and being used correctly; The recovery process is supervised at all times by a competent person; Recovery equipment and cylinders conform to the appropriate standards.
d) Pump down refrigerant system, possible.
e) If a vacuum is not possible, make a manifold so that refrigerant can be removed from various parts of the system.
f) Make sure that cylinder is situated on the scales before recovery takes place.
g) Start the recovery machine and operate in accordance with instructions.
h) Do not overfill cylinders. (No more than 80% volume liquid charge).
i) Do not exceed the maximum working pressure of the cylinder, even temporarily.
j) When the cylinders have been filled correctly and the process completed, make sure that the cylinders and the equipment are removed from site promptly and all isolation valves on the equipment are closed off.
k) Recovered refrigerant shall not be charged into another refrigeration system unless it has been cleaned and checked.
14. Labelling
Equipment shall be labelled stating that it has been de-commissioned and emptied of refrigerant. The label shall be dated and signed. Ensure that there are labels on the equipment stating the equipment contains flammable refrigerant.
15.Recovery
When removing refrigerant from a system, either for servicing or decommissioning, it is recommended
good practice that all refrigerants are removed safely. When transferring refrigerant into cylinders, ensure that only appropriate refrigerant recovery cylinders are employed. Ensure that the correct number of cylinders for holding the total system charge is available. All cylinders to be used are designated for the recovered refrigerant and labelled for that refrigerant (i.e. special cylinders for the recovery of refrigerant). Cylinders shall be complete with pressure relief valve and associated shut-off valves in good working order. Empty recovery cylinders are evacuated and, if possible, cooled before recovery occurs.
The recovery equipment shall be in good working order with a set of instructions concerning the equipment that is at hand and shall be suitable for the recovery of flammable refrigerants. In addition, a set of calibrated weighing scales shall be available and in good working order. Hoses shall be complete with leak-free disconnect couplings and in good condition. Before using the recovery machine, check that it is in satisfactory working order, has been properly maintained and that any associated electrical components are sealed to
prevent ignition in the event of a refrigerant release. Consult manufacturer if in doubt. The recovered refrigerant shall be returned to the refrigerant supplier in the correct recovery cylinder, and the relevant Waste Transfer Note arranged.
Do not mix refrigerants in recovery units and especially not in cylinders.
If compressors or compressor oils are to be removed, ensure that they have been evacuated to an acceptable level to make certain that flammable refrigerant does not remain within the lubricant. The evacuation process shall be carried out prior to returning the compressor to the suppliers. Only electric heating to the compressor body shall be employed to accelerate this process. When oil is drained from a system, it shall be carried out safely.
Non-duct connected appliances containing A2L refrigerants with the supply and return air openings in the conditioned space may have the body of the appliance may be installed in open areas such as false ceilings not being used as return air plenums, as long as the conditioned air does not directly communicate with the air of the false ceiling.
 | CAUTION:Risk of fire flammable materialsIMPORTANT NOTE: Read this manual carefully before installing or operating your new air conditioning unit. Make sure to save this manual for future reference. | |
 | CAUTION | This symbol shows that the operation manual should be read carefully. |
 | CAUTION | This symbol shows that information is available such as the operating manual or installation manual. |
 | CAUTION | This symbol shows that a service personnel should be handling this equipment with reference to the installation manual. |
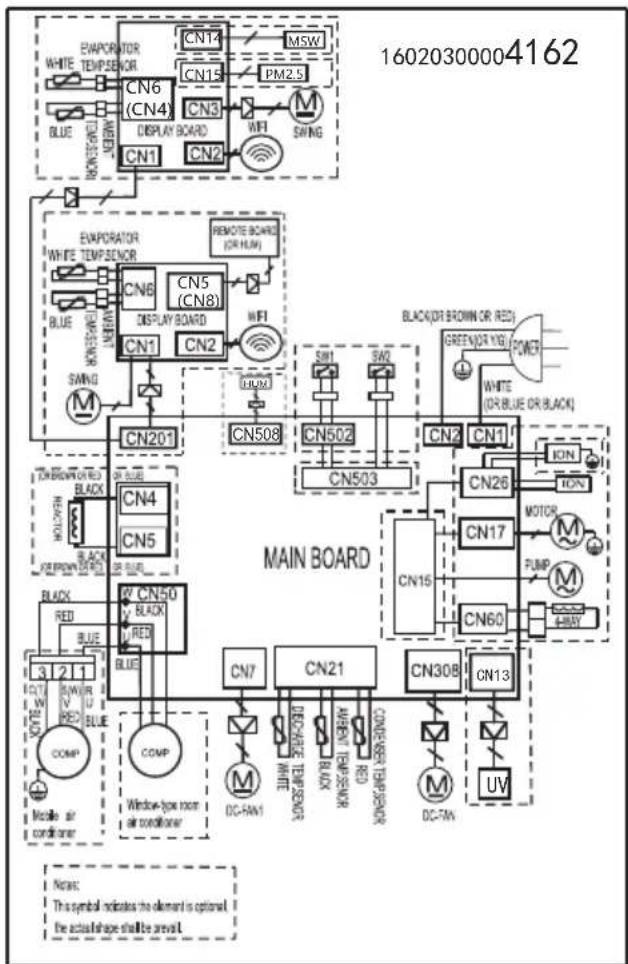
Wiring Diagram
flowchart
graph TD
    subgraph MAIN BOARD
        A["CN201"] --> B["CN508"]
        C["CN503"] --> D["CN502"]
        E["CN1"] --> F["CN2"]
        G["CN7"] --> H["CN21"]
        I["CN30B"] --> J["CN13"]
    end
    subgraph EVaporator
        K["CN6 (CN4)"] --> L["CN14"]
        M["CN13"] --> N["PM2.5"]
        O["SWI"] --> P["SWI"]
        Q["ROI"] --> R["ROI"]
    end
    subgraph Temperature Sensor
        S["SWI"] --> T["SWI"]
        U["ROI"] --> V["ROI"]
    end
    subgraph Control Panel
        W["Black (OR BROWN OR RED)"] --> X["GREEN (OR YES)"]
        Y["WHITE (OR BLUE OR BLACK)"] --> Z["POWER"]
    end
    subgraph Control Panel
        AA["Motor"] --> AB["M"]
        AC["PUMP"] --> AD["M"]
        AE["UV"] --> AF["M"]
    end
    style MAIN BOARD fill:#f9f,stroke:#333
    style EVaporator fill:#ccf,stroke:#333
    style Temperature Sensor fill:#cfc,stroke:#333
    style Control Panel fill:#fcc,stroke:#333
Packaging
Remove all packaging from inside the carton, along with any inserts placed into the side louvers.
PACKAGING INSERTS

natural_image
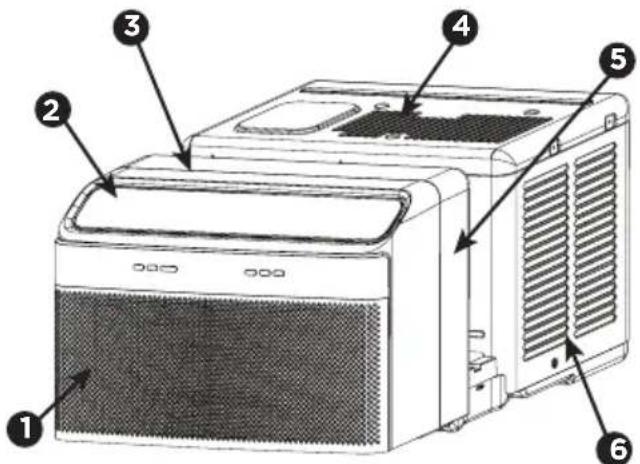
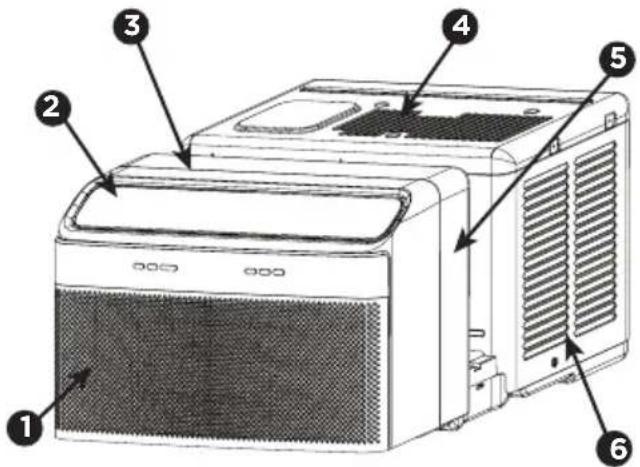
Technical line drawing of a front-mounted industrial machine with ventilation grilles and cooling unit (no text or symbols)Normal Sounds
text_image
Diagram of a front-end air conditioner unit with numbered parts labeled 1 through 61 Gurgle/Hiss
"Gurgling or hissing" noise may be heard due to refrigerant passing through evaporator during normal operation.
② Sound of Rushing Air
At the front of the unit, you may hear the sound of rushing air being moved by the fan.
3 High pitched Chatter
Today's high efficiency compressors may have a high pitched chatter during the cooling cycle.
4 Noise when unit starts
Within the first thirty seconds of turning on the unit, a "da-da" sound may be heard due to the start of the compressor (inverter models only). This is normal.
5 Vibration
If excessive vibration occurs, please check to see that unit is correctly installed.
6 Pinging or Swishing
Droplets of water hitting condenser during normal operation may cause "pinging or swishing" sounds.
Note: Do not drill into, or physically modify any part of the unit to eliminate the above stated 'Normal Sounds', because it will void the warranty.
FCC Interference Statement
This equipment has been tested and found to comply with the limits for a Class B digital device, pursuant to part 15 of the FCC Rules. These limits are designed to provide reasonable protection against harmful interference in a residential environment. This equipment generates, uses, and can radiate radio frequency energy and, if not installed and used in accordance with the instructions, may cause harmful interference to radio communications. However, there is no guarantee that interference will not occur in a particular installation. If this equipment does cause harmful interference to radio or television reception, which can be determined by tuning the device off and on, the user is encouraged to try to correct the interference by one or more of the following measures:
- Reorient or relocate the receiving antenna.
- Increase the separation between the device and receiver.
- Connect the equipment into an outlet other than the one used for the receiver.
- Consult the dealer or an experienced radio/TV technician for assistance.
This device complies with Part 15 of the FCC Rules. Operation is subject to the following two conditions: (1) This device may not cause harmful interference, and (2) This device must accept any interference received, including interference that may cause undesired operation.
FCC CAUTION: Any changes or modifications not expressly approved by the party responsible for compliance could void the user's authority to operate the equipment.
Host device Labeling
This device includes the following module. Contains FCC ID: 2AIBX-NIULL
RF exposure statement
This equipment complies with FCC radiation exposure limits set forth for an uncontrolled environment. This equipment should be installed and operated with minimum 20 cm between the radiator and your body. This transmitter must not be collocated or operating in conjunction with any other antenna or transmitter unless authorized to do so by the FCC.
INDUSTRY CANADA (IC) STATEMENT
This Class B digital apparatus complies with Canadian ICES-003.
This device complies with Industry Canada license-exempt RSS standard(s). Operation is subject to the following two conditions: (1) this device may not cause interference, and (2) this device must accept any interference, including interference that may cause undesired operation of the device.
The antenna (or antennas) must be installed so as to maintain at all times a distance minimum of at least 20 cm between the radiation source (antenna) and any individual. This device may not be installed or used in conjunction with any other antenna or transmitter.
l'exposition aux RF
Host device Labeling
This device includes the following module. Contains IC: 21700-NIULL
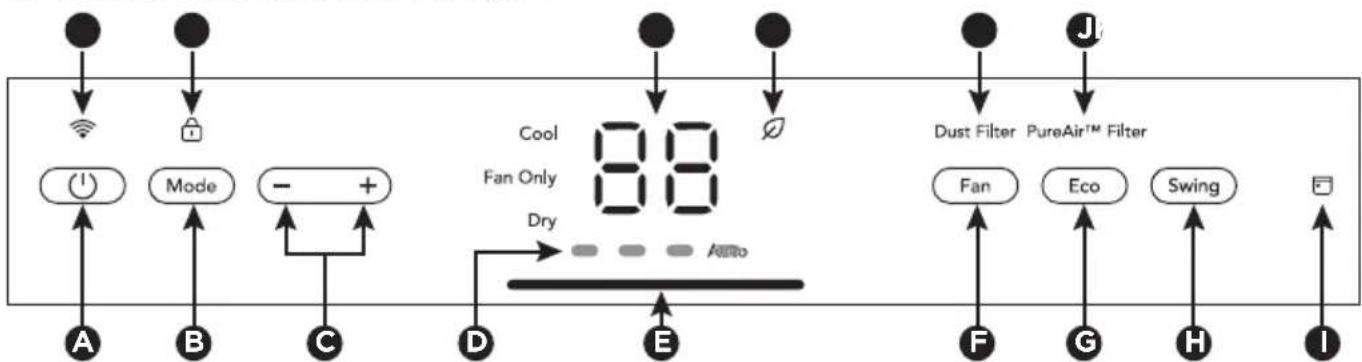
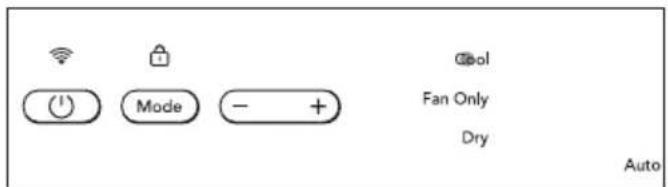
Before you begin, thoroughly familiarize yourself with the control panel, remote control and all its functions (as shown below). The unit can be controlled through the control panel, with the remote control, or with our App*.
flowchart
graph TD
    A["Input A"] --> B["Mode"]
    B --> C["Mode"]
    C --> D["Mode"]
    D --> E["D"]
    E --> F["Auto"]
    F --> G["Dust Filter"]
    G --> H["PureAir™ Filter"]
    H --> I["Fan"]
    H --> J["Eco"]
    H --> K["Swing"]
    I --> L["F"]
    J --> M["G"]
    K --> N["H"]
    L --> O["I"]
    M --> P["I"]
    N --> Q["I"]
    style A fill:#000,stroke:#fff,color:#fff
    style B fill:#000,stroke:#fff,color:#fff
    style C fill:#000,stroke:#fff,color:#fff
    style D fill:#000,stroke:#fff,color:#fff
    style E fill:#000,stroke:#fff,color:#fff
    style F fill:#000,stroke:#fff,color:#fff
    style G fill:#000,stroke:#fff,color:#fff
    style H fill:#000,stroke:#fff,color:#fff
    style I fill:#000,stroke:#fff,color:#fff
    style J fill:#000,stroke:#fff,color:#fff
    style K fill:#000,stroke:#fff,color:#fff
    style L fill:#000,stroke:#fff,color:#fff
    style M fill:#000,stroke:#fff,color:#fff
    style N fill:#000,stroke:#fff,color:#fff
    style O fill:#000,stroke:#fff,color:#fff
| A | Turns Unit On Or Off |
| B | Sets Mode |
| C | Adjusts Temperature |
| D | Fan speed display |
| E | Air quality light |
| F | Fan speed button |
| G | Eco button |
| H | Swing louver button |
| I | Schedule Indicator |
| PureAirTM Filter iconJ | |
| Change Dust Filter iconK | |
| Temperature displayL | |
| Child lock iconM | |
| N | WIFI Indicator* |
| Eco IndicatorO |
Note: Some feature can only be controlled through the control panel.
*Refer to the Quick Start Guide for detailed instructions on setting up your air conditioner for connected operation from your smart phone or tablet.
REMOTE CONTROL
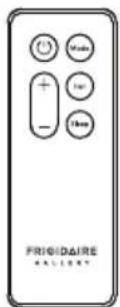
Battery Size: AAA
Warning: Do not mix old and new batteries. Do not mix alkaline, standard (carbon-zinc), or rechargeable (nickel-cadmium) batteries.
Do not ingest. Keep out of the reach of children.

The unit is equipped with a Wi-Fi module, which enables remote control, monitor and set your schedules from anywhere with your mobile phone.
Download our app and follow the step-step onboarding instructions to bring the product online.


text_image
QR code image containing encoded data, no visible human-readable text(iOS)


text_image
QR code image containing encoded data, no visible human-readable text(Android)

NOTE
The following instructions are for the control panel. The same instructions can be used for the remote control.
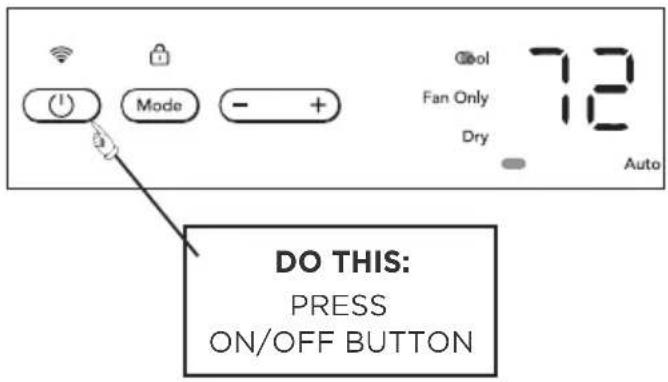
TO TURN UNIT ON:
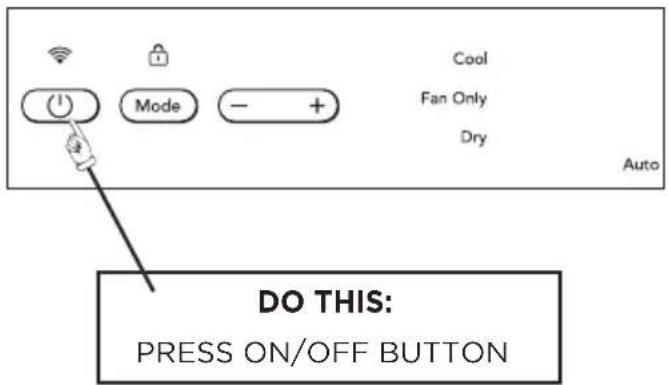
text_image
Cool Fan Only Dry Auto DO THIS: PRESS ON/OFF BUTTONYOU WILL SEE:
text_image
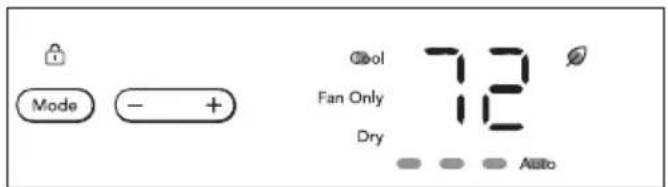
Mode - + Cool 72 Fan Only 12 Dry AirloNOTE: The unit will run in Cool mode with Eco feature and Auto fan speed setting when used for the first time. With the Eco feature, when the room temperature is below the set temperature, the fan will continue to run for 3 minutes after the compressor shuts off. The fan then cycles on for 2 minutes at 10 minute intervals until the room temperature is above the set temperature, at which time the compressor turns back on. Eco feature can be activated or deactivated by pressing the Eco button, and cannot be activated in 'fan only' mode.
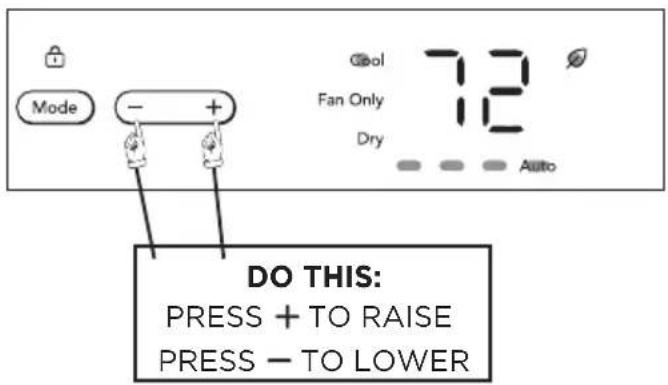
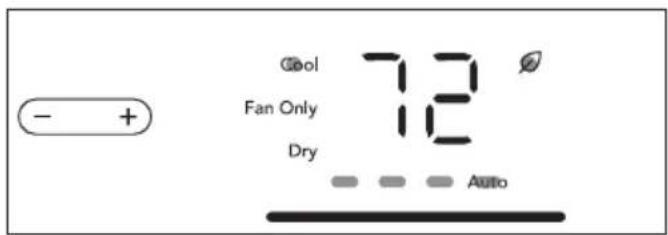
TO CHANGE TEMPERATURE SETTING:
text_image
Mode - + Cool 72 Fan Only Dry Auto DO THIS: PRESS + TO RAISE PRESS - TO LOWERYOU WILL SEE:
text_image
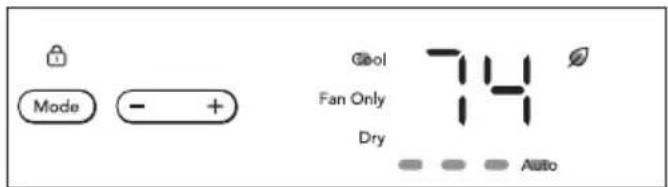
Mode - + Cool Fan Only Dry 74 AutoThe display will show the set temperature during normal operation, press either up (+) or down (-) buttons to adjust the temperature to desired setting. If the up (+) or down (-) button is pressed continuously, the unit will beep twice when the temperature setting reaches the upper/lower limits 90°F or 60°F.
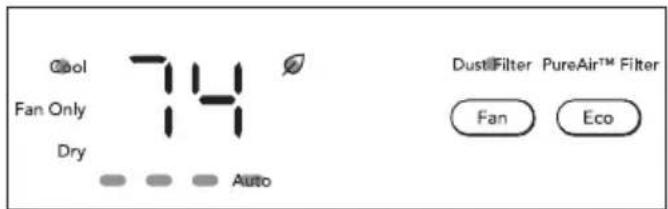
TO ADJUST FAN SPEEDS:
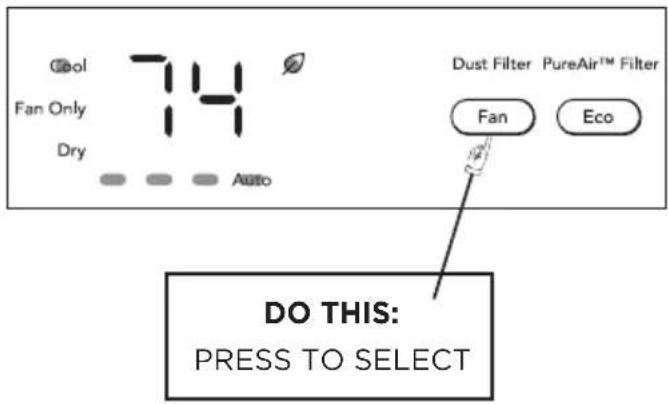
text_image
Cool Fan Only Dry 74 Auto Dust Filter PureAir™ Filter Fan Eco DO THIS: PRESS TO SELECTYOU WILL SEE:
text_image
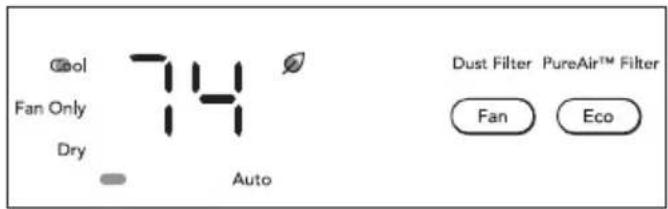
Cool Fan Only Dry 74 Auto Dust Filter PureAir™ Filter Fan EcoTO SET TO AUTO FAN:
text_image
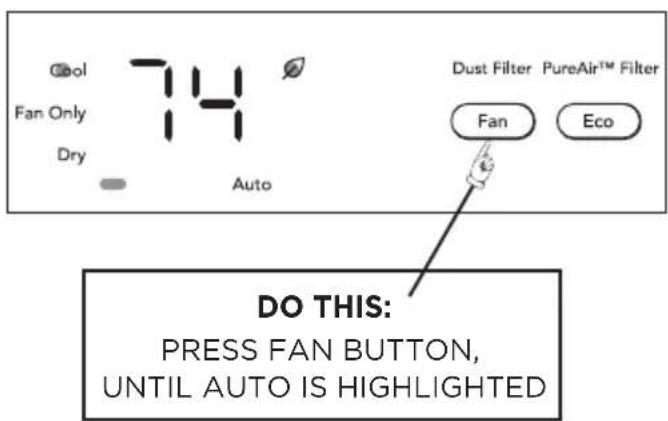
Cool Fan Only Dry 74 Auto Dust Filter PureAir™ Filter Fan Eco DO THIS: PRESS FAN BUTTON, UNTIL AUTO IS HIGHLIGHTEDYOU WILL SEE: COOL FEATURE:

text_image
Cool Fan Only Dry 74° Auto Dust Filter PureAir™ Filter Fan EcoInitially, fan starts on High Speed and adjusts to a slower speed dictated by room temperature. For example, if room temperature rises quickly, such as when a door is opened, the fan will automatically switch to the highest speed. The fan speed will re-adjust to a slower speed as the room cools. Press the fan button to adjust the fan speed manually.
TO OPERATE IN FAN ONLY MODE:
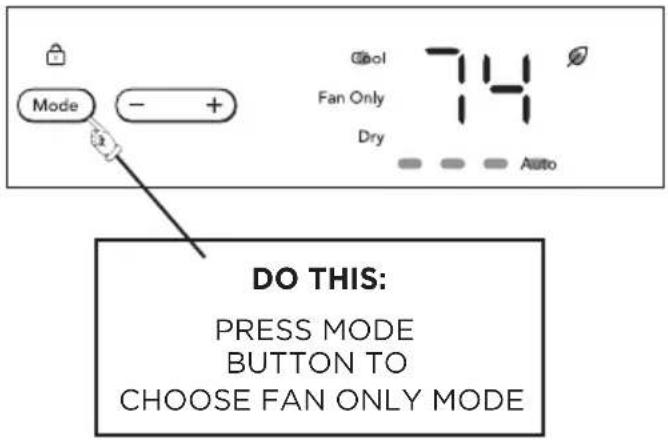
text_image
Mode - + 3 Do this: PRESS MODE BUTTON TO CHOOSE FAN ONLY MODEYOU WILL SEE:
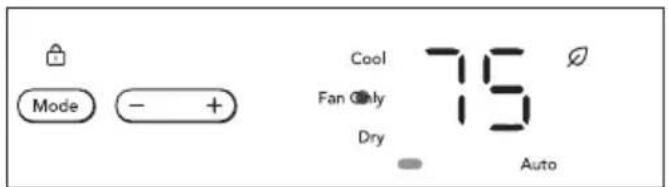
text_image
Mode - + Cool Fan Only Dry 75 15 AutoUse this function when cooling is not desired, such as for room air circulation or to exhaust stale air. You can choose any fan speed you prefer. (Except "Auto Fan"). When operating in this mode, the display will show the actual room temperature and the set temperature cannot be changed.
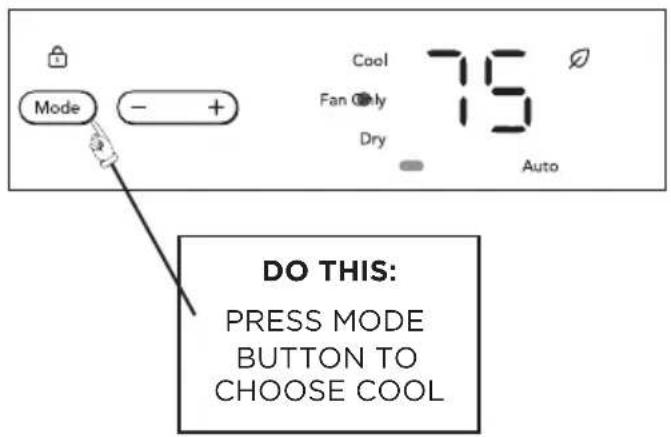
text_image
Mode - + Cool 75 Fan Only Dry Auto DO THIS: PRESS MODE BUTTON TO CHOOSE COOLYOU WILL SEE:
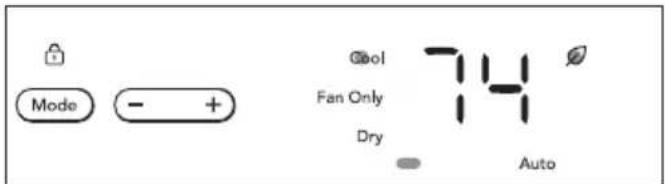
text_image
Mode - + Cool Fan Only Dry 74 AutoEach time Cool mode is selected, the ECO feature will be activated by default. Press ECO button to deactivate. When ECO feature is deactivated, the fan remains On all of the time with the compressor cycling on and off when the desired room temperature is reached.
DRY FEATURE:
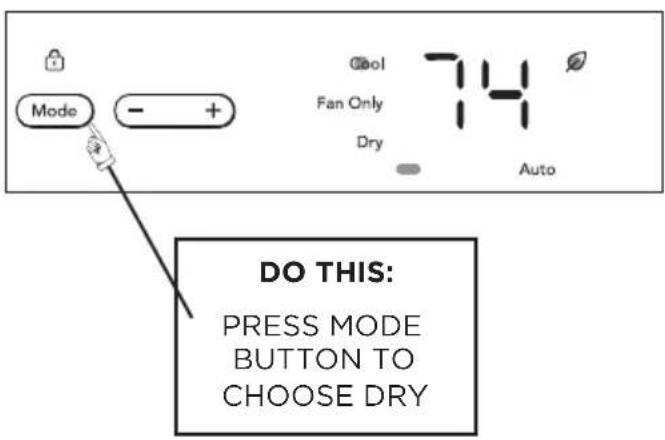
text_image
DO THIS: PRESS MODE BUTTON TO CHOOSE DRYYOU WILL SEE:
text_image
Mode - + Cool Fan Only Dry 74 AutoIn this mode, the air conditioner will work like a dehumidifier, but will still cool the room. The temperature can be adjusted between 60 °F (16 °C) and 90 °F (32 °C) and the fan speed will be held at Auto speed. Each time Dry mode is selected Eco feature will be activated as default. Press Eco button to deactivate.
Eco (ENERGY SAVER) FEATURE:
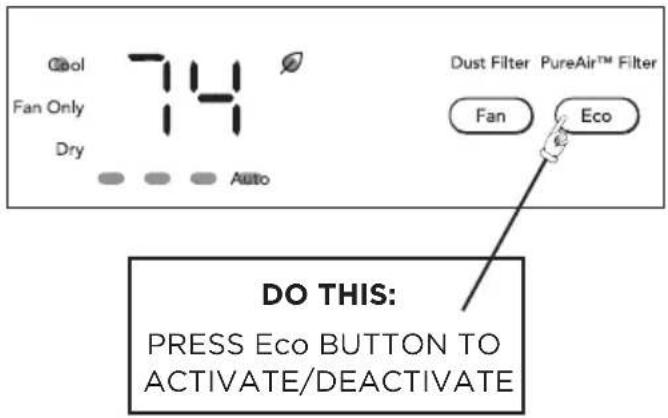
text_image
Cool Fan Only Dry 74 Auto Dust Filter PureAir™ Filter Fan Eco DO THIS: PRESS Eco BUTTON TO ACTIVATE/DEACTIVATEYOU WILL SEE:

text_image
Cbol Fan Only Dry 74 Auto Dust Filter PureAir™ Filter Fan EcoEach time Cool or Dry mode is selected Eco feature will be activated as default. We recommend leaving the Eco feature on to help save energy and money. To switch out of Eco mode, press the Eco button during Cool or Dry mode.
In Eco mode, the fan will continue to run for 3 minutes after the compressor shuts off. The fan then cycles on for 120 seconds at 10 minutes intervals until the room temperature is above the set temperature, at which time the compressor turns back on.

NOTE:
If the unit is shut off during Cool or Dry mode, unit will start with the same mode, target temperature and fan speed as prior to standby. If the mode was Cool or Dry, ECO will be activated automatically when the appliance turns on. If the unit is running in cool or dry mode without Eco feature and a power failure occurs, once the power is restored, Eco feature will remain off.
TO ACTIVATE THE CHILD LOCK FEATURE:
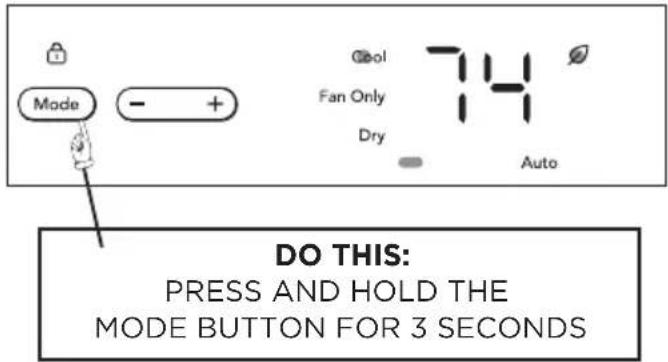
text_image
Mode - + Cool Fan Only Dry 74 Auto DO THIS: PRESS AND HOLD THE MODE BUTTON FOR 3 SECONDSYOU WILL SEE:
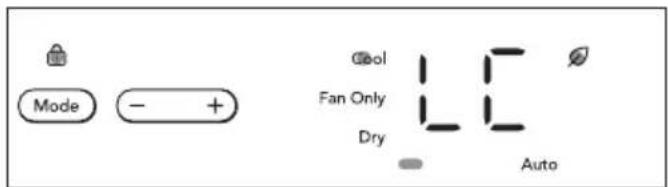
text_image
Mode - + Cool Fan Only Dry AutoPressing and holding the Mode button for 3 seconds will activate or deactivate the Lock function. The display will show LC for 5 secs. The control panel will be locked and settings cannot be changed.
CHECK DUST FILTER FEATURE:
text_image
@ol Fan Only Dry 74 Auto DustFilter PureAir™ Filter Fan EcoThis feature is a reminder to clean the Dust Filter (See Care and Cleaning). The Dust Filter light will illuminate after 250 hours of operation. To reset after cleaning the filter, hold the "Fan" button for 5 seconds.
YOU WILL SEE:
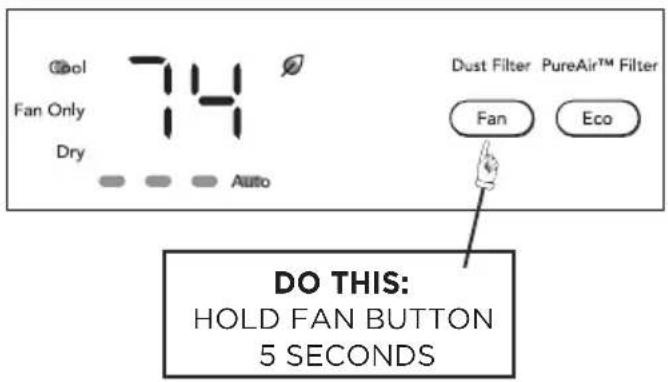
text_image
Cool Fan Only Dry 74 Auto Dust Filter PureAir™ Filter Fan Eco DO THIS: HOLD FAN BUTTON 5 SECONDSPUREAIR™ FILTER (sold separately):
This unit can be used with PureAir™ Filters, which can be purchased by scanning the QR code behind the air inlet grille, by visiting Frigidaire.com, or by calling Frigidaire Customer Service Center 1-800-944-9044(US) / 1-800-265-8352 (Canada).
PUREAIR™ FILTER INDICATOR:
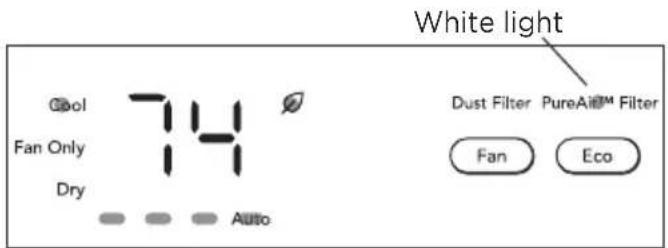
text_image
White light Cool Fan Only Dry 74 Auto Dust Filter PureAI™ Filter Fan EcoNote: The PureAir ^TM Filter indicator will glow white, if a PureAir ^TM filter is installed.
RESET PUREAIR™ FILTER LIGHT:
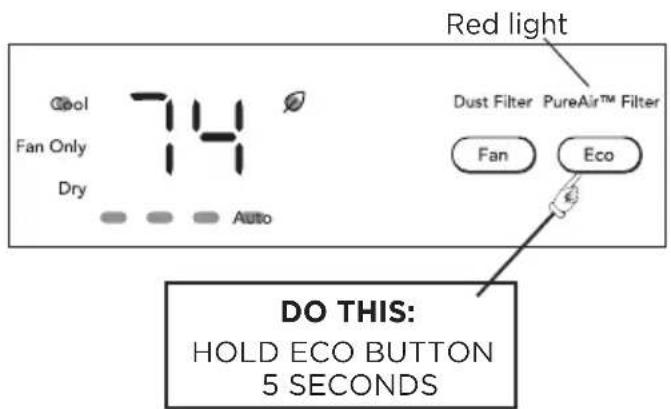
text_image
Red light Cool Fan Only Dry 74 Auto Dust Filter PureAir™ Filter Fan Eco DO THIS: HOLD ECO BUTTON 5 SECONDSAfter 1440 hours of operation the PureAir™ Filter indicator will turn red. To reset, replace with new PureAir™ Filter, then hold the "Eco" button 5 for seconds.
SLEEP FEATURE:
Sleep mode can only be activated by Remote control or APP.
The display will show SL for 3 seconds. Then, the display, indicator lights, and the air quality light will turn off.
In this mode, the unit will automatically select the Auto fan speed, and the selected temperature will increase by 2 °F 30 minutes after sleep mode is selected. The temperature will then increase by another 2 °F after an additional 30 minutes. This new temperature will be maintained for 7 hours before it returns to the originally selected temperature. This ends the "Sleep" mode and the unit will continue to operate as originally programmed. The "Sleep" mode program can be cancelled at any time during operation by pressing the "Sleep" button, "Fan" or "Mode" button.
DIMMING DISPLAY:

text_image
Cool Fan Only Dry Auto Dust Filter PureAir™ Filter Fan Eco SwingAfter 60 seconds of inactivity, the display and indicator lights will turn off. And the Air quality light will reduce its brightness. Press any button on the control panel or remote control, and the display will illuminate. Please note that if the unit is in Eco mode and the set temperature has been reached, the unit may appear off. However, the unit is on and will continue to sample the air temperature every 10 minutes. To confirm, press any button on the control panel or remote control.
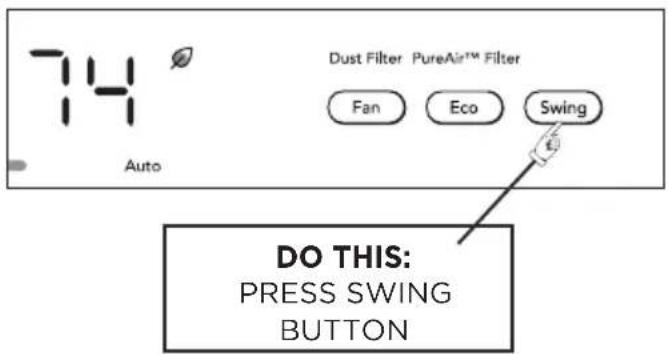
TO OPERATE SWING FEATURE:
text_image
74° Auto Dust Filter PureAir™ Filter Fan Eco Swing DO THIS: PRESS SWING BUTTONPress the Swing button to activate the swing louver and distribute air evenly throughout the room.
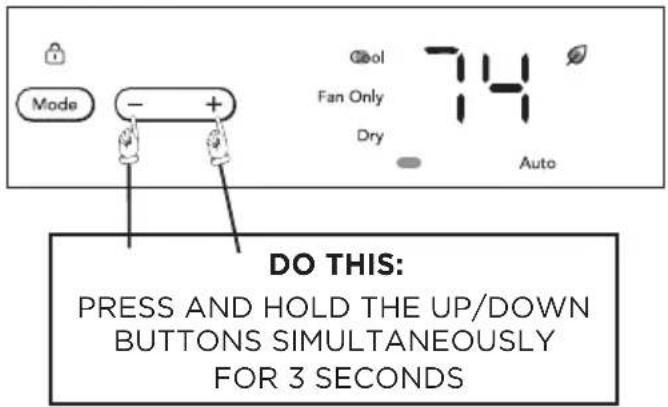
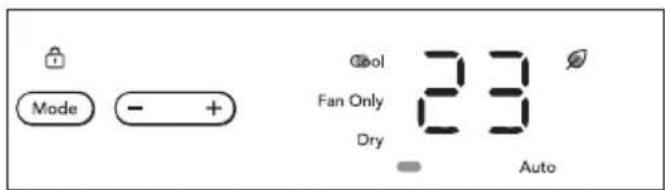
TO CHANGE THE TEMPERATURE SCALE (°F OR °C):
text_image
Mode - + Qol Fan Only Dry 74 Auto DO THIS: PRESS AND HOLD THE UP/DOWN BUTTONS SIMULTANEOUSLY FOR 3 SECONDSYOU WILL SEE:
text_image
Mode - + Cool 23 Fan Only Dry AutoYour AC is capable of displaying temperature in degrees Fahrenheit or degrees Celsius.
AIR QUALITY LIGHT
text_image
Cool Fan Only Dry 72° AutoWhen used for the first time, the Air quality light will emit a white light for 1 minute, then switch to Green, Yellow or Red according to the actual air quality in your room.
Color Air quality
Green Good
Yellow Moderate
Red Bad
Note: The Air quality light will turn off in sleep mode.
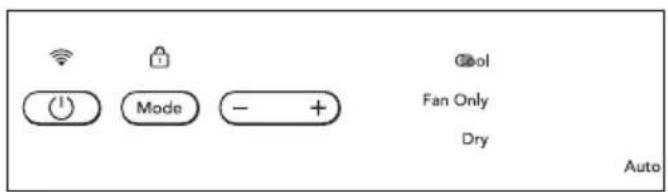
TO TURN UNIT OFF:
text_image
DO THIS: PRESS ON/OFF BUTTONYOU WILL SEE:
text_image
Cool Fan Only Dry AutoWhen the unit is turned off, the display will gradually fade away after 3 seconds. The unit will always return to "Eco" mode and "Auto" fan speed setting when it is turned on again.
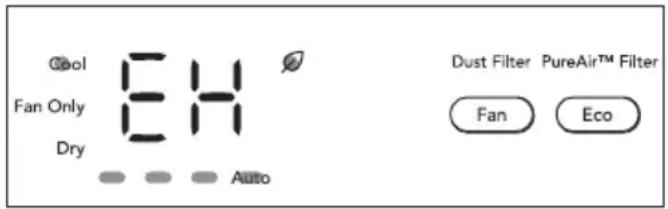
FAULT CODES:
When below error codes show on the display, please contact your Authorized Frigidaire Service Center.
| Error Code | Description |
| EH00 | Internal memory chip failure |
| EH60 | Indoor ambient temperature sensor is open/short circuited |
| EH0b | Communication malfunction of main control board. |
Note: The error code will be separated into 2 parts. The display will alternate in 1 second intervals. For example, if the fault code "EH00" occurs, the panel will first display "EH" for 1 second, then display "00" for another second. The error code will continue to loop until the issue is resolved.
SHOWS "EH" FOR ONE SECOND: THEN SHOWS "00" FOR ANOTHER SECOND:
text_image
Cool Fan Only Dry 84 Auto Dust Filter PureAir™ Filter Fan Eco
text_image
@ol Fan Only Dry Auto Dust Filter PureAir™ Filter Fan EcoNote: There are more than 3 error codes. If an error code appears on the display, turn off the unit and restart it. If the error code persist, please contact your Authorized Frigidaire Service Center.
ADDITIONAL THINGS YOU SHOULD KNOW
Now that you have mastered the operating procedure, here are more features in your control that you should become familiar with.

NOTE
The "Cool" circuit has an automatic 3 minute time delayed start if the unit is turned off and on quickly. This prevents overheating of the compressor and possible circuit breaker tripping. The fan will continue to run during this time.
- There is a 2-Second delay for the compressor shutting down when selecting FAN ONLY. This is to cover the possibility of having to roll through to select another mode.
- The control will maintain the set temperature within 2 degrees Fahrenheit, between 60^ and 90^ degrees.
• After a power outage, the unit will memorize the last setting and return the unit to the same setting once power is restored.
- The unit should be operated in an indoor temperature range of 60^ - 90^ (16°C - 32°C), and an outdoor temperature range of 64^ - 109^ (18°C - 43°C). Performance may be reduced outside of these operating temperatures.
Clean your air conditioner occasionally to keep it looking new. Be sure to unplug the unit before cleaning to prevent shock or fire hazards.
Dust Filter Cleaning
The Dust filter should be checked at least once a month to see if cleaning is necessary. Trapped particles in the Dust filter can build up and cause an accumulation of frost on the cooling coils.
- Open the front panel.
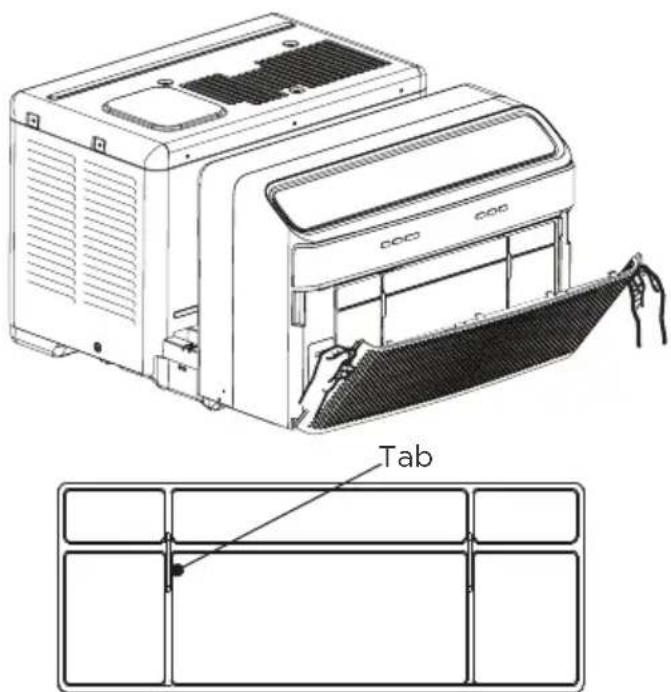
- Grasp the Dust Filter in the center, and pull up and out.
- Wash the Dust Filter using liquid dishwashing detergent and warm water. Rinse Dust Filter thoroughly. Gently shake excess water from the Dust Filter. Be sure Dust Filter is thoroughly dry before replacing.
• Instead of washing, you may vacuum the Dust Filter clean.
NOTE: When replacing the Dust Filter after cleaning, make sure the protruding tabs on the filter are facing outward, as shown below.
text_image
COCO TabDust Filter
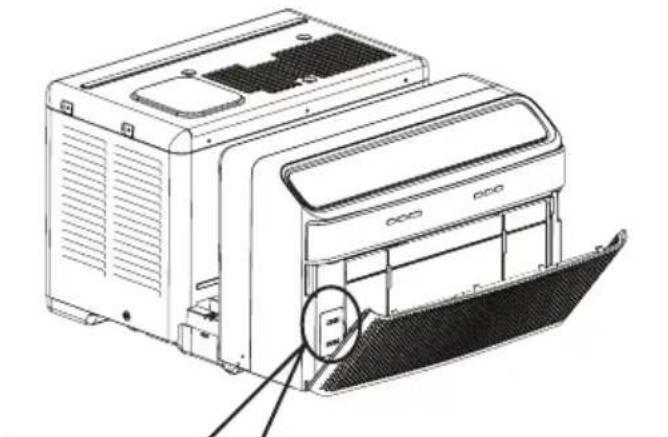
Cleaning of Air Quality Sensor
We suggest cleaning your Air Quality Sensor every 2 months. This suggestion is based on continuous usage of your unit.
To clean the air quality sensor:
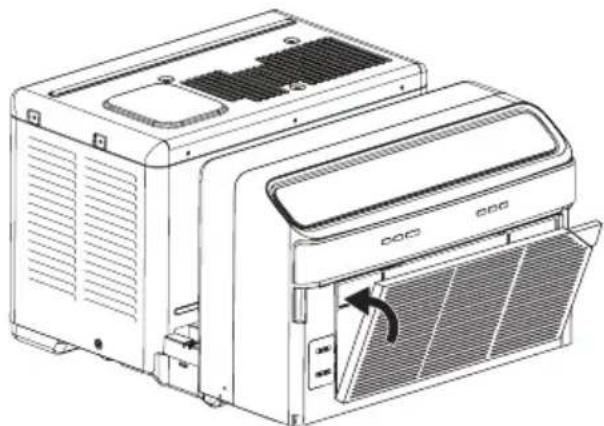
- Open the front panel.
- Open the Air Quality Sensor cover.
- Clean the lens, inlet and outlet, with a damp cotton swab. Use a dry cotton swab to remove any excess water from the sensor.
- Reinstall the cover and front panel after cleaning.
natural_image
Technical line drawing of a computer unit with a magnified inset showing a component (no text or symbols present)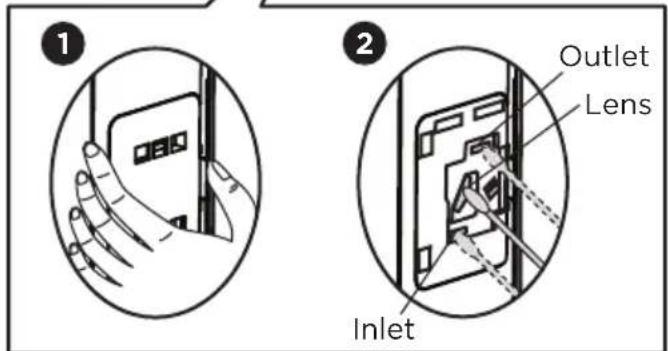
text_image
1 2 Outlet Lens InletPUREAIR™ FILTER (sold separately):
This unit has available space for use with a PureAir™ Filters (sold separately). Different types of PureAir™ Filters can be purchased by scanning the QR code behind the air inlet grille, by visiting Frigidaire.com, or by calling Frigidaire Customer Service Center 1-800-944-9044(US) / 1-800-265-8352 (Canada).
22 CARE AND CLEANING & ENERGY SAVING IDEAS
To install the PureAir ^TM Filter:
-
Remove the Dust filter as instructed in the Dust filter cleaning section.
-
Insert the PureAir™ filter in the reserved space behind the Dust Filter as shown below.
natural_image
Line drawing of a CDC air conditioner unit with ventilation slots and fan (no text or symbols)- Reinstall the Dust Filter and air inlet grille.
Note: If the PureAir ^TM filter is installed properly, the PureAir ^TM Filter indicator will glow white. Otherwise reinstall the filter.
The PureAir ^TM filter should be replaced regularly to achieve optimal results.
To remove the filter, grab the fabric tabs on either side of PureAir filter and pull out.
Cabinet Cleaning
- Be sure to unplug the air conditioner to prevent shock or fire hazard. The cabinet and front may be dusted with an oil-free cloth or washed with a cloth dampened in a solution of warm water and mild liquid dishwashing detergent. Rinse thoroughly and wipe dry.
- Never use harsh cleaners, wax or polish on the cabinet front.
- Be sure to wring excess water from the cloth before wiping around the controls. Excess water in or around the controls may cause damage to the air conditioner.
Winter Storage
If you plan to store your air conditioner during the cooler months, remove it carefully from the window according to the installation instructions, cover with plastic, or return to its the original carton.
Energy Saving Ideas
- Do not block air flow inside with blinds, curtains or furniture; or outside with shrubs, enclosures, or other buildings.
- The capacity of the room air conditioner must fit the room size for efficient and satisfactory operation.
• Install the room air conditioner on the shady side of your home. A window that faces north is best because it is shaded most of the day.
- Close the fireplace damper, floor and wall registers so cool air does not escape up the chimney and into the duct work.
- Keep blinds and drapes in other windows closed during the sunniest part of the day.
- Clean the air filter as recommended in the section "Care and Cleaning".
- Proper insulation and weather stripping in your home will help keep warm air out and cool air in.
- External house shading with trees, plants or awnings will help reduce the air conditioner's work load.
- Operate heat producing appliances such as ranges, washers, dryers and dishwashers during the coolest part of the day.
Before calling for service, review this list. It may save you time and expense. This list includes common occurrences that are not the result of defective workmanship or materials in this appliance.
| SOLUTIONOCCURRENCE | |
| Air conditioner will not operate. | Wall plug disconnected.Push plug firmly into wall outlet.Plug Current Device Tripped.Press the RESET button.House fuse blown or circuit breaker tripped.Replace fuse with time delay type or reset circuit breaker.Control is OFF.Turn Control ON and set to desired setting. |
| Air from unit does not feel cold enough. | Room temperature below 60°F (16°C).Cooling may not occur until room temperature rises above 60°F (16°C).Temperature sensing element touching cold coil, located behind air filter.Straighten away from coil.Reset to a lower temperature.Compressor shut-off by changing modes.Wait approximately 3 minutes and listen for compressor to restart when set in the COOL mode. |
| Air conditioner cooling, but room is too warm - ice forming on cooling coil behind decorative front | Outdoor temperature below 60 F° (16°C).To defrost the coil,set FAN ONLY mode.Dust filter may be dirty.Clean filter.Refer to Care and Cleaning section.To defrost,set to FAN ONLY mode.PureAirtMfilter(sold separately) may be dirty.Replace with new filter.Refer to Care and Cleaning section.To defrost,set to FAN ONLY mode.Temperature is set too low for night-time cooling.To defrost the coil,set to FAN ONLY mode.Then,set temperature to a higher setting. |
| Air conditioner cooling, but room is too warm - NO ice forming on cooling coil behind decorative front. | Dirty Dust filter - air restricted.Clean filters.Refer to Care and Cleaning section.PureAirtMfilter(sold separately) may be dirty.Replace with new filter.Refer to Care and Cleaning section.To defrost,set to FAN ONLY mode.Temperature is set too high.Set temperature to a lower setting.Air directional louvers positioned improperly.Position louvers for better air distribution.Front of unit is blocked by drapes, blinds, furniture, etc.- restricts air distribution.Clear blockage in front of unit.Doors,windows,registers,etc.open - cool air escapes.Close doors,windows, registers,etc.Unit recently turned on in hot room.Allow additional time to remove “stored heat” from walls,ceiling,floor and furniture. |
| Air conditioner turns on and off rapidly. | Dirty Dust filter - air restricted.Clean filters.Refer to Care and Cleaning section.PureAirtMfilter(sold separately) may be dirty.Replace with new filter.Refer to Care and Cleaning section.To defrost,set to FAN ONLY mode.Outside temperature extremely hot.Set FAN speed to a faster setting to bring air through cooling coils more frequently. |
| Noise when unit is cooling. | Air movement sound. This is normal. If too loud, set to lower FAN setting.Window vibration - poor installation. Refer to installation instructions or check with installer. |
| Water dripping INSIDE when unit is cooling. | Improper installation. Tilt air conditioner slightly to the outside to allow water drainage. Refer to installation instructions or check with installer. |
| Water dripping OUTSIDE when unit is cooling. | Unit removing large quantity of moisture from humid room. This is normal during excessively humid days. |
| Remote Sensing Deactivating Prematurely (some models). | Remote control not located within range. Place remote control within 20 feet & 120° radius of the front of the unit.Remote control signal obstructed. Remove obstruction. |
| Room too cold. | Set temperature too low. Increase set temperature.Remote Sensing activated (on some models) and remote control located in Hot Spot - Relocate remote control or deactivate remote sensing. |
| Trouble connecting the smart appliance to your wifi network or experiencing an issue with the app. | Please visit Frigidaire.com and select the Owner Support section to view Frequently Asked Questions. |
If These Solutions Fail, Call 1-800-944-9044(US)/1-800-265-8352(Canada) For Frigidaire Service.
Your appliance is covered by a limited one-year warranty for functional repairs only. For one year from your original date of purchase, Electrolux will pay all costs for repairing or replacing any parts of this appliance that prove to be defective in materials or workmanship when such appliance is installed, used and maintained in accordance with the provided instructions. After one year from your original date of purchase, the consumer will be responsible for diagnostic, labor and parts costs as well as any removal, transportation and reinstallation expenses which are incurred during service on components.
Exclusions
This warranty does not cover the following:
- Products with original serial numbers that have been removed, altered or cannot be readily determined.
- Product that has been transferred from its original owner to another party or removed outside the USA or Canada.
- Rust on the interior or exterior of the unit.
- Products purchased "as-is" are not covered by this warranty.
- Food loss due to any refrigerator or freezer failures.
- Products used in a commercial setting.
- Service calls which do not involve malfunction or defects in materials or workmanship, or for appliances not in ordinary household use or used other than in accordance with the provided instructions.
- Service calls to correct the installation of your appliance or to instruct you how to use your appliance.
- Expenses for making the appliance accessible for servicing, such as removal of trim, cupboards, shelves, etc., which are not a part of the appliance when it is shipped from the factory.
- Service calls to repair or replace appliance light bulbs, air filters, water filters, other consumables, or knobs, handles, or other cosmetic parts.
- Surcharges including, but not limited to, any after hour, weekend, or holiday service calls, tolls, ferry trip charges, or mileage expense for service calls to remote areas, including the state of Alaska.
- Damages to the finish of appliance or home incurred during installation, including but not limited to floors, cabinets, walls, etc.
- Damages caused by: services performed by unauthorized service companies; use of parts other than genuine Electrolux parts or parts obtained from persons other than authorized service companies; or external causes such as abuse, misuse, inadequate power supply, accidents, fires, or acts of God.
DISCLAIMER OF IMPLIED WARRANTIES; LIMITATION OF REMEDIES
CUSTOMER'S SOLE AND EXCLUSIVE REMEDY UNDER THIS LIMITED WARRANTY SHALL BE PRODUCT REPAIR OR REPLACEMENT AS PROVIDED HEREIN. CLAIMS BASED ON IMPLIED WARRANTIES, INCLUDING WARRANTIES OF MERCHANTABILITY OR FITNESS FOR A PARTICULAR PURPOSE, ARE LIMITED TO ONE YEAR OR THE SHORTEST PERIOD ALLOWED BY LAW, BUT NOT LESS THAN ONE YEAR. ELECTROLUX SHALL NOT BE LIABLE FOR CONSEQUENTIAL OR INCIDENTAL DAMAGES SUCH AS PROPERTY DAMAGE AND INCIDENTAL EXPENSES RESULTING FROM ANY BREACH OF THIS WRITTEN LIMITED WARRANTY OR ANY IMPLIED WARRANTY. SOME STATES AND PROVINCES DO NOT ALLOW THE EXCLUSION OR LIMITATION OF INCIDENTAL OR CONSEQUENTIAL DAMAGES, OR LIMITATIONS ON THE DURATION OF IMPLIED WARRANTIES, SO THESE LIMITATIONS OR EXCLUSIONS MAY NOT APPLY TO YOU. THIS WRITTEN WARRANTY GIVES YOU SPECIFIC LEGAL RIGHTS. YOU MAY ALSO HAVE OTHER RIGHTS THAT VARY FROM STATE TO STATE.
If You Need Service Keep your receipt, delivery slip, or some other appropriate payment record to establish the warranty period should service be required. If service is performed, it is in your best interest to obtain and keep all receipts. Service under this warranty must be obtained by contacting Electrolux at the addresses or phone numbers below.
This limited warranty only applies in the USA and Canada. In the USA, your appliance is warranted by Electrolux Major Appliances North America, a division of Electrolux Home Products, Inc. In Canada, your appliance is warranted by Electrolux Canada Corp. Electrolux authorizes no person to change or add to any obligations under this warranty. Obligations for service and parts under this warranty must be performed by Electrolux or an authorized service company. Product features or specifications as described or illustrated are subject to change without notice.
USA
1.800.944.9044
Electrolux Major Appliances
10200 David Taylor Drive
Charlotte, NC 28262

Electrolux
Canada
1.800.265.8352
Electrolux Canada Corp.
5855 Terry Fox Way
Mississauga, Ontario, Canada
L5V 3E4
FRIGIDAIRE
welcome home
Our home is your home. Visit us if you need help with any of these things:

owner support

accessories

service
registration
(See your registration card for more information.)
Frigidaire.com
1-800-944-9044
Frigidaire.ca
1-800-265-8352
There are 2 manuals in this document, please refer to below table for which manual is suitable for your AC
| Manual 1:Page 1-80 | For models with service model number:GHWQ085WD101, GHWQ105WD101, GHWQ125WD101 |
| Manual 2:Page 81-148 | For models with service model number:GHWQ085WD100, GHWQ105WD100, GHWQ125WD100 |
Please refer to your product's nameplate to check service model number.
natural_image
Technical line drawing of a mechanical device with ventilation grilles and a control panel (no text or symbols)Sonidos normales
text_image
Diagram of a front-end air conditioner unit with numbered parts labeled 1 through 61 Borboteo/Siseo
text_image
QR code image containing encoded data, no visible human-readable text(iOS)


text_image
QR code image containing encoded data, no visible human-readable text(Android)

NOTA
text_image
Mode Cool Fan Only Dry Autotext_image
Cool Fan Only Dry 72 AutoPara limpiar el sensor PM:
natural_image
Line drawing of a DCC air conditioner unit with cooling fan and ventilation slots (no text or symbols)Electrolux Major Appliances
10200 David Taylor Drive
Charlotte, NC 28262

Electrolux
Canada
1.800.265.8352
Electrolux Canada Corp.
5855 Terry Fox Way
Mississauga, Ontario, Canada
L5V 3E4
FRIGIDAIRE
bienvenido
casa
There are 2 manuals in this document, please refer to below table for which manual is suitable for your AC
| Manual 1:Page 1-80 | For models with service model number:GHWQ085WD101, GHWQ105WD101, GHWQ125WD101 |
| Manual 2:Page 81-148 | For models with service model number:GHWQ085WD100, GHWQ105WD100, GHWQ125WD100 |
Please refer to your product's nameplate to check service model number.
natural_image
Technical line drawing of a mechanical device with ventilation grilles and a door (no text or symbols)Sons normaux
text_image
Diagram of a front-end air conditioner unit with numbered parts labeled 1 through 6This Class B digital apparatus complies with Canadian ICES-003.
This device complies with Industry Canada license-exempt RSS standard(s). Operation is subject to the following two conditions:
(1) this device may not cause interference, and (2) this device must accept any interference, including interference that may cause undesired operation of the device.
The antenna (or antennas) must be installed so as to maintain at all times a distance minimum of at least 20 cm between the radiation source (antenna) and any individual. This device may not be installed or used in conjunction with any other antenna or transmitter.
l'exposition aux RF
Host device Labeling
This device includes the following module. Contains IC: 21700-NIULL
flowchart
graph TD
    A["●"] --> B["WiFi"]
    C["●"] --> D["Lock"]
    E["●"] --> F["Mode"]
    G["●"] --> H["+"]
    I["●"] --> J["A"]
    K["●"] --> L["Mode"]
    M["●"] --> N["+"]
    O["●"] --> P["A"]
    Q["●"] --> R["Mode"]
    S["●"] --> T["+"]
    U["●"] --> V["A"]
    W["●"] --> X["Mode"]
    Y["●"] --> Z["+"]
    AA["●"] --> AB["A"]
    AC["●"] --> AD["A"]
    AE["●"] --> AF["A"]
    AG["●"] --> AH["A"]
    AI["●"] --> AJ["A"]
    AK["●"] --> AL["A"]
    AM["●"] --> AN["A"]
    AO["●"] --> AP["A"]
    AQ["●"] --> AR["A"]
    AS["●"] --> AT["A"]
    AU["●"] --> AV["A"]
    AW["●"] --> AX["A"]
    AY["●"] --> AZ["A"]
    BA["●"] --> BB["A"]
    BC["●"] --> BD["A"]
    BE["●"] --> BF["A"]
    BG["●"] --> BH["A"]
    BI["●"] --> BJ["A"]
    BK["●"] --> BL["A"]
    BM["●"] --> BN["A"]
    BO["●"] --> BP["A"]
    BQ["●"] --> BR["A"]
    BS["●"] --> BT["A"]
    BU["●"] --> BV["A"]
    BW["●"] --> BX["A"]
    BY["●"] --> BZ["A"]
    CA["●"] --> CB["A"]
    CC["●"] --> CD["A"]
    CE["●"] --> CF["A"]
    CG["●"] --> CH["A"]
    CI["●"] --> CJ["A"]
    CK["●"] --> CL["A"]
    CM["●"] --> CN["A"]
    CO["●"] --> CP["A"]
    CS["●"] --> CSA["A"]
    CT["●"] --> CU["A"]
    CV["●"] --> CY["A"]
    CZ["●"] --> DA["A"]
    DB["●"] --> DC["A"]
    DV["●"] --> DW["A"]
    DX["●"] --> DXA["A"]
    DXB["●"] --> DXB1["A"]
    DXC["●"] --> DXC1["A"]
    DXD["●"] --> DXD2["A"]
    DXE["●"] --> DXE1["A"]
    DXF["●"] --> DXF1["A"]
    DXG["●"] --> DXG1["A"]
    DXH["●"] --> DXH1["A"]
text_image
QR code image containing encoded data, no visible human-readable text(ios)


text_image
QR code image containing encoded data, no visible human-readable text(Android)

REMARQUE
text_image
cool Fan Only Dry 72 Auto ACTION: APPUYEZ SUR LE BOUTON MARCHE/ARRÊTCE QUI APPARAÎT:
text_image
Cool Fan Only Dry Autonatural_image
Line drawing of a two-tiered air conditioner unit with ventilation slots and a cooling fan (no text or symbols)Electrolux Major Appliances
10200 David Taylor Drive
Charlotte, NC 28262

Electrolux
Canada
1.800.265.8352
Electrolux Canada Corp.
5855 Terry Fox Way
Mississauga, Ontario, Canada
L5V 3E4
FRIGIDAIRE
bienvenue maison
Important Safety Instructions.... 3
Packaging....7
Normal Sounds....7
FCC Statement...... 8
Air Conditioner Features....9
Operating Instructions.... 10
Care and Cleaning.... 16
Energy Saving Ideas.... 17
Before You Call.... 18
Major Appliance Limited Warranty.....20
There are 2 manuals in this document, please refer to below table for which manual is suitable for your AC
| Manual 1:Page 1-80 | For models with service model number:GHWQ085WD101, GHWQ105WD101, GHWQ125WD101 |
| Manual 2:Page 81-148 | For models with service model number:GHWQ085WD100, GHWQ105WD100, GHWQ125WD100 |
Please refer to your product's nameplate to check service model number.
Welcome to our family
Thank you for bringing Frigidaire® into your home! We see your purchase as the beginning of a long relationship together.
This manual is your resource for the use and care of your product. Please read it before using your appliance. Keep it handy for quick reference. If something doesn't seem right, the troubleshooting section will help you with common issues.
FAQs, helpful tips and videos, cleaning products, and kitchen and home accessories are available at www.frigidaire.com.
We are here for you! Visit our website, chat with an agent, or call us if you need help. We may be able to help you avoid a service visit. If you do need service, we can get that started for you.
Let's make it official! Be sure to register your product.
Keep your product info here so it's easy to find.
Model Number ____
Serial Number ____
Purchase Date ____

WARNING
For Your Safety
Do not store or use gasoline or other flammable vapors and liquids in the vicinity of this or any other appliance. Read product labels for flammability and other warnings.

WARNING
Prevent Accidents
To reduce the risk of fire, electrical shock, or injury to persons when using your air conditioner, follow basic precautions, including the following:
- Be sure the electrical service is adequate for the model you have chosen. This information can be found on the serial plate, which is located on the side of the cabinet and behind the grille.
- If the air conditioner is to be installed in a window, you will probably want to clean both sides of the glass first. If the window is a triple-track type with a screen panel included, remove the screen completely before installation.
- Be sure the air conditioner has been securely and correctly installed according to the separate installation instructions provided with this manual. Save this manual and the installation instructions for possible future use in removing or reinstalling this unit.
- When handling the air conditioner, be careful to avoid cuts from sharp metal fins on front and rear coils.

WARNING
Electrical Information
The complete electrical rating of your new room air conditioner is stated on the serial plate. Refer to the rating when checking the electrical requirements.
- Be sure the air conditioner is properly grounded. To minimize shock and fire hazards, proper grounding is important.
The power cord is equipped with a three-prong grounding plug for protection against shock hazards.
- Your air conditioner must be used in a properly grounded wall receptacle. If the wall receptacle you intend to use is not adequately grounded or protected by a time delay fuse or circuit breaker, have a qualified electrician install the proper receptacle.
- Do not run air conditioner without outside protective cover in place. This could result in mechanical damage within the air conditioner.
- Do not use an extension cord or an adapter plug.

WARNING
Avoid fire hazard or electric shock. Do not use an extension cord or an adaptor plug. Do not remove any prong from the power cord.
Grounding type wall receptacle

text_image
Do not, under any circumstances, cut, remove, or bypass the grounding prong. Power supply cord with 3-prong grounding plug and current detection device
NOTE
The power supply cord with this air conditioner contains a current detection device designed to reduce the risk of fire.
Please refer to the section ‘Operation of Current Device’ for details.
In the event that the power supply cord is damaged, it cannot be repaired. It must be replaced with a cord from the product manufacturer.

SAFETY PRECAUTIONS
DANGER! Avoid Serious Injury or Death
- This air conditioner contains no user-serviceable parts. Always call an authorized Electrolux servicer for repairs.
- Do not insert or place fingers or objects into the air discharge area in the front of the unit.
- Do not start or stop the air conditioner by unplugging the power cord or turning off the power at the electrical box.
- Do not cut or damage the power cord.
- If the power cord is damaged, it should only be replaced by an authorized Electrolux servicer.
- In the event of a malfunction (sparks, burning smell, etc.), immediately stop the operation, disconnect the power cord, and call an authorized Electrolux servicer.
- Do not operate the air conditioner with wet hands.
- Do not pull on the power cord.
- Do not drink any water that is drained from the air conditioner.

SAFETY PRECAUTIONS
CAUTION! Avoid Injury or damage to the unit or other property
- Provide ventilation per installation instructions.
- Do not direct airflow at fireplaces or other heat related sources as this could cause flare ups or make units run excessively.
- Do not climb on or place objects on outdoor part of the unit.
- Do not hang objects off the unit.
- Do not place containers with liquids on the unit.
- Turn off the air conditioner at the power source when it will not be used for an extended period of time.
- Periodically check the condition of the unit's installation accessories for any damage.
- Do not apply heavy pressure to the radiator fins of the unit.
- Operate the unit without air filter in place.
- Do not block or cover the intake grille, discharge area and outlet ports.
- Ensure that any electrical/electronic equipment is one yard away from the unit.
- Do not use or store flammable gases near the unit.
- Do not touch the metal parts of the unit when removing the filter. Injuries can occur when handling sharp metal edges.
- Do not use water to clean inside the air conditioner. Exposure to water can destroy the insulation, leading to possible electric shock.
- When cleaning the unit, first make sure that the power and circuit breaker are turned off.

WARNING
FOR FLAMMABLE REFRIGERANT
- Do not use means to accelerate the defrosting process or to clean, other than those recommended by the manufacturer.
- Do not pierce or burn.
- Be aware that the refrigerants may not contain an odour.
- Compliance with national gas regulations shall be observed.
- Keep ventilation openings clear of obstruction.
- The appliance shall be stored in a room without continuously operating ignition sources (for example: open flames, an operating gas appliance) and ignition sources or (for example: an operating electric heater) close to the appliance.
- The appliance shall be stored so as to prevent mechanical damage from occurring.
- A warning that the appliance shall be stored in a well-ventilated area where the room size corresponds to the room area as specified for operation.
- Any person who is involved with working on or breaking into a refrigerant circuit should hold a current valid certificate from an industry-accredited assessment authority, which authorizes their competence to handle refrigerants safely in accordance with an industry recognized assessment specification.
- Servicing shall only be performed as recommended by the equipment manufacturer. Maintenance and repair requiring the assistance of other skilled personnel shall be carried out under the supervision of the person competent in the use of flammable refrigerants.
- DO NOT modify the length of the power cord or use an extension cord to power the unit.
- DO NOT share a single outlet with other electrical appliances. Improper power supply can cause fire or electrical shock.
- Please follow the instruction carefully to handle, install, clear, service the air conditioner to avoid any damage or hazard. Flammable Refrigerant R32 is used within air conditioner. When maintaining or disposing the air conditioner, the refrigerant (R32 or R290) shall be recovered properly, shall not discharge to air directly.
- No any open fire or device like switch which may generate spark/arcing shall be around air conditioner to avoid causing ignition of the flammable refrigerant used. Please follow the instruction carefully to store or maintain the air conditioner to prevent mechanical damage from occurring.
- Flammable refrigerant - R32 is used in air conditioner. Please follow the instruction carefully to avoid any hazard.
- The refrigerating system should not receive maintenance, service, or repair by any person.
- Ensure that the area is in the open or that it is adequately ventilated before breaking into the system or conducting any hot work. A degree of ventilation shall continue during the period that the work is carried out. The ventilation should safely disperse any released refrigerant and preferably expel it externally into the atmosphere.
- Check that cabling will not be subject to wear, corrosion, excessive pressure, vibration, sharp edges or any other adverse environmental effects. The check shall also take into account the effects of aging or continual vibration from sources such as compressors or fans.
- Under no circumstances shall potential sources of ignition be used in the searching for or detection of refrigerant leaks. A halide torch (or any other detector using a naked flame) shall not be used. The following leak detection methods are deemed acceptable for all refrigerant systems. Electronic leak detectors may be used to detect refrigerant leaks but, in the case of FLAMMABLE REFRIGERANTS, the sensitivity may not be adequate, or may need re-calibration. (Detection equipment shall be calibrated in a refrigerant-free area.) Ensure that the detector is not a potential source of ignition and is suitable for the refrigerant used. Leak detection equipment shall be set at a percentage of
the LFL of the refrigerant and shall be calibrated to the refrigerant employed, and the appropriate percentage of gas (25% maximum) is confirmed. Leak detection fluids are also suitable for use with most refrigerants but the use of detergents containing chlorine shall be avoided as the chlorine may react with the refrigerant and corrode the copper pipe-work.
NOTE Examples of leak detection fluids are - bubble method,
- fluorescent method agents.
If a leak is suspected, all naked flames shall be removed/extinguished.
If a leakage of refrigerant is found contact local manufacture to replace unit.

CAUTION
- This appliance is not intended for use by persons (including children) with reduced physical, sensory or mental capabilities or lack of experience and knowledge, unless they have been given supervision or instruction concerning use of the appliance by a person responsible for their safety.
• Children should be supervised to ensure that they do not play with the appliance. - If the supply cord is damaged, it must be replaced by the manufacturer, its service agent or similarly qualified persons in order to avoid a hazard.
- The appliance shall be installed in accordance with national wiring regulations.
READ THIS SECTION BEFORE ATTEMPTING TO OPERATE AIR CONDITIONER.
Unit must be upright for one hour prior to operating.
Operation of Current Device
The power supply cord contains a current device that senses damage to the power cord. To test your power supply cord do the following:
- Plug in the Air Conditioner.
- The power supply cord will have TWO buttons on the plug head. Press the TEST button. You will notice a click as the RESET button pops out.
- Press the RESET button again, you will notice a click as the button engages.
- The power supply cord is now supplying electricity to the unit. (This is also indicated by a light on the plug head).
Plug in & press RESET
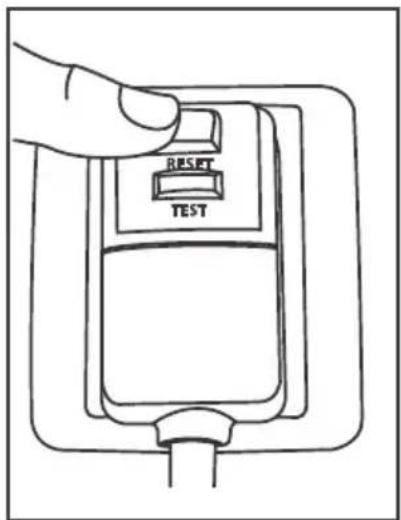
text_image
RESET TEST
NOTE
- Do not use this device to turn the unit on or off.
• Always make sure the RESET button is pushed in for correct operation. - The power supply cord must be replaced if it fails to reset when either the TEST button is pushed, or it cannot be reset. A new one can be obtained from the product manufacturer.
- If power supply cord is damaged, it CANNOT be repaired. It MUST be replaced by one obtained from the product manufacturer.
Explanation of symbols displayed on the unit
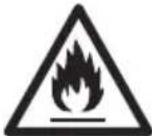 | WARNING | This symbol shows that this appliance used a flammable refrigerant. If the refrigerant is leaked and exposed to an external ignition source, there is a risk of fire. |
 | CAUTION | This symbol shows that the operation manual should be read carefully. |
 | CAUTION | This symbol shows that a service personnel should be handling this equipment with reference to the installation manual. |
 | CAUTION | This symbol shows that information is available such as the operating manual or installation manual. |
Packaging
Remove all packaging from inside the carton, along with any inserts placed into the side louvers.
PACKAGING INSERTS
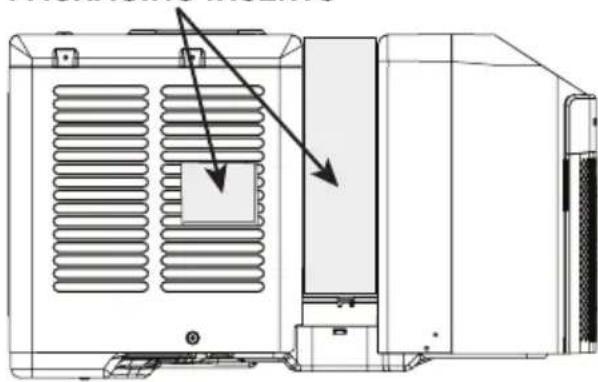
natural_image
Technical line drawing of a mechanical device with ventilation slots and a door (no text or symbols)Normal Sounds
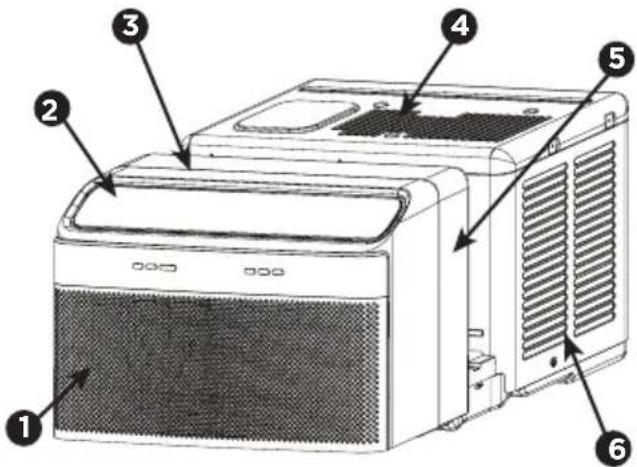
text_image
Diagram of a front-end air conditioner unit with numbered parts labeled 1 through 61 Gurgle/Hiss
"Gurgling or hissing" noise may be heard due to refrigerant passing through evaporator during normal operation.
② Sound of Rushing Air
At the front of the unit, you may hear the sound of rushing air being moved by the fan.
3 High pitched Chatter
Today's high efficiency compressors may have a high pitched chatter during the cooling cycle.
4 Noise when unit starts
A “da-da” sound may occur when the unit is turned on in thirty seconds due to the compressor starting (For Inverter type). It is normal.
5 Vibration
Unit may vibrate and make noise because of poor wall or window construction or incorrect installation.
6 Pinging or Swishing
Droplets of water hitting condenser during normal operation may cause "pinging or swishing" sounds.
Note: Don't try to drill any holes on the base pan to eliminate the normal sounds, otherwise it will void the warranty.
FCC Interference Statement
This equipment has been tested and found to comply with the limits for a Class B digital device, pursuant to part 15 of the FCC Rules. These limits are designed to provide reasonable protection against harmful interference in a residential environment. This equipment generates, uses, and can radiate radio frequency energy and, if not installed and used in accordance with the instructions, may cause harmful interference to radio communications. However, there is no guarantee that interference will not occur in a particular installation. If this equipment does cause harmful interference to radio or television reception, which can be determined by tuning the device off and on, the user is encouraged to try to correct the interference by one or more of the following measures:
- Reorient or relocate the receiving antenna.
- Increase the separation between the device and receiver.
- Connect the equipment into an outlet other than the one used for the receiver.
- Consult the dealer or an experienced radio/TV technician for assistance.
This device complies with Part 15 of the FCC Rules. Operation is subject to the following two conditions: (1) This device may not cause harmful interference, and (2) This device must accept any interference received, including interference that may cause undesired operation.
FCC CAUTION: Any changes or modifications not expressly approved by the party responsible for compliance could void the user's authority to operate the equipment.
Host device Labeling
This device includes the following module. Contains FCC ID: 2AIBX-NIULL
RF exposure statement
This equipment complies with FCC radiation exposure limits set forth for an uncontrolled environment. This equipment should be installed and operated with minimum 20 cm between the radiator and your body. This transmitter must not be collocated or operating in conjunction with any other antenna or transmitter unless authorized to do so by the FCC.
INDUSTRY CANADA (IC) STATEMENT
This Class B digital apparatus complies with Canadian ICES-003.
This device complies with Industry Canada license-exempt RSS standard(s). Operation is subject to the following two conditions: (1) this device may not cause interference, and (2) this device must accept any interference, including interference that may cause undesired operation of the device.
The antenna (or antennas) must be installed so as to maintain at all times a distance minimum of at least 20 cm between the radiation source (antenna) and any individual. This device may not be installed or used in conjunction with any other antenna or transmitter.
l'exposition aux RF
Host device Labeling
This device includes the following module. Contains IC: 21700-NIULL
text_image
This is the location of the module.Air Conditioner Features
ELECTRONIC CONTROL
Before you begin, thoroughly familiarize yourself with the control panel, remote control and all its functions (as shown below). The unit can be controlled through the control panel, with the remote control, or with the Frigidaire® App*.
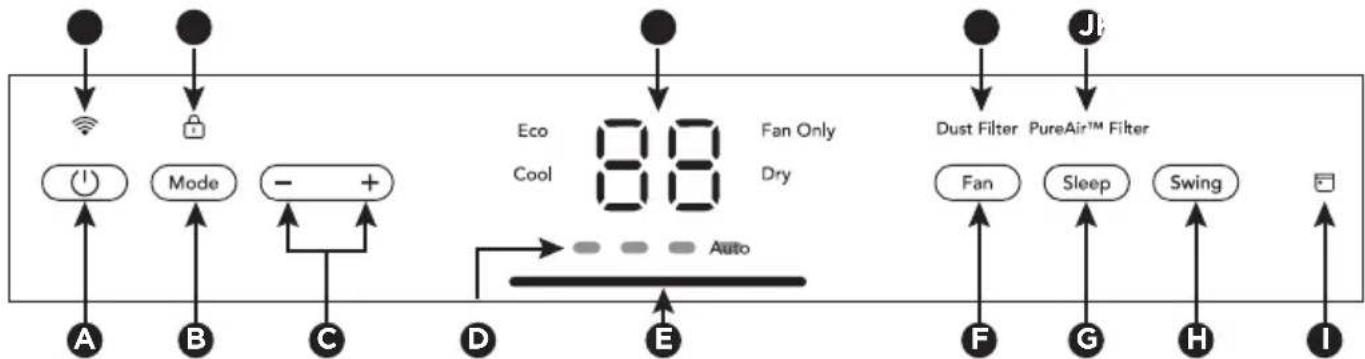
flowchart
graph TD
    A["Input Air"] --> B["Light WiFi"]
    C["Input Air"] --> D["Lock"]
    E["Air"] --> F["Mode"]
    G["Bir"] --> H["Mode"]
    I["Cir"] --> J["-"]
    K["D"] --> L["Auto"]
    M["E"] --> N["Fan Only Dry"]
    O["F"] --> P["Dust Filter"]
    Q["G"] --> R["PureAir™ Filter"]
    S["H"] --> T["Sweep"]
    U["I"] --> V["Control Box"]
| A | Turns Unit On Or Off |
| B | Set Mode |
| C | Adjusts Temperature |
| D | Fan speed display |
| E | Air quality light |
| F | Fan speed button |
| G | Sleep button |
| H Swing button | |
| I | Schedule Indicator |
| PureAirTM Filter iconJ | |
| Dust Filter change iconK | |
| Displays TemperatureL | |
| Child lock iconM | |
| N | WIFI Indicator* |
*Refer to the Quick Start Guide for detailed instructions on setting up your air conditioner for connected operation from your smart phone or tablet.
Note: Some feature can only be controlled through the control panel.
REMOTE CONTROL
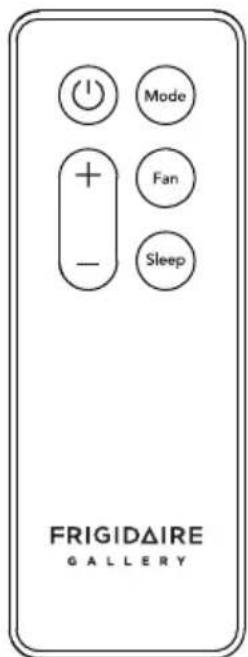
text_image
FRIGIDAIRE GALLERYBattery Size: AAA
Warning: Do not mix old and new batteries. Do not mix alkaline, standard (carbon-zinc), or rechargeable (nickel-cadmium) batteries. Do not ingest. Keep out of the reach of children.

NOTE
The following instructions are for the control panel. The same instructions can be used for the remote control.
TO TURN UNIT ON:
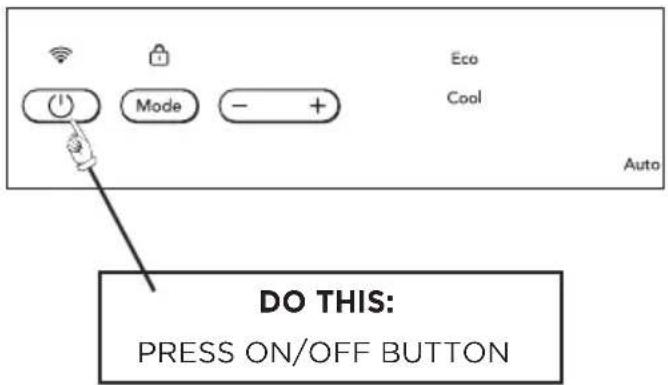
text_image
Eco Cool Auto DO THIS: PRESS ON/OFF BUTTONYOU WILL SEE:
text_image
Mode - + Ebo Cool 72 Fan Only Dry AutoNOTE: The unit will run in Eco(energy saver) mode when powered on each time. In this mode, the fan will continue to run for 3 minutes after compressor shuts off. The fan then cycles on for 120 seconds at 10 minute intervals until the room temperature is above the set temperature, at which time the compressor turns back on.
TO CHANGE TEMPERATURE SETTING:

text_image
Mode - + Ebo Cool 72 Fan Only Dry Auto DO THIS: PRESS + TO RAISE PRESS - TO LOWERYOU WILL SEE:
text_image
Mode - + E Cool 74 Fan Only Dry AutoThe display will show the set temperature during normal operation, press either up (+) or down (-) buttons to adjust the temperature to desired setting. If the up (+) or down (-) button is pressed continuously, the unit will beep twice when the temperature setting reaches the upper/lower limits 90°F or 60°F.
TO ADJUST FAN SPEEDS:

text_image
Ebb Cool 74 Fan Only Dry Auto Dust Filter PureAir™ Filter Fan Sleep DO THIS: PRESS TO SELECTYOU WILL SEE:
text_image
Eco Cool 74 Fan Only Dry Auto Dust Filter PureAir™ Filter Fan SleepTO USE AUTO FAN FEATURE:

text_image
Ebb Cool 74 Fan Only Dry Auto Dust Filter PureAir™ Filter Fan Sleep DO THIS: PRESS FAN BUTTON, CHOOSE AUTOYOU WILL SEE: COOL FEATURE:
text_image
Eoo Cool 74 Fan Only Dry Auto Dust Filter PureAir™ Filter Fan SleepInitially, fan starts on High Speed and adjusts to a slower speed dictated by room temperature. For example, if room temperature rises quickly, such as when a door is opened, the fan will automatically switch to the highest speed. The fan speed will re-adjust to a slower speed as the room cools. Press the fan button to adjust the fan speed manually.
TO OPERATE ON FAN ONLY:
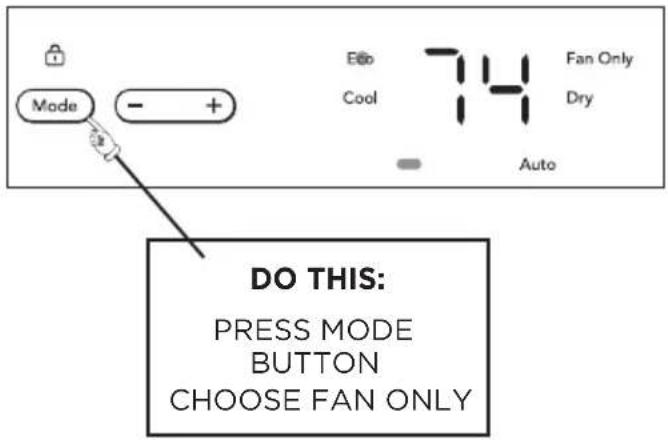
text_image
Mode - + Eoo Cool 74 Fan Only Dry Auto DO THIS: PRESS MODE BUTTON CHOOSE FAN ONLYYOU WILL SEE:
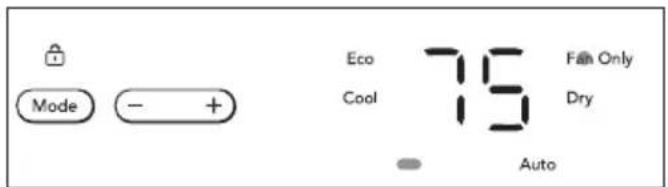
text_image
Mode - + Eco 75 Fan Only Cool 13 Dry AutoUse this function when cooling is not desired, such as for room air circulation or to exhaust stale air. You can choose any fan speed you prefer. (Except "Auto Fan"). When operating in this mode, the display will show the actual room temperature and the set temperature cannot be changed.
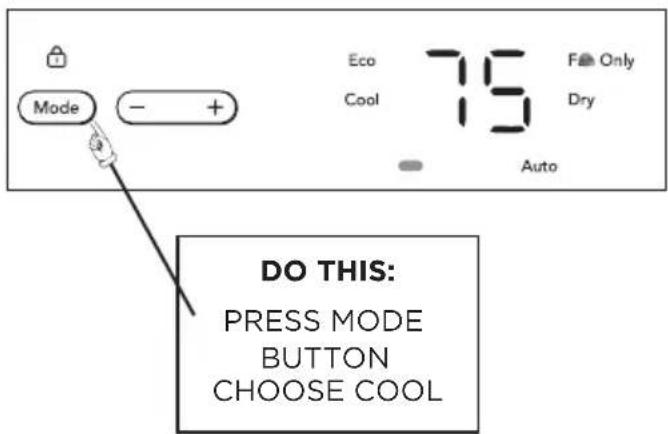
text_image
Mode - + Eco Cool 75 Auto F# Only Dry DO THIS: PRESS MODE BUTTON CHOOSE COOLYOU WILL SEE:
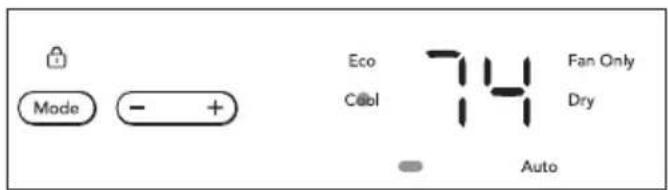
text_image
Mode - + Eco Cool 74 Fan Only Dry AutoIn this mode, the fan remains on all of the time with the compressor cycling on and off when the desired room temperature is reached.
DRY FEATURE:
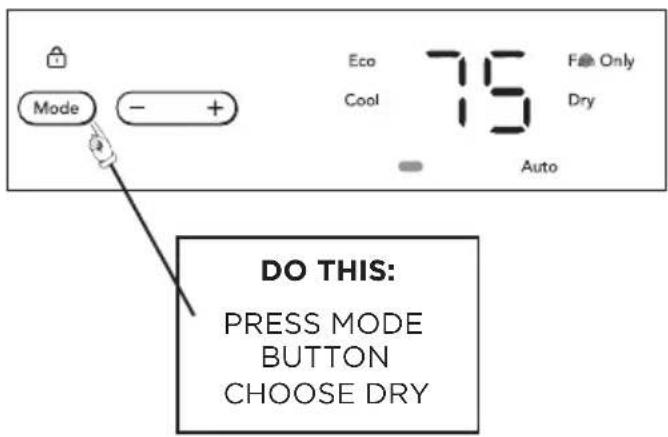
text_image
Mode - + Eco Cool 75 F# Only Dry Auto DO THIS: PRESS MODE BUTTON CHOOSE DRYYOU WILL SEE:
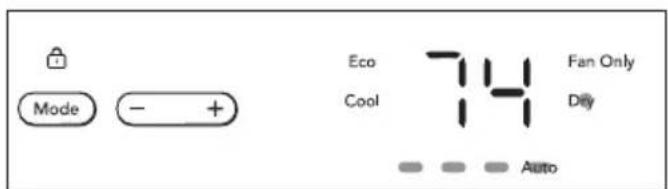
text_image
Mode - + Eco 74 Fan Only Cool Dily AutoIn this mode, the air conditioner will work like a dehumidifier, but will still cool the room. The temperature can be adjusted between 62 °F (17 °C) and 86 °F (30 °C) and the fan speed will be held at Auto speed.
Eco (ENERGY SAVER) MODE:
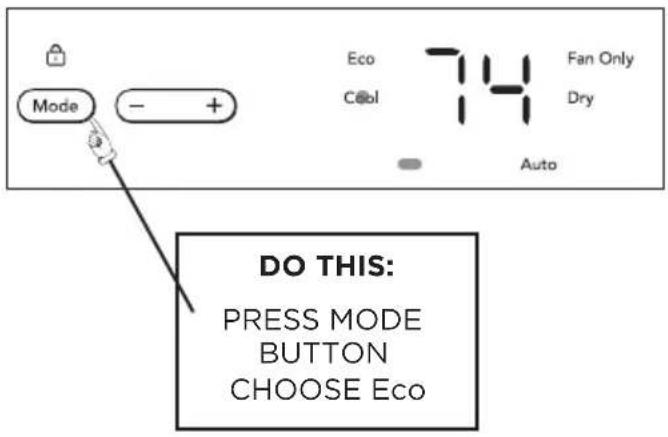
text_image
Mode - + Eco Cool 74 Fan Only Dry Auto DO THIS: PRESS MODE BUTTON CHOOSE EcoYOU WILL SEE:

text_image
Mode - + Ebox Cool 74 Fan Only Dry AutoThe unit is factory set to run in Eco (energy saver) mode. We recommend leaving the unit in Eco mode to help save energy and money. However, to switch out of Eco mode, press the mode button until another mode is selected.
In Eco mode, the fan will continue to run for 3 minutes after the compressor shuts off. The fan then cycles on for 120 seconds at 10 minutes intervals until the room temperature is above the set temperature, at which time the compressor turns back on.

NOTE:
Please note, that if the unit is changed to 'Cool', 'Dry' or 'Fan Only' mode then shut off, the unit will turn back on in Eco mode. This is mandatory per government regulations. If the unit is changed to 'Cool', 'Dry' or 'Fan Only' mode and a power failure occurs, once the power is restored, the unit will return to 'Cool' or 'Fan Only' mode.
TO ACTIVATE THE CHILD LOCK FEATURE:
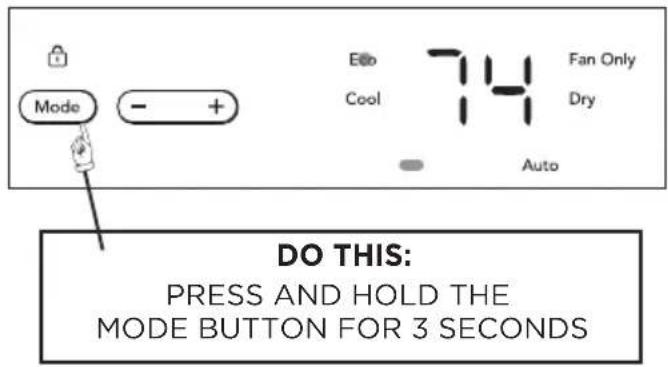
text_image
DO THIS: PRESS AND HOLD THE MODE BUTTON FOR 3 SECONDSYOU WILL SEE:
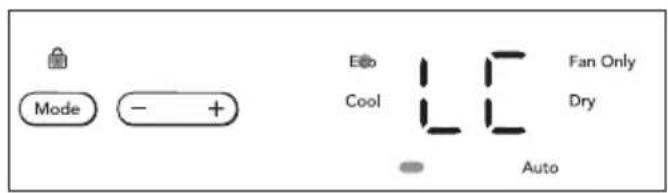
text_image
Mode - + Eo Cool - Auto Fan Only DryPressing and holding the Mode button for 3 seconds will activate or deactivate the Lock function. The display will show LC for 5 secs. The control panel will be locked and settings cannot be changed.
CHECK DUST FILTER FEATURE:
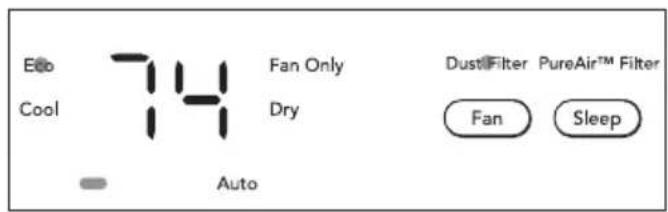
text_image
Ebb Cool 74 Fan Only Dry Auto DustFilter PureAir™ Filter Fan SleepThis feature is a reminder to clean the Dust Filter (See Care and Cleaning). The Dust Filter light will illuminate after 250 hours of operation. To reset after cleaning the filter, hold the "Fan" button for 5 seconds.
YOU WILL SEE:
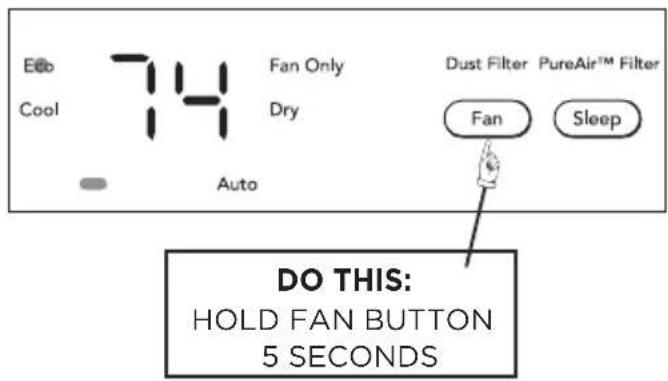
text_image
Ebb Cool 74 Fan Only Dry Auto Dust Filter PureAir™ Filter Fan Sleep DO THIS: HOLD FAN BUTTON 5 SECONDSPUREAIR™ FILTER (sold separately):
This unit can be used with PureAir™ Filters, which can be purchased by scanning the QR code behind the air inlet grille, by visiting Frigidaire.com, or by calling Frigidaire Customer Service Center 1-800-944-9044(US) / 1-800-265-8352 (Canada).
PUREAIR™ FILTER INDICATOR:
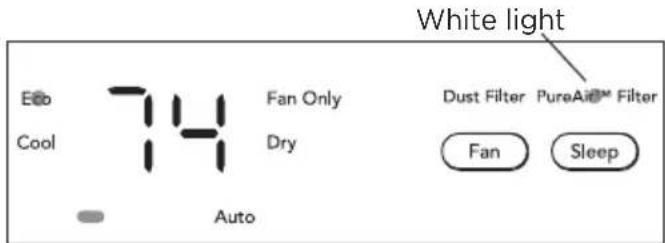
text_image
White light Eco Cool 74 Fan Only Dry Auto Dust Filter PureA® Filter Fan SleepNote: The PureAir ^™ Filter indicator will glow white, if a PureAir ^™ filter is installed.
RESET PUREAIR™ FILTER LIGHT:
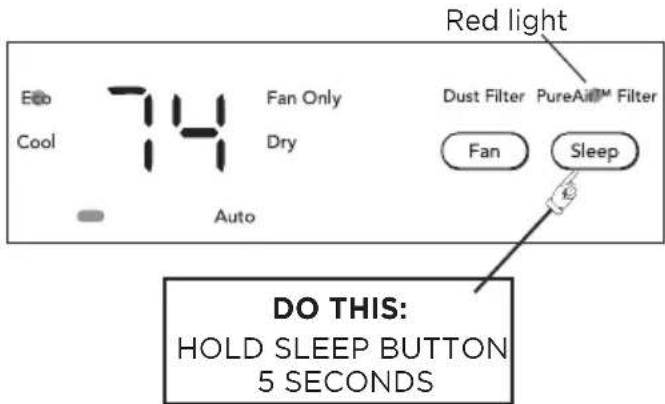
text_image
Red light Eco Cool 74 Fan Only Dry Auto Dust Filter PureAill™ Filter Fan Sleep DO THIS: HOLD SLEEP BUTTON 5 SECONDSAfter 1440 hours of operation the PureAir™ Filter indicator will turn red. To reset, replace with new PureAir™ Filter, then hold the "Sleep" button 5 for seconds.
SLEEP FEATURE:
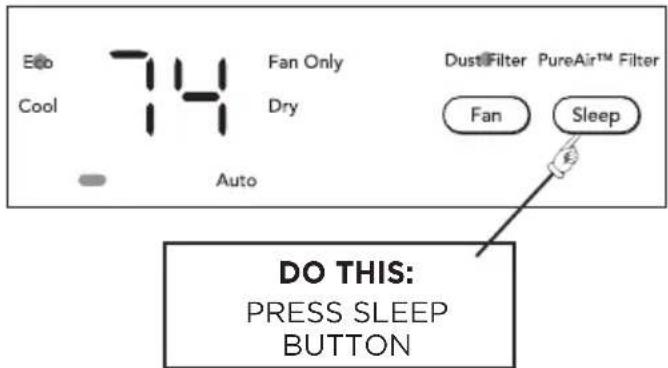
text_image
Eco Cool 74 Fan Only Dry Auto DustFilter PureAir™ Filter Fan Sleep DO THIS: PRESS SLEEP BUTTONYOU WILL SEE:
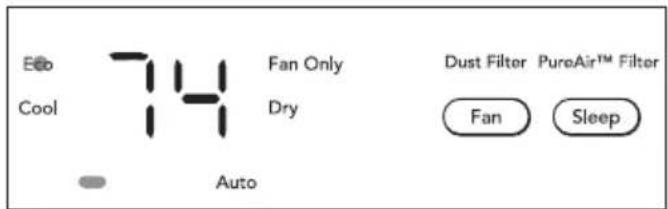
text_image
Eoo Cool 74 Fan Only Dry Auto Dust Filter PureAir™ Filter Fan SleepThe display will show SL for 3 seconds. Then, the display, indicator lights, and the air quality light will turn off.
In this mode, the unit will automatically select the Auto fan speed, and the selected temperature will increase by 2 °F 30 minutes after sleep mode is selected. The temperature will then increase by another 2 °F after an additional 30 minutes. This new temperature will be maintained for 7 hours before it returns to the originally selected temperature. This ends the "Sleep" mode and the unit will continue to operate as originally programmed. The "Sleep" mode program can be cancelled at any time during operation by pressing the "Sleep" button, "Fan" or "Mode" button.
DIMMING DISPLAY:

text_image
Eco Fan Only Dust Filter PureAir™ Filter Cool Dry Fan Sleep Swing AutoAfter 60 seconds of inactivity, the display and indicator lights will turn off. And the Air quality light will reduce its brightness. Press any button on the control panel or remote control, and the display will illuminate. Please note that if the unit is in Eco mode and the set temperature has been reached, the unit may appear off. However, the unit is on and will continue to sample the air temperature every 10 minutes. To confirm, press any button on the control panel or remote control.
TO OPERATE SWING FEATURE:
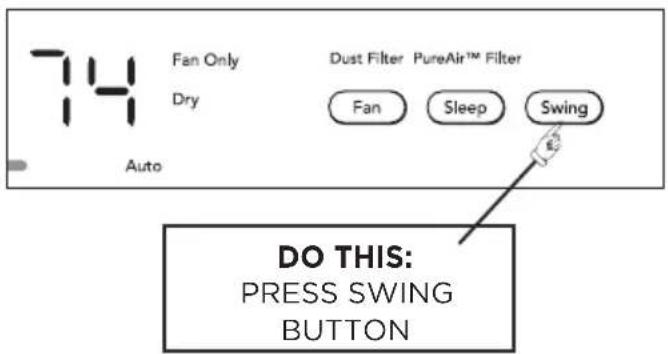
text_image
74 Fan Only Dry Auto Dust Filter PureAir™ Filter Fan Sleep Swing DO THIS: PRESS SWING BUTTONPress the Swing button to activate the swing louver and distribute air evenly throughout the room.
TO CHANGE THE TEMPERATURE SCALE (°F OR °C):
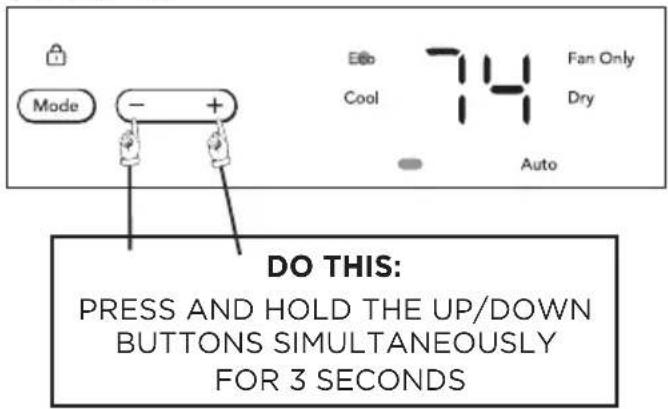
text_image
Mode - + Ebb Cool 74 Fan Only Dry Auto DO THIS: PRESS AND HOLD THE UP/DOWN BUTTONS SIMULTANEOUSLY FOR 3 SECONDSYOU WILL SEE:
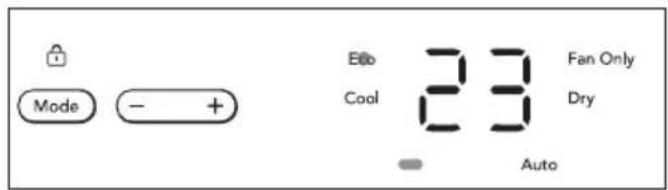
text_image
Mode - + Ebo Cool 23 Fan Only Dry AutoYour AC is capable of displaying temperature in degrees Fahrenheit or degrees Celsius.
AIR QUALITY LIGHT
text_image
Ebo Cool 72 Fan Only Dry AutoWhen used for the first time, the Air quality light will emit a white light for 1 minute, then switch to Green, Yellow or Red according to the actual air quality in your room.
Color Air quality
Green Good
Yellow Moderate
Red Bad
Note: The Air quality light will turn off in sleep mode.
TO TURN UNIT OFF:
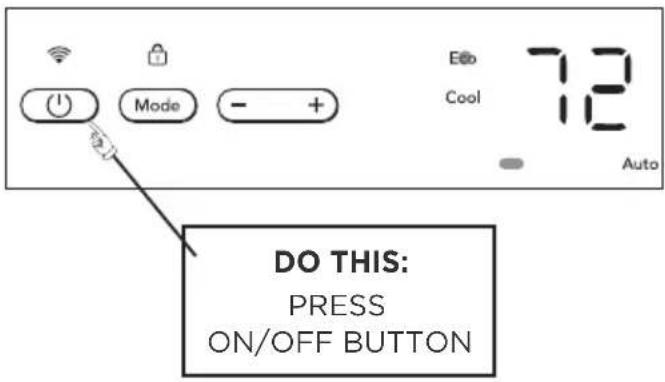
text_image
Eoo Cool 72 Auto DO THIS: PRESS ON/OFF BUTTONYOU WILL SEE:
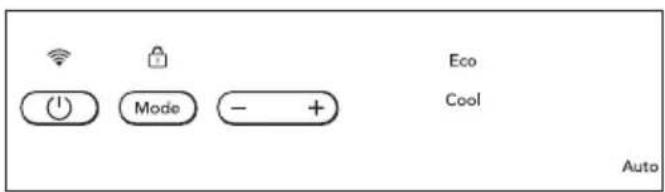
text_image
Eco Cool AutoWhen the unit is turned off, the display will gradually fade away after 3 seconds. The unit will always return to "Eco" mode and "Auto" fan speed setting when it is turned on again.
FAULT CODES:
When below error codes show on the display, please contact your Authorized Frigidaire Service Center.
| Error Code | Description |
| EH00 | Internal memory chip failure |
| EH60 | Indoor ambient temperature sensor is open/short circuited |
| EH0b | Communication malfunction of main control board. |
Note: The error code will be separated into 2 parts. The display will alternate in 1 second intervals. For example, if the fault code "EH00" occurs, the panel will first display "EH" for 1 second, then display "00" for another second. The error code will continue to loop until the issue is resolved.
SHOWS "EH" FOR ONE SECOND: THEN SHOWS "00" FOR ANOTHER SECOND:
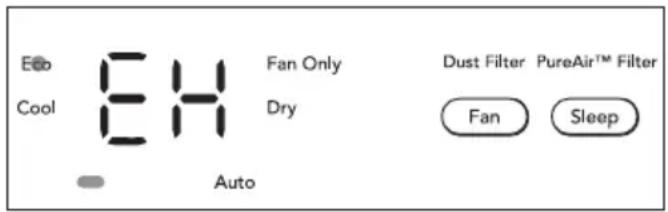
text_image
Eoo Cool 8H Fan Only Dry Auto Dust Filter PureAir™ Filter Fan Sleep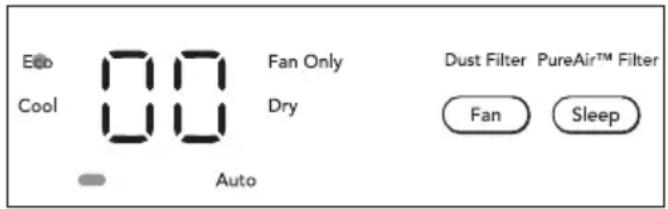
text_image
Eoo Cool Fan Only Dry Auto Dust Filter PureAir™ Filter Fan SleepNote: There are more than 3 error codes. If an error code appears on the display, turn off the unit and restart it. If the error code persist, please contact your Authorized Frigidaire Service Center.
ADDITIONAL THINGS YOU SHOULD KNOW
Now that you have mastered the operating procedure, here are more features in your control that you should become familiar with.

NOTE
The "Cool" circuit has an automatic 3 minute time delayed start if the unit is turned off and on quickly. This prevents overheating of the compressor and possible circuit breaker tripping. The fan will continue to run during this time.
- There is a 2-Second delay for the compressor shutting down when selecting FAN ONLY. This is to cover the possibility of having to roll through to select another mode.
-
The control will maintain the set temperature within 2 degrees Fahrenheit, between 60^ and 90^ degrees.
-
After a power outage, the unit will memorize the last setting and return the unit to the same setting once power is restored.
- The unit should be operated in an indoor temperature range of 60^ - 90^ (16°C - 32°C), and an outdoor temperature range of 64^ - 109^ (18°C - 43°C). Performance may be reduced outside of these operating temperatures.
Clean your air conditioner occasionally to keep it looking new. Be sure to unplug the unit before cleaning to prevent shock or fire hazards.
Dust Filter Cleaning
The Dust filter should be checked at least once a month to see if cleaning is necessary. Trapped particles in the Dust filter can build up and cause an accumulation of frost on the cooling coils.
- Open the front panel.
- Grasp the Dust Filter in the center, and pull up and out.
- Wash the Dust Filter using liquid dishwashing detergent and warm water. Rinse Dust Filter thoroughly. Gently shake excess water from the Dust Filter. Be sure Dust Filter is thoroughly dry before replacing.
• Instead of washing, you may vacuum the Dust Filter clean.
NOTE: When replacing the Dust Filter after cleaning, make sure the protruding tabs on the filter are facing outward, as shown below.
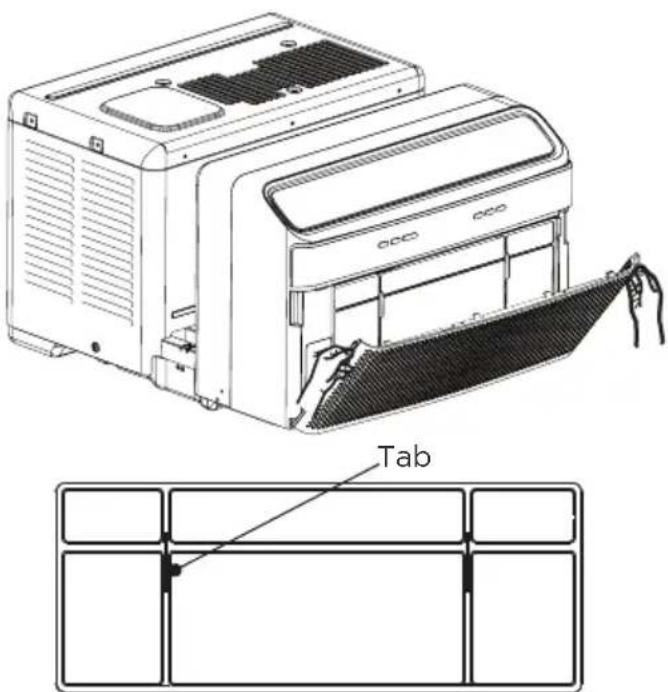
text_image
TabDust Filter
Cleaning of Air Quality Sensor
We suggest cleaning your Air Quality Sensor every 2 months. This suggestion is based on continuous usage of your unit.
To clean the air quality sensor:
- Open the front panel.
- Open the Air Quality Sensor cover.
- Clean the lens, inlet and outlet, with a damp cotton swab. Use a dry cotton swab to remove any excess water from the sensor.
- Reinstall the cover and front panel after cleaning.
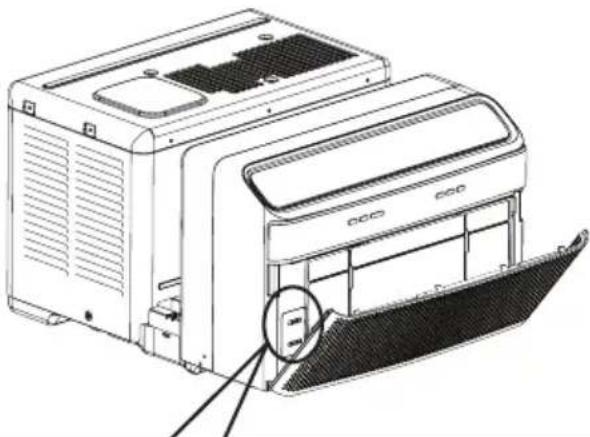
natural_image
Line drawing of a small air conditioner unit with a close-up view of its lid and cover (no text or symbols)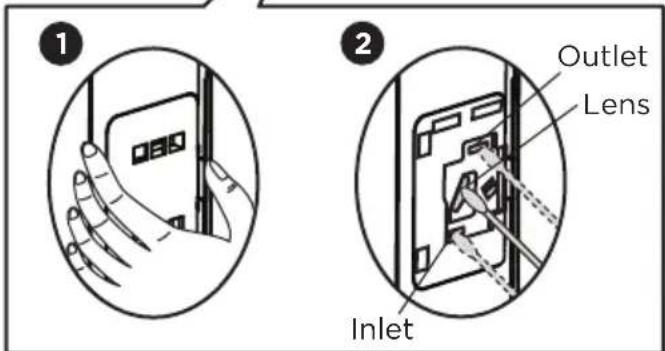
text_image
1 2 Outlet Lens InletPUREAIR™ FILTER (sold separately):
This unit has available space for use with a PureAir™ Filters (sold separately). Different types of PureAir™ Filters can be purchased by scanning the QR code behind the air inlet grille, by visiting Frigidaire.com, or by calling Frigidaire Customer Service Center 1-800-944-9044(US) / 1-800-265-8352 (Canada).
To install the PureAir™ Filter:
-
Remove the Dust filter as instructed in the Dust filter cleaning section.
-
Insert the PureAir™ filter in the reserved space behind the Dust Filter as shown below.
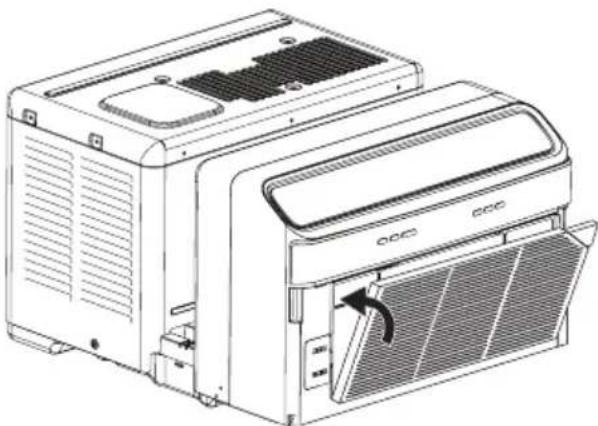
natural_image
Line drawing of a CDO air conditioner unit with ventilation slots and fan (no text or symbols)- Reinstall the Dust Filter and air inlet grille.
Note: If the PureAir ^TM filter is installed properly, the PureAir ^TM Filter indicator will glow white. Otherwise reinstall the filter.
The PureAir ^TM filter should be replaced regularly to achieve optimal results.
To remove the filter, grab the fabric tabs on either side of PureAir filter and pull out.
Cabinet Cleaning
- Be sure to unplug the air conditioner to prevent shock or fire hazard. The cabinet and front may be dusted with an oil-free cloth or washed with a cloth dampened in a solution of warm water and mild liquid dishwashing detergent. Rinse thoroughly and wipe dry.
- Never use harsh cleaners, wax or polish on the cabinet front.
- Be sure to wring excess water from the cloth before wiping around the controls. Excess water in or around the controls may cause damage to the air conditioner.
Winter Storage
If you plan to store your air conditioner during the cooler months, remove it carefully from the window according to the installation instructions, cover with plastic, or return to its the original carton.
Energy Saving Ideas
- Do not block air flow inside with blinds, curtains or furniture; or outside with shrubs, enclosures, or other buildings.
- The capacity of the room air conditioner must fit the room size for efficient and satisfactory operation.
• Install the room air conditioner on the shady side of your home. A window that faces north is best because it is shaded most of the day. - Close the fireplace damper, floor and wall registers so cool air does not escape up the chimney and into the duct work.
- Keep blinds and drapes in other windows closed during the sunniest part of the day.
- Clean the air filter as recommended in the section "Care and Cleaning".
- Proper insulation and weather stripping in your home will help keep warm air out and cool air in.
- External house shading with trees, plants or awnings will help reduce the air conditioner's work load.
- Operate heat producing appliances such as ranges, washers, dryers and dishwashers during the coolest part of the day.
Before calling for service, review this list. It may save you time and expense. This list includes common occurrences that are not the result of defective workmanship or materials in this appliance.
| SOLUTIONOCCURRENCE | |
| Air conditioner will not operate. | Wall plug disconnected.Push plug firmly into wall outlet.Plug Current Device Tripped.Press the RESET button.House fuse blown or circuit breaker tripped.Replace fuse with time delay type or reset circuit breaker.Control is OFF.Turn Control ON and set to desired setting. |
| Air from unit does not feel cold enough. | Room temperature below 60°F (16°C).Cooling may not occur until room temperature rises above 60°F (16°C).Temperature sensing element touching cold coil, located behind air filter.Straighten away from coil.Reset to a lower temperature.Compressor shut-off by changing modes.Wait approximately 3 minutes and listen for compressor to restart when set in the COOL mode. |
| Air conditioner cooling, but room is too warm - ice forming on cooling coil behind decorative front | Outdoor temperature below 60 F° (16°C).To defrost the coil,set FAN ONLY mode.Dust filter may be dirty.Clean filter.Refer to Care and Cleaning section.To defrost,set to FAN ONLY mode.PureAirTM filter(sold separately) may be dirty.Replace with new filter.Refer to Care and Cleaning section.To defrost,set to FAN ONLY mode.Temperature is set too low for night-time cooling.To defrost the coil,set to FAN ONLY mode.Then,set temperature to a higher setting. |
| Air conditioner cooling, but room is too warm - NO ice forming on cooling coil behind decorative front. | Dirty Dust filter - air restricted.Clean filters.Refer to Care and Cleaning section.PureAirTM filter(sold separately) may be dirty.Replace with new filter.Refer to Care and Cleaning section.To defrost,set to FAN ONLY mode.Temperature is set too high.Set temperature to a lower setting.Air directional louvers positioned improperly.Position louvers for better air distribution.Front of unit is blocked by drapes, blinds, furniture, etc.- restricts air distribution.Clear blockage in front of unit.Doors, windows, registers,etc.open - cool air escapes.Close doors, windows, registers,etc.Unit recently turned on in hot room.Allow additional time to remove “stored heat” from walls, ceiling, floor and furniture. |
| Air conditioner turns on and off rapidly. | Dirty Dust filter - air restricted.Clean filters.Refer to Care and Cleaning section.PureAirTM filter(sold separately) may be dirty.Replace with new filter.Refer to Care and Cleaning section.To defrost,set to FAN ONLY mode.Outside temperature extremely hot.Set FAN speed to a faster setting to bring air through cooling coils more frequently. |
| Noise when unit is cooling. | ·Air movement sound. This is normal. If too loud, set to lower FAN setting.·Window vibration - poor installation. Refer to installation instructions or check with installer. |
| Water dripping INSIDE when unit is cooling. | ·Improper installation. Tilt air conditioner slightly to the outside to allow water drainage. Refer to installation instructions or check with installer. |
| Water dripping OUTSIDE when unit is cooling. | ·Unit removing large quantity of moisture from humid room. This is normal during excessively humid days. |
| Remote Sensing Deactivating Prematurely (some models). | ·Remote control not located within range. Place remote control within 20 feet & 120° radius of the front of the unit.·Remote control signal obstructed. Remove obstruction. |
| Room too cold. | ·Set temperature too low. Increase set temperature.·Remote Sensing activated (on some models) and remote control located in Hot Spot - Relocate remote control or deactivate remote sensing. |
| Trouble connecting the smart appliance to your wifi network or experiencing an issue with the app. | ·Please visit Frigidaire.com and select the Owner Support section to view Frequently Asked Questions. |
If These Solutions Fail, Call 1-800-944-9044(US)/1-800-265-8352(Canada) For Frigidaire Service.
Your appliance is covered by a limited one-year warranty for functional repairs only. For one year from your original date of purchase, Electrolux will pay all costs for repairing or replacing any parts of this appliance that prove to be defective in materials or workmanship when such appliance is installed, used and maintained in accordance with the provided instructions. After one year from your original date of purchase, the consumer will be responsible for diagnostic, labor and parts costs as well as any removal, transportation and reinstallation expenses which are incurred during service on components.
Exclusions
This warranty does not cover the following:
- Products with original serial numbers that have been removed, altered or cannot be readily determined.
- Product that has been transferred from its original owner to another party or removed outside the USA or Canada.
- Rust on the interior or exterior of the unit.
- Products purchased "as-is" are not covered by this warranty.
- Food loss due to any refrigerator or freezer failures.
- Products used in a commercial setting.
- Service calls which do not involve malfunction or defects in materials or workmanship, or for appliances not in ordinary household use or used other than in accordance with the provided instructions.
- Service calls to correct the installation of your appliance or to instruct you how to use your appliance.
- Expenses for making the appliance accessible for servicing, such as removal of trim, cupboards, shelves, etc., which are not a part of the appliance when it is shipped from the factory.
- Service calls to repair or replace appliance light bulbs, air filters, water filters, other consumables, or knobs, handles, or other cosmetic parts.
- Surcharges including, but not limited to, any after hour, weekend, or holiday service calls, tolls, ferry trip charges, or mileage expense for service calls to remote areas, including the state of Alaska.
- Damages to the finish of appliance or home incurred during installation, including but not limited to floors, cabinets, walls, etc.
- Damages caused by: services performed by unauthorized service companies; use of parts other than genuine Electrolux parts or parts obtained from persons other than authorized service companies; or external causes such as abuse, misuse, inadequate power supply, accidents, fires, or acts of God.
DISCLAIMER OF IMPLIED WARRANTIES; LIMITATION OF REMEDIES
CUSTOMER'S SOLE AND EXCLUSIVE REMEDY UNDER THIS LIMITED WARRANTY SHALL BE PRODUCT REPAIR OR REPLACEMENT AS PROVIDED HEREIN. CLAIMS BASED ON IMPLIED WARRANTIES, INCLUDING WARRANTIES OF MERCHANTABILITY OR FITNESS FOR A PARTICULAR PURPOSE, ARE LIMITED TO ONE YEAR OR THE SHORTEST PERIOD ALLOWED BY LAW, BUT NOT LESS THAN ONE YEAR. ELECTROLUX SHALL NOT BE LIABLE FOR CONSEQUENTIAL OR INCIDENTAL DAMAGES SUCH AS PROPERTY DAMAGE AND INCIDENTAL EXPENSES RESULTING FROM ANY BREACH OF THIS WRITTEN LIMITED WARRANTY OR ANY IMPLIED WARRANTY. SOME STATES AND PROVINCES DO NOT ALLOW THE EXCLUSION OR LIMITATION OF INCIDENTAL OR CONSEQUENTIAL DAMAGES, OR LIMITATIONS ON THE DURATION OF IMPLIED WARRANTIES, SO THESE LIMITATIONS OR EXCLUSIONS MAY NOT APPLY TO YOU. THIS WRITTEN WARRANTY GIVES YOU SPECIFIC LEGAL RIGHTS. YOU MAY ALSO HAVE OTHER RIGHTS THAT VARY FROM STATE TO STATE.
If You Need Service Keep your receipt, delivery slip, or some other appropriate payment record to establish the warranty period should service be required. If service is performed, it is in your best interest to obtain and keep all receipts. Service under this warranty must be obtained by contacting Electrolux at the addresses or phone numbers below.
This limited warranty only applies in the USA and Canada. In the USA, your appliance is warranted by Electrolux Major Appliances North America, a division of Electrolux Home Products, Inc. In Canada, your appliance is warranted by Electrolux Canada Corp. Electrolux authorizes no person to change or add to any obligations under this warranty. Obligations for service and parts under this warranty must be performed by Electrolux or an authorized service company. Product features or specifications as described or illustrated are subject to change without notice.
USA
1.800.944.9044
Electrolux Major Appliances
10200 David Taylor Drive
Charlotte, NC 28262

Electrolux
Canada
1.800.265.8352
Electrolux Canada Corp.
5855 Terry Fox Way
Mississauga, Ontario, Canada
L5V 3E4
FRIGIDAIRE
welcome home
Our home is your home. Visit us if you need help with any of these things:

owner support

accessories

service

registration
(See your registration card for more information.)
Frigidaire.com
1-800-944-9044
Frigidaire.ca
1-800-265-8352
Aire Acondicionado
uso y cuidados
Introducción......2
There are 2 manuals in this document, please refer to below table for which manual is suitable for your AC
| Manual 1:Page 1-80 | For models with service model number:GHWQ085WD101, GHWQ105WD101, GHWQ125WD101 |
| Manual 2:Page 81-148 | For models with service model number:GHWQ085WD100, GHWQ105WD100, GHWQ125WD100 |
Please refer to your product's nameplate to check service model number.
natural_image
Technical line drawing of a mechanical device with ventilation grilles and a door (no text or symbols)Sonidos normales
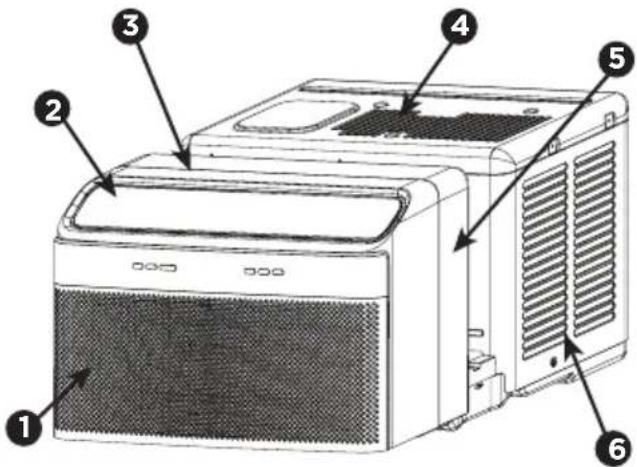
text_image
Diagram of a front-end air conditioner unit with numbered parts labeled 1 through 61 Borboteo/Siseo
text_image
Mode - + Eoo 74 Fan Only Cool Dry Autotext_image
Ebo Cool 72 Fan Only Dry AutoPara limpiar el sensor PM:
natural_image
Technical line drawing of a refrigerant air conditioner unit with a door and ventilation cover (no text or symbols)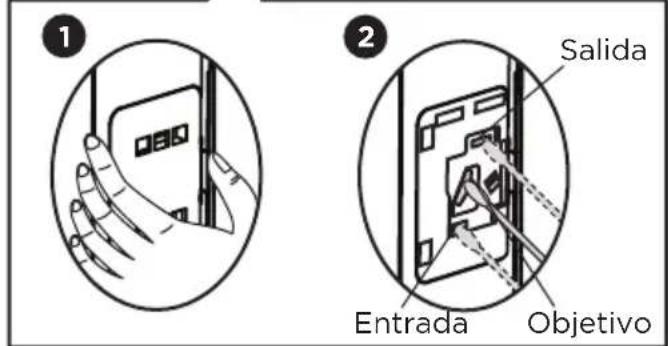
text_image
1 2 Salida Entrada Objetivonatural_image
Line drawing of a DCC air conditioner unit with cooling fan and ventilation slots (no text or symbols)Electrolux Major Appliances
10200 David Taylor Drive
Charlotte, NC 28262

Electrolux
Canada
1.800.265.8352
Electrolux Canada Corp.
5855 Terry Fox Way
Mississauga, Ontario, Canada
L5V 3E4
FRIGIDAIRE
bienvenido
casa
There are 2 manuals in this document, please refer to below table for which manual is suitable for your AC
| Manual 1:Page 1-80 | For models with service model number:GHWQ085WD101, GHWQ105WD101, GHWQ125WD101 |
| Manual 2:Page 81-148 | For models with service model number:GHWQ085WD100, GHWQ105WD100, GHWQ125WD100 |
Please refer to your product's nameplate to check service model number.
natural_image
Technical line drawing of a device rear panel with ventilation slots and a door, showing no text or symbols.Sons normaux
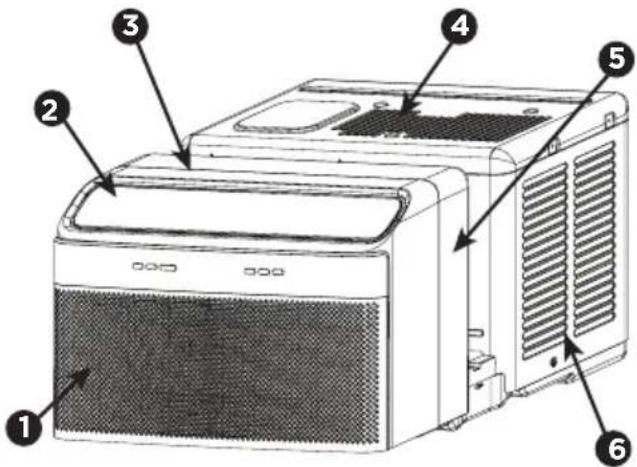
text_image
Diagram of a front-end air conditioner unit with numbered parts labeled 1 through 6This Class B digital apparatus complies with Canadian ICES-003.
This device complies with Industry Canada license-exempt RSS standard(s). Operation is subject to the following two conditions:
(1) this device may not cause interference, and (2) this device must accept any interference, including interference that may cause undesired operation of the device.
The antenna (or antennas) must be installed so as to maintain at all times a distance minimum of at least 20 cm between the radiation source (antenna) and any individual. This device may not be installed or used in conjunction with any other antenna or transmitter.
l'exposition aux RF
Host device Labeling
This device includes the following module. Contains IC: 21700-NIULL
text_image
Mode - + E Cool 74 Fan Only Dry Autotext_image
Mode - + Eoo Cool - - Fan Only Dry Autotext_image
Edo Cool 72 Fan Only Dry Autonatural_image
Technical line drawing of a computer unit with a door and fan, showing internal components without any text or symbols.
natural_image
Line drawing of a DCC air conditioner unit with ventilation slots and cooling fins (no text or symbols)Electrolux Major Appliances
10200 David Taylor Drive
Charlotte, NC 28262

Electrolux
Canada
1.800.265.8352
Electrolux Canada Corp.
5855 Terry Fox Way
Mississauga, Ontario, Canada
L5V 3E4