Claudia - Air Conditioning PALMAKO - Free user manual and instructions
Find the device manual for free Claudia PALMAKO in PDF.

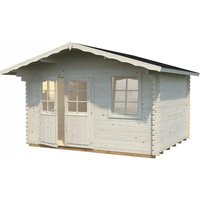
| Product type | Log cabin (garden shed) |
| Brand | Palmako |
| Model | Claudia |
| Dimensions (W x D) | 420 x 320 cm |
| Wall thickness | 34 mm |
| Material | Untreated Nordic spruce wood |
| Foundation type | Strip footing, point footings, cement slabs or cast concrete |
| Minimum foundation height | 5 cm above ground |
| Joist spacing | Max. 50-60 cm |
| Door | Single or double door (depending on model) with outward opening doors |
| Windows | Pivot, tilt, or sliding depending on model |
| Roof | Boards with bitumen felt and finishing battens |
| Roof pitch | Not specified, but with purlins and gables |
| Bracing | 4 pieces (if included), screwed inside |
| Paint and maintenance | Colorless primer, wood glaze, semi-annual inspection |
| Warranty | Replacement of defective material upon presentation of control number |
| Number of manual pages | 56 |
| Available languages | FR, DE, EN, ES, IT |
Frequently Asked Questions - Claudia PALMAKO
User questions about Claudia PALMAKO
0 question about this device. Answer the ones you know or ask your own.
Ask a new question about this device
Download the instructions for your Air Conditioning in PDF format for free! Find your manual Claudia - PALMAKO and take your electronic device back in hand. On this page are published all the documents necessary for the use of your device. Claudia by PALMAKO.
USER MANUAL Claudia PALMAKO
Inspection Certificate
Controlecertificaat • Kontrollschein • Bulletin de contrôle • Certificato di controllo • Certificado de control • Kontrollskjema • Kontrol Certifikat • Tarkastustodistus • Besiktningsprotokoll
Art. Nr. FRY34-4232
Please keep safely!
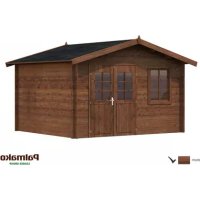
natural_image
Exterior view of a simple wooden house with black tiled roof and open windows (no signage or text)The producer shall have the right to make technical changes to the product • Technische Änderungen vorbehalten • Le producteur réserve le droit d'effectuer des modifications techniques au produit • Il produttore mantiene il diritto di apportare modifiche tecniche al prodotto • Reservado el derecho a modificaciones técnicas • Produsent forbeholder seg retten til å endre tekniske egenskaper ved produktet • Alle rechten en technische wijzigingen voorbehouden • Výrobce si vyhrazuje právo na technické změny výrobku • Valmistaja pidättää oikeuden tehdä tuotteeseen teknisiä muutoksia • Tillverkaren har rätt att utföra tekniska förändringar för produkten
1 General information

Dear client,
We are glad that you have decided in favour of our garden house!
Please read the assembly manual carefully before proceeding with the house installation! You will thus avoid problems and will not waste time.
Recommendations:
Keep the house package until its complete assembly in a dry place, but not in direct contact with the ground, protected from weather conditions (moisture, the sun, etc.). Do not keep the house package in a heated room!
When selecting the garden house location, make sure that the house will not be subjected to extreme weather conditions (areas of strong snowfall or winds); otherwise you should attach the house (for instance, with anchors) to the subsoil.

Warranty
Your house is made from high quality fir and delivered in the natural (unprocessed) form. If, despite our thorough inspection, you should have complaints, please submit the filled out control sheet and purchase invoice to the product seller.
ATTENTION: Please be sure to keep the documentation accompanying the house package! The control sheet includes the control number of the house. We can only review complaints if you submit the control number of the house to the seller!
The warranty does not cover:
➢ Peculiarities of wood as a natural material
➢ Wooden details already painted (processed with a wood preservative)
Wooden details containing whole branches that do not endanger the stability of the house
Colour tone variations caused by wood structure differences that do not influence wood lifetime
Wooden details containing (caused by drying) small cracks/gaps that do not pass through and do not influence the structure of the house
Twisted wooden details if they can nevertheless be installed
Roof and floor boards that may have on their concealed surfaces some non-planed areas, colour differences and waning
Complaints resulting from an incompetent manner of the installation of the house or the house subsiding due to an incompetently made foundation
Complaints caused by introducing self-initiative changes to the house, such as the deformation of wooden details and doors/windows due to an incompetent manner of wood processing; the attachment of storm braces too rigidly, doorframes being screwed onto wall logs, etc.
The complaints covered by the warranty are satisfied to the extent of replacing the deficient/faulty material. All other demands will be excluded!

Garden house painting and maintenance
Wood is a natural material, growing and adapting depending on weather conditions. Large and small cracks, colour tone differences and changes, as well as a changing structure of wood are not errors, but a result of wood growing and a peculiarity of wood as a natural material.
Unprocessed wood (except for foundation joists) becomes greyish after having been left untouched for a while, and can be turn blue and become mouldy. To protect the wooden details of your garden house, you must immediately process them with a wood preservative.
We recommend that you cover the floor boards in advance with a colourless wood impregnation agent, especially the bottom sides of the boards, to which you will no longer have access when the house is assembled. Only this will prevent moisture penetration.
We definitely recommend that you also process the doors and windows with a wood impregnation agent, and do that namely both inside and outside! Otherwise the doors and windows can become twisted.
After the house assembly is completed, we recommend for the conclusive finishing a weather protection paint that will protect wood from moisture and UV radiation.
When painting, use high quality tools and paints, follow the paint application manual and manufacturer's safety and usage instructions. Never paint a surface in strong sunlight or rainy weather. Consult a specialist regarding paints suitable for unprocessed softwood and follow the paint manufacturer's instructions.
Having been properly painted, your garden house's lifetime will increase substantially. We recommend that you inspect the house thoroughly once every six months.
2 Preparation for assembly
Tools and preparation of components
To assemble the garden house, you will need the following tools:

assembly aid

ladder

hammer

water-level

screwdriver

saw

knife

measuring tape

pliers

drill
ADVICE: To avoid splinters, we recommend that you wear the corresponding protective gloves during the assembly process.
Preparation of components:
Sort the components based on the wall plans (see Technical specifications) and place them at the four sides of the house in the installation sequence.
ATTENTION: Never place the components directly on grass or a muddy surface because it will be very difficult or even impossible to clean them up later!
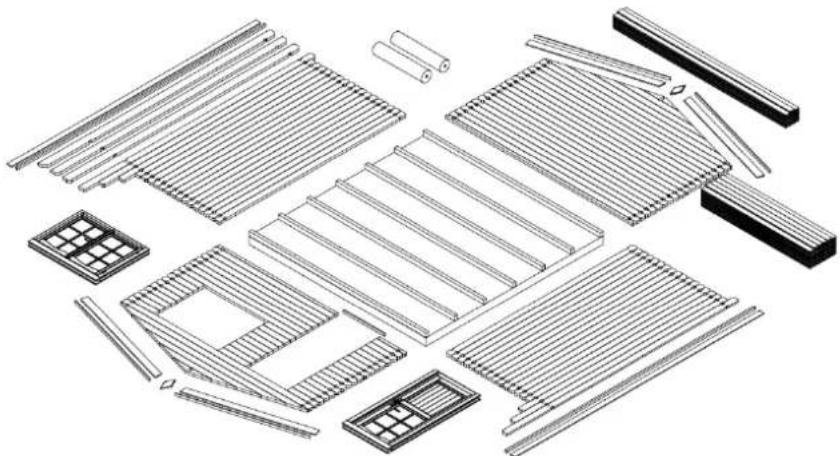
natural_image
Exploded view of a grid-patterned mechanical assembly (no text or symbols)Foundation
A good foundation is the most important aspect guaranteeing the duration and safety of your house. Only a completely level, rectangular and bearing foundation will ensure problem-free installation of the house, its stability and especially the matching of the doors. With a good foundation, your house will stand for many years more.
Prepare the foundation so that its upper edge extends from the ground to a height of at least 5cm . At the same time make sure that there are sufficient air apertures under the house floor for ventilation.
We recommend the following foundation options:
- Strip or spot foundation
- Foundation from concrete or pavement slabs
- Cast concrete bed
Prepare the foundation so that the foundation joists are propped up on every side with intervals not exceeding 50-60 cm.
Consult an expert in this field or have the foundation prepared by specialists.
3 Garden house assembly
ATTENTION:
➢ You will find included in the house package one spare log (longest wall log).
You will find included in the house package one spare board (longest roof or floor board).
The house package also includes 2-3 marked hitting blocks (wall profile approximately 20-30 cm long).
All of the details listed above ARE NOT mentioned in the specification list.
The drawings have the details marked with three-digit position numbers. The exact positions of those details that have the third digit "x" can be found in the specification list.
Base frame (Foundation joists)
The base frame of the house must be completely flat and level to ensure that the installation proceeds without problems.
ATTENTION: different house can have different foundation placements – see the appended base frame drawing (in Technical specifications)!
Place the impregnated foundation joists on the prepared foundation in accordance with the drawing at equal intervals. Make sure that the joists are level and rectangular prior to screwing them together.
ADVICE: It is recommended to place between the foundation joists and foundation a damp-proof course that will protect the house from moisture and decay.
ADVICE: To ensure protection from wind and storm, it is recommended to attach the foundation joists to the foundation (for this, you can use for instance metal angles, anchors, etc.). The corresponding materials are not included in the supplied kit!
Installation of foundation joists:
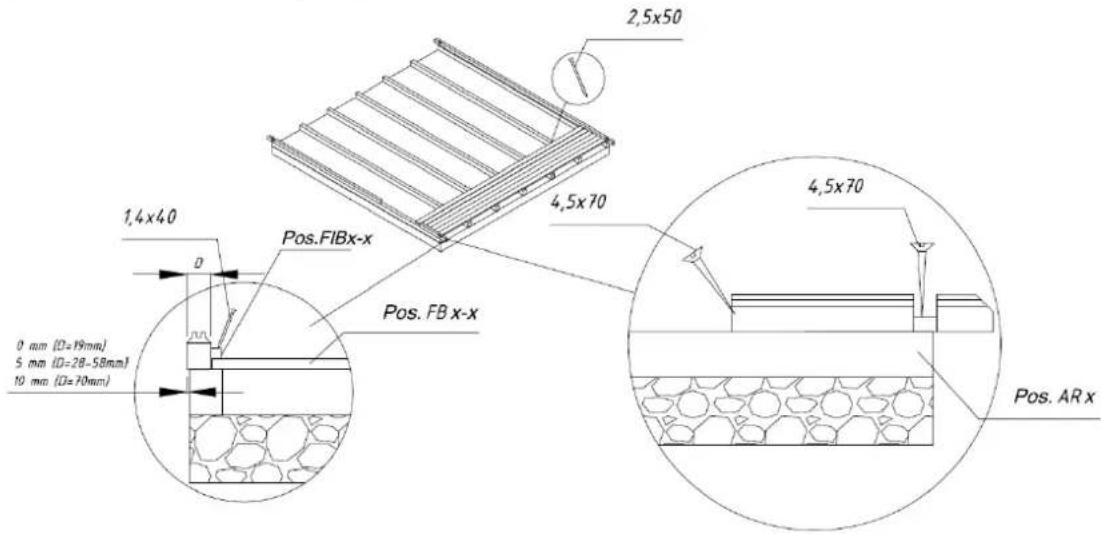
text_image
2,5x50 4,5x70 1,4x40 Pos.FIBx-x Pos. FB x-x 0 mm (D=19mm) 5 mm (D=28-58mm) 10 mm (D=70mm) 4,5x70 Pos. AR xWalls
When installing the walls, it is important to remember that:
The logs are always assembled with their tongue upwards!
If necessary, use the hitting block and hammer! Never directly hit the tongue with the hammer!
Install the walls in accordance with the appended wall plans (see Technical specifications).
First of all place half logs of front and back wall at the correct location and attach them with screws to the foundation joists. Then install the side wall logs. Make sure that the first layer of logs extends a bit over the foundation joists: the logs must extend over the joists by some 3-5 mm. You will thus protect the house from moisture, allowing the free flow of rainwater into the ground.
ATTENTION: After the first layer of logs, measure the diagonal lengths and, if necessary, re-install the logs. Only if the diagonal lengths are completely equal is the base frame rectangular and you can mutually attach the logs.
The first layer of logs:
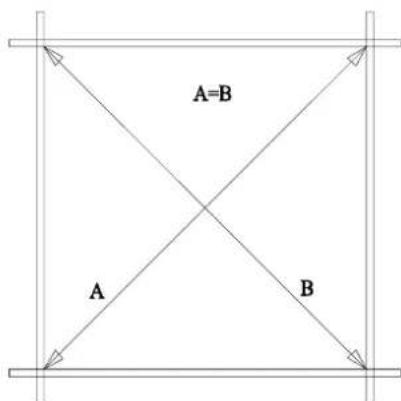
text_image
A=B A BContinue the installation of the walls by strongly forcing the wall logs into one another. If necessary, use the hitting block and hammer. At the same time, do not forget to begin the installation of the door and windows. You should definitely begin the door installation after the 5^th-6^th layer of logs.
Door and window
Doorframe:
If it is a double door, the doorframe is supplied in separate parts due to transportation requirements and you will have to begin by assembling it.
To do this, place together the 4 parts of the frame and screw them onto one another.
Make sure that the part of the frame with the deeper notch is installed upwards. The lateral jamb parts have hinges and are mirrored.
It is recommended to install the leaves later.
If it is a single door, its frame and leaf are supplied already assembled.
Door installation:
The doorframe is placed at the formed aperture and pushed with force onto the lower log. If it is a double door, place the leaves on the hinges now. To open and close the door, fit the separately packaged lock and handle.
Doorframe installation (Only necessary for a double door!):

text_image
5x90 5x90
natural_image
Isometric line drawing of a two-story wooden cabin with windows and a door (no text or symbols)Window installation:
Continue with the installation of the wall logs until you reach the window height. The wall plans (see Technical specifications) show how many logs go under the window. Install the window similarly with the door. Just like the door, push the window frame with the window into the window aperture onto the lower log, applying force. Make sure that the window is not fitted backwards (topsy-turvy).
ADVICE: Definitely make sure that the windows and doors open in the proper direction. The doors always open from the inside to the outside. The revolving-tilting windows open to the inside. The revolving and the slinging windows open to the outside (the window handles are on the inside).
ATTENTION: It is not necessary to fix the doors and windows to the wall logs! If you wish to do this, it will be sufficient to fix them with a couple of screws in the lower part of the frame because as they dry, the wall logs will begin subsiding.
You can conduct the final adjustments of the doors and windows only some 2-3 weeks after the house installation, when the house will have become adapted to weather conditions and its logs settled.
Apex
In most cases, the apex is supplied in one piece (attention: in some house options, the apex can comprise several parts! In this case, these parts will have to be screwed together prior to other actions). Having installed the last wall logs, place the apex on the front and back walls and attach them with screws.
The apexes have indents for the rafters. The rafters also have the corresponding indents, ensuring that the roof is placed firmly and in the right place.
Now place the rafters in the Installation of rafters: corresponding indents in the apexes.
Make sure that the upper wall log, apexes and rafters are level. Having fitted the rafters, screw them onto the apex from above.
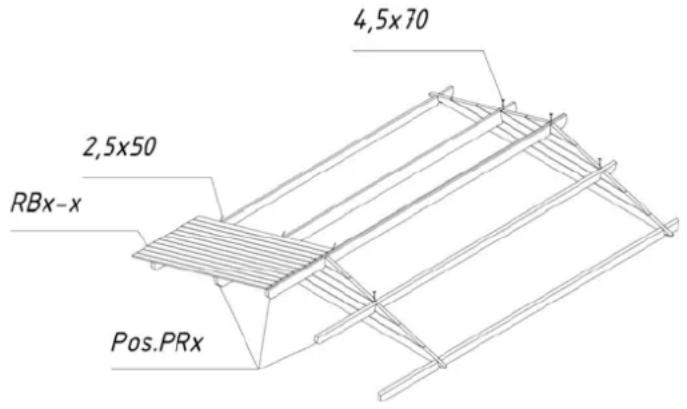
text_image
4,5x70 2,5x50 RBx-x Pos.PRxATTENTION: If the wall logs are not properly pressed on top of one another without gaps, the upper wall log may not be on the same level with the apexes. In this case you should tap the wall logs downwards as necessary or plane the apex or sidewall log somewhat lower.
Roof
Before installing the roof boards, make sure that the house is completely level. Use the water-level to check all walls.
ATTENTION: When placing the roof, use a stable ladder. Do not step on the roof as the structure is suitable to sustain only an even load (snow, wind, etc.), and not a point load!
Begin the installation of the roof boards from the front edge of the roof. Tap the boards lightly and attach them from above and below with nails to the rafters and upper wall log.
ATTENTION: Do not press the roof boards together too densely and you will avoid moisture-causing bulging! Leave an interval of about 1 mm between the boards to allow for swelling.
- During the whole process of installing the roof boards, make sure that their crest rafters coincide and the eave sides of the boards extend at a uniform distance. Verify this with a rope or the lateral eave lath that you may install for verification purposes.
- The roof boards must be even with the rafter ends in front and behind. If necessary, saw both last roof boards so narrow that they are even with the rafter ends.
Having installed the roof boards, the roof felt and roof slats must be attached.
The table of components shows whether the roof cover material and slats are included with this house option!
First of all, screw the roof edge reinforcements and eave edgings under the roof board ends. Then install the roof cover material.
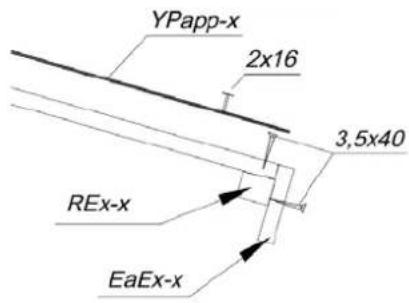
Installation of roof slats:
text_image
YPapp-x 2x16 3,5x40 REx-x EaEx-x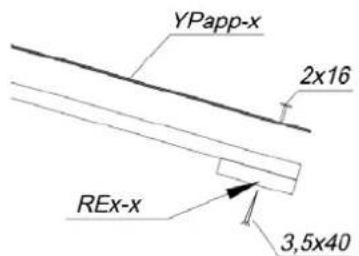
text_image
YPapp-x 2x16 REx-x 3,5x40Roof cover material (NB! Some house options do not include it in the kit!)
Cut the roof felt in accordance with the roof length into suitable pieces and begin installing them parallel to the lower edge of the roof, moving toward the crest and placing the felt strips in the direction from the back wall to the front wall. The felt should extend from the edge by approximately 2-4 cm. Attach the roof felt to the roof boards with the supplied felt nails at intervals of about 15 cm. Make sure that the felt strips overlap by at least 10 cm.
Installation of wind braces and facia boards:
Having installed the roof cover material, attach the wind braces to the roof and the facia boards to the rafters and upper wall logs.
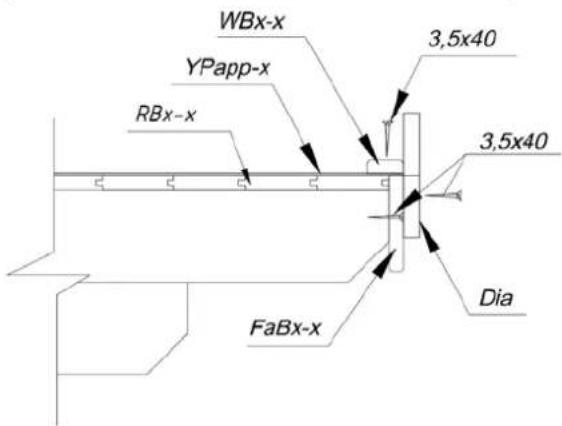
text_image
WBx-x YPapp-x RBx-x 3,5x40 3,5x40 Dia FaBx-xFloor
Only when the house is built completely you can install the floor boards, thus avoiding unnecessary smudging on the floor.
Place the floor boards on the base frame, tap them lightly against one another and then nail them with force to the foundation joists. If necessary, cut the last floor board to the suitable width.
The final operation is the fitting of the floor beadings to cover the spaces between the floor boards and walls. If necessary, cut the floor beadings to the suitable length.
ATTENTION: Depending on the climate at the house location, the floor boards can either swell or diminish. If the floor boards are very dry while the climate is damp, they will easily absorb moisture. In
this case, the floor boards should not be attached very densely to avoid likely bulging. Leave some space (1-2 mm) between the floor boards to allow for swelling. But if your climate is warm and dry, you can install the boards densely because they will become drier and spaces may appear between them.
Storm braces (NB! Not included in some house option kits!)
Attach the storm braces (if included in the supplied kit) to the inner sides of the front (2 units) and back (2 units) walls with the supplied bolts. It is important for the logs to be drilled through in advance. Please keep the distances indicated in the drawing so that no problems occur due to wood swelling or diminishing.
ADVICE: Make sure that the storm braces are attached to the apex log from above and to the middle of the first full-length wall log from below. If necessary, shorten the upper ends of the slats.
Do not turn the screws tightly so wood can further swell or diminish.
With the house having settled, you should adjust the attachments so the wall logs can settle.
Installation of storm braces:

text_image
ca 100mm Pos. StBx-xGeneral advice:
Problem: Gaps appear between the wall logs
Cause: Additional details are attached to the house that do not allow wood to swell/diminish.
Solutions: If the door/window is attached to the wall logs with screws/nails, remove these screws/nails; If the storm brace is screwed on too tightly, loosen its attachment; If (rain water) pipes are installed on the wall, loosen their attachments;
Problem: The doors and windows become stuck.
Cause: The house/foundation has settled.
Solution: Check whether the house is level. Level the foundation joists and walls.
Cause: The doors and windows have swelled due to moisture.
Solution: Adjust the door and window hinges; if necessary, plane the door or window narrower.

We wish you total success with the garden house installation and much joy with this house for many years to come!
I. Generelles

natural_image
Exploded view of various mechanical components including rods, grating, and housing (no text or symbols)Fundament
natural_image
Isometric line drawing of a two-story wooden cabin with windows and a door, no text or symbols presenttext_image
YPapp-x 2x16 3,5x40 REx-x EaEx-x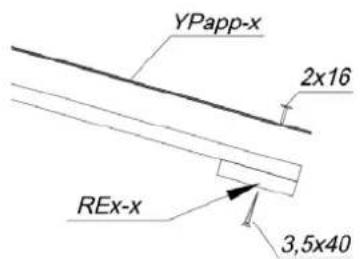
text_image
YPapp-x 2x16 REx-x 3,5x40text_image
WBx-x YPapp-x RBx-x 3,5x40 3,5x40 Dia FaBx-xnatural_image
Exploded view of various mechanical components including rods, grating, and housing (no text or symbols)Fondations
natural_image
Isometric line drawing of a two-story wooden cabin with windows and a door (no text or symbols)text_image
YPapp-x 2x16 3,5x40 REx-x EaEx-x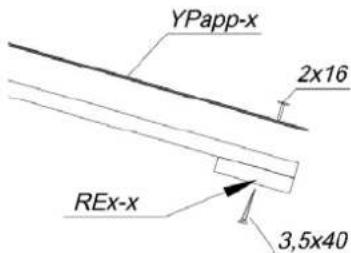
text_image
YPapp-x 2x16 REx-x 3,5x40text_image
WBx-x YPapp-x RBx-x 3,5x40 3,5x40 Dia FaBx-xnatural_image
Exploded view diagram of a mechanical assembly with multiple components and no visible text or symbolsFondamenta
natural_image
Isometric line drawing of a two-story wooden cabin with windows and a door (no text or symbols)text_image
WBx-x YPapp-x RBx-x 3,5x40 3,5x40 Dia FaBx-xnatural_image
Exploded view of a mechanical assembly with multiple parallel strips and grid-like components (no text or symbols)Cimentación
natural_image
Isometric line drawing of a two-story wooden cabin with a window and door (no text or symbols)text_image
YPapp-x 2x16 3,5x40 REx-x EaEx-x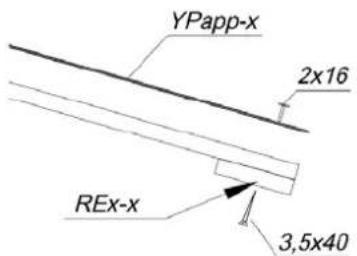
text_image
YPapp-x 2x16 REx-x 3,5x40other
| Section | Dimension | | ------- | --------- | | Top Section | 3990 | | Middle Section | 685 | | Bottom Section | 60 | | Left Section (①) | 2990 | | Right Section (②) | 2990 | | Bottom Section (③) | 2990 | | Middle Section (④) | 685 | | Top Section (⑤) | 685 | | Middle Section (⑥) | 655 | | Bottom Section (⑦) | 655 | | Left Section (④) | 655 | | Right Section (⑤) | 655 | | Bottom Section (⑥) | 655 | | Left Section (④) | 655 | | Right Section (⑤) | 655 | | Bottom Section (⑦) | 655 | | Left Section (④) | 655 | | Right Section (⑤) | 655 | | Bottom Section (⑥) | 655 | | Left Section (④) | 655 | | Right Section (⑤) | 655 | | Bottom Section (⑦) | 655 | | Intersection Point (①) | 685, 655, 60, 2990, 2990, 2990, 2990, 2990, 2990, 2990, 2990, 2990, 2990, 2990, 2990, 2990, 2990, 2990, 2990, 2990, 3990, 3990, 3990, 3990, 3990, 3990, 3990, 3990, 3990, 3990, 3990, 3990, 3990, 3990, 3990, 3990, 3990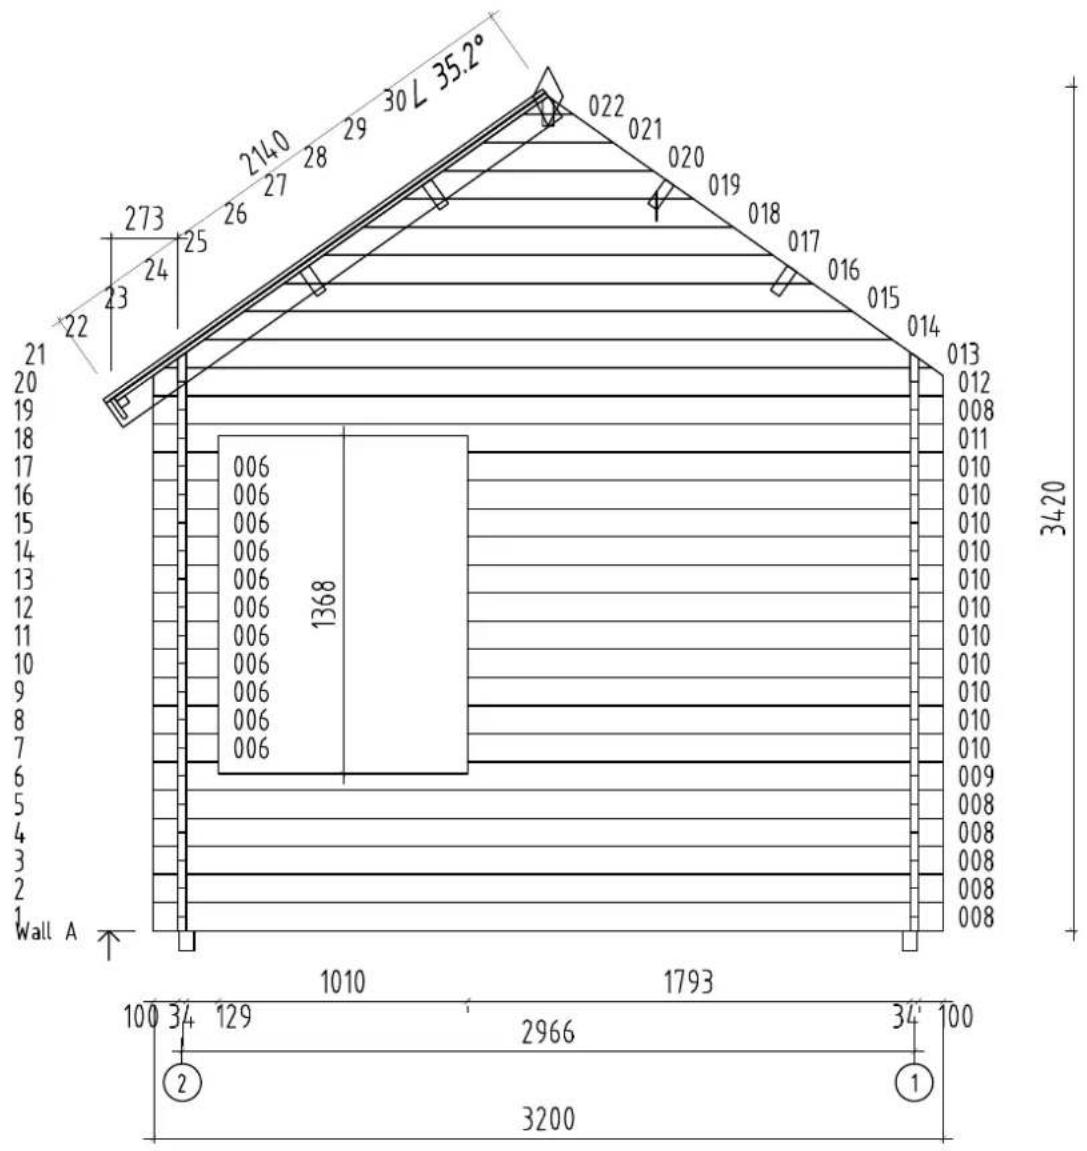
other
| Wall A | Height | | ------ | ------ | | 1 | 100 | | 2 | 129 | | 3 | 1793 | | 4 | 2966 | | 5 | 34 | | 6 | 1010 | | 7 | 1793 | | 8 | 2966 | | 9 | 34 | | 10 | 1010 | | 11 | 1793 | | 12 | 2966 | | 13 | 34 | | 14 | 1010 | | 15 | 1793 | | 16 | 2966 | | 17 | 34 | | 18 | 1010 | | 19 | 1793 | | 20 | 2966 | | 21 | 34 | | 22 | 1010 | | 23 | 1793 | | 24 | 2966 | | 25 | 34 | | 26 | 1010 | | 27 | 1793 | | 28 | 2966 | | 29 | 34 | | 30 | 1010 | | 31 | 1793 | | Wall A | Dimension (labeled) |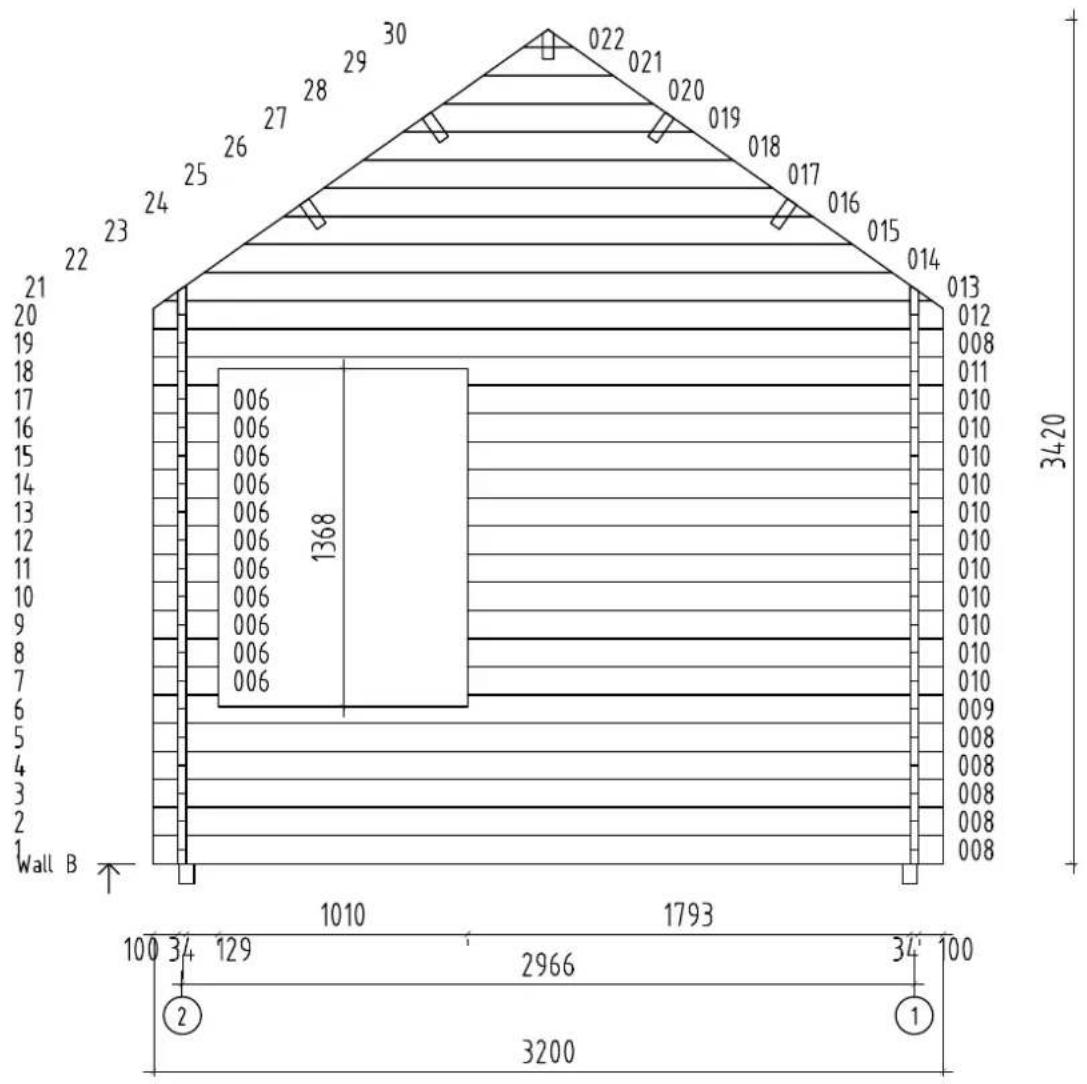
other
| Wall | Dimension | |------|---------| | Top Left | 30 | | Top Right | 022 | | Bottom Left | 29 | | Bottom Right | 021 | | Bottom Center | 28 | | Bottom Right | 020 | | Bottom Center | 27 | | Bottom Right | 26 | | Bottom Center | 25 | | Bottom Left | 24 | | Bottom Right | 23 | | Bottom Center | 22 | | Bottom Right | 21 | | Middle Left | 1368 | | Middle Right | 006 | | Middle Center | 006 | | Middle Right | 006 | | Middle Left | 006 | | Middle Right | 006 | | Middle Center | 006 | | Middle Right | 006 | | Middle Left | 006 | | Middle Right | 006 | | Middle Center | 006 | | Middle Right | 006 | | Middle Left | 006 | | Middle Right | 006 | | Middle Center | 006 | | Middle Right | 006 |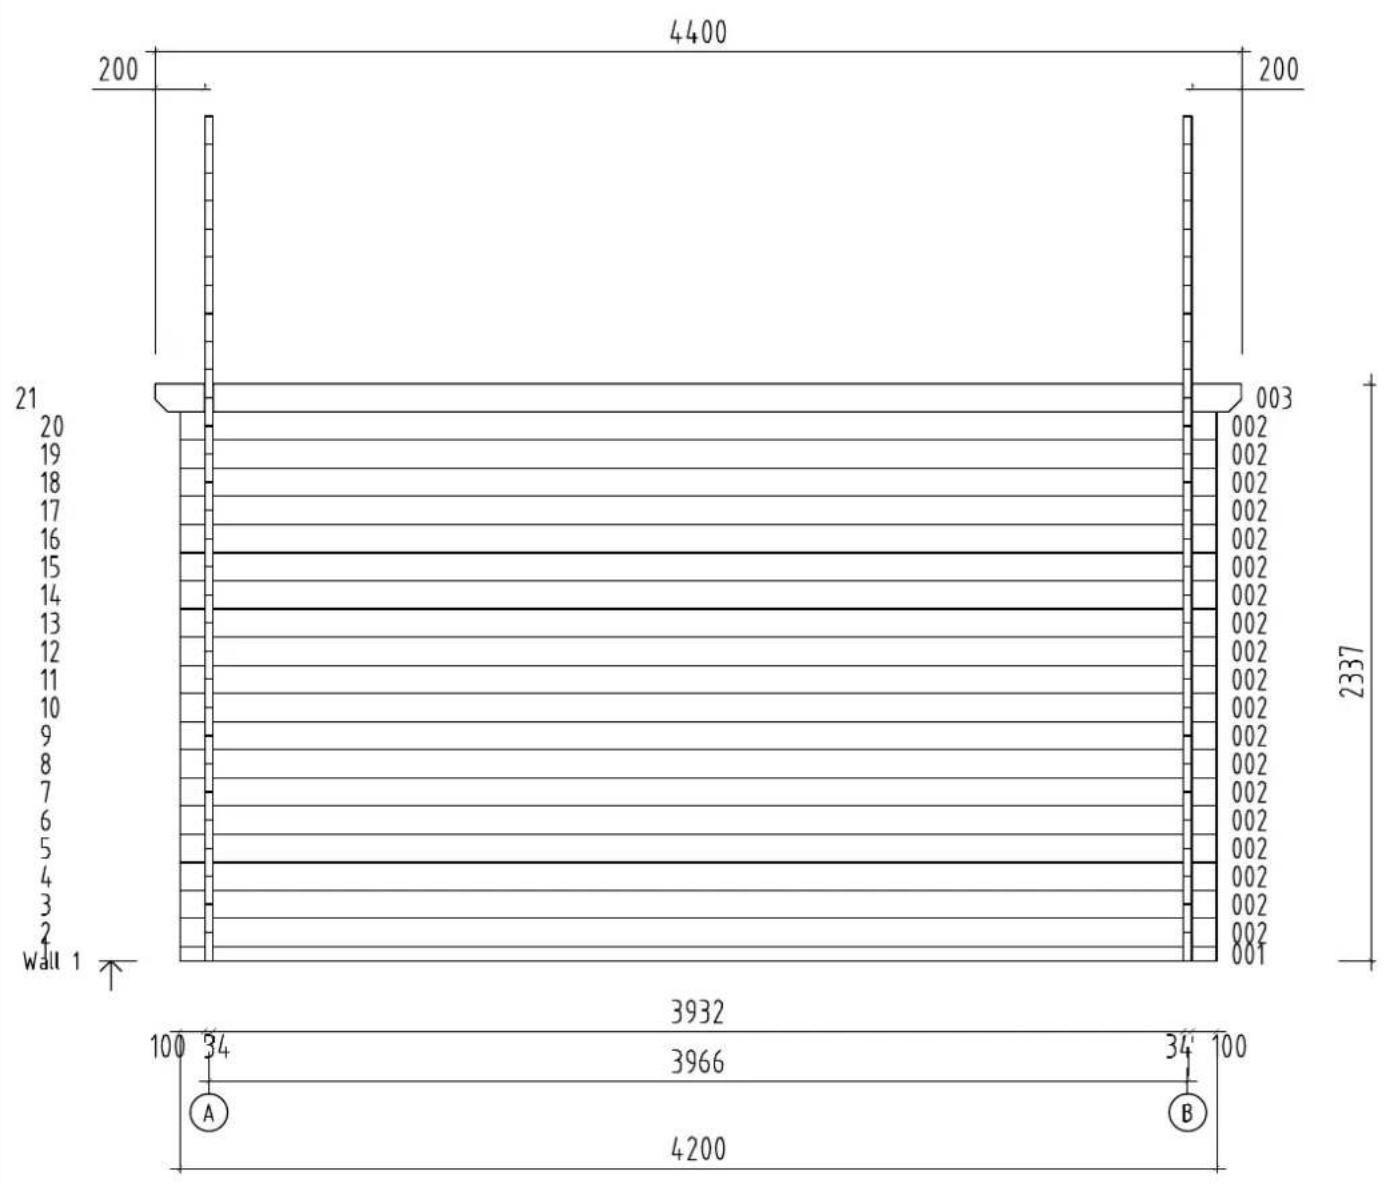
other
| Wall Width | Height | | ---------- | ------ | | 200 | 4400 | | 21 | 200 | | 2337 | 3932 | | 3966 | 3966 | | 4200 | 4200 |
other
| Section | Dimension | |---------|-----------| | Total Height | 4400 | | Total Width | 200 | | Wall Width | 2337 | | Wall Height | 1995 | | Wall Width | 1368 | | Wall Height | 1010 | | Wall Width | 1254 | | Wall Height | 1010 | | Wall Width | 100 | | Wall Height | 4200 | | Wall Width | 4200 | | Wall Height | 200 | | Wall Width | 200 | | Wall Height | 200 | | Wall Width | 200 | | Wall Height | 200 | | Wall Width | 200 | | Wall Height | 200 | | Wall Width | 200 | | Wall Height | 200 | | Wall Width | 200 | | Wall Height | 200 | | Wall Width | 200 | | Wall Height | 1368 | | Wall Width | 1368 | | Wall Height | 1368 | | Wall Width | 1368 | | Wall Height | 1368 | | Wall Width | 1368 | | Wall Height | 1368 | | Wall Width | 1368 | | Wall Height | 1368 | | Wall Width | 1368 | | Wall Height | 1368 | | Wall Width | 1367 | | Wall Height | 1367 | | Wall Width | 1367 | | Wall Height | 1367 | | Wall Width | 1367 | | Wall Height | 1367 | | Wall Width | 1367 | | Wall Height | 1367 | | Wall Width | 1367 | | Wall Height | 1367 | | Wall Width | 1367 | | Wall Height | 1366 | | Wall Width | 1366 | | Wall Height | 1366 | | Wall Width | 1366 | | Wall Height | 1366 | | Wall Width | 1366 | | Wall Height | 1366 | | Wall Width | 1366 | | Wall Height | 1366 | | Wall Width | 1366 | | Wall Height | 1366 | | Wall Width | 1365 | | Wall Height | 1365 | | Wall Width | 1365 | | Wall Height | 1365 | | Wall Width | 1365 | | Wall Height | 1365 | | Wall Width | 1365 | | Wall Height | 1365 | | Wall Width | 1365 | | Wall Height | 1365 | | Wall Width | 1365 | | Wall Height | 1364 | | Wall Width | 1364 | | Wall Height | 1364 | | Wall Width | 1364 | | Wall Height | 1364 | | Wall Width | 1364 | | Wall Height | 1364 | | Wall Width | 1364 | | Wall Height | 1364 | | Wall Width | 1364 | | Wall Height | 1364 | | Wall Width | 1363 | | Wall Height | 1363 | | Wall Width | 1363 | | Wall Height | 1363 | | Wall Width | 1363 | | Wall Height | 1362 | | Wall Width | 1362 | | Wall Height | 1362 | | Wall Width | 1362 | | Wall Height | 1362 | | Wall Width | 1362 | | Wall Height | 1362 | | Wall Width | 1362 | | Wall Height | 1362 | | Wall Width | 1362 | | Wall Height | 1362 | | Wall Width | 1361 | | Wall Height | 1361 | | Wall Width | 1361 | | Wall Height | 1361 | | Wall Width | 1361 | | Wall Height | 1361 | | Wall Width | 1361 | | Wall Height | 1360 | | Wall Width | 1360 | | Wall Height | 1360 | | Wall Width | 1360 | | Wall Height | 1359 | | Wall Width | 1359 | | Wall Height | 1359 | | Wall Width | 1359 | | Wall Height | 1359 | | Wall Width | 1359 | | Wall Height | 1358 | | Wall Width | 1358 | | Wall Height | 1358 | | Wall Width | 1358 | | Wall Height | 1358 | | Wall Width | 1358 | | Wall Height | 1357 | | Wall Width | 1357 | | Wall Height | 1357 | | Wall Width | 1357 | | Wall Height | 1357 | | Wall Width | 1357 | | Wall Height | 1357 | | Wall Width | 1357 | | Wall Height | 1357 | | Wall Width | 1357 | | Wall Height | 1357 | | Wall Width | 1358 | | Wall Height | 1358 | | Wall Width | 1358 | | Wall Height | 1358 | | Wall Width | 1358 | | Wall Height | 1358 | | Wall Width | 1358 | | Wall Height | 1358 | | Wall Width | 1358 | | Wall Height | 1358 | | Wall Width | 1359 | | Wall Height | 1359 | | Wall Width | 1359 | | Wall Height | 1359 | | Wall Width | 1359 | | Wall Height | 1359 | | Wall Width | 1359 | | Wall Height | 1359 | | Wall Width | 1359 | | Wall Height | 1359 | | Wall Width | 1359 | | Wall Height | 1358 | | Wall Width | 1358 | | Wall Height | 1358 | | Wall Width | 1359 | | Wall Height | 1299 [Ground] [Ground] [Ground] [Ground] [Ground] [Ground] [Ground] [Ground] [Ground] [Ground] [Ground] [Ground] [Ground] [Ground] [Ground] [Ground] [Ground] [Ground] [Ground] [Ground] [Ground] [Ground] [Ground] [Ground] [Ground] [Ground] [Ground] [Ground] [Ground] [Ground] [Ground] [Ground] [Ground] [Ground] [A] [B]Fix the roof elements Rel-1 and Rel-2 to the purlins and the gable Rel-3 to the top log using 5x90 mm and 6x120 mm screws. Holes need to be drilled beforehand. Screws shall pass through the frame of the elements and the roof board. Next attach together the roof elements and fix to the gable. Finally install the fascia boards and the diamond.