CPH 401 BQ X - Cooker Fulgor Milano - Free user manual and instructions
Find the device manual for free CPH 401 BQ X Fulgor Milano in PDF.

User questions about CPH 401 BQ X Fulgor Milano
0 question about this device. Answer the ones you know or ask your own.
Ask a new question about this device
Download the instructions for your Cooker in PDF format for free! Find your manual CPH 401 BQ X - Fulgor Milano and take your electronic device back in hand. On this page are published all the documents necessary for the use of your device. CPH 401 BQ X by Fulgor Milano.
USER MANUAL CPH 401 BQ X Fulgor Milano
natural_image
Four black circles arranged in a 2x2 grid on a white background (no text or symbols)CPH 401 BQ X
BARBECUE FILOTOP CON MANOPOLA
FILOTOP BARBECUE WITH KNOB
BARBECUE FILOTOP AVEC BUTON
GRILL FILOTOP MIT KNOPF
BARBACOA FILOTOP CON POMO
natural_image
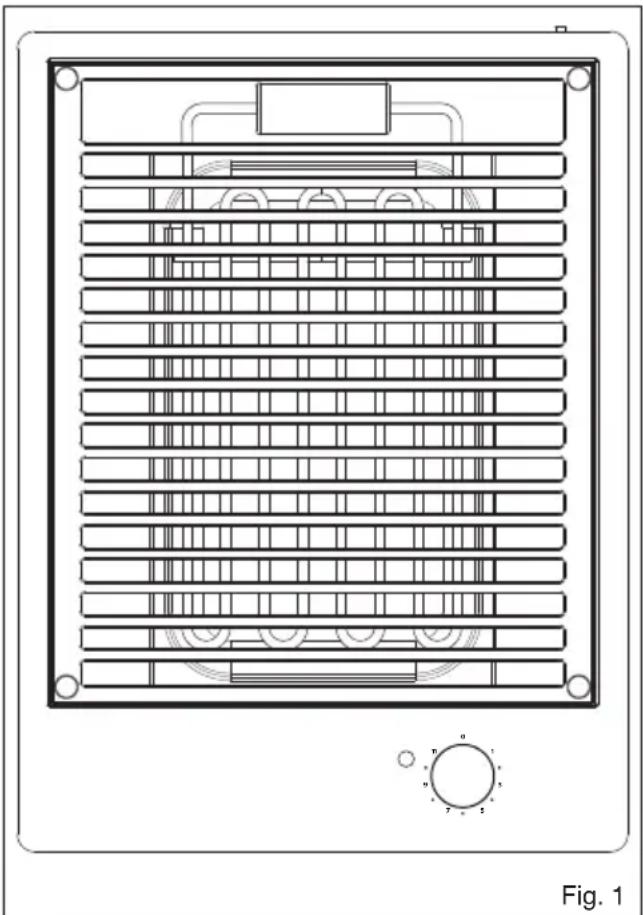
Technical line drawing of a rectangular electronic device with horizontal slats and a circular button, labeled Fig. 1 (no text or symbols on the diagram itself)Manutenzione
We would like to thank you and congratulate you on your choice. This new product has been carefully designed and built using top quality materials, and meticulously tested to ensure that it meets all your culinary requirements. Please read and observe these simple instructions, which will enable you to achieve excellent results from the very first time you use it. This state-of-the-art appliance comes to you with our very best wishes.
THE MANUFACTURER
Index
User instructions, 8
Installation, 8
Use, 8
Maintenance, 8
Installation instructions, 9
Installation, 9
Positioning, 9
Electrical connection, 9
THIS PRODUCT IS DESIGNED FOR DOMESTIC USE. THE MANUFACTURER DECLINES ALL RESPONSIBILITY FOR PERSONAL INJURY OR PROPERTY DAMAGE DERIVING FROM INCORRECT INSTALLATION OR IMPROPER, ERRONEOUS OR UNSUITABLE USE. THE APPLIANCE MUST NOT BE USED BY PEOPLE (INCLUDING CHILDREN) WITH PHYSICAL, SENSORIAL OR MENTAL IMPAIRMENTS, OR BY PEOPLE WITHOUT THE NECESSARY EXPERIENCE OR KNOWLEDGE, UNLESS
I Italiano
GB English
FR Français
DE Deutsch
ES Español
PT Português
Technical data
Power 230 V
Power 2400
Power supply cable 3x1,5 mm ^2
W
THEY ARE SUPERVISED OR INSTRUCTED IN THE USE OF THE APPLIANCE BY A PERSON RESPONSIBLE FOR THEIR SAFETY. CHILDREN MUST BE SUPERVISED TO ENSURE THAT THEY DO NOT PLAY WITH THE APPLIANCE.
User instructions
Installation
All installation operations (electrical connection) must be carried out by people qualified in compliance with the laws in force. For specific instructions, see the installation section.
Use
(Fig.1) The barbecue allows you to grill your food fast.
Using the control knob on the front panel, you can turn on the heater that can cook faster or more slowly, according to the settings from 1 to 11. It works as a grill by turning the knob to position 11. You will notice a slight click that shows that the thermostat has been turned off, and the heating coil soon gets red hot.
This does not mean that you cannot get very good grilling results from the intermediate positions. On the contrary, these positions are recommended for cooking delicate dishes, or to cook the food evenly overall, and right into the middle as well.
The lava rock in the tray is provided to absorb the drips of oil or grease that are produced during cooking. As well, it accumulates heat during the start-up phase of the heater, and so gives you a more constant grilling performance, which is very similar to that obtained from charcoal.
Water can be put into the tray, instead of the lava rock. (We suggest a depth of about 3 cm or one inch.) The presence of water in the tray eliminates unpleasant cooking smells, without reducing the performance of the barbecue in any way.
To obtain the best results, we therefore recommend preheating the lava rock for at least 10 minutes at position 1. This is particularly advisable when you turn on the equipment for the first time, because it allows you to reduce the risk, during cooking, of the food absorbing smells that the heating coil produces when it is first switched on.
natural_image
Technical line drawing of a rectangular electronic device with horizontal slats and a circular button, labeled Fig. 1 (no text or symbols on the diagram itself)Maintenance
Unplug the appliance before performing any maintenance. To increase the life of the appliance, it is essential to periodically perform a general cleaning, keeping the following in mind:
- the steel parts must be cleaned with a suitable product (available in stores) that is not abrasive or corrosive. Avoid products that contain chlorine (bleach, etc.);
- avoid leaving acid or alkaline substances on the work surface (vinegar, salt, lemon juice, etc.).

CHARCOAL OR SIMILAR COMBUSTIBLE FUEL MUST NOT BE USED WITH THIS APPLIANCE.
Installation instructions
Installation
These instructions are provided for qualified installers as a guide to installation, adjustment and maintenance in conformity with current laws and standards. Service must always be performed with the appliance disconnected from the electricity.
Positioning (Fig. 2 and 3)
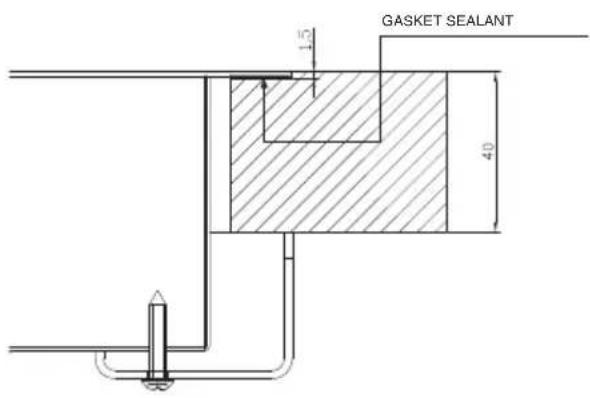
The appliance is designed to be built in to a work surface as shown in the figure. Prepare the edge of the hob with the sealant provided (Fig. 5).
Electrical connection
Before connecting to the electricity, make sure that:
- the characteristics of the system match the data on the bottom of the hob;
- the system has an effective earth connection compliant with current standards and laws. An earth connection is required by law.
- If the appliance has no cable and/or plug, use material suitable for the absorption indicated on the registration plate and for the working temperature. The cable must not reach a temperature higher than 50 °C above room temperature in any point.
- For direct connection to the mains, it is necessary to provide a device that ensures disconnection from the mains, with an open distance of the contacts that allows complete disconnection under Category III conditions, conforming to the installation rules.
- The omnipolar plug or switch must be easy to reach when the appliance is installed.
- The appliance is NOT intended for use with an external timer or a separate remote control system.
- If it is necessary to replace the power cord of the fryer, use only an oil-resistant type H05RN-F or H07RN-F cable.
- If it is necessary to replace the power cord of the barbecue, use an H05RR-F type cable or equivalent.
Note: The manufacturer declines all liability if the usual accident prevention standards and the above instructions are not followed.
To avoid all risk, if the power cable becomes damaged, it must only be replaced by the manufacturer, by an authorised service centre, or by a qualified electrician.

text_image
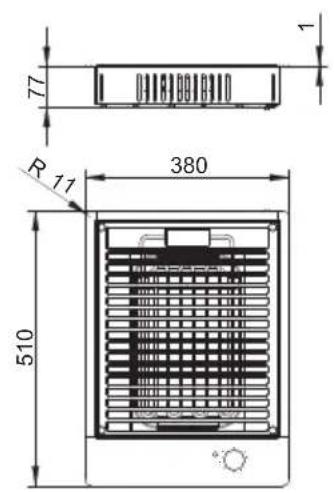
77 R 11 380 510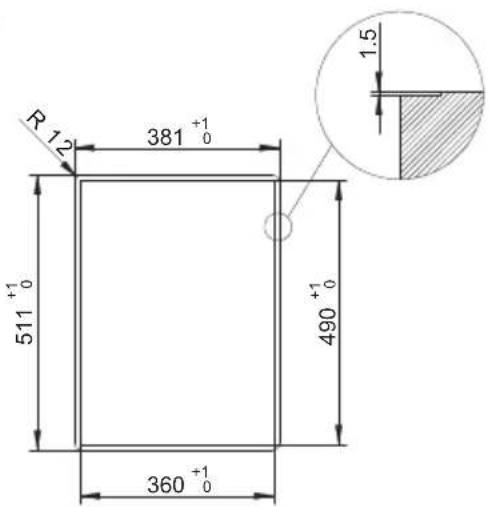
text_image
R 12 381 +1 0 511 +1 0 490 +1 0 360 +1 0 1.5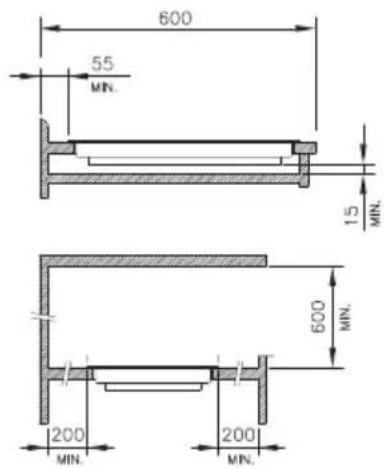
text_image
600 55 MIN. 15 MIN. 600 200 MIN. 200 MIN.Fig. 2
text_image
GASKET SEALANT 1.5 40
text_image
GASKET SEALANT 1.5 30Fig. 3