
G73 - Heating NewAir - Free user manual and instructions
Find the device manual for free G73 NewAir in PDF.

| Brand | NewAir |
| Model | G73 |
| Product Type | Radiant heater (electric heater) |
| Supply Voltage | 240 V |
| Power Consumption | 5000 W |
| Installation Type | Wall or ceiling mount |
| Adjustable Orientation | 45° rotation and 45° tilt |
| Temperature Control | Yes, rotary thermostat |
| Overheat Protection | Yes, temporary shutdown |
| Safety Distance (combustible materials) | 0.9 m (3 feet) |
| Minimum Installation Height | 1.9 m (6 feet) |
| Usage | Indoor only |
| Assembly Required | Handle attachment |
| Cleaning | Vacuum with flat nozzle, damp cloth |
| Warranty | 1 year limited |
| Customer Service | support@newair.com |
Frequently Asked Questions - G73 NewAir
User questions about G73 NewAir
0 question about this device. Answer the ones you know or ask your own.
Ask a new question about this device
Download the instructions for your Heating in PDF format for free! Find your manual G73 - NewAir and take your electronic device back in hand. On this page are published all the documents necessary for the use of your device. G73 by NewAir.
USER MANUAL G73 NewAir
Hardwired Electric Garage Heater
Radiateur de Garage Électrique Câblé Calentador de Garaje Eléctrico Cableado
natural_image
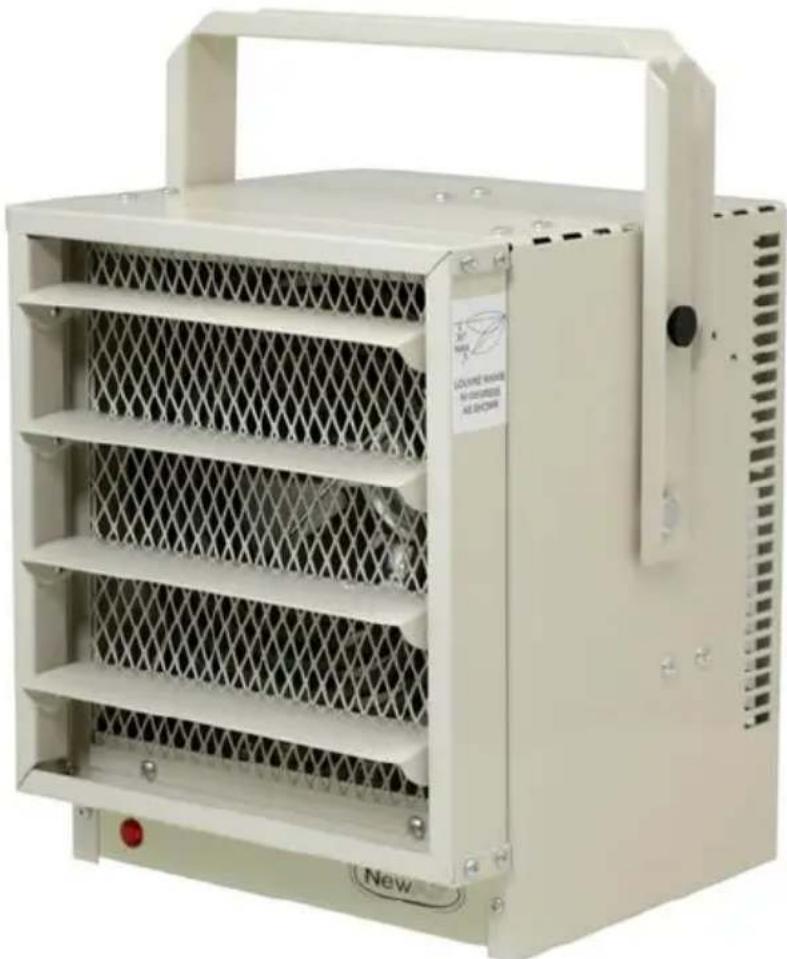
Exterior view of a beige industrial air conditioning unit with mesh ventilation and a handle (no visible text or symbols)OWNER'S MANUAL
English Manual ....3
A Name You Can Trust
Trust should be earned and we will earn yours. Customer happiness is the focus of our business.
From the factory to the warehouse, from the sales floor to your home, the whole Newair family promises to provide you with innovative products, exceptional service, and support when you need it the most.
Count on Newair
As a proud Newair owner, welcome to our family. There are no robots here, real people shipped your product and real people are here to help you.
Contact Us
Please reach out to our customer service team before making a return to your store of purchase. We are happy to help with any questions or concerns!
Mon-Fri from 8-4 PST at:
Call: 1-855-963-9247
Email: support@newair.com
Online: www.newair.com
A team member will respond to you within 24 hours.
Follow Us

Facebook.com/newairusa

Instagram.com/newairusa

YouTube.com/newairusa

Twitter.com/newairusa
READ AND SAVE THESE INSTRUCTIONS.
TABLE OF CONTENTS
Specifications....5
Register Your Product Online 6
Safety Information & Warnings....7
Heater Assembly....9
Heater Installation 10
Heater Location and Clearances....10
Installation of Wall/Ceiling Hanger Bracket....10
Electrical Connection....11
Operating Instructions 12
Setting the Thermostat....12
Cleaning & Storage....13
Regular Cleaning 13
Storage 13
Troubleshooting....14
Limited Manufacturer's Warranty 15
SPECIFICATIONS
| MODEL NO. | G73 |
| VOLTAGE: | 240 volts |
| POWER CONSUMPTION: | 5000W |
REGISTER YOUR PRODUCT ONLINE
Register Your Newair Product Online Today!
Take advantage of all the benefits product registration has to offer:

Service and Support
Diagnose troubleshooting and service issues faster and more accurately

Recall Notifications
Stay up to date for safety, system updates and recall notifications

Special Promotions
Opt-in for Newair promotions and offers
Registering your product information online is safe & secure and takes less than 2 minutes to complete:
newair.com/register
Alternatively, we recommend you attach a copy of your sales receipt below and record the following information, located on the manufacturer's nameplate on the rear of the unit. You will need this information if it becomes necessary to contact the manufacturer for service inquiries.
Date of Purchase: ____
Serial Number: ____
Model Number: ____
SAFETY INFORMATION & WARNINGS

When using any electrical appliance, basic safety precautions must be followed in order to reduce the risk of fire, electrical shock and/or injury to persons or property. Be sure to read all instructions before using this appliance and observe the following safety tips:
- This heater is hot when in use. To avoid burns, do not let bare skin touch the hot surface. Always use the handle when moving this heater. The trim around the air outlet grille becomes hot during heater operation. Keep combustible materials such as furniture, pillows, bedding, papers, clothes, and curtains at least 3 feet (0.9 m) from the front of the heater.
- Extreme caution is necessary when any heater is used by or near children or invalids, and whenever the heater is left operating and unattended.
- Do not install less than 6 feet (1.9 m) from the floor.
- Do not operate the heater if the supplied wire is damaged, the heater malfunctions, or the heater has been dropped or damaged in any manner. Return heater to authorized service facility for examination, electrical or mechanical adjustment, or repair.
- Do not use the heater outdoors.
- This heater is not intended for use in bathrooms, laundry areas and similar humid indoor locations. Never put a heater where it may fall into a bathtub or other water container.
- Connect to properly grounded outlets only. Check heater voltage and amperage on the back of the heater to make sure it agrees with the electric service supplied.
- Do not insert or allow foreign objects to enter any ventilation or exhaust opening as this may cause an electric shock or fire, or damage to the heater.
- To prevent a possible fire, do not block air intakes or exhaust in any manner. Do not use on soft surfaces, like a bed, where openings may become blocked.
- All electrical heaters have hot, arcing, or sparking parts inside. Do not use in areas where gasoline, paint, or flammable liquids are used or stored or where the unit will be exposed to flammable vapors.
- Do not modify the heater. Use it only as described in this manual. Any other use not recommended by the manufacturer may cause fire, electric shock, or injury to persons.
- Always use a certified electrician should new circuits or outlets be required.
-
Disconnect all power supply before performing any cleaning, maintenance, or relocation of the unit.
-
When transporting or storing the unit, keep in a dry place, free from excessive vibration, and store so as to avoid damage.
- Make sure that no pieces of polystyrene or other packaging material have been left between one element of the appliance and another. It may be necessary to clean the appliance with a vacuum cleaner.
- Do not run-in locations when the heater will be left unattended for long periods of time.
- Do not use attachments or filters. They are not recommended.
- Use this heater only as described in this manual. Any other use not recommended by the manufacturer may cause fire, electric shock or injury to persons.
SAVE THESE INSTRUCTIONS
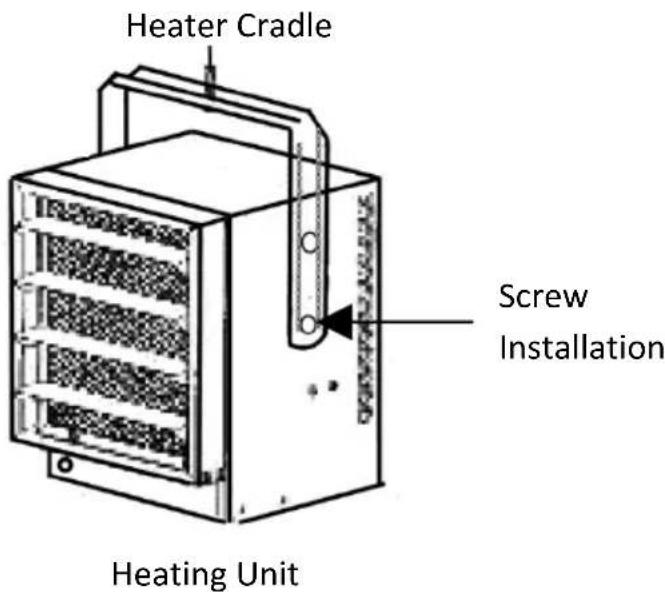
HEATER ASSEMBLY
You will need to attach the heater cradle to the heating unit using the provided screws and washers.
- Using a wrench, remove the provided screws and washers from either side of the unit.
- Slide the heater cradle down over top the heater unit until the bottom holes of the heater cradle and heating unit are aligned on each side.
- Using a wrench, tighten each screw and washer through the heater cradle and into the heating unit.
- Ensure the screws are fully tightened and the heater cradle is tightly secured.
text_image
Heater Cradle Screw Installation Heating UnitHEATER INSTALLATION
NOTE: Please contact a licensed electrician to install your heater to the proper outlets or circuits. Do not attempt to install your heater by yourself. A hired professional will prevent personal injuries from occurring.
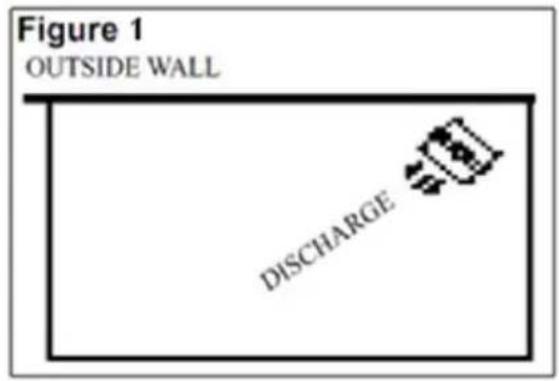
HEATER LOCATION AND CLEARANCES
The heater must be installed in a fixed location. Ensure that hot air discharge is parallel to or away from walls (Figure 1).
text_image
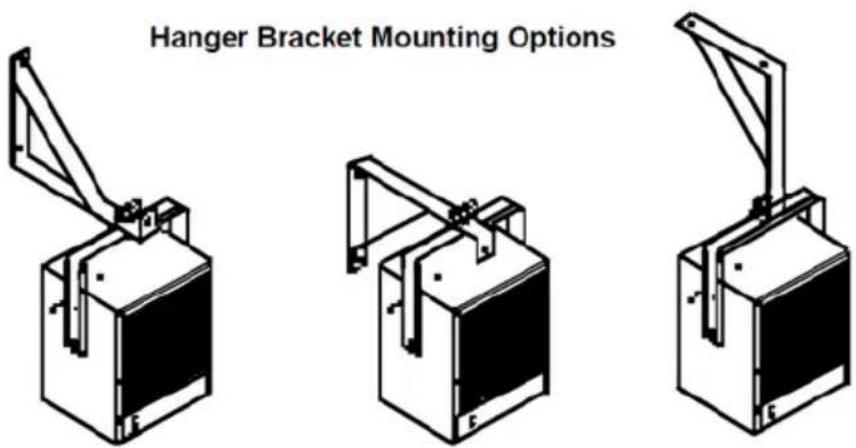
Figure 1 OUTSIDE WALL DISCHARGEINSTALLATION OF WALL/CEILING HANGER BRACKET
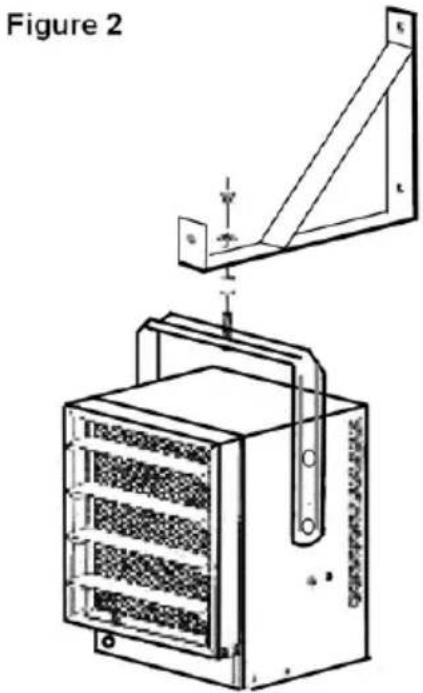
The hanger bracket allows the unit to be rotated approximately 45 degrees in each direction from center, when attached to a wall and tilted in a 45-degree range while suspended from a wall or ceiling.
NOTE: The hardware for mounting the hanger bracket to the wall or ceiling is included.
text_image
Hanger Bracket Mounting OptionsCAUTION: When turning and/or tilting the heater do not block the exhaust opening.
The following steps are shown in Figure 2:
- Locate a stud or other suitable support and install hanger bracket on wall or ceiling. Select a location where the control knob on the back of the heater is easily reachable.
- Insert carriage bolt into square opening of heater handle.
- Slide spacer over the carriage bolt shaft and insert the hanger bracket opening and hold them in position.
- Slide lock washer and thread nut onto carriage bolt. Turn and tighten with wrench.
text_image
Figure 2Do not install less than 6 feet (1.9 m) from the floor.
ELECTRICAL CONNECTION
WARNING: Consult local electrical codes in addition to the following requirements:
- Turn off main power supply at the electrical panel.
- Route supply wires from circuit breaker to an approved junction box, located near compact unit heater. These supply wires must be two conductor non-metallic sheath cable with ground wire. Each heater should be on an individual, properly fused circuit.
- Route supply wires from junction box to G73. These supply wires must be two conductor metallic sheath (BX) cable with ground wire. Alternatively, appropriate conduit can be used.
- Remove junction box cover of G73 and remove one knockout hole. Insert approved bushing into hole and feed wire cable through. Tighten bushing around cable.
- Make electrical connection to G73 according to relevant wire diagram. Make connections using approved wire nut connectors and secure the grounding wire to the ground screw on the heater chassis.
- Replace junction box cover of G73.
OPERATING INSTRUCTIONS
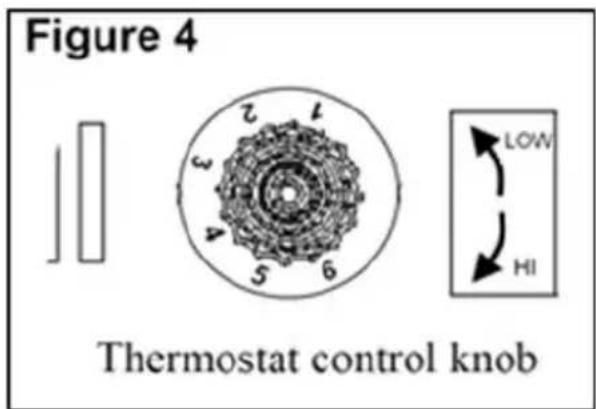
SETTING THE THERMOSTAT
- Before connecting or disconnecting plug, turn knob fully counterclockwise (Figure 4).
- Heater is equipped with a thermostat. To adjust temperature to your individual requirements, turn thermostat control knob clockwise all the way to turn heater on.
- When room reaches desired temperature, turn thermostat knob counterclockwise until you hear a "click". Leave in this position to maintain room temperature at this setting.
- For additional heat, turn clockwise until you hear "click" again and heater will turn on.
- To turn heater to the lowest setting, turn the thermostat knob counterclockwise all the way.
text_image
Figure 4 Thermostat control knobCLEANING & STORAGE
REGULAR CLEANING
Before any cleaning:
- Make sure the heater is turned off.
- Disconnect power supply at source.
CAUTION: Allow at least 30 minutes for the heater to cool before attempting any maintenance or cleaning.
- Do not spray cleaning liquid or other chemicals onto the unit.
- Interior dust can often be removed by using a vacuum cleaner with a crevice tool attachment.
- To clean housing, use a clean, soft and lightly damp cloth to gently wipe all the dirt from the surface of the unit. Be sure not to wet the heating element and the switches. Allow the unit to dry completely before using it.
STORAGE
- Perform the cleaning procedures described above.
- Wipe all parts dry.
- Pack the heater in a plastic bag and store it in a cool, dry place.
TROUBLESHOOTING
| Problem | Possible Causes | Solution |
| Unit is not heating. | Overheat protection has temporarily deactivated the heater. | Turn the heater off; disconnect the power and allow it to cool. Inspect and remove any objects on or adjacent to the heater. Wait 30 minutes before restoring power. |
| Room temperature has been warmed up to thermostat setting. | To increase the room temperature, adjust thermostat control knob to a higher setting by turning clockwise. | |
| Heater is not wired correctly. | Follow the included hardwiring directions. Contacting a licensed electrician is recommended. | |
| Breaker/Fuse has been tripped. | Check your electrical box to confirm the breaker has not been blow. This may occur if the receptacle is shared between other high consumption appliances. | |
| The heater is producing a burning smell. | A drop of oil fell on the heating coil during the manufacturing process. It will quickly evaporate and should not occur again. | Ensure room in which heater is situated is well ventilated. |
| Check and ensure there are no combustible materials within 0.9 meters (3 ft.) surrounding the heater. | Remove any combustible items from the heater. | |
| Ensure a minimum clearance of 5.5 inches (14 cm) from both sides and rear of heater to adjacent walls. | Reposition the heater so there is enough space around the heater to the adjacent walls. |
Please do not attempt to open or repair the heater yourself. Doing so could cause damage or personal injury.
LIMITED MANUFACTURER'S WARRANTY
This appliance is covered by a limited manufacturer's warranty. For one year from the original date of purchase, the manufacturer will repair or replace any parts of this appliance that prove to be defective in materials and workmanship, provided the appliance has been used under normal operating conditions as intended by the manufacturer.
Warranty Terms:
During the first year, any components of this appliance found to be defective due to materials or workmanship will be repaired or replaced, at the manufacturer's discretion, at no charge to the original purchaser. The purchaser will be responsible for any removal or transportation costs.
Warranty Exclusions:
The warranty will not apply if damage is caused by any of the following:
- Power failure
- Damage in transit or when moving the appliance
- Improper power supply such as low voltage, defective household wiring or inadequate fuses
- Accident, alteration, misuse or abuse of the appliance such as using non-approved accessories, inadequate air circulation in the room or abnormal operating conditions (extreme temperatures)
- Use in commercial or industrial applications
- Fire, water damage, theft, war, riot, hostility or acts of God such as hurricanes, floods, etc.
- Use of force or damage caused by external influences
- Partially or completely dismantled appliances
- Excess wear and tear by the user
Obtaining Service:
When making a warranty claim, please have the original bill of purchase with the purchase date available. Once confirmed that your appliance is eligible for warranty service, all repairs will be performed by a Newair™ authorized repair facility. The purchaser will be responsible for any removal or transportation costs. Replacement parts and/or units will be new, re-manufactured or refurbished and is subject to the manufacturer's discretion. For technical support and warranty service, please email support@newairusa.com.
Un nom de confiance
Instagram.com/newairusa
Twitter.com/newairusa
LISEZ ET CONSERVEZ CES INSTRUCTIONS.
TABLE DES MATIÈRES
Email: support@newair.com
Instagram.com/newairusa

YouTube.com/newairusa

Twitter.com/newairusa