Dragon 4 Pro TRD40615E - Heating DELONGHI - Free user manual and instructions
Find the device manual for free Dragon 4 Pro TRD40615E DELONGHI in PDF.
Download the instructions for your Heating in PDF format for free! Find your manual Dragon 4 Pro TRD40615E - DELONGHI and take your electronic device back in hand. On this page are published all the documents necessary for the use of your device. Dragon 4 Pro TRD40615E by DELONGHI.
USER MANUAL Dragon 4 Pro TRD40615E DELONGHI
Instructions for use. Keep these instructions Visit www.delonghi.com for a list of service centers near you. ELECTRIC CHARACTERISTICS 120 V~ 60 Hz 1500 W2
L’appareil ne fonctionne pas Assurez-vous qu'il est branché et que la prise électrique fonctionne. Vériez l’absence d’obstruction. La température est réglée trop base. Branchez-le sur le secteur. Enlevez l'obstruction et laissez refroidir l'appareil. Si l'appareil ne fonctionne pas, veuillez contacter le numéro sans frais Delonghi Réglez la température à une position plus élevée. Sonde défectueuse, L'écran ache: PF Contacter le numéro sans frais Delonghi. L'écran ache: Ht (Haute température) L’appareil est recouvert ou obstrué. Vériez si l’appareil est recouvert ou obstrué. Lors que la température interne du produit sera réduite, l'alarme disparaît.10 IMPORTANT SAFEGUARDS When using any electrical appliance, some basic safety precautions should always be observed to reduce the risk of re, electric shock, and/or injury to persons. Read all in- structions carefully before using the appliance. Specically: Danger! Failure to observe the warning may result in life threatening injury by electric shock. - The appliance must not be placed immediately under a xed power socket. - Do not use the appliance outdoors. - This heater is not intended for use in bathrooms, laundry areas, or similar indoor locations. Never position the appliance where it may fall into a bathtub or come in contact with water. - If the power cable is damaged, stop using the product. Power cable must be replaced by the manufacturer, an authorised service centre or a qualied electrician in order to eliminate all risk. - Do not use this heater in the immedi- ate surroundings of a bath, a shower or a swimming pool. - Do not insert or allow foreign objects to enter any ventilation or exhaust opening as this may cause an electric shock, re, or damage the heater. Important! Failure to observe the warning could result in injury or dam- age to the appliance. - The appliance is not intended for use by persons (including children) with reduced physical, sensory or mental capabilities, or lack of experience and knowledge, unless they have been given supervision or instruction concerning use of the appliance by a person responsible for their safety. Children should be supervised to ensure that they do not play with the appliance. - CAUTION — Some parts of this product can become very hot and cause burns. Particular attention has to be given where children and vulnerable people are pres- ent. - The internal parts of the appliance can become very hot or produce sparks during operation. Do not use the appliance in areas where gasoline, paints, or other ammable liquids are used or stored. - This heater is lled with a precise quantity of special oil. Repairs requiring opening of the oil container are only to be made by the manufacturer or his service agent who should be contacted if there is an oil leak; when scrapping the heater, follow the regulations concerning the disposal of oil. - ATTENTION: To avoid the safety system resetting accidentally, this appliance must not be powered through an external on/o device such as a timer, or connected to a circuit which is turned o and on regularly by the energy supplier. - Do not use the appliance in small rooms when they are occupied by persons that are not capable of leaving the room, unless constant supervision is provided. - Always disconnect the plug from the power outlet when the appliance is not in use. - Do not wrap the cord around the appli- ance immediately after use.11 - When the appliance is in use unwrap the cord from the cord holder. - The appliance must not be located im- mediately below a xed socket-outlet. Danger of burns!! Failure to observe the warning could result in burns or scalds. - WARNING: To avoid overheating, never under any circumstances cover the appliance during operation as this would lead to a dangerous rise in temperature, and risk of re. Do not use the appliance on soft surfaces, such as beds, where the openings may become blocked. - Do not run the power cord under car- peting. Do not cover cord with throw rugs, runners, or the like. Keep the cord away from any passageways where it could be tripped over. Please note: This symbol indicates recommendations and important infor- mation for the user. - Always use the appliance in an upright position. - Do not use this appliance with an extension cord or outlet strip. Connect the appliance directly to a suitable outlet. - Make sure that the plug is fully inserted into the outlet. Wall outlets may deteriorate with time, so check the plug periodically for signs of overheating or deformation. If the outlet has deteriorated, stop using it and have it repaired. - To prevent burns, do not touch hot surfaces with bare skin. Use the handle when moving the appliance. Keep all ammable materials, such as furniture, pillows, bedding, paper, clothing, and curtains at least 90 cm (3 feet) from the front and top of the appliance also avoid contact with the sides and back. - Do not use the appliance in rooms with a oor area of less than 4m². - Before putting the appliance away, make sure it is completely o and unplugged from the mains socket. Wrap the cable around the cord wrap. Do not store in dusty atmospheres. - Do not rest anything on the appliance. - Do not use the appliance to dry laundry. Do not obstruct the air intake and outlet grilles (danger of overheating). - Do not use the appliance near walls, furniture, curtains, etc. - Do not place the heater near a bed because objects such as pillows or blankets can fall o the bed and be ignited by the heater. - Never place the power cable on top of the heater while it is hot. - We recommend that you not place the heater in a draught, because strong draughts of air may adversely aect the equipment’s operational ecien- cy. - The rst time you use the appliance, operate it of at least 2 hours with the thermostat at maximum to eliminate the “new” smell. - Position the appliance so that the plug and the outlet can be easily reached even after installation. - This appliance is not intended for use at altitudes exceeding 2000 m (6561 feet). - The appliance is tted with a safety device which will switch o it in case12 of accidental overheating. To reset, please contact Customer Experience, see enclosed guarantee. SAVE THESE INSTRUCTIONS
THIS PRODUCT IS FOR HOUSEHOLD USE
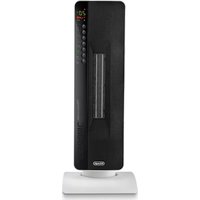
ONLY DESCRIPTION A Display B ON/Standby button C Power setting button D - Adjustment button E + Adjustment button F Timer button G Brightness button H ECO button I Cord holder L Wheel USE Fitting the wheels Turn the radiator upside down on a rug or soft surface to prevent damaging the paint nish. Fully unfold the wheels by turning them outwards (Fig. 1). Turn the radiator back to its upright position. Important! Always operate the appliance in upright position only (wheels on the bottom, controls on top). Any other position could create hazardous situation. Location Place appliance on the oor beneath the coldest window in the room, or any other location. Your appliance will re- duce the eect of cold drafts. The appliance should not be placed immediately below a power outlet. Do not use this appliance in rooms with a oor area of less than 43 square feet (4 sq. m.). Power connection The radiator must be connected to a properly polarized household outlet in perfect working condition. The appliance will be set in the standby condition. The display will show the symbol. Keep loose clothing or bedding, furniture and ammable material away from the power outlet where the heater is plugged in. After an interruption of the power supply (power failure or appliance unplugged) the unit goes always to standby . When the unit is switched on by pressing the ON/Standby button, the operating conditions will be same ones previously set. Heating function To turn the appliance on, insert the plug into an electrical outlet then press the (B) button. Press button (C) to set the required power level: MIN ( ); MED ( ); MAX ( ) (see g. 2)
To select the desired temperature, press button + or - (E or D). By pushing the + or - button once, the temperature (shown on the display) will increase or decrease by 1°F (1°C) . Holding the + or - button depressed the value will increase or decrease rapidly. The appliance allows you to set a temperature of 5°C (41°F) and a range from 10°C to 28°C (50°F to 82°F). Anti-freeze function Setting the temperature to 5°C (41°F), the appliance will activate the Anti-freeze function. The display will show the symbol, in this way the appliance will turn on automatically, at the MAX power, only if the room temperature falls below 5°C (41°F), to help prevent freezing conditions. If you wish to go back to the Heating function, press the "+" button once. Fig. 1 Your product is equipped with a polarized alternating current line plug (a plug having one prong wider than the others). This plug will t into the power outlet only one way. This is a safety feature. If you are unable to insert the plug fully into the outlet, try reversing the plug. If the plug should still fail to t, contact your electrician to replace your obsolete outlet. Do not attempt to modify the plug to bypass this safety feature. Fig. 213 Please note: in the Anti-freeze function the power level settings are not able to be adusted. The unit will run at MAX. ECO function When this function is active the appliance automatically sets the most appropriate power level to guarantee optimum comfort while reducing energy consumption. To activate this function press the "ECO" (H) button. The display will show symbol. If the selected temperature is much higher then the actual room temperature, the appliance will start automatically and rapidly heat the room. The appliance will automatically select the most convenient power level (MAX-MED-MIN-OFF). If MAX power level has been selected using the button, the appliance will cycle between: MAX-MED-MIN- OFF. If MED power level has been selected, the appliance will cycle between: MED-MIN-OFF. If MIN power level has been selected, the appliance will cycle between: MIN-OFF. Working indicator The symbol indicates the heating status by means of its colors. RED: the unit is heating at the maximum power. YELLOW: the unit is heating at the medium power. GREEN: the unit is heating at the minimum power. absent: the unit is not heating. Brightness of the display The appliance allows two dierent brightness settings for the display. The highest is active when any key button is pressed. After a few seconds of keyboard inactivity, the brightness will decrease to the operating brightness level. This lower level can be adjusted by means of the light button (G). Press the light button repeatedly till the desired brightness is reached. There are three brightness levels available. Key lock In order to avoid accidental operation, you can lock the keyboard using the keylock function. To activate this function press buttons + and - together for at least 3 seconds. The display shows the symbol and a double acoustic signal will be emitted. To deactivate the function, proceed in the same way. Timer function This function can be activated in two dierent ways. Delayed start: With the appliance in standby mode, press the timer button (F) . The symbol is displayed ashing together with the hours left before the appliance comes on (see g. 3) . Change the hours using the + and - buttons, then wait a few seconds for the program to be stored. The display will return to standby and the symbols remains on. When the programmed time has elapsed, the appliance will come on with the previous settings. Delayed stop: with the appliance on, press the timer button . The symbol is displayed ashing together with the hours left before the appliance goes to standby (see g. 3) . Change the hours using the + and - buttons, then wait a few seconds for the program to be stored. The current settings and symbol are displayed. At the end of the set time the appliance switches to standby automatically. To go back to operating without the timer, press the timer button twice. The timer symbol disappears from the display. Please note: the time is settable from 0.5 to 24 hours. Change of the temperature scale The display can show the temperature in both °F and °C. To select the desired temperature scale, when the unit is in standby position, press and hold the "+" and "ECO" keys for at least 10 seconds, then release. The change of scale will be indicated by two short beeps. Alarms The appliance has a diagnostic system that makes it possible to signal malfunctions. In case of problems, the display will show an alarm message: (Probe failure) With this alarm the appliance does not operate. Contact De'Longhi Customer Service. (High temperature) When the product’s internal temperature Fig. 314 is too high, the heating power will progressively and automatically be reduced. The display shows intermittently till the internal temperature is lowered. To help eliminate the cause of this alarm, check that the unit is not covered or obstructed. SAFETY DEVICE A safety device switches the appliance o in the event of overheating. To restart the appliance, contact the De'Longhi toll free number.
MAINTENANCE AND SERVICE
Always remove the plug from the power outlet and allow the appliance to cool. Wipe appliance with a soft damp cloth, do not use detergents and abrasives. Should the appliance not be in use over a certain length of time, wrap the cord around the cord holder and store it in a dry place. This appliance has been built to give many years of trouble free service. In case of malfunction or doubt, do not try to repair the appliance by yourself: this may result in a re hazard or electric shock. Contact the De'Longhi toll free number. TROUBLESHOOTING
PROBLEM CAUSE SOLUTION
The appliance doesn't work Be sure it is plugged in and that the electrical outlet is working. Check for any obstruction. The temperature may be set too low. Plug into the power outlet. Remove the obstruction and let the appliance cool down. If the appliance doesn't work please contact the De'Longhi toll free number. Set the temperature to a higher position. Probe failure, the display shows: PF Contact the De'Longhi toll free number. The display shows: Ht (High temperature) The unit is covered or obstructed. Check that the unit is not covered or obstructed. When the product's internal temperature decreases the alarm will disappear.www.delonghi.com 5711011581_00_0419 Printed in China/ Imprimé en Chine