
Radia S TRRS0715E - Heating DELONGHI - Free user manual and instructions
Find the device manual for free Radia S TRRS0715E DELONGHI in PDF.
| Product type | Oil-filled radiator |
| Model | Radia S TRRS0715E |
| Brand | DeLonghi |
| Power | 1500 W |
| Voltage / Frequency | 120 V ~ 60 Hz |
| Number of elements | 7 |
| Approximate dimensions (L x D x H) | 60 x 25 x 65 cm |
| Approximate weight | 12 kg |
| Casters | Yes, Easy Wheel system |
| Temperature adjustment | 41 °F to 82 °F (5 °C to 28 °C) |
| Available power levels | Min, Med, Max |
| Eco function | Yes, automatic regulation for energy saving |
| Anti-freeze function | Yes, maintains 41 °F (5 °C) |
| Timer | Delayed start and stop (0.5 to 24 h) |
| Key lock | Yes |
| Display | Digital with heating indicator (colors) |
| Operation indicator | Red (Max), Orange (Med), Green (Min) |
| Safety distance | At least 90 cm from the front and top |
| Overheat protection | Yes, automatic shutdown |
| Usage | Household use only |
| Maintenance | Wipe with a damp cloth, no abrasive detergents |
| Spare parts / Repairability | Not user-serviceable. Contact DeLonghi after-sales service |
Frequently Asked Questions - Radia S TRRS0715E DELONGHI
User questions about Radia S TRRS0715E DELONGHI
0 question about this device. Answer the ones you know or ask your own.
Ask a new question about this device
Download the instructions for your Heating in PDF format for free! Find your manual Radia S TRRS0715E - DELONGHI and take your electronic device back in hand. On this page are published all the documents necessary for the use of your device. Radia S TRRS0715E by DELONGHI.
USER MANUAL Radia S TRRS0715E DELONGHI
Instructions for use. Keep these instructions
Visit www.delonghi.com for a list of service centers near you.
ELECTRIC CHARACTERISTICS
120V 60Hz1500W
When using any electrical appliance, some basic safety precautions should always be observed to reduce the risk of fire, electric shock, and/or injury to persons. Read all instructions carefully before using the appliance. Specifically:

Danger!
Failure to observe the warning may result in life threatening injury by electric shock.
- Do not operate any heater with a damaged cord or plug or after the heater malfunctions, has been dropped or damaged in any manner. If heater has leaked any oil, discontinue using the heater and contact the service centre as indicated in the instruction leaflet. Return heater to authorized service facility for examination, electrical or mechanical adjustment, or repair.
- This heater is not intended for use in bathrooms, laundry areas, or similar indoor locations. Never position the appliance where it may fall into a bathtub or come in contact with water.
- Use this appliance only as described in this manual. Any other use not indicated by the manufacturer may cause fire, electric shock, or injury to persons.
- CAUTION: To prevent electric shock, make sure the wide prong of the plug is inserted in the wide slot of the outlet.

Important!
Failure to observe the warning could result in injury or damage to the appliance.
- The appliance is not intended for use by persons (including children) with reduced physical, sensory or mental capabilities, or lack of experience and knowledge, unless they have been given supervision or instruction concerning use of the appliance by a person responsible for their safety.
Children should be supervised to ensure that they do not play with the appliance.
Extreme caution is necessary when any heater is used by or near children or invalids and whenever the heater is left operating and unattended.
- Do not wrap the cord around the appliance immediately after use.
- To prevent current overload and blown fuses, make sure that no other appliance is plugged into the same outlet or into another outlet wired into the same circuit.
If the power cord is damaged, to reduce the risk of malfunction it must be replaced by the manufacturer, its service agent, or a licensed and qualified professional.
- Do not use this appliance with an extension cord or outlet strip. Connect the appliance directly to a suitable outlet.

Danger of burns!!
Failure to observe the warning could result in burns or scalds.
- This appliance gets very hot when in use. To prevent burns, do not touch hot surfaces with bare skin. Use the handle when moving the appliance. Keep all flammable materials, such as furniture, pillows, bedding, paper, clothing, and curtains at least 3 feet (90 cm) from the front and top of the appliance, also avoid contact with the sides and back.
- Do not run the power cord under carpeting. Do not cover cord with throw rugs, runners, or the like. Keep the cord away from any passageways where it could be tripped over.
- Do not insert or allow foreign objects to get into the air intake or air outlet grille, as this may cause electric shock or fire, or damage the appliance.
- To prevent a possible fire, do not block air intake or air outlet grille in any way. Do not use the appliance on soft surfaces, such as beds, where the openings may become blocked.
- Do not cover the appliance while it is functioning in order to avoid overheating and the risk of fire.
- The internal parts of the appliance can become very hot or produce sparks during opera
tion. Do not use the appliance in areas where gasoline, paints, or other flammable liquids are used or stored.
- It is normal for heater's plug and cord to feel warm to the touch. However, an excessively hot or deformed plug or cord is not normal and may be the result of a defective electrical outlet. Defective outlets must be replaced before using the heater. Plugging the heater into a worn outlet may result in overheating of the power cord or may cause the risk of fire.
- Do not place the heater near a bed because objects such as pillows or blankets can fall off the bed and be ignited by the heater.

Please note:
This symbol indicates recommendations and important information for the user.
- If your radiator is equipped with a polyethylene tape used as a carry handle, remove it before connecting appliance to the outlet.
Always disconnect the plug from the power outlet when the appliance is not in use. - Do not use the appliance outdoors.
- To completely turn off the appliance, push the ON/OFF button, and then unplug the heater.
- Connect to properly polarized outlets only.
- Make sure that the plug is fully inserted into the outlet. Wall outlets may deteriorate with time, so check the plug periodically for signs of overheating or deformation. If the outlet has deteriorated, stop using it and have it repaired.
- Check that neither the appliance nor the power cord have been damaged during shipping.
- Make sure that no styrofoam or other packing materials remain in the appliance.
- Make sure that no pieces of polystyrene or other packaging material have been left between one element of the appliance and another. It may be necessary to pass over the appliance with a vacuum cleaner.
- The first time the appliance is used, run it at the maximum power for at least two hours.
During this time, ventilate the room thoroughly to eliminate the "new" smell released by the appliance. It is completely normal for the appliance to emit "creaking" sounds the first time it is run.
- Extreme caution is necessary whenever the heater is left operating unattended.
- Do not open the appliance. No user-serviceable parts inside.
SAVE THESE INSTRUCTIONS
THIS PRODUCT IS FOR HOUSEHOLD USE ONLY
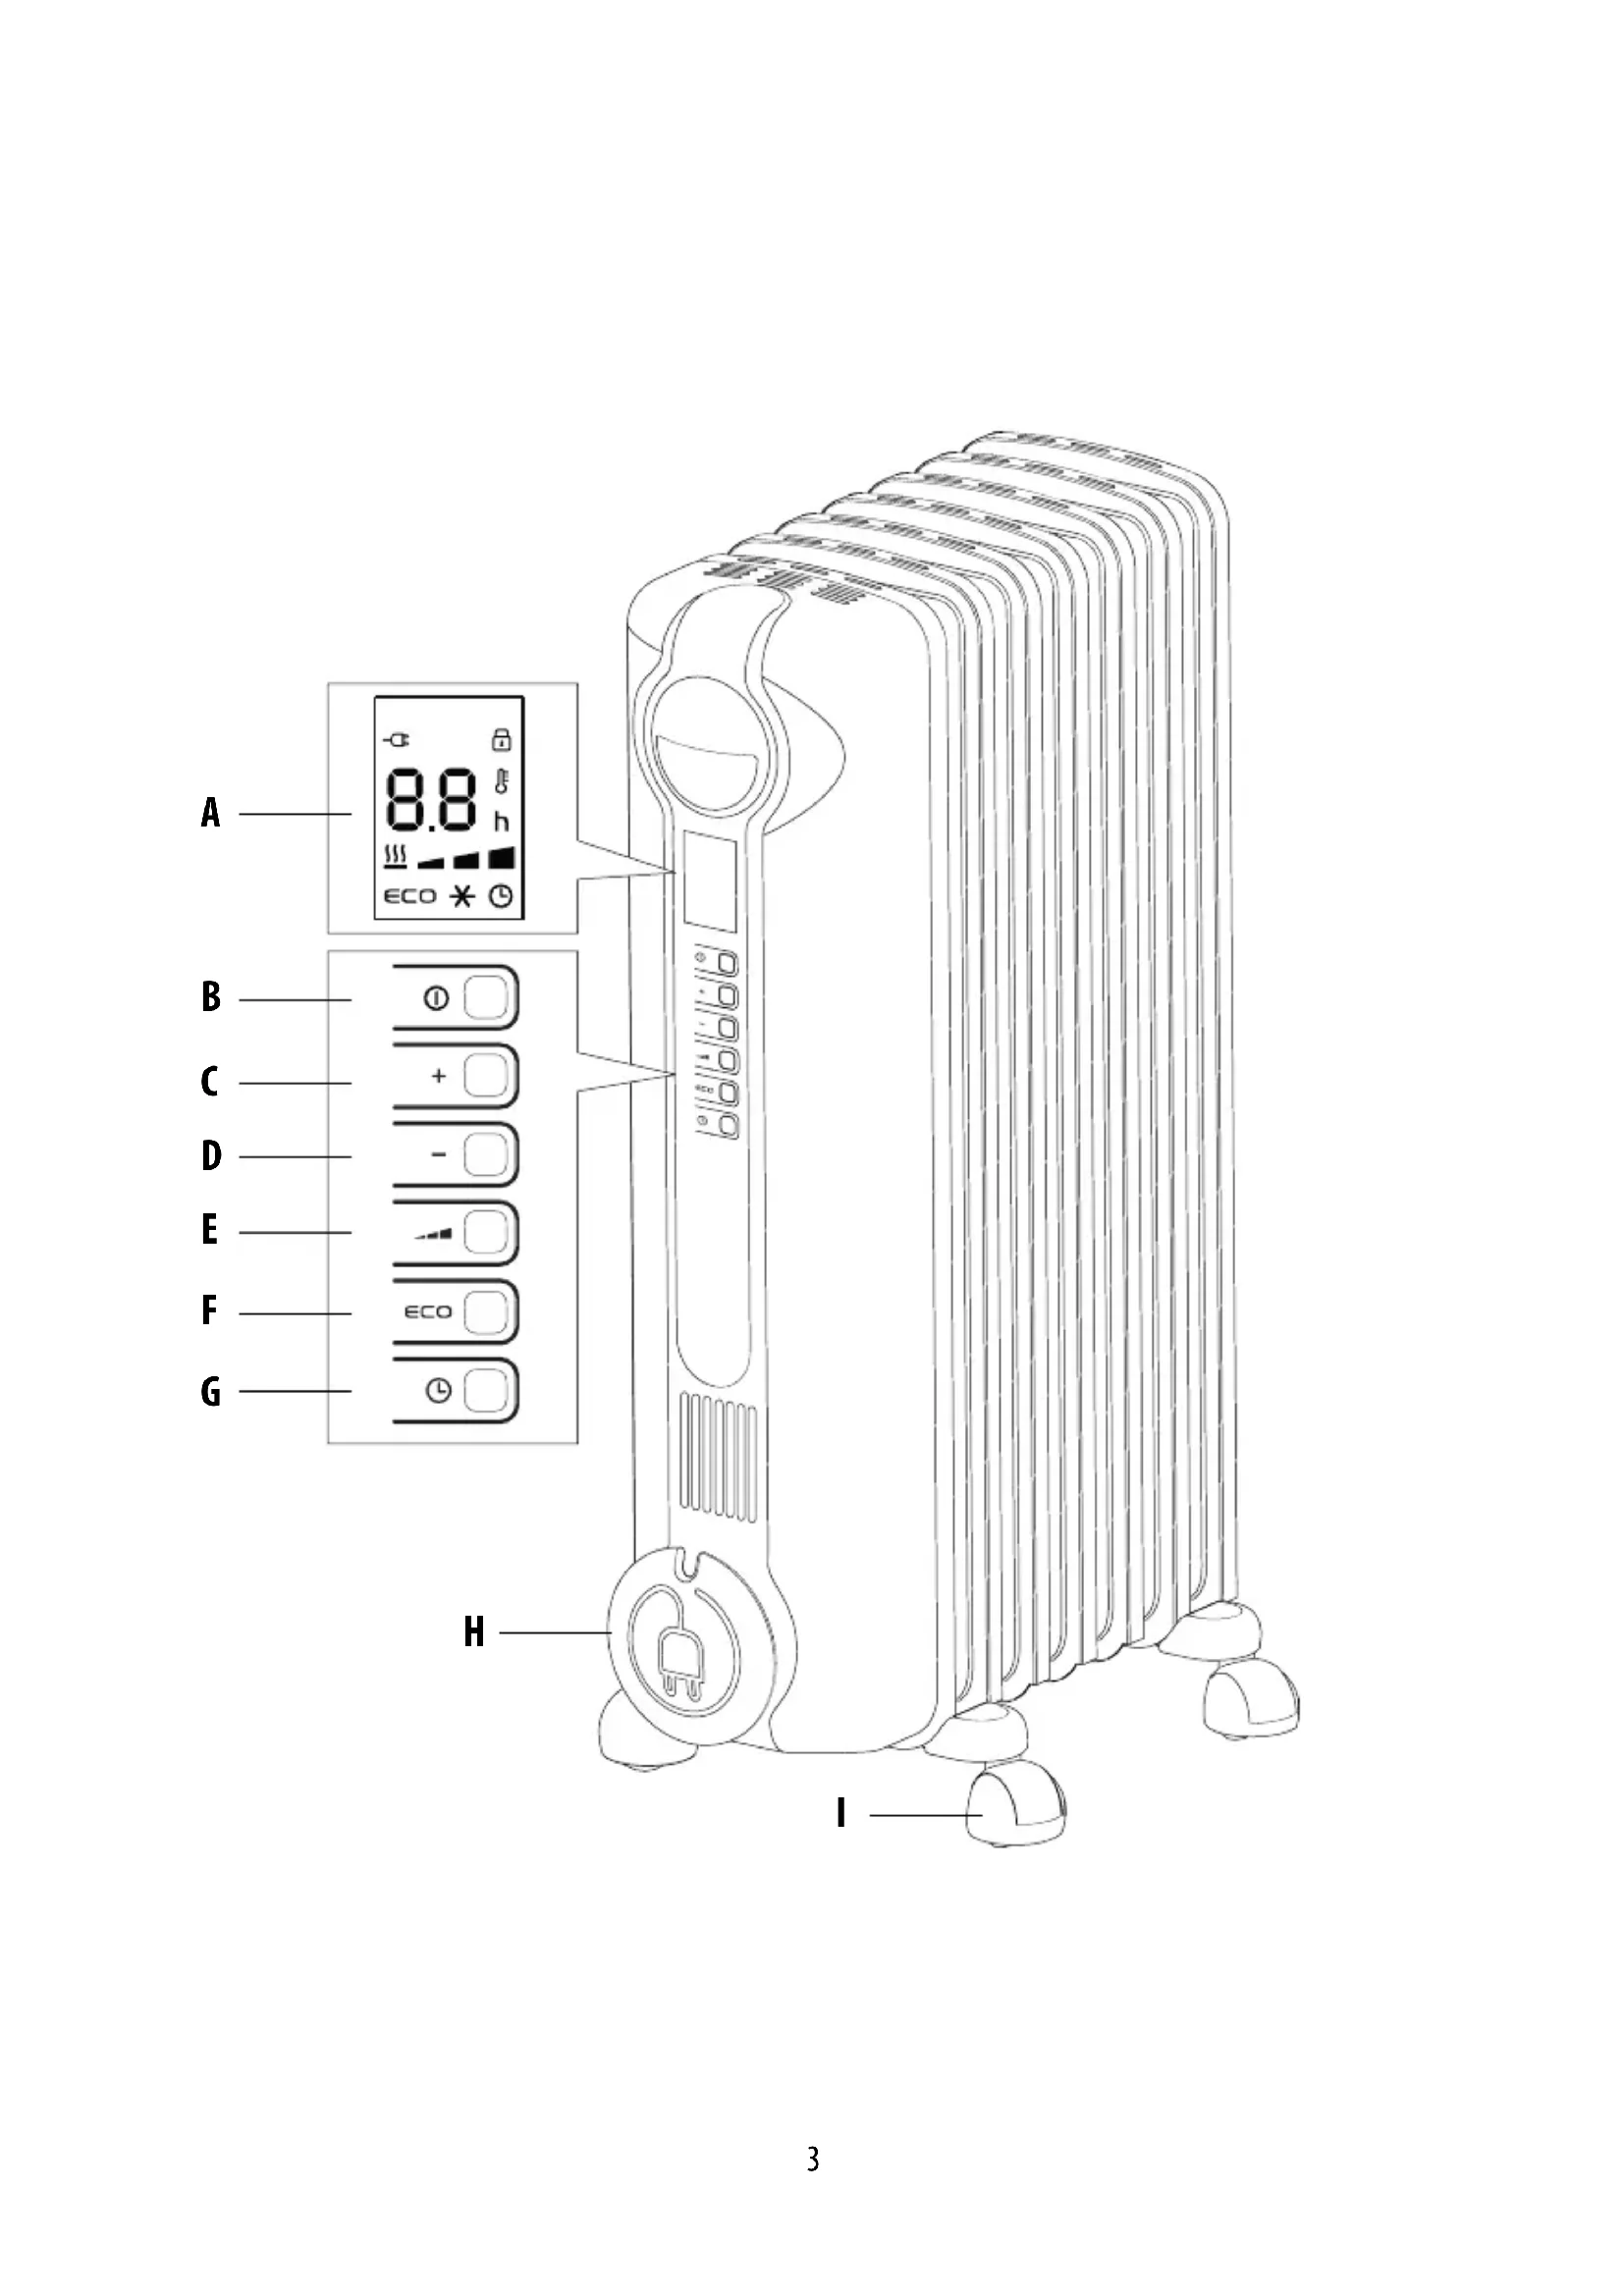
DESCRIPTION
A display
B on-standby button
C increase button
D decrease button
E power button
F eco button
G timer button
H cord holder
I wheel
USE
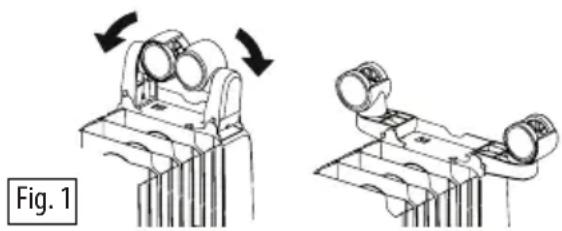
"Easy wheel" system
Turn the radiator upside down on a rug or a soft surface in order to prevent damaging the paint finish.
Fully unfold the wheels by turning them outwards (Fig. 1).
Turn the radiator back to its upright position.
Location
The heater must not be placed immediately below a power outlet. Do not use this radiator in rooms having a surface area of less than 43 square feet (4 sq.m.).
Power connection
- Before using the appliance check that your supply
voltage is the same of that shown on the rating label of the unit and that the power socket and power supply line correspond to the load specified.
- Check also the current capacity of your fuses. CONNECT YOUR HEATER TO EARTH PROVIDED SOCKET ONLY.
Plug in the heater, the appliance will be set in the standby condition. The display will show the symbol. Keep loose clothing or bedding, furniture and flammable material away from the power outlet where the heater is plugged in. After an interruption of the power supply (power failure or appliance unplugged) the unit goes always to stand-by.
Heating function
To turn the appliance on, press the (B) button.
Press button (E) to set the required power level:
MIN(→;MED()MAX()(see fig.2)To
select the desired temperature, press button + or - (C or D). By pushing the + or - button once, the temperature (shown on the display) will increase or decrease by 34^ (1^) . Keeping the + or - button depressed the value will increase o decrease rapidly.
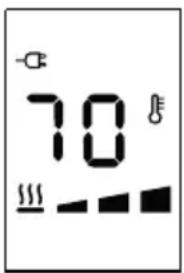
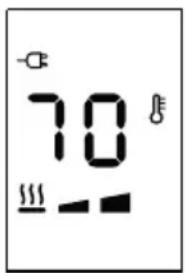
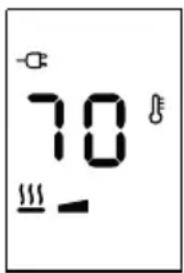
Fig. 2
The appliance allows to set the temperature from 41^ (5^) to 82^ (28^) .
Anti-freeze function
Setting the temperature to 41^ (5^) with the "-" button, the appliance will activate the Antifreeze function.
The display will show the symbol, in this way the appliance will turn on automatically, at the max power, only if the room temperature falls below 41^ (5^) .
If you wish to go back to the Heating function, press the "+" button once. After an interruption of the power supply (probe failure or appliance unplugged) the unit goes always to stand-by.
Eco function
When this function is active the appliance automatically sets the most appropriate power level to guarantee optimum comfort while reducing energy consumption.
To activate this function press the "ECO" (F) button. The display will show symbol. If the selected temperature
is much higher than the actual room temperature, the appliance will start automatically and rapidly to heat the room.
The appliance will automatically select the most convenient power level (MAX-MED-MIN-OFF).
If MAX power level has been selected using the button, the appliance will cycle between: MAX-MED-MIN-OFF.
If MED power level has been selected, the appliance will cycle between: MED-MIN-OFF.
If MIN power level has been selected, the appliance will cycle between: MIN-OFF.
Working indicator
The symbol indicates the heating status by means of its colors.
RED: the unit is heating at the maximum power.
ORANGE: the unit is heating at the medium power.
GREEN: the unit is heating at the minimum power.
absent: the unit is not heating.
Key lock
In order to avoid accidental operation, you can lock the keyboard using the keylock function. To activate this function during on mode, press buttons + and - together for at least 3 seconds. The display shows the symbol and a double acoustic signal will be emitted. To disactivate the function proceed in the same way.
Timer function
This function can be activated in two different ways.
Delayed start: With the appliance in standby mode, press the timer button (G) ⑤he hours left before the appliance comes on is displayed together the ①symbol and "h" symbol flashing (see fig. 3). Change the hours using the + and - buttons, then wait a few seconds for the program to be stored. The display will return to off and the ⑤symbols remains on. When the programmed time has elapsed, the appliance will come on with the previous settings.
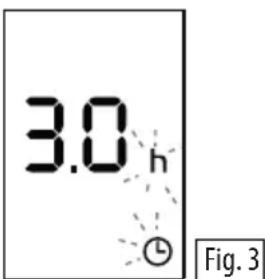
Fig. 3
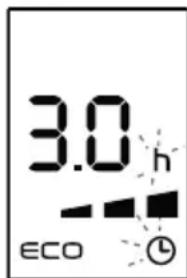
Delayed stop: with the appliance on, press the timer button
L. The hours left before the appliance goes to stand-by mode, the power level and in case the function selected are displayed together with the Symbol and "h" symbol flashing (see fig. 3).
Change the hours using the + and - buttons, then wait a few seconds for the program to be stored. The current settings and symbol are displayed. At the end of the set time the appliance switches to standby mode automatically. To go back to operating without the timer, press the timer button twice. The timer symbol disappears from the display.

Please note: the time is settable from 0.5 to 24 hours.
Change of the temperature scale
The display can show the temperature in both ^ F and ^ C .
To select the desired temperature scale, when the unit is in standby position, press and hold the "+" and "ECO" keys for at least 10 seconds, then release.
The change of scale will be indicated by two short beeps.
Brightness of the display
The appliance allows two different brightness settings for the display.
The highest is active when any key button is pressed. After a few seconds of key board inactivity, the brightness will decrease to the operating brightness level. This lower level can be adjusted in this way:
with the appliance in on mode after pressing for 5 seconds the ECO button the display will show (see fig.4):
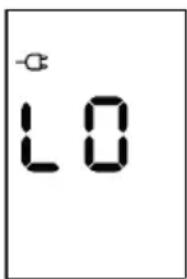
Fig. 4
- With the + and - button is possible to select the desired brightness (three brightness levels available).
- After 5 seconds without to press any button, the brightness level will be memorized and the operating conditions will be the same ones previously set.
Alarms
The appliance has a diagnostic system that makes it possible to signal malfunctions.
In case of problems, the display will show an alarm message:
- (Plobe-Failure) blinking
With this alarm the appliance does not operate. Contact the De'Longhi Customer Service.
- (night temperature)
When the product's internal temperature is too high, the heating power will progressively and automatically be reduced.
The display shows H for two seconds, blinking. To remove the cause of this alarm check that the unit is not covered and let the appliance cool down.
SAFETY DEVICE
A safety device switches the appliance off in the event of overheating. To restart the appliance, contact the De longhi toll free number.
MAINTENANCE AND SERVICE
Always remove the plug from the power outlet and allow the appliance to cool. Wipe appliance with a soft damp cloth, do not use detergents and abrasives.
Should the appliance not be in use over a certain length of time, wrap the cord around the cord holder and store it in a dry place. This appliance has been built to give many years of trouble free service. In case of malfunction or doubt, do not try to repair the appliance by yourself: this may result in a fire hazard or electric shock. Contact the De longhi toll free number.
TROUBLESHOOTING
| PROBLEM CAUSE SOLUTION | ||
| The display doesn't work Be sure | it is plugged in and that the electrical outlet is working | Plug into the power outlet |
| The safety device may have switched off the appliance | Remove the obstruction and let the appliance cool down. If the appliance doesn't work please contact the De longhi toll free number. | |
| The appliance doesn't warm up The temperature may be set too low | Set the temperature to a higher value | |
| The display shows: Plinking | It indicates that the room temperature sensor has failed | Please contact the De longhi toll free number. |
| The display shows: H(E) (High temperature) blinking | The unit has reached a too high internal temperature | Check that the unit is not covered and let the appliance cool down. When the product internal temperature decreases, the alarm will disappear. If the appliance doesn't work please contact the De longhi toll free number. |
MISES EN GARDE IMPORTANTES
- (Temperature elevated)
(Temperature elevation)