PIXMA G2410 - Printer CANON - Free user manual and instructions
Find the device manual for free PIXMA G2410 CANON in PDF.

User questions about PIXMA G2410 CANON
0 question about this device. Answer the ones you know or ask your own.
Ask a new question about this device
Download the instructions for your Printer in PDF format for free! Find your manual PIXMA G2410 - CANON and take your electronic device back in hand. On this page are published all the documents necessary for the use of your device. PIXMA G2410 by CANON.
USER MANUAL PIXMA G2410 CANON
Read Safety and Important Information (addendum) first.
Lea primero Informacion de seguidade e informacion importante (apendice).
Installing the Printer page 1
Instalacion de la impresora.. pagina 1
UcTaHOBJIeHHI npHTepa cToPiHa 1
1 1

Connecting with Computer page 4
1. Checking Included Items
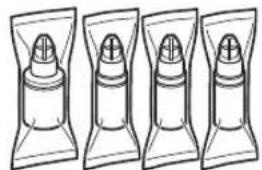
Cartridge Ink bottle
Power cord
Setup CD-ROM for Windows PC
Safety and Important Information
Getting Started (this manual)
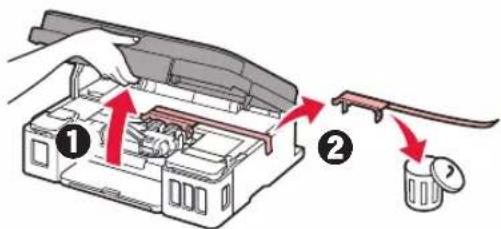
2. Removing Packing Materials

1 Remove the packing materials (such as orange tape) from outside the printer.
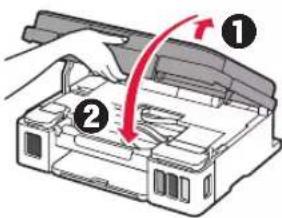
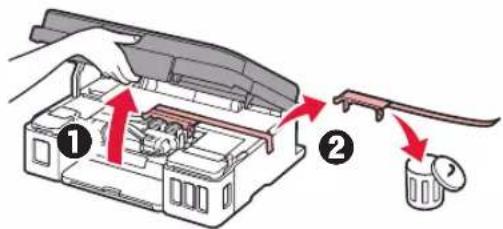
2 1 Open the scanning unit / cover.
Remove the orange tape and the protective material and discard them.
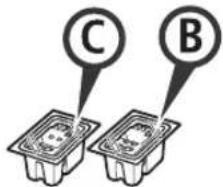
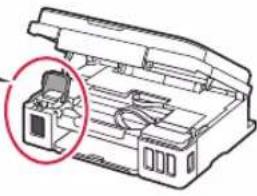
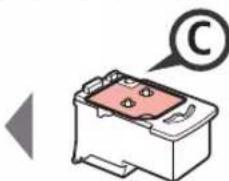
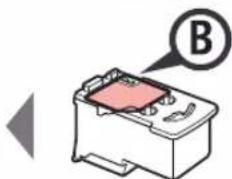
3. Installing the Cartridge

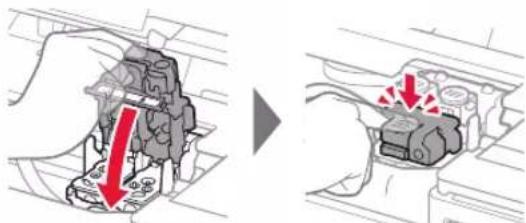
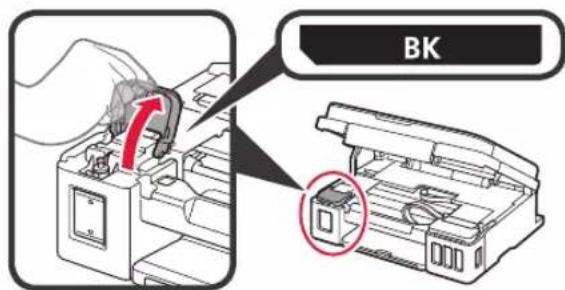
1 Open the cartridge locking cover.
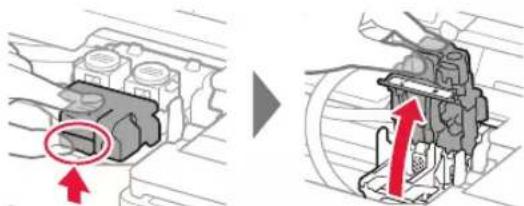
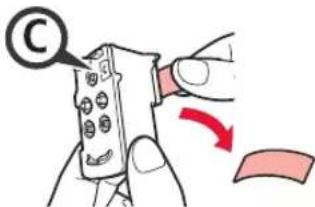
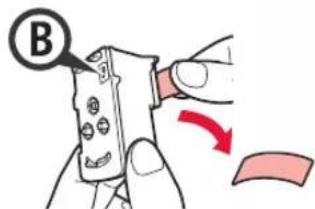
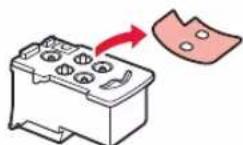
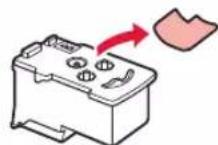
2 Take out each cartridge from the package and remove the label.

3 Remove the protective tape.
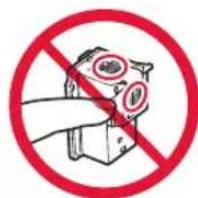
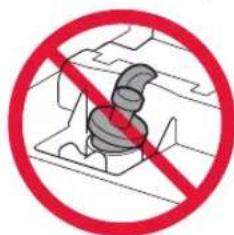
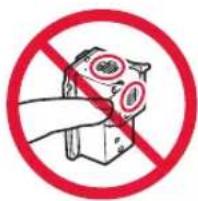
Do not touch.
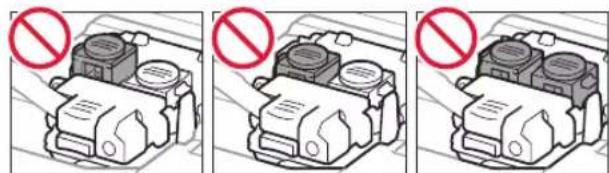
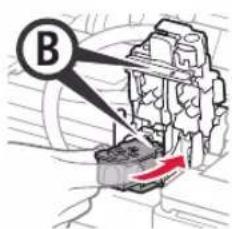
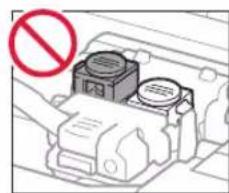
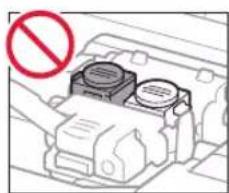
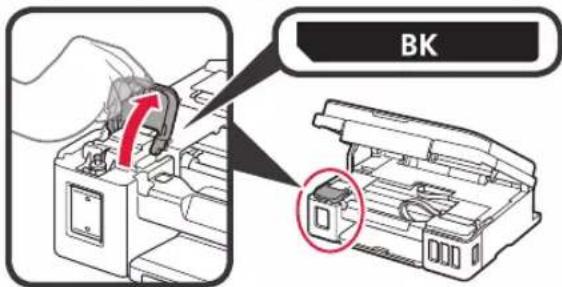
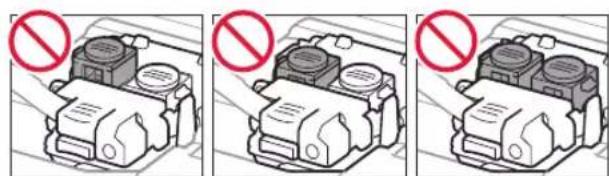
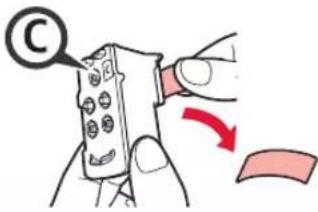
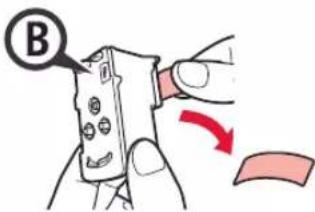
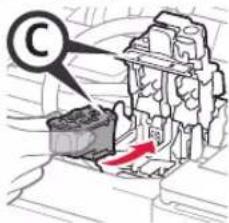
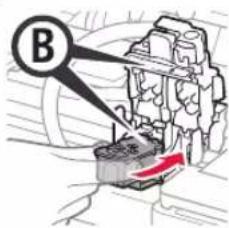
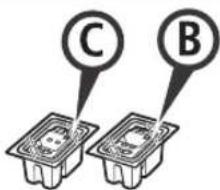
4 Insert the C (color) cartridge on the left and the B (black) cartridge on the right.
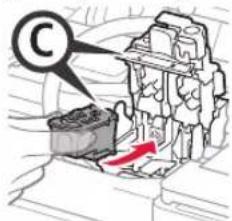
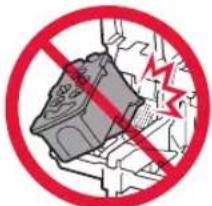
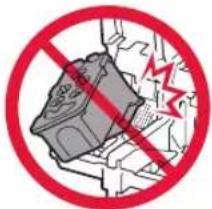
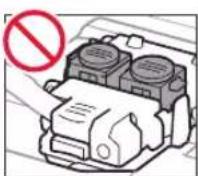
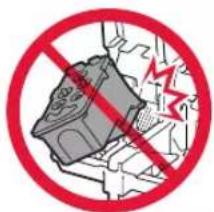
Do not bump it against the surrounding parts.
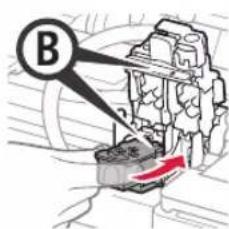
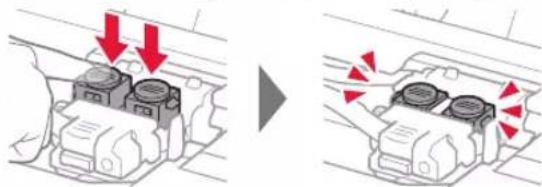
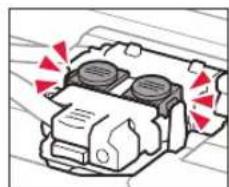
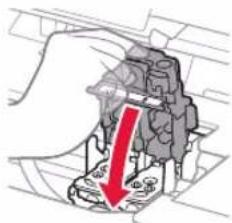
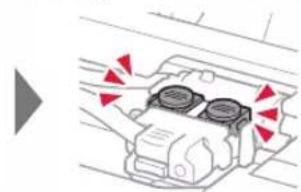
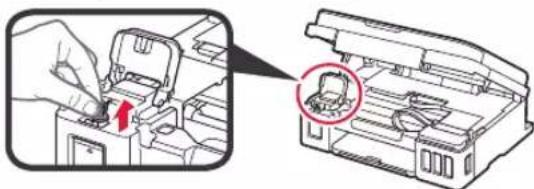
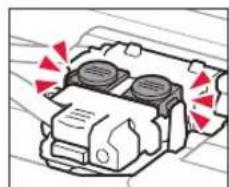
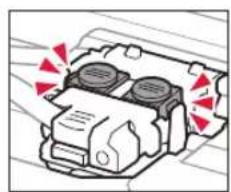
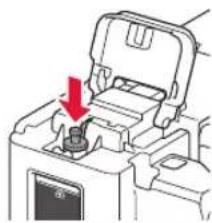
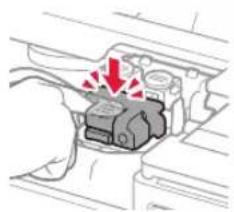
5 Close the cartridge locking cover and push it down.
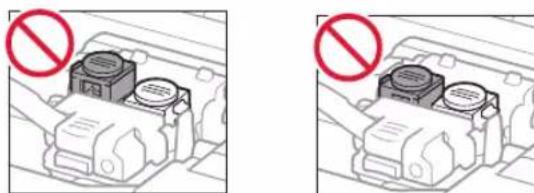
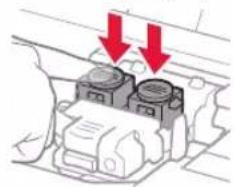
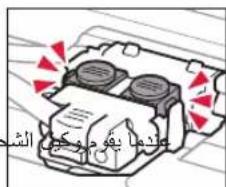
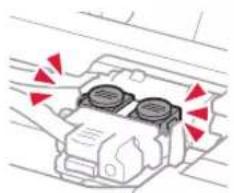
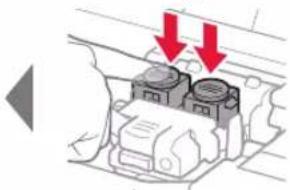
6 Press down both joint buttons completely.
4. Turning on Printer

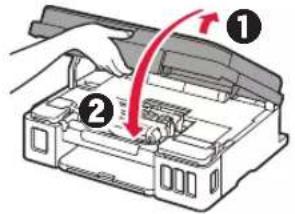
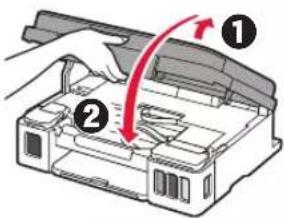
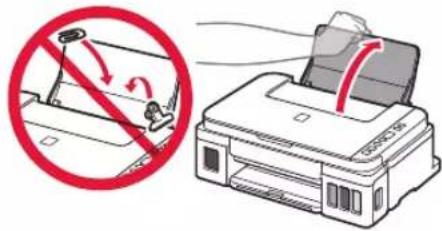
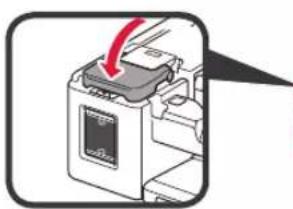
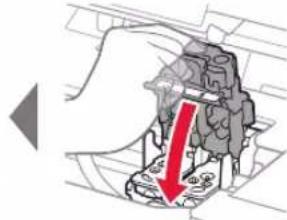
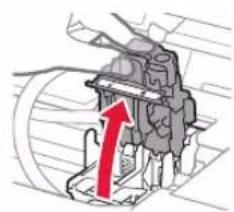
1 LIFT UP the scanning unit / cover, and then close it.
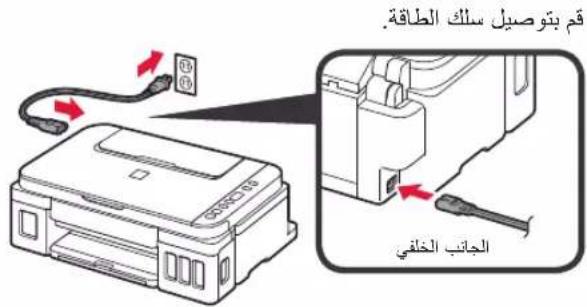
2 Connect the power cord.
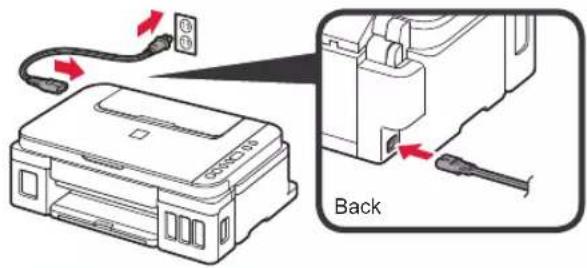
Do not connect any cables except the power cord yet.
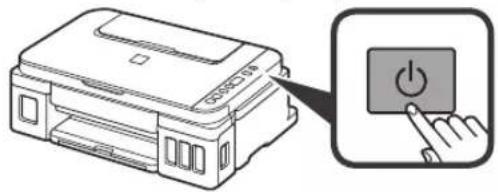
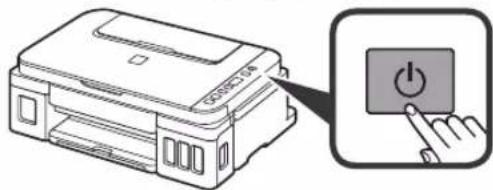
3 Press the ON button.

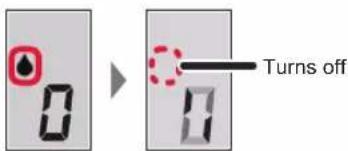
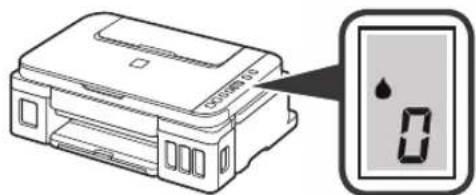
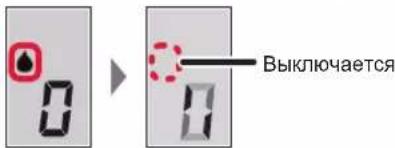
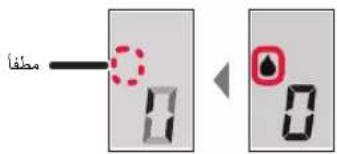
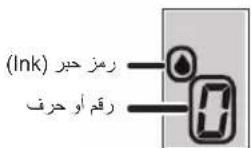
4 Confirm that (nk icon) and are displayed on the screen.
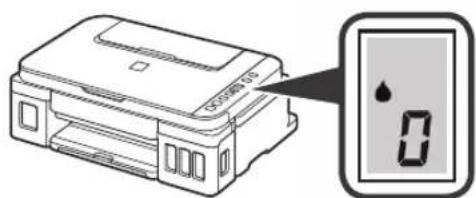
If a different screen appears, refer to "If any of the following screens appear" on page 3 to resolve the error.
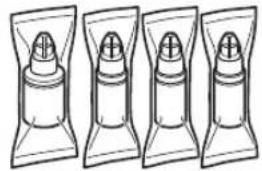
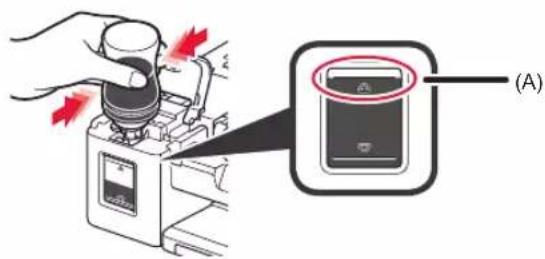
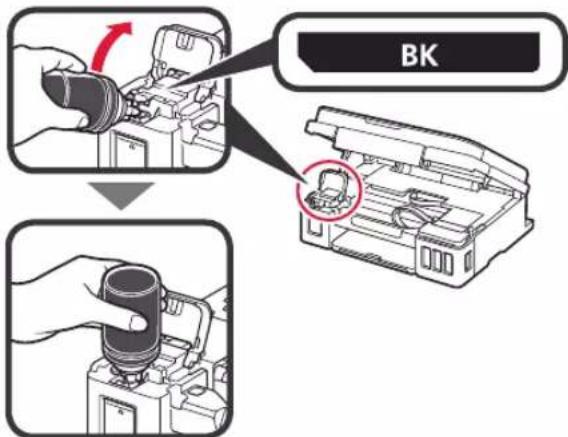
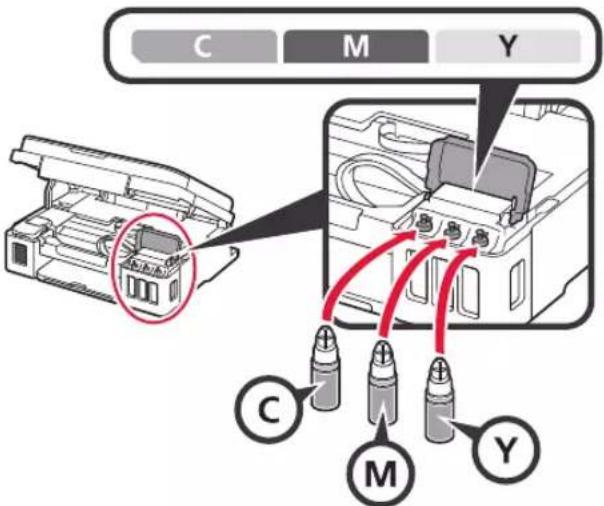
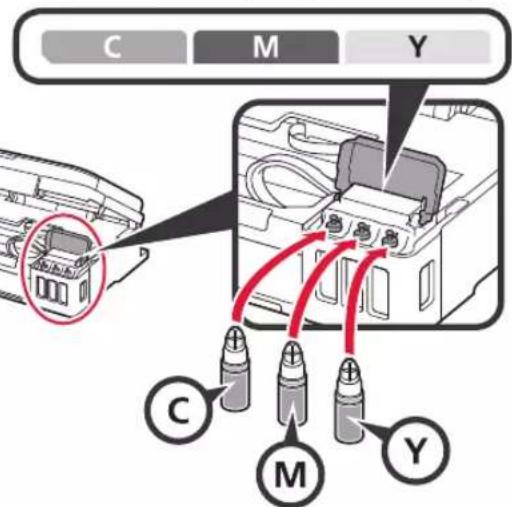
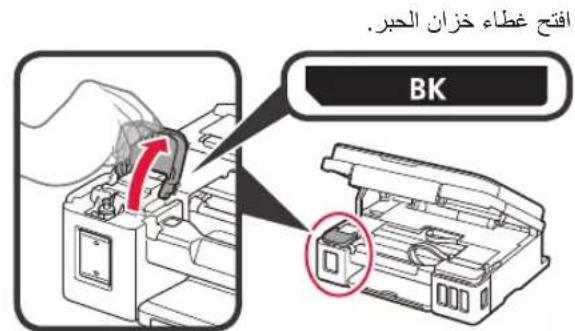
5. Pouring Ink

This product requires careful handling of ink. Ink may splatter when the ink tanks are filled with ink. If ink gets on your clothes or belongings, it may not come off.
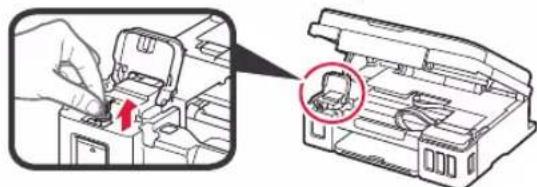
1 Open the scanning unit / cover.
2 Open the ink tank cover.
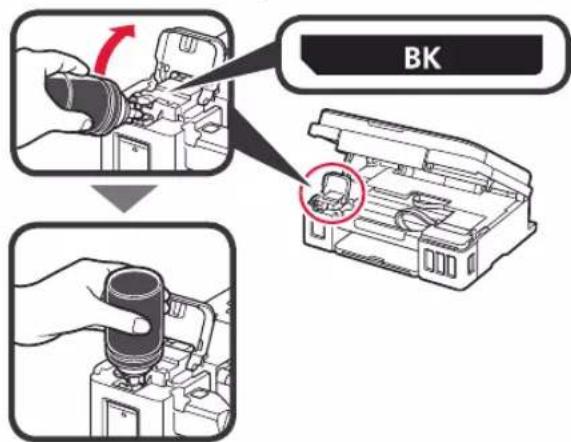
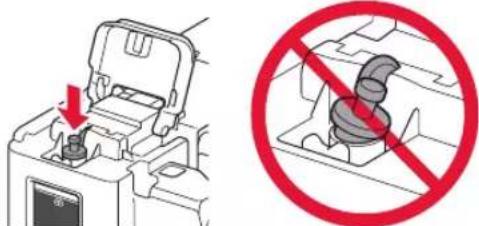
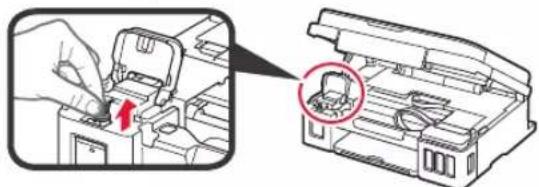
3 Grab and remove the tank cap of the ink tank.
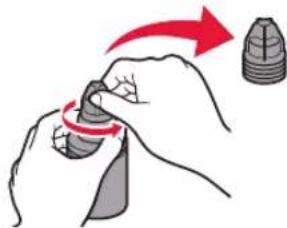
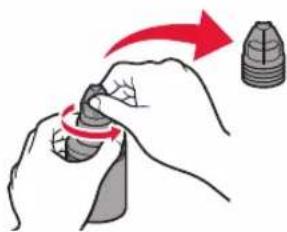
4 Hold the ink bottle upright and remove the bottle cap.

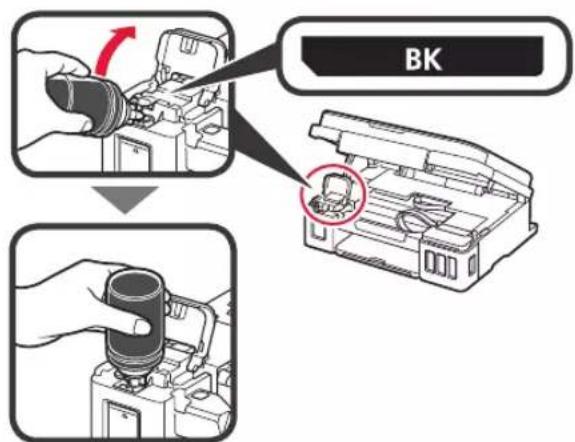
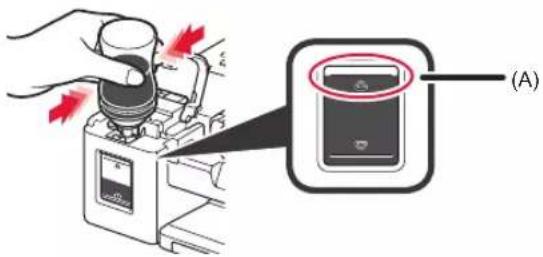
5 Insert the nozzle of the ink bottle into the inlet and stand the ink bottle upside down.
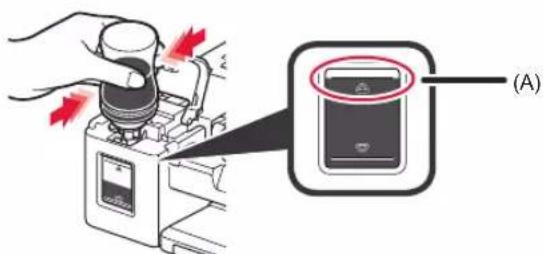
Pour all ink into the ink tank.
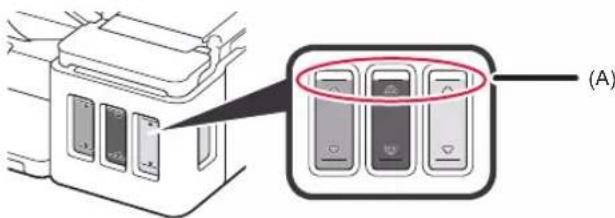
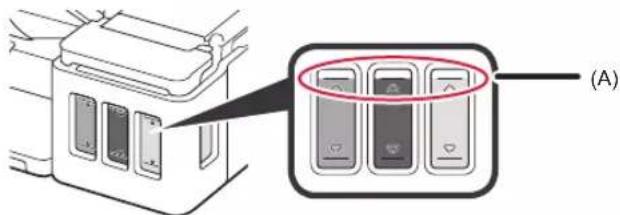
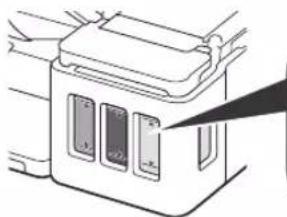
Confirm that the ink has been filled to the upper limit line (A).
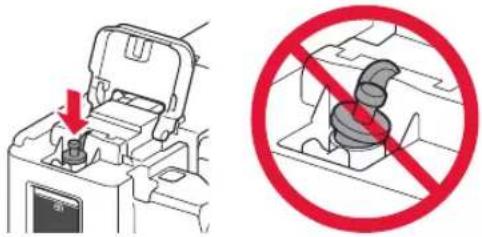
7 Replace the tank cap securely.
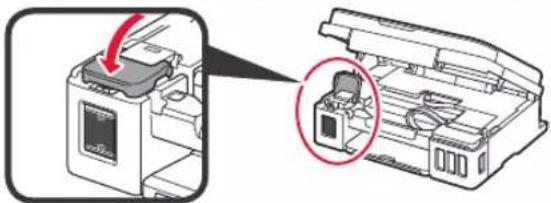
8 Close the ink tank cover.

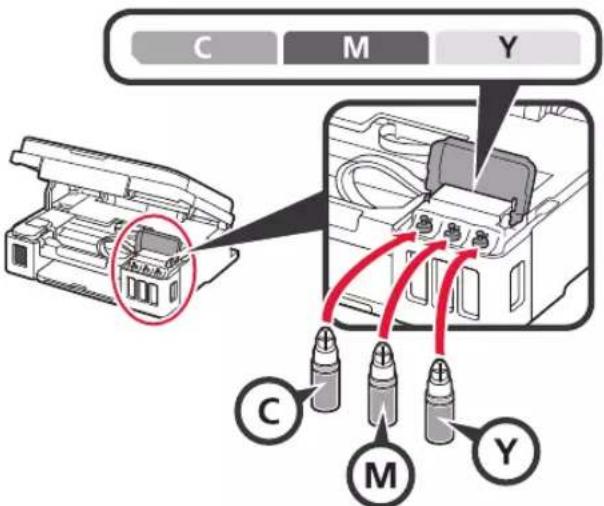
9 Repeat steps 2 to 8 to pour all ink into the corresponding ink tanks on the right according to the label.
Confirm that the ink has been filled to the upper limit line (A).
10 LIFT UP the scanning unit / cover, and then close it.
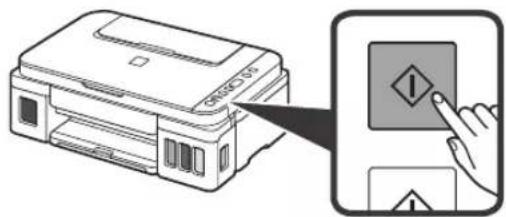
6. Preparing the Ink System
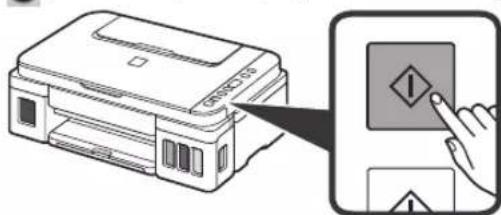
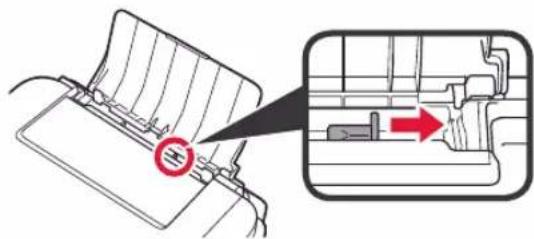
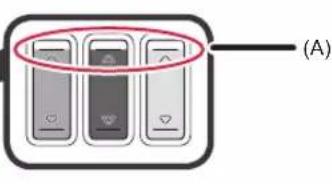
1 Press the Black button and confirm that icon) disappears.
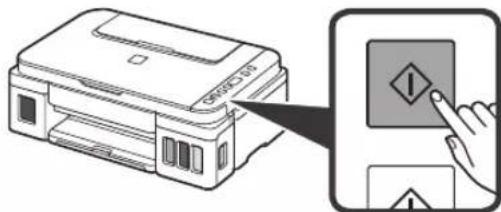
Ink preparation takes about 5 to 6 minutes. Proceed to the next page.

If any of the following screens appear
EO4
The cartridges are not installed correctly. "3. Installing the Cartridge" on page 1
EOS
No cartridges are installed. "3.Installing the Cartridge" on page 1
EO9
The protective materials are not removed. "2. Removing Packing Materials" on page 1
P0B
Ink is not prepared normally. Press the ON button to restart the printer, and then see "5. Pouring Ink" on page 2.
#
Waiting to prepare ink. "6.Preparing the Ink System" If you have not poured ink into the ink tank yet, see "5.Pouring Ink" on page 2.
For all other cases, refer to the Online Manual.
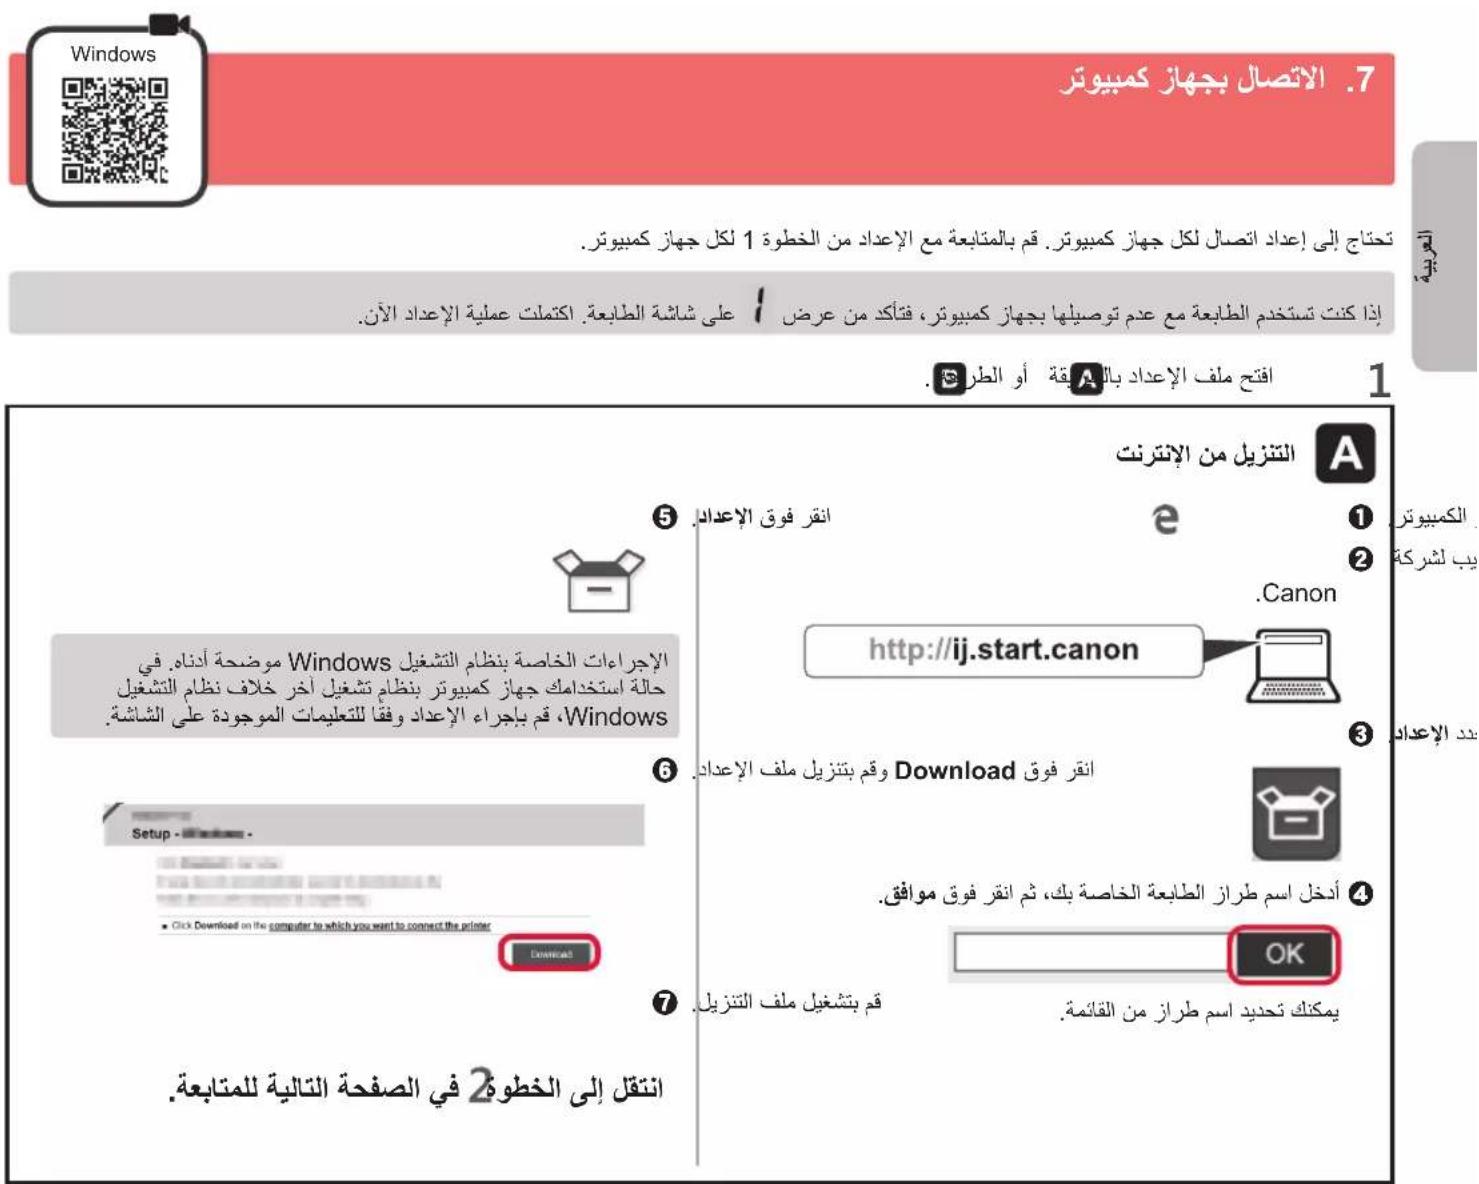
7. Connecting to Computer
You need a connection setup for each computer. Proceed with the setup from step 1 for each computer.
If you use the printer while it is not connected to a computer, confirm that i is displayed on the printer's screen. The setup is now complete.
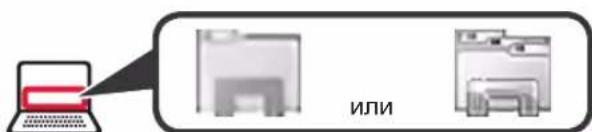
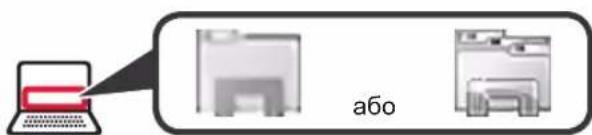
1 Start the setup file for either method A method B

Downloading from the Internet
Open a web browser (etc.) on your computer.
Input the following URL and access the Canon website.

3 Select Set Up.

Input the model name of your printer and click OK.

You can select a model name from the list.
Click Setup.

The procedures for Windows are shown below. If you are using a computer with an OS other than Windows, do the setup according to the on-screen instructions.
Click Download and download the setup file.
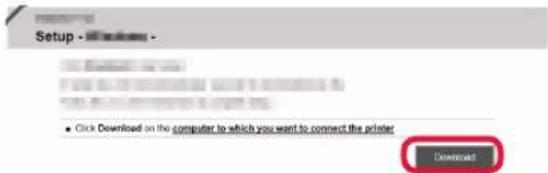
7 Execute the downloaded file.
Proceed to step 2 on the next page to continue.

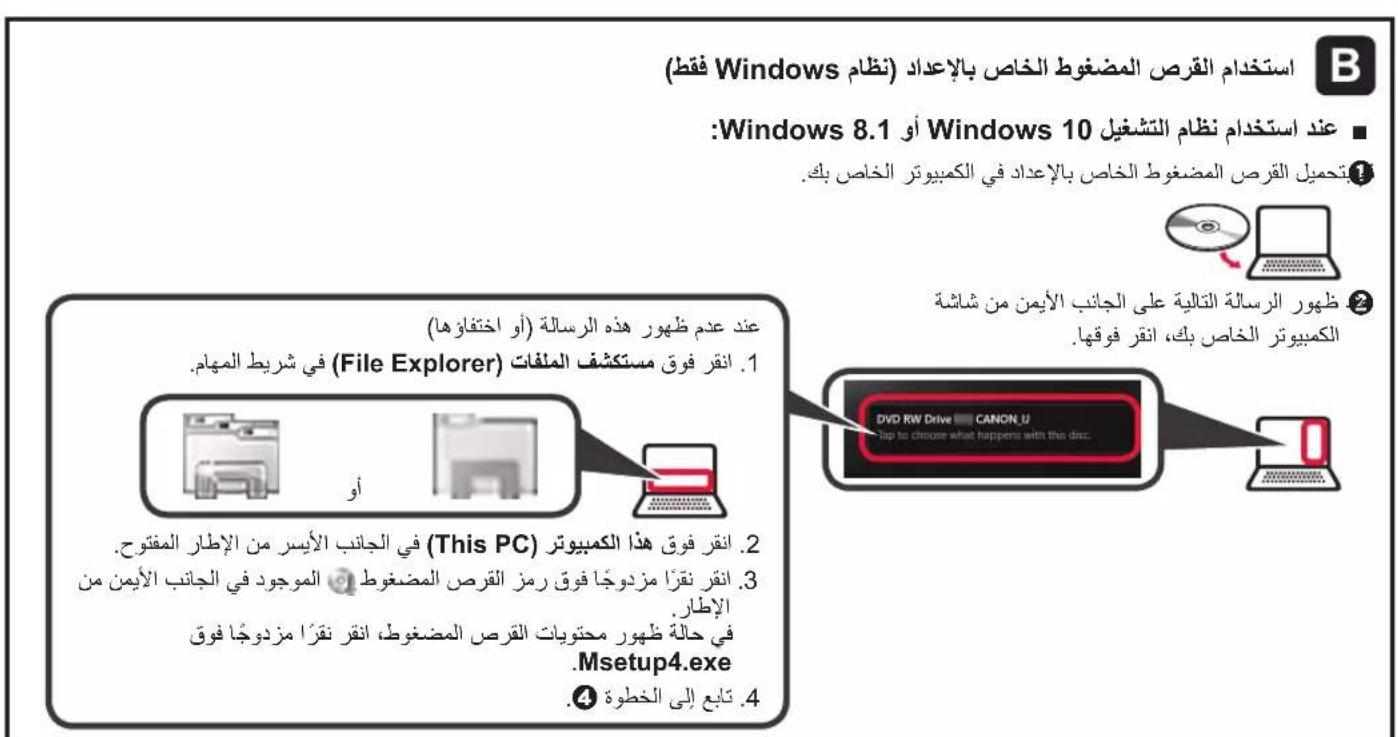
Using Setup CD-ROM (Windows Only)
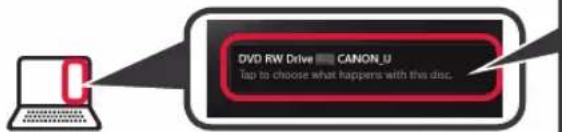
When using Windows 10 or Windows 8.1:
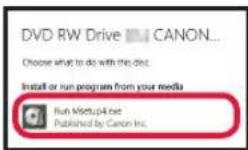
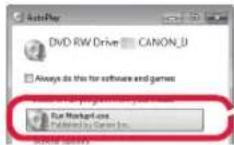
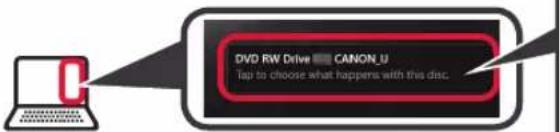
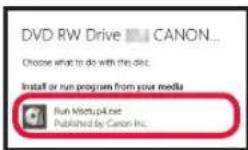
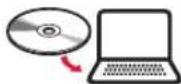
1 Load the Setup CD-ROM in your computer.

When the following message appears on the right side of your computer screen, click it.
When This Message Does Not Appear (or Has Disappeared)
- Click File Explorer on the taskbar.

- Click This PC on the left side of the opened window.
- Double-click the CD-ROM icon on the right side of the window. If the contents of the CD-ROM appear, double-click Msetup4.exe.
- Proceed to step 4.
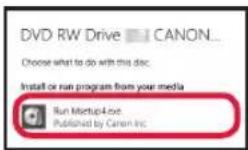
If the following screen appears, click Run Msetup4.exe.
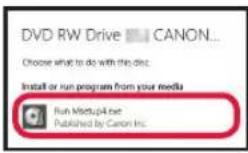
If the User Account Control dialog box appears, click Yes.
Proceed to step 2 to continue.
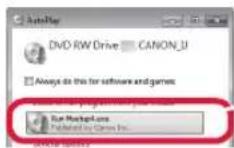
When using Windows 7:
1 Load the Setup CD-ROM in your computer.

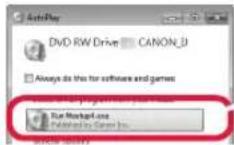
When the AutoPlay screen appears, click Run Msetup4.exe.
When AutoPlay Screen Does Not Appear
- Click Computer from the start menu.
- Double-click the CD-ROM icon on the right side of the opened window. If the contents of the CD-ROM appear, double-click Msetup4.exe.
If the User Account Control dialog box appears, click Continue.
Proceed to step 2 to continue.
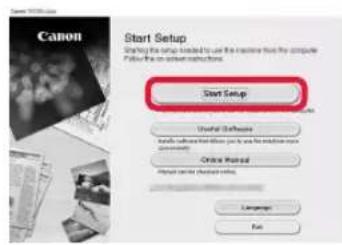
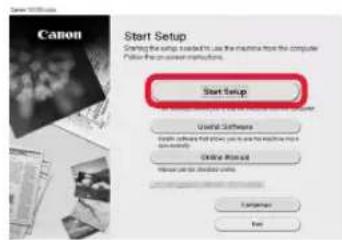
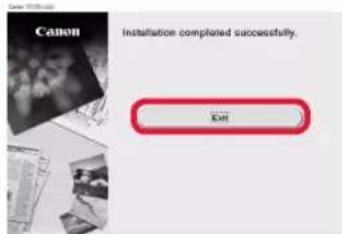
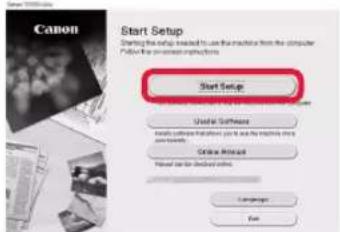
2 Click Start Setup.
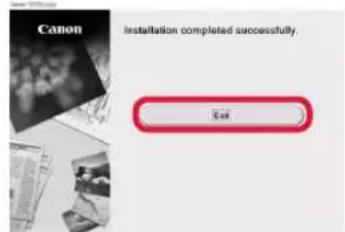
If the following screen appears, click Exit.
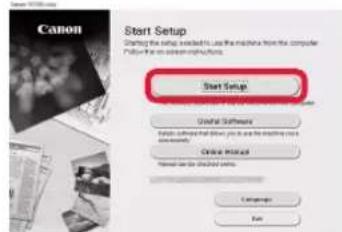

The setup is complete when it appears on the printer's screen. You can print from your computer.
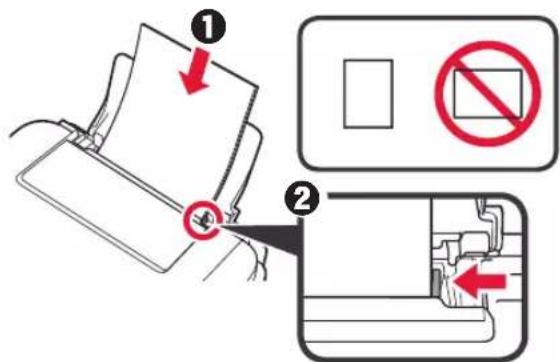
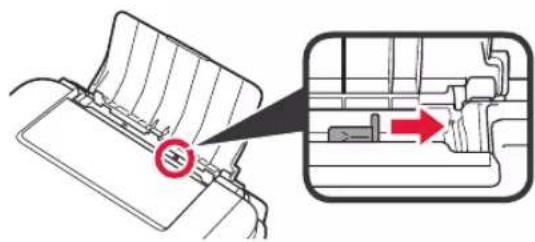
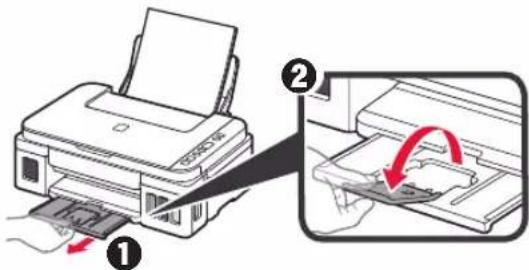
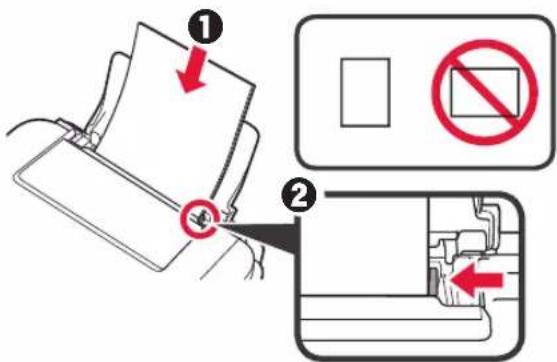
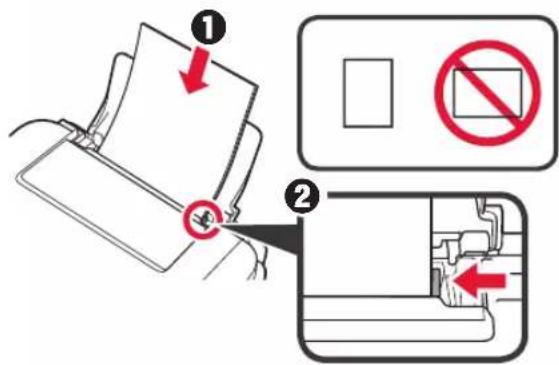
1 Open the paper support.

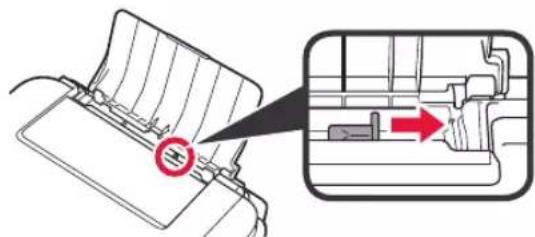
2 Slide the right paper guide to the end.
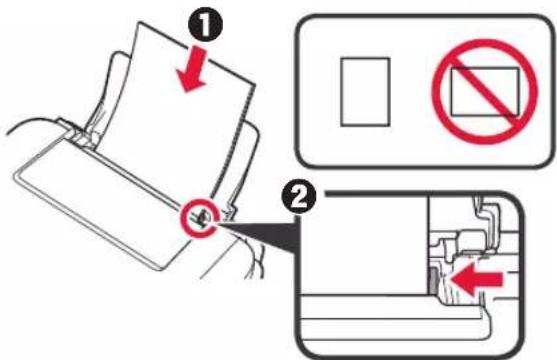
3 1 Load paper with the print side facing up.
Slide the right paper guide to align it with the side of the paper stack.
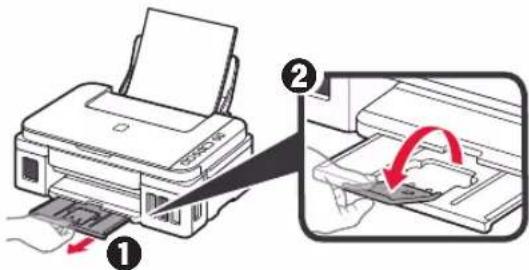
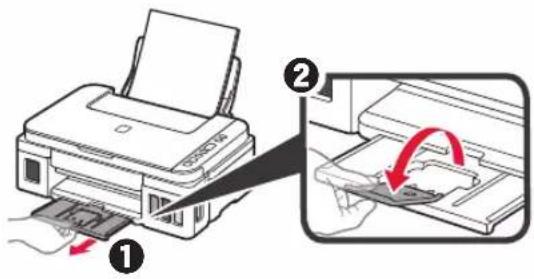
4 ① Pull out the paper output tray.
Open the output tray extension.
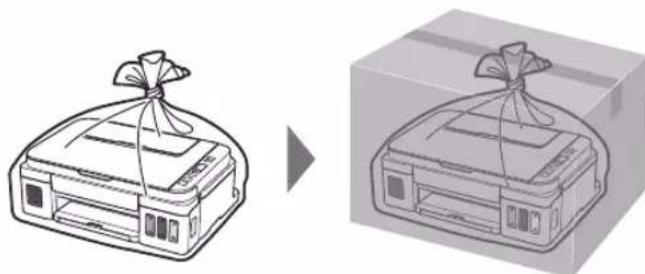
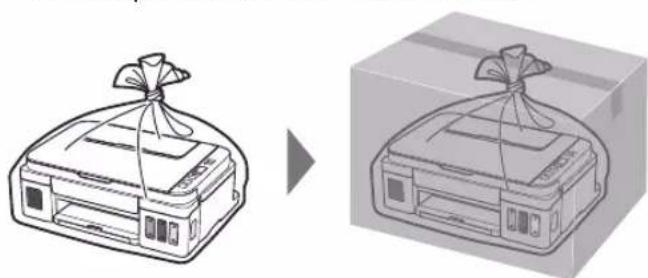
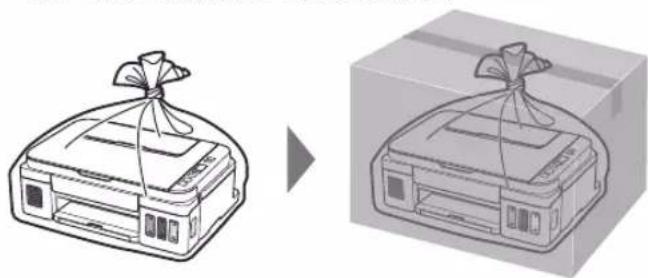
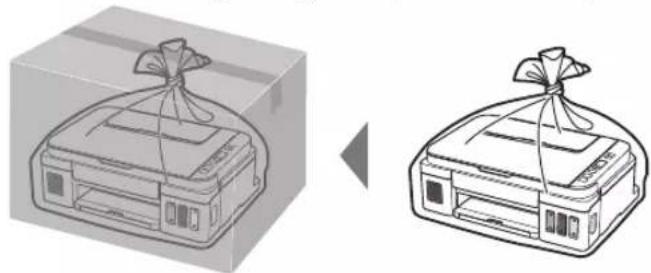
Transporting Your Printer
When relocating the printer, make sure of the following. Refer to the Online Manual for details.
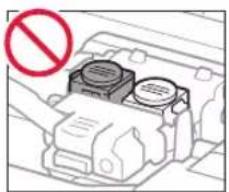
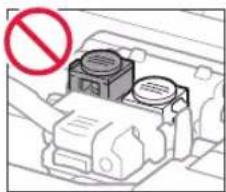
Check that both joint buttons are pressed down completely to avoid ink leaks.
Pack the printer in a plastic bag in case ink leaks.
- Pack the printer in a sturdy box so that it is placed with its bottom facing down, using sufficient protective material to ensure safe transport.
- Do not tilt the printer. Ink may leak.
- Please handle with care and ensure the box remains flat and NOT turned upside down or on its side, as the printer may be damaged and ink in the printer may leak.
- When a shipping agent is handling transport of the printer, have its box marked "THIS SIDE UP" to keep the printer with its bottom facing down. Mark also with "FRAGILE" or "HANDLE WITH CARE".
He yapaiTe NM no OKpykaiouM DeTaIaM.
5 3akpoIte fikcnpyuouky KpbIuKy KapTpndka n npnxMnte ee.

6 Haxmnte do ynopa obe coeHNHTeJbHbIe KHOJIKN.
3 HaxmTe KhoNky BkI (ON).
4 Y6eIITecb, yTO 3HaOHcHepHnna (Ink)) n OTo6paKaIOCTc Ha 3KpaHe.
Pn noBneHn npyro 3kpaHa cm. pa3dEe
「Pn noBneHn oHoro n3 cNeDyUxNx 3kpaHOB Ha cTpaHnue 3, yTo6bI yCTpaHnTB Own6ky.
5. 3aɪnVBka ērpHŋl

3TOT npOdyKT Tpe6yeT octopoXHoro o6paueHnC ueHNaMNI. Pn 3anONHeHn YepHnIbHbIX KOHTeHepOB ueHNa MOrYt pa36pb13raTbcr. EcnN YepHnla nonaTy Ha ODeKdy HnnpyRne BeuN, OHN MOrYt He OTCTnPaTbcr.
1 OTKpoIe MoDyNb cKaHnPoBaHa / KpbIiKy.
2 OTkpOte KpbIshky YepHnIbHoro KOHTeHepa.
3 Bo3bMntecb 3a KOJNaUOK KOHTeHepa n ydaJIte ero c YepHnIbHoro KOHTeHepa.
4 YdepKnBa qnaKOH C yepHnAmn BepTnKaJIbHO, CHMmTe KOJNaYOK qnaKoHa.
5 BCTaBBTe HakoHeuHc fnaKoHa c YepHnIaMn BO BnyckHOe OTBepCTne n nepeBepHnTe fnaKOH C YepHnIaMn BBepx DHom.
6 BbIeIe BCE YepHnla B YepHnIbHbI KOHTeHep. Y6eIITecb, yTo YepHnla DOCTnraIOT BepxHero npedena (A).
7 OctopoxHo yctaHOBNTe Ha MeCTO KOJINaYOK KOHTeHepa.
8 3akpoTe KpbIiKy cepHnIbHoro KOHTeHepa.
9 NOBTOPNE DeiCTBn 2-8, YTO6bI HAnITb BCE UepHnla B COOTBETCTByIOUne UepHnIbHbIe KOHTeHepbl Cnpaba corlacho MapKnpoBke.
Y6eNTecb, YTO YepHnla DoCTnraIOT BepxHero npedena (A).
10 PnIOHmITE moyIb cKaHnpoBaHn/ KpbIuKy, a 3aTeM 3akpoIte.
1 Haxmnte KhoNky YepHbI (Black) n y6eNTecb, yTo (3naOK YepHnna (Ink)) 6oJee He oTo6paXaetc.
IoproToBka YepHnI 0bHuHO 3aHMaet ot 5 do 6 MNHT. IepexoIndte K cJeDyIoUe CTpaHnce.

Pn noBHeHn Ondoro n3 cJeDyUoXxKpaHOB
EO4
KaptpnJxynyctaHOBJIeHbI HnepaBnJIbHO.
3.YctaHObKa KapTpndkaHa cTpaHnue 1
EOS
KaptpnDkn He ycTaHOBJIeHbI.
«3.YctaHOBKa KapTpndka» Ha cTpaHnue 1
EO9
3aunThbMaTepaJ He ChrT.
«2.YdaJIeHHe yIaKOBOUHbIX MaTePnaIOB» Ha cTpaHnue 1
P0B
YeHnHa He NoIroTOBneHbI OJnxHbIM 6pa3OM. HaxMnte KhoNky BKl (ON), yTo6bl nepe3anyctntb npHtep, n CM. pa3deJ «5. 3aJIbKa YeHnI» Ha cTpaHnue 2.
OxuaHne noTobKn cepHnI.
Moxho Bb6paTb IMr MoJeN 13 cnNcKa.
5 电KHTe HAcTpoKa.

Hnke npBedeHb IpOeDpybI dny OpeauonHO cnCTembl Windows.Ecnn nCnoNb3yETc KOMnbIOTe p c onepauonHO CNCTeMo,OTnUHO OT Windows, BbINOHNTE HAcTPOky, CneDy INCHPTyKUmHa 3kpaHe.
6 3aepnnte 3arpyntb n 3arpy3nte paan yctahOBKn.

3anycntte 3arpyxehhbl faaiI.
IpeenTe K 2Ha cneyioe CtpaHnce, YTo6bl npoDoJXnTb.

IcnoJb3ObaHne yCTaHOBOUHoro KOMnakT-Dncka (ToIbKO Windows)
PnncnoJb30BaHnn Windows 10 nIn Windows 8.1:
BCTaBBTe B KOMNbIOTepeYCTaHOBOUHbIKOMnAKT-DINCK.

KordaB npabOu qactn kpaHa KOMnbIOTepe nOBNTcCneDyUouee coooHHe,ueKNHTe erO.

Ecnn3TO coo6eHHe nOABnEaTc (nHnNCye3IO
- HaxmTe PnoBodnK (File Explorer) Ha naHeJn 3aJaU.
- HaxMnte 3TOT PIK (This PC) B JIeBOJ YACTN OTKpbIBUEROCr OKHa.
3.Двжды ишелкнгte 3HAчOK KOMпаКТ-ДИССКВпраВоч qacTN OkHA.
Korda оTOбрASTcR coDEрЖIMоE KOMпaKT-DИССКA,
Двжды ишелкнгte phm Msetup4.exe. - Перейдente Кшагу 6
3Pn noBHeHn CJeDyUoIero 3KpaHa HaxMnte 3anyctntb Msetup4.exe (Run Msetup4.exe).
Ipi nioBHeHn dHaNoROBOrO OKHa KoHTpOb yueTHbIX 3aHncei (User Account Control) HaxMnte Da (Yes). IpeynTe K wary 2yTo6bl npoDoJXnTb.
PnncnoJb30BaHnn Windows 7:
BcTaBBte B KOMnbIOTe p yCTaHOBOHyKOMnAaT-DnCK.

2 Пи появени Крара АВTo3anyck (AutoPlay)нжмITEЗanyctntbMsetup4.exe (Run Msetup4.exe).
Ecnn 3kpA HbTo3anyck (AutoPlay) He noBnreTc
- HaxmTe KomnbOpTe (Computer) B MeHIO Nyck.
2.Двжды иелкнгte 3нayok kOMnaKT-ДИСКаВпраВОч actn OTKpbITOrO OKha.Korда оTO6pa3NTcR coapedKIMMOe kOMnaKT-DИСКa,Двжды иелкнгte phaJN Msetup4.exe.
3Пи NOBHeHn DnAnorOBOr OkHa KOHTpOJIb yETHBIX 3aIncen (User Account Control) HaxMITE PpoOnKntb (Continue).
Ipeennte K wary 2yto6bl npoJnxTb.
2 ⅢeJIKNHnTe Haayatb HacrpoNky (Start Setup).
Pn noBHeHn CneIyUoero kpaHa HaxMnte BbIXoA (Exit).

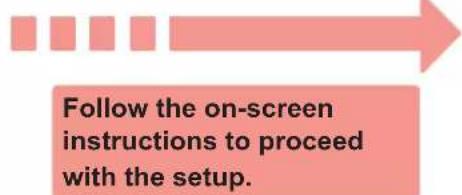
CneyuTe HnctpyKcuaM Ha 3kpaHe, YTo6bI npoDOnXHTb HAcTpoNky.

Ecnn 3KpaH npInTepa oTo6paxaet I hactpoiKa 3aBepweHa. Tenepb Bbl MoKeTe BbINOHNrTb Neayt b C KOMNbIOTepa.
1 OtkpoTe ynop dJa 6yMaHn.

2 Cdbnhtepaayu Hapabnauy6ymanndo KOHua.
3 3arpy3nte6ymaryIuueBOOCTOPHOH BBepx.
IpepeBnHbTe npaByo HnpaBJIIOyO 6ymarN do COBMeueHna CO cTOnKoB 6ymarN.
4 BbIDBnHbTe JIoTOK npHema 6yMaHn.
OTKPOTe DOONIHHTeHbIJI IOTOK pImeMa 6ymar.
IepemeueHne npHTepa
Ipi nepemeuen npnntepa no3a6oTbTecb o cneyuouem. Ira noJyehna noDpo6hix cbehen cm. OhnaH-pykoBOcTB0.
Bo n36exahanyeueyepnyny6eintecbBTOM,TO 06e coeHNHTenbHbIe KNONHaKaTbI do ynopa.

B cnyuae yteukyepHn nomectnte npHTep B nactkoBni NaKeT.
YnaknyTe npHTe B TBepdyu Kopo6ky, NOMEcTBErHO HxKHO Yo YacTb Ha DHO Kopo6Kn I NCNoJIb3yJIOCTaTOHoe KOINueCTBO 3aUHTHO MATEpnaIa Dn8e3ONaCHO TpaHCnOpTnPOBKn.
- He hakloHnTe npHTep. YepHnla MoryT BbITEyb.
- O6paaetaTecb octopoxHo, yTO6bl Kopo6ka neKana pOBHO n HE nepeBopaunbanac bOpaTHoI CTOPOHnHa 60K, NocOJIbky B 3TOM cIyae BO3MOxHO NOBpeXdHHe npINTepa nn yTeYka cepHnI.
Korda 3KcneDntop 6ydt npHnMaTb 3aKa3 Ha TpaHCnOpTnpOBky npHtepa, npKpeNtte 3TNKeTKy «BEPXHRA CTOPOHA»ДЯ obecneueHn TpaHCnOpTnpOBKn npHtepa HxHNe qAcTBIO BHN3. Kpome Toro, npKpeNtte 3TNKeTKy «XPYNIKOE» nnn «OBPAUATbCRA C OCTOPOXHOCTbIO!
He BCTaHOBJIeHO KapTpNDJI.
- UCTaHOBHeHHaKapTpIgKaHa cTOpIHc1
EO9
3axnchi matepiann He BuaJIeHo.
2.3HHTaNaKyBaJIbHINMaTepiAniBHa ctopinci 1
P0B
UopHnIO He niiIroTOBJeHO YK cnI.
HaTnCiHtB KHOhKy YBMK. (ON), 0o6 nepe3aBaHTaxkNTn npInTp, a Notim nepeRJIbTe po3dIn «5.HaNBAHHy OOpHJNa» Ha cToPiHci 2.
OiyBaHHn iJrTOBKn YOpHnla.
Ha3By moJeI moXHa Bn6paTn 3i cnNcKy.
5 HaTnCHiB HAcTpOioBaHHa.

Dani onicaHO npoceIpyn IINr Windows. RaKIO Bn BnKOpNCTOByeTE KOMI'IOTeP 3 OC, BiIMHHO BIWindows, DToPMyIteCb IHCTpyKci, RKi 3'ABTmMyTbCra Ha ekpahi.
6 KnaHtB 3aBaHTaxnTn 3abaHTaxTe paan BCTaHOBneHnA.

3anyctitb 3aBaHTaxeHn faaiJ.
IpeenidtBdoKpOky 2HaHacTynHi cToPiHci,io6 npoDoBXHTn.

BukopncTaHHa KomnakT-DnCka 3 nporpaMOIO BCTaHOBJHn (TINbKn DnA Windows)
Windows 10 a60 Windows 8.1
BCTaBTe KOMnAKT-DnCK i3 npOrpAmOIO BCTaHOBJIeHHBA KOMI'IOTeP.

2 KOnB npabii yactniE kpaHa KOMNIOTepa 3'BAITbCg ne NOBIOMJIeHHKNAUHiTb NOrO.
KuO ce nobIDomHHe 3'YBIOcOa (a6o 3nKJIo)
- Knauchitb PpobidnK (File Explorer) Ha naheJI 3aBdaHb.
- Klaunihb nyHK TcHn (This PC) nibopyy y BIKHI, 0o BiKpInocr.
- Dihi KnaHITb NO3HaKy KOMNaKT-DnCKa npabOpuy BIKHI. Koni BiO6pa3ntbc BMICT KOMNaKT-DnCKa, Dihi KnaHITb paui Msetup4.exe.
- Ipeeniditbdo kpoky 4
3 RaKIO 3'ABNTbCra TaKn ekpaH, HATNCHiT KbONKy 3anycnttn Msetup4.exe (Run Msetup4.exe).
3 RaKIO 3'ABNTbCra diaIaIorOBE BIKHO CnyX6a 3axncty KopncTyBaHIB (User Account Control), KnaHiTb Tak (Yes). IpeenDiTb Do KpOKy 2,06 npoDobxHTN.
Windows 7
BCTaBTe KOMnAkr-Dnck i3 nporpamOIO BcTaHOBnEHHB KOMn'IOTep.

KoN3'ABNTbCkpaH ABTOBIDTBOpENH (AutoPlay),KnauHiTb 3anyctn Msetup4. exe (Run Msetup4.exe).
Kkoekpan ABTOBIDTBOPEHNAutoPlay) He 3'ABnEeTbcra
- KnaHTb Komn'tep (Computer) y roIOBHOmy MeHIO.
2.ДычкmaHITbNo3HaUkyKOMnAaT-DnCKa npabopyy BIKHI,TOBikpneTBcR. KOnN BiO6pa3ntbCBA MICT KOMnAaKT-DnCKa,ДычкmaHITb faMsetup4.exe.
3 RaKuo 3'ABNTbcra dianorOBE BIKHO Cnyx6a 3axncty KopncTyBaiv (User Account Control),KnauHiTb PnpoBxntn (Continue).
Ipeeniditbdo kpoky 2.06 npoobxntn.
2 Bn6epiTb npHKT 3anyck HacrpooBaHHa (Start Setup).
KUO 3'ABNTbC TaKn ekpaH, HATNCHTb KHONKy Buxi (Exit).

Uo npOoBxHn HAcTpoOBaHH, DOTpMyIeCb IHcTpkyi, kI 3'ABNtMBybCHa ekpaHi.
Якwo Ha ekpani npnTepa 3'ЯBnacr no3NaUc, ue o3NaUc, zo HactpoOBaHHa 3aBepseHo. Tenep moKHa dpyKyBaTn 3 KOMn'IoTepa.
1 BiikpnTe nIynopy dna nanepy.

2 NocyHbTe npabn HnnpMnK dna nanepy do kiHra.

3 3abaHTaXTe nanip cToPOHOIO dIpyky Doropn.
10cyhTe npaBn HapmHK dna panepy, 6 BupiBHTN Ioro 3I CTopoHOCTOCY nanepy.
4 1 BuTARHITb IOTOK BUNBEdEHnI nanepy.
BbIkpniTe nooobkyBaB bviHoro JOTka.

TpaHcnpTyBaHH npHTepa
Iiud nepemieHn npHTepa nepeKoHaTecra, 0Bn DToTpmyTeca HabeDeHX HxKue IHCTpykui. 06 otpmaTn DOknaDiHi BiDOMOcTi, INB. DokyMeNT OHnaHOBn NocioHK.
Uo6 3ano6irtn npotikahHIO yOpHnla, nepekoHaTeCra, 0o 6nDIBKHNK3'EDHaHHHaTNCHYTO NOBHCIO.
Pomictb npntep y noJIeTnJeHOBn nakeT, ocklbkn OOpHnlo MoKe npotikatn.
Iomicttb npntepy TBepdy Kopo6ky HxKhboio YactnoHO npntepa DoHN3y Kopo6Kn, BnKOpNCTOByOuN DOCTaTHIO KINbKiCtB 3axnCHoro MATEpiany dna rapaHTyBaHH 6e3neHOro TpaHCnOpTyBaHH.
He haxnIyTe npHtep. YOpHnIO MOKe BnteKtn.
- Nobodtec3 Kopo6koO 6opekHo Ta nepekoHaTeC8, 10 ii cIHKn pIBH, BOHa HE nepeBepHyTa dOrOpn dHom a6o Ha6iK, OckIbKn npHTep MOKe NOsKOJNTncb, a YOpHNIO B HbOMy MOKe BNTEKtN.
HannuithhaKopo6i i3 npHTepom «LIM BOKOM D0TPOU》,uo6 niad TpaHcnpTyBaHHeKcneINTOp 3aBxJn TpIMab npHTep HxHbOo CTopoHOo DoHN3y.Takox Hanuith«KPUXKE» a6o「NOBOIDNTUC OBEPEXHO»
1 1
03
14 2
必须经过 ( x,y) 调节
1
2
a
山
Jai aiee eae ee ae eae eae eae eae
gao gao jiaolai jiali yu juyiyue gao qinai gao jaiall gao yao -1
J 1
aie 1
a a
y
b
"da" aale gaiallg ciaaalb jao


.(Run Msetup4.exe) Msetup4.exe
.(Yes) (User Account Control)
aai 2gii jai
:Windoe
1
(AutoPlay)
(Computer)
(.Continue) (User Account Control)
aai 2gii jai
.(Exit)
.(Start Setup)
3

a 10211111111
Jgssll jgs no aelal l iis dscag g aalal aalw ie 1yblsie Jssl ad sck
Black) (lnk)
aall 65 5 5
a

40E
1 1
50E
1 aalal"aaaal 3
90E
aall all
1 aall"al all 2
BOP
a
(ON)j jie 2
J 1
"Jaii piai 1.6"
5" 2
i
alala jali aee 45
jzjjieelae
8
9
1 8 2 1 2
(A)
10

aill jy gnnn nn jy wann nn jy aee
2
a 11111111111111111111
3
4
yall j 1jll j 1jll j 1j
5
.(A)
6

aalb14

Ae 1
1
2
Aelllll 1
(ON)
3

4
"aiiil iaiii j 1 1 1 1 1 1 1 1 1 1 1 1 1 1 1 1 1

i 10000000000000000000000000000000000000000000000000000000000
e / 1
5
1
1
A
s y 11 (y) C a b j B
a
Jia 4a
Jolil Jilil jnil gjbnial
3
a
aalal
Windows
alil lalal, jai laline
()
4
2
1
aaiioll jllj
2
1
Lagio alisi aal sall gaiy
5

3

a.aaal aee
1
aall all jy p a y all no ay y Jc y

Access Online Manual Acesse o Manual On-line Ooctyn KdoKymenty OHnaH-pyKOBOCTBO
Acceso al Manual en linea Acces au Manuel en ligne OoctyndoDOKyMeNTa OHnaHOBNIoci6Nk

From browser
Do navegador
U36pay3epa
caiaial
Dees el navegador
Pn nOMOUI npbka Ha pa6oHem CTone
3a donomoroo npnka Ha po6ohomy ctoni
sall

Windows 10


Canon G2010 series Online Manual